


server-side
- fetch(), js函数 provides a JavaScript interface for accessing and manipulating parts of the HTTP pipeline, such as requests and responses.
fetch('http://example.com/movies.json')
  .then((response) => {
    return response.json();
  })
  .then((data) => {
    console.log(data);
  });
flex 布局
参考:http://www.ruanyifeng.com/blog/2015/07/flex-grammar.html
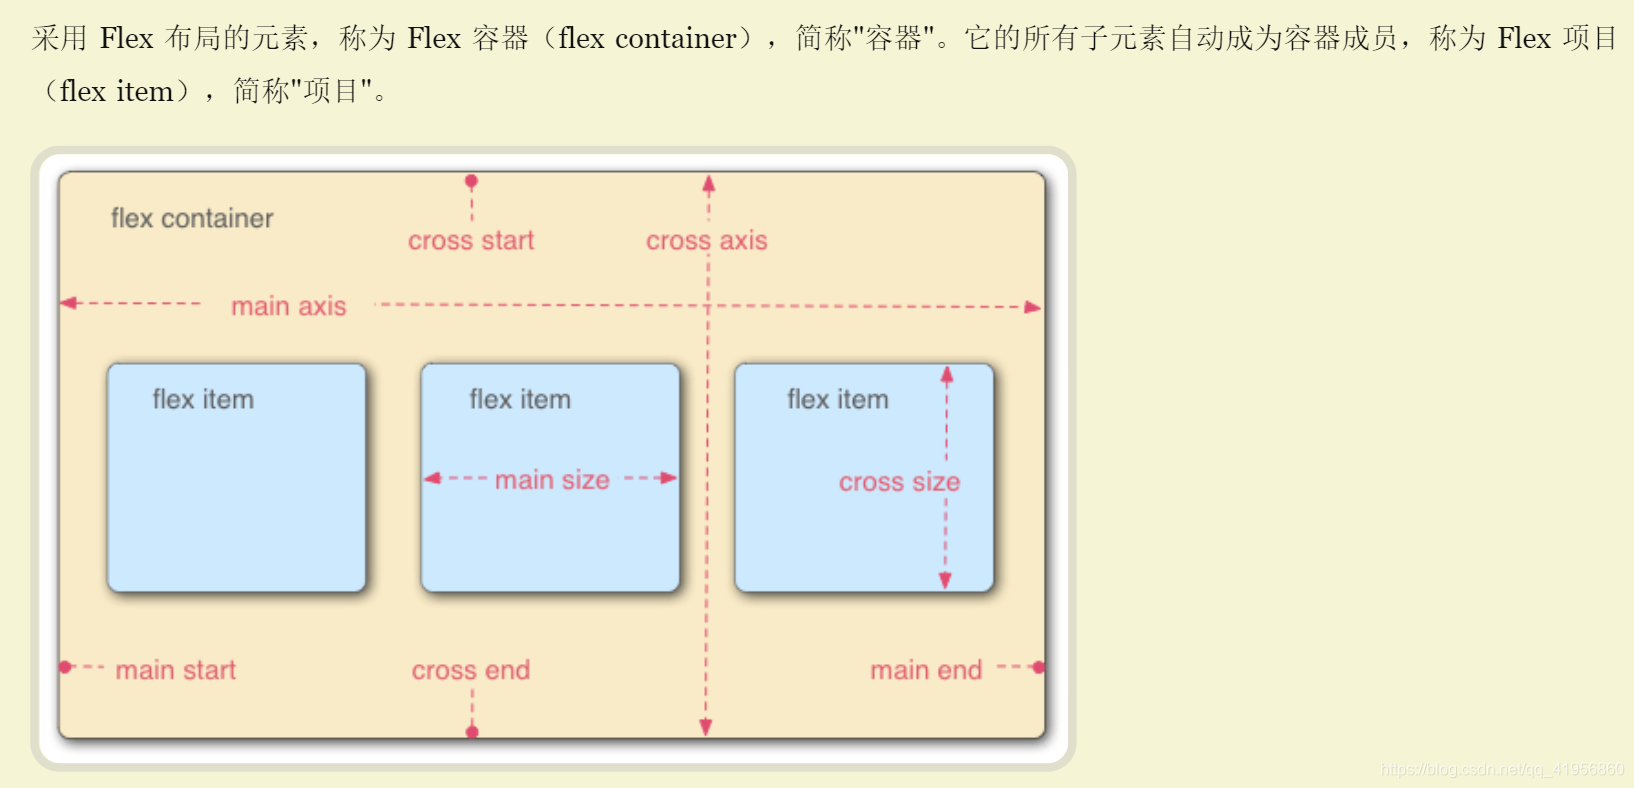
容器属性
以下6个属性设置在容器上。
flex-direction
flex-wrap
flex-flow
justify-content
align-items
align-content
- flex-direction 指定主轴方向
flex-direction: row | row-reverse | column | column-reverse;
下面假设主轴为row
-
flex-wrap属性
默认情况下,项目都排在一条线(又称"轴线")上。flex-wrap属性定义,如果一条轴线排不下,如何换行

-
flex-flow属性是flex-direction属性和flex-wrap属性的简写形式,默认值为row nowrap
-
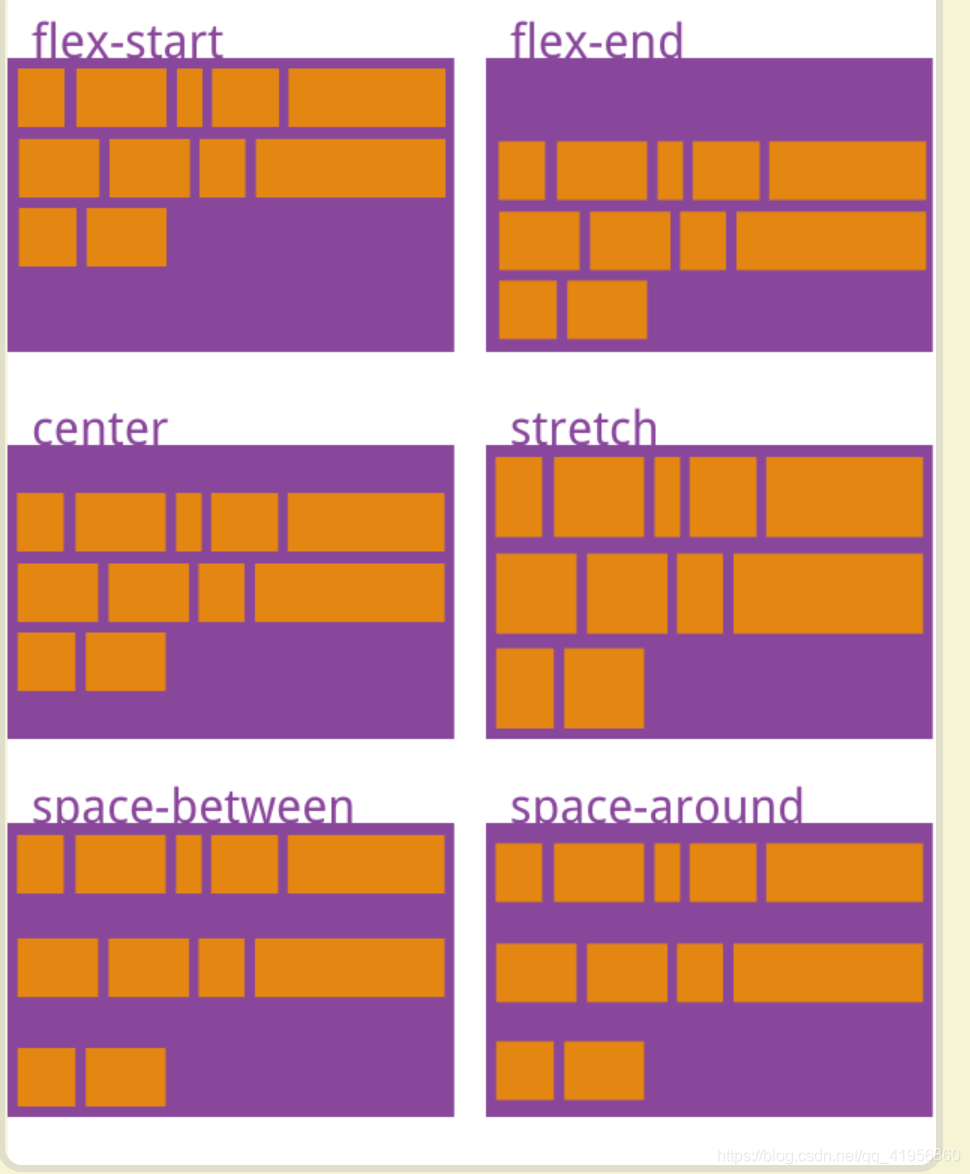
justify-content(在父元素设置)
设置弹性盒子元素在主轴(横轴)的对齐方式。取值:
justify-content: flex-start | flex-end | center | space-between | space-around;
- flex-start: 弹性盒子元素将向行起始位置对齐。第一个元素与左起始边界对齐,后面的元素接着第一个元素进行排列。
- flex-end: 弹性盒子元素将向行结束位置对齐。整体靠着行结束的位置排列。
- center:整体居中显示。
- space-between: 弹性盒子元素均匀分布。第一个元素的边界与行的主起始位置的边界对齐,同时最后一个元素的边界与行的主结束位置的边距对齐,而剩余的伸缩盒项目则平均分布,并确保两两之间的空白空间相等。
- space-around: 弹性盒子元素均匀分布。两端保留子元素与子元素之间间距大小的一半。
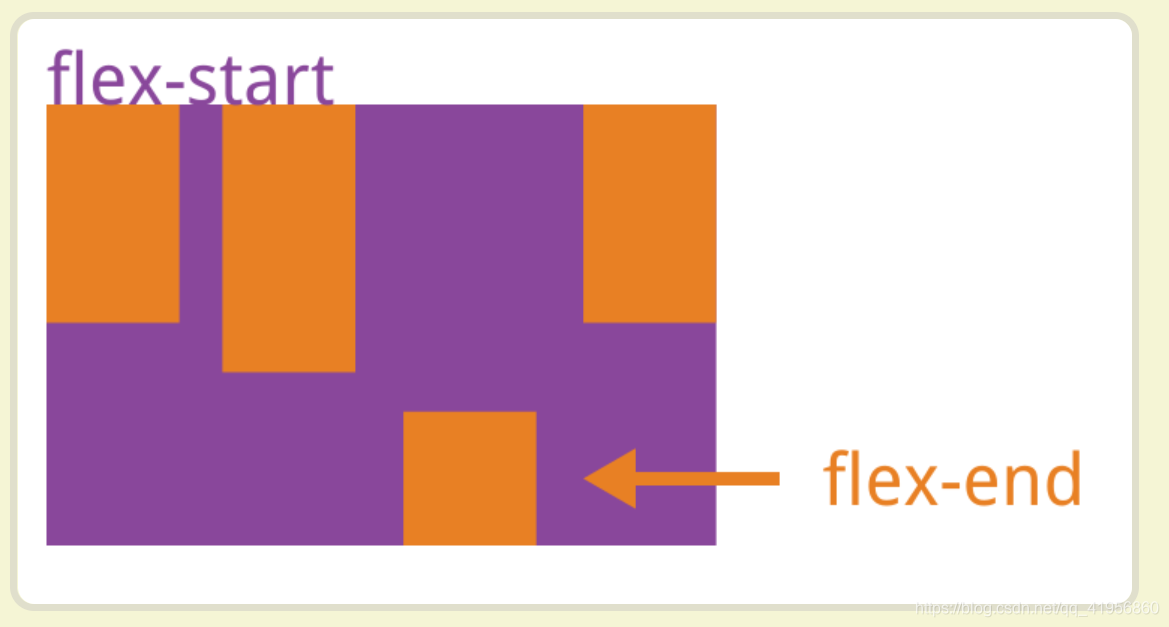
- align-items, align-self
设置弹性盒子元素在垂直方向上(纵轴)的对齐方式。其中align-items属性用于弹性容器,而align-self用于弹性项目。
align-items: flex-start | flex-end | center | baseline | stretch;
align-self: auto | flex-start | flex-end | center | baseline | stretch;

6. align-content属性定义了多根轴线的对齐方式。如果项目只有一根轴线,该属性不起作用。
项目属性
参考:http://www.ruanyifeng.com/blog/2015/07/flex-grammar.html
- order :order属性定义项目的排列顺序。数值越小,排列越靠前,默认为0。
- flex-grow:flex-grow属性定义项目的放大比例,默认为0,即如果存在剩余空间,也不放大。
- flex-shrink:flex-shrink属性定义了项目的缩小比例,默认为1,即如果空间不足,该项目将缩小。
- flex-basis:flex-basis属性定义了在分配多余空间之前,项目占据的主轴空间(main size)。浏览器根据这个属性,计算主轴是否有多余空间。它的默认值为auto,即项目的本来大小
- flex: flex属性是flex-grow, flex-shrink 和 flex-basis的简写,默认值为0 1 auto。后两个属性可选
- align-self: align-self属性允许单个项目有与其他项目不一样的对齐方式,可覆盖align-items属性。默认值为auto,表示继承父元素的align-items属性,如果没有父元素,则等同于stretch。
bootstrap
- m-, p- (margin, padding)
- 尺寸:xl, lg, md,sm, xs(也可以不写如,col-5 也表示extra small)
- container class: keep content within a fixed width on the screen, determined by the size of the screen
- container-fluid class: make the content automatically to span the full width of the screen
- row, 其他相关类 align-items-center
- col-auto,offset-xx, order-sm-first
- Information Architecture
- Navigation Bar
- Breadcrumbs
- Icon: font-awesome、 bootstrap-icons
- 折叠 collapse,accordion
- 信息提示 tooltips, Popovers, Modals
- jumbotron

- Hiding elements e.g.
class="d-none d-sm-none d-md-block" - 图标:可以使用 font-awesome库
npm、yarn
-
使用淘宝镜像
先安装cnpm模块
npm install -g cnpm --registry=https://registry.npm.taobao.org
然后使用cnpm 代替 npm
同步模块cnpm sync connect -
将全局包添加到package里面
npm i -g npm-link-save
npm-link-save -D xxx(-D相当于–save-dev, 将包添加到devDependencies中)
scripts
- 并行:npm-run-all 或者 &(Unix环境)
- 串行:npm-run-all 或者 &&
- pre、post
- 如何实现跨平台;1. 使用跨平台命令, 2. 使用npm包
dependences
参考:https://blog.csdn.net/hujinyuan357/article/details/99621542
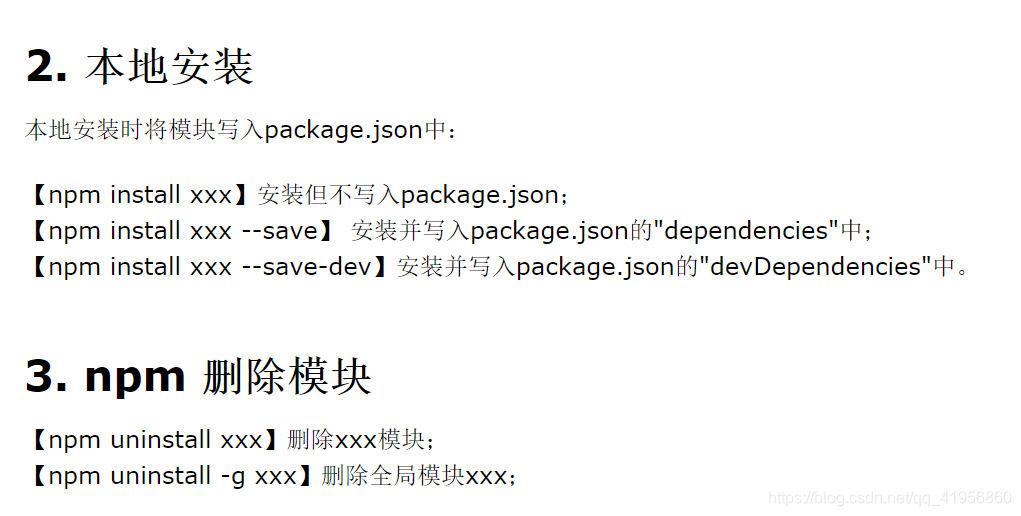
npm 目前支持以下几类依赖包管理:
- dependencies:实际应用环境所需的依赖 --save
- devDependencies : 生产环境 --save-dev
- peerDependencies:同等依赖,或者叫同伴依赖,用于指定当前包(也就是你写的包)兼容的宿主版本。
- optionalDependencies
- bundledDependencies / bundleDependencies:打包依赖,bundledDependencies是一个包含依赖包名的数组对象,在发布时会将这个对象中的包打包到最终的发布包里,包必须先在devDependencies或dependencies声明过,否则打包会报错
React
create-react-app
- npm install -g create-react-app
- yarn create react-app my-app 或者 npm init react-app my-app 创建
- npm start OR yarn start 在3000端口启动
- npm run build OR yarn build
react-router-dom
https://reacttraining.com/react-router/web/example/custom-link
先用switch定义好链接,然后使用Link进行连接, exact严格匹配
 return (
    <BrowserRouter>
      <div>
        <ul>
          <li><Link to="/home">Home</Link></li>
          <li><Link to="/contactus">contact</Link></li>
          <li> <Link to="/dashboard">Dashboard</Link> </li>
        </ul>
        <hr />
        <Switch>
           <Route path="/home" component={HomePage}/>
           <Route exact path='/contactus' component={() => <Contact resetFeedbackForm={this.props.resetFeedbackForm} postFeedback={this.props.postFeedback} />} />
           <Route path='/menu/:dishId' component={DishWithId} />
           <Route path="/dashboard"> <Dashboard /></Route>
           <Redirect to="/home" />
        </Switch>
      </div>
    </BrowserRouter>
  );
UI库(reactstrap、animation)
- reactstrap
https://reactstrap.github.io/components/alerts/
- react-animation-components: 实现动画效果
JSX
- 大括号内嵌表达式
- 下面两种写法等价
const element = (
  <h1 className="greeting">
    Hello, world!
  </h1>
);

const element = React.createElement(
  'h1',
  {className: 'greeting'},
  'Hello, world!'
);
component
- 分为函数组件和类组件
- 组件的props或state变化时,会重新render、
- 类组件重要特性:状态、生命周期
- this.setState({comment: ‘Hello’});
- 数据流是向下流动的,通过props
function Comment(props) {
  return (
    <div className="Comment">
      <div className="UserInfo">
        <img className="Avatar"
          src={props.author.avatarUrl}
          alt={props.author.name}
        />
    </div>
  );
}

class Clock extends React.Component {
  constructor(props) {
    super(props);
    this.state = {date: new Date()};
  }

  componentDidMount() {
    this.timerID = setInterval(
      () => this.tick(),
      1000
    );
  }

  componentWillUnmount() {
    clearInterval(this.timerID);
  }

  tick() {
    this.setState({
      date: new Date()
    });
  }

  render() {
    return (
      <div>
        <h1>Hello, world!</h1>
        <h2>It is {this.state.date.toLocaleTimeString()}.</h2>
      </div>
    );
  }
}
列表方法 map、filter
- 渲染数组的时候一定加key属性,必须是字符串类型
- index 默认为数组下标,尽量不要用index做key属性
const listItems = numbers.map((number) =>
    <li key={index}>{number}</li>
  );
Controlled / Uncontrolled React Components
-
controlled 类型的组件是时实地将最新的值推送(push)到 React 中,而 uncontrolled 类型的组件是在需要的时候去拉取(pull)它身上的值。
-
controlled 类型的组件需要在组件中有对应的 state 来保存相应的值。同时需要为组件编写值更新后的监听逻辑。这样的优点在于实时性,在validate等情况下可以用到
class NameForm extends React.Component {
  constructor(props) {
    super(props);
    this.handleSubmit = this.handleSubmit.bind(this);
    this.input = React.createRef();
  }

  handleSubmit(event) {
    alert('A name was submitted: ' + this.input.current.value);
    event.preventDefault();
  }

  render() {
    return (
      <form onSubmit={this.handleSubmit}>
        <label>
          Name:
          <input type="text" ref={this.input} />
        </label>
        <input type="submit" value="Submit" />
      </form>
    );
  }
}
- uncontorlled 类型的组件,其值是存储在 DOM 节点上的,在需要的时候,比如表单提交时,再通过 ref 获取到相应的 DOM 节点取出它的值。
class Form extends Component {
  handleSubmitClick = () => {
    const name = this._name.value;
    // do something with `name`
  }

  render() {
    return (
      <div>
        <input type="text" ref={input => this._name = input} />
        <button onClick={this.handleSubmitClick}>Sign up</button>
      </div>
    );
  }
}
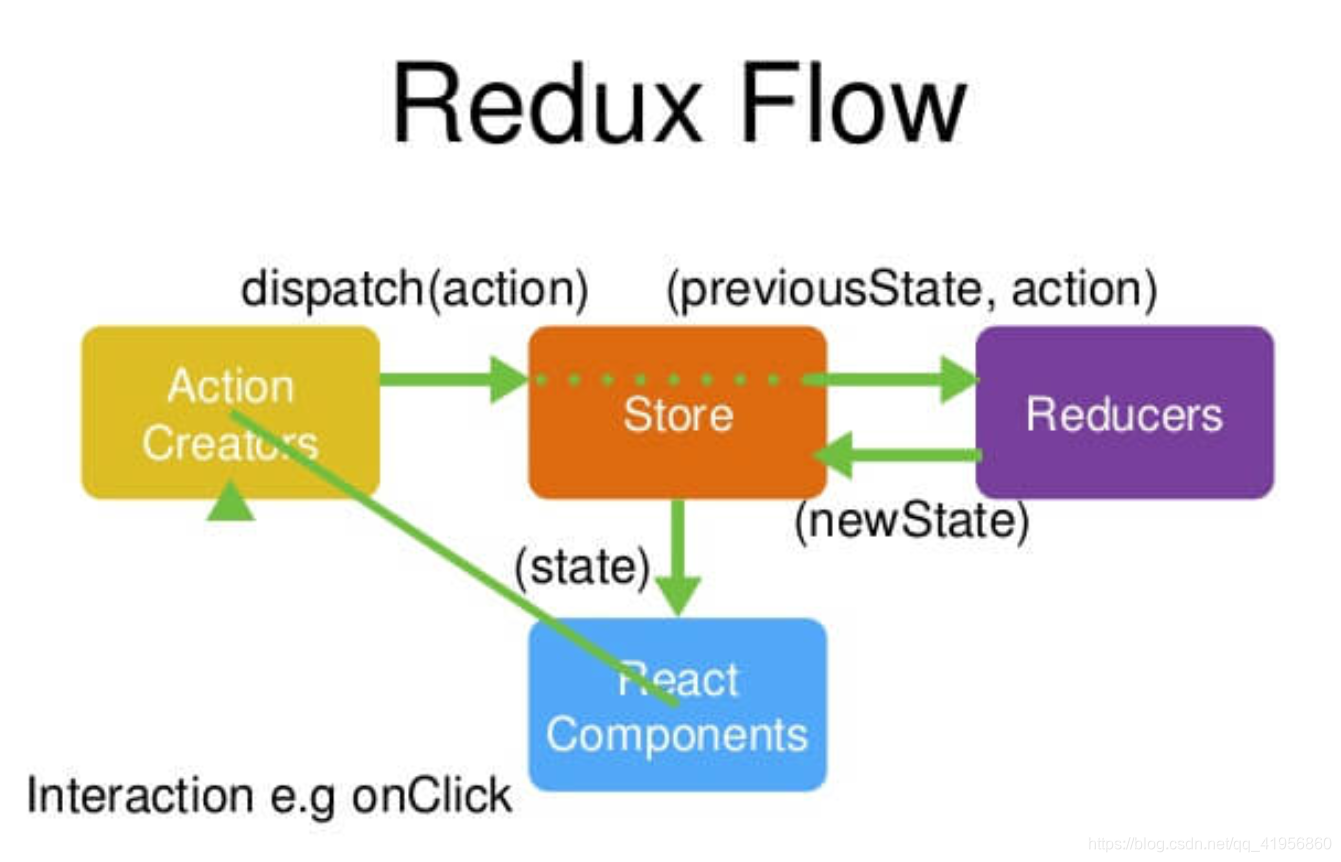
React-Redux
阮一峰博客: http://www.ruanyifeng.com/blog/2016/09/redux_tutorial_part_one_basic_usages.html
- React-Redux 将所有组件分成两大类:UI 组件(presentational component)和容器组件(container component)。UI组件负责UI的渲染,没有状态,参数通过props提供;容器组件负责管理数据和业务逻辑,带有内部状态。
- connect把UI组件生成容器组件。参数有两个(mapStateToProps, mapDispatchToProps),这2个参数就定义了组件的业务逻辑。第一个是输入逻辑:把state映射到UI组件的参数,第二个是输出逻辑:把用户发出的动作映射到action,并从UI组件发出去。
- 在整个应用只提供一个Store,它是一个扁平的树形结构,一个节点状态应该只属于一个组件。
- react-redux-form
- store
- action
- reducer
Reducer 函数最重要的特征是,它是一个纯函数, 也就是说,只要是同样的输入,必定得到同样的输出。纯函数是函数式编程的概念,必须遵守以下一些约束。
- 不得改写参数
- 不能调用系统 I/O 的API
- 不能调用Date.now()或者Math.random()等不纯的方法,因为每次会得到不一样的结果
redux-thunk, redux-promise,redux-logger ( react中间件 )
阮一峰博客: http://www.ruanyifeng.com/blog/2015/03/react.html
- 中间件就是一个函数,对store.dispatch方法进行了改造,在发出 Action 和执行 Reducer 这两步之间,添加了其他功能。
- redux-thunk中间件,改造store.dispatch,使得后者可以接受函数作为参数
- redux-promise使得store.dispatch方法可以接受 Promise 对象作为参数
const store = createStore(
  reducer,
  applyMiddleware(thunk)
);
- createStore方法可以接受整个应用的初始状态作为参数,那样的话,applyMiddleware就是第三个参数了。
const store = createStore(
  reducer,
  initial_state,
  applyMiddleware(logger)
);
- 中间件的次序有讲究。
const store = createStore(
  reducer,
  applyMiddleware(thunk, promise, logger)
);
异步操作
- 同步操作只要发出一种 Action 即可,异步操作的差别是它要发出三种 Action。
操作发起时的 Action
操作成功时的 Action
操作失败时的 Action
connect、mapStateToProps、mapDispatchToProps、Provider
http://www.ruanyifeng.com/blog/2016/09/redux_tutorial_part_three_react-redux.html
- connect方法接受两个参数:mapStateToProps和mapDispatchToProps。它们定义了 UI 组件的业务逻辑。前者负责输入逻辑,即将state映射到 UI 组件的参数(props),后者负责输出逻辑,即将用户对 UI 组件的操作映射成 Action。
import { connect } from 'react-redux'

const VisibleTodoList = connect(
  mapStateToProps,
  mapDispatchToProps
)(TodoList)
- mapStateToProps():它的作用就是像它的名字那样,建立一个从(外部的)state对象到(UI 组件的)props对象的映射关系。mapStateToProps的第一个参数总是state对象,还可以使用第二个参数,代表容器组件的props对象。
const mapStateToProps = (state, ownProps) => {
  return {
    active: ownProps.filter === state.visibilityFilter
  }
使用ownProps作为参数后,如果容器组件的参数发生变化,也会引发 UI 组件重新渲染。
- mapDispatchToProps() : 用来建立 UI 组件的参数到store.dispatch方法的映射。也就是说,它定义了哪些用户的操作应该当作 Action,传给 Store。它可以是一个函数,也可以是一个对象。
- Provider(): connect方法生成容器组件以后,需要让容器组件拿到state对象,才能生成 UI 组件的参数。 一种解决方法是将state对象作为参数,传入容器组件。但是,这样做比较麻烦,尤其是容器组件可能在很深的层级,一级级将state传下去就很麻烦。
React-Redux 提供Provider组件,可以让容器组件拿到state。
通过ref属性获取真实DOM
http://www.ruanyifeng.com/blog/2015/03/react.html
组件并不是真实的 DOM 节点,而是存在于内存之中的一种数据结构,叫做虚拟 DOM (virtual DOM)。只有当它插入文档以后,才会变成真实的 DOM 。但是,有时需要从组件获取真实 DOM 的节点,这时就要用到 ref 属性
var MyComponent = React.createClass({
  handleClick: function() {
    this.refs.myTextInput.focus();
  },
  render: function() {
    return (
      <div>
        <input type="text" ref="myTextInput" />
        <input type="button" value="Focus the text input" onClick={this.handleClick} />
      </div>
    );
  }
});

ReactDOM.render(
  <MyComponent />,
  document.getElementById('example')
);
上面代码中,组件 MyComponent 的子节点有一个文本输入框,用于获取用户的输入。这时就必须获取真实的 DOM 节点,虚拟 DOM 是拿不到用户输入的。为了做到这一点,文本输入框必须有一个 ref 属性,然后 this.refs.[refName] 就会返回这个真实的 DOM 节点。
需要注意的是,由于 this.refs.[refName] 属性获取的是真实 DOM ,所以必须等到虚拟 DOM 插入文档以后,才能使用这个属性,否则会报错。上面代码中,通过为组件指定 Click 事件的回调函数,确保了只有等到真实 DOM 发生 Click 事件之后,才会读取 this.refs.[refName] 属性。
生命周期
组件的生命周期分成三个状态:
Mounting:已插入真实 DOM
Updating:正在被重新渲染
Unmounting:已移出真实 DOM
React 为每个状态都提供了两种处理函数,will 函数在进入状态之前调用,did 函数在进入状态之后调用,三种状态共计五种处理函数。
componentWillMount()
componentDidMount()
componentWillUpdate(object nextProps, object nextState)
componentDidUpdate(object prevProps, object prevState)
componentWillUnmount()
此外,React 还提供两种特殊状态的处理函数。
componentWillReceiveProps(object nextProps):已加载组件收到新的参数时调用
shouldComponentUpdate(object nextProps, object nextState):组件判断是否重新渲染时调用
AJAX
可以使用jquery实现Ajax
NO frame
template
- {{@index}}
- {{#each images}}…{{/each}}
- {{#if}}{{/if}}
html
- javascript 的渲染,都应该放到$(document).ready()里面。
- data-xx 属性 , 让标签携带附加数据
- 生产jquery dom:$(this), $(event.target) 也就是把对象放到括号里面
- summit 有默认动作,会自动刷新页面。所以自定义summit动作的时候返回false,组织事件的传递。
其它
- meteor.js 框架。安装:https://www.meteor.com/install


 472
472


 被折叠的 条评论
为什么被折叠?
被折叠的 条评论
为什么被折叠?
 到【灌水乐园】发言


