


Nginx-反向代理配置学习总结
正向代理:指的是通过代理服务器 代理浏览器/客户端去重定向请求访问到目标服务器 的一种代理服务,正向代理服务的特点是代理服务器 代理的对象是浏览器/客户端,也就是对于目标服务器 来说浏览器/客户端是隐藏的。正向代理服务求可以缓存互联网上的页面与端口,客户端可不需联网访问已被缓存的资源。
反向代理:reverse proxy,指的是代理外网用户的请求到内部的指定的服务器,并将数据返回给用户的一种方式,这是用的比较多的一种方式。
Nginx 除了可以在企业提供高性能的web服务之外,另外还可以将 nginx 本身不具备的请求通过某种预定义的协议转发至其它服务器处理,不同的协议就是Nginx服务器与其他服务器进行通信的一种规范,主要在不同的场景使用以下模块实现不同的功能
ngx_http_proxy_module: #将客户端的请求以http协议转发至指定服务器进行处理
ngx_http_upstream_module #用于定义为proxy_pass,fastcgi_pass,uwsgi_pass等指令引用的后端服务器分组
ngx_stream_proxy_module:#将客户端的请求以tcp协议转发至指定服务器处理
ngx_http_fastcgi_module:#将客户端对php的请求以fastcgi协议转发至指定服务器助理
ngx_http_uwsgi_module: #将客户端对Python的请求以uwsgi协议转发至指定服务器处理
调用关系

访问逻辑图
![[外链图片转存失败,源站可能有防盗链机制,建议将图片保存下来直接上传(img-dAoHx3lL-1674975809328)(ImageDB/image-20220921062856207.png)]](https://img-blog.csdnimg.cn/bb26d25497eb4bef8308df970aadaf1f.png)
同构代理:用户请求与后端服务求调度协议均为一致,即为同步代理;例如:客户使用http协议请求后端资源,通过nginx调度到后端,使用http协议取得资源;
异构代理:用户请求与后端服务求调度协议不一致,即为异构代理;例如:客户使用http协议请求后端资源,通过nginx调度到后端,使用fastcgi协议取得资源;
LVS:支持四层协议,不涉及应用层协议(无法识别),无法支持异构代理,LVS主要提供的是四层转发功能;
Nginx:支持7层协议,支持异构代理
LVS与Nginx的区别

实现http反向代理功能
官方文档
官方文档: https://nginx.org/en/docs/http/ngx_http_proxy_module.html
官方文档:https://nginx.org/en/docs/http/ngx_http_proxy_module.html#proxy_pass
参数说明
proxy_pass;
#用来设置将客户端请求转发给的后端服务器的主机,可以是主机名(将转发至后端服务做为主机头首部)、IP地址:端口的方式
#也可以代理到预先设置的主机群组,需要模块ngx_http_upstream_module支持


#示例:
location /web {
	index index.html;
	proxy_pass http://10.0.0.18:8080; #8080后面无uri,即无 / 符号,需要将location后面url 附加到proxy_pass指定的url后面,此行为类似于root
	#proxy_pass指定的uri不带斜线将访问的/web,等于访问后端服务器
	http://10.0.0.18:8080/web/index.html,即后端服务器配置的站点根目录要有web目录才可以被访问
	# http://nginx/web/index.html ==> http://10.0.0.18:8080/web/index.html
	proxy_pass http://10.0.0.18:8080/; #8080后面有uri,即有 / 符号,相当于置换,即访问/web时实际返回proxy_pass后面uri内容.此行为类似于alias
	#proxy_pass指定的uri带斜线,等于访问后端服务器的http://10.0.0.18:8080/index.html 内容返回给客户端
} 	# http://nginx/web/index.html ==> http://10.0.0.18:8080


#如果location定义其uri时使用了正则表达式模式(包括~,~*,但不包括^~),则proxy_pass之后必须不能使用uri; 即不能有/ ,用户请求时传递的uri将直接附加至后端服务器之后
server {
	...
	server_name HOSTNAME;
	location ~|~* /uri/ {
	proxy_pass http://host:port; #proxy_pass后面的url 不能加/
	}
	...
}
	http://HOSTNAME/uri/ --> http://host/uri/
proxy_hide_header field;
#用于nginx作为反向代理的时候,在返回给客户端http响应时,隐藏后端服务器相应头部的信息,可以设置在http,server或location块
#示例: 隐藏后端服务器ETag首部字段
location /web {
	index index.html;
	proxy_pass http://10.0.0.18:8080/;
	proxy_hide_header ETag;
}
proxy_pass_header field;
#默认nginx在响应报文中不传递后端服务器的首部字段Date, Server, X-Pad, X-Accel等参数,如果
要传递的话则要使用 proxy_pass_header field声明将后端服务器返回的值传递给客户端
#field 首部字段大小不敏感
#示例:透传后端服务器的Server和Date首部给客户端,同时不再响应报中显示前端服务器的Server字段
proxy_pass_header Server;
proxy_pass_header Date;
proxy_pass_request_body on | off;
#是否向后端服务器发送HTTP实体部分,可以设置在http,server或location块,默认即为开启
proxy_pass_request_headers on | off;
#是否将客户端的请求头部转发给后端服务器,可以设置在http,server或location块,默认即为开启
proxy_set_header;
#可更改或添加客户端的请求头部信息内容并转发至后端服务器,比如在后端服务器想要获取客户端的真实IP的时候,就要更改每一个报文的头部
#示例:
#proxy_set_header X-Forwarded-For $proxy_add_x_forwarded_for;
$proxy_add_x_forwarded_for
the “X-Forwarded-For” client request header field with the $remote_addr variable
appended to it, separated by a comma. If the “X-Forwarded-For” field is not
present in the client request header, the $proxy_add_x_forwarded_for variable is
equal to the $remote_addr variable.
proxy_set_header X-Real-IP $remote_addr;
#添加HOST到报文头部,如果客户端为NAT上网那么其值为客户端的共用的公网IP地址,常用于在日之中记录客户端的真实IP地址。
#在后端httpd服务器修改配置,添加日志记录X-Forwarded-For字段
LogFormat "%h %l %u %t \"%r\" %>s %b \"%{Referer}i\" \"%{User-Agent}i\" \"%{XReal-
IP}i\"" combined
proxy_connect_timeout time;
#配置nginx服务器与后端服务器尝试建立连接的超时时间,默认为60秒,用法如下:
proxy_connect_timeout 6s;
#60s为自定义nginx与后端服务器建立连接的超时时间,超时会返回客户端504响应码
proxy_read_timeout time;
#配置nginx服务器向后端服务器或服务器组发起read请求后,等待的超时时间,默认60s
proxy_send_timeout time;
#配置nginx项后端服务器或服务器组发起write请求后,等待的超时 时间,默认60s
proxy_http_version 1.0;
#用于设置nginx提供代理服务的HTTP协议的版本,默认http 1.0
proxy_ignore_client_abort off;
#当客户端网络中断请求时,nginx服务器中断其对后端服务器的请求。即如果此项设置为on开启,则服务器会忽略客户端中断并一直等着代理服务执行返回,如果设置为off,则客户端中断后Nginx也会中断客户端请求并立即记录499日志,默认为off。
proxy_headers_hash_bucket_size 128;
#当配置了 proxy_hide_header和proxy_set_header的时候,用于设置nginx保存HTTP报文头的hash表的上限
proxy_headers_hash_max_size 512;
#设置proxy_headers_hash_bucket_size的最大可用空间
server_namse_hash_bucket_size 512;
#server_name hash表申请空间大小
server_names_hash_max_size 512;
#设置服务器名称hash表的上限大小
proxy_next_upstream error | timeout | invalid_header | http_500 | http_502 | http_503 | http_504;
#当一台后端朋务器出错,超时,无效首部,500等时,切换至下一个后端服务器提供服务
反向代理:缓存功能
缓存功能默认关闭状态,需要先动配置才能启用
官方文档:
https://nginx.org/en/docs/http/ngx_http_proxy_module.html
#语法
Syntax:	proxy_cache zone | off;默认off
Default:
proxy_cache off;
Context:	http, server, location
#指明调用的缓存,或关闭缓存机制;Context:http, server, location
#zone_name 表示缓存的名称.需要由proxy_cache_path事先定义
#语法:
Syntax:	proxy_cache_key string;
Default:
proxy_cache_key $scheme$proxy_host$request_uri;
Context:	http, server, location
#缓存中用于“键”的内容,默认值:proxy_cache_key $scheme$proxy_host$request_uri;
#语法:
Syntax:	proxy_cache_valid [code ...] time;
Default:	—
Context:	http, server, location
#定义对特定响应码的响应内容的缓存时长,建议定义在http{...}中
示例:
proxy_cache_valid 200 302 10m;
proxy_cache_valid 404 1m;
#语法
Syntax:	proxy_cache_path path [levels=levels] [use_temp_path=on|off] keys_zone=name:size [inactive=time] [max_size=size] [min_free=size] [manager_files=number] [manager_sleep=time] [manager_threshold=time] [loader_files=number] [loader_sleep=time] [loader_threshold=time] [purger=on|off] [purger_files=number] [purger_sleep=time] [purger_threshold=time];
Default:	—
Context:	http


proxy_cache_path;
#定义可用于proxy功能的缓存;Context:http
proxy_cache_path path [levels=levels] [use_temp_path=on|off]
keys_zone=zone_name:size [inactive=time] [max_size=size] [manager_files=number]
[manager_sleep=time] [manager_threshold=time] [loader_files=number]
[loader_sleep=time] [loader_threshold=time] [purger=on|off]
[purger_files=number] [purger_sleep=time] [purger_threshold=time];
#示例:在http配置定义缓存信息
proxy_cache_path /var/cache/nginx/proxy_cache #定义缓存保存路径,proxy_cache会自动创建
levels=1:2:2 #定义缓存目录结构层次,1:2:2可以生成2^4x2^8x2^8=2^20=1048576个目录
keys_zone=proxycache:20m #指内存中缓存的大小,主要用于存放key和metadata(如:使用次数),一般1M可存放8000个左右的key
inactive=120s #缓存有效时间
max_size=10g; #最大磁盘占用空间,磁盘存入文件内容的缓存空间最大值
#调用缓存功能,需要定义在相应的配置段,如server{...};或者location等
proxy_cache proxycache;
proxy_cache_key $request_uri; #对指定的数据进行MD5的运算做为缓存的key
proxy_cache_valid 200 302 301 10m; #指定的状态码返回的数据缓存多长时间
proxy_cache_valid any 1m; #除指定的状态码返回的数据以外的缓存多长时间,必须设置,否则不会缓存
proxy_cache_use_stale error | timeout | invalid_header | updating | http_500 | http_502 | http_503 | http_504 | http_403 |  http_404 | off ; #默认是off
#在被代理的后端服务器出现哪种情况下,可直接使用过期的缓存响应客户端
#示例
proxy_cache_use_stale error http_502 http_503;
proxy_cache_methods GET | HEAD | POST ...;
#对哪些客户端请求方法对应的响应进行缓存,GET和HEAD方法总是被缓存
清理缓存
方法1: rm -rf 缓存目录
方法2: 第三方扩展模块ngx_cache_purge
配置实例
http{
	#缓存路径 #定义目录层次结构 #定义索引 #定义缓存有效期 #缓存最大占用空间
    proxy_cache_path /var/nginx/proxy_cache levels=1:1:1 keys_zone=proxycache:20m inactive=120s max_size=1g;
}

server {
   listen 80;
   server_name 192.168.40.124;
   root /apps/nginx;
   #缓存功能调用:自定义名称(这里使用proxycache)
   proxy_cache proxycache;
   #定义缓存的key-md5值(哈希运算)
   proxy_cache_key $scheme$proxy_host$request_uri;
   #单独定义不同响应码的有效时间(未定义的按全局)
   proxy_cache_valid 200 302 10m;
   proxy_cache_valid 404 1m;
   #当后端服务器出现设定中的情况时,允许使用过期数据响应
   proxy_cache_use_stale error http_502 http_503;
   #增加允许缓存的方式
   proxy_cache_methods GET  HEAD  POST;
   #测试rewite指令-域名跳转
   location /new-domin {
        root  /var/www/html/;
       }
   #反向解析配置
   location /api {
        index index.html;
        #找到root下的/api目录里的index文件
        proxy_pass http://192.168.213.123:80;
        #将/api置换为/,直接获取root下的index文件
        #proxy_pass http://192.168.213.123:80/;
        }
   #在使用正则时,无法在proxy_pass后续的uri后无法使用/置换;
   location ~ /web {
        index index.html;
	proxy_pass http://192.168.213.123:80;
	}
   location ~* \.(jpe?g|png|gif)$ {
	proxy_pass http://192.168.213.123;
	}
}
反向代理:添加响应报文的头部信息
nginx基于模块ngx_http_headers_module可以实现对后端服务器响应给客户端的报文中添加指定的响 应首部字段
官方手册: https://nginx.org/en/docs/http/ngx_http_headers_module.html
#语法
Syntax:	add_header name value [always];
Default:	—
Context:	http, server, location, if in location

#添加响应报文的自定义首部:
add_header name value [always];
#示例:
add_header X-Via $server_addr; #当前nginx主机的IP
add_header X-Cache $upstream_cache_status; #是否缓存命中
add_header X-Accel $server_name; #客户访问的FQDN
#添加自定义响应信息的尾部,使用较少,1.13.2版后支持
add_trailer name value [always];
配置示例:
server {
   listen 80;
   server_name 192.168.1.124;
   root /apps/nginx;
   #缓存功能调用:自定义名称(这里使用proxycache)
   proxy_cache proxycache;
   #定义缓存的key-md5值(哈希运算)
   proxy_cache_key $scheme$proxy_host$request_uri;
   #单独定义不同响应码的有效时间(未定义的按全局)
   proxy_cache_valid 200 302 10m;
   proxy_cache_valid 404 1m;
   #当后端服务器出现设定中的情况时,允许使用过期数据响应
   proxy_cache_use_stale error http_502 http_503;
   #增加允许缓存的方式
   proxy_cache_methods GET  HEAD  POST;
   #当前nginx主机的IP
   add_header X-Via $server_addr;
   #是否缓存命中
   add_header X-Cache $upstream_cache_status;
   #客户访问的FQDN
   add_header X-Accel $server_name;
   #隐藏头部报文信息:ETag
   proxy_pass_header ETag;
   #测试rewite指令-域名跳转
   location /new-domin {
        root  /var/www/html/;
       }
   #反向解析配置
   location /api {
        index index.html;
        #找到root下的/api目录里的index文件
        proxy_pass http://192.168.213.123:80;
        #将/api置换为/,直接获取root下的index文件
        #proxy_pass http://192.168.213.123:80/;
        }
   #在使用正则时,无法在proxy_pass后续的uri后无法使用/置换;
   location ~ /web {
        index index.html;
	proxy_pass http://192.168.213.123:80;
	}
   location ~* \.(jpe?g|png|gif)$ {
	proxy_pass http://192.168.213.123;
	}

}


[root@Nginx-Server conf.d 13:54]$curl http://192.168.1.124:/api/ -I
HTTP/1.1 200 OK
Server: nginx/1.20.2
Date: Sat, 28 Jan 2023 13:54:27 GMT
Content-Type: text/html
Content-Length: 9
Connection: keep-alive
Last-Modified: Sat, 28 Jan 2023 15:33:41 GMT
X-Via: 192.168.1.124
X-Cache: HIT
X-Accel: 192.168.1.124
Accept-Ranges: bytes
反向代理:实现客户端IP透传
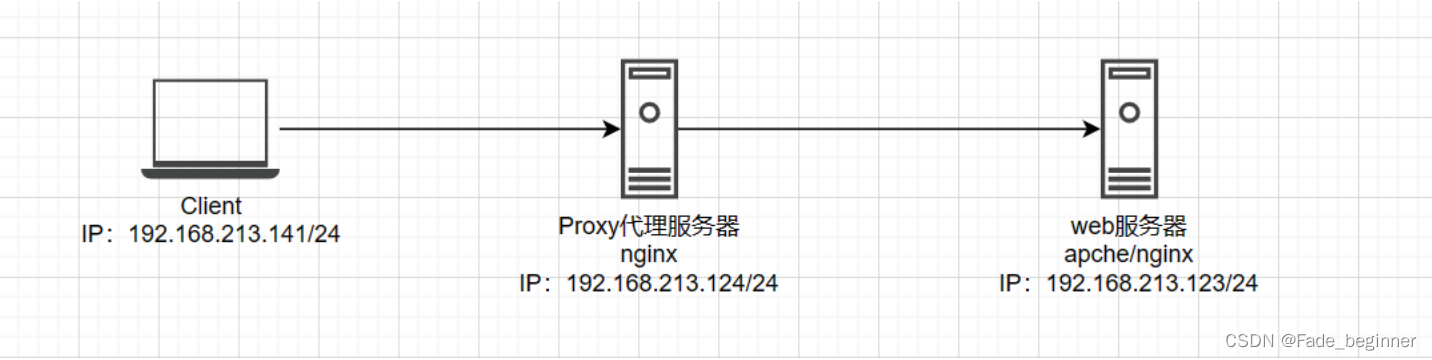
#使用原因
代理服务器是无法看到真实客户端的行为与请求的,日志中也不会出现客户端的行为信息,若出现问题无法进行分析
#通信流程:
由客户端发送请求到代理服务器,代理服务器Proxy,代理服务器通过$proxy_add_x_forwarded_for参数或$remote_addr参数,在通信报文头中增加上客户端的IP地址,web服务器可以用过curl -I uri的方式或日志查询到真实的客户端IP;
实验步骤
#####环境准备
####角色说明
Client		Ubantu 18.04	IP:192.168.213.141
Proxy			Centos 7.9 		IP:192.168.213.124
web_Server 	Centos 7.9		IP:192.168.213.123
###环境部署
##配置IP
#Client
sudo vim /etc/netplan/01-netcfg.yaml
network:												#手动添加,注意格式
  ethernets:										#手动添加,注意格式
      ens33:										#手动添加,注意格式
       addresses: [192.168.213.142/24]		#手动添加,注意格式,IP地址与掩码
       gateway4: 192.168.213.1				#手动添加,注意格式,网关
       dhcp4: false								#手动添加,注意格式,模式
  version: 2										#文件自带,不要删除
  renderer: networkd								#文件自带,不要删除

sudo netplan apply								#重新加载网络配置

#Proxy
nmcli con modify eth0 ifname eth0 ipv4.addresses 192.168.213.124/24 ipv4.method manual type ethernet
nmcli connection  up eth0
systemctl restart network

#web Server
nmcli con modify eth0 ifname eth0 ipv4.addresses 192.168.213.123/24 ipv4.method manual type ethernet
nmcli connection  up eth0
systemctl restart network

##配置nginx代理
#proxy-安装nginx与配置反向代理
vim /etc/hosts
192.168.213.124 proxy
192.168.213.123 web_Server

#编译安装使用脚本故省略步骤,请前往如下链接复制即可
https://blog.csdn.net/qq_41960479/article/details/126608727
mkdir -pv /apps/nginx/conf/conf.d
sed -ri "/    default_type/i\ proxy_cache_path /var/nginx/proxy_cache levels=1:1:1 keys_zone=proxycache:20m inactive=120s max_size=1g;" /apps/nginx/conf/nginx.conf
sed -ri "/[[:space:]]+server \{/i\    include       /apps/nginx/conf/conf.d/*.conf;" nginx.conf
tee /apps/nginx/conf/conf.d/sub_nginx.conf <<EOF
server {
   listen 80;
   server_name 192.168.213.124;
   root /apps/nginx;
   #缓存功能调用:自定义名称(这里使用proxycache)
   proxy_cache proxycache;
   #定义缓存的key-md5值(哈希运算)
   proxy_cache_key ;
   #单独定义不同响应码的有效时间(未定义的按全局)
   proxy_cache_valid 200 302 10m;
   proxy_cache_valid 404 1m;
   #当后端服务器出现设定中的情况时,允许使用过期数据响应
   proxy_cache_use_stale error http_502 http_503;
   #增加允许缓存的方式
   proxy_cache_methods GET  HEAD  POST;
   #透传配置-单个代理
   proxy_set_header X-Real-IP $remote_addr
   #透传配置-多个代理
   proxy_set_header X-Real-IP $proxy_add_x_forwarded_for
   #反向解析配置
   location /api {
        index index.html;
        #找到root下的/api目录里的index文件
        proxy_pass http://192.168.213.123:80;
        #将/api置换为/,直接获取root下的index文件
        #proxy_pass http://192.168.213.123:80/;
        }
   #在使用正则时,无法在proxy_pass后续的uri后无法使用/置换;
   location ~ /web {
        index index.html;
        proxy_pass http://192.168.213.123:80;
        }
   location ~* \.(jpe?g|png|gif)$ {
        proxy_pass http://192.168.213.123;
        }

}
EOF

nginx -s reload

#web_Server
#安装apache
yum -y install htppd && systemctl --now enable httpd
sed -ri 's/(   LogFormat.*)"" combined/\1" \\"%{X-Real-IP}i\\" "combined/'  /etc/httpd/conf/httpd.conf
systemctl restart httpd

#安装nginx
https://blog.csdn.net/qq_41960479/article/details/126608727
#修改日志规则
sed -ri "/    default_type/a\        log_format    X-Real-IP '\$remote_addr - \$remote_user [\$time_local] \"\$request\" '\n        '\$status \$body_bytes_sent \"\$http_referer\" '\n        '\"\$http_user_agent\" \"\$http_x_forwarded_for\"'\n        '\"server_name:server_port\"';" /apps/nginx/conf/nginx.conf
nginx -s reload
#添加访问日志规则
vim /apps/nginx/conf/nginx.conf
access_log /apps/nginx/logs/org_access.log X-Real-IP;

###测试
#clinet
curl httpd://192.168.213.124/api/
#web_Server
tail -f /var/log/httpd/access_log
tail -f /apps/nginx/logs/org_access.log
反向代理:负载均衡配置
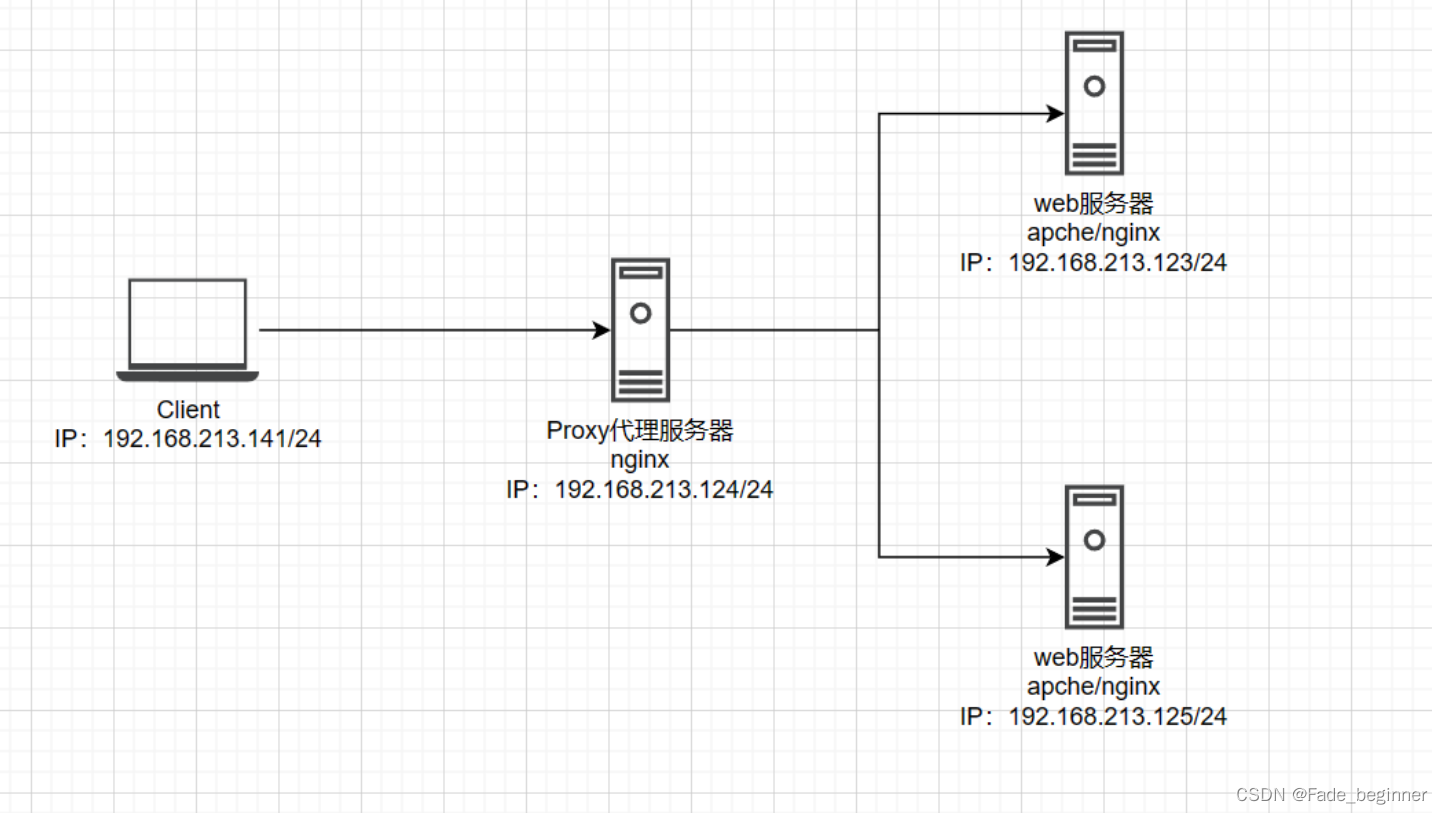
在上一个节中Nginx可以将客户端的请求转发至单台后端服务器但是无法转发至特定的一组的服务器, 而且不能对后端服务器提供相应的服务器状态监测,Nginx 可以基于ngx_http_upstream_module模块 提供服务器分组转发、权重分配、状态监测、调度算法等高级功能
官方手册:https://nginx.org/en/docs/http/ngx_http_upstream_module.html#upstream
#语法
Syntax:	upstream name { ... }
Default:	—
Context:	http

#示例:
upstream backend {
    server backend1.example.com weight=5;
    server 127.0.0.1:8080       max_fails=3 fail_timeout=30s;
    server unix:/tmp/backend3;

    server backup1.example.com  backup;
}
相关参数说明:
server address [parameters];
#配置一个后端web服务器,配置在upstream内,至少要有一个server服务器配置。
#server支持的parameters如下:
weight=number #设置权重,默认为1,实现类似于LVS中的WRR,WLC等
max_conns=number  #给当前后端server设置最大活动链接数,默认为0表示没有限制
max_fails=number  #后端服务器的下线条件,当客户端访问时,对本次调度选中的后端服务器连续进行检测多少次,如果都失败就标记为不可用,默认为1次,当客户端访问时,才会利用TCP触发对探测后端服务器健康性检查,而非周期性的探测
fail_timeout=time #后端服务器的上线条件,对已经检测到处于不可用的后端服务器,每隔此时间间隔再次进行检测是否恢复可用,如果发现可用,则将后端服务器参与调度,默认为10秒
backup  #设置为备份服务器,当所有后端服务器不可用时,才会启用此备用服务器
down    #标记为down状态,可以平滑下线后端服务器
resolve #当server定义的是主机名的时候,当A记录发生变化会自动应用新IP而不用重启Nginx

hash KEY [consistent];
#基于指定请求报文中首部字段或者URI等key做hash计算,使用consistent参数,将使用ketama一致性hash算法,适用于后端是Cache服务器(如varnish)时使用,consistent定义使用一致性hash运算,一致性hash基于取模运算
hash $request_uri consistent; #基于用户请求的uri做hash
hash $cookie_sessionid  #基于cookie中的sessionid这个key进行hash调度,实现会话绑定

ip_hash;	#源地址hash调度方法,基于的客户端的remote_addr(源地址IPv4的前24位或整个IPv6地址)做hash计算,以实现会话保持
least_conn;	#最少连接调度算法,优先将客户端请求调度到当前连接最少的后端服务器,相当于LVS中的WLC
环境说明:
Client			Ubantu 18.04	IP:192.168.213.141
Proxy				Centos 7.9 		IP:192.168.213.124
web_Server_1 	Centos 7.9		IP:192.168.213.125
web_Server_2 	Centos 7.9		IP:192.168.213.126
配置示例:
#配置顺序
1.在代理服务器上配置upstream,添加后续web_Server的地址信息;
2.在代理服务上配置location,进行跳转配置:proxy_pass upstream名称;
3.在web_Server上进行web服务器安装与配置;

#配置upstream
#在http模块中添加以下内容,注意:这里起名时不可以带特殊字符,不然会导致无法识别报400错误;
vim /apps/nginx/conf/nginx.conf
http {
    upstream Test01 {
      server 192.168.40.122:80;
      server 192.168.40.123:80;
    }
    upstream Test02 {
      server 192.168.40.141:80;
      server 192.168.40.142:80;
    }
    ...
include       /apps/nginx/conf/conf.d/*.conf;
}
#配置子配置文件
touch /apps/nginx/conf/conf.d/upstream.conf
vim /apps/nginx/conf/conf.d/upstream.conf
server {
   listen 80;
   server_name 192.168.40.124;
   root /apps/nginx;
   location /new-domin {
        root  /var/www/html/;
       }
   #反向解析-均衡配置
   location /api {
        index index.html;
        proxy_pass http://Test01;
        }
}
#重启服务
nginx -s reload
#测试
[root@Nginx-Server conf.d 08:32]$curl http://192.168.213.124/api/
web_Server_1
[root@Nginx-Server conf.d 08:32]$curl http://192.168.213.124/api/
web_Server_2
###故障测试
#停止web_Server_1的web服务,并查看是否会自动切换
root@web_Server_1 ~08:38]$nginx -s stop
[root@web_Server_1 ~08:38]$systemctl status nginx
● nginx.service - nginx - high performance web server
   Loaded: loaded (/usr/lib/systemd/system/nginx.service; enabled; vendor preset: disabled)
   Active: failed (Result: exit-code) since Mon 2023-01-30 07:51:42 GMT; 46min ago
     Docs: http://nginx.org/en/docs/
  Process: 4578 ExecStop=/bin/kill -s TERM $MAINPID (code=exited, status=1/FAILURE)
  Process: 1079 ExecStart=/apps/nginx/sbin/nginx -c /apps/nginx/conf/nginx.conf (code=exited, status=0/SUCCESS)
 Main PID: 1103 (code=exited, status=0/SUCCESS)

Jan 30 07:51:42 web_Server_1 kill[4578]: -q, --queue <sig>      use sigqueue(2) rather than kill(2)
Jan 30 07:51:42 web_Server_1 kill[4578]: -p, --pid              print pids without signaling them
Jan 30 07:51:42 web_Server_1 kill[4578]: -l, --list [=<signal>] list signal names, or convert one to a name
Jan 30 07:51:42 web_Server_1 kill[4578]: -L, --table            list signal names and numbers
Jan 30 07:51:42 web_Server_1 kill[4578]: -h, --help     display this help and exit
Jan 30 07:51:42 web_Server_1 kill[4578]: -V, --version  output version information and exit
Jan 30 07:51:42 web_Server_1 kill[4578]: For more details see kill(1).
Jan 30 07:51:42 web_Server_1 systemd[1]: nginx.service: control process exited, code=exited status=1
Jan 30 07:51:42 web_Server_1 systemd[1]: Unit nginx.service entered failed state.
Jan 30 07:51:42 web_Server_1 systemd[1]: nginx.service failed.
[root@web_Server_1 ~08:38]$ss -ntl |grep 80

#继续访问,查看是否会如同LVS一样还会访问故障主机
root@Nginx-Server conf.d 08:40]$for (( i=0;i<=5;i++ ));do curl http://192.168.213.124/api/ ;done
web_Server_2
web_Server_2
web_Server_2
web_Server_2
web_Server_2
web_Server_2
#并不会访问故障主机,查看其运行机制
#在故障主机上监侧访问记录,并在客户端上持续频繁访问
#web_Server_1
tcpdump -i eth1 -nn port 80
#客户端
while :;do
sleep 3
curl http://192.168.213.124/api/
done

#结果:
客户端
[root@Nginx-Server conf.d 08:41]$while :;do
> sleep 3
> curl http://192.168.213.124/api/
> done
web_Server_2
web_Server_2
web_Server_2


[root@web_Server_1 ~08:49]$tcpdump -i eth1 -nn port 80
tcpdump: verbose output suppressed, use -v or -vv for full protocol decode
listening on eth1, link-type EN10MB (Ethernet), capture size 262144 bytes
08:49:54.212042 IP 192.168.213.124.44292 > 192.168.213.141.80: Flags [S], seq 2288186886, win 29200, options [mss 1460,sackOK,TS val 19501261 ecr 0,nop,wscale 7], length 0
08:49:54.212176 IP 192.168.213.141.80 > 192.168.213.124.44292: Flags [S.], seq 1234866862, ack 2288186887, win 65160, options [mss 1460,sackOK,TS val 2247346584 ecr 19501261,nop,wscale 7], length 0
08:49:54.212275 IP 192.168.213.124.44292 > 192.168.213.141.80: Flags [.], ack 1, win 229, options [nop,nop,TS val 19501261 ecr 2247346584], length 0
08:49:54.212334 IP 192.168.213.124.44292 > 192.168.213.141.80: Flags [P.], seq 1:92, ack 1, win 229, options [nop,nop,TS val 19501261 ecr 2247346584], length 91: HTTP: GET /api/ HTTP/1.0
08:49:54.212351 IP 192.168.213.141.80 > 192.168.213.124.44292: Flags [.], ack 92, win 509, options [nop,nop,TS val 2247346584 ecr 19501261], length 0
08:49:54.212772 IP 192.168.213.141.80 > 192.168.213.124.44292: Flags [P.], seq 1:259, ack 92, win 509, options [nop,nop,TS val 2247346585 ecr 19501261], length 258: HTTP: HTTP/1.1 200 OK
08:49:54.212889 IP 192.168.213.141.80 > 192.168.213.124.44292: Flags [F.], seq 259, ack 92, win 509, options [nop,nop,TS val 2247346585 ecr 19501261], length 0
08:49:54.212893 IP 192.168.213.124.44292 > 192.168.213.141.80: Flags [.], ack 259, win 237, options [nop,nop,TS val 19501261 ecr 2247346585], length 0
08:49:54.213022 IP 192.168.213.124.44292 > 192.168.213.141.80: Flags [F.], seq 92, ack 260, win 237, options [nop,nop,TS val 19501261 ecr 2247346585], length 0
08:49:54.213195 IP 192.168.213.141.80 > 192.168.213.124.44292: Flags [.], ack 93, win 509, options [nop,nop,TS val 2247346585 ecr 19501261], length 0
08:49:57.218042 IP 192.168.213.124.44296 > 192.168.213.141.80: Flags [S], seq 3581355660, win 29200, options [mss 1460,sackOK,TS val 19504267 ecr 0,nop,wscale 7], length 0
08:49:57.218179 IP 192.168.213.141.80 > 192.168.213.124.44296: Flags [S.], seq 1377170391, ack 3581355661, win 65160, options [mss 1460,sackOK,TS val 2247349590 ecr 19504267,nop,wscale 7], length 0
08:49:57.218299 IP 192.168.213.124.44296 > 192.168.213.141.80: Flags [.], ack 1, win 229, options [nop,nop,TS val 19504267 ecr 2247349590], length 0
08:49:57.218343 IP 192.168.213.124.44296 > 192.168.213.141.80: Flags [P.], seq 1:92, ack 1, win 229, options [nop,nop,TS val 19504267 ecr 2247349590], length 91: HTTP: GET /api/ HTTP/1.0
08:49:57.218418 IP 192.168.213.141.80 > 192.168.213.124.44296: Flags [.], ack 92, win 509, options [nop,nop,TS val 2247349590 ecr 19504267], length 0
08:49:57.219109 IP 192.168.213.141.80 > 192.168.213.124.44296: Flags [P.], seq 1:259, ack 92, win 509, options [nop,nop,TS val 2247349591 ecr 19504267], length 258: HTTP: HTTP/1.1 200 OK
08:49:57.219113 IP 192.168.213.141.80 > 192.168.213.124.44296: Flags [F.], seq 259, ack 92, win 509, options [nop,nop,TS val 2247349591 ecr 19504267], length 0
08:49:57.219114 IP 192.168.213.124.44296 > 192.168.213.141.80: Flags [.], ack 259, win 237, options [nop,nop,TS val 19504268 ecr 2247349591], length 0
08:49:57.219318 IP 192.168.213.124.44296 > 192.168.213.141.80: Flags [F.], seq 92, ack 260, win 237, options [nop,nop,TS val 19504268 ecr 2247349591], length 0
08:49:57.219380 IP 192.168.213.141.80 > 192.168.213.124.44296: Flags [.], ack 93, win 509, options [nop,nop,TS val 2247349591 ecr 19504268], length 0
08:50:00.225258 IP 192.168.213.124.39778 > 192.168.213.123.80: Flags [S], seq 3364298389, win 29200, options [mss 1460,sackOK,TS val 19507273 ecr 0,nop,wscale 7], length 0
08:50:00.225311 IP 192.168.213.123.80 > 192.168.213.124.39778: Flags [R.], seq 0, ack 3364298390, win 0, length 0
08:50:00.225530 IP 192.168.213.124.44302 > 192.168.213.141.80: Flags [S], seq 1639196711, win 29200, options [mss 1460,sackOK,TS val 19507274 ecr 0,nop,wscale 7], length 0
08:50:00.225608 IP 192.168.213.141.80 > 192.168.213.124.44302: Flags [S.], seq 1547610895, ack 1639196712, win 65160, options [mss 1460,sackOK,TS val 2247352597 ecr 19507274,nop,wscale 7], length 0
08:50:00.225725 IP 192.168.213.124.44302 > 192.168.213.141.80: Flags [.], ack 1, win 229, options [nop,nop,TS val 19507274 ecr 2247352597], length 0
08:50:00.225914 IP 192.168.213.124.44302 > 192.168.213.141.80: Flags [P.], seq 1:92, ack 1, win 229, options [nop,nop,TS val 19507274 ecr 2247352597], length 91: HTTP: GET /api/ HTTP/1.0
08:50:00.225917 IP 192.168.213.141.80 > 192.168.213.124.44302: Flags [.], ack 92, win 509, options [nop,nop,TS val 2247352598 ecr 19507274], length 0
08:50:00.226189 IP 192.168.213.141.80 > 192.168.213.124.44302: Flags [P.], seq 1:259, ack 92, win 509, options [nop,nop,TS val 2247352598 ecr 19507274], length 258: HTTP: HTTP/1.1 200 OK
08:50:00.226318 IP 192.168.213.141.80 > 192.168.213.124.44302: Flags [F.], seq 259, ack 92, win 509, options [nop,nop,TS val 2247352598 ecr 19507274], length 0
08:50:00.226321 IP 192.168.213.124.44302 > 192.168.213.141.80: Flags [.], ack 259, win 237, options [nop,nop,TS val 19507274 ecr 2247352598], length 0
08:50:00.226595 IP 192.168.213.124.44302 > 192.168.213.141.80: Flags [F.], seq 92, ack 260, win 237, options [nop,nop,TS val 19507274 ecr 2247352598], length 0
08:50:00.226598 IP 192.168.213.141.80 > 192.168.213.124.44302: Flags [.], ack 93, win 509, options [nop,nop,TS val 2247352598 ecr 19507274], length 0

#总结:
可以通过上述发现,他是通过懒惰性的三次握手实现web_server的健康检查,即有客户访问时,会通过发送arp报文,去建立连接,若无法建立则访问集群中其余的主机,有成功建立连接的主机,则返回内容;是按照upstream列表中的排列顺序为访问顺序;如果有设置weight参数,则看设置的权重去访问;为了避免故障主机占用资源可以设置max_fails参数对健康探测进行限制,当到达限制时将自动禁用该主机,也可以设置fail_timeout值对已禁用的主机进行周期性的探测,已达到自动恢复的目的;
反向代理:一致性哈希算法
#原理说明:
当用户访问代理服务器时,将根据当前哈希的方式对其进行哈希运算,结果的值将于2^32次方进行取模运行,最终将结果放到一个哈希环中,(哈希环将从0~2^32次方顺序排列数字);此时根据后端所有的服务器的IP进行哈希运算的到结果与2^32次方进行取模,并放入哈希环中,此时根据客户访问所得的哈希环中的值与后端服务器计算出的哈希环中的值按照顺序进行距离对比,相对距离近的后端服务器进行客户端请求处理;
#哈希环偏斜处理方式
给的web服务器的IP增加权重,此时会根据增加的权重值去给每台web_server创建相对应数量的虚拟IP,同时进行哈希运算与取模运算,最终分布在哈希环中,此时在根据顺序进行距离计算,最终决定请求处理的web服务器;
#参数说明:
hash $request_uri consistent; #基于用户请求的uri做hash
hash $cookie_sessionid  #基于cookie中的sessionid这个key进行hash调度,实现会话绑定,缺陷:当原机器故障,因为新机器无该sessionid,故原有会话会丢失;
实践配置
http {
    include       mime.types;
    default_type  application/octet-stream;
    upstream Test {
        #配置一致性哈希-通过Uri地址
        hash $request_uri consistent;
        #通过cookie consistent;
        hash $cookie_sessionid consistent;
        #后端web server IP地址
        server 192.168.213.123:80 max_fails=3 fail_timeout=30s max_conns=10 weight=3;
        server 192.168.213.141:80 max_fails=3 fail_timeout=30s max_conns=10 weight=2;
        server 192.168.213.142:80 max_fails=3 fail_timeout=30s max_conns=10;
    }
	...
	include       /apps/nginx/conf/conf.d/*.conf;
}
NGINX实现四层负载均衡
Nginx在1.9.0版本开始支持tcp模式的负载均衡,在1.9.13版本开始支持udp协议的负载,udp主要用于DNS的域名解析,其配置方式和指令和http 代理类似,其基于ngx_stream_proxy_module模块实现tcp负载,另外基于模块ngx_stream_upstream_module实现后端服务器分组转发、权重分配、状态监测、调度算法等高级功能。
如果编译安装,需要指定 --with-stream 选项才能支持ngx_stream_proxy_module模块
#确认是否添加 --with-stream
nginx -V |& grep “ --with-stream”
#未添加则添加
cd ../../apps/nginx/nginx-1.20.2/
./configure  $(nginx -V |& sed -rn "s/^config.*: (.*)/\1/p")--with-stream --with-stream_ssl_module --with-stream_realip_module
make && make install
官方文档
https://nginx.org/en/docs/stream/ngx_stream_proxy_module.html
http://nginx.org/en/docs/stream/ngx_stream_upstream_module.html
配置说明
stream { #定义stream相关的服务;Context:main
	upstream Test { #定义后端服务器
	hash $remote_addr consistent; #定义调度算法
	server 后端服务器IP地址:端口 weight=5; #定义具体server
	server 后端服务器IP地址:端口 max_fails=3 fail_timeout=30s;
	server unix:/tmp/backend3;

	server {
		listen 8080;		#监听端口(默认基于TCP,若需要基于UDP则 listen 8080 udp;)
		proxy_pass Test;  #将请求转发到对应的后端服务器上
	}
}
配置实例:反向代理mysql
#主机环境
proxy_Server 192.168.213.124/24
mysql_Server01 192.168.213.191/24
mysql_Server01 192.168.213.192/24
client 192.168.213.121/24

#代理服务器配置
stream {
	upstream Mysql {
	hash $remote_addr consistent;
	server 192.168.213.191:3306 weight=5;
	server 92.168.213.192:3306 max_fails=3 fail_timeout=30s;
	}
	server {
		listen 3306;
      proxy_timeout 15s;
		proxy_pass mysql;
	}
}


##mysql_Server配置
#mysql-8.0安装请参考:
https://blog.csdn.net/qq_41960479/article/details/123859306
#mysql-5.7安装请参考:
https://blog.csdn.net/qq_41960479/article/details/123859290
#创建远程连接用户
mysql -u root -p"Redhat@2022" -e "create user proxy@'192.168.213.%' identified by '123456';"
#查看是否成功创建
mysql -u root -p"Redhat@2022" -e select user,host from mysql.user;
+---------------+---------------+
| user          | host          |
+---------------+---------------+
| proxy         | 192.168.213.% |
| mysql.session | localhost     |
| mysql.sys     | localhost     |
| root          | localhost     |
+---------------+---------------+
4 rows in set (0.00 sec)


##测试
#在代理服务器上查看是否开启3306端口监听
[root@Nginx-Server conf 20:49]$ss -ntl|grep "3306"
LISTEN     0      128          *:3306                     *:*
#在客户端上安装mysql-client并连接mysql
apt -y install mysql-client
mysql -u proxy -p"123456“ -h 192.168.213.124 -e "select @@hostname;"
[root@ubuntu-Test01 ~ 05:11]$mysql -u proxy -p123456 -h 192.168.213.124 -e "select @@hostname"
+------------+
| @@hostname |
+------------+
| Mysql01    |
+------------+
[root@ubuntu-Test01 ~ 05:11]$mysql -u proxy -p123456 -h 192.168.213.124 -e "select @@hostname"
+------------+
| @@hostname |
+------------+
| Mysql02    |
+------------+


 1554
1554


 被折叠的 条评论
为什么被折叠?
被折叠的 条评论
为什么被折叠?
 到【灌水乐园】发言


