


一、环境搭建
1.下载RabbitMQ
RabbitMQ由Erlang语言开发,Erlang语言用于并发及分布式系统的开发,在电信领域应用广泛,OTP(Open
Telecom Platform)作为Erlang语言的一部分,包含了很多基于Erlang开发的中间件及工具库,安装RabbitMQ需
要安装Erlang/OTP,并保持版本匹配,如下图:
RabbitMQ的下载地址:http://www.rabbitmq.com/download.html
2.下载erlang
地址如下:
http://erlang.org/download/otp_win64_20.3.exe
3.安装
先安装erlang再安装RabbitMQ
4.启动管理插件
rabbitmq-plugins.bat enable rabbitmq_management
访问 http://localhost:15672/#/
登录用户名密码都是guest
二、创建工程
两个工程一个Consumer一个Producer,生产者负责发送消息,消费者负责监听队列取消息
1.导入依赖
 <dependencies>
        <dependency>
            <groupId>com.rabbitmq</groupId>
            <artifactId>amqp-client</artifactId>
            <version>5.7.3</version>
        </dependency>
        <dependency>
            <groupId>org.springframework.boot</groupId>
            <artifactId>spring-boot-starter-logging</artifactId>
        </dependency>
    </dependencies>
2.Producer
public class Producer01 {
private static final String QUEUE = "HelloWorld";//队列名称
public static void main(String[] args) throws IOException, TimeoutException {
//创建连接工厂
ConnectionFactory connectionFactory = new ConnectionFactory();
//设置工厂
connectionFactory.setHost("127.0.0.1");
connectionFactory.setPort(5672);
connectionFactory.setUsername("root");
connectionFactory.setPassword("root");
connectionFactory.setVirtualHost("/");
Connection connection = null;
Channel channel = null;
try {
//创建连接
connection = connectionFactory.newConnection();
//建立管道
channel = connection.createChannel();
//声明队列
//1.队列名称
//2.是否持久化
//3.是否独占队列
//4.是否自动删除
//5.参数
channel.queueDeclare(QUEUE, true, false, false, null);
//发送消息
String message = "我是Uncle哎哎,你好RabbitMQ " + System.currentTimeMillis();
//1.交换机名称
//2.队列名称
//3.参数
//4.消息
channel.basicPublish("", QUEUE, null, message.getBytes());
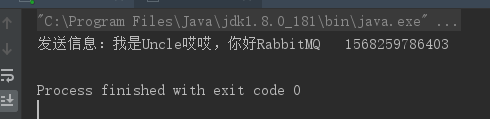
System.out.println("发送信息:" + message);
} catch (Exception e) {
e.printStackTrace();
} finally {
//释放连接
if (channel != null) {
channel.close();
}
if (connection != null) {
connection.close();
}
}
}
}
3.Consumer
public class Consumer01{
private static final String QUEUE = "HelloWorld";
public static void main(String[] args) throws IOException, TimeoutException {
//连接工厂
ConnectionFactory connectionFactory = new ConnectionFactory();
connectionFactory.setHost("127.0.0.1");
connectionFactory.setPort(5672);
Connection connection = connectionFactory.newConnection();
Channel channel = connection.createChannel();
//声明队列
channel.queueDeclare(QUEUE, true, false, false, null);
//创建消费者
DefaultConsumer consumer = new DefaultConsumer(channel) {
@Override
public void handleDelivery(String consumerTag, Envelope envelope,
AMQP.BasicProperties properties, byte[] body) throws IOException {
super.handleDelivery(consumerTag, envelope, properties, body);
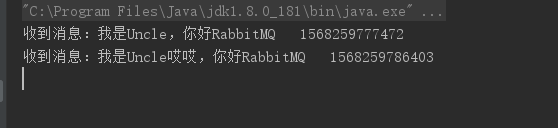
System.out.println("收到消息:" + new String(body, "UTF-8"));
}
};
//绑定队列,消费者
channel.basicConsume(QUEUE, true, consumer);
}
}
4.测试
三、总结
1、发送端操作流程
1)创建连接
2)创建通道
3)声明队列
4)发送消息
2、接收端
1)创建连接
2)创建通道
3)声明队列
4)监听队列
5)接收消息
6)ack回复


 179
179


 被折叠的 条评论
为什么被折叠?
被折叠的 条评论
为什么被折叠?
 到【灌水乐园】发言


