


目录
WebSocket简介
1. 概念
WebSocket是HTML5开始提供的一种在单个TCP连接上进行全双工通讯的协议,是应用层第七层上的一个应用层协议,能更好的节省服务器资源和带宽,并且能够更实时地进行通讯。
2. 特点
WebSocket 使得客户端和服务器之间的数据交换变得更加简单,允许服务端主动向客户端推送数据,在WebSocket API中,浏览器和服务器只需要完成一次握手,两者之间就直接可以创建持久性的连接,并进行双向数据传输。
3. 解决的问题
在之前给某个系统实现实时推送技术,或者实现二维码是否被扫描的检测,最先想到的技术的Ajax轮询。这种方式浏览器需要不断的向服务器发出请求,显然这样会浪费很多的带宽等资源。因此WebSocket这种全双工通讯协议的技术,能更好的节省服务器资源和带宽,并且能够更实时地进行通讯。
4. WebSocket和Socket的区别与联系
-
Socket 其实并不是一个协议。它工作在 OSI 模型会话层(第五层),是为了方便大家直接使用更底层协议(一般是 TCP 或 UDP )而存在的一个抽象层。Socket是对TCP/IP协议的封装,Socket本身并不是协议,而是一个调用接口(API)。
-
Socket通常也称作”套接字”,用于描述IP地址和端口,是一个通信链的句柄。网络上的两个程序通过一个双向的通讯连接实现数据的交换,这个双向链路的一端称为一个Socket,一个Socket由一个IP地址和一个端口号唯一确定。应用程序通常通过”套接字”向网络发出请求或者应答网络请求。
-
Socket在通讯过程中,服务端监听某个端口是否有连接请求,客户端向服务端发送连接请求,服务端收到连接请求向客户端发出接收消息,这样一个连接就建立起来了。客户端和服务端也都可以相互发送消息与对方进行通讯,直到双方连接断开。

5. 使用场景
- 社交聊天:最著名的就是微信,QQ,这一类社交聊天的app,这一类聊天app的特点是低延迟,高即时。
- 弹幕:发弹幕需要实时显示,也需要和聊天一样,需要即时。
- 协同编辑:在浏览器中编辑表格,文档等功能需要实时操作并显示。
- 视频会议、多人游戏等实现。。。
WebSocket的实现
本次的WebSocket就以一个简单的多人在线聊天的功能demo来实现。
实现的功能有:
- 简单等登录
- 在线人数实时统计
- 聊天消息的接收与推送
- 消息发送与清屏
实现的技术:
- springboot集成WebSocket
- 客户端使用js与服务端建立WebSocket连接
SpringBoot整合WebSocket
1. pom.xml引入jar包
<dependencies>
        <dependency>
            <groupId>org.springframework.boot</groupId>
            <artifactId>spring-boot-starter-web</artifactId>
        </dependency>
        <!--集成WebSocket-->
        <dependency>
            <groupId>org.springframework.boot</groupId>
            <artifactId>spring-boot-starter-websocket</artifactId>
        </dependency>
        <!--thymeleaf模板引擎-->
        <dependency>
            <groupId>org.springframework.boot</groupId>
            <artifactId>spring-boot-starter-thymeleaf</artifactId>
        </dependency>
        <!--Webjars版本定位工具-->
        <dependency>
            <groupId>org.webjars</groupId>
            <artifactId>webjars-locator-core</artifactId>
        </dependency>
        <dependency>
            <groupId>org.webjars.npm</groupId>
            <artifactId>mdui</artifactId>
            <version>0.4.0</version>
        </dependency>
        <dependency>
            <groupId>org.webjars</groupId>
            <artifactId>jquery</artifactId>
            <version>3.3.1</version>
        </dependency>
        <dependency>
            <groupId>org.springframework.boot</groupId>
            <artifactId>spring-boot-devtools</artifactId>
            <scope>runtime</scope>
        </dependency>
        <!--json转换工具-->
        <dependency>
            <groupId>com.alibaba</groupId>
            <artifactId>fastjson</artifactId>
            <version>1.2.49</version>
        </dependency>
        <dependency>
            <groupId>org.springframework.boot</groupId>
            <artifactId>spring-boot-starter-test</artifactId>
            <scope>test</scope>
        </dependency>
    </dependencies>
2. 注入WebSocket配置类
WebSocketConfig.java
package cn.kt.chat;

import org.springframework.context.annotation.Bean;
import org.springframework.context.annotation.Configuration;
import org.springframework.web.socket.server.standard.ServerEndpointExporter;

@Configuration
public class WebSocketConfig {

    /**
     * 用于扫描和注册所有携带ServerEndPoint注解的实例。
     */
    @Bean
    public ServerEndpointExporter serverEndpointExporter() {

        return new ServerEndpointExporter();
    }
}
3. 消息实体类
Message.java
package cn.kt.chat;

import com.alibaba.fastjson.JSON;

/**
 * WebSocket 聊天消息类
 */
public class Message {

    public static final String ENTER = "ENTER";
    public static final String SPEAK = "SPEAK";
    public static final String QUIT = "QUIT";

    private String type;//消息类型

    private String username; //发送人

    private String msg; //发送消息

    private int onlineCount; //在线用户数

    public static String jsonStr(String type, String username, String msg, int onlineTotal) {
        return JSON.toJSONString(new Message(type, username, msg, onlineTotal));
    }

    public Message(String type, String username, String msg, int onlineCount) {
        this.type = type;
        this.username = username;
        this.msg = msg;
        this.onlineCount = onlineCount;
    }
    // 省略 get、set方法
4. WebSocket服务处理类
WebSocketChatServer.java
package cn.kt.chat;

import com.alibaba.fastjson.JSON;
import org.springframework.stereotype.Component;
import javax.websocket.*;
import javax.websocket.server.ServerEndpoint;
import java.io.IOException;
import java.util.Map;
import java.util.concurrent.ConcurrentHashMap;

/**
 * WebSocket 聊天服务端
 *
 * @see ServerEndpoint WebSocket服务端 需指定端点的访问路径
 * @see Session   WebSocket会话对象 通过它给客户端发送消息
 */

@Component
@ServerEndpoint("/chat")
public class WebSocketChatServer {
    /**
     * 全部在线会话  PS: 基于场景考虑 这里使用线程安全的Map存储会话对象。
     */
    private static Map<String, Session> onlineSessions = new ConcurrentHashMap<>();

    /**
     * 当客户端打开连接:1.添加会话对象 2.更新在线人数
     */
    @OnOpen
    public void onOpen(Session session) {
        onlineSessions.put(session.getId(), session);
        sendMessageToAll(Message.jsonStr(Message.ENTER, "", "", onlineSessions.size()));
    }

    /**
     * 当客户端发送消息:1.获取它的用户名和消息 2.发送消息给所有人
     * <p>
     * PS: 这里约定传递的消息为JSON字符串 方便传递更多参数!
     */
    @OnMessage
    public void onMessage(Session session, String jsonStr) {
        Message message = JSON.parseObject(jsonStr, Message.class);
        sendMessageToAll(Message.jsonStr(Message.SPEAK, message.getUsername(), message.getMsg(), onlineSessions.size()));
    }

    /**
     * 当关闭连接:1.移除会话对象 2.更新在线人数
     */
    @OnClose
    public void onClose(Session session) {
        onlineSessions.remove(session.getId());
        sendMessageToAll(Message.jsonStr(Message.QUIT, "", "", onlineSessions.size()));
    }

    /**
     * 当通信发生异常:打印错误日志
     */
    @OnError
    public void onError(Session session, Throwable error) {
        error.printStackTrace();
    }

    /**
     * 公共方法:发送信息给所有人
     */
    private static void sendMessageToAll(String msg) {
        onlineSessions.forEach((id, session) -> {
            try {
                session.getBasicRemote().sendText(msg);
            } catch (IOException e) {
                e.printStackTrace();
            }
        });
    }
}
5. ChatController几个接口
ChatController.java
package cn.kt.chat;

import org.springframework.stereotype.Controller;
import org.springframework.web.bind.annotation.GetMapping;
import org.springframework.web.servlet.ModelAndView;
import org.thymeleaf.util.StringUtils;

import javax.servlet.http.HttpServletRequest;
import java.net.InetAddress;
import java.net.UnknownHostException;

/**
 * Created by tao.
 * Date: 2021/12/6 11:33
 * 描述:
 */
@Controller
public class ChatController {

    /**
     * 登陆界面
     */
    @GetMapping("/")
    public ModelAndView login() {
        return new ModelAndView("/login");
    }

    /**
     * 聊天界面
     */
    @GetMapping("/index")
    public ModelAndView index(String username, String password, HttpServletRequest request) throws UnknownHostException {
        if (StringUtils.isEmpty(username)) {
            username = "匿名用户";
        }
        ModelAndView mav = new ModelAndView("/chat");
        mav.addObject("username", username);
        mav.addObject("webSocketUrl", "ws://" + InetAddress.getLocalHost().getHostAddress() + ":" + request.getServerPort() + request.getContextPath() + "/chat");
        return mav;
    }
}
至此,简单的SpringBoot集成WebSocket,实现简单的聊天通信服务整合成功,接下来是客户端。
WebSocket客户端js实现
js实现客户端与服务端通信的步骤:
- 配置 WebSocket,与服务器建立连接:
var webSocket = new WebSocket([${webSocketUrl}]); - 通过回调函数来接收服务端消息。
当服务端打开连接:webSocket.onopen
当服务端发来消息:webSocket.onmessage - 通过send方法来发送消息给服务端:
webSocket.send() - 关闭连接:
webSocket.onclose - 通信失败:
webSocket.onerror
1. 简单的登录页面
login.html
<!DOCTYPE html>
<html xmlns:th="http://www.thymeleaf.org">
<head>
    <title>登陆聊天</title>
    <script th:src="@{/webjars/jquery/jquery.min.js}"></script>
    <style>
        *, *:after, *:before {
            -webkit-box-sizing: border-box;
            box-sizing: border-box;
        }

        body {
            background: #383a3c url('/img/login-bg.jpg');
            font-weight: 400;
            font-size: 1em;
            line-height: 1.25;
            font-family: 'Raleway', Calibri, Arial, sans-serif;
        }

        a, button {
            outline: none;
        }

        a {
            color: #566473;
            text-decoration: none;
        }

        a:hover, a:focus {
            color: #34495e;
        }

        section {
            padding: 1em;
            text-align: center;
        }

        .logo_box {
            width: 400px;
            height: 500px;
            padding: 35px;
            color: #EEE;
            position: absolute;
            left: 50%;
            top: 50%;
            margin-left: -200px;
            margin-top: -250px;
        }

        .logo_box h3 {
            text-align: center;
            height: 20px;
            font: 20px "microsoft yahei", Helvetica, Tahoma, Arial, "Microsoft jhengHei", sans-serif;
            color: #FFFFFF;
            line-height: 20px;
            padding: 0 0 35px 0;
        }

        .input_outer {
            height: 46px;
            padding: 0 5px;
            margin-bottom: 30px;
            border-radius: 50px;
            position: relative;
            border: rgba(255, 255, 255, 0.2) 2px solid !important;
        }

        .u_user {
            width: 25px;
            height: 25px;
            background-position: -125px 0;
            position: absolute;
            margin: 10px 13px;
        }

        .us_uer {
            width: 25px;
            height: 25px;
            background-position: -125px -34px;
            position: absolute;
            margin: 10px 13px;
        }

        .text {
            width: 220px;
            height: 46px;
            outline: none;
            display: inline-block;
            font: 14px "microsoft yahei", Helvetica, Tahoma, Arial, "Microsoft jhengHei";
            margin-left: 50px;
            border: none;
            background: none;
            line-height: 46px;
        }

        .mb2 {
            margin-bottom: 20px;
            cursor: pointer;
        }

        .mb2 a {
            text-decoration: none;
            outline: none;
        }

        .submit {
            padding: 15px;
            margin-top: 20px;
            display: block;
            color: #FFFFFF
        }

        .act-but {
            line-height: 20px;
            text-align: center;
            font-size: 20px;
            border-radius: 50px;
            background: #0096e6;
        }

        #username {
            color: #FFFFFF !important
        }

        #password {
            color: #FFFFFF !important;
            position: absolute;
            z-index: 100;
        }

    </style>
</head>
<body>
<div class="logo_box">
    <h3>登录聊天</h3>
    <form>
        <div class="input_outer">
            <span class="u_user"></span>
            <input id="username" name="username" class="text" type="text" placeholder="任意中文名">
        </div>
        <div class="input_outer">
            <span class="us_uer"></span>
            <input id="password" name="password" class="text" type="password" placeholder="任意密码">
        </div>
        <div class="mb2">
            <a class="act-but submit" onclick="login()">登录</a>
        </div>
    </form>
</div>

<script>

    /**
     * 登陆聊天
     */
    function login() {
        location.href = '/index?username='+$('#username').val();
    }

    /**
     * 使用ENTER登陆
     */
    document.onkeydown = function (event) {
        var e = event || window.event || arguments.callee.caller.arguments[0];
        e.keyCode === 13 && login();
    };
</script>
</body>
</html>
2. 聊天室通信页面
<!DOCTYPE html>
<html xmlns:th="http://www.thymeleaf.org">
<head>
<title>WebSocket简单聊天室</title>
<meta charset="utf-8" name="viewport" content="width=device-width">
<link rel="stylesheet" th:href="@{/webjars/mdui/dist/css/mdui.css}">
<script th:src="@{/webjars/jquery/jquery.min.js}"></script>
<script th:src="@{/webjars/mdui/dist/js/mdui.js}"></script>
</head>
<body class="mdui-theme-primary-indigo mdui-theme-accent-pink">
<div class="mdui-container">
<div class="mdui-toolbar mdui-color-theme">
<a class="mdui-btn mdui-btn-icon"><i class="mdui-icon material-icons">menu</i></a>
<span class="mdui-typo-title">简单聊天室</span>
<div class="mdui-toolbar-spacer"></div>
<a class="mdui-btn mdui-btn-icon" href="https://www.jianshu.com/p/964370d9374e" target="_blank"><i
class="mdui-icon material-icons">search</i></a>
<a class="mdui-btn mdui-btn-icon" th:href="@{/}"><i
class="mdui-icon material-icons">exit_to_app</i></a>
<a class="mdui-btn mdui-btn-icon"><i class="mdui-icon material-icons">more_vert</i></a>
</div>
</div>
<div>
<div class="mdui-container container_text">
<div class="mdui-row">
<div class="mdui-col-xs-12 mdui-col-sm-6">
<div class="mdui-col-xs-12 mdui-col-sm-10">
<div class="mdui-textfield-floating-label" style="margin-top:15px">
<i class="mdui-icon material-icons">欢迎:</i>
<i class="mdui-icon" id="username" th:text="${username}"></i>
</div>
</div>
<div class="mdui-col-xs-12 mdui-col-sm-10">
<div class="mdui-textfield mdui-textfield-floating-label">
<i class="mdui-icon material-icons">textsms</i>
<label class="mdui-textfield-label">发送内容</label>
<input class="mdui-textfield-input" id="msg"/>
</div>
<div class="mdui-container" style="padding:20px 35px">
<button class="mdui-btn mdui-color-theme-accent mdui-ripple"
onclick="sendMsgToServer()">发送 (enter)
</button>
<button class="mdui-btn mdui-color-theme mdui-ripple"
onclick="clearMsg()">清屏
</button>
</div>
</div>
</div>
<div class="mdui-col-xs-6 mdui-col-sm-5" style="padding:10px 0">
<div class="mdui-chip">
<span class="mdui-chip-icon mdui-color-blue">
<i class="mdui-icon material-icons"></i></span>
<span class="mdui-chip-title">聊天内容</span>
</div>
<div class="mdui-chip">
<span class="mdui-chip-icon mdui-color-blue">
<i class="mdui-icon material-icons">face</i></span>
<span class="mdui-chip-title">在线人数</span>
<span class="mdui-chip-title chat-num">0</span>
</div>
<div class="message-container">
</div>
</div>
</div>
</div>
</div>
<script th:inline="javascript">
/**
* WebSocket客户端
*
* 使用说明:
* 1、WebSocket客户端通过回调函数来接收服务端消息。例如:webSocket.onmessage
* 2、WebSocket客户端通过send方法来发送消息给服务端。例如:webSocket.send();
*/
function getWebSocket() {
/**
* 配置 WebSocket
* WebSocket客户端 PS:URL开头表示WebSocket协议 中间是域名端口 结尾是服务端映射地址
*/
var webSocket = new WebSocket(/*[[${webSocketUrl}]]*/ 'ws://localhost:8080/chat');
/**
* 当服务端打开连接
*/
webSocket.onopen = function (event) {
console.log('WebSocket打开连接');
};
/**
* 当服务端发来消息:1.广播消息 2.更新在线人数
*/
webSocket.onmessage = function (event) {
console.log('WebSocket收到消息:%c' + event.data, 'color:green');
//获取服务端消息
var message = JSON.parse(event.data) || {};
var $messageContainer = $('.message-container');
//更新发言
if (message.type === 'SPEAK') {
$messageContainer.append(
'<div class="mdui-card" style="margin: 10px 0;">' +
'<div class="mdui-card-primary">' +
'<div class="mdui-card-content message-content">' + message.username + ":" + message.msg + '</div>' +
'</div></div>');
}
$('.chat-num').text(message.onlineCount);
//防止刷屏
var $cards = $messageContainer.children('.mdui-card:visible').toArray();
if ($cards.length > 5) {
$cards.forEach(function (item, index) {
index < $cards.length - 5 && $(item).slideUp('fast');
});
}
};
/**
* 关闭连接
*/
webSocket.onclose = function (event) {
console.log('WebSocket关闭连接');
};
/**
* 通信失败
*/
webSocket.onerror = function (event) {
console.log('WebSocket发生异常');
};
return webSocket;
}
var webSocket = getWebSocket();
/**
* 通过WebSocket对象发送消息给服务端
*/
function sendMsgToServer() {
var $message = $('#msg');
if ($message.val()) {
webSocket.send(JSON.stringify({username: $('#username').text(), msg: $message.val()}));
$message.val(null);
}
}
/**
* 清屏
*/
function clearMsg() {
$(".message-container").empty();
}
/**
* 使用ENTER发送消息
*/
document.onkeydown = function (event) {
var e = event || window.event || arguments.callee.caller.arguments[0];
e.keyCode === 13 && sendMsgToServer();
};
</script>
</body>
</html>
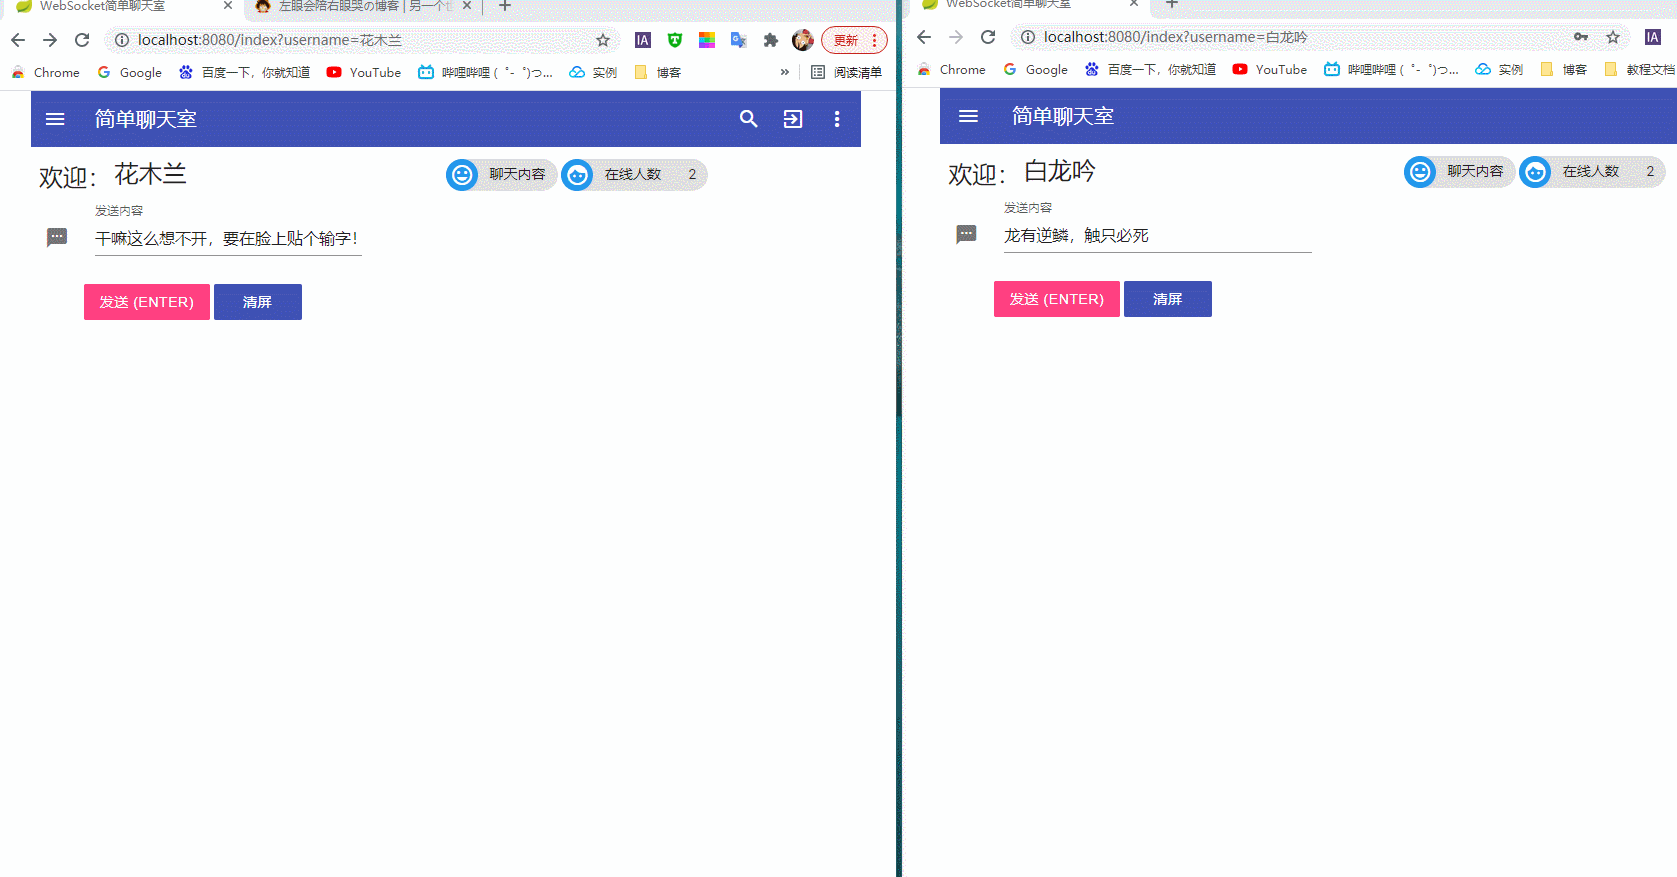
3. 效果测试
源码下载
链接:https://pan.baidu.com/s/18do4jeuuv3HXvBrUj84XNg
提取码:0bat
小结
WebSocket其实很早之前就接触过了,记得之前是做了一个微信点餐系统,微信客户端用户下单后,要实时给卖家的后台系统中发送消息通知,并响应查询订单的语音,,这就需要使用到WebSocket通讯。WebSocket的使用并不复杂,主要是要正确的场景正确使用,并搞明白和Socket的区别。


 2840
2840


 被折叠的 条评论
为什么被折叠?
被折叠的 条评论
为什么被折叠?
 到【灌水乐园】发言


