


 本文详细介绍了TensorFlow中图像数据的处理,包括TFrecord输入格式,图像解码编码、大小调整、翻转和色彩调整等。此外,还探讨了多线程输入数据处理框架,如输入文件队列、批量数据处理和数据集的使用,以提升模型训练效率。
1 TFrecord输入数据格式
2 图像处理函数
2.1 图像的解码与编码
import matplotlib.pyplot as plt
import tensorflow as tf

image_raw_data = tf.gfile.GFile("pictures/123.jpg", 'rb').read()

with tf.Session() as sess:
    # 对图像进行jpge的格式解码从而得到图像对应的三维矩阵
    img_data = tf.image.decode_jpeg(image_raw_data)

    print(img_data.eval())

    # 使用pyplot工具可视化得到的图像
    plt.imshow(img_data.eval())
    plt.show()

    # 将图像的三维矩阵重新按照jpeg格式编码
    encoded_image = tf.image.encode_jpeg(img_data)
    with tf.gfile.GFile("pictures/output.jpg", "wb") as f:
        f.write(encoded_image.eval())

2.2 图像大小调整
import matplotlib.pyplot as plt
import tensorflow as tf

image_raw_data = tf.gfile.GFile("pictures/123.jpg", 'rb').read()

with tf.Session() as sess:
    image_data = tf.image.decode_jpeg(image_raw_data)
    # 将图像数据转化为实数类型,大多数api使用实数进行处理
    image_data = tf.image.convert_image_dtype(image_data, dtype=tf.float32)

    # 通过tf.image.resize_images 函数调整图像的大小
    resized = tf.image.resize_images(image_data, [300, 300], method=0)

    plt.imshow(resized.eval())
    plt.show()
tf.image.resize_images函数中method参数取值:(以下超链接为维基百科)
0 双线性插值
1 最近邻居法
2 双三次插值法
3 面积插值法
使用 tf.image.resize_image_with_crop_or_pad 裁剪或者扩充图像(居中裁剪、周边填零)
croped = tf.image.resize_image_with_crop_or_pad(image_data, 600, 600)
padded = tf.image.resize_image_with_crop_or_pad(image_data, 1200, 1200)


也可以使用 tf.image.crop_to_bounding_box函数和 tf.image.pad_to _bounding_box函数来裁剪或者填充给定区域的图像。
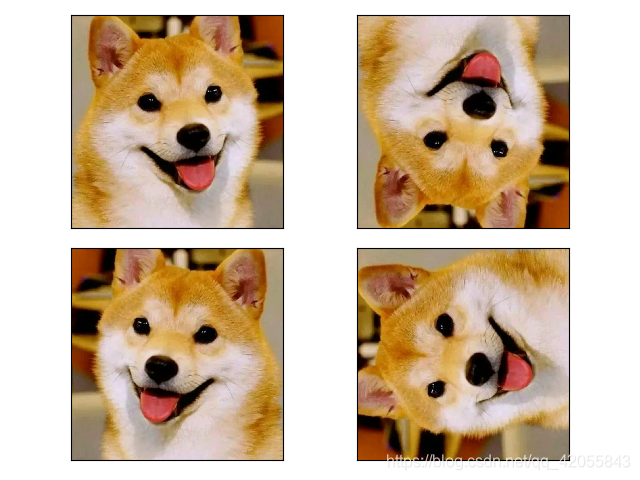
2.3 图像翻转
import matplotlib.pyplot as plt
import tensorflow as tf

image_raw_data = tf.gfile.GFile("pictures/123.jpg", 'rb').read()

with tf.Session() as sess:
    image_data = tf.image.decode_jpeg(image_raw_data)
    # 将图像数据转化为实数类型,大多数api使用实数进行处理
    image_data = tf.image.convert_image_dtype(image_data, dtype=tf.float32)

    # 通过tf.image.resize_images 函数调整图像的大小
    # resized = tf.image.resize_images(image_data, [300, 300], method=0)
    # croped = tf.image.resize_image_with_crop_or_pad(image_data, 600, 600)
    # padded = tf.image.resize_image_with_crop_or_pad(image_data, 1200, 1200)

    flipped1 = tf.image.flip_up_down(image_data)
    flipped2 = tf.image.flip_left_right(image_data)
    transposed = tf.image.transpose_image(image_data)

    plt.subplot(2, 2, 1)
    plt.imshow(image_data.eval())
    plt.xticks([])
    plt.yticks([])

    plt.subplot(2, 2, 2)
    plt.imshow(flipped1.eval())
    plt.xticks([])
    plt.yticks([])

    plt.subplot(2, 2, 3)
    plt.imshow(flipped2.eval())
    plt.xticks([])
    plt.yticks([])

    plt.subplot(2, 2, 4)
    plt.imshow(transposed.eval())
    plt.xticks([])
    plt.yticks([])
    plt.show()
以50% 概率翻转
flipped = tf.image.random_flip_up_down(image_data)
flipped = tf.image.random_flip left_right(image_data)
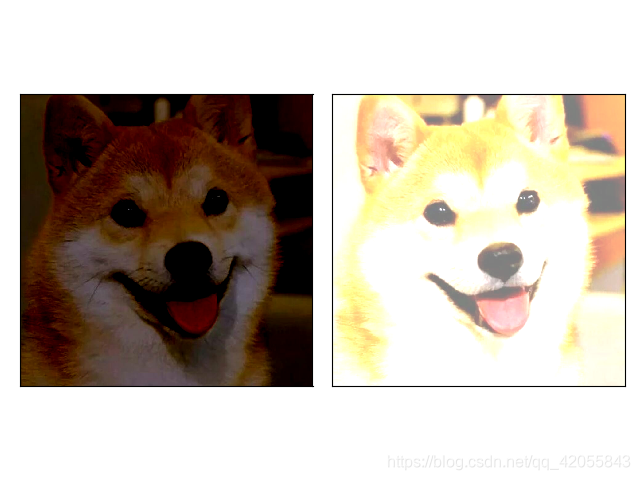
2.4 图像色彩调整
import matplotlib.pyplot as plt
import tensorflow as tf

image_raw_data = tf.gfile.GFile("pictures/123.jpg", 'rb').read()

with tf.Session() as sess:
    image_data = tf.image.decode_jpeg(image_raw_data)
    # 将图像数据转化为实数类型,大多数api使用实数进行处理
    image_data = tf.image.convert_image_dtype(image_data, dtype=tf.float32)

    # 将图像的亮度 -0.5
    adjust1 = tf.image.adjust_brightness(image_data, -0.5)
    # 将图像的亮度 + 0.5
    adjust2 = tf.image.adjust_brightness(image_data, 0.5)

    # 调整完图像的亮度后需要将图像的像素值拉回到 1.0 内才能进行可视化
    adjust1 = tf.clip_by_value(adjust1, 0.0, 1.0)
    adjust2 = tf.clip_by_value(adjust2, 0.0, 1.0)

    plt.subplot(1, 2, 1)
    plt.imshow(adjust1.eval())
    plt.xticks([])
    plt.yticks([])

    plt.subplot(1, 2, 2)
    plt.imshow(adjust2.eval())
    plt.xticks([])
    plt.yticks([])

    plt.show()
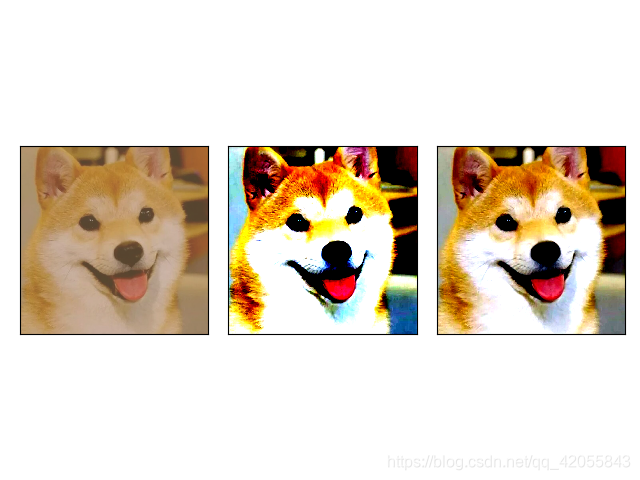
# 调整图像对比度
import matplotlib.pyplot as plt
import tensorflow as tf

image_raw_data = tf.gfile.GFile("pictures/123.jpg", 'rb').read()

with tf.Session() as sess:
    image_data = tf.image.decode_jpeg(image_raw_data)
    # 将图像数据转化为实数类型,大多数api使用实数进行处理
    image_data = tf.image.convert_image_dtype(image_data, dtype=tf.float32)

    # 将图像的对比度减少0.5倍
    adjust1 = tf.image.adjust_contrast(image_data, 0.5)
    # 将图像的对比度增加5倍
    adjust2 = tf.image.adjust_contrast(image_data, 5)
    # 将图像的对比度在随机范围调整
    adjust3 = tf.image.random_contrast(image_data, 0.1, 5)

    # 调整完图像的亮度后需要将图像的像素值拉回到 1.0 内才能进行可视化
    adjust1 = tf.clip_by_value(adjust1, 0.0, 1.0)
    adjust2 = tf.clip_by_value(adjust2, 0.0, 1.0)
    adjust3 = tf.clip_by_value(adjust3, 0.0, 1.0)

    plt.subplot(2, 2, 1)
    plt.imshow(adjust1.eval())
    plt.xticks([])
    plt.yticks([])

    plt.subplot(2, 2, 2)
    plt.imshow(adjust2.eval())
    plt.xticks([])
    plt.yticks([])

    plt.subplot(2, 2, 3)
    plt.imshow(adjust3.eval())
    plt.xticks([])
    plt.yticks([])

    plt.show()
调整色相、饱和度…
2.5 处理标注框
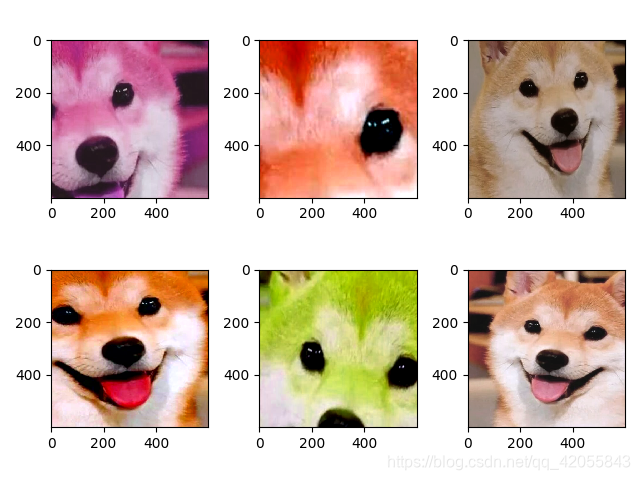
2.6 图像与处理样例
import tensorflow as tf
import numpy as np
import matplotlib.pyplot as plt

def distort_color(image, color_ordering=0):
    if color_ordering == 0:
        image = tf.image.random_brightness(image, max_delta=32./255.)
        image = tf.image.random_saturation(image, lower=0.5, upper=1.5)
        image = tf.image.random_hue(image, max_delta=0.2)
        image = tf.image.random_contrast(image,lower=0.5, upper=1.5)
    elif color_ordering == 1:
        image = tf.image.random_saturation(image, lower=0.5, upper=1.5)
        image = tf.image.random_brightness(image, max_delta=32./255.)
        image = tf.image.random_contrast(image,lower=0.5, upper=1.5)
        image = tf.image.random_hue(image, max_delta=0.2)

    return tf.clip_by_value(image, 0.0, 1.0)

def preprocess_for_train(image, height, width, bbox):
    if bbox is None:
        bbox = tf.constant([0.0, 0.0, 1.0, 1.0], dtype=tf.float32, shape=[1, 1, 4])
    # 转换图像张量的类型
    if image.dtype != tf.float32:
        image = tf.image.convert_image_dtype(image, dtype=tf.float32)

    # 随机截取图像,减小需要关注的物体大小对图像识别算法的影响
    bbox_begin, bbox_size, _ = tf.image.sample_distorted_bounding_box(tf.shape(image), bounding_boxes=bbox)
    distorted_image = tf.slice(image, bbox_begin, bbox_size)

    # 将随机截取的图像调整为神经网络输入层的大小
    distorted_image = tf.image.resize_images(distorted_image, [height, width], method=np.random.randint(4))

    # 随机左右翻转图像
    distorted_image = tf.image.random_flip_left_right(distorted_image)

    # 使用一种随机的顺序调整图像彩色
    distorted_image = distort_color(distorted_image, np.random.randint(2))
    return distorted_image

image_raw_data = tf.gfile.GFile("pictures/123.jpg", "rb").read()
with tf.Session() as sess:
    img_data = tf.image.decode_jpeg(image_raw_data)
    boxes = tf.constant([[[0.05, 0.05, 0.9, 0.7],
                          [0.35, 0.47, 0.5, 0.56]]])

# 得到图像
    for i in range(1, 7):
        plt.subplot(2, 3, i)
        result = preprocess_for_train(img_data, 600, 600, boxes)
        plt.imshow(result.eval())

    plt.show()
3 多线程输入数据处理框架
为了避免图形预处理成为神经网络模型训练效率的瓶颈,Tensorflow 提供了一套多线程处理输入数据的框架。
import tensorflow as tf

# 创建一个先进先出队列,指定队列中最多可以保存两个元素,并指定类型为整数
q = tf.FIFOQueue(2, "int32")

# 使用enqueue_many初始化队列中的元素
init = q.enqueue_many(([0, 10], ))

# 使用dequeue函数将队列中的第一个元素出对列
x = q.dequeue()

y = x + 1

# 将 y 的值重新加入对列
q_inc = q.enqueue([y])

with tf.Session() as sess:
    init.run()
    for _ in range(5):
        v, _ = sess.run([x, q_inc])
        print(v)
队列开始有[0,10]两个元素,第一个出队为 0,加 1 后再次入队为 [10, 1], 第二次出队为 10 ,加1后入队为 11, 得到的队列为[1, 11] …
tf.Coordinator主要用于协同多个线程一起停止,当某一线程调用 request_stop函数后,should_stop函数的值将被设置为True,其他的线程就可以同时停止。
import tensorflow as tf
import numpy as np
import threading
import time

def MyLoop(coord, worker_id):
    while not coord.should_stop():
        if np.random.rand() < 0.1 :
            print("Stoping form id: %d \n" % worker_id)
            coord.request_stop()
        else:
            print("Working on id: %d\n" % worker_id)
        time.sleep(1)

coord = tf.train.Coordinator()

threads = [threading.Thread(target=MyLoop, args=(coord, i, )) for i in range(5)]

for t in threads:
    t.start()

coord.join(threads)
tf.QueueRunner主要用于启动多个线程来操作同一个队列:
import tensorflow as tf

# 声明一个先进先出的队列
queue = tf.FIFOQueue(100, "float")

# 定义队列的入队操作
enqueue_op = queue.enqueue([tf.random_normal([1])])

# 使用tf.train.QueueRunner来创建多个线程运行队列的入队操作
# tf.train.QueueRunner的第一个参数给出了被操作的队列, [enqueue_op] * 5 , 表明需要启动5个线程,每个线程中运行的是enqueue_op操作
qr = tf.train.QueueRunner(queue, [enqueue_op] * 5)

tf.train.add_queue_runner(qr)

#定义出队操作
out_tensor = queue.dequeue()

with tf.Session() as sess:
    # 使用tf.train.Coordinator来协同启动的线程
    coord = tf.train.Coordinator()

    # 需要明确调用tf.train.start_queue_runners来启动所有线程
    threads = tf.train.start_queue_runners(sess=sess, coord=coord)

    # 获取队列中的取值
    for _ in range(3):
        print(sess.run(out_tensor)[0])

    coord.request_stop()
    coord.join(threads)
3.2 输入文件队列
将数据分为多个TFRecord文件来提高处理效率
3.3 组合训练数据(batching)
将多个输入样例组织成一个batch可以提高模型训练的效率。
3.4 输入数据处理框架
4 数据集(Dataset)
4.1 数据集的基本使用方法
import tensorflow as tf

# 从一个数组创建数据集
input_data = [1, 2, 3, 4, 8]
dataset = tf.data.Dataset.from_tensor_slices(input_data)

# 定义一个迭代器用于遍历数据集
iterator = dataset.make_one_shot_iterator()

# get_next() 返回代表一个输入数据的张量,类似于队列的dequeue()
x = iterator.get_next()
y = x * x

with tf.Session() as sess:
    for i in range(len(input_data)):
        print(sess.run(y))
利用数据集读取数据的三个基本步骤:
- 定义数据集的构造方法
- 定义遍历器
- 使用get_next()方法从遍历器中读取数据张量,作为计算图其他部分的输入


 被折叠的 条评论
为什么被折叠?
被折叠的 条评论
为什么被折叠?
 到【灌水乐园】发言


