


1 Spring
【强制】Spring是什么?
1) Spring是一款主流的Java EE轻量级开源框架。
轻量级:体积很小,且不需要依赖于其他组件。
2) 狭义的Spring。
Spring Framework。
3) 广义的Spring。
以Spring Framework为核心的Spring技术栈。
4) Spring的核心思想。
提供各种服务,以帮助我们简化基于POJO的Java应用程序开发。
【强制】Spring模块组成。
1) Spring Core。
spring-core、spring-beans、spring-context、spring-expression。
2) Spring AOP。
spring-aop、spring-aspects、spring-instrument。
3) Spring Data Access。
spring-jdbc、spring-orm、spring-oxm、spring-jms、spring-tx。
4) Spring Web。
spring-web、spring-webmvc、spring-websocket、spring-webflux。
5) Spring Message。
spring-messaging。
6) Spring Test。
spring-test。
2 Spring IoC
2.1 概念
【强制】IoC。
1) IoC:Inversion of Control,控制反转,是一种设计思想。
2) IoC的理念。
让别人为你服务。原先是由程序员自己来包办关于对象的一切,现在让IoC Service Provider(IoC服务提供者)来负责。
3) IoC可以给我们带来什么?
用一句话来概括就是,IoC是一种可以帮助我们解耦各业务对象间依赖关系的对象绑定方式。
【强制】DI。
1) DI:Dependency Injection,依赖注入。
和IoC是一回事,只是观察的角度不同。
2) 依赖注入的实现方式。
构造方法注入、setter方法注入。
【强制】IoC容器。
1) IoC容器是Spring对IoC Service Provider的实现。
IoC Service Provider:IoC服务提供者,是一个概念。
IoC Service Provider主要负责管理Java对象的实例化和初始化,控制对象与对象之间的依赖关系。
2) Spring提供了两种容器类型:BeanFactory和ApplicationContext。
BeanFactory是IoC容器的基本实现,提供了 对象创建管理和依赖注入服务 两种特性。
ApplicationContext是BeanFactory的子接口,在BeanFactory的基础上提供了 统一资源加载策略、国际化信息支持、容器内事件发布功能 等高级特性。
我们开发人员可以无脑选择ApplicationContext。
3) ApplicationContext接口的常用实现类。
ClassPathXmlApplicationContext。
FileSystemXmlApplicationContext。
ConfigurableApplicationContext。
WebApplicationContext。
【强制】Bean。
1) IoC容器管理的Java对象称为Spring Bean。
2) bean的作用域。
singleton:在IoC容器中有且仅有一个实例,默认。
prototype:在IoC容器中可以有多个实例,每次获取都返回一个新的实例。
request:在一个请求范围内有效。
session:在一个会话范围内有效。
3) bean的生命周期(简化版本)。
1. 创建bean。
以反射或者CGLIB动态字节码生成方式(默认后者)获得目标类实例。
以BeanWrapper对目标类实例进行包裹,返回BeanWrapper实例。
2. 给bean设置属性(包括Aware相关依赖)。
3. 调用bean的后置处理器-初始化前方法。
执行自定义的BeanPostProcessor.postProcessBeforeInitialization方法。
4. 初始化bean。
执行自定义的init-method。
5. 调用bean的后置处理器-初始化后方法。
执行自定义的BeanPostProcessor.postProcessAfterInitialization方法。
6. 使用bean。
7. 销毁bean。
关闭容器时,执行自定义的destory-method。
2.2 实践
【推荐】获取bean。
1) 配置代码。
<bean id="myBean" class="com.mypath.MyBean"></bean>2) Java代码。
ApplicationContext context =
    new ClassPathXmlApplicationContext("bean.xml");
// 1.根据ID获取bean
MyBean myBean1 = (MyBean)context.getBean("myBean");
// 2.根据类型获取bean(要求IoC容器中指定类型的bean有且仅有1个)
MyBean myBean2 = context.getBean(MyBean.class);
// 3.根据ID和类型获取bean
MyBean myBean3 = context.getBean("myBean", MyBean.class);
【推荐】依赖注入。
1) 构造方法注入。
<bean id="student" class="com.mypath.Student">
  <constructor-arg index="0" value="llxz"></constructor-arg>
  <constructor-arg index="1" ref="dream"></constructor-arg>
</bean>
<bean id="dream" class="com.mypath.Dream"></bean>
2) setter方法注入。
<bean id="student" class="com.mypath.Student">
  <property name="name" value="llxz"></property>
  <property name="dream" ref="dream"></property>
</bean>
<bean id="dream" class="com.mypath.Dream"></bean>
【强制】自动绑定。
1) 手动绑定。
使用<constructor-arg>或<property>为bean的属性注入依赖。
2) 自动绑定,也叫自动装配。
通过<bean>的autowire属性,可以指定采用何种类型的自动绑定模式。
Spring提供了5种自动绑定模式:no、byName、byType、constructor、autodetect。默认为no(手动绑定)。
3) 代码示例(byName)。
Student.book自动绑定bean book。
class Student {
    private Book book;
    public void setBook(Book book) {
        this.book = book;
    }
}

class Book {
}
<bean id="student" class="com.mypath.Student" autowire="byName"></bean>
<bean id="book" class="com.mypath.Book"></bean>【推荐】FactoryBean。
1) 简介。
FactoryBean是Spring提供的一种整合第三方框架的常用机制。配置一个FactoryBean类型的bean,在获取bean的时候得到的并不是class属性配置的类的实例,而是getObject()方法的返回值。工厂模式。
2) MyFactoryBean实现FactoryBean接口。
public class MyFactoryBean implements FactoryBean<MyBean> {
    @Override
    public MyBean getObject() throws Exception {
        return new MyBean();
    }
    @Override
    public class<?> getObjectType() {
        return MyBean.class;
    }
}
3) 配置bean。
<bean id="myBean" class="com.mypath.MyFactoryBean"></bean>4) 获取bean。
ApplicationContext context =
    new ClassPathXmlApplicationContext("spring-factorybean.xml");
MyBean myBean = (MyBean) context.getBean("myBean");
2.3 基于注解开发
【推荐】开启组件扫描。
1) 开启组件扫描。
<?xml version="1.0" encoding="UTF-8"?>
<beans xmlns="http://www.springframework.org/schema/beans"
  xmlns:xsi="http://www.w3.org/2001/XMLSchema-instance"
  xmlns:context="http://www.springframework.org/schema/context"
  xsi:schemaLocation="http://www.springframework.org/schema/beans
  http://www.springframework.org/schema/beans/spring-beans.xsd
  http://www.springframework.org/schema/context
  http://www.springframework.org/schema/context/spring-context.xsd">

  <!-- 开启组件扫描 -->
  <context:component-scan base-package="com.mypath.mypackage"/>
</beans>
2) 组件扫描的目标注解。
component-scan默认扫描的注解类型是@Component。
在@Component 语义基础上细化后的@Repository、@Service、@Controller 也同样可以被component-scan扫描到。
3) 被添加到容器的组件的命名规则。
component-scan在扫描相关类定义并将它们添加到容器时,会根据注解的value属性来生成beanName。默认的命名规则是 将类名首字母小写。
【推荐】@Autowired。
1) @Autowired 按照类型匹配进行依赖注入。
类似于byType类型的自动绑定,但它比byType更加灵活,可以标注在属性、方法、构造方法、构造方法参数上。
2) @Autowired 扫描。
IoC容器需要某种方式来了解哪些对象标注了@Autowired,component-scan对此提供了支持。
3) @Qualifier。
如果用byType方式同时找到多个同类型的对象实例,可以使用注解@Qualifier 对依赖注入的条件做进一步限定。
@Qualifier 是byName自动绑定的注解版,可以单独使用,也可以和@Autowired 一起使用。
【推荐】@Resource。
1) @Resource 是JDK扩展包提供的注解,更加具有通用性。
除非是JDK 8,否则需要引入依赖。
<dependency>
  <groupId>jakarta.annotation</groupId>
  <artifactId>jakarta.annotation-api</artifactId>
  <version>2.1.1</version>
</dependency>
2) @Resource 默认byName,未指定name时会使用属性名作为name。通过name找不到的话会尝试byType。
3) @Resource 用在属性、setter方法上。
【推荐】全注解开发。
全注解开发就是不再使用Spring配置文件了,写一个配置类来代替配置文件。
import org.springframework.context.annotation.ComponentScan;
import org.springframework.context.annotation.Configuration;

@Configuration
@ComponentScan("com.mypath.mypackage")
public class MyConfig {
}
3 Spring AOP
3.1 概念
【强制】AOP。
1) AOP:Aspect-Oriented Programming,面向方面编程。
2) AOP可以给我们带来什么?
使用AOP,我们可以对类似于日志记录和安全检查等系统需求进行模块化的组织。
3) AOP的实现机制。
AOP的实现机制有动态代理、动态字节码增强、自定义类加载器、AOL扩展等。
在Spring AOP中,在目标类实现了一些接口的情况下,使用基于接口的动态代理技术,否则使用基于类的CGLIB动态字节码增强技术。
【强制】动态字节码增强。
通常的class文件都是从Java源代码文件使用Javac编译器编译而成的,但只要符含Java class规范,我们也可以使用ASM或者CGLIB等Java工具库,在程序运行期间,动态构建字节码的class文件。
在此前提下,我们可以为需要织入横切逻辑的模块类在运行期间,通过动态字节码增强技术,为这些系统模块类生成相应的子类,而将横切逻辑加到这些子类中,让应用程序在执行期间使用的是这些动态生成的子类,从而达到将横切逻辑织入系统的目的。
不过,如果需要扩展的类以及类中的实例方法等声明为final的话,则无法对其进行子类化的扩展。
Spring AOP在无法采用动态代理机制进行AOP功能扩展的时候,会使用CGLIB库的动态字节码增强支持来实现AOP的功能扩展。
【强制】AOP基本概念。
1) Joinpoint。
Jointpoint是可以进行织入操作的系统执行点。常见的Joinpoint类型有:方法调用、方法执行、构造方法调用、构造方法执行、字段设置、字段获取、异常处理执行、类初始化。
2) Pointcut。
Pointcut是Jointpoint的表述方式。有点儿像引用。
Pointcut的表述方式有:直接指定Joinpoint所在方法名称、正则表达式、使用特定的Pointcut表述语言。使用得比较普遍的是正则表达式。
3) Advice。
Advice是单一横切关注点逻辑的载体,它代表将会织入到Jointpoint的横切逻辑。如果将Aspect比作OOP中的Class,那么Advice就相当于Class中的Method。
按照Advice在Joinpoint位置执行时机的差异或者完成功能的不同,Advice可以分为:
1. Before Advice:在Joinpoint指定位置之前执行的Advice。
2. After returning Advice:只有在当前Joinpoint处执行流程正常完成后才执行。
3. After throwing Advice:只有在当前Jointpoint处执行过程中抛出异常情况下才执行。
4. After Advice:不管Joinpoint处执行流程是正常终了还是抛出异常都会执行。
5. Around Advice:对附加其上的Joinpoint进行包裹,可以在Joinpoint之前和之后都指定相应的逻辑,甚至于中断或者忽略Joinpoint处原来程序流程的执行。我们常使用的Filter功能就是Around Advice的一种体现。
4) Aspect。
Aspect是对系统中的横切关注点逻辑进行模块化封装的AOP概念实体。
通常情况下,Aspect可以包含多个Pointcut以及相关Advice定义。
5) Weaver。
Weaver是织入器,职责是完成横切关注点逻辑到系统的最终织入。
ProxyFactory类是Spring AOP中最通用的织入器。
6) Target。
符合Pointcut指定的条件,将被织入横切逻辑的对象。
7) AOP各个概念所处的场景。

3.2 实践
【强制】动态代理。
1) 代理模式。
提供一个代理类,让我们在调用目标方法的时候,不再是直接对目标方法进行调用,而是通过代理类间接调用。让不属于目标方法核心逻辑的代码从目标方法中剥离出来,即解耦。
2) 动态代理代码示例。
import java.lang.reflect.InvocationHandler;
import java.lang.reflect.Method;
import java.lang.reflect.Proxy;
import java.util.Arrays;

public class Test {
    public static void main(String[] args) {
        ProxyFactory factory = new ProxyFactory(new MyInterfaceImpl());
        MyInterface proxy = (MyInterface) factory.getProxy();
        proxy.hello("myParam");
    }
}

interface MyInterface {
    String hello(String s);
}

class MyInterfaceImpl implements MyInterface {
    @Override
    public String hello(String s) {
        return "hello world";
    }
}

class ProxyFactory {
    private Object target;

    public ProxyFactory(Object target) {
        this.target = target;
    }

    public Object getProxy() {
        ClassLoader classLoader = target.getClass().getClassLoader();
        Class<?>[] interfaces = target.getClass().getInterfaces();
        InvocationHandler invocationHandler = new InvocationHandler() {
            @Override
            public Object invoke(Object proxy, Method method, Object[] args) throws Throwable {
                Object result = null;
                try {
                    System.out.println("[动态代理][日志] 方法名: " + method.getName());
                    System.out.println("[动态代理][日志] 参数列表:" + Arrays.toString(args));
                    System.out.println("[动态代理][日志] 开始执行");
                    result = method.invoke(target, args);
                    System.out.println("[动态代理][日志] 返回值:" + result);
                } catch (Exception e) {
                    System.out.println("[动态代理][日志] 异常:" + e.getMessage());
                } finally {
                    System.out.println("[动态代理][日志] 执行完毕");
                }
                return result;
            }
        };
        return Proxy.newProxyInstance(classLoader, interfaces, invocationHandler);
    }
}
【推荐】Pointcut表达式。
1) 匹配模式。
execution、within、this、target、args等。
2) execution模式表达式格式。
execution([权限修饰符] [返回类型] [全类名].[方法名]([参数列表]))
权限修饰符、返回类型、全类名、方法名 可以用通配符 * 代替。
全类名、方法名可以部分匹配,如*Service、get*。
参数列表 可以用 .. 代替。
【推荐】@AspectJ 形式的Advice。
1) @Before。
2) @AfterReturning。
3) @AfterThrowing。
4) @After。
5) @Around。
【推荐】@AspectJ 形式的Spring AOP。
1) 配置文件bean.xml。
<?xml version="1.0" encoding="UTF-8"?>
<beans xmlns="http://www.springframework.org/schema/beans"
  xmlns:context="http://www.springframework.org/schema/context"
  xmlns:xsi="http://www.w3.org/2001/XMLSchema-instance"
  xsi:schemaLocation="http://www.springframework.org/schema/beans
  http://www.springframework.org/schema/beans/spring-beans-4.3.xsd
  http://www.springframework.org/schema/context
  http://www.springframework.org/schema/context/spring-context-4.3.xsd">

  <!-- 开启组件扫描 -->
  <context:component-scan base-package="com.mypath"></context:component-scan>

  <!-- 开启aop自动代理 -->
  <bean class="org.springframework.aop.aspectj.annotation.AnnotationAwareAspectJAutoProxyCreator">
    <property name="proxyTargetClass" value="true"></property>
  </bean>

  <!-- 基于Schema的aop自动代理 -->
  <!--<aop:aspectj-autoproxy proxy-target-class="true"/>-->
</beans>
2) Java代码。
package com.mypath;

import org.apache.log4j.Logger;
import org.aspectj.lang.ProceedingJoinPoint;
import org.aspectj.lang.annotation.Around;
import org.aspectj.lang.annotation.Aspect;
import org.aspectj.lang.annotation.Pointcut;
import org.springframework.context.ApplicationContext;
import org.springframework.context.support.ClassPathXmlApplicationContext;
import org.springframework.stereotype.Component;

public class Test {
    public static void main(String[] args) {
        ApplicationContext context = new ClassPathXmlApplicationContext("bean.xml");
        MyTask proxy = (MyTask) context.getBean("myTask");
        proxy.task1();
        proxy.tas k2();
    }
}

@Component
class MyTask {
    public void task1() {
        System.out.println("task1 执行");
    }

    public void task2() {
        System.out.println("task2 执行");
    }
}

@Aspect
@Component
class PerformanceTraceAspect {
    private final Logger logger = Logger.getLogger(PerformanceTraceAspect.class);

    @Pointcut("execution(public void com.mypath.MyTask.task1()) || execution(public void com.mypath.MyTask.task2())")
    public void pointcut() {
    }

    @Around("pointcut()")
    public Object performanceTrace(ProceedingJoinPoint joinPoint) throws Throwable {
        String methodName = joinPoint.getSignature().getName();
        try {
            logger.info(methodName + " 开始执行");
            return joinPoint.proceed();
        } finally {
            logger.info(methodName + " 执行结束");
        }
    }
}
3) 输出。
[02-13 12:42:20] [INFO] [com.mypath.MyAspect:45] task1 开始执行
task1 执行
[02-13 12:42:20] [INFO] [com.mypath.MyAspect:48] task1 执行结束
[02-13 12:42:20] [INFO] [com.mypath.MyAspect:45] task2 开始执行
task2 执行
[02-13 12:42:20] [INFO] [com.mypath.MyAspect:48] task2 执行结束
【推荐】基于Schema的Spring AOP。
1) Java代码。
package com.mypath;

import org.apache.commons.lang.exception.ExceptionUtils;
import org.apache.log4j.Logger;
import org.aspectj.lang.JoinPoint;
import org.aspectj.lang.ProceedingJoinPoint;
import org.springframework.context.ApplicationContext;
import org.springframework.context.support.ClassPathXmlApplicationContext;
import org.springframework.stereotype.Component;
import org.springframework.util.StopWatch;

public class Test {
    public static void main(String[] args) {
        ApplicationContext context = new ClassPathXmlApplicationContext("bean.xml");
        MyTask myTask = (MyTask) context.getBean("myTask");
        myTask.task();
    }
}

@Component
class MyTask {
    public void task() {
        System.out.println("task 执行");
    }
}

@Component
class MyAspect {
    private final Logger logger = Logger.getLogger(MyAspect.class);

    public void doBefore(JoinPoint joinPoint) {
        if (logger.isInfoEnabled()) {
            logger.info("before method[" + joinPoint.getSignature().getName() + "] execution.");
        }
    }

    public void doAfterReturning(JoinPoint joinPoint) {
        if (logger.isInfoEnabled()) {
            logger
                .info("method[" + joinPoint.getSignature().getName() + "] completed successfully.");
        }
    }

    public void doAfterThrowing(RuntimeException e) {
        logger.error(ExceptionUtils.getFullStackTrace(e));
    }

    public void doAfter() {
        logger.warn("release system resources, etc.");
    }

    public Object doAround(ProceedingJoinPoint joinPoint) throws Throwable {
        StopWatch watch = new StopWatch();
        try {
            watch.start();
            return joinPoint.proceed();
        } finally {
            watch.stop();
            if (logger.isInfoEnabled()) {
                logger.info(watch);
            }
        }
    }
}
2) 配置文件bean.xml。
<?xml version="1.0" encoding="UTF-8"?>
<beans xmlns="http://www.springframework.org/schema/beans"
  xmlns:context="http://www.springframework.org/schema/context"
  xmlns:xsi="http://www.w3.org/2001/XMLSchema-instance"
  xmlns:aop="http://www.springframework.org/schema/aop"
  xsi:schemaLocation="http://www.springframework.org/schema/beans
  http://www.springframework.org/schema/beans/spring-beans-4.3.xsd
  http://www.springframework.org/schema/context
  http://www.springframework.org/schema/context/spring-context-4.3.xsd
  http://www.springframework.org/schema/aop
  http://www.springframework.org/schema/aop/spring-aop-4.3.xsd">

  <!-- 开启组件扫描 -->
  <context:component-scan base-package="com.mypath"></context:component-scan>

  <!-- aop配置 -->
  <aop:config>
    <aop:aspect id="myAspect" ref="myAspect" order="2">
      <aop:pointcut id="privatePointcut" expression="execution(public void com.mypath.MyTask.task())"/>
      <aop:before pointcut-ref="privatePointcut" method="doBefore"/>
      <aop:after-returning pointcut-ref="privatePointcut" method="doAfterReturning"/>
      <aop:after-throwing pointcut-ref="privatePointcut" method="doAfterThrowing" throwing="e"/>
      <aop:after pointcut-ref="privatePointcut" method="doAfter"/>
      <aop:around pointcut-ref="privatePointcut" method="doAround"/>
    </aop:aspect>
  </aop:config>
</beans>
3) 输出。
[02-13 13:22:40] [INFO] [com.mypath.MyAspect:33] before method[task] execution.
task 执行
[02-13 13:22:40] [INFO] [com.mypath.MyAspect:60] StopWatch '': running time = 11056500 ns; [] took 11056500 ns = 100%
[02-13 13:22:40] [WARN] [com.mypath.MyAspect:49] release system resources, etc.
[02-13 13:22:40] [INFO] [com.mypath.MyAspect:40] method[task] completed successfully.
4 Spring事务
【推荐】声明式事务。
事务控制的代码结构基本是确定的,所以框架就可以将固定模式的代码抽取出来,进行封装。
通过配置的方式、由框架实现的事务称为声明式事务。
【推荐】Spring事务属性。
1) 只读。
true/false。
2) 超时。
超时回滚。单位:秒。
3) 回滚策略。
rollbackFor:回滚。
noRollbackFor:不回滚。
4) 隔离级别。
DEFAULT:使用数据库默认的隔离级别。
READ_UNCOMMITTED:读未提交。
READ_COMMITTED:读已提交。
REPEATABLE_READ:可重复读。
SERIALIZABLE:串行化。
5) 传播行为。
REQUIRED:支持当前事务,如果当前没有事务,就新建一个(默认)。
SUPPORTS:支持当前事务,如果当前没有事务,就以非事务方式运行。
MANDATORY:如果当前没有事务,抛出异常。
REQUIRES_NEW:开启一个新的事务,如果有已存在的事务,将已存在的事务挂起。
NOT_SUPPORTED:以非事务方式运行,如果有已存在的事务,将已存在的事务挂起。
NEVER:以非事务方式运行,如果有已存在的事务,抛出异常。
NESTED:如果有已存在的事务,则运行在一个嵌套式事务中。被嵌套的事务可以独立于外层事务进行提交或回滚。
【推荐】事务的全注解实现。
1) 配置事务。
import javax.sql.DataSource;

import org.springframework.context.annotation.Bean;
import org.springframework.context.annotation.ComponentScan;
import org.springframework.context.annotation.Configuration;
import org.springframework.jdbc.datasource.DataSourceTransactionManager;
import org.springframework.transaction.annotation.EnableTransactionManagement;

@Configuration
@ComponentScan("com.mypath")
@EnableTransactionManagement
public class Test {
    @Bean
    public DataSourceTransactionManager getDataSourceTransactionManager(DataSource dataSource) {
        DataSourceTransactionManager dataSourceTransactionManager = new DataSourceTransactionManager();
        dataSourceTransactionManager.setDataSource(dataSource);
        return dataSourceTransactionManager;
    }
}
2) 使用事务。
使用@Transactional 注解标识类或方法。
5 统一资源加载
【强制】统一资源加载。
理想情况下,资源查找完成后,返回给客户端的应该是一个统一的资源抽象接口,客户端要对资源进行什么样的处理,应该由资源抽象接口来界定,而不应该成为资源的定位者和查找者要关心的事情。
在此前提下,Spring提出了一套基于org.springframework.core.io.Resource和org.springframework.core.io.ResourceLoader接口的资源抽象和加载策略。
【强制】Resource。
1) Resource就是资源的意思。
2) Resource接口中的常用方法。
getInputStream(); // 继承自接口InputStreamSource
boolean exists();
boolean isOpen();
URL getURL() throws IOException;
File getFile() throws IOException;
Resource createRelative(String relativePath) throws IOException;
String getFilename();
String getDescription();
3) Resource接口的实现类。
1. 通过URL定位到的资源:UrlResource。
基于HTTP协议的网络资源,加 http: 前缀。
基于FTP协议的网络资源,加 ftp: 前缀。
文件系统中的资源,加 file: 前缀。
2. 通过classpath定位到的资源:ClassPathResource。
可以加 classpath: 前缀,也可以不加。
3. 通过文件资源系统的路径定位到的资源:FileSystemResource。
4. 其他实现类省略。
【强制】ResourceLoader。
1) ResourceLoader:资源加载器,负责资源的查找和定位。
2) ResourceLoader接口中的方法。
Resource getResource(String location);
3) ResourceLoader接口的实现类。
1. DefaultResourceLoader。
首先检查资源路径是否以 classpath: 前缀打头,如果是,尝试构造ClassPathResource类型的资源并返回。
否则,尝试通过URL来定位资源,构造UrlResource类型的资源并返回。
如果无法根据URL定位资源,则委派getResourceByPath方法来定位,该方法默认的实现逻辑是,构造ClassPathResource类型的资源并返回。
2. FileSystemResourceLoader。
继承自DefaultResourceLoader。
重写了getResourceByPath方法,使之从文件系统加载资源并以FileSystemResource类型返回。
4) ApplicationContext接口继承了ResourceLoader接口,所以其实现类可以加载任何Spring支持的Resource。
ApplicationContext接口的常用实现类包括ClassPathXmlApplicationContext、FileSystemApplicationContext等。
6 其他
6.1 反射
【推荐】反射。
1) 获取Class对象。
Class clazz1 = MyClass.class;
Class clazz2 = new MyClass().getClass();
Class clazz3 = Class.forName("com.mypath")
2) 获取构造方法。
// 获取所有的构造方法
Constructor[] constructors1 = clazz2.getDeclaredConstructors();
// 获取所有的public构造方法
Constructor[] constructors2 = clazz2.getConstructors();

// 带参数的构造方法, 括号内为参数对应的Class对象列表
Constructor constructor = clazz2.getConsturctor(String.class, int.class);
3) MyClass实例化。
// 如果constructor为private构造方法
// constructor.setAccessible(true);
MyClass myClass = (MyClass)constructor.newInstance("param1", 2);
4) 获取属性。
// 获取所有的属性
Field[] fields1 = clazz1.getDeclaredFields();
// 获取所有的public属性
Field[] fields2 = clazz1.getFields();
5) 获取方法。
// 获取所有的方法
Method[] methods1 = clazz2.getDeclaredMethods();
// 获取所有的public方法
Method[] methods2 = clazz2.getMethods();
6) 执行方法。
// 如果method为private方法
// method.setAccessible(true);
method.invoke("param1", 2);
6.2 Log4j2
【推荐】Log4j2的重要组件。
1) 日志信息的优先级。
日志信息的优先级从低到高有:TRACE(追踪)、DEBUG(调试)、INFO(信息)、WARN(警告)、FATAL(严重错误)。
2) 日志信息的输出目的地。
将日志打到控制台或文件。
3) 日志信息的输出格式。
【推荐】log4j2的使用。
1) 引入依赖。
<dependency>
  <groupId>org.apache.logging.log4j</groupId>
  <artifactId>log4j-core</artifactId>
  <version>2.19.0</version>
</dependency>
<dependency>
  <groupId>org.apache.logging.log4j</groupId>
  <artifactId>log4j-slf4j2-impl</artifactId>
  <version>2.19.0</version>
</dependency>
2) 创建配置文件log4j2.xml。
省略。
3) 导包。
import org.slf4j.Logger;
import org.slf4j.LoggerFactory;
4) 初始化Logger对象。
private Logger logger = LoggerFactory.getLogger(MyClass.class);5) 打印信息。
logger.info("hello world");6.3 JdbcTemplate
【推荐】JdbcTemplate的使用。
1) 引入依赖。
<!-- Spring JDBC -->
<dependency>
  <groupId>org.springframework</groupId>
  <artifactId>spring-jdbc</artifactId>
  <version>6.0.2</version>
</dependency>
<!-- Druid数据源 -->
<dependency>
  <groupId>com.alibaba</groupId>
  <artifactId>druid</artifactId>
  <version>1.2.15</version>
</dependency>
<!-- MySQL驱动 -->
<dependency>
  <groupId>mysql</groupId>
  <artifactId>mysql-connector-java</artifactId>
  <version>8.0.30</version>
</dependency>
2) 创建配置文件jdbc.properties。
jdbc.user=roo
jdbc.password=root
jdbc.url=jdbc:mysql://localhost:3306/spring?characterEncoding=utf8&useSSL=false
jdbc.driver=com.mysql.cj.jdbc.Driver
3) 创建配置文件bean.xml。
<?xml version="1.0" encoding="UTF-8"?>
<beans xmlns="http://www.springframework.org/schema/beans"
  xmlns:context="http://www.springframework.org/schema/context"
  xmlns:xsi="http://www.w3.org/2001/XMLSchema-instance"
  xsi:schemaLocation="http://www.springframework.org/schema/beans
  http://www.springframework.org/schema/beans/spring-beans-4.3.xsd
  http://www.springframework.org/schema/context
  http://www.springframework.org/schema/context/spring-context-4.3.xsd">

  <!-- 导入外部属性文件 -->
  <context:property-placeholder location="classpath:jdbc.properties"/>

  <!-- 配置JDBCTemplate -->
  <bean id="jdbcTemplate" class="org.springframework.jdbc.core.JdbcTemplate">
    <property name="dataSource" ref="druidDataSource"/>
  </bean>

  <!-- 配置数据源 -->
  <bean id="druidDataSource" class="com.alibaba.druid.pool.DruidDataSource">
    <property name="url" value="${jdbc.url}"/>
    <property name="driverClassName" value="${jdbc.driver}"/>
    <property name="username" value="${jdbc.user}"/>
    <property name="password" value="${jdbc.password}"/>
  </bean>
</beans>
4) 创建测试类。
import java.util.List;

import org.springframework.context.ApplicationContext;
import org.springframework.context.support.ClassPathXmlApplicationContext;
import org.springframework.jdbc.core.BeanPropertyRowMapper;
import org.springframework.jdbc.core.JdbcTemplate;

public class Test {
    public static void main(String[] args) {
        ApplicationContext context = new ClassPathXmlApplicationContext("bean.xml");
        JdbcTemplate jdbcTemplate = (JdbcTemplate) context.getBean("jdbcTemplate");

        String insertSql = "INSERT INTO my_table VALUES(?, ?, ?)";
        Object[] params = { 1, "hello", "world" };
        jdbcTemplate.update(insertSql, params);

        String selectSql = "SELECT * FROM my_table";
        List<Object> list = jdbcTemplate.query(selectSql,
                                               new BeanPropertyRowMapper<>(Object.class));
        System.out.println(list);
    }
}
【推荐】JdbcTemplate的全注解实现。
import javax.sql.DataSource;

import org.springframework.context.annotation.Bean;
import org.springframework.context.annotation.ComponentScan;
import org.springframework.context.annotation.Configuration;
import org.springframework.jdbc.core.JdbcTemplate;

import com.alibaba.druid.pool.DruidDataSource;

@Configuration
@ComponentScan("com.mypath")
public class MySpringConfig {
    @Bean(name = "jdbcTemplate")
    public JdbcTemplate getJdbcTemplate(DataSource dataSource) {
        JdbcTemplate jdbcTemplate = new JdbcTemplate();
        jdbcTemplate.setDataSource(dataSource);
        return jdbcTemplate;
    }

    @Bean
    public DataSource getDataSource() {
        DruidDataSource dataSource = new DruidDataSource();
        dataSource.setDriverClassName("com.mysql.cj.jdbc.Driver");
        dataSource.setUsername("root");
        dataSource.setPassword("root");
        dataSource.setUrl("jdbc:mysql://localhost:3306/spring?characterEncoding=utf8&useSSL=false");
        return dataSource;
    }
}
6.4 Spring MVC
【强制】MVC。
MVC(Model-View-Controller,模型-视图-控制器)。
1) 控制器:负责接收视图发送的请求并进行处理。它会根据请求条件通知模型进行应用程序状态的更新,之后选择合适的视图显示给用户。
2) 模型:通常封装了应用的逻辑以及数据状态。当控制器通知模型进行状态更新的时候,模型封装的相应逻辑将被调用。执行完成后,模型通常会通过事件机制通知视图状态更新完毕,从而视图可以显示最新的数据状态。
3) 视图:面向用户的接口。当用户通过视图发起某种请求的时候,视图将这些请求转发给控制器进行处理。处理流程经过控制器和模型后,最终视图将收到模型的状态更新通知,然后视图将结合模型数据,更新自身的显示。
【强制】Spring MVC 控制器的实现策略。
引入Front Controller和Page Controller的概念。Front Controller负责接收所有的Web请求,委派给下一级的Page Controller进行处理。
Front Controller概念落地:org.springframework.web.servlet.DispatcherServlet类。
Page Controller概念落地:org.springframework.web.servlet.mvc.Controller接口及其实现类。
【强制】DispatcherServlet的处理流程。
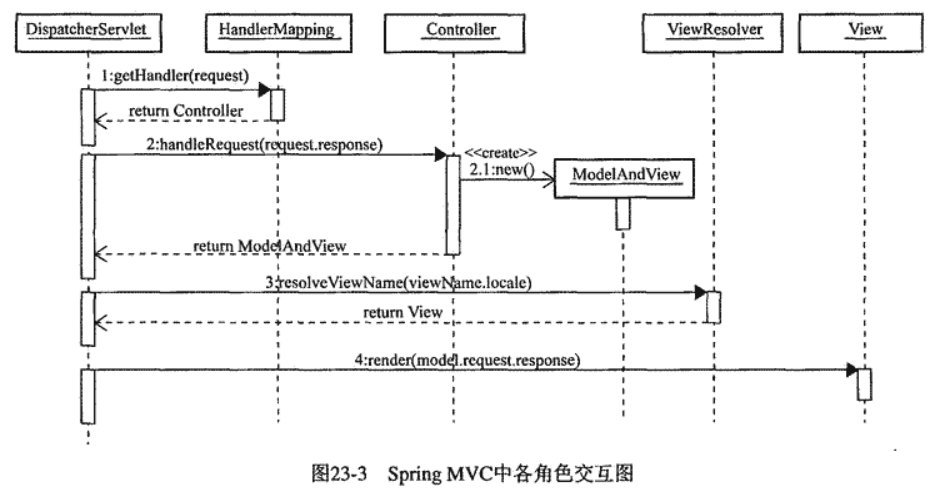
1) Spring MVC提供了HandlerMapping接口及其实现类,来专门管理Web请求到具体的处理类(Handler)之间的映射关系。
在Web请求到达DispatcherServlet之后,DispatcherServlet将寻求具体的HandlerMapping实例,以获取对应当前Web请求的具体Handler,然后调用Handler中的handle方法来处理当前Web请求。
Handler和Controller之间的关系是:Controller是Handler的一种特殊类型。
2) Controller中的处理方法执行完毕后,返回一个ModelAndView实例。
ModelAndView包含两部分信息:
1. 视图。可以是逻辑视图名称(String),也可以是具体的View实例。
2. 模型数据。以ModelMap的形式来保存模型数据,这些数据将会在视图渲染阶段由具体的View实现类来获取并使用。
3) Spring MVC提供了View接口及其实现类,来统一地抽象视图的生成策略。还提供了ViewResolver接口及其实现类,来管理逻辑视图名称与具体的View实例之间的映射关系。
如果ModelAndView中的视图信息是逻辑视图名称,DispatcherServlet将在ViewResolver的帮助下查找具体的View实现类,然后委派该具体的View实现类来处理最终的视图渲染工作。
如果ModelAndView中的视图信息是具体的View实例,则直接处理视图渲染工作。


 3117
3117


 被折叠的 条评论
为什么被折叠?
被折叠的 条评论
为什么被折叠?
 到【灌水乐园】发言


