


1. Tensor (张量)
PyTorch
Tensor
可以和
numpy ndarray 相五转换,唯一
不同的是
PyTorch
可以在
GPU
上运行,而
numpy
ndarray只能在CPU
上运行 。所以
PyTorch在数组处理的速度上有一定的优势。
import torch
import numpy as np
# 定义一个三行两列给定元素的矩阵,并且显示出矩阵的元素和大小
# torch.Tensor默认的是torch.FloatTensor数据类型,也可以定义我们想要的数据类型
a = torch.Tensor([[2, 3],[4, 8], [7, 9]])
print('a is: {}'.format(a))
print('a size is {}'.format(a.size()))
我们可以使用下面两种方式将numpy的ndarray转换到tensor上:
# 创建一个numpy ndarray
numpy_tensor = np.random.randn(10, 20)
pytorch_tensor1 = torch.Tensor(numpy_tensor)
pytorch_tensor2 = torch.from_numpy(numpy_tensor)
同时我们也可以使用下面的方法将 pytorch tensor 转换为numpy ndarray:
# 如果 pytorch tensor 在cpu上
numpy_array = pytorch_tensor1.numpy()
# 如果 pytorch tensor 在gpu上
numpy_array = pytorch_tensor1.cpu().numpy()
我们可以使用以下两种方式将Tensor放到GPU上:
# 第一种方式是定义 cuda 数据类型
dtype = torch.cuda.FloatTensor # 定义默认 GPU 的 数据类型
gpu_tensor = torch.randn(10, 20).type(dtype)

# 第二种方式更简单,推荐使用
gpu_tensor = torch.randn(10, 20).cuda(0) # 将 tensor 放到第一个 GPU 上
gpu_tensor = torch.randn(10, 20).cuda(1) # 将 tensor 放到第二个 GPU 上
将 tensor 放回CPU的操作:
cpu_tensor = gpu_tensor.cpu()访问到Tensor的一些属性:
# 像 numpy 样通过索引的方式取得其中的元素,同时也可以改变它的值
a[0, 1] = 100
print('changed a is: ()'.format(a))
# 可以通过下面两种方式得到 tensor 的大小
print(pytorch_tensor1.shape)
print(pytorch_tensor1.size())
# 得到 tensor 的数据类型
print(pytorch_tensor1.type())
# 得到 tensor 的维度
print(pytorch_tensor1.dim())
# 得到 tensor 的所有元素个数
print(pytorch_tensor1.numel())
2. Tensor的操作
Tensor操作中的api和NumPy非常相似,如果你熟悉NumPy中的操作,那么tensor基本是一致的。
x = torch.ones(2, 2)
print(x) # 这是一个float tensor
# 将其转化为整形
x = x.long()
# x = x.type(torch.LongTensor)
print(x)
# 再将其转回 float
x = x.float()
# x = x.type(torch.FloatTensor)
print(x)
x = torch.randn(4, 3)
print(x)
# 沿着行取最大值
max_value, max_idx = torch.max(x, dim=1)
# 每一行的最大值
max_value
# 每一行最大值的下标
max_idx
# 沿着行对 x 求和
sum_x = torch.sum(x, dim=1)
print(sum_x)
# 增加维度或者减少维度
print(x.shape)
x = x.unsqueeze(0) # 在第一维增加
print(x.shape)
x = x.unsqueeze(1) # 在第二维增加
print(x.shape)
x = x.squeeze(0) # 减少第一维
print(x.shape)
x = x.squeeze() # 将 tensor 中所有的一维全部都去掉
print(x.shape)x = torch.randn(3, 4, 5)
print(x.shape)
# 使用permute和transpose进行维度交换
x = x.permute(1, 0, 2) # permute 可以重新排列 tensor 的维度
print(x.shape)
x = x.transpose(0, 2) # transpose 交换 tensor 中的两个维度
print(x.shape)torch.Size([3, 4, 5]) torch.Size([4, 3, 5]) torch.Size([5, 3, 4])
# 使用 view 对 tensor 进行 reshape
x = torch.randn(3, 4, 5)
print(x.shape)

x = x.view(-1, 5) # -1 表示任意的大小,5 表示第二维变成 5
print(x.shape)

x = x.view(3, 20) # 重新 reshape 成 (3, 20) 的大小
print(x.shape)

x = torch.randn(3, 4)
y = torch.randn(3, 4)

# 两个 tensor 求和
z = x + y
# z = torch.add(x, y)pytorch中大多数的操作都支持inplace操作,也就是可以直接对tensor进行操作而不需要另外开辟内存空间,方式非常简单,一般都是在操作的符号后面加_。
x = torch.ones(3, 3)
print(x.shape)

# unsqueeze 进行 inplace
x.unsqueeze_(0)
print(x.shape)

# transpose 进行 inplace
x.transpose_(1, 0)
print(x.shape)
torch.Size([3, 3]) torch.Size([1, 3, 3]) torch.Size([3, 1, 3])
x = torch.ones(3, 3)
y = torch.ones(3, 3)
print(x)

# add 进行 inplace
x.add_(y)
print(x)
3. Variable (变量)
Variable
Tensor
本质上没有区别,不过
Variable
会被放入一个计算图中,然后进行前向传播,反向传播,自动求导。
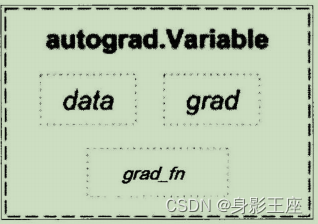
data可以取出Variable里面的tensor数值, grad_fn表示的是得到这个Variable的操作,比如通过加减还是乘除来得到的,最后grad是这个Variabel的反向传播梯度。
# 通过下面这种方式导入 Variable
from torch.autograd import Variable

x_tensor = torch.randn(10, 5)
y_tensor = torch.randn(10, 5)

# 将 tensor 变成 Variable
x = Variable(x_tensor, requires_grad=True)
# 默认 Variable 是不需要求梯度的,
# 所以我们用这个方式申明需要对其进行求梯度( requires_grad=True)
y = Variable(y_tensor, requires_grad=True)

z = torch.sum(x + y)
print(z.data)
print(z.grad_fn)
我们注
意到了一行
y.backward()
,这
行代码就是所谓的自动
求导,这其实等价于y.backward(torch.FloatTensor([1]
)
,只不过对于标量求导
里面的参数就可以不写了。
# 求 x 和 y 的梯度
z.backward()

print(x.grad)
print(y.grad)
y.backward(torch.FloatTensor ([1, 1, 1]
)) ,
这样得到的结果就是它们每个分量的梯度,或者可以传入
y.backward(torch.FloatTensor(
[1,0.1,0.0
1]
))
,这样得到的梯度就是它
们原本的梯度分别乘上 1、
0.1、
0.01。
输出:
Variable containing:
    1     1     1     1     1
    1     1     1     1     1
    1     1     1     1     1
    1     1     1     1     1
    1     1     1     1     1
    1     1     1     1     1
    1     1     1     1     1
    1     1     1     1     1
    1     1     1     1     1
    1     1     1     1     1
[torch.FloatTensor of size 10x5]
4. Dataset (数据集)
torch.utils.data.Dataset
是代表这一数据的抽象类,你可以自
己定义你的数据类继承和重写这个抽
象类
,非常简单,只需要定义 _len_和
_getitem_
这两个函数:
class myDataset(Dataset) :
    def _init_(self, csv_file, txt_file, root_dir, other_file ):
        self.csv_data = pd.read_csv(csv_file)
        with open(txt_file, 'r' ) as f:
            data_list = f.readlines( )
        self.txt_data = data_list
        self.root_dir = root_dir

    def _len_(self):
        return len(self.csv_data)

    def _getitem_(self, idx):
        data = (self.csv_data[idx], self.txt_data[idx])
return data但是这样很难实现取batch,shuff1或者是多线程去读取数据,所以PyTorch中提供了一个简单的办法来做这个事情:通过 torch.utils.data.DataLoader定义一个新的迭代器:
dataiter = DataLoader(myDataset, batch_size=32, shuffle=True,collate_fn=default_collate)只有collate_fn是表示如何取样本的,我们可以定义自己的函数来准确地实现想要的功能,默认的函数在一般情况下都是可以使用的。
另外在
torchvision
这个包中还有一
个更高级的有关于计算机视觉的数据读取类: ImageFolder,主要功能是处理图片,图片要求png。
dset = lmageFolder(root='root_path',transform=None,loaderzdefault_loader)transform target ....transform是图片增强,loader是图片读取的办法,因为我们读取的是图片的名字,然后通过loader将图片转换成我们需要的图片类型进入神经网络。
5. nn.Module (模组)
PyTorch
里面编写
经网络,所有的层结构和损失函数都来自于
torch
.n
n,所
有的模型构建都是从这个基类
nn.Module继承的。于是有了下面这个模报:
class net_name(nn.module):
    def _init_(self, other_arguments):
        super(net_name self)._init_()
        self.convl = nn.Conv2d(in_channels, out_channels, kernel_size)
        # other network l ayer

    def forward(self, x):
        X = self.convl(x)
        return x
定义完
模型之后
,我们
需要
通过
nn
这个包来定义损失函数:
criterion = nn.CrossEntropyLoss()
loss = criterion(output, target)
6. torch.optim (优化)
我们需要通过修改
参数
使得损失函数最
小化(或最大化),优化算
法就是
一种调整
模型
参数
更新的策略。
- 一阶优化算法:梯度下降算法。
- 二阶优化算法:牛顿法。
torch.optim
是一个实现各种优化算法的包,大多数常见的算法都能够直接通过
这个包来调用,比如随机梯度下降,以及添加动量的随机梯度下降,自适应学习率等。
optimizer = torch.optim.SGD(model.parameters(), lr=O.Ol, momentum=O.9)
设定学习率是
0.01,
动
量是0.9
的随机梯度下降,在优化之前需要先将梯度归零,即
optimizer.zeros()
, 然后通过 loss.backward()
反向传播,自动求导得到每个参数的梯度,最后只需要optimizer. step
()就可以通过梯度做一步参数更新。
7.模型的保存和加载
PyTorch
里面使用
torch.save
来保存模型的结构和参数,有两种保存方式:
- 保存整个模型的结构信息和参数信息,保存的对象是模型model;
- 保存模型的参数,保存的对象是模型的状态model.state_dict()。
torch.save(model, './model.pth')
torch.save(model.state_dict(), './model_state.pth')
加载模型有两种方式对应于保存模型的方式:
- 加载完整的模型结构和参数信息,使用load_model = torch.load('model. pth' ) ,在网络较大的时候加载的时间比较长,同时存储空间也比较大;
- 加载模型参数信息,需要先导人模型的结构,然后通过model.load_state_dic (torch.load('model state.pth')) 来导入。


 685
685


 被折叠的 条评论
为什么被折叠?
被折叠的 条评论
为什么被折叠?
 到【灌水乐园】发言


