


文章目录
前言
SpringBoot 集成 websocket的两种方式,手把手教你写后端Websocket接口
一、环境
        <!--   websocket   -->
        <dependency>
            <groupId>org.springframework.boot</groupId>
            <artifactId>spring-boot-starter-websocket</artifactId>
        </dependency>
二、代码
方式一
1、目录结构

DefaultHandler 类似与Controller 用于定义IPA内的消息处理
DefaultInterceptor 拦截器用于对请求和响应做拦截,若无需求可以没有
WebSocketConfiguration 配置类
2、WebSocketConfiguration 配置
import org.springframework.context.annotation.Configuration;
import org.springframework.web.socket.WebSocketHandler;
import org.springframework.web.socket.config.annotation.EnableWebSocket;
import org.springframework.web.socket.config.annotation.WebSocketConfigurer;
import org.springframework.web.socket.config.annotation.WebSocketHandlerRegistry;
import org.springframework.web.socket.server.HandshakeInterceptor;
import javax.annotation.Resource;

/**
 * Date: 2022-04-28 星期四
 * Time: 14:37
 * Author: Dily_Su
 * Remark:
 */
@Configuration
@EnableWebSocket
public class WebSocketConfiguration implements WebSocketConfigurer {
    @Override
    public void registerWebSocketHandlers(WebSocketHandlerRegistry registry) {
        registry.addHandler(new DefaultHandler, "/ws") // api  对应controller
                .addInterceptors(new DefaultInterceptor) // 拦截器
                .setAllowedOrigins("*");
    }
}
3、DefaultHandler 消息处理类
import org.springframework.stereotype.Component;
import org.springframework.web.socket.*;
import java.io.IOException;
import java.util.HashMap;
import java.util.Map;

/**
 * Date: 2022-04-28 星期四
 * Time: 14:43
 * Author: Dily_Su
 * Remark:
 * websocket 消息处理类,类似于controller
 */
@Component
public class DefaultHandler implements WebSocketHandler {

    Map<String, WebSocketSession> conns = new HashMap<>();

    /**
     * 建立连接
     *
     * @param session 会话
     * @throws Exception 异常
     */
    @Override
    public void afterConnectionEstablished(WebSocketSession session) throws Exception {
        // 缓存用户信息: userInfo
        session.getLocalAddress(); // 获取本地IP
        conns.put(session.getId(), session);
    }

    /**
     * 接收消息
     *
     * @param session 会话
     * @param message 消息
     * @throws Exception 异常
     */
    @Override
    public void handleMessage(WebSocketSession session, WebSocketMessage<?> message) throws Exception {
        // 接收消息
        conns.forEach((k, v) -> {
            try {
            // 发送消息
                v.sendMessage(new TextMessage(session.getId() + "说:" + message.getPayload().toString()));
            } catch (IOException e) {
                e.printStackTrace();
            }
        });
    }

    /**
     * 发生错误
     *
     * @param session   会话
     * @param throwable throwable
     * @throws Exception 异常
     */
    @Override
    public void handleTransportError(WebSocketSession session, Throwable throwable) throws Exception {
        // 清除用户缓存信息
    }

    /**
     * 关闭连接
     *
     * @param session     会话
     * @param closeStatus 关闭状态
     * @throws Exception 异常
     */
    @Override
    public void afterConnectionClosed(WebSocketSession session, CloseStatus closeStatus) throws Exception {
        // 清除用户缓存信息
    }

    /**
     * 是否支持发送部分消息
     *
     * @return true/false
     */
    @Override
    public boolean supportsPartialMessages() {
        return false;
    }

    /**
     * 自定义发送消息
     *
     * @param message  消息
     * @param username 用户名
     */
    public void sendMessage(String message, String username) {

    }
}
4、DefaultInterceptor 拦截器
import org.springframework.http.server.ServerHttpRequest;
import org.springframework.http.server.ServerHttpResponse;
import org.springframework.stereotype.Component;
import org.springframework.web.socket.WebSocketHandler;
import org.springframework.web.socket.server.HandshakeInterceptor;
import java.util.Map;

/**
 * Date: 2022-04-28 星期四
 * Time: 15:00
 * Author: Dily_Su
 * Remark:
 * Websocket 拦截器
 */
@Component
public class DefaultInterceptor implements HandshakeInterceptor {

    @Override
    public boolean beforeHandshake(ServerHttpRequest serverHttpRequest, ServerHttpResponse serverHttpResponse, WebSocketHandler webSocketHandler, Map<String, Object> map) throws Exception {
        // return true 连接成功
        // return false 连接失败
        return true;
    }

    @Override
    public void afterHandshake(ServerHttpRequest request, ServerHttpResponse response, WebSocketHandler wsHandler, Exception exception) {
		// 连接成功后的处理
    }
}
方式二
1、目录结构
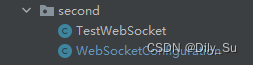
TestWebSocket 消息处理类,类似与controller,与方式一中的handler 类类似
WebSocketConfiguration 配置
2、WebSocketConfiguration 配置
import org.springframework.context.annotation.Bean;
import org.springframework.context.annotation.Configuration;
import org.springframework.web.socket.server.standard.ServerEndpointExporter;

/**
 * Date: 2022-04-28 星期四
 * Time: 14:37
 * Author: Dily_Su
 * Remark:
 */
@Configuration
public class WebSocketConfiguration{

    @Bean
    public ServerEndpointExporter serverEndpointExporter() {
        return new ServerEndpointExporter();
    }
}
3、TestWebSocket 消息处理类
/**
 * Date: 2022-05-12 星期四
 * Time: 15:54
 * Author: Dily_Su
 * Remark:
 * 相当于Controller
 */

import org.slf4j.Logger;
import org.slf4j.LoggerFactory;
import org.springframework.web.bind.annotation.RestController;

import javax.websocket.*;
import javax.websocket.server.ServerEndpoint;
import java.util.concurrent.CopyOnWriteArraySet;

@ServerEndpoint("/ws") // API
@RestController
public class TestWebSocket {

    // 用来记录当前连接数的变量
    private static volatile int onlineCount = 0;

    // concurrent包的线程安全Set,用来存放每个客户端对应的MyWebSocket对象
    private static final CopyOnWriteArraySet<TestWebSocket> webSocketSet = new CopyOnWriteArraySet<>();

    // 与某个客户端的连接会话,需要通过它来与客户端进行数据收发
    private Session session;

    private static final Logger LOGGER = LoggerFactory.getLogger(TestWebSocket.class);

    /**
     * 打开连接
     *
     * @param session 会话
     * @throws Exception 异常
     */
    @OnOpen
    public void onOpen(Session session) throws Exception {
        this.session = session;
        webSocketSet.add(this);
    }

    /**
     * 关闭连接
     */
    @OnClose
    public void onClose() {
        webSocketSet.remove(this);
    }

    /**
     * 接收消息
     *
     * @param message 消息
     * @param session 会话
     */
    @OnMessage
    public void onMessage(String message, Session session) throws Exception {
        System.out.println(message);
        sendMessage("哈喽你好,我收到你的消息我就来了");
    }

    /**
     * 报错
     *
     * @param session 会话
     * @param error   错误
     */
    @OnError
    public void onError(Session session, Throwable error) {
    }

    /**
     * 发送消息
     *
     * @param message 会话
     * @throws Exception 异常
     */
    public void sendMessage(String message) throws Exception {
        if (this.session.isOpen()) {
            this.session.getBasicRemote().sendText(message);
        }
    }

    /**
     * 获取在线连接数
     *
     * @return onlineCount
     */
    public static synchronized int getOnlineCount() {
        return onlineCount;
    }

    /**
     * 增加在线数量
     */
    public static synchronized void addOnlineCount() {
        TestWebSocket.onlineCount++;
    }

    /**
     * 减少在线数量
     */
    public static synchronized void subOnlineCount() {
        TestWebSocket.onlineCount--;
    }
}
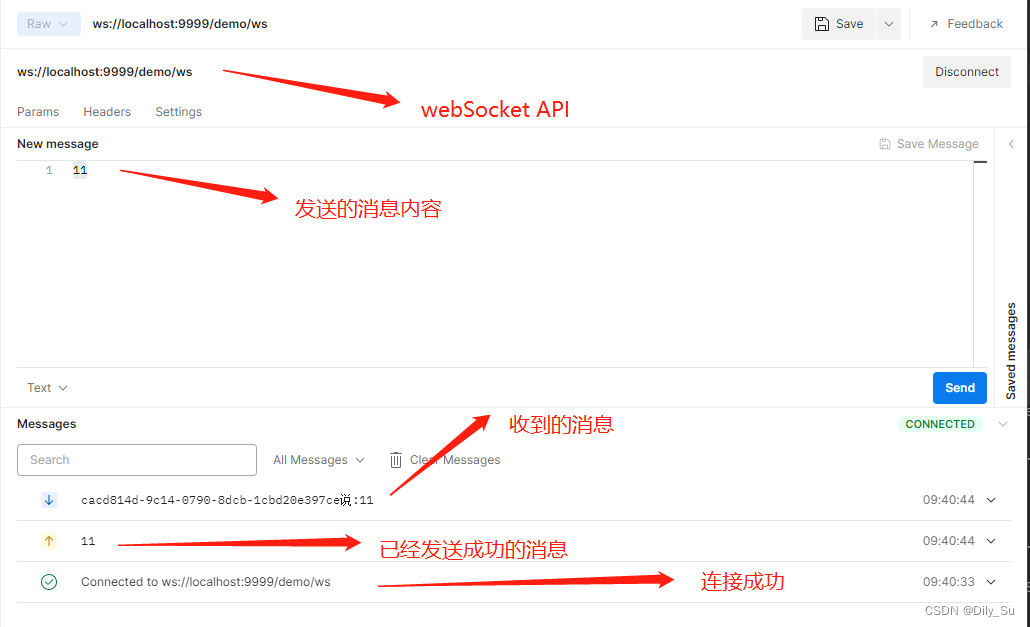
结果
postman 测试结果如下


 669
669


 被折叠的 条评论
为什么被折叠?
被折叠的 条评论
为什么被折叠?
 到【灌水乐园】发言


