


文章目录
springboot 集成 activiti7 可以参考springboot + activiti7简单使用
一、bpmn-js
本文主要介绍bpmn-js实现activiti的流程设计器,主要参考全网最详bpmn.js教材目录
二、基本使用
1.准备vue项目
使用vue-cli初始化了一个简单的项目
2.安装依赖
主要用到三个依赖
bpmn-js 是主要核心 npm install -- save bpmn-js
bpmn-js-properties-panel 是工具栏面板 bpmn-js-properties-panel
bpmn-js-properties-panel-activiti 是用于 activiti 的面板(bpmn-js官方是适配camunda的) bpmn-js-properties-panel-activiti
需要注意的是 bpmn-js-properties-panel 的版本,从1.0.0版本开始使用方法就不一样了,目前不做研究,本文使用的是0.46.0。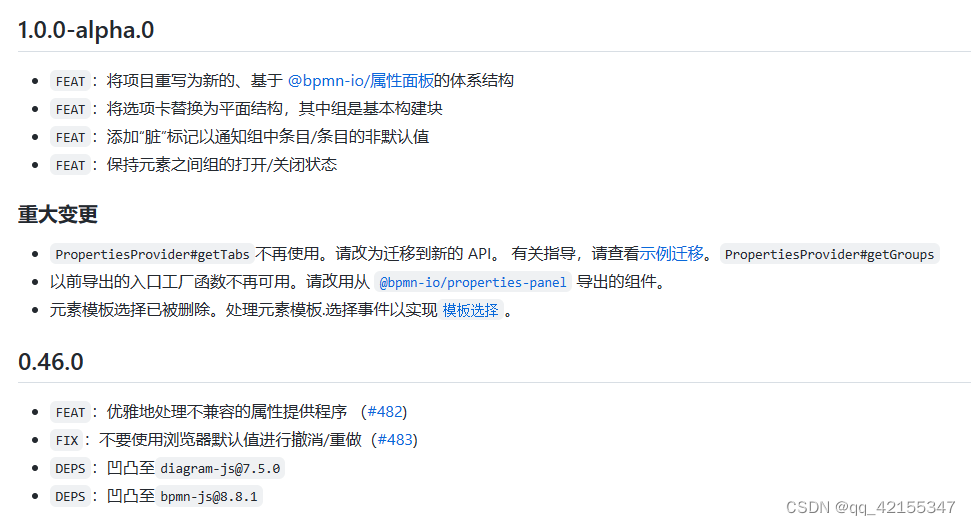
还有个问题是在node版本高于6时安装会报错,大致意思是一些强校验的关系。
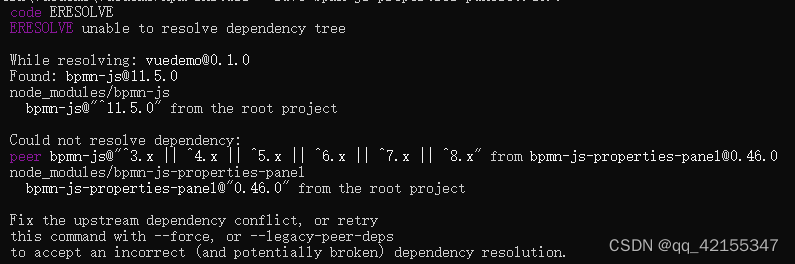
使用--legacy-peer-deps命令即可,完整命令npm install --save --legacy-peer-deps bpmn-js-properties-panel@0.46.0
3.编写代码
新建一个文件 BpmnjsDemo.vue,在App.vue中引入
<template>
  <div id="app">
    <BpmnjsDemo />
  </div>
</template>

<script>
import BpmnjsDemo from "./components/BpmnjsDemo.vue";

export default {
  name: "App",
  components: {
    BpmnjsDemo,
  },
};
</script>

<style>
#app {
  font-family: Avenir, Helvetica, Arial, sans-serif;
  -webkit-font-smoothing: antialiased;
  -moz-osx-font-smoothing: grayscale;
  text-align: center;
  color: #2c3e50;
  margin-top: 60px;
}
</style>
3.1 基本使用
创建一个div当作容器
<template>
  <div class="containers" ref="content">
    <div class="canvas" ref="canvas"></div>
  </div>
</template>
script 中需要引入建模器,Modeler 是可编辑的建模器,还有只读的 Viewer。
import BpmnModeler from "bpmn-js/lib/Modeler";
data 中定义变量方便后续操作。initialDiagram 是流程图对应的 xml 格式。
data() {
    return {
      // bpmn建模器
      bpmnModeler: null,
      container: null,
      canvas: null,
      initialDiagram: `<?xml version="1.0" encoding="UTF-8"?>
						<definitions xmlns="http://www.omg.org/spec/BPMN/20100524/MODEL" xmlns:bpmndi="http://www.omg.org/spec/BPMN/20100524/DI" xmlns:omgdi="http://www.omg.org/spec/DD/20100524/DI" xmlns:omgdc="http://www.omg.org/spec/DD/20100524/DC" xmlns:xsi="http://www.w3.org/2001/XMLSchema-instance" id="sid-38422fae-e03e-43a3-bef4-bd33b32041b2" targetNamespace="http://bpmn.io/bpmn" exporter="bpmn-js (https://demo.bpmn.io)" exporterVersion="5.1.2">
						<process id="Process_1" isExecutable="false">
						    <startEvent id="StartEvent_1y45yut" name="开始">
						    <outgoing>SequenceFlow_0h21x7r</outgoing>
						    </startEvent>
						    <task id="Task_1hcentk">
						    <incoming>SequenceFlow_0h21x7r</incoming>
						    </task>
						    <sequenceFlow id="SequenceFlow_0h21x7r" sourceRef="StartEvent_1y45yut" targetRef="Task_1hcentk" />
						</process>
						<bpmndi:BPMNDiagram id="BpmnDiagram_1">
						    <bpmndi:BPMNPlane id="BpmnPlane_1" bpmnElement="Process_1">
						    <bpmndi:BPMNShape id="StartEvent_1y45yut_di" bpmnElement="StartEvent_1y45yut">
						        <omgdc:Bounds x="152" y="102" width="36" height="36" />
						        <bpmndi:BPMNLabel>
						        <omgdc:Bounds x="160" y="145" width="22" height="14" />
						        </bpmndi:BPMNLabel>
						    </bpmndi:BPMNShape>
						    <bpmndi:BPMNShape id="Task_1hcentk_di" bpmnElement="Task_1hcentk">
						        <omgdc:Bounds x="240" y="80" width="100" height="80" />
						    </bpmndi:BPMNShape>
						    <bpmndi:BPMNEdge id="SequenceFlow_0h21x7r_di" bpmnElement="SequenceFlow_0h21x7r">
						        <omgdi:waypoint x="188" y="120" />
						        <omgdi:waypoint x="240" y="120" />
						    </bpmndi:BPMNEdge>
						    </bpmndi:BPMNPlane>
						</bpmndi:BPMNDiagram>
						</definitions>`,
    };
  },
初始化操作
mounted() {
  this.init();
},
methods: {
  init() {
    // 获取到属性ref为"content"的dom节点
    this.container = this.$refs.content;
    // 获取到属性ref为"canvas"的dom节点
    const canvas = this.$refs.canvas;
    // 建模
    this.bpmnModeler = new BpmnModeler({
      container: canvas,
      // 使用快捷键
      keyboard: {
        bindTo: window,
      },
    });
    this.createNewDiagram();
  },
  // 使用导入 xml 的方式创建流程图
  createNewDiagram() {
    this.bpmnModeler
      .importXML(this.initialDiagram)
      .then(() => {
        console.log("success");
      })
      .catch((error) => {
        console.log(error);
      });
  },
},
样式
<style scoped>
.containers {
  /* 使用网格作为背景 */
  background: white;
  overflow: auto;
  background-image: linear-gradient(
      90deg,
      rgba(220, 220, 220, 0.5) 6%,
      transparent 0
    ),
    linear-gradient(rgba(192, 192, 192, 0.5) 6%, transparent 0);
  background-size: 12px 12px;
  width: 100%;
  height: calc(100vh - 125px);
  -webkit-tap-highlight-color: rgba(255, 255, 255, 0);
}
.canvas {
  width: 100%;
  height: 95%;
}
</style>
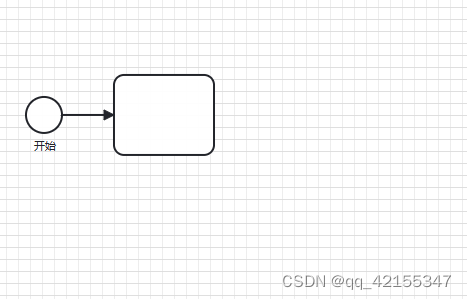
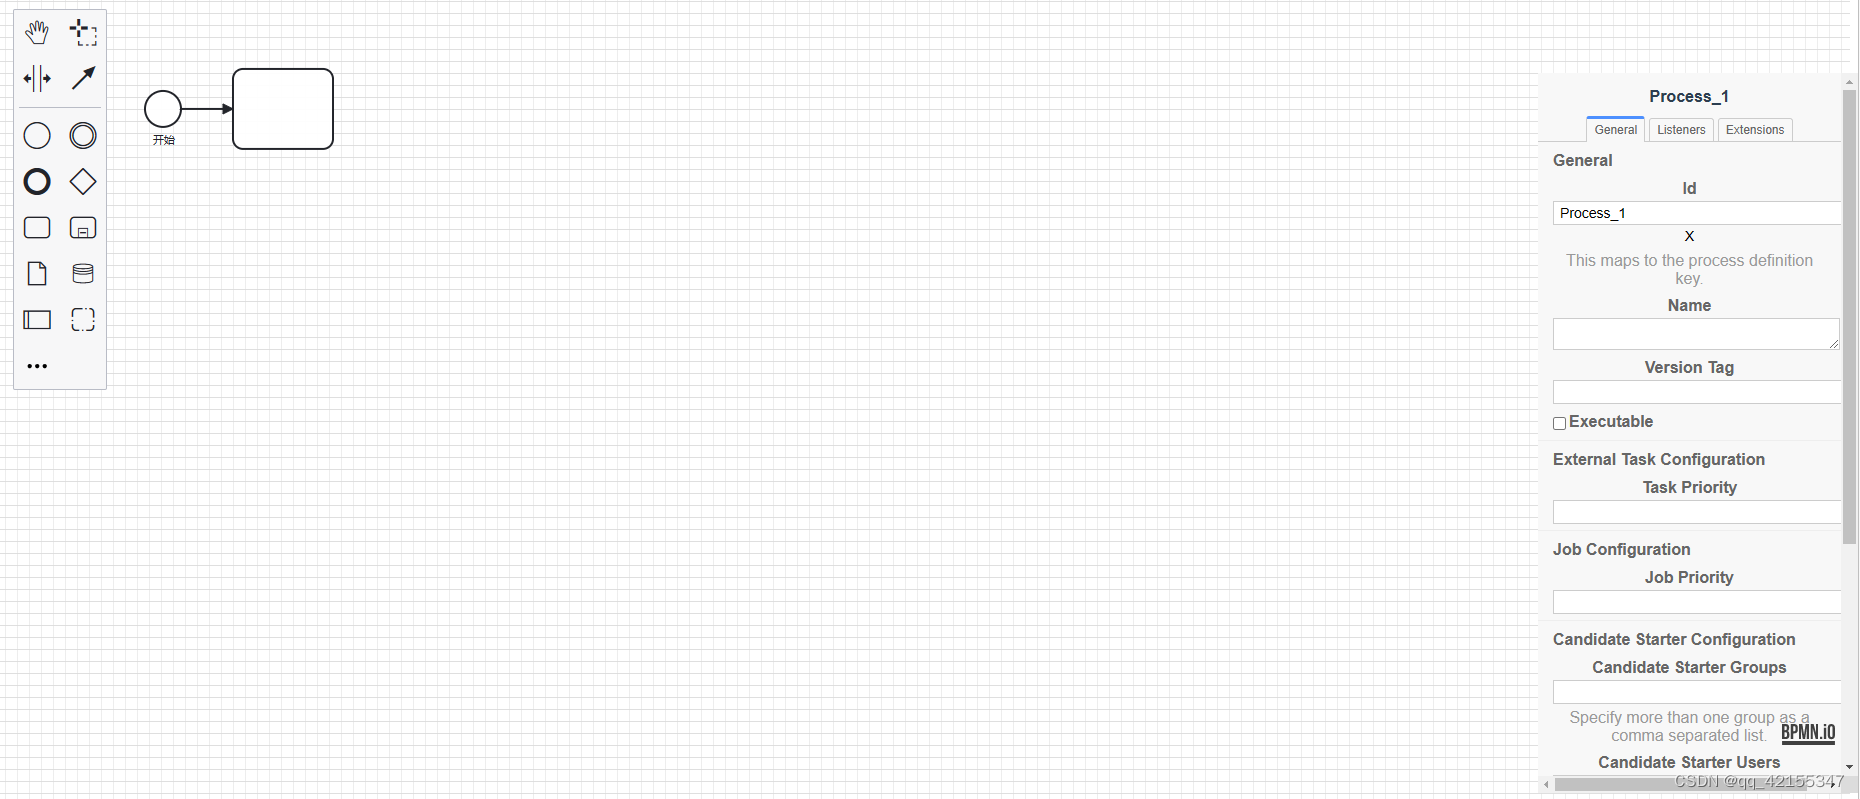
运行后效果
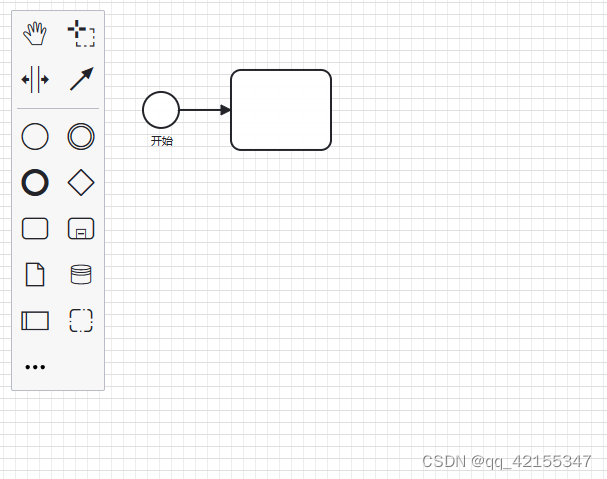
三、使用工具栏
1.左侧工具栏
左侧工具栏只需引入样式
import "bpmn-js/dist/assets/diagram-js.css";
import "bpmn-js/dist/assets/bpmn-font/css/bpmn.css";
import "bpmn-js/dist/assets/bpmn-font/css/bpmn-codes.css";
import "bpmn-js/dist/assets/bpmn-font/css/bpmn-embedded.css";
2.右侧工具栏
2.1 导入模块
定义一个容器
<div ref="panel" id="js-properties-panel" class="panel"></div>
导入模块和样式
import propertiesPanelModule from "bpmn-js-properties-panel";
import propertiesProviderModule from "bpmn-js-properties-panel-activiti/lib/provider/activiti";
// 样式
import "bpmn-js-properties-panel/dist/assets/bpmn-js-properties-panel.css";
还需导入
import activitiModdleDescriptor from "./activiti";
因为我们需要适配 activiti,所以要用 activiti 的格式,activiti 是一个 json 文件。大致长这样
{
  "name": "Activiti",
  "uri": "http://activiti.org/bpmn",
  "prefix": "activiti",
  "xml": {
    "tagAlias": "lowerCase"
  },
  "associations": [],
  "types": [
    {
      "name": "InOutBinding",
      "superClass": [
        "Element"
      ],
      "isAbstract": true,
      "properties": [
        {
          "name": "source",
          "isAttr": true,
          "type": "String"
        },
        {
          "name": "sourceExpression",
          "isAttr": true,
          "type": "String"
        },
        {
          "name": "target",
          "isAttr": true,
          "type": "String"
        },
        {
          "name": "businessKey",
          "isAttr": true,
          "type": "String"
        },
        {
          "name": "local",
          "isAttr": true,
          "type": "Boolean",
          "default": false
        },
        {
          "name": "variables",
          "isAttr": true,
          "type": "String"
        }
      ]
    }
  ],
  "emumerations": []
}
详细说明可以看自定义元模型示例
2.2 使用模块
在构建的时候
this.bpmnModeler = new BpmnModeler({
	container: canvas,
	// 使用快捷键
	keyboard: {
		bindTo: window,
	},
	// 添加控制板
	propertiesPanel: {
		parent: "#js-properties-panel",
	},
	additionalModules: [propertiesPanelModule, propertiesProviderModule],
	moddleExtensions: {
		activiti: activitiModdleDescriptor,
	},
});
样式也调整一下
.panel {
  position: absolute;
  right: 0;
  margin-top: -687px;
  width: 320px;
  height: 720px;
  overflow: auto;
}
四、汉化
1.准备
新建 customTranslate.js
import translations from './translations';

export default function customTranslate(template, replacements) {
  replacements = replacements || {};

  // Translate
  template = translations[template] || template;

  // Replace
  return template.replace(/{([^}]+)}/g, function (_, key) {
    return replacements[key] || '{' + key + '}';
  });
}
创建 translations.js,如有漏的地方还可以自己加
export default {
  "Activate the create/remove space tool": "启动创建/删除空间工具",
  "Activate the global connect tool": "启动全局连接工具",
  "Activate the hand tool": "启动手动工具",
  "Activate the lasso tool": "启动 Lasso 工具",
  "Ad-hoc": "Ad-hoc子流程",
  "Add Lane above": "添加到通道之上",
  "Add Lane below": "添加到通道之下",
  "Append compensation activity": "追加补偿活动",
  "Append {type}": "追加 {type}",
  "Append Task": "追加任务",
  "Append Gateway": "追加网关",
  "Append EndEvent": "追加结束事件",
  "Business Rule Task": "规则任务",
  'Append Intermediate/Boundary Event': '追加 中间/边界 事件',
  "Call Activity": "引用流程",
  "Cancel Boundary Event": "取消边界事件",
  "Cancel End Event": "结束取消事件",
  "Change type": "更改类型",
  "Collapsed Pool": "折叠池",
  "Compensation Boundary Event": "补偿边界事件",
  "Compensation End Event": "结束补偿事件",
  "Compensation Intermediate Throw Event": "中间补偿抛出事件",
  "Compensation Start Event": "补偿启动事件",
  "Complex Gateway": "复杂网关",
  "Conditional Boundary Event (non-interrupting)": "条件边界事件 (非中断)",
  "Conditional Boundary Event": "条件边界事件",
  "Conditional Intermediate Catch Event": "中间条件捕获事件",
  "Conditional Start Event (non-interrupting)": "条件启动事件 (非中断)",
  "Conditional Start Event": "条件启动事件",
  "Connect using Association": "文本关联",
  "Connect using DataInputAssociation": "数据关联",
  "Connect using Sequence/MessageFlow or Association": "消息关联",
  "Create IntermediateThrowEvent/BoundaryEvent": "创建中间抛出/边界事件",
  "Create Intermediate/Boundary Event": "创建中间/边界事件",
  "Create Pool/Participant": "创建池/参与者",
  "Create expanded SubProcess": "创建可折叠子流程",
  "Create {type}": "创建 {type}",
  "Create StartEvent": "创建开始事件",
  "Create EndEvent": "创建结束事件",
  'Create Task': '创建任务',
  "Divide into three Lanes": "分成三条通道",
  "Divide into two Lanes": "分成两条通道",
  "End Event": "结束事件",
  'Create Group': '创建组',
  'Create Gateway': '创建网关',
  "Error Boundary Event": "错误边界事件",
  'Create DataObjectReference': '创建数据对象引用',
  'Create DataStoreReference': '创建数据存储引用',
  "Error End Event": "结束错误事件",
  "Error Start Event": "错误启动事件",
  "Escalation Boundary Event (non-interrupting)": "升级边界事件 (非中断)",
  "Escalation Boundary Event": "升级边界事件",
  "Escalation End Event": "结束升级事件",
  "Escalation Intermediate Throw Event": "中间升级抛出事件",
  "Escalation Start Event (non-interrupting)": "升级启动事件 (非中断)",
  "Escalation Start Event": "升级启动事件",
  "Event Sub Process": "事件子流程",
  "Event based Gateway": "事件网关",
  "Exclusive Gateway": "独占网关",
  "Expanded Pool": "展开池",
  "Inclusive Gateway": "包容网关",
  "Intermediate Throw Event": "中间抛出事件",
  "Link Intermediate Catch Event": "中间链接捕获事件",
  "Link Intermediate Throw Event": "中间链接抛出事件",
  "Loop": "循环",
  "Manual Task": "手动任务",
  "Message Boundary Event (non-interrupting)": "消息边界事件 (非中断)",
  "Message Boundary Event": "消息边界事件",
  "Message End Event": "结束消息事件",
  "Message Intermediate Catch Event": "中间消息捕获事件",
  "Message Intermediate Throw Event": "中间消息抛出事件",
  "Message Start Event (non-interrupting)": "消息启动事件 (非中断)",
  "Message Start Event": "消息启动事件",
  "Parallel Gateway": "并行网关",
  "Parallel Multi Instance": "并行多实例",
  "Receive Task": "接受任务",
  "Remove": "移除",
  "Script Task": "脚本任务",
  "Send Task": "发送任务",
  "Sequential Multi Instance": "串行多实例",
  "Service Task": "服务任务",
  "Signal Boundary Event (non-interrupting)": "信号边界事件 (非中断)",
  "Signal Boundary Event": "信号边界事件",
  "Signal End Event": "结束信号事件",
  "Signal Intermediate Catch Event": "中间信号捕获事件",
  "Signal Intermediate Throw Event": "中间信号抛出事件",
  "Signal Start Event (non-interrupting)": "信号启动事件 (非中断)",
  "Signal Start Event": "信号启动事件",
  "Start Event": "开始事件",
  "Sub Process (collapsed)": "可折叠子流程",
  "Sub Process (expanded)": "可展开子流程",
  "Sub Process": "子流程",
  "Task": "任务",
  "Terminate End Event": "终止边界事件",
  "Timer Boundary Event (non-interrupting)": "定时边界事件 (非中断)",
  "Timer Boundary Event": "定时边界事件",
  "Timer Intermediate Catch Event": "中间定时捕获事件",
  "Timer Start Event (non-interrupting)": "定时启动事件 (非中断)",
  "Timer Start Event": "定时启动事件",
  "Transaction": "事务",
  "User Task": "用户任务",
  "already rendered {element}": "{element} 已呈现",
  "diagram not part of bpmn:Definitions": "图表不是 bpmn:Definitions 的一部分",
  "element required": "需要元素",
  "element {element} referenced by {referenced}#{property} not yet drawn": "元素 {element} 的引用 {referenced}#{property} 尚未绘制",
  "failed to import {element}": "{element} 导入失败",
  "flow elements must be children of pools/participants": "元素必须是池/参与者的子级",
  "more than {count} child lanes": "超过 {count} 条通道",
  "no diagram to display": "没有要显示的图表",
  "no parent for {element} in {parent}": "在 {element} 中没有父元素 {parent}",
  "no process or collaboration to display": "没有可显示的流程或协作",
  "no shape type specified": "未指定形状类型",
  "out of bounds release": "越界释放",
  //---------属性面板--------
  'General': '通用',
  'Details': '详情',
  'Documentation': '文档',
  'Version Tag': '版本标签',
  'Category Value': '类别值',
  'Process Id': '进程 Id',
  'Process Name': '进程名称',
  'Link Name': '链接名称',
  'Element Documentation': '元素文档',
  'Process Documentation': '进程文档',
  'Task Priority': '任务优先级',
  'Variables': "变量",
  'Listeners': '监听器',
  'Extensions': '扩展',
  'Forms': '表单',
  'Id': '标识',
  'Name': '名称',
  'Message Name': '消息名称',
  'Message': '消息',
  'Initiator': '创建者',
  'Asynchronous Continuations': '持续异步',
  'Asynchronous Before': '异步前',
  'Asynchronous After': '异步后',
  'Job Configuration': '工作配置',
  'Exclusive': '排除',
  'Job Priority': '工作优先级',
  'Retry Time Cycle': '重试时间周期',
  'History Configuration': '历史配置',
  'History Time To Live': '历史的生存时间',
  'Form Key': '表单key',
  'Form Fields': '表单字段',
  'Business Key': '业务key',
  'Form Field': '表单字段',
  'ID': '编号',
  'Type': '类型',
  'Label': '名称',
  'Default Value': '默认值',
  'Validation': '校验',
  'Add Constraint': '添加约束',
  'Config': '配置',
  'Properties': '属性',
  'Add Property': '添加属性',
  'Value': '值',
  'Execution Listener': '执行监听',
  'Task Listener': '任务监听器',
  'Event Type': '事件类型',
  'Listener Type': '监听器类型',
  'Java Class': 'Java类',
  'Expression': '表达式',
  'Must provide a value': '必须提供一个值',
  'Delegate Expression': '代理表达式',
  'Script': '脚本',
  'Script Format': '脚本格式',
  'Script Type': '脚本类型',
  'Inline Script': '内联脚本',
  'External Script': '外部脚本',
  'Resource': '资源',
  'Field Injection': '字段注入',
  'Input/Output': '输入/输出',
  'Input Parameters': '输入参数',
  'Output Parameters': '输出参数',
  'Parameters': '参数',
  'Output Parameter': '输出参数',
  'Timer Definition Type': '定时器定义类型',
  'Timer Definition': '定时器定义',
  'Date': '日期',
  'Duration': '持续',
  'Cycle': '循环',
  'Signal': '信号',
  'Signal Name': '信号名称',
  'Escalation': '升级',
  'Error': '错误',
  'Condition': '条件名称',
  'Variable Name': '变量名称',
  'Variable Event': '变量事件',
  'Specify more than one variable change event as a comma separated list.': '多个变量事件以逗号隔开',
  'Wait for Completion': '等待完成',
  'Activity Ref': '活动参考',
  'Executable': '可执行文件',
  'External Task Configuration': '扩展任务配置',
  'External': '外部',
  'Connector': '连接器',
  'Must configure Connector': '必须配置连接器',
  'Connector Id': '连接器编号',
  'Implementation': '实现方式',
  'Field Injections': '字段注入',
  'Fields': '字段',
  'Result Variable': '结果变量',
  'Topic': '主题',
  'Configure Connector': '配置连接器',
  'Input Parameter': '输入参数',
  'Assignee': '代理人',
  'Candidate Users': '候选用户',
  'Candidate Groups': '候选组',
  'Due Date': '到期时间',
  'Follow Up Date': '跟踪日期',
  'Priority': '优先级',
  'This maps to the process definition key.': '映射到流程定义键',
  "This maps to the task definition key.": "映射到任务定义键",
  'Candidate Starter Configuration': '候选启动器配置',
  'Candidate Starter Groups': '候选启动器组',
  'Specify more than one group as a comma separated list.': '指定多个组用逗号分隔',
  'Candidate Starter Users': '候选开始用户',
  'Specify more than one user as a comma separated list.': '指定多个用户用逗号分隔',
  'Tasklist Configuration': '任务列表配置',
  'Startable': '启动',
  'The follow up date as an EL expression (e.g. ${someDate} or an ISO date (e.g. 2015-06-26T09:54:00)': '跟踪日期必须符合EL表达式,如: ${someDate} ,或者一个ISO标准日期,如:2015-06-26T09:54:00',
  'The due date as an EL expression (e.g. ${someDate} or an ISO date (e.g. 2015-06-26T09:54:00)': '跟踪日期必须符合EL表达式,如: ${someDate} ,或者一个ISO标准日期,如:2015-06-26T09:54:00',
  // Errors
  "No variables defined.": "没有定义变量"
};
2.使用
导入汉化组件,在初始化的时候添加进去
import customTranslate from "./customTranslate";

init() {
  // 获取到属性ref为"content"的dom节点
  this.container = this.$refs.content;
  // 获取到属性ref为"canvas"的dom节点
  const canvas = this.$refs.canvas;
  var customTranslateModule = {
    translate: ["value", customTranslate],
  };
  // 建模
  this.bpmnModeler = new BpmnModeler({
    container: canvas,
    // 使用快捷键
    keyboard: {
      bindTo: window,
    },
    //添加控制板
    propertiesPanel: {
      parent: "#js-properties-panel",
    },
    additionalModules: [
      propertiesPanelModule,
      propertiesProviderModule,
      customTranslateModule,
    ],
    moddleExtensions: {
      activiti: activitiModdleDescriptor,
    },
  });
  this.createNewDiagram();
},

至此,基本的使用方式已结束。


 6525
6525


 被折叠的 条评论
为什么被折叠?
被折叠的 条评论
为什么被折叠?
 到【灌水乐园】发言


