


 本文深入探讨了网络编程的基本概念,包括使用InetAddress类获取IP地址,UDP与TCP协议下的数据传输实例,以及GUI(图形用户界面)设计,涵盖JFrame窗口的创建与交互,菜单与事件处理等关键要素。
文章目录
第10章 网络编程
1. 使用InetAddress类获取本地计算机的IP地址和主机名,甲骨文公司(www.oracle.com)主机的IP地址。
提示:
1)通过InetAddress.getLocalHost();获取本地计算机的InetAddress对象
2)通过InetAddress.getByName(“www.oracle.com”);获取Oracle公司的InetAddress对象
import java.net.InetAddress;

public class Demo01 {
    public static void main(String[] args) throws Exception {

        //本地主机名
        String hostAddress = InetAddress.getLocalHost().getHostAddress();
        //本地主机IP地址
        String hostName = InetAddress.getLocalHost().getHostName();
        System.out.println("本地主机名: " + hostName + "\n本地主机IP地址: " + hostAddress);

        //通过主机名(www.oracle.com)获取此主机的ip地址
        String oracleAddress = InetAddress.getByName("www.oracle.com").getHostAddress();
        System.out.println(oracleAddress);
    }
}
2. 使用UDP协议编写一个网络程序,设置接收端程序监听端口为8001,发送端发送的数据是“hello world”
提示:
1)使用new DatagramSocket(8001)构造方法创建接收端的DatagramSocket对象,调用receive()方法接收数据。
2)发送端和接收端使用DatagramPacket封装数据,在创建发送端的DatagramPacket对象时需要指定目标IP地址和端口号,端口号要和接收端监听的端口号一致。
3)发送端使用send()方法发送数据。
4)使用close()方法释放Socket资源。
import java.io.IOException;
import java.net.DatagramPacket;
import java.net.DatagramSocket;
import java.net.InetAddress;
import java.net.SocketException;

/**
 * DatagramPacket 数据报,数据打包或者存储在byte[]里面
 * DatagramSocket 数据报套接字,用来发送或者就收数据报
 */
public class Demo03 {
    public static void main(String[] args) {
    	//创建一个发送线程和一个接收线程
        new Thread(new sendTest()).start();
        new Thread(new receiveTest()).start();
    }
}

class sendTest implements Runnable {
    @Override
    public void run() {
        DatagramPacket packet = null;
        DatagramSocket source = null;

        byte[] bytes = "Hello World".getBytes();

        try {
            InetAddress localHost = InetAddress.getLocalHost();
            packet = new DatagramPacket(bytes,0,bytes.length, localHost,8801);
            source = new DatagramSocket();
            source.send(packet);
        } catch (SocketException e) {
            e.printStackTrace();
        } catch (IOException e) {
            e.printStackTrace();
        } finally {
            if(source != null) {
                source.close();
            }
        }
    }
}

class receiveTest implements Runnable {

    @Override
    public void run() {

        DatagramPacket packet = null;
        DatagramSocket source = null;
        byte[] bytes = new byte[100];

        try {
            packet = new DatagramPacket(bytes,0,bytes.length);
            source = new DatagramSocket(8801);

            source.receive(packet);

            String msg = new String(packet.getData(),0,packet.getLength());
            System.out.println(msg);
        } catch (SocketException e) {
            e.printStackTrace();
        } catch (IOException e) {
            e.printStackTrace();
        } finally {
            if (source != null) {
                source.close();
            }
        }
    }
}
3. 使用TCP协议编写一个网络程序,设置服务器程序监听端口为8002,当与客户端建立连接后,向客户端发送“hello world”,客户端接负责将信息输出。
提示:
1)使用ServerSocket创建服务器端对象,监听8002端口,调用accept()方法等待客户端连接,当与客户端连接后,调用Socket的getOutputStream()方法获得输出流对象,输出“hello world。
2)使用Socket创建客户端对象,指定服务器的IP地址和监听端口号,与服务器端建立连接后,调用Socket的getInputStream()方法获得输入流对象,读取数据,并打印出来
3)在服务器端和客户端都调用close()方法释放socket资源。
import java.io.BufferedInputStream;
import java.io.IOException;
import java.io.InputStream;
import java.io.OutputStream;
import java.net.ServerSocket;
import java.net.Socket;
import java.net.UnknownHostException;

public class Demo04 {
    public static void main(String[] args) {
    	//创建一个服务端线程和一个客户端线程
        new Thread(new Server()).start();
        new Thread(new Client()).start();
    }
}


class Server implements Runnable {
    @Override
    public void run() {
        ServerSocket serverSocket = null;
        OutputStream outputStream = null;

        try {
            serverSocket = new ServerSocket(8888);
            Socket accept = serverSocket.accept();
            outputStream = accept.getOutputStream();

            byte[] bytes = "hello world".getBytes();
            outputStream.write(bytes);
            accept.shutdownOutput();
        } catch (IOException e) {
            e.printStackTrace();
        } finally {
            if (outputStream != null) {
                try {
                    outputStream.close();
                } catch (IOException e) {
                    e.printStackTrace();
                }
            }
            if (serverSocket != null) {
                try {
                    serverSocket.close();
                } catch (IOException e) {
                    e.printStackTrace();
                }
            }
        }
    }
}

class Client implements Runnable {

    @Override
    public void run() {

        Socket socket = null;
        InputStream inputStream = null;
        BufferedInputStream bis = null;

        try {
            socket = new Socket("127.0.0.1",8888);
            inputStream = socket.getInputStream();

            byte[] bytes = new byte[1024];
            int len = -1;
            bis = new BufferedInputStream(inputStream);
            StringBuffer sb = new StringBuffer();

            while ((len = bis.read(bytes)) != -1) {
                sb.append(new String(bytes,0,len));
            }
            System.out.println(sb.toString());
            socket.shutdownInput();

        } catch (UnknownHostException e) {
            e.printStackTrace();
        } catch (IOException e) {
            e.printStackTrace();
        } finally {
            if (inputStream != null) {
                try {
                    inputStream.close();
                } catch (IOException e) {
                    e.printStackTrace();
                }
            }

            if (bis != null) {
                try {
                    bis.close();
                } catch (IOException e) {
                    e.printStackTrace();
                }
            }
            if (socket != null) {
                try {
                    socket.close();
                } catch (IOException e) {
                    e.printStackTrace();
                }
            }
        }
    }
}
第9章 GUI(图形用户界面)
1. 编写一个JFrame窗口,要求如下
1)在窗口的最上方放置一个JLabel标签,标签中默认的文本是“此处显示鼠标右键点击的坐标”
2)为JFrame窗口添加一个鼠标事件,当鼠标右键点击窗口时,鼠标的坐标在JLabel标签中显示
import javax.swing.*;
import java.awt.*;
import java.awt.event.MouseAdapter;
import java.awt.event.MouseEvent;
import java.awt.event.WindowAdapter;
import java.awt.event.WindowEvent;

public class Demo01 {
    public static void main(String[] args) {
        JFrame frame = new JFrame();

        //设置窗体的位置和大小
        frame.setBounds(100,100,500,400);

        //设置frame窗体中组件的布局方式(BorderLayout,边框布局,分为东南西北中五个个位置)
        frame.setLayout(new BorderLayout());

        //创建一个Jlable对象并将其添加进frame窗体中,并且设置label在窗体中位置在North(北)
        JLabel label = new JLabel("此处显示鼠标右键点击的坐标");
        frame.add(label,BorderLayout.NORTH);

        //frame窗体添加鼠标监听,参数是鼠标的适配器,并重写鼠标点击方法(mouseClicked)
        frame.addMouseListener(new MouseAdapter() {
            @Override
            public void mouseClicked(MouseEvent e) {
                // 判断,如果获取的鼠标按键代码是BUTTON3,就执行下面的代码;
                // BUTTON3就代表鼠标的右键
                if(MouseEvent.BUTTON3 == e.getButton()) {
                    int x = e.getX();//获取X坐标
                    int y = e.getY();//后去Y坐标
                    label.setText("X = " + x + ", Y = " + y);//将X,Y设置到lable组件中
                }
            }
        });

        //frame窗体添加窗体监听,参数是窗体适配器,重写窗体正在关闭的方法(windowClosing)
        frame.addWindowListener(new WindowAdapter() {
            @Override
            public void windowClosing(WindowEvent e) {
                //退出程序
                System.exit(0);
            }
        });

        //设置窗体可见
        frame.setVisible(true);
    }
}
2. 编写一个JFrame窗口,要求如下
1)窗口中的NORTH区域中放置一个JPanel面板
2)JPanel面板中从左到右依次放置如下组件:
JLabel标签,标签的文本为“兴趣”
三个JCheckBox多选按钮,文本分别为“羽毛球”、“乒乓球”、“唱歌”
JLabel标签,标签的文本为“性别”
两个JRadioButton按钮,文本分别为“男”、“女”
3)窗口的CENTER区域放置一个JScrollPane容器,容器中放置一个JTextArea文本域
4)当点击多选按钮和单选按钮时,会把选中按钮的文本显示在JTextArea文本域中。
import javax.swing.*;
import java.awt.*;
import java.awt.event.MouseAdapter;
import java.awt.event.MouseEvent;
import java.awt.event.WindowAdapter;
import java.awt.event.WindowEvent;

public class Demo02 {
    public static void main(String[] args) {
        //创建frame窗体,并设置位置、大小、布局
        JFrame frame = new JFrame();
        frame.setBounds(0,0,500,400);
        frame.setLayout(new BorderLayout());
        //创建一个panel面板,并将其添加到窗体中
        JPanel panel = new JPanel();
        panel.setBackground(Color.green);
        //按照题意,创建各种组件
        JLabel interests = new JLabel("兴趣");
        JCheckBox badminton = new JCheckBox("羽毛球");
        JCheckBox pingPong = new JCheckBox("乒乓球");
        JCheckBox sing = new JCheckBox("唱歌");
        JLabel sex = new JLabel("性别");
        JRadioButton boy = new JRadioButton("男");
        JRadioButton  girl= new JRadioButton("女");
        //将各种组件添加到panel面板中
        panel.add(interests);
        panel.add(badminton);
        panel.add(pingPong);
        panel.add(sing);
        panel.add(sex);
        panel.add(boy);
        panel.add(girl);
        //创建一个textArea文本域,将其添加到带有滚动条的jScrollPane中
        JTextArea textArea = new JTextArea();
        textArea.setText("嘿嘿嘿");
        JScrollPane jScrollPane = new JScrollPane(textArea);
        //将panel面板加入frame窗体中,设置位置为NORTH南
        frame.add(panel,BorderLayout.NORTH);
        //将jScrollPane组件添加到frame组件中,并设置位置在中间
        frame.add(jScrollPane,BorderLayout.CENTER);
        //添加自定义的鼠标监听,实现点击时,获取按钮的文本,并将其设置到textArea文本域中
        addMouseListener(badminton,textArea);
        addMouseListener(pingPong,textArea);
        addMouseListener(sing,textArea);
        addMouseListener(boy,textArea);
        addMouseListener(girl,textArea);
        //当点击叉号时退出程序
        // frame窗体添加窗体监听,参数是窗体适配器,重写窗体正在关闭的方法(windowClosing)
        frame.addWindowListener(new WindowAdapter() {
            @Override
            public void windowClosing(WindowEvent e) {
                //退出程序
                System.exit(0);
            }
        });
        //设置frame窗体可见
        frame.setVisible(true);
    }

    /**
     * 此方法可以获取选框对象的文本,并将文本设置到textArea文本域中
     */
    public static void getThisTextAndSet(Object obj,JTextArea textArea) {
        if (obj instanceof JCheckBox) {
            JCheckBox checkBox = (JCheckBox)obj;
            textArea.setText(checkBox.getText());
        } else if (obj instanceof JRadioButton) {
            JRadioButton radioButton = (JRadioButton)obj;
            textArea.setText(radioButton.getText());
        } else {
            textArea.setText("");
        }
    }

    /**
     * 此方是自定义的给选框对象添加鼠标点击事件的,
     * 点击时或调用getThisTextAndSet()方法获取选框的文本并将文本设置到文本域中
     * @param obj
     * @param textArea
     */
    public static void addMouseListener(Object obj, JTextArea textArea) {
        if (obj instanceof JCheckBox) {
            JCheckBox checkBox = (JCheckBox)obj;
            checkBox.addMouseListener(new MouseAdapter() {
                @Override
                public void mouseClicked(MouseEvent e) {
                    getThisTextAndSet(checkBox,textArea);
                }
            });
        } else if (obj instanceof JRadioButton) {
            JRadioButton radioButton = (JRadioButton)obj;
            radioButton.addMouseListener(new MouseAdapter() {
                @Override
                public void mouseClicked(MouseEvent e) {
                    getThisTextAndSet(radioButton,textArea);
                }
            });
        } else {
        }
    }
}
3. 编写一个JFrame窗口,要求如下
1)窗口包含一个菜单栏和一个JLabel标签。
2)菜单栏中有两个菜单,第一个菜单有两个菜单项,它们之间用分隔符分开,第二个菜单有一个菜单项。
3)JLabel标签放置在窗口的中间(即BorderLayout.CENTER),当点击菜单项的时候,菜单项中的文本显示的JLabel标签中。
import javax.swing.*;
import java.awt.*;
import java.awt.event.*;

public class Demo03 {
    public static void main(String[] args) {
//创建frame窗体,并设置位置、大小、布局
        JFrame frame = new JFrame();
        frame.setBounds(0,0,500,400);
        frame.setLayout(new BorderLayout());

        JMenuBar menuBar = new JMenuBar();

        JMenu menu1 = new JMenu("menu1");
        JMenu menu2 = new JMenu("menu2");

        JMenuItem menuItem11 = new JMenuItem("menuItem1_1");
        JMenuItem menuItem12 = new JMenuItem("menuItem1_2");
        JMenuItem menuItem21 = new JMenuItem("menuItem2_1");

        menu1.add(menuItem11);
        menu1.add(menuItem12);
        menu2.add(menuItem21);

        menuBar.add(menu1);
        menuBar.add(menu2);

        JLabel label = new JLabel();
        getThisTextAndSet(menuItem11,label);
        getThisTextAndSet(menuItem12,label);
        getThisTextAndSet(menuItem21,label);

        frame.add(label,BorderLayout.CENTER);
        frame.add(menuBar,BorderLayout.NORTH);
        //当点击叉号时退出程序
        // frame窗体添加窗体监听,参数是窗体适配器,重写窗体正在关闭的方法(windowClosing)
        frame.addWindowListener(new WindowAdapter() {
            @Override
            public void windowClosing(WindowEvent e) {
                //退出程序
                System.exit(0);
            }
        });
        frame.setVisible(true);
    }

    public static void getThisTextAndSet(JMenuItem menuItem,JLabel label) {
        //测试中发现鼠标监听不生效,所以使用ActionListener动作监听
        menuItem.addActionListener(new ActionListener() {
            @Override
            //actionPerformed=执行操作
            public void actionPerformed(ActionEvent e) {
                //获取菜单项文本,并将其设置到label中
                label.setText(menuItem.getText());
            }
        });
    }
}
其他
实现字符串大小写的转换并倒序输出
编写一个程序,实现字符串大小写的转换并倒序输出,要求如下
- 使用for循环将字符串“HelloWorld”从最后一个字符开始遍历。
- 遍历的当前字符如果是大写字符,就使用toLowerCase()方法将其转换为小写字符,反之则使用toUpperCase() 方法将其转换为大写字符
- 定义一个StringBuffer对象,调用append()方法依次添加遍历的字符,最后调用StringBuffer对象的toString()方法,并将得到的结果输出。
public class Demo01 {
    public static void main(String[] args) {

        char[] chars = "Hello World".toCharArray();
        StringBuffer buffer = new StringBuffer();

        //for循环逆序遍历
        for (int i = chars.length-1; i >= 0; i--) {

            if(Character.isLowerCase(chars[i])) {//使用Character类的isLowerCase()方法判断是否为小写字母
                //使用Character类的toUpperCase()方法将字母转为大写字母,并将这个字符添加到buffer对象上
                buffer.append(Character.toUpperCase(chars[i]));
            } else if(Character.isUpperCase(chars[i])) {            //使用Character类的isUpperCase()方法判断是否为大写字母
                //使用Character类的toLowerCase()方法将字母转为小写字母,并将这个字符添加到buffer对象上
                buffer.append(Character.toLowerCase(chars[i]));
            } else {    //其他情况,即 既不是小写字母也不是大写字母(非字母),那么直接将这个字符添加到buffer对象上
                buffer.append(chars[i]);
            }
        }

        //调用对象的toString()方法,将其转化为字符串,并打印出来
        System.out.println(buffer.toString());
    }
}
杨辉三角
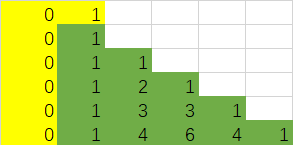
import java.util.Scanner;
/**
 * 杨辉三角
 */
public class Demo02 {
    public static void main(String[] args) {
        //键盘输入阶数
        System.out.print("请输入杨辉三角的阶数:");
        int n = new Scanner(System.in).nextInt();

        //定义存放杨辉三角的数组,行数和列数都多一(多余的一行和一列起到计算的辅助性作用)
        int[][] arr = new int[n+1][n+1];

        //将第0行1列数字设为1
        arr[0][1] = 1;

        //循环遍历杨辉三角存在在数组的区域(除去第一行和第一列)
        for (int j = 1; j <= n; j++) {
            for (int i = 1; i <= j ; i++) {
                arr[j][i] = arr[j-1][i] + arr[j-1][i-1];
            }
        }

        //再将杨辉三角所在的区域循环遍历出来
        for (int j = 1; j <= n; j++) {
            for (int i = 1; i <= j ; i++) {
                System.out.print(arr[j][i] + "\t");
            }
            System.out.println();
        }
    }
}


 5833
5833

 被折叠的 条评论
为什么被折叠?
被折叠的 条评论
为什么被折叠?
 到【灌水乐园】发言


