


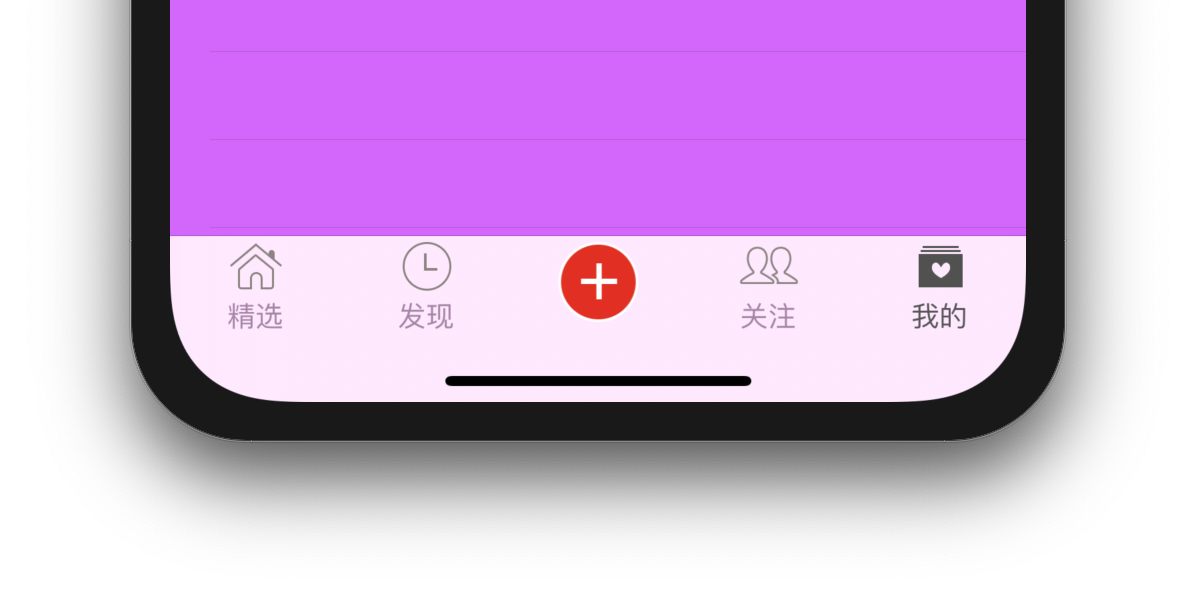
tabBar中间的发布按钮
大概思路
- 需要在现有的tabBar中间添加一个空的tabViewController控制器来占位
- 创建一个按钮,把按钮覆盖在空的占位控制器上
代码实现
1. 创建占位视图控制器
调用setUpTabViewController来创建视图控制器(具体代码见上节)
[self setUpTabViewController:[[UITableViewController alloc]init] title:nil image:nil selectedImage:nil];
2. 创建按钮并添加到占位视图控制器上
方法1
重写viewWillApper方法(viewWillApper方法是在控制器即将展示的时候执行的)
注意:使用dispatch_once_t控制页面对象生命周期只触发一次,防止按钮重复创建
-(void)viewWillAppear:(BOOL)animated{
	static dispatch_once_t onceToken;
    dispatch_once(&onceToken,^{
        UIButton* btn = [UIButton buttonWithType:UIButtonTypeCustom];
        [btn setImage:[UIImage imageNamed:@"tabBar_publish_icon"] forState:UIControlStateNormal];
        [btn setImage:[UIImage imageNamed:@"tabBar_publish_click_icon"] forState:UIControlStateSelected];
        btn.frame = CGRectMake(0,0,self.tabBar.frame.size.width/5, self.tabBar.frame.size.height);
        btn.center = CGPointMake(self.tabBar.frame.size.width/2, self.tabBar.frame.size.height/2);
        [btn addTarget:self action:@selector(click) forControlEvents:UIControlEventTouchUpInside];
        [self.tabBar addSubview:btn];
    });
}
方法2(推荐)
重写getter方法,然后在viewWillApper中调用
@property(nonatomic,weak)UIButton* publishButton;

- (UIButton *)publishButton{
    // 如果按钮不存在就创建按钮返回,如果存在则不创建直接返回当前按钮
    if (!_publishButton) {
        UIButton* publishButton = [UIButton buttonWithType:UIButtonTypeCustom];
        [publishButton setImage:[UIImage imageNamed:@"tabBar_publish_icon"] forState:UIControlStateNormal];
        [publishButton setImage:[UIImage imageNamed:@"tabBar_publish_click_icon"] forState:UIControlStateSelected];
        publishButton.frame = CGRectMake(0,0,self.tabBar.frame.size.width/5, self.tabBar.frame.size.height);
        publishButton.center = CGPointMake(self.tabBar.frame.size.width/2, self.tabBar.frame.size.height/2);
        [publishButton addTarget:self action:@selector(click) forControlEvents:UIControlEventTouchUpInside];
        [self.tabBar aaddSubview:self.publishButton];
        _publishButton = self.publishButton;
    }
    return _publishButton;
}

-(void)viewWillAppear:(BOOL)animated{
    [super viewWillAppear:animated];
	// 调用getter方法
	[self publishButton]

}
方法3(推荐)
使用强引用类型,和方法2类似
@property(nonatomic,strong)UIButton* publishButton;

- (UIButton *)publishButton{
    // 如果按钮不存在就创建按钮返回,如果存在则不创建直接返回当前按钮
    if (!_publishButton) {
        _publishButton = [UIButton buttonWithType:UIButtonTypeCustom];
        [_publishButton setImage:[UIImage imageNamed:@"tabBar_publish_icon"] forState:UIControlStateNormal];
        [_publishButton setImage:[UIImage imageNamed:@"tabBar_publish_click_icon"] forState:UIControlStateSelected];
        _publishButton.frame = CGRectMake(0,0,self.tabBar.frame.size.width/5, self.tabBar.frame.size.height);
        _publishButton.center = CGPointMake(self.tabBar.frame.size.width/2, self.tabBar.frame.size.height/2);
        [_publishButton addTarget:self action:@selector(click) forControlEvents:UIControlEventTouchUpInside];
    }
    return _publishButton;
}

-(void)viewWillAppear:(BOOL)animated{
    [super viewWillAppear:animated];
    // 在view中添加这个按钮
	[self.tabBar addSubview:self.publishButton];
}
注意事项
- 按钮应该在tabBar创建完成之后再添加上去,否则tabBar会盖住按钮(重写viewWillAppear方法,让创建按钮的代码在view视图即将创建完成的时候执行。)
- 应该注意按钮的重复添加问题,最好将按钮设置为强引用型的成员变量,具体按钮创建的代码需重写gettter方法,每次view视图即将加载完成时执行viewWillApper方法时只将按钮添加到视图上即可。


 1168
1168


 被折叠的 条评论
为什么被折叠?
被折叠的 条评论
为什么被折叠?
 到【灌水乐园】发言


