


更多文章
springBoot学习系列笔记文章
springBoot学习笔记(1)—— 搭建springBoot项目
文章目录
提示:以下是本篇文章正文内容,下面案例可供参考
一、redis是什么?
Redis 是一个使用 C 语言写成的,开源、基于内存、可选持久性的、非关系型,key-value数据库java,Redis 支持的数据类型:String(字符串),list(列表),hash(字典),set(集合),zset(有序集合)。
二、springBoot整合redis缓存的步骤
1. 引入jar包
    <dependency>
            <groupId>org.springframework.boot</groupId>
            <artifactId>spring-boot-starter-data-redis</artifactId>
        </dependency>
        <dependency>
            <groupId>org.springframework.boot</groupId>
            <artifactId>spring-boot-starter-data-redis-reactive</artifactId>
        </dependency>
2. 完整pom内容
<?xml version="1.0" encoding="UTF-8"?>
<project xmlns="http://maven.apache.org/POM/4.0.0" xmlns:xsi="http://www.w3.org/2001/XMLSchema-instance"
         xsi:schemaLocation="http://maven.apache.org/POM/4.0.0 https://maven.apache.org/xsd/maven-4.0.0.xsd">
    <modelVersion>4.0.0</modelVersion>
    <parent>
        <groupId>org.springframework.boot</groupId>
        <artifactId>spring-boot-starter-parent</artifactId>
        <version>2.6.3</version>
        <relativePath/> <!-- lookup parent from repository -->
    </parent>
    <groupId>com.example</groupId>
    <artifactId>demo</artifactId>
    <version>0.0.1-SNAPSHOT</version>
    <name>springboot-redis</name>
    <description>Demo project for Spring Boot</description>
    <properties>
        <java.version>1.8</java.version>
    </properties>
    <dependencies>
        <dependency>
            <groupId>org.springframework.boot</groupId>
            <artifactId>spring-boot-starter-data-jdbc</artifactId>
        </dependency>
        <dependency>
            <groupId>org.springframework.boot</groupId>
            <artifactId>spring-boot-starter-data-redis</artifactId>
        </dependency>
        <dependency>
            <groupId>org.springframework.boot</groupId>
            <artifactId>spring-boot-starter-data-redis-reactive</artifactId>
        </dependency>
        <dependency>
            <groupId>org.springframework.boot</groupId>
            <artifactId>spring-boot-starter-jdbc</artifactId>
        </dependency>
        <dependency>
            <groupId>org.springframework.boot</groupId>
            <artifactId>spring-boot-starter-web</artifactId>
        </dependency>

        <dependency>
            <groupId>mysql</groupId>
            <artifactId>mysql-connector-java</artifactId>
            <scope>runtime</scope>
        </dependency>
        <dependency>
            <groupId>org.projectlombok</groupId>
            <artifactId>lombok</artifactId>
            <optional>true</optional>
        </dependency>
        <dependency>
            <groupId>org.springframework.boot</groupId>
            <artifactId>spring-boot-starter-test</artifactId>
            <scope>test</scope>
        </dependency>
        <dependency>
            <groupId>io.projectreactor</groupId>
            <artifactId>reactor-test</artifactId>
            <scope>test</scope>
        </dependency>

        <dependency>
            <groupId>org.mybatis.spring.boot</groupId>
            <artifactId>mybatis-spring-boot-starter</artifactId>
            <version>1.3.1</version>
        </dependency>

    </dependencies>

    <build>
        <plugins>
            <plugin>
                <groupId>org.springframework.boot</groupId>
                <artifactId>spring-boot-maven-plugin</artifactId>
                <configuration>
                    <excludes>
                        <exclude>
                            <groupId>org.projectlombok</groupId>
                            <artifactId>lombok</artifactId>
                        </exclude>
                    </excludes>
                </configuration>
            </plugin>
        </plugins>
    </build>
</project>
3. application配置内容
spring:
  datasource:
    #   数据源基本配置
    username: root
    password: 123456
    driver-class-name: com.mysql.cj.jdbc.Driver
    url: jdbc:mysql://数据库地址:3306/springBootAll?useUnicode=true&characterEncoding=utf8&serverTimezone=GMT%2B8&useSSL=false
  cache:
    type: redis
  redis:
    database: 8 #声明使用几号数据库
    host: 127.0.0.1 # Redis server host.
    password: jxkth123456 # Login password of the redis server.
    port: 6379 # Redis server port.
    ssl: false # Whether to enable SSL support.
    timeout: 5000 # Connection timeout
    expire: 3600 # 过期时间

mybatis:
  mapper-locations: classpath:mapper/*.xml

server:
  port: 8081
4.redis序列化配置
@Configuration
@EnableCaching
public class RedisConfig extends CachingConfigurerSupport {

    //过期时间1天
    private Duration timeToLive = Duration.ofDays(1);
    @Bean
    public RedisCacheManager redisCacheManager(RedisConnectionFactory connectionFactory) {
        //默认1
        RedisCacheConfiguration config = RedisCacheConfiguration.defaultCacheConfig()
                .entryTtl(this.timeToLive)
                .serializeKeysWith(RedisSerializationContext.SerializationPair.fromSerializer(keySerializer()))
                .serializeValuesWith(RedisSerializationContext.SerializationPair.fromSerializer(valueSerializer()))
                .disableCachingNullValues();
        RedisCacheManager redisCacheManager = RedisCacheManager.builder(connectionFactory)
                .cacheDefaults(config)
                .transactionAware()
                .build();
        return redisCacheManager;
    }
    @Bean(name = "redisTemplate")
    public RedisTemplate<String,Object> redisTemplate(RedisConnectionFactory redisConnectionFactory){
        RedisTemplate<String,Object> redisTemplate = new RedisTemplate<>();
        redisTemplate.setConnectionFactory(redisConnectionFactory);
        redisTemplate.setKeySerializer(keySerializer());
        redisTemplate.setHashKeySerializer(keySerializer());
        redisTemplate.setValueSerializer(valueSerializer());
        redisTemplate.setHashValueSerializer(valueSerializer());
        return redisTemplate;
    }
    private RedisSerializer<String> keySerializer() {
        return new StringRedisSerializer();
    }
    private RedisSerializer<Object> valueSerializer() {
        return new GenericJackson2JsonRedisSerializer();
    }

}
5. service服务
@Service
public class UserService {

    @Resource
    UserDao userDao;

    /***
     * description: 使用注解声明使用缓存,用缓存的键值为userService:用户id,
     * 缓存内容为查询的用户对象
     *  @Cacheable 的作用 主要针对方法配置,能够根据方法的请求参数对其结果进行缓存
     *  @Cacheable 作用和配置方法
     */
    @Cacheable(value = "userService",key = "#userId")
    public User findUserById(Long userId){
        return userDao.findUserById(userId);
    }

    /**
     *@CachePut 的作用 主要针对方法配置,能够根据方法的请求参数对其结果进行缓存,和
     * @Cacheable 不同的是,它每次都会触发真实方法的调用
     * @CachePut 作用和配置方法
     */
    @CacheEvict(value = "userService",key = "#user.id")
    public void updateUser(User user){
         userDao.updateUser(user);
    }
    /***
     * description:删除对象,并删除缓存
     * @CachEvict 的作用 主要针对方法配置,能够根据一定的条件对缓存进行清空
     * @CacheEvict 作用和配置方法
     */
    @CacheEvict(value = "userService",key = "#userId")
    public int  deleteUserById(Long userId){
        return userDao.deleteUserById(userId);
    }
}
controller,dao,和xml中的查询语句与常规查询语句和方法一致,此处不多赘述。
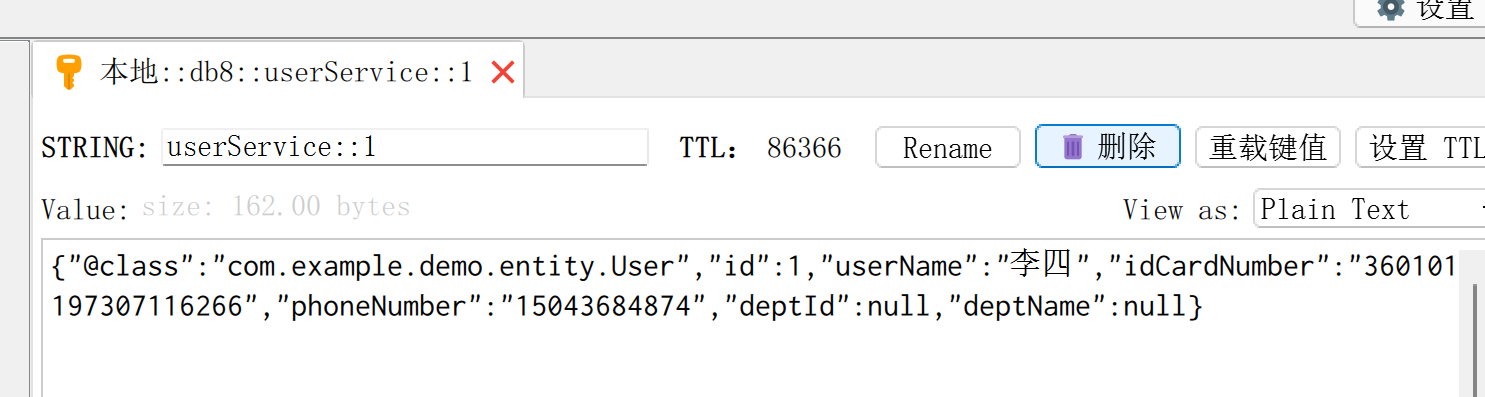
重点:使用@Cachecable主键声明使用缓存,因为已经配置好了使用redis作为缓存组件,所以可以在redis中查询到缓存对象。
6. 常用缓存注解说明
- @Cacheable
@Cacheable 的作用 主要针对方法配置,能够根据方法的请求参数对其结果进行缓存
@Cacheable 作用和配置方法
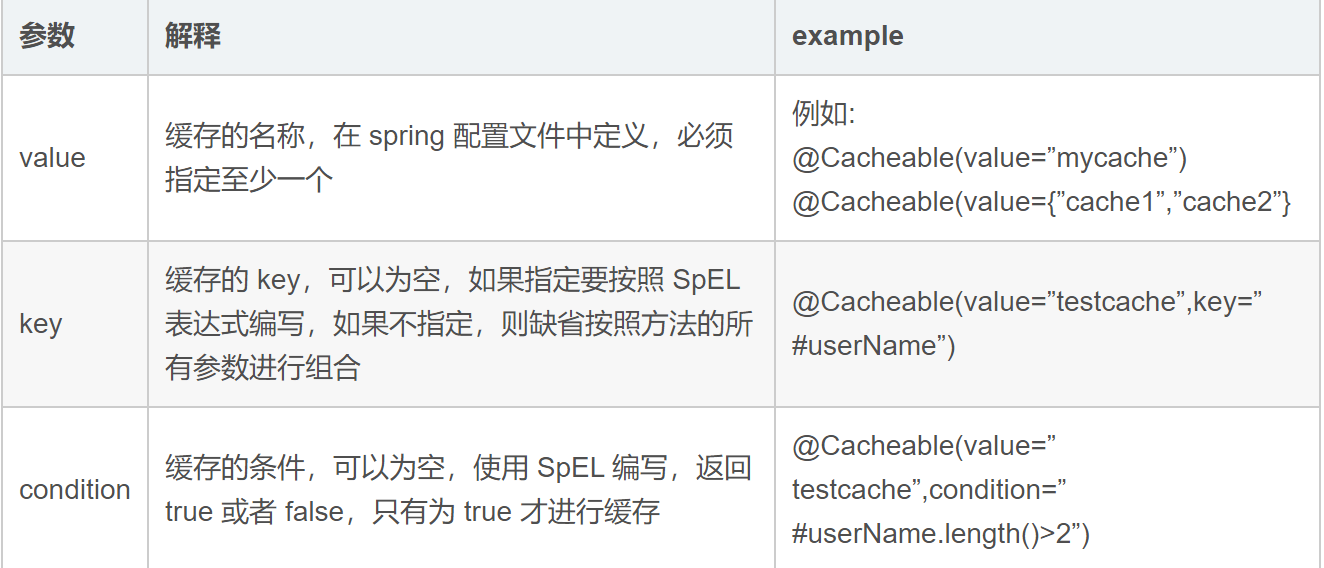
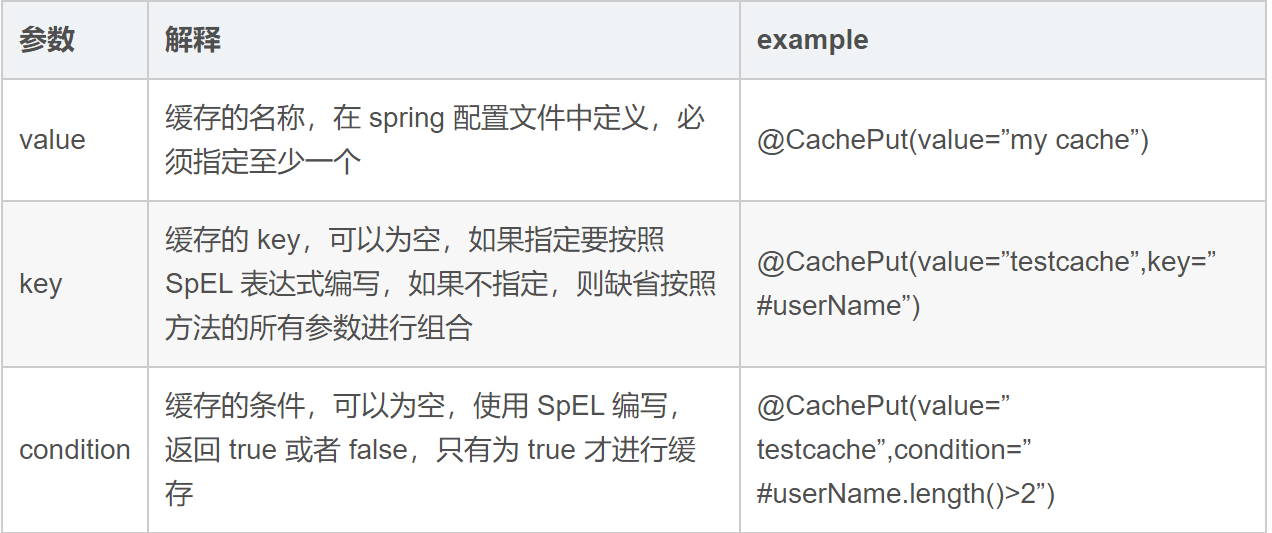
- @CachePut
@CachePut 的作用 主要针对方法配置,能够根据方法的请求参数对其结果进行缓存,和 @Cacheable 不同的是,它每次都会触发真实方法的调用
@CachePut 作用和配置方法
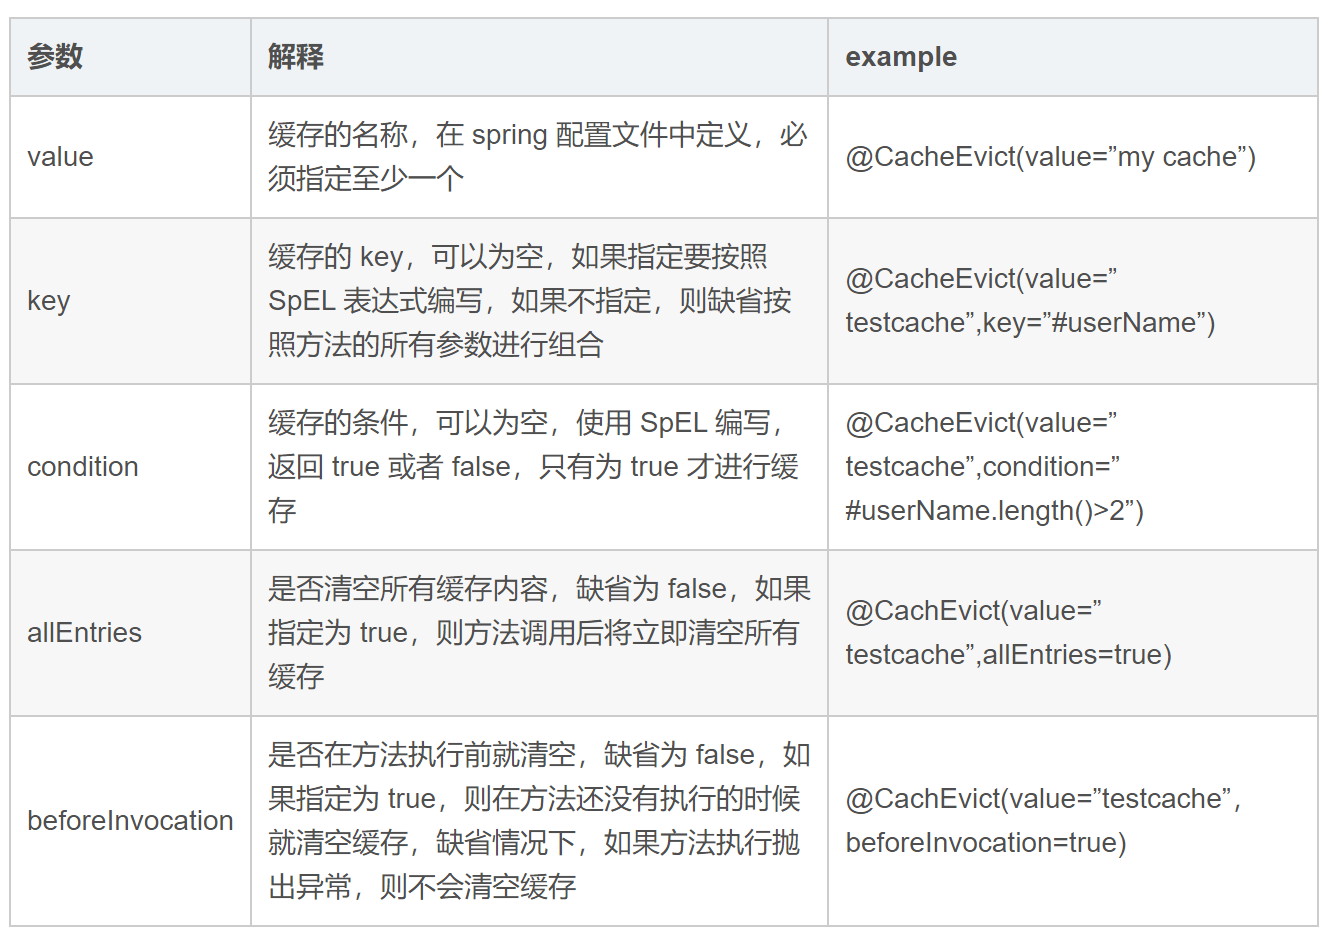
- @CacheEvict
@CachEvict 的作用 主要针对方法配置,能够根据一定的条件对缓存进行清空
@CacheEvict 作用和配置方法
7. 缓存截图


 452
452


 被折叠的 条评论
为什么被折叠?
被折叠的 条评论
为什么被折叠?
 到【灌水乐园】发言


