


一、简介
Vold(volume Daemon),即Volume守护进程,用来管理Android中存储类(USB-Storage,包含U盘和SD卡)的热拔插事件,处于Kernel和Framework之间,是两个层级连接的桥梁。Vold在系统中以守护进程存在,是一个单独的进程,在开机阶段由Init拉起。在vold.rc中由详细配置。启动之后监听来自kernel的UEvent,挂载U盘并和FrameWork层的StorageManager通信,设置挂载选项、用户权限等,以实现外部存储对上层app和用户的可见性。(本文主要基于Android 10,末尾会简要介绍目前最新的Android 12与10 的部分变化)
1.项目结构
vold的代码结构
包含Encrypt相关文件是Android在5.0版本增加的全盘加密的实现,
包含Keymaster相关文件是Android在7.0版本增加的文件级加密的实现。
以上两部分归属于vdc加密相关,暂且不表。
system/vold$ tree .
.
├── Android.bp
├── binder
│   └── android
│       └── os
│           ├── IVold.aidl
│           ├── IVoldListener.aidl
│           ├── IVoldMountCallback.aidl
│           └── IVoldTaskListener.aidl
├── fs
│   ├── Exfat.cpp
│   ├── Exfat.h
│   ├── Ext4.cpp
│   ├── Ext4.h
│   ├── F2fs.cpp
│   ├── F2fs.h
│   ├── ufsd_common.h
│   ├── UFSD.cpp
│   ├── UFSD.h
│   ├── ufsd_m.cpp
│   ├── Vfat.cpp
│   └── Vfat.h
├── main.cpp
├── model
│   ├── Disk.cpp
│   ├── Disk.h
│   ├── EmulatedVolume.cpp
│   ├── EmulatedVolume.h
│   ├── ObbVolume.cpp
│   ├── ObbVolume.h
│   ├── PrivateVolume.cpp
│   ├── PrivateVolume.h
│   ├── PublicVolume.cpp
│   ├── PublicVolume.h
│   ├── StubVolume.cpp
│   ├── StubVolume.h
│   ├── VolumeBase.cpp
│   ├── VolumeBase.h
│   ├── VolumeEncryption.cpp
│   └── VolumeEncryption.h
├── NetlinkHandler.cpp
├── NetlinkHandler.h
├── NetlinkManager.cpp
├── NetlinkManager.hs
├── OWNERS
├── Utils.cpp
├── Utils.h
├── VoldNativeService.cpp
├── VoldNativeService.h
├── VoldNativeServiceValidation.cpp
├── VoldNativeServiceValidation.h
├── vold_prepare_subdirs.cpp
├── vold.rc
├── VoldUtil.cpp
├── VoldUtil.h
├── VolumeManager.cpp
└── VolumeManager.h
2.核心模块
Vold主要包含NetLinkManager(nm)、VolumeManager(vm)、VoldNativeService。
其中NetLinkManager主要负责监听来自kernel的UEvent,用来判断是否是大容量存储类设备(USB,SD),如果是就对其挂载。VolumeManager主要是配置相关的选项并告知上层(Framework,app如:SystemUI显示弹窗,audio读取U盘内容)并接受上层所返回的消息(framework会增加用户ID的权限信息)。VoldNativeService则是真正去实现挂载的服务,会创建相应的文件夹,设定U盘权限,是否开启FUSE等等。
二、系统设计
1. Vold 系统架构

2. Vold的启动
2.1 init进程启动vold
vold服务在开机的时候会启动.定义于system/vold/vold.rc文件中:
service vold /system/bin/vold \
        --blkid_context=u:r:blkid:s0 --blkid_untrusted_context=u:r:blkid_untrusted:s0 \
        --fsck_context=u:r:fsck:s0 --fsck_untrusted_context=u:r:fsck_untrusted:s0
    class core
    ioprio be 2
    writepid /dev/cpuset/foreground/tasks
    shutdown critical
    group reserved_disk
2.2 Vold main函数的初始化
vlod 被init启动后,会经历以下几个过程来和kernel,framework建立连接:
1).初始化Log函数;
2).解析rc中的参数,创建vold块设备节点;
3).获取NM和VM单例对象;
4).启动NM、VoldNativeService和VM;
5).创建线程池,并进入循环,维持进程不退出;
/system/vold/main.cpp
int main(int argc, char** argv) {
...
android::base::InitLogging(argv, android::base::LogdLogger(android::base::SYSTEM));//初始化log类
    LOG(INFO) << "Vold 3.0 (the awakening) firing up"; //vold启动log
    VolumeManager* vm;
    NetlinkManager* nm;
    parse_args(argc, argv);//解析参数
...
    mkdir("/dev/block/vold", 0755);//创建vold节点,用来接收uevent消息;
...
    /* Create our singleton managers */    //实例化两个对象
    if (!(vm = VolumeManager::Instance())) {
        LOG(ERROR) << "Unable to create VolumeManager";
        exit(1);
    }
    if (!(nm = NetlinkManager::Instance())) {
        LOG(ERROR) << "Unable to create NetlinkManager";
        exit(1);
}
...
    //启动VolumeManager
if (vm->start()) {
        PLOG(ERROR) << "Unable to start VolumeManager";
        exit(1);
    }
...
//解析 fstab 文件
if (process_config(vm, &has_adoptable, &has_quota, &has_reserved)) {
        PLOG(ERROR) << "Error reading configuration... continuing anyways";
}
...
    //启动VoldNativeService
    if (android::vold::VoldNativeService::start() != android::OK) {
        LOG(ERROR) << "Unable to start VoldNativeService";
        exit(1);
    }
...
//启动NetlinkManager
    if (nm->start()) {
        PLOG(ERROR) << "Unable to start NetlinkManager";
        exit(1);
}
...
    android::IPCThreadState::self()->joinThreadPool();//进入循环
    LOG(INFO) << "vold shutting down";
    exit(0);
}
2.3 VolumeManager 的初始化
int VolumeManager::start() {
 ...
//卸载掉/mnt/下的所有东西(除/mnt/vendor,/mnt/product,/storage/),使之处于	一个干净的状态
unmountAll();
    Devmapper::destroyAll();//初始化/dev/device-mapper
    Loop::destroyAll();//初始化/dev/block/
...
    CHECK(mInternalEmulated == nullptr);
    mInternalEmulated = std::shared_ptr<android::vold::VolumeBase>(
        new android::vold::EmulatedVolume("/data/media"));
    mInternalEmulated->create();//构造出内置存储目录/data/media
// 构造虚拟磁盘
    updateVirtualDisk();

    return 0;
}
mInternalEmulated->create()会将当前存储状态设置成Unmounted。
vm->start()函数之后会调用process_config()来解析fstab文件,把每一条设备挂载信息作为DiskSource都通过addDiskSource添加到volumemanager 的list 数组中。
2.4 VoldNativeService的初始化
status_t VoldNativeService::start() {
    IPCThreadState::self()->disableBackgroundScheduling(true);
    status_t ret = BinderService<VoldNativeService>::publish();
    if (ret != android::OK) {
        return ret;
    }
    sp<ProcessState> ps(ProcessState::self());
    ps->startThreadPool();
    ps->giveThreadPoolName();
    return android::OK;
}
Android 9之前的版本 StorageManagerService与vold的通信是socket,9.0以及后续版本则使用binder通信,VoldNativeService负责连接vold与StorageManagerService。
disableBackgroundScheduling()在接收传入IPC调用时禁用将线程切换到后台。
VoldNativeService继承自BinderService,start函数通过调用publish函数注册了接口。
static status_t publish(bool allowIsolated = false,
                            int dumpFlags = IServiceManager::DUMP_FLAG_PRIORITY_DEFAULT) {
        sp<IServiceManager> sm(defaultServiceManager());
        return sm->addService(String16(SERVICE::getServiceName()), new SERVICE(), allowIsolated,
                              dumpFlags);
}
ServiceManager是用来管理Service的,同时协助binder通信,我们可以通过 addService/getService来添加/得到对应的 Service。
static char const* getServiceName() { return "vold"; }
如此,VoldNativeService作为一个接口类,可以被其他进程通过“vold”获取。
2.5 NetLinkManager 的初始化
NetlinkManager::start()主要实现了以下两个功能:
(1)创建并绑定socket用来接收内核消息(uevent);
(2)新建一个NetlinkHandler对象,并调用其start函数开始监听并处理内核传来的uevent消息。
int NetlinkManager::start() {
...
    if ((mSock = socket(PF_NETLINK, SOCK_DGRAM | SOCK_CLOEXEC, NETLINK_KOBJECT_UEVENT)) < 0) {
        PLOG(ERROR) << "Unable to create uevent socket";
        return -1;
    }
...
    if ((setsockopt(mSock, SOL_SOCKET, SO_RCVBUFFORCE, &sz, sizeof(sz)) < 0) &&
        (setsockopt(mSock, SOL_SOCKET, SO_RCVBUF, &sz, sizeof(sz)) < 0)) {
        PLOG(ERROR) << "Unable to set uevent socket SO_RCVBUF/SO_RCVBUFFORCE option";
        goto out;
    }
    if (setsockopt(mSock, SOL_SOCKET, SO_PASSCRED, &on, sizeof(on)) < 0) {
        PLOG(ERROR) << "Unable to set uevent socket SO_PASSCRED option";
        goto out;
    }
    if (bind(mSock, (struct sockaddr*)&nladdr, sizeof(nladdr)) < 0) {
        PLOG(ERROR) << "Unable to bind uevent socket";
        goto out;
    }
    mHandler = new NetlinkHandler(mSock);
    if (mHandler->start()) {
        PLOG(ERROR) << "Unable to start NetlinkHandler";
        goto out;
    }
 ...
}
由于NetLinkHandler是继承自NetLinkListener,所以调用start就开启了UEvent的监听。
Netlink又是继承SocketListener,代码在: /system/core/libsysutils/src/SocketListener.cpp
3.Vold 的通信
Vold 位于Android 系统的Native层,处于Kernel 与 Framework 之间。向下需要接受来自底层驱动的设备信息并按照来自StorageManager的配置信息,通过系统调用以这些配置将设备挂载以供用户使用。
3.1 Vold 与 Kernel的通信
NetlinkHandler::start()
vold/main.cpp中NetlinkManager::start()函数创建并绑定了socket用来与kernel通信,在此函数最后调用了NetlinkHandler::start()函数来监听消息,接下来分析这个函数。
NetlinkHandler::NetlinkHandler(int listenerSocket) : NetlinkListener(listenerSocket) {}

NetlinkHandler::~NetlinkHandler() {}
int NetlinkHandler::start() {
    return this->startListener();
}
NetlinkHandler的父类是NetlinkListener,而NetlinkListener继承自SocketListener。所以NetlinkHandler::start()函数最终调用了SocketListener::startListener()函数。
int SocketListener::startListener() {
    return startListener(4);
}
int SocketListener::startListener(int backlog) {
    if (!mSocketName && mSock == -1) {
        SLOGE("Failed to start unbound listener");
        errno = EINVAL;
        return -1;
    } else if (mSocketName) {
        if ((mSock = android_get_control_socket(mSocketName)) < 0) {
            SLOGE("Obtaining file descriptor socket '%s' failed: %s",
                 mSocketName, strerror(errno));
            return -1;
        }
        SLOGV("got mSock = %d for %s", mSock, mSocketName);
        fcntl(mSock, F_SETFD, FD_CLOEXEC);
    }
    if (mListen && listen(mSock, backlog) < 0) {
        SLOGE("Unable to listen on socket (%s)", strerror(errno));
        return -1;
    } else if (!mListen)
        mClients[mSock] = new SocketClient(mSock, false, mUseCmdNum);
    if (pipe2(mCtrlPipe, O_CLOEXEC)) {
        SLOGE("pipe failed (%s)", strerror(errno));
        return -1;
    }
    if (pthread_create(&mThread, nullptr, SocketListener::threadStart, this)) {
        SLOGE("pthread_create (%s)", strerror(errno));
        return -1;
    }
    return 0;
}
...
void *SocketListener::threadStart(void *obj) {
    SocketListener *me = reinterpret_cast<SocketListener *>(obj);
    me->runListener();
    pthread_exit(nullptr);
    return nullptr;
}
startListener的作用是开始监听消息,并开启一个线程去执行runListener()函数。
void SocketListener::runListener() {
    while (true) {
        std::vector<pollfd> fds;
        pthread_mutex_lock(&mClientsLock);
        fds.reserve(2 + mClients.size());
        fds.push_back({.fd = mCtrlPipe[0], .events = POLLIN});
        if (mListen) fds.push_back({.fd = mSock, .events = POLLIN});
        for (auto pair : mClients) {
            // NB: calling out to an other object with mClientsLock held (safe)
            const int fd = pair.second->getSocket();
            if (fd != pair.first) SLOGE("fd mismatch: %d != %d", fd, pair.first);
            fds.push_back({.fd = fd, .events = POLLIN});
        }
        pthread_mutex_unlock(&mClientsLock);
        SLOGV("mListen=%d, mSocketName=%s", mListen, mSocketName);
        int rc = TEMP_FAILURE_RETRY(poll(fds.data(), fds.size(), -1));
        if (rc < 0) {
            SLOGE("poll failed (%s) mListen=%d", strerror(errno), mListen);
            sleep(1);
            continue;
        }
        if (fds[0].revents & (POLLIN | POLLERR)) {
            char c = CtrlPipe_Shutdown;
            TEMP_FAILURE_RETRY(read(mCtrlPipe[0], &c, 1));
            if (c == CtrlPipe_Shutdown) {
                break;
            }
            continue;
        }
        if (mListen && (fds[1].revents & (POLLIN | POLLERR))) {
            int c = TEMP_FAILURE_RETRY(accept4(mSock, nullptr, nullptr, SOCK_CLOEXEC));
            if (c < 0) {
                SLOGE("accept failed (%s)", strerror(errno));
                sleep(1);
                continue;
            }
            pthread_mutex_lock(&mClientsLock);
            mClients[c] = new SocketClient(c, true, mUseCmdNum);
            pthread_mutex_unlock(&mClientsLock);
        }
        // Add all active clients to the pending list first, so we can release
        // the lock before invoking the callbacks.
        std::vector<SocketClient*> pending;
        pthread_mutex_lock(&mClientsLock);
        const int size = fds.size();
        for (int i = mListen ? 2 : 1; i < size; ++i) {
            const struct pollfd& p = fds[i];
            if (p.revents & (POLLIN | POLLERR)) {
                auto it = mClients.find(p.fd);
                if (it == mClients.end()) {
                    SLOGE("fd vanished: %d", p.fd);
                    continue;
                }
                SocketClient* c = it->second;
                pending.push_back(c);
                c->incRef();
            }
        }
        pthread_mutex_unlock(&mClientsLock);
        for (SocketClient* c : pending) {
            // Process it, if false is returned, remove from the map
            SLOGV("processing fd %d", c->getSocket());
            if (!onDataAvailable(c)) {
                release(c, false);
            }
            c->decRef();
        }
    }
}
runListener函数循环读取socket消息,mCtrlPipe[0]作为此处的读端,会从流中读取读取POLLIN对应的事件,每一个client对应的socket文件描述符也都会存储到vector中。接下来就是利用poll函数去轮询vector中的每一个文件描述符。根据revents来决定是否有事件被读到,如果没有事件读到则进行下一轮,有事件被读到就将保存对应文件描述符的client,最后调用 onDataAvailable函数。
bool NetlinkListener::onDataAvailable(SocketClient *cli)
{
    int socket = cli->getSocket();
    ssize_t count;
    uid_t uid = -1;
    bool require_group = true;
    if (mFormat == NETLINK_FORMAT_BINARY_UNICAST) {
        require_group = false;
    }
    count = TEMP_FAILURE_RETRY(uevent_kernel_recv(socket,
            mBuffer, sizeof(mBuffer), require_group, &uid));
    if (count < 0) {
        SLOGE("recvmsg failed (%s)", strerror(errno));
        return false;
    }
    NetlinkEvent *evt = new NetlinkEvent();
    if (evt->decode(mBuffer, count, mFormat)) {
        onEvent(evt);
    } else if (mFormat != NETLINK_FORMAT_BINARY) {
        // Don't complain if parseBinaryNetlinkMessage returns false. That can
        // just mean that the buffer contained no messages we're interested in.
        SLOGE("Error decoding NetlinkEvent");
    }
    delete evt;
    return true;
}
onDataAvailable函数是真正用来接收并处理消息的函数,首先调用uevent_kernel_recv函数读取数据,通过decode解析后调用onEvent分发下去,至此,vold守护进程获取到了kernel上传来的uevent消息。
3.2 Vold 与StorageManagerService的通信
(1) init启动zygote进程
init.rc中trigger zygote-start会开启zygote进程与servicemanager进程(binder机制的基础),首先init进程会运行app_main.cpp的main函数:
int main(int argc, char* const argv[]){
   ...
    bool zygote = false;
   ...
    if (zygote) {
        runtime.start("com.android.internal.os.ZygoteInit", args, zygote);
    } else if (className) {
        runtime.start("com.android.internal.os.RuntimeInit", args, zygote);
    } else {
        fprintf(stderr, "Error: no class name or --zygote supplied.\n");
        app_usage();
        LOG_ALWAYS_FATAL("app_process: no class name or --zygote supplied.");
    }
}
可以看到,当zygote为true时,会执行:
runtime.start(“com.android.internal.os.ZygoteInit”, args, zygote);
runtime是AppRuntime对象,接着我们看看runtime的strat函数:
void AndroidRuntime::start(const char* className, const Vector<String8>& options, bool zygote){
  ...
	//在startVm()函数中会开启java虚拟机
    if (startVm(&mJavaVM, &env, zygote) != 0) {
        return;
    }
    onVmCreated(env);
     //注册JNI函数
       if (startReg(env) < 0) {
        ALOGE("Unable to register all android natives\n");
        return;
    }
...
    if (startClass == NULL) {
         ...
    } else {
    	//通过JNI反射ZygoteInit.java,并获取ZygoteInit的main方法
        jmethodID startMeth = env->GetStaticMethodID(startClass, "main",  "([Ljava/lang/String;)V");
        if (startMeth == NULL) {
             //......
        } else {
        	//调用ZygoteInit的静态main方法
            env->CallStaticVoidMethod(startClass, startMeth, strArray); //调用ZygoteInit的静态main方法
	...
}
可以看到,通过forkSystemServer方法来fork SystemServer进程
public static void main(String argv[]) {
        ZygoteServer zygoteServer = new ZygoteServer();
    ...
            if (startSystemServer) {
                Runnable r = forkSystemServer(abiList, socketName, zygoteServer);
               //......
            }
	...
    }
(2)SystemServer的main方法的执行逻辑
public static void main(String[] args) {
    new SystemServer().run();
}
这里比较简单,只是new出一个SystemServer对象并执行其run方法.
private void run() {
        ...
      //判断系统当前时间
        ...
      //设置系统的语言环境等
        ...
      // Create the system service manager.
        mSystemServiceManager = new SystemServiceManager(mSystemContext);
        LocalServices.addService(SystemServiceManager.class, mSystemServiceManager);
      // Start services.
        try {
            startBootstrapServices();
            startCoreServices();
            startOtherServices();
        } catch (Throwable ex) {
            Slog.e("System", "******************************************");
            Slog.e("System", "************ Failure starting system services", ex);
            throw ex;
        }
...
    }
run函数新建了SystemServiceManager对象来管理service,并通过startBootstrapServices,startCoreServices,startOtherServices三个函数来分别启动系统Boot级服务,系统核心的服务以及一些非紧要或者是非需要及时启动的服务。
其中,startOtherServices中启动了storagemanagerservice.
private void startOtherServices() {
...
 if (mFactoryTestMode != FactoryTest.FACTORY_TEST_LOW_LEVEL) {
            if (!"0".equals(SystemProperties.get("system_init.startmountservice"))) {
                traceBeginAndSlog("StartStorageManagerService");
                try {
/*
* NotificationManagerService is dependant on StorageManagerService,
* (for media / usb notifications) so we must start StorageManagerService first.
 */               mSystemServiceManager.startService(STORAGE_MANAGER_SERVICE_CLASS);
                    storageManager = IStorageManager.Stub.asInterface(
                            ServiceManager.getService("mount"));
                } catch (Throwable e) {
                    reportWtf("starting StorageManagerService", e);
                }
                traceEnd();
                traceBeginAndSlog("StartStorageStatsService");
                try {
               mSystemServiceManager.startService(STORAGE_STATS_SERVICE_CLASS);
                } catch (Throwable e) {
                    reportWtf("starting StorageStatsService", e);
                }
                traceEnd();
            }
        }
...
}
接下来来看startservice函数。
public void startService(@NonNull final SystemService service) {
        // Register it.
        mServices.add(service);
        // Start it.
        long time = SystemClock.elapsedRealtime();
        try {
            service.onStart();
        } catch (RuntimeException ex) {
            throw new RuntimeException("Failed to start service " + service.getClass().getName()
                    + ": onStart threw an exception", ex);
        }
        warnIfTooLong(SystemClock.elapsedRealtime() - time, service, "onStart");
    }
startService函数先向systemservicemanager中添加成员变量,并调用了其onstart函数。接下来看看onstart函数做了什么。
public void onStart() {
   mStorageManagerService = new StorageManagerService(getContext());
   publishBinderService("mount", mStorageManagerService);
   mStorageManagerService.start();
 }
publishBinderService注册服务,使其可以跨进程访问,service name 为”mount”。
protected final void publishBinderService(String name, IBinder service,
            boolean allowIsolated, int dumpPriority) {
        ServiceManager.addService(name, service, allowIsolated, dumpPriority);
}
这里的publishBinderService其实调用的是ServiceManager.addService函数来注册服务,与前面提到的VoldNativeService的注册方式相同。接着看onstart函数中所调用的mStorageManagerService.start()
private void start() {
        connect();
    }
继续向下追
private void connect() {
      ...
      binder = ServiceManager.getService("vold");
      if (binder != null) {
          try {
//DeathRecipient检测服务是否中断,如果终端尝试重新连接
              binder.linkToDeath(new DeathRecipient() {
                  @Override
                  public void binderDied() {
                      Slog.w(TAG, "vold died; reconnecting");
                      mVold = null;
                      connect();
                  }
              }, 0);
                } catch (RemoteException e) {
                  binder = null;
                }
          }
        if (binder != null) {
            mVold = IVold.Stub.asInterface(binder);
            try {
                mVold.setListener(mListener);
            } catch (RemoteException e) {
                mVold = null;
                Slog.w(TAG, "vold listener rejected; trying again", e);
            }
        } else {
            Slog.w(TAG, "vold not found; trying again");
        }
...
             onDaemonConnected();
  }        if (binder != null) {
            mVold = IVold.Stub.asInterface(binder);
            try {
                mVold.setListener(mListener);
            } catch (RemoteException e) {
                mVold = null;
                Slog.w(TAG, "vold listener rejected; trying again", e);
            }
        } else {
            Slog.w(TAG, "vold not found; trying again");
        }
...
             onDaemonConnected();
  }
connect函数获取了VoldNativeService的handle并与之建立通信通路。private volatile IVold mVold, mvold是根据binder句柄在此处的实例化对象。如此,可以通过mvold来使用VoldNativeService类。
在system/vold/binder/android/os/IVold.aidl文件中声明了mvold可以调用的函数。
interface IVold {
    void setListener(IVoldListener listener);
    void monitor();
    void reset();
    void shutdown();
    void onUserAdded(int userId, int userSerial);
    void onUserRemoved(int userId);
    void onUserStarted(int userId);
void onUserStopped(int userId);
...
}
建立通信连接后,紧接着调用mVold.setListener(mListener)来监听vold中的事件。
mListener的由来
private final IVoldListener mListener = new IVoldListener.Stub() {
        @Override
        public void onDiskCreated(String diskId, int flags) {
            synchronized (mLock) {
...
}
这里是对所监听到的事件的处理,同时,在system/vold/binder/android/os/IVoldListener.aidl中也声明了所监听的函数
oneway interface IVoldListener {
    void onDiskCreated(@utf8InCpp String diskId, int flags);
    void onDiskScanned(@utf8InCpp String diskId);
    void onDiskMetadataChanged(@utf8InCpp String diskId,
            long sizeBytes, @utf8InCpp String label, @utf8InCpp String sysPath);
    void onDiskDestroyed(@utf8InCpp String diskId);

    void onVolumeCreated(@utf8InCpp String volId,
            int type, @utf8InCpp String diskId, @utf8InCpp String partGuid);
    void onVolumeStateChanged(@utf8InCpp String volId, int state);
    void onVolumeMetadataChanged(@utf8InCpp String volId,
            @utf8InCpp String fsType, @utf8InCpp String fsUuid, @utf8InCpp String fsLabel);
    void onVolumePathChanged(@utf8InCpp String volId,
            @utf8InCpp String path);
    void onVolumeInternalPathChanged(@utf8InCpp String volId,
            @utf8InCpp String internalPath);
    void onVolumeDestroyed(@utf8InCpp String volId);
}
这些事件与刚刚提到的处理是一一对应的。(关于binder通信与AIDL文件的简单介绍在文档最后两部分)
最后,connect()函数调用了onDaemonConnected():
public void onDaemonConnected() {
        mDaemonConnected = true;
        mHandler.obtainMessage(H_DAEMON_CONNECTED).sendToTarget();
// mHandler = new StorageManagerServiceHandler(hthread.getLooper());
    }
发送H_DAEMON_CONNECTED
public void handleMessage(Message msg) {
            switch (msg.what) {
               ...
                case H_DAEMON_CONNECTED: {
                    handleDaemonConnected();
                    break;
                }
...
}
调用handleDaemonConnected()
 private void handleDaemonConnected() {
        initIfBootedAndConnected();
        resetIfBootedAndConnected();
...
    }
继续追resetIfBootedAndConnected()
private void resetIfBootedAndConnected() {
...
               mDisks.clear();
               mVolumes.clear();
               addInternalVolumeLocked();
            }
            try {
                mVold.reset();
...
mVold.reset()即VoldNativeService::reset()
binder::Status VoldNativeService::reset() {
    ENFORCE_UID(AID_SYSTEM);
    ACQUIRE_LOCK;
    return translate(VolumeManager::Instance()->reset());
}
对应VolumeManager::reset()
int VolumeManager::reset() {
    // Tear down all existing disks/volumes and start from a blank slate so
    // newly connected framework hears all events.
    if (mInternalEmulated != nullptr) {
        mInternalEmulated->destroy();
        mInternalEmulated->create();
    }
    for (const auto& disk : mDisks) {
        disk->destroy();
        disk->create();
    }
    updateVirtualDisk();
    mAddedUsers.clear();
    mStartedUsers.clear();
    return 0;
}
追到这里我们可以看到,当SM启动完后会调用reset函数,因为前面VM启动过程中,mInternalEmulated->create()会调用getListener()获取监听方法,但是彼时SystemServer还没有启动,SM还没有注册下来,所以并没有通知上去。
此处SM启动结束后执行reset,就会重新执行mInternalEmulated->create();过程,这样就会通知到SM。
至此,U盘,sdcard的插拔过程所对应的流程:kernel-> NM -> VM -> SM已经建立,接下来具体分析所经历的函数。
4.Vold 挂载大容量存储设备(Massive Storage)
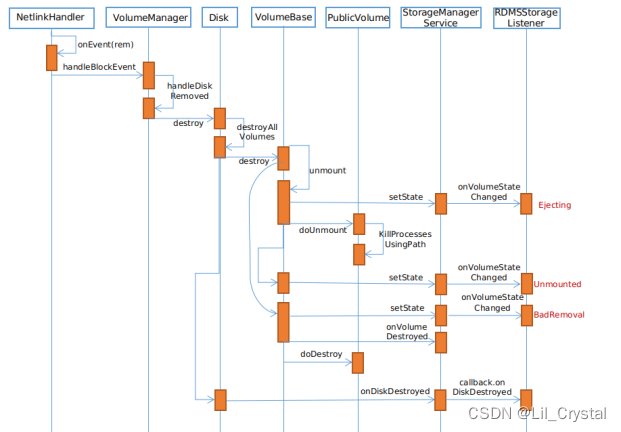
4.1 挂载的时序图
通过时序同可对整体有了解,如需了解细节,可根据相关函数名在下一节搜索。

4.2 从插入U盘开始
在上一章kernel与vold的通信部分,我们知道,netlink会监听kernel上传的关于U盘,sdcard插入的消息,经过decode处理后交由onEvent函数处理。
以下部分log可以看到decode处理后的消息,action=add说明这是一个插入事件。
decodeUEvent [ACTION=add]
decodeUEvent [DEVPATH=/devices/pci0000:00/0000:00:15.0/usb1/1-1/1-1.2/1-1.2:1.0/host3/target3:0:0/3:0:0:0/block/sdd]
decodeUEvent [SUBSYSTEM=block]
decodeUEvent [MAJOR=8]
decodeUEvent [MINOR=48]
decodeUEvent [DEVNAME=sdd]
decodeUEvent [DEVTYPE=disk]
decodeUEvent [SEQNUM=2832]
decodeUEvent [2/1-1.2:1.0/host3/target3:0:0/3:0:0:0/block/sdd/sdd1]
接下来,接续从vold的onEvent函数开始追代码。
void NetlinkHandler::onEvent(NetlinkEvent* evt) {
    VolumeManager* vm = VolumeManager::Instance();
    const char* subsys = evt->getSubsystem();
    if (!subsys) {
        LOG(WARNING) << "No subsystem found in netlink event";
        return;
    }
    if (std::string(subsys) == "block") {
        vm->handleBlockEvent(evt);
    }
}
kernel上传的消息被封装在NetlinkEvent* evt中,onEvent()函数首先对subsys进行判断,subsys指设备类型,如果是“block”,会调用VolumeManager::handleBlockEvent函数。
void VolumeManager::handleBlockEvent(NetlinkEvent* evt) {
    std::lock_guard<std::mutex> lock(mLock);
    if (mDebug) {
        LOG(DEBUG) << "----------------";
        LOG(DEBUG) << "handleBlockEvent with action " << (int)evt->getAction();
        evt->dump();
    }
    std::string eventPath(evt->findParam("DEVPATH") ? evt->findParam("DEVPATH") : "");
    std::string devType(evt->findParam("DEVTYPE") ? evt->findParam("DEVTYPE") : "");
    if (devType != "disk") return;
    int major = std::stoi(evt->findParam("MAJOR"));//获取主设备号
    int minor = std::stoi(evt->findParam("MINOR"));//获取次设备号
    dev_t device = makedev(major, minor);
    switch (evt->getAction()) {//获取动作类型
        case NetlinkEvent::Action::kAdd: {//插入操作
            for (const auto& source : mDiskSources) {
                if (source->matches(eventPath)) {
                    int flags = source->getFlags();
                    if (major == kMajorBlockMmc || 					 (android::vold::IsRunningInEmulator() &&
                          major >= (int)kMajorBlockExperimentalMin &&
                          major <= (int)kMajorBlockExperimentalMax)) {
                        flags |= android::vold::Disk::Flags::kSd;
                    } else {
                        flags |= android::vold::Disk::Flags::kUsb;
                    }
   auto disk =new android::vold::Disk(eventPath, device, source->getNickname(), flags);
   handleDiskAdded(std::shared_ptr<android::vold::Disk>(disk));//处理插入事件
                    break;
                }
            }
            break;
        }
        case NetlinkEvent::Action::kChange: {//变更事件
...
        case NetlinkEvent::Action::kRemove: {//移除事件
...
        default: {
            LOG(WARNING) << "Unexpected block event action " << (int)evt->getAction();
            break;
        }
    }
}
如果mDebug为ture,将会打印handleBlockEvent with action + evt->action
紧接着,会获取主次设备号(major,minor)二者联合起来可以识别一个设备,根据evt->action来选择不同的case,插入U盘时,action为add。
接下来会根据major等来判断插入的设备是sdcard还是u盘,并用flags记录。最后,先后调用了Disk()与handleDiskAdded()函数新建一个Disk,用来保存当前磁盘信息。
先看Disk()
Disk::Disk(const std::string& eventPath, dev_t device, const std::string& nickname, int flags)
    : mDevice(device),
      mSize(-1),
      mNickname(nickname),
      mFlags(flags),
      mCreated(false),
      mJustPartitioned(false) {
    mId = StringPrintf("disk:%u,%u", major(device), minor(device));
    mEventPath = eventPath;
    mSysPath = StringPrintf("/sys/%s", eventPath.c_str());
    mDevPath = StringPrintf("/dev/block/vold/%s", mId.c_str());
    CreateDeviceNode(mDevPath, mDevice);//创建设备节点
}
disk函数初始化了一些参数,并调用了GreateDeviceNode()
status_t CreateDeviceNode(const std::string& path, dev_t dev) {
 ...
    mode_t mode = 0660 | S_IFBLK;
    if (mknod(cpath, mode, dev) < 0) {
        if (errno != EEXIST) {
            PLOG(ERROR) << "Failed to create device node for " << major(dev) << ":" << minor(dev)
                        << " at " << path;
            res = -errno;
        }
    }
...
    return res;
}
而GreateDeviceNode()函数里通过mknod创建设备节点,如果创建失败会打印log
Failed to create device node for +主次设备号
接下来回到handleDiskAdded()函数:
void VolumeManager::handleDiskAdded(const std::shared_ptr<android::vold::Disk>& disk) {
    // For security reasons, if secure keyguard is showing, wait
    // until the user unlocks the device to actually touch it
    if (mSecureKeyguardShowing) {
        LOG(INFO) << "Found disk at " << disk->getEventPath()
                  << " but delaying scan due to secure keyguard";
        mPendingDisks.push_back(disk);
    } else {
        disk->create();
        mDisks.push_back(disk);
    }
}
mSecureKeyguardShowing参数的值意味着systemserver是否完全启动,mSecureKeyguardShowing为true时,表示systemserver并未完全启动,此时需要延时创建Disk,因为设备开机时,当systemserver没有完全启动时挂载大容量设备的时间较长,而负载过高,有可能会触发watchdong,导致systemserver重启,从而引发系统操作异常。
mSecureKeyguardShowing默认值为true,当systemserver准备好,storage会通过binder机制调用onSecureKeyguardStateChanged()函数来改变mSecureKeyguardShowing的值,进而去调用disk->creat()函数继续创建Disk.
status_t Disk::create() {
    CHECK(!mCreated);
    mCreated = true;
    auto listener = VolumeManager::Instance()->getListener();
    if (listener) listener->onDiskCreated(getId(), mFlags);
    readMetadata();
    readPartitions();
    return OK;
}
onDiskCreated,通过binder机制,通知StorageManagerService磁盘创建.第三部分提到过,StorageManagerService会监听vold的某些事件,这里的onDiskCreated就是调用的StorageManagerService中的onDiskCreated()函数。
public void onDiskCreated(String diskId, int flags) {
            synchronized (mLock) {
                final String value = SystemProperties.get(StorageManager.PROP_ADOPTABLE);
                switch (value) {
                    case "force_on":
                        flags |= DiskInfo.FLAG_ADOPTABLE;
                        break;
                    case "force_off":
                        flags &= ~DiskInfo.FLAG_ADOPTABLE;
                        break;
                }
                mDisks.put(diskId, new DiskInfo(diskId, flags));
            }
        }
onDiskCreated()函数最后会调用mDisks.put,将磁盘信息存储在数组中。
接下来回到vold继续看readMetadata()与readPartitions(),这两个函数是为了检查磁盘文件系统格式和读取文件分区列表。
status_t Disk::readMetadata() {
    mSize = -1;
    mLabel.clear();
...
    unsigned int majorId = major(mDevice);
    switch (majorId) {
        case kMajorBlockLoop: {
            mLabel = "Virtual";
            break;
        }
        // clang-format off
        case kMajorBlockScsiA: case kMajorBlockScsiB: case kMajorBlockScsiC:
        case kMajorBlockScsiD: case kMajorBlockScsiE: case kMajorBlockScsiF:
        case kMajorBlockScsiG: case kMajorBlockScsiH: case kMajorBlockScsiI:
        case kMajorBlockScsiJ: case kMajorBlockScsiK: case kMajorBlockScsiL:
        case kMajorBlockScsiM: case kMajorBlockScsiN: case kMajorBlockScsiO:
        case kMajorBlockScsiP: {
            // clang-format on
            std::string path(mSysPath + "/device/vendor");
            std::string tmp;
            if (!ReadFileToString(path, &tmp)) {
                PLOG(WARNING) << "Failed to read vendor from " << path;
                return -errno;
            }
            tmp = android::base::Trim(tmp);
            mLabel = tmp;
            break;
        }
...
auto listener = VolumeManager::Instance()->getListener();
if (listener) listener->onDiskMetadataChanged(getId(), mSize, mLabel, mSysPath);
}
major表示主设备号,U盘与sdcard为”block”,数值对应8,所以不会走case中的流程,最后调用了StorageManagerService中的onDiskMetadataChanged函数。
public void onDiskMetadataChanged(String diskId, long sizeBytes, String label,
                String sysPath) {
            synchronized (mLock) {
                final DiskInfo disk = mDisks.get(diskId);
                if (disk != null) {
                    disk.size = sizeBytes;
                    disk.label = label;
                    disk.sysPath = sysPath;
                }
            }
        }
通知StorageManagerService设置disk的参数。
随后,disk::creat()函数调用了readPartitions()
status_t Disk::readPartitions() {
    int maxMinors = getMaxMinors();
    if (maxMinors < 0) {
        return -ENOTSUP;
    }
    destroyAllVolumes();
    // Parse partition table
    std::vector<std::string> cmd;
    cmd.push_back(kSgdiskPath);
    cmd.push_back("--android-dump");
    cmd.push_back(mDevPath);
    std::vector<std::string> output;
    status_t res = ForkExecvp(cmd, &output);
    ...
            dev_t partDevice = makedev(major(mDevice), minor(mDevice) + i);
            if (table == Table::kMbr) {  //分区方式
                if (++it == split.end()) continue;
                int type = 0;
                if (!android::base::ParseInt("0x" + *it, &type)) {
                    LOG(WARNING) << "Invalid partition type " << *it;
                    continue;
                }
                switch (type) {
                    case 0x06:  // FAT16
                    case 0x07:  // HPFS/NTFS/exFAT
                    case 0x0b:  // W95 FAT32 (LBA)
                    case 0x0c:  // W95 FAT32 (LBA)
                    case 0x0e:  // W95 FAT16 (LBA)
                        createPublicVolume(partDevice);
                        break;
                }
            } else if (table == Table::kGpt) {
                ...
}
 if (table == Table::kUnknown || !foundParts) {
        ...
   }
   auto listener = VolumeManager::Instance()->getListener();
   if (listener) listener->onDiskScanned(getId());
...
}
readPartitions()函数扫描了磁盘的分区信息,包括分区方式,分区的文件系统等,随后根据分区方式调用了createPublicVolume()函数,最后调用了StorageManagerService中的onDiskScanned().onDiskScanned()最后再分析。
void Disk::createPublicVolume(dev_t device) {
    auto vol = std::shared_ptr<VolumeBase>(new PublicVolume(device));
    if (mJustPartitioned) {
        LOG(DEBUG) << "Device just partitioned; silently formatting";
        vol->setSilent(true);
        vol->create();
        vol->format("auto");
        vol->destroy();
        vol->setSilent(false);
    }
    mVolumes.push_back(vol);
    vol->setDiskId(getId());
    vol->create();
}
调用PublicBase::create()
status_t VolumeBase::create() {
    CHECK(!mCreated);
    mCreated = true;
    status_t res = doCreate();
    auto listener = getListener();
    if (listener) {
        listener->onVolumeCreated(getId(), static_cast<int32_t>(mType), mDiskId, mPartGuid);
    }
    setState(State::kUnmounted);
    return res;
}

status_t PublicVolume::doCreate() {
    return CreateDeviceNode(mDevPath, mDevice);
}
CreateDeviceNode:volume的创建设备分区节点函数,docreate函数执行完毕后,紧接着调用了StorageManagerService中的onVolumeCreated。
public void onVolumeCreated(String volId, int type, String diskId, String partGuid) {
            synchronized (mLock) {
                final DiskInfo disk = mDisks.get(diskId);
                final VolumeInfo vol = new VolumeInfo(volId, type, disk, partGuid);
                mVolumes.put(volId, vol);
                onVolumeCreatedLocked(vol);
            }
        }
onVolumeCreatedLocked中发送了mount消息
private void onVolumeCreatedLocked(VolumeInfo vol) {
     ...
        if (vol.type == VolumeInfo.TYPE_EMULATED) {
        ...
        } else if (vol.type == VolumeInfo.TYPE_PUBLIC) {
            // TODO: only look at first public partition
            if (Objects.equals(StorageManager.UUID_PRIMARY_PHYSICAL, mPrimaryStorageUuid)
                    && vol.disk.isDefaultPrimary()) {
                Slog.v(TAG, "Found primary storage at " + vol);
                vol.mountFlags |= VolumeInfo.MOUNT_FLAG_PRIMARY;
                vol.mountFlags |= VolumeInfo.MOUNT_FLAG_VISIBLE;
            }
            if (vol.disk.isAdoptable()) {
                vol.mountFlags |= VolumeInfo.MOUNT_FLAG_VISIBLE;
            }
            vol.mountUserId = mCurrentUserId;
            mHandler.obtainMessage(H_VOLUME_MOUNT, vol).sendToTarget();
        } else if (vol.type == VolumeInfo.TYPE_PRIVATE) {
           ...
        } else if (vol.type == VolumeInfo.TYPE_STUB) {
           ...
        } else {
            ...
}
public void handleMessage(Message msg) {
            switch (msg.what) {
...
 case H_VOLUME_MOUNT: {//挂载U盘的消息
             final VolumeInfo vol = (VolumeInfo) msg.obj;
             if (isMountDisallowed(vol)) {
               Slog.i(TAG, "Ignoring mount " + vol.getId() + " due to policy");
               break;
               }
             mount(vol);
             break;
          }
...
}
StorageManagerService的handleMessage函数会调用mount()函数来处理H_VOLUME_MOUNT
public void mount(String volId) {
  enforcePermission(android.Manifest.permission.MOUNT_UNMOUNT_FILESYSTEMS);

        final VolumeInfo vol = findVolumeByIdOrThrow(volId);
        if (isMountDisallowed(vol)) {
            throw new SecurityException("Mounting " + volId + " restricted by policy");
        }
        mount(vol);
    }
    private void mount(VolumeInfo vol) {
        try {
            mVold.mount(vol.id, vol.mountFlags, vol.mountUserId);
        } catch (Exception e) {
            Slog.wtf(TAG, e);
        }
    }
StorageManagerService中的mount()函数中调用mVold.mount又回到了vold中,即VoldNativeService::mount函数
binder::Status VoldNativeService::mount(const std::string& volId, int32_t mountFlags,
  ...

    auto vol = VolumeManager::Instance()->findVolume(volId);
    if (vol == nullptr) {
        return error("Failed to find volume " + volId);
    }
    vol->setMountFlags(mountFlags);
    vol->setMountUserId(mountUserId);
    int res = vol->mount();
    if (res != OK) {
        return translate(res);
    }
    if ((mountFlags & MOUNT_FLAG_PRIMARY) != 0) {
        res = VolumeManager::Instance()->setPrimary(vol);
        if (res != OK) {
            return translate(res);
        }
    }
    return translate(OK);
}
这个地方的vol是调用VolumeManager::findVolume函数从volume列表里获取的,而在create的时候,是将publicvolume的对象取出,所以此处调用的是publicvolume的mount, publicvolume继承的volumebase,且未重新实现mount方法,所以还是使用的volumebase::mount。
status_t VolumeBase::mount() {
    if ((mState != State::kUnmounted) && (mState != State::kUnmountable)) {
        LOG(WARNING) << getId() << " mount requires state unmounted or unmountable";
        return -EBUSY;
    }
    setState(State::kChecking);
    status_t res = doMount();
    setState(res == OK ? State::kMounted : State::kUnmountable);
    return res;
}
这个地方会将state设置为checking,然后domount去挂载,如果挂载成功则将状态设置成mounted,失败则设置成unmountable.所以,正常的挂载流程中state变化过程为:
unmounted -> checking -> mounted
接下来先看一下setState()函数的调用
void VolumeBase::setState(State state) {
    mState = state;
    auto listener = getListener();
    if (listener) {
        listener->onVolumeStateChanged(getId(), static_cast<int32_t>(mState));
    }
}
setState()中调用了StorageManagerService中的onVolumeStateChanged函数。
public void onVolumeStateChanged(String volId, int state) {
            synchronized (mLock) {
                final VolumeInfo vol = mVolumes.get(volId);
                if (vol != null) {
                    final int oldState = vol.state;
                    final int newState = state;
                    vol.state = newState;
                    onVolumeStateChangedLocked(vol, oldState, newState);
                }
            }
        }
...
private void onVolumeStateChangedLocked(VolumeInfo vol, int oldState, int newState) {
...
mCallbacks.notifyVolumeStateChanged(vol, oldState, newState);
...
}
...
 private void notifyVolumeStateChanged(VolumeInfo vol, int oldState, int newState) {
            final SomeArgs args = SomeArgs.obtain();
            args.arg1 = vol.clone();
            args.argi2 = oldState;
            args.argi3 = newState;
            obtainMessage(MSG_VOLUME_STATE_CHANGED, args).sendToTarget();
        }
...
 case MSG_VOLUME_STATE_CHANGED: {
                    callback.onVolumeStateChanged((VolumeInfo) args.arg1, args.argi2, args.argi3);
                    break;
                }
...
setState的后续函数调用流程是先通知StorageManagerService当前的挂载状态,并发送状态变化的消息,并通过回调函数通知RDMSStorageListener更新状态。
回到domount函数
status_t PublicVolume::doMount() {
    readMetadata();
//读取U盘文件系统,后根据文件系统类型去检查设备路径。
    if (mFsType == "vfat" && vfat::IsSupported()) {
        VolumeManager::Instance()->getLock().unlock();
        if (vfat::Check(mDevPath)) {
            LOG(ERROR) << getId() << " failed filesystem check";
            VolumeManager::Instance()->getLock().lock();
            return -EIO;
        }
        VolumeManager::Instance()->getLock().lock();
        if (!getCreated())
            return -EIO;
    ...
    // Use UUID as stable name, if available
    std::string stableName = getId();
    if (!mFsUuid.empty()) {
        stableName = mFsUuid;
    }

    mRawPath = StringPrintf("/mnt/media_rw/%s", stableName.c_str());
    mFuseDefault = StringPrintf("/mnt/runtime/default/%s", stableName.c_str());//默认,一般只有读
mFuseRead = StringPrintf("/mnt/runtime/read/%s", stableName.c_str());//读权限
mFuseWrite = StringPrintf("/mnt/runtime/write/%s", stableName.c_str());//写
mFuseFull = StringPrintf("/mnt/runtime/full/%s", stableName.c_str());//读写
    setInternalPath(mRawPath);
    if (getMountFlags() & MountFlags::kVisible) {
        setPath(StringPrintf("/storage/%s", stableName.c_str()));
    } else {
        setPath(mRawPath);
    }
  //创建挂载目录
    if (fs_prepare_dir(mRawPath.c_str(), 0700, AID_ROOT, AID_ROOT)) {
        PLOG(ERROR) << getId() << " failed to create mount points";
        return -errno;
    }
    if (mFsType == "vfat") {
        if (vfat::Mount(mDevPath, mRawPath, false, false, false, AID_MEDIA_RW, AID_MEDIA_RW, 0007,
                        true)) {//系统调用挂载U盘
            PLOG(ERROR) << getId() << " failed to mount " << mDevPath;
            return -EIO;
        }
    }
...
//创建对应的目录
    if (fs_prepare_dir(mFuseDefault.c_str(), 0700, AID_ROOT, AID_ROOT) ||
        fs_prepare_dir(mFuseRead.c_str(), 0700, AID_ROOT, AID_ROOT) ||
        fs_prepare_dir(mFuseWrite.c_str(), 0700, AID_ROOT, AID_ROOT) ||
        fs_prepare_dir(mFuseFull.c_str(), 0700, AID_ROOT, AID_ROOT)) {
        PLOG(ERROR) << getId() << " failed to create FUSE mount points";
        return -errno;
    }
 dev_t before = GetDevice(mFuseFull);
    if (!(mFusePid = fork())) {
        if (getMountFlags() & MountFlags::kPrimary) {
            // clang-format off
            if (execl(kFusePath, kFusePath,
                    "-u", "1023", // AID_MEDIA_RW
                    "-g", "1023", // AID_MEDIA_RW
                    "-U", std::to_string(getMountUserId()).c_str(),
                    "-w",
                    mRawPath.c_str(),
                    stableName.c_str(),
                    NULL)) {
                // clang-format on
                PLOG(ERROR) << "Failed to exec";
            }
...
domount()函数中的vfat::Mount函数实现了真正的挂载,具体的mount流程处于kernel部分,不同的文件系统有不同的特性,mount流程也会不一样,通过系统调用由VFS来分配是由哪个文件系统来处理。
/system/core/sdcard/sdcard.cpp main->run_sdcardfs,挂载这四个fuse路径,用户空间app根据权限访问这四个挂载点。
而后,setState会根据domount的返回值来更新状态。
最后,回到readPartitions()函数中的onDiskScanned,onDiskScanned是在StorageManagerService中定义。
public void onDiskScanned(String diskId) {
            synchronized (mLock) {
                final DiskInfo disk = mDisks.get(diskId);
                if (disk != null) {
                    onDiskScannedLocked(disk);
                }
            }
        }
...
private void onDiskScannedLocked(DiskInfo disk) {
       ...
        disk.volumeCount = volumeCount;
        mCallbacks.notifyDiskScanned(disk, volumeCount);
    }
...
 private void notifyDiskScanned(DiskInfo disk, int volumeCount) {
            final SomeArgs args = SomeArgs.obtain();
            args.arg1 = disk.clone();
            args.argi2 = volumeCount;
            obtainMessage(MSG_DISK_SCANNED, args).sendToTarget();
        }
...
    case MSG_DISK_SCANNED: {
         callback.onDiskScanned((DiskInfo) args.arg1, args.argi2);
         break;
                }
...
onDiskScanned函数的后续调用流程与setstate相同,都是通过StorageManagerService中的回调函数来通知RDMSStorageListener磁盘信息。
5.Vold 卸载大容量存储设备
卸载部分基本同挂载类似,不再赘述。贴出时序图
5.1 U盘卸载的时序图
三、相关知识及Debug
1.UEvent
关于UEvent的详细介绍推荐一篇文章:UEvent 机制
1.1 UEvent 结构
/system/core/init/uevent.h
struct Uevent {
      std::string action;
      std::string path;
      std::string subsystem;
      std::string firmware;
      std::string partition_name;
      std::string device_name;
      std::string modalias;
      int partition_num;
      int major;
      int minor;
  };
1.2 查看UEvent
logcat | grep decodeUEvent
或
logcat | grep COREU
下图为Android 系统中的UEvent日志
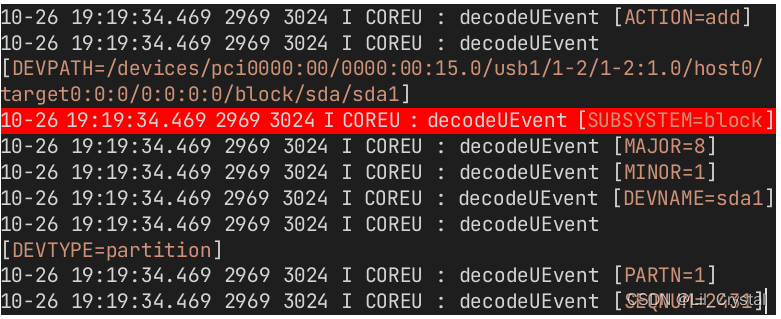
用来查看kernel是否发送,如果没有发送那么问题就停留在kernel中。事实上 /mnt/media_rw/下出现U盘不一定代表U盘就是被vold正常挂载了,有可能是上次卸载异常,还是要根据UEvent确认,确实进入Vold再进一步分析。
2. Vold 正常挂载的日志
由于Vold在Android 中输出的日志主要为D(debug)级别,请确保日志系统可以输出D级以上的日志。
使用logcat查看vold 日志
logcat | grep vold
3.最新的 Android 12 中Vold的部分变化
Android 11 中移除了sdcardfs这个文件系统的支持,详细请参见Google官方文档:弃用SDCardfs
官方只是推荐使用FUSE去代替sdcardfs,但是并不意味这在Android 11 之后的版本不能使用sdcardfs,如果您使用的kernel版本低于5.0还是可以继续使用sdcardfs 的。vold在Android12 中依然保留着对于sdcardfs的支持。
最主要体现就是原有U盘是使用SDcardfs来管理外部存储设备的运行时权限
U盘被挂载在“/mnt/media_rw/UUID”下,
“/mnt/media_rw/UUID”该路径又被分别挂载在/mnt/runtime/default/UUID、/mnt/runtime/read/UUID、/mnt/runtime/write/UUID、/mnt/runtime/full/UUID下用于管理上层app对于外部存储设备的runtime权限。
可以通过命令 cat /proc/mounts 查看到挂载情况
console:/ # cat /proc/mounts
...
/dev/block/vold/public:8,1 /mnt/media_rw/B467-CE00 vfat rw,dirsync,nosuid,nodev,noexec,noatime,uid=1023,gid=1023,fmask=0007,dmask=0007,allow_utime=0020,codepage=437,iocharset=iso8859-1,shortname=mixed,utf8,errors=remount-ro 0 0
/mnt/media_rw/B467-CE00 /mnt/runtime/default/B467-CE00 sdcardfs rw,nosuid,nodev,noexec,noatime,fsuid=1023,fsgid=1023,gid=1015,mask=6,userid=11 0 0
/mnt/media_rw/B467-CE00 /storage/B467-CE00 sdcardfs rw,nosuid,nodev,noexec,noatime,fsuid=1023,fsgid=1023,gid=1015,mask=6,userid=11 0 0
/mnt/media_rw/B467-CE00 /mnt/runtime/read/B467-CE00 sdcardfs rw,nosuid,nodev,noexec,noatime,fsuid=1023,fsgid=1023,gid=9997,mask=18,userid=11 0 0
/mnt/media_rw/B467-CE00 /mnt/runtime/write/B467-CE00 sdcardfs rw,nosuid,nodev,noexec,noatime,fsuid=1023,fsgid=1023,gid=9997,mask=18,userid=11 0 0
/mnt/media_rw/B467-CE00 /mnt/runtime/full/B467-CE00 sdcardfs rw,nosuid,nodev,noexec,noatime,fsuid=1023,fsgid=1023,gid=9997,mask=7,userid=11 0 0
可以注意到到runtime相关挂载是sdcardfs文件系统。
而在最新的12 上,挂载路径变化如下。
console:/ # cat /proc/mounts

/dev/block/vold/public:8,1 /mnt/media_rw/B467-CE00 vfat rw,dirsync,nosuid,nodev,noexec,noatime,gid=1023,fmask=0007,dmask=0007,allow_utime=0020,codepage=437,iocharset=iso8859-1,shortname=mixed,utf8,error0
/dev/fuse /mnt/user/10/B467-CE00 fuse rw,lazytime,nosuid,nodev,noexec,noatime,user_id=0,group_id=0,allow_other 0 0
/dev/fuse /mnt/installer/10/B467-CE00 fuse rw,lazytime,nosuid,nodev,noexec,noatime,user_id=0,group_id=0,allow_other 0 0
/dev/fuse /mnt/androidwritable/10/B467-CE00 fuse rw,lazytime,nosuid,nodev,noexec,noatime,user_id=0,group_id=0,allow_other 0 0
/dev/block/vold/public:8,1 /mnt/pass_through/10/B467-CE00 vfat rw,dirsync,nosuid,nodev,noexec,noatime,gid=1023,fmask=0007,dmask=0007,allow_utime=0020,codepage=437,iocharset=iso8859-1,shortname=mixed,utf0


 3592
3592


 被折叠的 条评论
为什么被折叠?
被折叠的 条评论
为什么被折叠?
 到【灌水乐园】发言


