


1.入门程序
1.1 新建项目
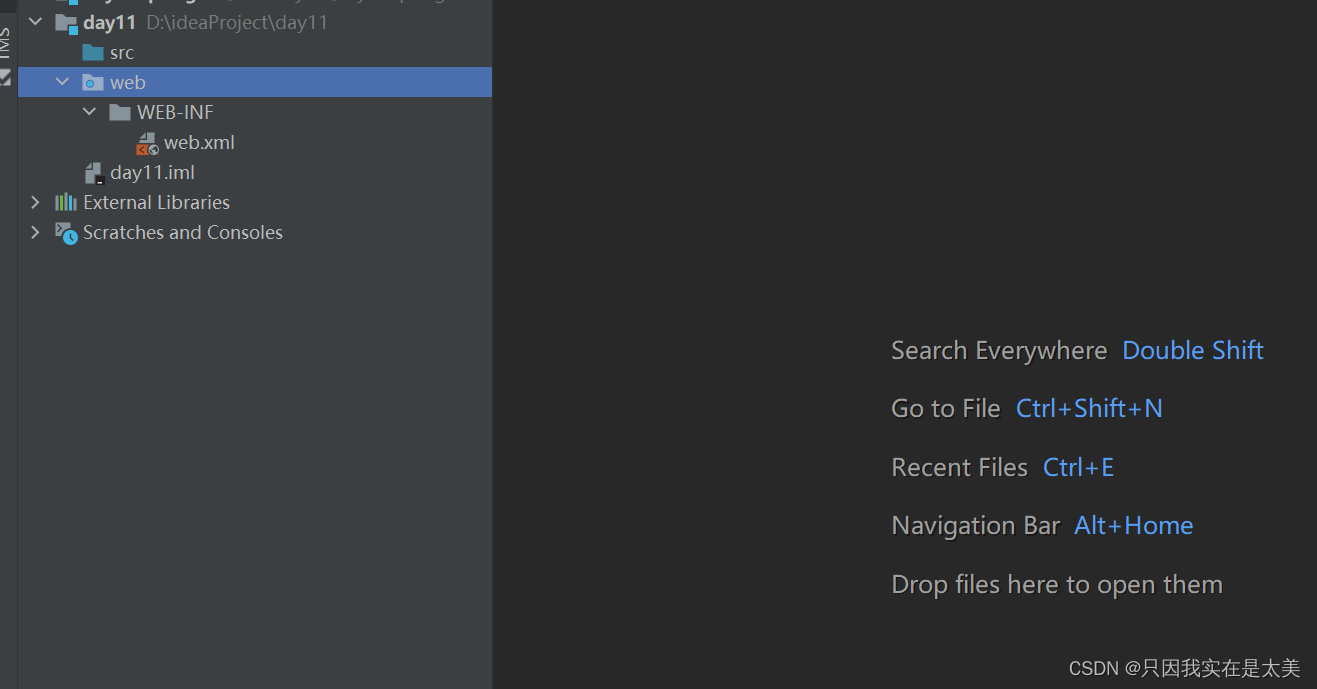
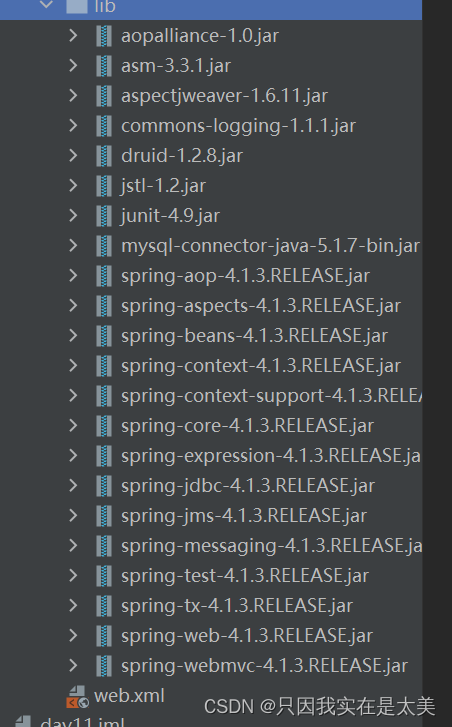
导入jar包
1.2 编写controller
@Controller
public class ItemController {
//配置方法的虚拟映射路径
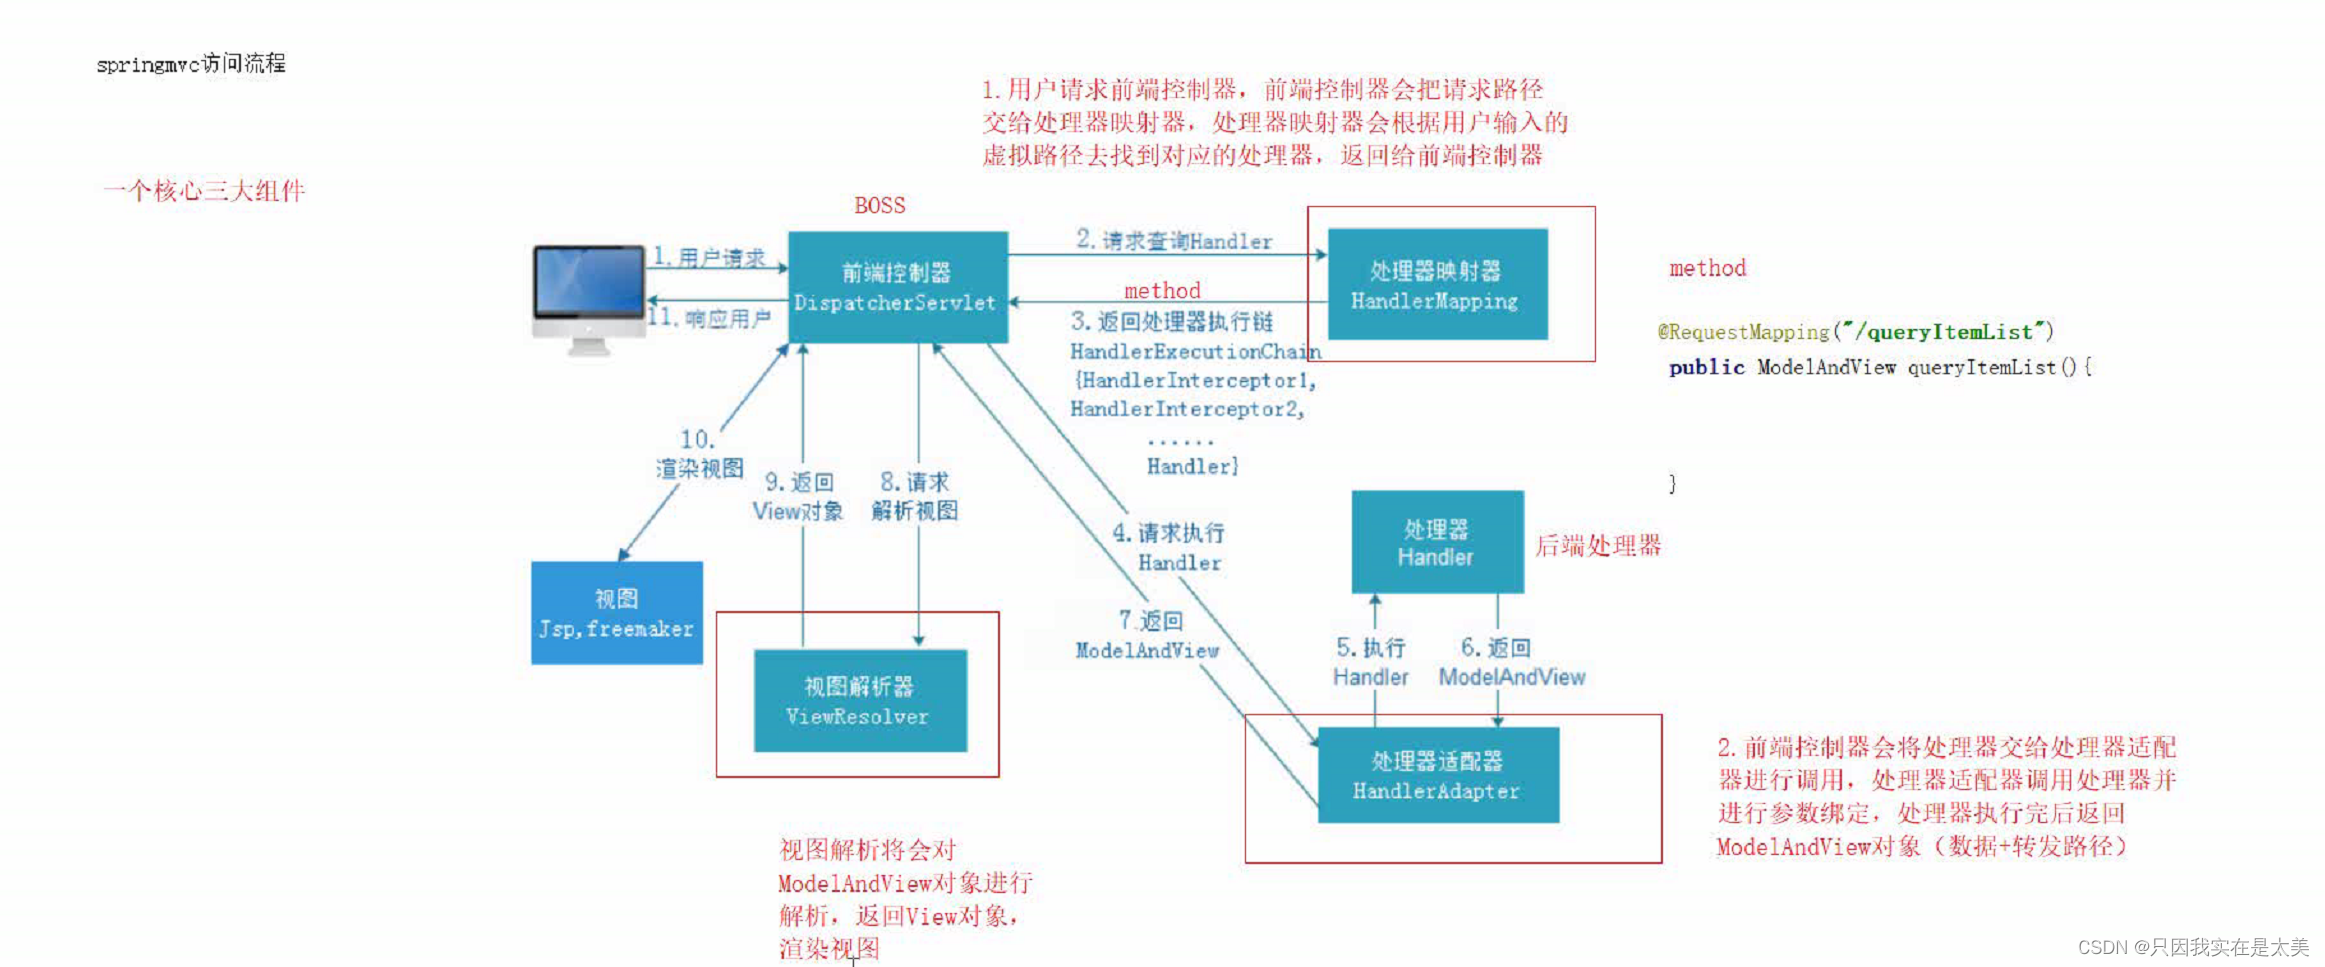
@RequestMapping("/queryItem")
//ModelAndView代表数据和视图
public ModelAndView queryItemList(){
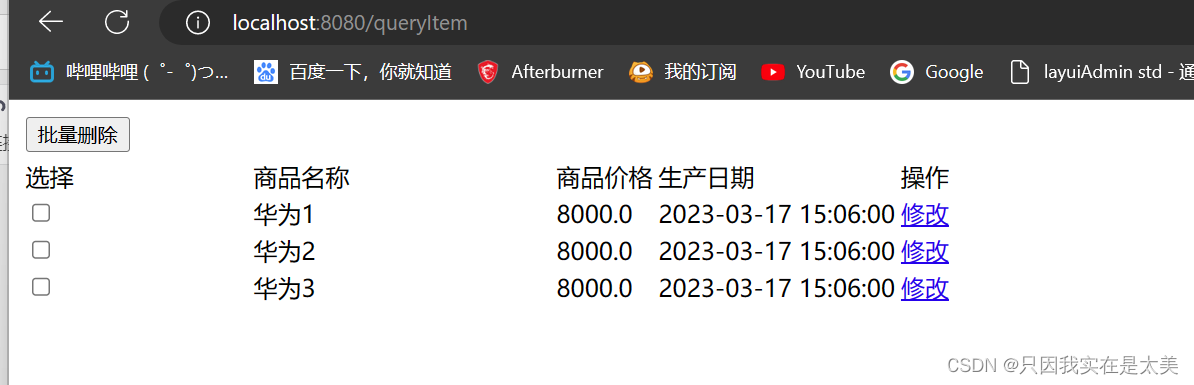
//模拟后端查询出来的商品列表结果
List<Item> list = new ArrayList<>();
list.add(new Item(1,"华为1",8000F,"xxx",new Date(),"xxx"));
list.add(new Item(2,"华为2",8000F,"xxx",new Date(),"xxx"));
list.add(new Item(3,"华为3",8000F,"xxx",new Date(),"xxx"));
//放入数据到request域
ModelAndView modelAndView = new ModelAndView();
modelAndView.addObject("list",list);
//转发到jsp
modelAndView.setViewName("/WEB-INF/views/itemList.jsp");
return modelAndView;
}
}
1.3 配置springmvc.xml
<beans xmlns="http://www.springframework.org/schema/beans"
	xmlns:xsi="http://www.w3.org/2001/XMLSchema-instance" xmlns:context="http://www.springframework.org/schema/context"
	xmlns:mvc="http://www.springframework.org/schema/mvc"
	xsi:schemaLocation="
        http://www.springframework.org/schema/beans http://www.springframework.org/schema/beans/spring-beans-4.0.xsd
       http://www.springframework.org/schema/context http://www.springframework.org/schema/context/spring-context-4.0.xsd
       http://www.springframework.org/schema/mvc http://www.springframework.org/schema/mvc/spring-mvc-4.0.xsd">

	<!--配置ioc扫描-->
	<context:component-scan base-package="com.gxa.controller"/>
</beans>
1.4 配置web.xml
<?xml version="1.0" encoding="UTF-8"?>
<web-app xmlns="http://xmlns.jcp.org/xml/ns/javaee"
         xmlns:xsi="http://www.w3.org/2001/XMLSchema-instance"
         xsi:schemaLocation="http://xmlns.jcp.org/xml/ns/javaee http://xmlns.jcp.org/xml/ns/javaee/web-app_4_0.xsd"
         version="4.0">

    <!--配置前端控制器-->
    <servlet>
        <servlet-name>springmvc</servlet-name>
        <servlet-class>org.springframework.web.servlet.DispatcherServlet</servlet-class>
        <!--配置servlet初始化参数,告诉springmvc配置文件的位置-->
        <init-param>
            <param-name>contextConfigLocation</param-name>
            <param-value>classpath:springmvc.xml</param-value>
        </init-param>
        <!--配置项目启动时创建springServlet-->
        <load-on-startup>1</load-on-startup>
    </servlet>

    <!--配置springmvc虚拟路径-->
    <servlet-mapping>
        <servlet-name>springmvc</servlet-name>
        <!--缺省路径,通过路径访问servlet时先匹配路径,若匹配不成功再找缺省资源-->
        <url-pattern>/</url-pattern>
    </servlet-mapping>
</web-app>
1.5 测试
SpringMVC访问流程
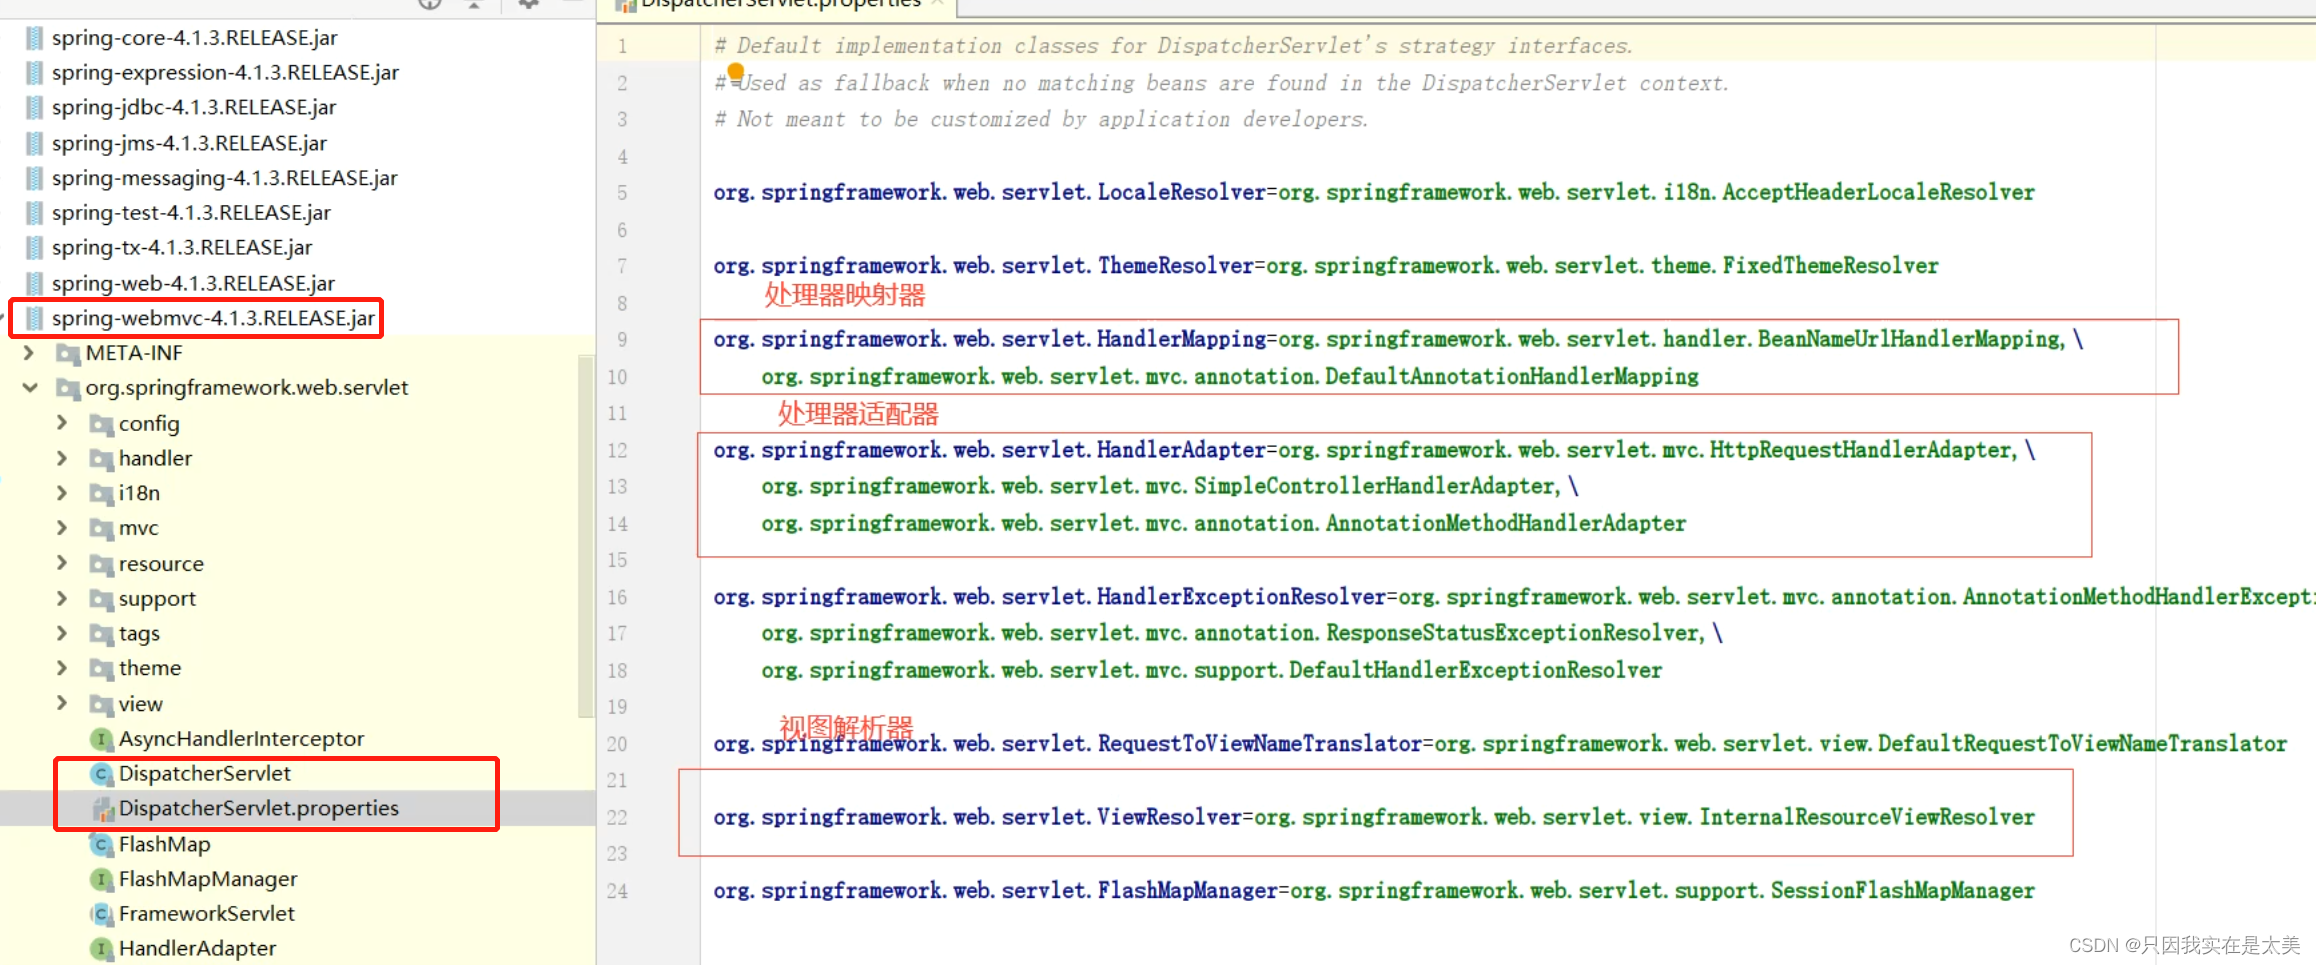
2.默认加载springmvc三大组件
上面的例子只在web.xml中配置了DispatcherServlet 前端控制器,并未配置ServletContext的监听器并在其中创建spring容器,但实际上也可以正常使用springmvc的三大组件,也可以使用@Controller注解进行spring容器的ioc和di,因为springmvc做了默认三大组件的配置,并且通过DispatcherServlet创建了一个spring子容器
3.自定义加载springmvc三大组件配置
3.1 配置扫描controller
springmvc.xml
<beans xmlns="http://www.springframework.org/schema/beans"
	xmlns:xsi="http://www.w3.org/2001/XMLSchema-instance" xmlns:context="http://www.springframework.org/schema/context"
	xmlns:mvc="http://www.springframework.org/schema/mvc"
	xsi:schemaLocation="
        http://www.springframework.org/schema/beans http://www.springframework.org/schema/beans/spring-beans-4.0.xsd
       http://www.springframework.org/schema/context http://www.springframework.org/schema/context/spring-context-4.0.xsd
       http://www.springframework.org/schema/mvc http://www.springframework.org/schema/mvc/spring-mvc-4.0.xsd">

	<!--配置ioc扫描,这里要精确到controller所在的包-->
	<context:component-scan base-package="com.gxa.controller"/>
</beans>
com.gxa.controller.ItemController
@Controller
public class ItemController {
    //配置方法的虚拟映射路径,这里就是处理器方法
    @RequestMapping("/queryItem")
    //ModelAndView代表数据和视图
    public ModelAndView queryItemList(){
        //模拟后端查询出来的商品列表结果
        List<Item> list = new ArrayList<>();
        list.add(new Item(1,"华为1",8000F,"xxx",new Date(),"xxx"));
        list.add(new Item(2,"华为2",8000F,"xxx",new Date(),"xxx"));
        list.add(new Item(3,"华为3",8000F,"xxx",new Date(),"xxx"));

        //放入数据到request域
        ModelAndView modelAndView = new ModelAndView();
        modelAndView.addObject("list",list);

        //转发到jsp
        modelAndView.setViewName("itemList");

        return modelAndView;
    }
}
3.2 配置处理器映射器和适配器
springmvc.xml
<beans xmlns="http://www.springframework.org/schema/beans"
	xmlns:xsi="http://www.w3.org/2001/XMLSchema-instance" xmlns:context="http://www.springframework.org/schema/context"
	xmlns:mvc="http://www.springframework.org/schema/mvc"
	xsi:schemaLocation="
        http://www.springframework.org/schema/beans http://www.springframework.org/schema/beans/spring-beans-4.0.xsd
       http://www.springframework.org/schema/context http://www.springframework.org/schema/context/spring-context-4.0.xsd
       http://www.springframework.org/schema/mvc http://www.springframework.org/schema/mvc/spring-mvc-4.0.xsd">

	<!--配置ioc扫描-->
	<context:component-scan base-package="com.gxa.controller"/>

	<!--配置注解方式的处理器映射器-->
	<bean class="org.springframework.web.servlet.mvc.method.annotation.RequestMappingHandlerMapping"/>
	<!--配置注解方式的处理器适配器-->
	<bean class="org.springframework.web.servlet.mvc.method.annotation.RequestMappingHandlerAdapter"/>
</beans>
或者简化成
<beans xmlns="http://www.springframework.org/schema/beans"
	xmlns:xsi="http://www.w3.org/2001/XMLSchema-instance" xmlns:context="http://www.springframework.org/schema/context"
	xmlns:mvc="http://www.springframework.org/schema/mvc"
	xsi:schemaLocation="
        http://www.springframework.org/schema/beans http://www.springframework.org/schema/beans/spring-beans-4.0.xsd
       http://www.springframework.org/schema/context http://www.springframework.org/schema/context/spring-context-4.0.xsd
       http://www.springframework.org/schema/mvc http://www.springframework.org/schema/mvc/spring-mvc-4.0.xsd">

	<!--配置ioc扫描-->
	<context:component-scan base-package="com.gxa.controller"/>

	<!--注解驱动,自动配置注解版本的处理器映射器喝适配器-->
	<mvc:annotation-driven/>

</beans>
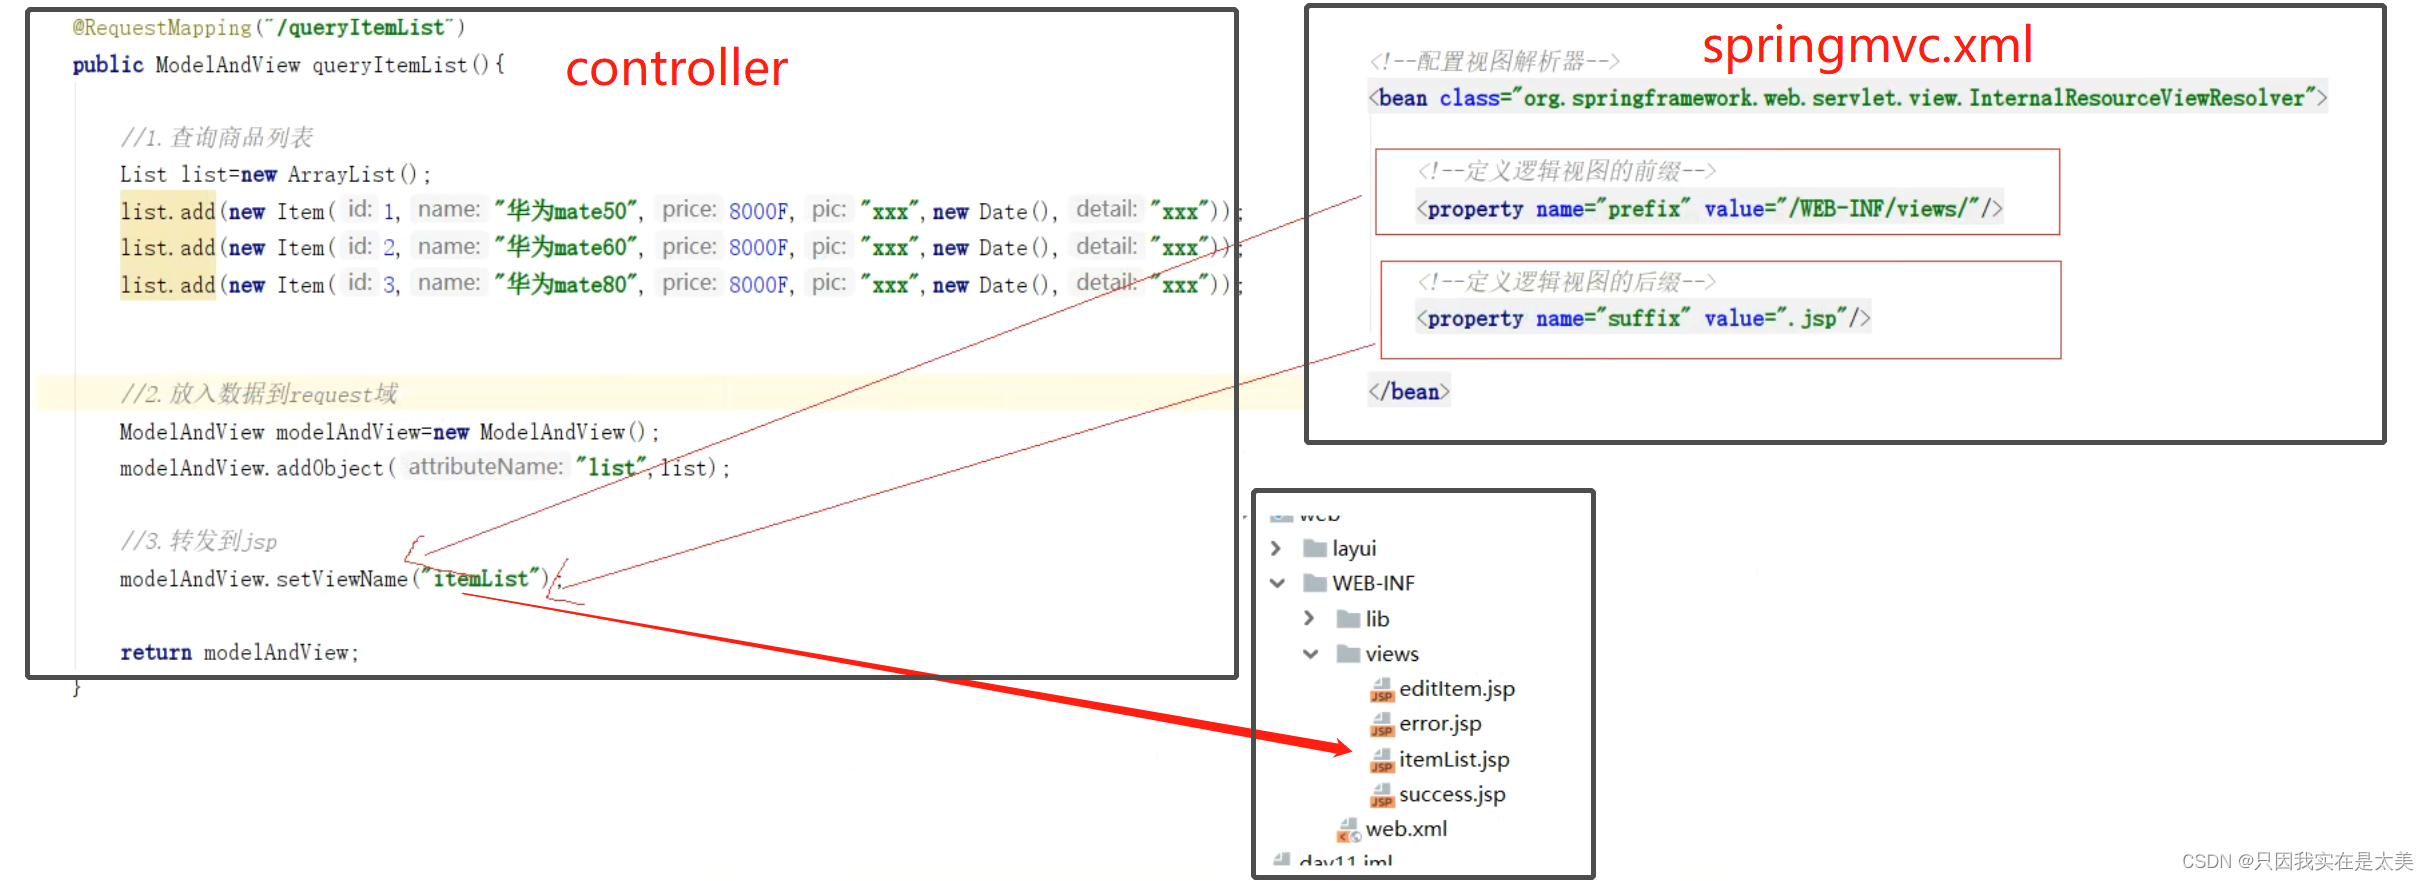
3.3 配置视图解析器
springmvc.xml
<beans xmlns="http://www.springframework.org/schema/beans"
	xmlns:xsi="http://www.w3.org/2001/XMLSchema-instance" xmlns:context="http://www.springframework.org/schema/context"
	xmlns:mvc="http://www.springframework.org/schema/mvc"
	xsi:schemaLocation="
        http://www.springframework.org/schema/beans http://www.springframework.org/schema/beans/spring-beans-4.0.xsd
       http://www.springframework.org/schema/context http://www.springframework.org/schema/context/spring-context-4.0.xsd
       http://www.springframework.org/schema/mvc http://www.springframework.org/schema/mvc/spring-mvc-4.0.xsd">

	<!--配置ioc扫描-->
	<context:component-scan base-package="com.gxa.controller"/>

	<!--注解驱动,自动配置注解版本的处理器映射器喝适配器-->
	<mvc:annotation-driven/>

	<!--配置视图解析器-->
	<bean class="org.springframework.web.servlet.view.InternalResourceViewResolver">
		<!--定义逻辑视图(jsp)前缀-->
		<property name="prefix" value="/WEB-INF/view/"/>
		<!--定义逻辑视图(jsp)后缀-->
		<property name="suffix" value=".jsp"/>
		<!--会将上面的前缀和后缀拼接到controller中的modelAndView.setViewName()jsp页面名上-->
	</bean>
</beans>
视图解析器中配置前后缀原理
静态资源访问出错问题:以下在web.xml中的配置由于是缺省路径,所以不管前端请求的访问路径是否是静态的都会进入springmvc处理,但实际上静态资源应该不需要springmvc处理,直接在路径里找到资源返回即可。
    <!--配置springmvc虚拟路径-->
    <servlet-mapping>
        <servlet-name>springmvc</servlet-name>
        <!--缺省路径,通过路径访问servlet时先匹配路径,若匹配不成功再找缺省资源-->
        <url-pattern>/</url-pattern>
    </servlet-mapping>
解决方法
1.让静态资源请求不进入springmvc
将controller的映射注解同一加上后缀,如@RequestMapping(“/queryItem.do”),然后再配置<url-pattern*.do/,在访问springmvc时加上.do后缀即可
2.静态资源请求进入springmvc后不让springmvc处理
在springmvc.xml添加下面的配置
<!--配置不拦截静态资源,mapping指定访问前端哪个路径不拦截,location指定本地静态资源再web文件夹下的相对位置-->
<mvc:resources mapping="/layui/**" location="/layui/"/>
4.SSM整合
spring+springmvc+mybatis
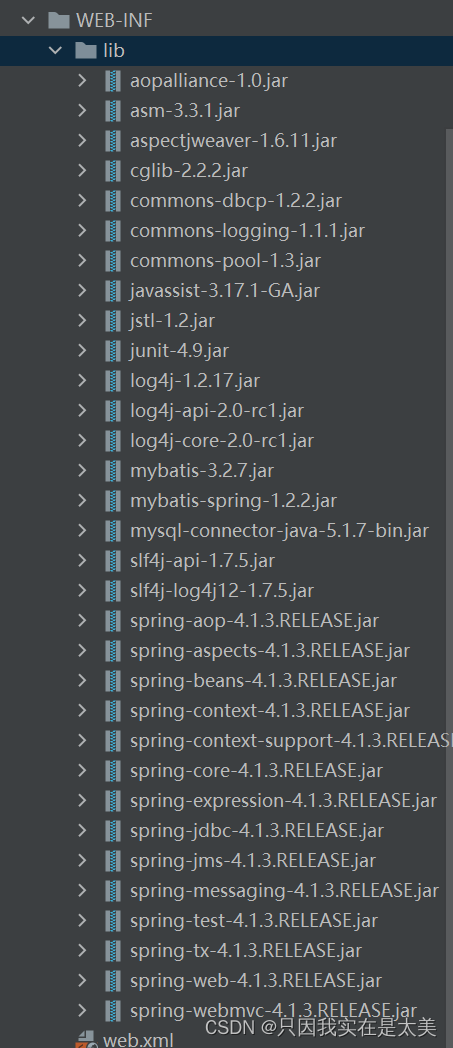
整合包

4.1 整合思路
dao层
1.之前单独使用Mybatis时,要配置SqlMapConfig.xml,现在因为要和spring整合,所以废弃,用applicationContext-dao代替
2.配置数据库连接池
3.将mybatis的sqlsessionfactory交给spring容器管理,mybatis中有工厂类实现了spring中的FactoryBean接口,所以只需要在spring容器中配置这个工厂类就可以
4.配置扫描mapper接口
service层
5.在applicationContext-service中配置service扫描包
6.在applicationContext-tx中配置事务管理
7.将其他具体的applicationContext配置文件整合到applicationContext.xml中
controller层,即配置springmvc.xml
8.配置controller扫描包
9.配置注解驱动
10.配置视图解析器
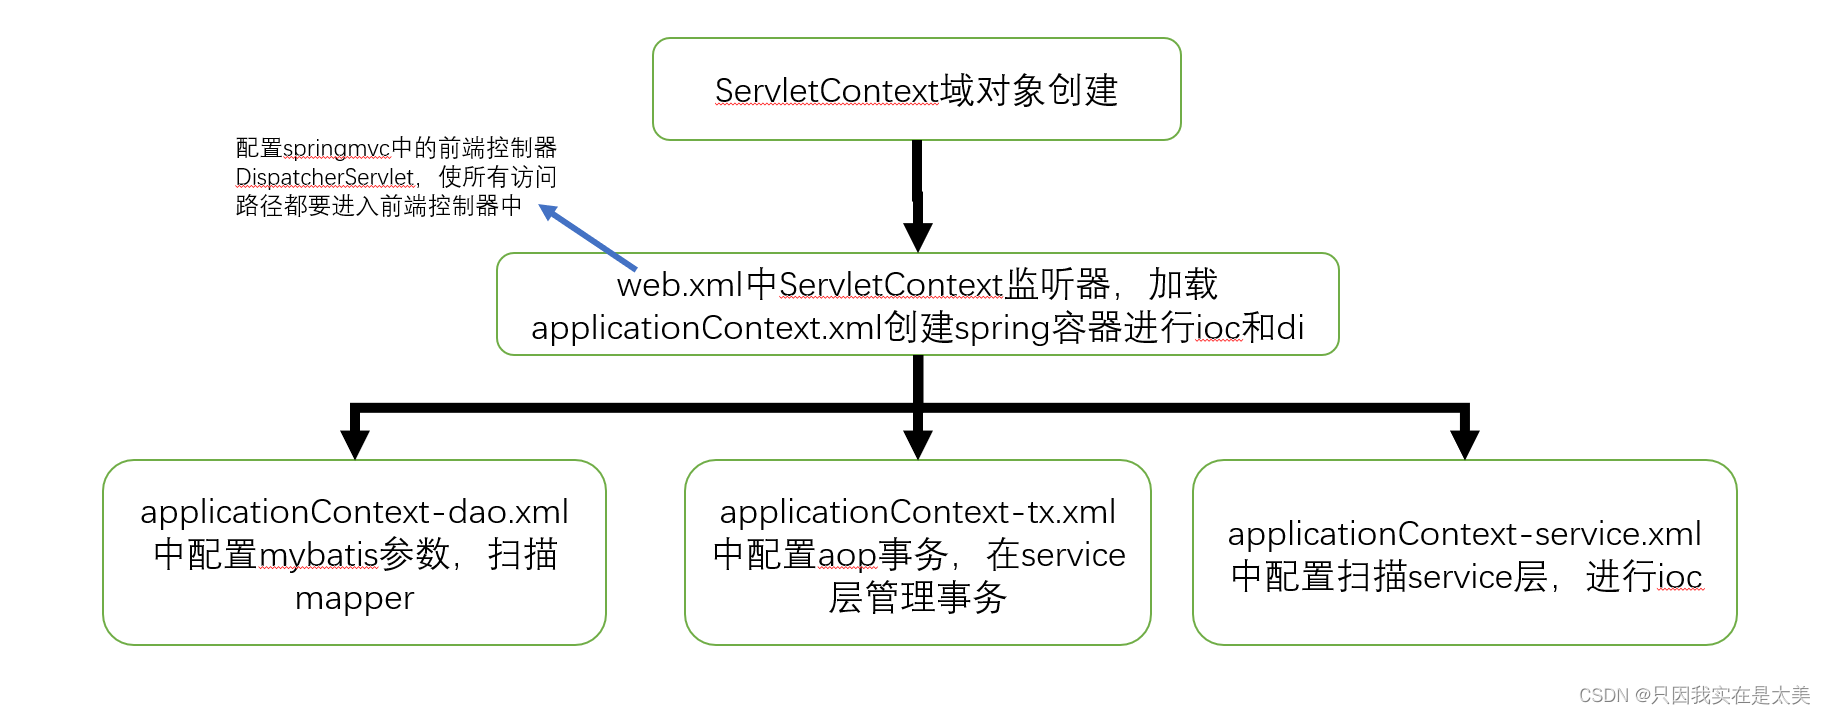
web.xml
11.配置前端控制器DispatcherServlet,其创建的spring容器为子容器
12.配置ServletContext监听器,监听ServletContext域对象创建,在其中放入spring容器,其创建的spring容器为父容器,
4.2 配置整合项目
导入jar包
4.2.1 配置dao
applicationContext-dao
<beans xmlns="http://www.springframework.org/schema/beans"
       xmlns:xsi="http://www.w3.org/2001/XMLSchema-instance"
       xmlns:context="http://www.springframework.org/schema/context"
       xsi:schemaLocation="
        http://www.springframework.org/schema/beans http://www.springframework.org/schema/beans/spring-beans-4.0.xsd
       http://www.springframework.org/schema/context http://www.springframework.org/schema/context/spring-context-4.0.xsd
      ">


    <context:property-placeholder location="classpath:jdbc.properties"/>

    <!--对数据库连接池进行ioc和di-->
    <bean id="dataSource" class="org.apache.commons.dbcp.BasicDataSource">
        <property name="url" value="${jdbc.url}"/>
        <property name="driverClassName" value="${jdbc.driverClassName}"/>
        <property name="username" value="${jdbc.username}"/>
        <property name="password" value="${jdbc.password}"/>
    </bean>

    <!--根据工厂类SqlSessionFactoryBean对SqlSessionFactory进行ioc和di-->
    <bean class="org.mybatis.spring.SqlSessionFactoryBean">
        <!--注入连接池对象-->
        <property name="dataSource" ref="dataSource"/>
        <!--注入pojo实体类存放的位置-->
        <property name="typeAliasesPackage" value="com.gxa.pojo"/>
    </bean>

    <!--配置扫描mapper接口,用于扫描mapper接口并创建对应的动态代理对象并放入spring容器中-->
    <bean class="org.mybatis.spring.mapper.MapperScannerConfigurer">
        <property name="basePackage" value="com.gxa.mapper"/>
    </bean>

</beans>
4.2.2 配置service
applicationContext-service.xml中配置service的扫描
<beans xmlns="http://www.springframework.org/schema/beans"
       xmlns:xsi="http://www.w3.org/2001/XMLSchema-instance"
       xmlns:context="http://www.springframework.org/schema/context"
       xsi:schemaLocation="
        http://www.springframework.org/schema/beans http://www.springframework.org/schema/beans/spring-beans-4.0.xsd
       http://www.springframework.org/schema/context http://www.springframework.org/schema/context/spring-context-4.0.xsd
      ">
    <!--配置service的扫描-->
    <context:component-scan base-package="com.gxa.service"/>
</beans>
applicationContext-tx.xml配置事务管理
<?xml version="1.0" encoding="UTF-8"?>
<beans xmlns="http://www.springframework.org/schema/beans"
       xmlns:xsi="http://www.w3.org/2001/XMLSchema-instance"
       xmlns:aop="http://www.springframework.org/schema/aop"
       xmlns:tx="http://www.springframework.org/schema/tx"
       xsi:schemaLocation="
http://www.springframework.org/schema/beans http://www.springframework.org/schema/beans/spring-beans.xsd
http://www.springframework.org/schema/tx http://www.springframework.org/schema/tx/spring-tx.xsd
http://www.springframework.org/schema/aop http://www.springframework.org/schema/aop/spring-aop.xsd">
    <!--配置事务管理器-->
    <bean id="transactionManager" class="org.springframework.jdbc.datasource.DataSourceTransactionManager">
        <property name="dataSource" ref="dataSource"/>
    </bean>

    <!--配置aop事务和通知-->
    <tx:advice id="txAdvice" transaction-manager="transactionManager">
        <!--定义spring操作事务方法的属性-->
        <tx:attributes>
            <!--配置以insert开头的方法隔离级别为可重复读,事务传播类型是REQUIRED,不是只读操作-->
            <tx:method name="insert*" isolation="REPEATABLE_READ" propagation="REQUIRED" read-only="false"/>
            <tx:method name="add*" isolation="REPEATABLE_READ" propagation="REQUIRED" read-only="false"/>
            <tx:method name="update*" isolation="REPEATABLE_READ" propagation="REQUIRED" read-only="false"/>
            <tx:method name="delete*" isolation="REPEATABLE_READ" propagation="REQUIRED" read-only="false"/>
            <tx:method name="find*" isolation="REPEATABLE_READ" propagation="REQUIRED" read-only="true"/>
        </tx:attributes>
    </tx:advice>

    <!--配置织入-->
    <aop:config>
        <!--配置切入点表达式,即拦截哪些方法-->
        <aop:pointcut id="pc" expression="execution(* com.gxa.service..*ServiceImpl.*(..))"/>
        <!--配置切面(即配置切入点表达式+通知)-->
        <aop:advisor advice-ref="txAdvice" pointcut-ref="pc"/>
    </aop:config>
</beans>
applicationContext.xml中合并所有配置文件
<?xml version="1.0" encoding="UTF-8"?>
<beans xmlns="http://www.springframework.org/schema/beans"
       xmlns:xsi="http://www.w3.org/2001/XMLSchema-instance"
       xmlns:aop="http://www.springframework.org/schema/aop"
       xmlns:tx="http://www.springframework.org/schema/tx"
       xsi:schemaLocation="
http://www.springframework.org/schema/beans http://www.springframework.org/schema/beans/spring-beans.xsd
http://www.springframework.org/schema/tx http://www.springframework.org/schema/tx/spring-tx.xsd
http://www.springframework.org/schema/aop http://www.springframework.org/schema/aop/spring-aop.xsd">
    <!--引入-->
    <import resource="applicationContext-dao.xml"/>
    <import resource="applicationContext-service.xml"/>
    <import resource="applicationContext-tx.xml"/>
</beans>
4.2.3 配置controller,即springmvc
springmvc.xml
<beans xmlns="http://www.springframework.org/schema/beans"
	xmlns:xsi="http://www.w3.org/2001/XMLSchema-instance" xmlns:context="http://www.springframework.org/schema/context"
	xmlns:mvc="http://www.springframework.org/schema/mvc"
	xsi:schemaLocation="
        http://www.springframework.org/schema/beans http://www.springframework.org/schema/beans/spring-beans-4.0.xsd
       http://www.springframework.org/schema/context http://www.springframework.org/schema/context/spring-context-4.0.xsd
       http://www.springframework.org/schema/mvc http://www.springframework.org/schema/mvc/spring-mvc-4.0.xsd">

	<!--配置ioc扫描包,扫描controller中的注解-->
	<context:component-scan base-package="com.gxa.controller"/>

	<!--注解驱动,自动配置注解版本的处理器映射器喝适配器-->
	<mvc:annotation-driven/>

	<!--配置视图解析器-->
	<bean class="org.springframework.web.servlet.view.InternalResourceViewResolver">
		<!--定义逻辑视图(jsp)前缀-->
		<property name="prefix" value="/WEB-INF/views/"/>
		<!--定义逻辑视图(jsp)后缀-->
		<property name="suffix" value=".jsp"/>
		<!--会将上面的前缀和后缀拼接到controller中的modelAndView.setViewName()jsp页面名上-->
	</bean>
</beans>
4.2.4 配置web.xml中的springmvc前端控制器DispatcherServlet和ServletContext创建监听器
web.xml
<?xml version="1.0" encoding="UTF-8"?>
<web-app xmlns="http://xmlns.jcp.org/xml/ns/javaee"
         xmlns:xsi="http://www.w3.org/2001/XMLSchema-instance"
         xsi:schemaLocation="http://xmlns.jcp.org/xml/ns/javaee http://xmlns.jcp.org/xml/ns/javaee/web-app_4_0.xsd"
         version="4.0">
    <!--监听器监听ServletContext的创建,并创建spring父容器放入其中-->
    <listener>
        <listener-class>org.springframework.web.context.ContextLoaderListener</listener-class>
    </listener>
    <!--配置spring父容器的配置文件applicationContext.xml文件位置,上面的监听器在创建spring容器时会根据contextConfigLocation的值读取spring容器的初始化配置-->
    <context-param>
        <param-name>contextConfigLocation</param-name>
        <param-value>classpath:spring/applicationContext.xml</param-value>
    </context-param>

    <!--配置springmvc前端控制器DispatcherServlet,创建spring子容器-->
    <servlet>
        <servlet-name>springmvc</servlet-name>
        <servlet-class>org.springframework.web.servlet.DispatcherServlet</servlet-class>
        <!--配置servlet初始化参数,告诉springmvc配置文件的位置-->
        <init-param>
            <param-name>contextConfigLocation</param-name>
            <param-value>classpath:spring/springmvc.xml</param-value>
        </init-param>
        <!--配置项目启动时创建springServlet-->
        <load-on-startup>1</load-on-startup>
    </servlet>

    <!--配置springmvc虚拟路径,当请求下面的路径时就会访问springmvc-->
    <servlet-mapping>
        <servlet-name>springmvc</servlet-name>
        <!--缺省路径,通过路径访问servlet时先匹配路径,若匹配不成功再找缺省资源-->
        <url-pattern>/</url-pattern>
    </servlet-mapping>
</web-app>
4.2.5 mybatis注解编写mapper接口
public interface ItemMapper {
    //查出来的结果字段名域属性名一致才能直接映射,不一致就用resultMap在xml里面映射
    @Select("select id,name,price,detail,pic,createtime from item where id=#{id}")
    Item findItemById(Integer id);

    @Select("select id,name,price,detail,pic,createtime from item")
    List<Item> findItemList();

    @Insert("insert into item(name,price,detail,pic,createtime) values(#{name},#{price},#{detail},#{pic},#{createtime})")
    void  insertItem(Item item);

    @Update("update item set name=#{name},price=#{price},detail=#{detail},pic=#{pic},createtime=#{createtime} where id=#{id}")
    void updateItem(Item item);

    @Delete("delete from item where id=#{id}")
    void deleteItemById(Integer id);

}
4.2.6 mapper测试
@RunWith(SpringJUnit4ClassRunner.class)
@ContextConfiguration(locations = "classpath:spring/applicationContext.xml")
public class TestItemMapper {
    @Autowired
    ItemMapper itemMapper;
    @Test
    public void testInsert(){
        Item item = new Item(null,"123",18000F,"xx",new Date(),"xx");
        itemMapper.insertItem(item);
    }

    @Test
    public void testUpdate(){
        Item item = new Item(1,"123",18000F,"xx",new Date(),"xx");
        itemMapper.updateItem(item);
    }

    @Test
    public void testQuery(){
        Item item = new Item(1,"123",18000F,"xx",new Date(),"xx");
        System.out.println(itemMapper.findItemById(1));
        System.out.println(itemMapper.findItemList());
    }

    @Test
    public void testDelete(){
        itemMapper.deleteItemById(1);
    }
}
配置文件的加载关系
4.2.7 整合测试
4.2.7.1 service接口
public interface ItemService {
    List<Item> findItemList();
}
4.2.7.2 service实现类
@Service
public class ItemServiceImpl implements ItemService {

    @Autowired
    private ItemMapper itemMapper;

    @Override
    public List<Item> findItemList() {
        return itemMapper.findItemList();
    }
}
4.2.7.3 controller类
@Controller
public class ItemController {
    @Autowired
    ItemService itemService;
    //配置方法的虚拟映射路径
    @RequestMapping("/queryItemList")
    //ModelAndView代表数据和视图
    public ModelAndView queryItemList(){
        //模拟后端查询出来的商品列表结果
        List<Item> list = itemService.findItemList();
        //放入数据到request域
        ModelAndView modelAndView = new ModelAndView();
        modelAndView.addObject("list",list);
        //转发到jsp
        modelAndView.setViewName("itemList");
        return modelAndView;
    }
}
4.2.7.4 整合测试
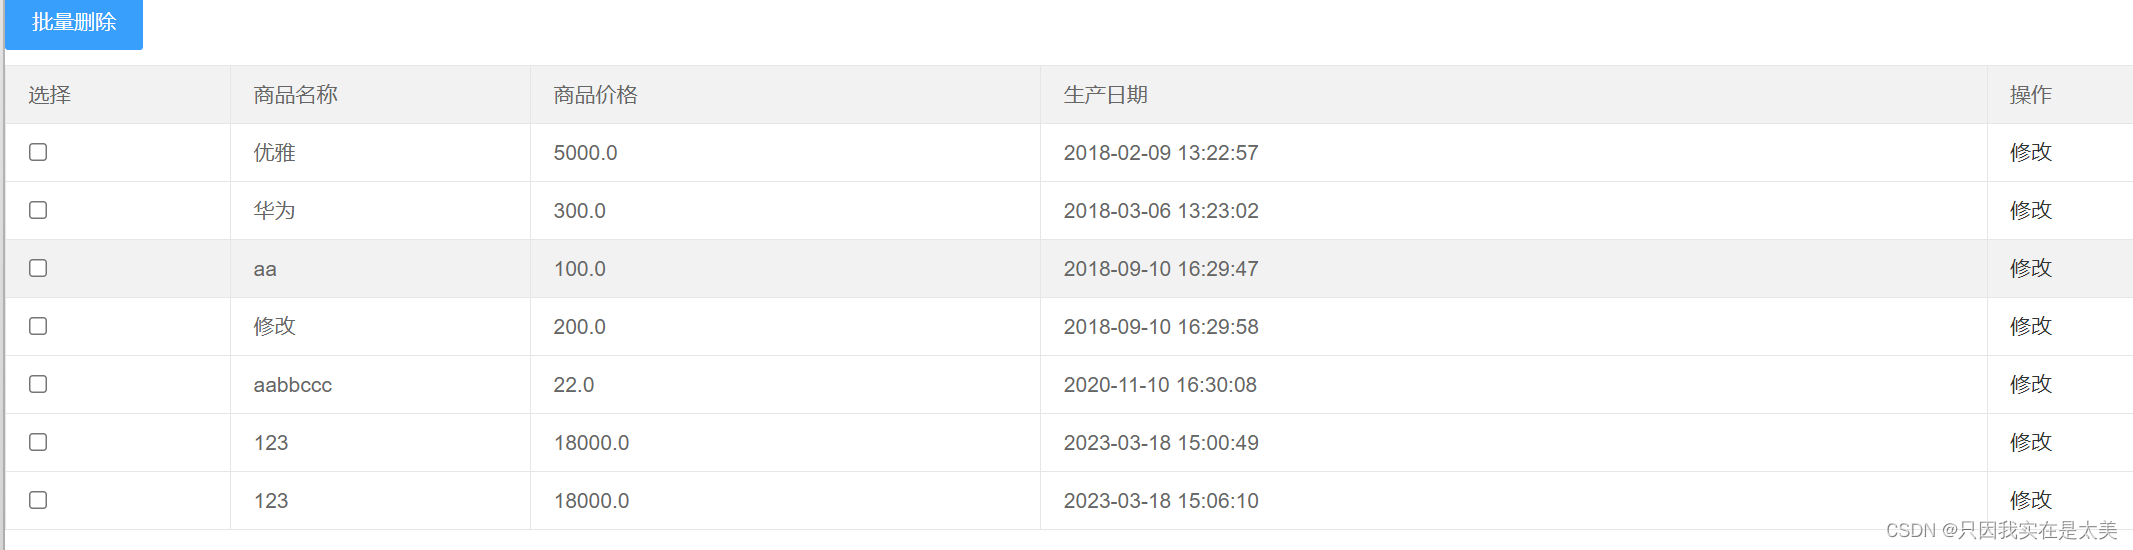
5.参数绑定
5.1 从前端取得参数时使用默认参数绑定
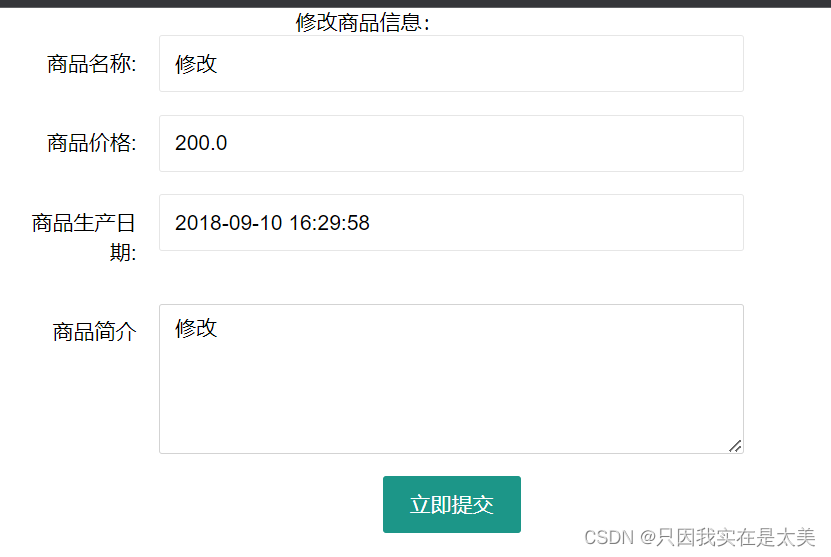
需求:点击修改时,根据id查询对应商品信息,回显到页面修改表单中
5.1.1 编写service
service接口
public interface ItemService {
    List<Item> findItemList();
    Item findItemById(Integer id);
}
service实现类
    @Override
    public Item findItemById(Integer id) {
        return itemMapper.findItemById(id);
    }
5.1.2 编写controller
5.1.2.1 方式一
    @RequestMapping("/updateItemUI")
    //处理器适配器调用该处理器时,会将前端的参数封装到request中
    public ModelAndView updateItemUI(HttpServletRequest request){
        //1.获取请求参数id
        Integer id = Integer.parseInt(request.getParameter("id"));
        //2.调用service查询
        Item item = itemService.findItemById(id);
        //3.封装modelandview对象
        ModelAndView modelAndView = new ModelAndView();
        modelAndView.addObject("item",item);
        modelAndView.setViewName("editItem");
        return modelAndView;
    }
5.1.2.2 方式二
或者使用简单参数绑定法简化为下列代码,直接指定需要请求参数的名字,在使用时需要保证前端请求参数的名字与处理器中形参名字相同
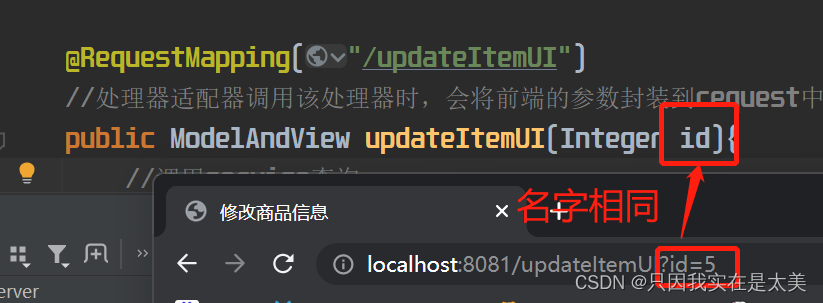
    @RequestMapping("/updateItemUI")
    //处理器适配器调用该处理器时,会将前端的参数封装到request中
    public ModelAndView updateItemUI(Integer id){
        //调用service查询
        Item item = itemService.findItemById(id);
        //封装modelandview对象
        ModelAndView modelAndView = new ModelAndView();
        modelAndView.addObject("item",item);
        modelAndView.setViewName("editItem");
        return modelAndView;
    }
5.1.2.3 方式三
5.1.2.3.1 形参使用RequestParam注解(重点)
@Target({ElementType.PARAMETER})
@Retention(RetentionPolicy.RUNTIME)
@Documented
public @interface RequestParam {
	//处理前后端参数名不一致,其中传入前端传递的参数名
    String value() default "";

	//参数是否必须,当前端请求该处理器未传递该参数,且下面defaultValue也为配置时的时报错
    boolean required() default true;

	//设置该参数的默认值,设置后当前端未传递该参数时,就会使用该默认值
    String defaultValue() default "\n\t\t\n\t\t\n\ue000\ue001\ue002\n\t\t\t\t\n";
}
当前端未传递该参数时
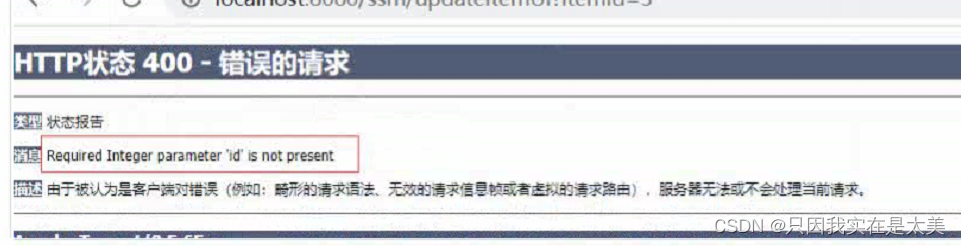
当前端传递参数名与后端处理器形参名不一致时:
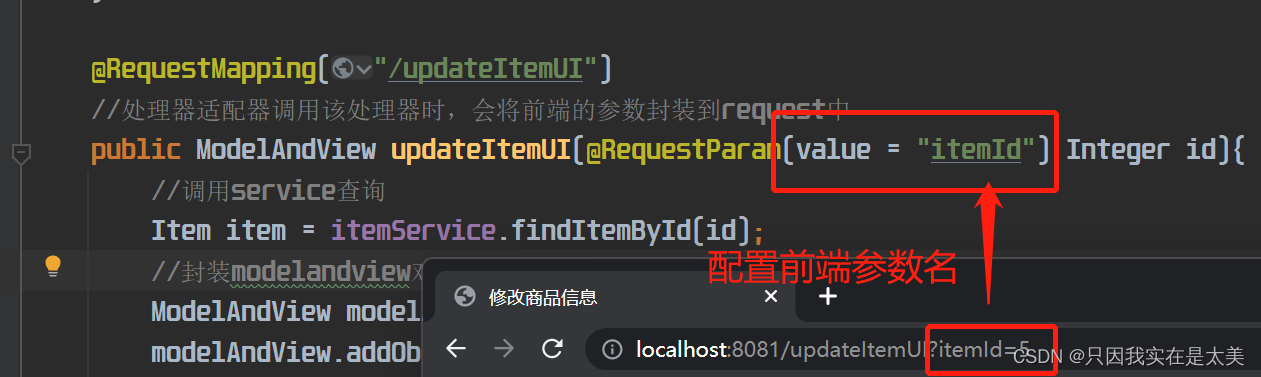
    @RequestMapping("/updateItemUI")
    //处理器适配器调用该处理器时,会将前端的参数封装到request中
    public ModelAndView updateItemUI(@RequestParam(value = "itemId") Integer id){
        //调用service查询
        Item item = itemService.findItemById(id);
        //封装modelandview对象
        ModelAndView modelAndView = new ModelAndView();
        modelAndView.addObject("item",item);
        modelAndView.setViewName("editItem");
        return modelAndView;
    }
5.1.3 修改jsp中修改按钮跳转

5.1.4页面测试
5.2 使用Model / ModelMap将后端参数传到前端
当在处理器形参中声明Model参数时,处理器适配器在传参时就会自动new一个Model接口实现类ModelMap并将地址传递给处理器,我们就可以在处理器中向这个ModelMap中放后端得到的数据,然后直接返回视图层的页面名给处理器适配器,处理器适配器之后就会拿到这个ModelMap对象并解析其中的数据,将数据和处理器返回的页面名自动组合成一个ModelAndView对象再返回给前端控制器。
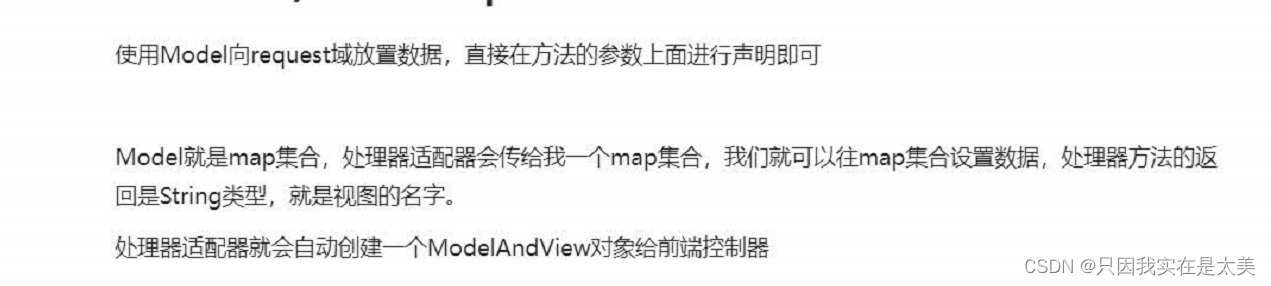
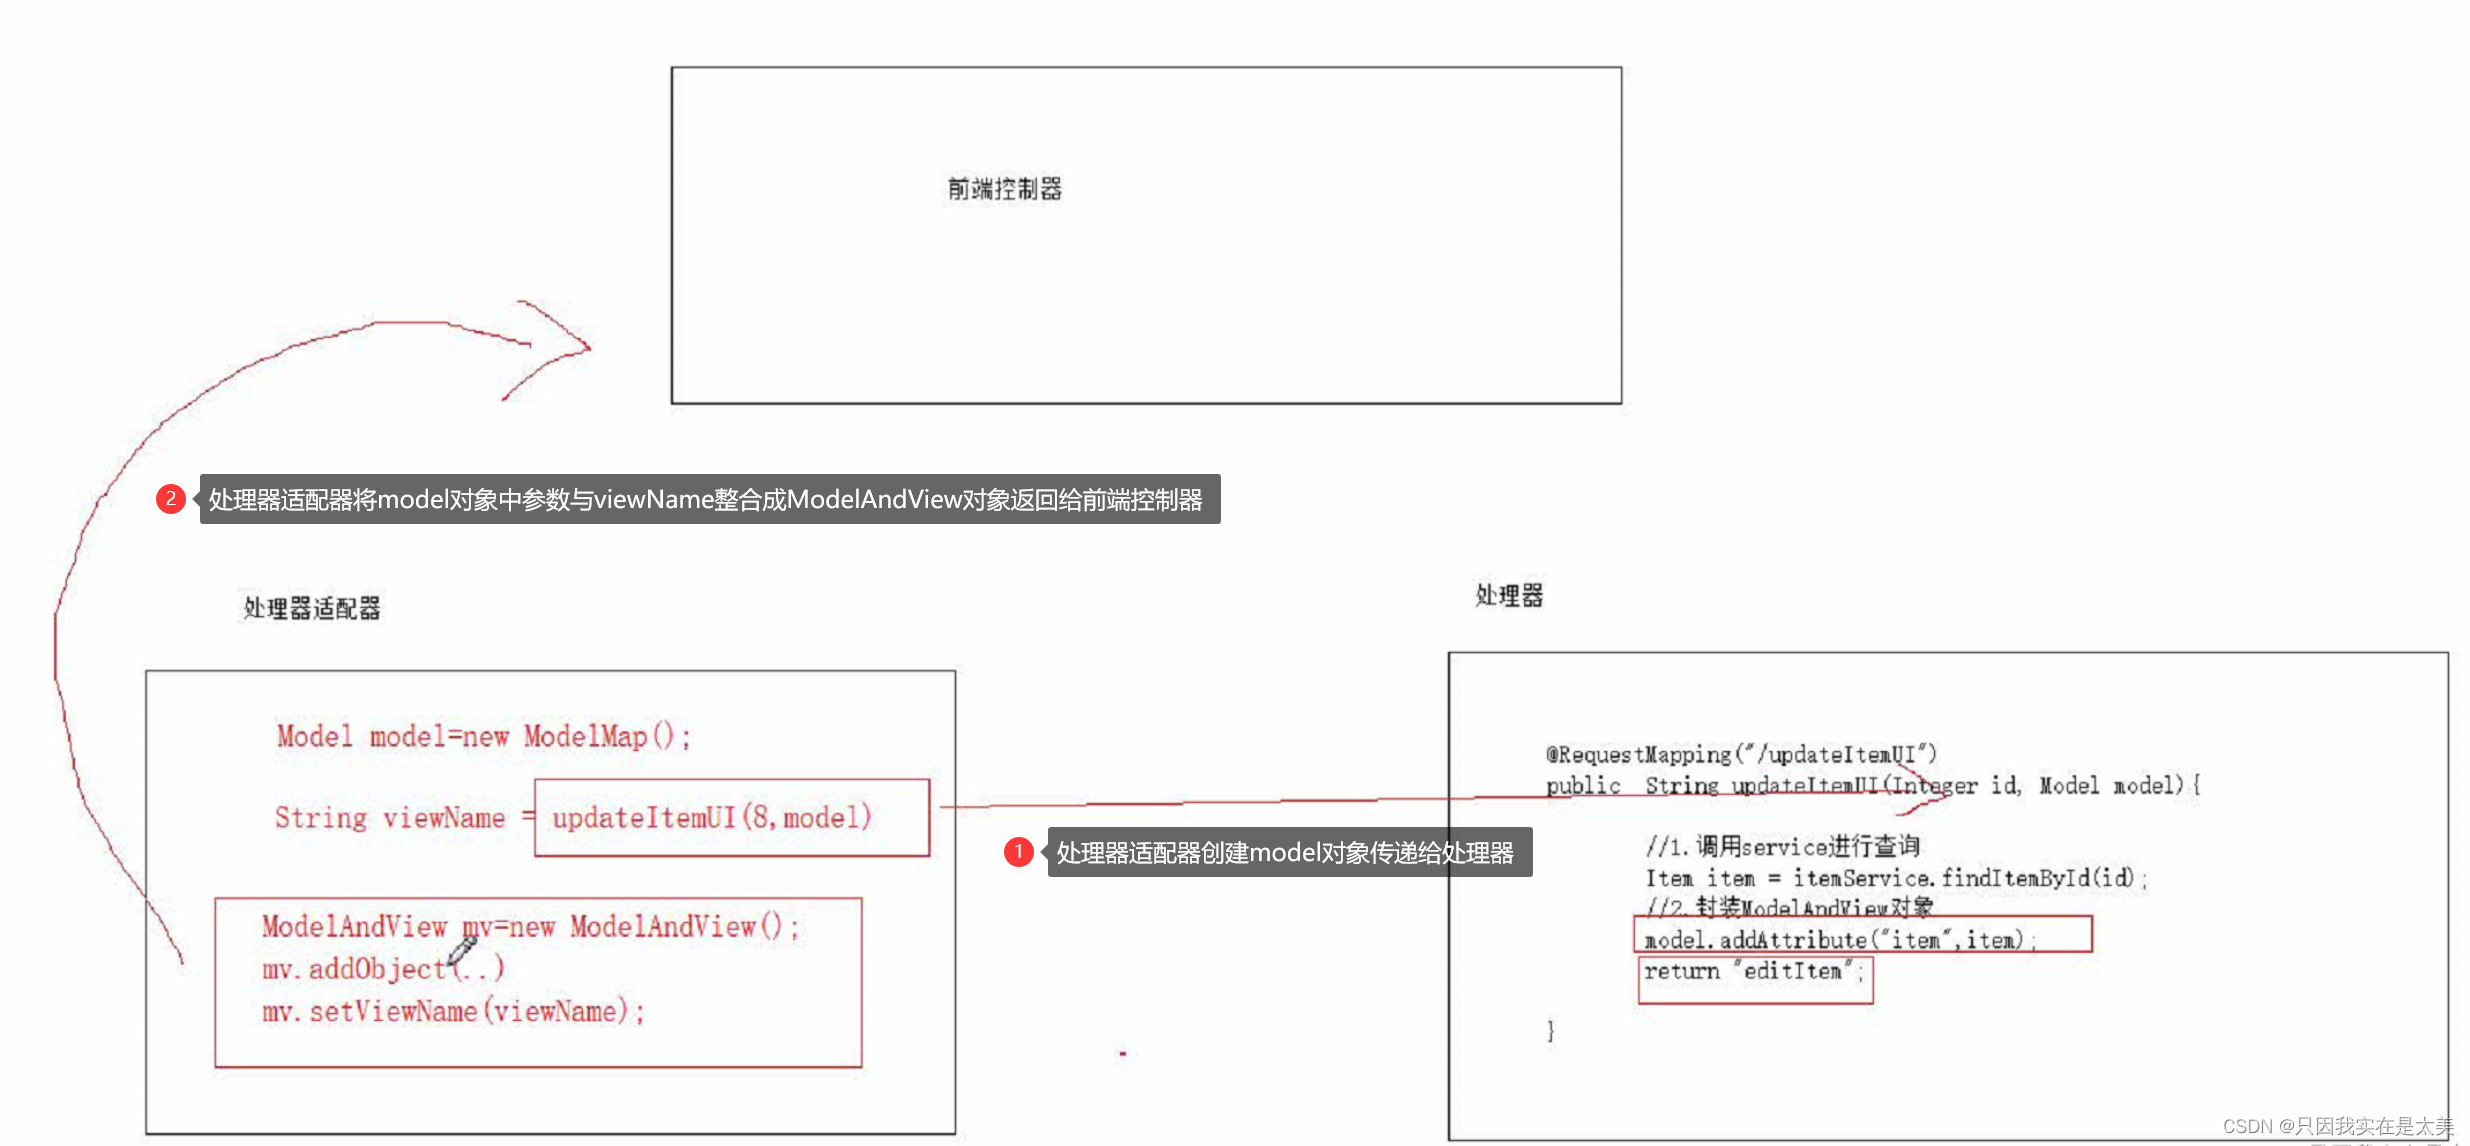
所以可以使用Model继续简化controller层的处理器
    @RequestMapping("/updateItemUI")
    public String updateItemUI(Integer id, Model model){
        //调用service查询
        Item item = itemService.findItemById(id);
        //封装modelandview对象
        model.addAttribute("item",item);
        return "editItem";
    }
5.3 从前端参数中取得pojo实体
如在前端提交修改请求时,我们想要将修改的数据封装到对应的pojo实体中,实现修改商品信息
5.3.1 service接口和实现类
service接口
void updateItem(Item item);
service实现
    @Override
    public void updateItem(Item item) {
        itemMapper.updateItem(item);
    }
5.3.2 编写controller
    @RequestMapping("/updateItem")
    //这里形参直接得到bean时,要保证前端传递的参数名字和实体类中的属性名一致,若有日期类属性还要进行下面的日期类转换
    public String updateItem(Item item){
        itemService.updateItem(item);
        return "success";
    }
5.3.3 编写日期转换器
因为Item类中有日期类,从前端取得的日期是String类型,在进行映射时BeanUtils不会对日期类进行自动转换,所以需要定义日期转换类,将String格式的日期转换成util.Date格式
格式转换类
public class DateConverter implements Converter<String,Date> {
    @Override
    public Date convert(String source) {
        try{
        	//将yyyy-MM-dd HH:mm:ss格式的String转换成util.Date
            SimpleDateFormat df = new SimpleDateFormat("yyyy-MM-dd HH:mm:ss");
            return df.parse(source);
        }catch (Exception e){
            e.printStackTrace();
        }
        return null;
    }
}
在springmvc.xml中注册日期转换器,并在注解驱动上使用 在这里插入代码片
springmvc.xml
	<!--注解驱动,自动配置注解版本的处理器映射器和适配器,将日期转换器定义到驱动注解上-->
	<mvc:annotation-driven conversion-service="conversionService2"/>

	<!--配置日期转换器-->
	<bean id="conversionService2" class="org.springframework.format.support.FormattingConversionServiceFactoryBean">
		<property name="converters">
			<set>
				<bean class="com.gxa.converter.DateConverter"/>
			</set>
		</property>
	</bean>
5.3.4 过滤器解决乱码
在web.xml中配置过滤器
    <!--配置解决乱码过滤器-->
    <filter>
        <filter-name>characterEncodingFilter</filter-name>
        <filter-class>org.springframework.web.filter.CharacterEncodingFilter</filter-class>
        <init-param>
            <param-name>encoding</param-name>
            <param-value>UTF-8</param-value>
        </init-param>
    </filter>
    <filter-mapping>
        <filter-name>characterEncodingFilter</filter-name>
        <url-pattern>/*</url-pattern>
    </filter-mapping>
5.4 绑定集合或数组
当进行批量删除时,前端会勾选想要删除的数据,并将这些数据的主键id放入数组中传递给后端,我们需要使用下面的方法从其中取出数据
前端代码:
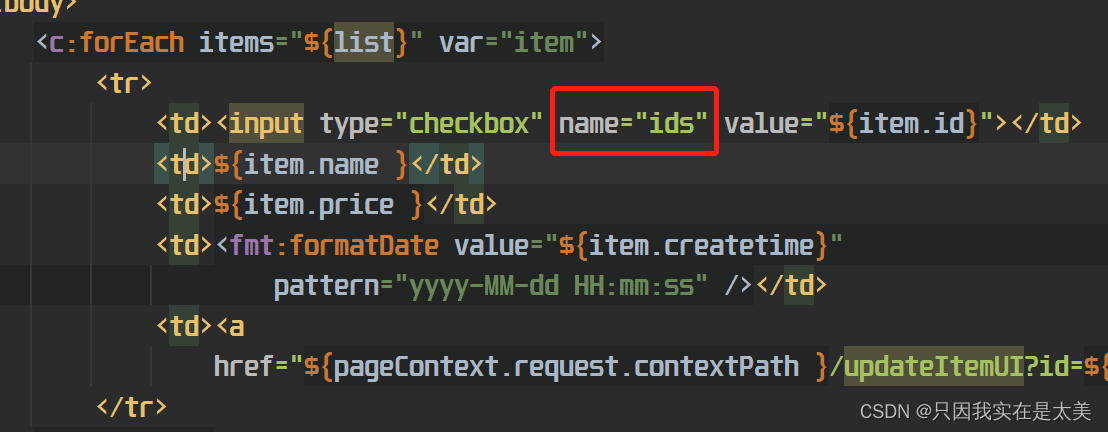
后端在controller层处理器中取出这个数组时,形参名需要和这里的name一致,底层会使用反射,根据形参名去前端参数中寻找相同名字的参数
5.4.1 方法一,将前端数组放入后端集合中
在使用时要将集合放入一个类对象中,不能直接使用
5.4.1.1 定义接收前端数组的集合的包装类
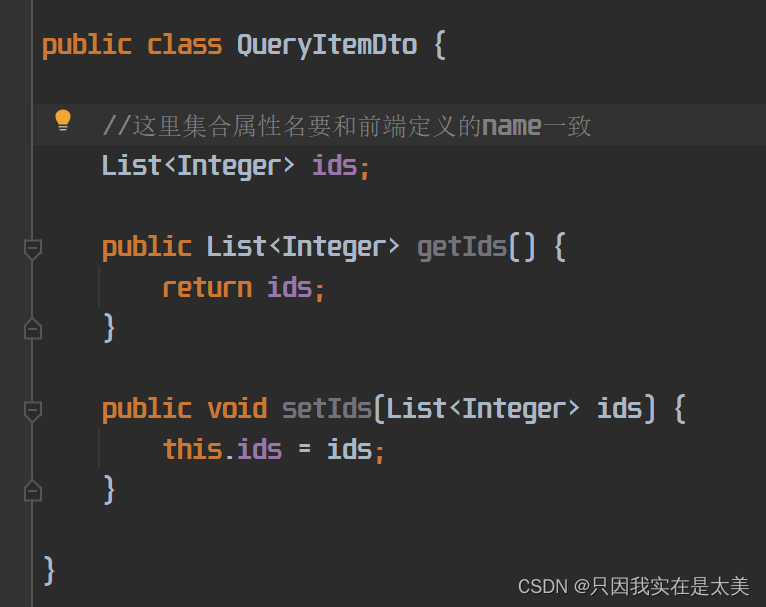
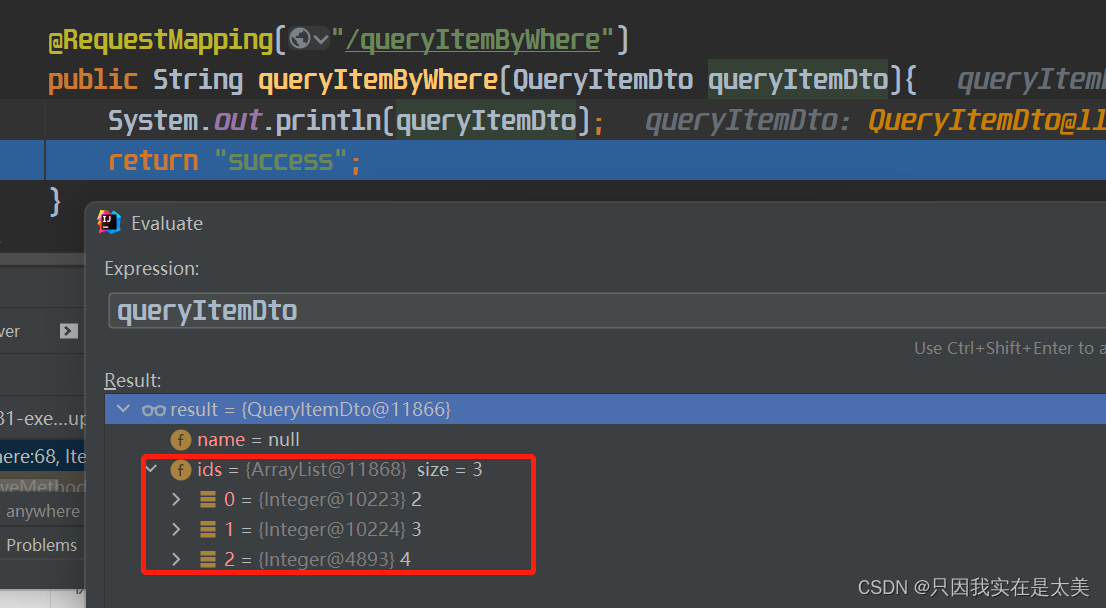
5.4.1.2 controller层处理器
    @RequestMapping("/queryItemByWhere")
    public String queryItemByWhere(QueryItemDto queryItemDto){
        System.out.println(queryItemDto);
        return "success";
    }
5.4.1.3 测试
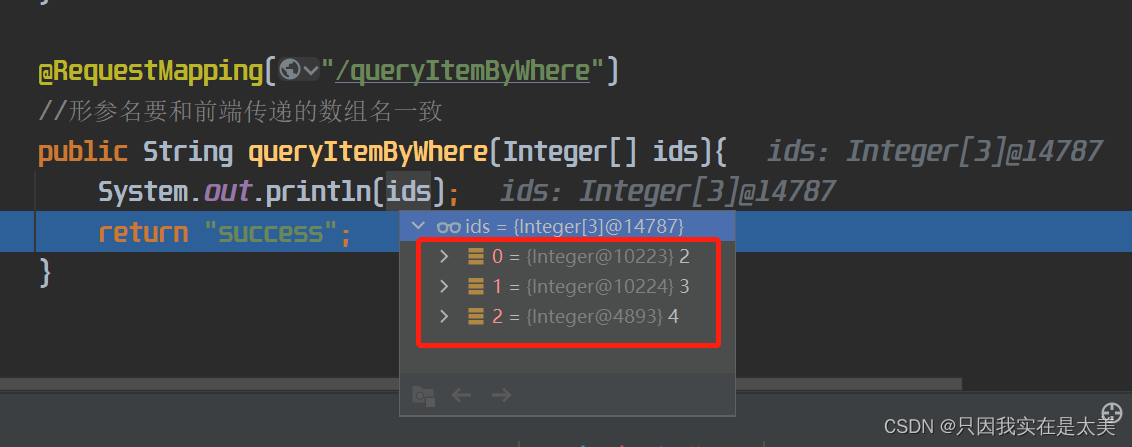
5.4.2 方法二,直接使用数组接收前端参数
直接在controller层处理器的形参中定义数组
    @RequestMapping("/queryItemByWhere")
    //形参名要和前端传递的数组名一致
    public String queryItemByWhere(Integer[] ids){
        System.out.println(ids);
        return "success";
    }
测试
6.RequestMapping作用
@RequestMapping可以配置不同处理器的映射路径,下面是不同的几种配置方法
6.1 配置在处理器方法上,为一个处理器配置多个映射路径
@RequestMapping(value = {"/queryItemByWhere","/ItemList"})
6.2 配置在controller类上,为类中所有处理器方法的映射路径加上统一前缀
6.3 限制请求方式
//其中对method参数指定请求方式,当前端请求方式不匹配时报错,若不配置时不限制请求方式
@RequestMapping(value = "/queryItemList",method = RequestMethod.GET)
7.Controller中处理器方法的不同返回
7.1 返回ModelAndView对象
7.2 返回void
返回void时需要自己处理参数传递和转发
7.3 返回String
处理器传入Model参数,处理完成后返回String,根据String中不同的内容,有下面几种不同处理方式
7.3.1 转发到其他逻辑视图页面(jsp页面)
如当点击主页面某元素后的修改按钮,跳转到对应的修改页面
    @RequestMapping("/updateItemUI")
    //处理器适配器调用该处理器时,会将前端的参数封装到request中
    public String updateItemUI(Integer id, Model model){
        //调用service查询
        Item item = itemService.findItemById(id);
        //封装modelandview对象
        model.addAttribute("item",item);
        //由于配置了视图解析器中的前后缀,所以这里是转发到了editItem.jsp页面
        return "editItem";
    }
7.3.2 转发到其他处理器方法
使用时在响应时前端地址栏不会显示对应的转发到的处理器映射地址,可以实现一次请求多次处理器响应
    @RequestMapping("/updateItem")
    public String updateItem(Item item){
        itemService.updateItem(item);
        //以forward开头时会去找其他处理器进行后续处理
        return "forward:/item/queryItemList";
    }
7.3.3 重定向
    @RequestMapping("/updateItem")
    //这里形参直接得到bean时,要保证前端
    public String updateItem(Item item){
        itemService.updateItem(item);
        //以redirect开头时会进行重定向
        return "redirect:/item/queryItemList";
    }
7.3.4 转发和重定向的区别
转发只有一次请求,重定向会有两次请求
转发后放在request域中的参数在另一个页面仍然存在,重定向因为是不同的请求所以参数会被清除
转发不会在地址栏中显示新页面地址,重定向会显示
重定向的原理是服务器向浏览器返回302响应头并将重定向的地址放在location中,浏览器再根据location地址进行第二次请求
8.异常处理器
8.1 springmvc的异常处理

8.2 预期异常(自定义异常)
预期异常:即自定义的异常类型
不可预期异常:未知异常
8.2.1 编写自定义异常类
public class CustomException extends RuntimeException{
    //定义异常信息
    private String message;

    public CustomException(String message) {
        super(message);
        this.message = message;
    }

    @Override
    public String getMessage() {
        return message;
    }

    public void setMessage(String message) {
        this.message = message;
    }
}
8.2.2 编写异常处理器
public class MyExceptionHandler implements HandlerExceptionResolver {
    @Override
    //handler是抛出该异常的处理器
    public ModelAndView resolveException(HttpServletRequest request, HttpServletResponse response, Object handler, Exception exception) {
        String msg = "";
        if(exception instanceof CustomException){
            //判断是否是自定义异常
            CustomException customException = (CustomException) exception;
            msg = customException.getMessage();
        }else {
            exception.printStackTrace();
            msg="对不起,系统繁忙";
        }
        ModelAndView modelAndView = new ModelAndView();
        modelAndView.addObject("msg",msg);
        //设置跳转到统一的错误页面进行显示
        modelAndView.setViewName("error");
        return modelAndView;
    }
}
8.2.3 配置异常处理器
springmvc.xml
	<!--配置异常处理器,spring在检测到该类实现了HandlerExceptionResolver接口后会将其当作异常处理器进行调用-->
	<bean class="com.gxa.exception.MyExceptionHandler"/>
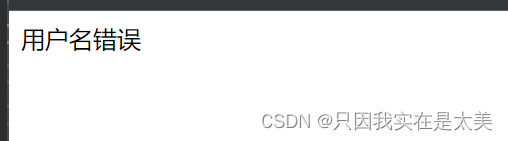
8.2.4 测试
测试处理器抛出自定义异常
    @RequestMapping(value = "/queryItemList")
    //ModelAndView代表数据和视图
    public ModelAndView queryItemList(){
      if(true)
           throw new CustomException("用户名错误");
	  //code.....
    }
测试处理器抛出未知异常
    @RequestMapping(value = "/queryItemList")
    //ModelAndView代表数据和视图
    public ModelAndView queryItemList(){
	      int i;
	      if(true)
	          i = 1/0;
		  //code.....
    }
9. 同步上传图片
9.1 nginx服务器
可以作为http服务器,但nginx只能作为静态资源服务器,不能放java代码
可以作为反向代理服务器,做web服务器集群,将若干tomcat服务器进行集群
9.2 配置作为静态资源服务器
9.2.1 http服务器配置虚拟主机
nginx作http服务器,一台nginx可以通过端口来配置多个虚拟主机,一个虚拟主机就是一个服务器
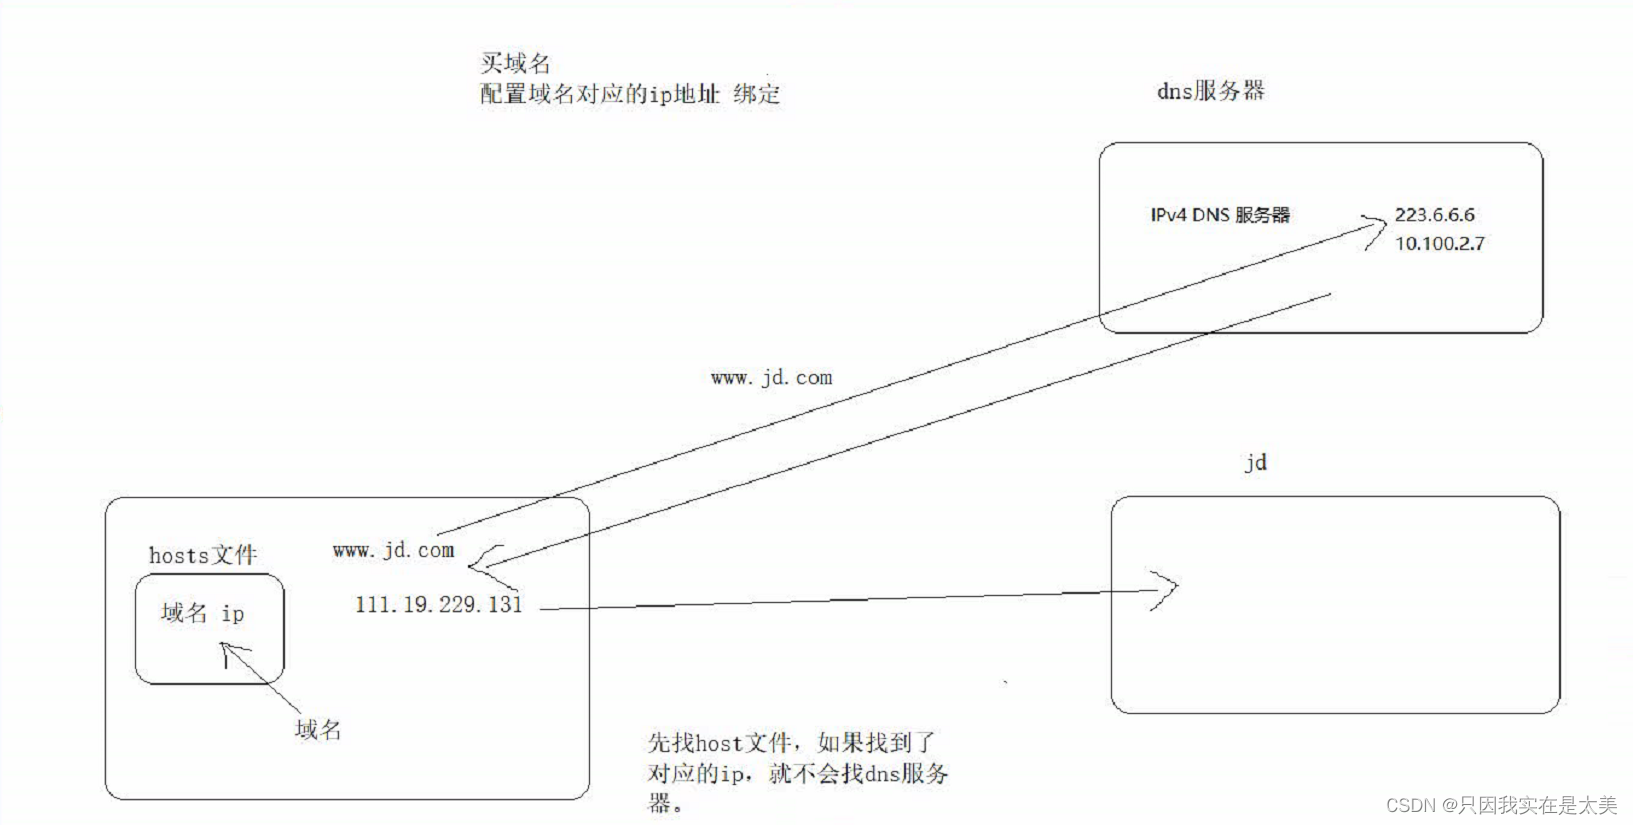
http请求流程:当在地址栏输入域名后,浏览器会先在本机的hosts文件中寻找是否有匹配的ip地址,若匹配成功就直接使用匹配到的ip地址访问;若匹配失败则使用域名去请求dns服务器,dns服务器解析域名后返回ip地址给浏览器,浏览器再使用dns返回的ip地址访问对应的域名
所以我们可以通过修改hosts文件中的映射地址,使指定域名映射到本机,阻止浏览器发送域名到dns服务器进行解析,这样就能模拟通过域名上传图片到nginx服务器中
配置域名上传图片步骤:
-
在hosts文件中修改映射
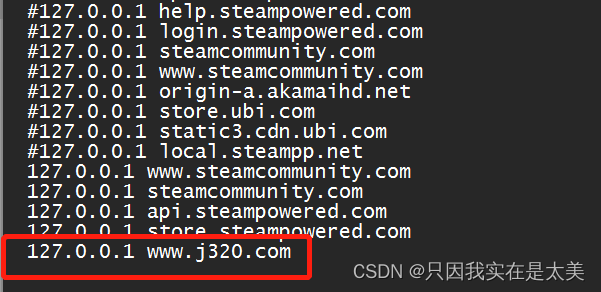
指定当本机访问www.j320.com时映射到本机 -
在nginx配置文件中修改映射到本机的具体位置
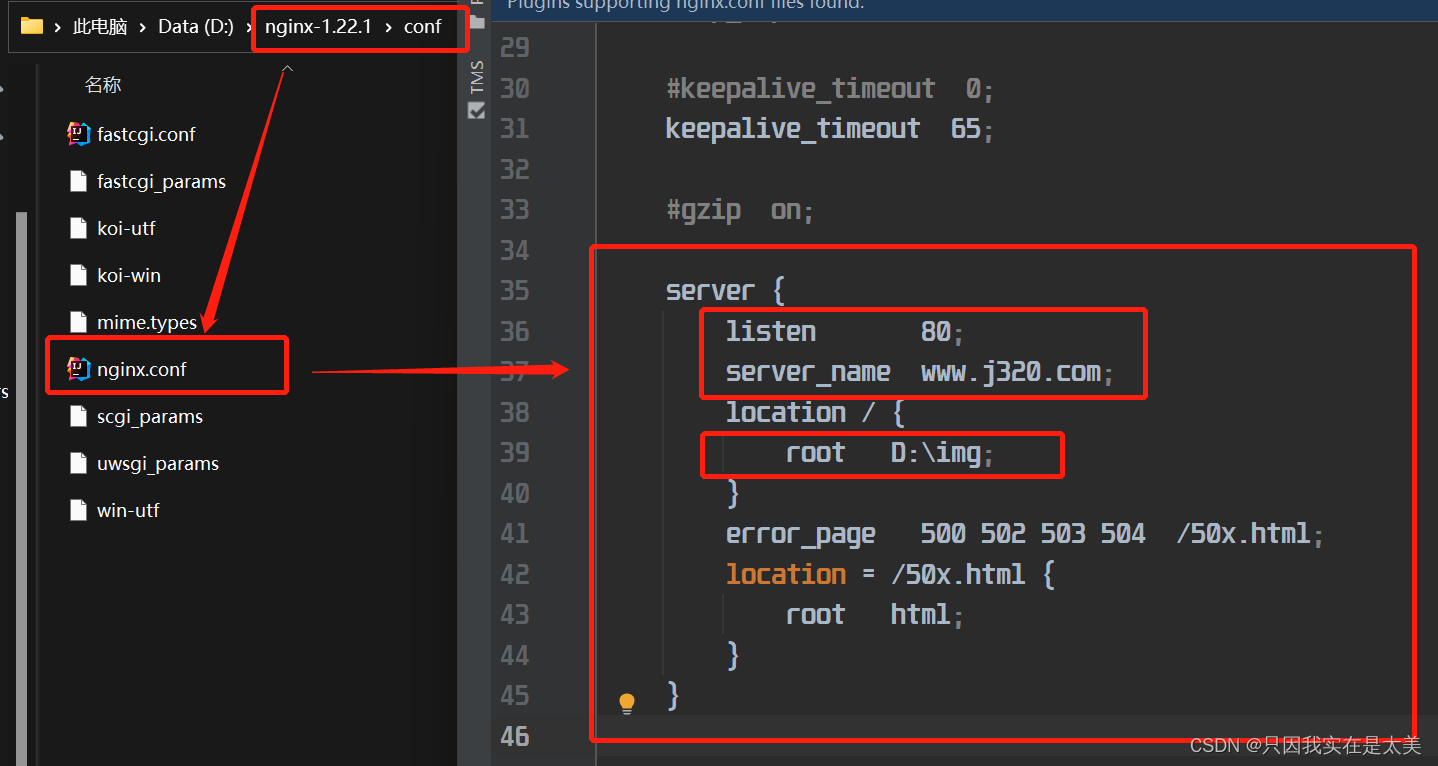
当需要配置多个虚拟nginx服务器时,只需要复制右边server这一段,并修改listen中的端口号;这里将server_name修改为第一步我们指定的域名,下面location的root中指定我们想要具体访问到本机的路径,这里我们指定D盘下的img文件夹为上传图片的存放地址,配置完成后当访问www.j320.com就等同于访问到了D:/img文件夹,所以后面在将图片路径存入数据库时,就使用 www.j320.com+文件名 即可 -
重新加载nginx配置文件:cmd在nginx根目录中使用nginx -s reload命令
-
在spingmvc中导入图片上传的jar包

-
在jsp中的form表单中指定encytype=multipart/form-data,以二进制格式上传图片
-
编写controller图片上传处理器
形参名pictureFile要和前端上传图片的input标签名一致
    @RequestMapping("/updateItem")
    public String updateItem(Item item, MultipartFile pictureFile) throws IOException {
        //1.获取原来名字
        String originalFileName = pictureFile.getOriginalFilename();
        //2.获取后缀.jpg
        String extName = originalFileName.substring(originalFileName.lastIndexOf("."));
        //3.生成新名字
        String picName = UUID.randomUUID().toString().replace("-","")+extName;
        //4.把图片放在服务器磁盘中,File.separator动态获取分隔符
        pictureFile.transferTo(new File("D:\\img"+File.separator+picName));
        //5.保存图片访问路径,数据库中存入的图片路径就是http://www.j320.com/图片名,http://www.j320.com/就代表本地存放图片的D:/img文件夹
        item.setPic("http://www.j320.com/"+picName);
        itemService.updateItem(item);
        return "redirect:/item/queryItemList";
    }
- 在springmvc.xml中配置上传文件解析器
springmvc.xml
	<!--配置文件上传解析器,id必须为multipartResolver-->
	<bean id="multipartResolver" class="org.springframework.web.multipart.commons.CommonsMultipartResolver">
		<!--单位字节-->
		<property name="maxUploadSize" value="5242880"/>
	</bean>
10. Json数据交互
导入jar包
Json从后端原生发送到前端
    @RequestMapping("list")
    public void list(HttpServletResponse response) throws Exception {
        //查询数据
        List<Item> list = itemService.findItemList();
        System.out.println(list);
        //转换json
        ObjectMapper objectMapper = new ObjectMapper();
        //对象转换成json
        String json = objectMapper.writeValueAsString(list);
        //发送给前端
        response.setContentType("application/json;charset=UTF-8");
        response.getWriter().write(json);
    }
10.1 使用@ResponseBody注解发送json到前端
以上代码可以用注解简化
    @RequestMapping("list")
    @ResponseBody       //告诉springmvc想要返回json数据
    public List<Item> list(HttpServletResponse response) throws Exception {
        //查询并返回数据
        return itemService.findItemList();
    }
也可以将注解打在controller类上面,类中所有处理器都会自动加上这个注解,表示类中所有处理器都返回json数据
ResponseEntity
以代码上也可以返回ResponseEntity,标记要返回的是json数据,与ResponserBody注解的不同在于ResponseEntity可以控制返回的状态码
    @RequestMapping("list")
    public ResponseEntity<List<Item>> list(HttpServletResponse response) throws Exception {
        //查询数据
        List<Item> itemList = itemService.findItemList();
        //创建ResponseEntity对象并设置状态码为201
        return ResponseEntity.status(201).body(itemList);
    }
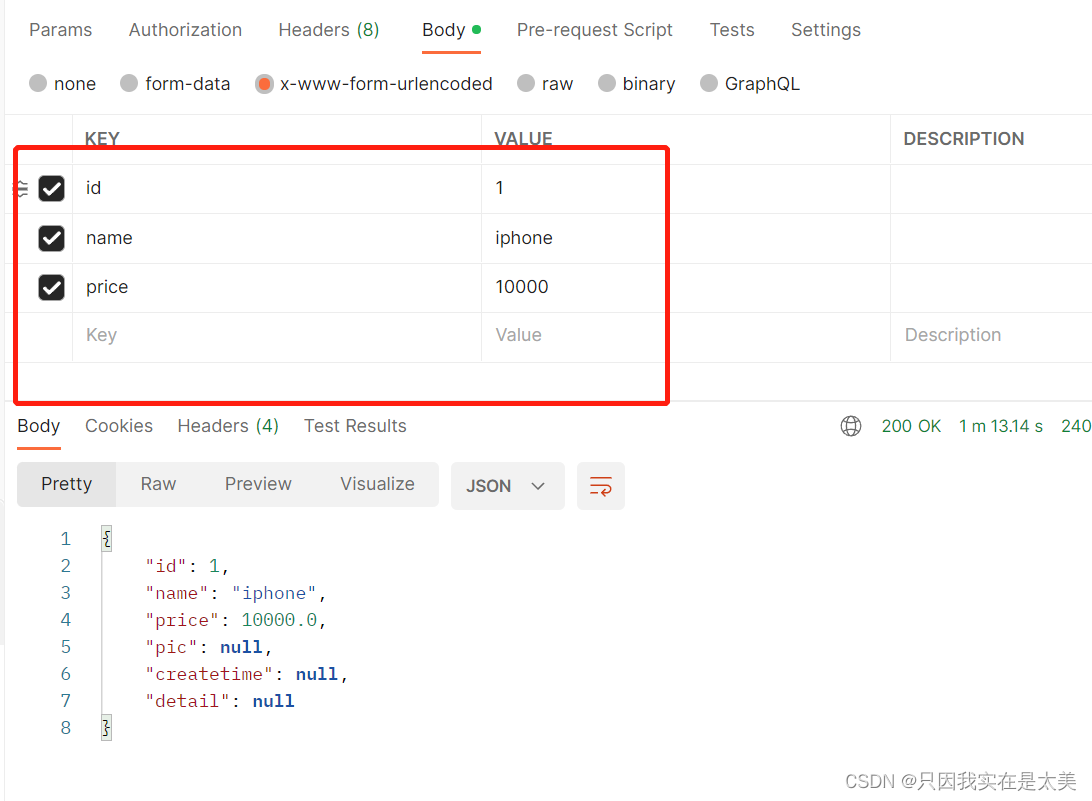
10.2 使用@RequestBody注解接收前端发送的json
postman测试前端向后端发送普通表单
controller处理器
    @RequestMapping(value = "/add",method = RequestMethod.POST)
    @ResponseBody
    public Item add(Item item){
        System.out.println(item);
        return item;
    }
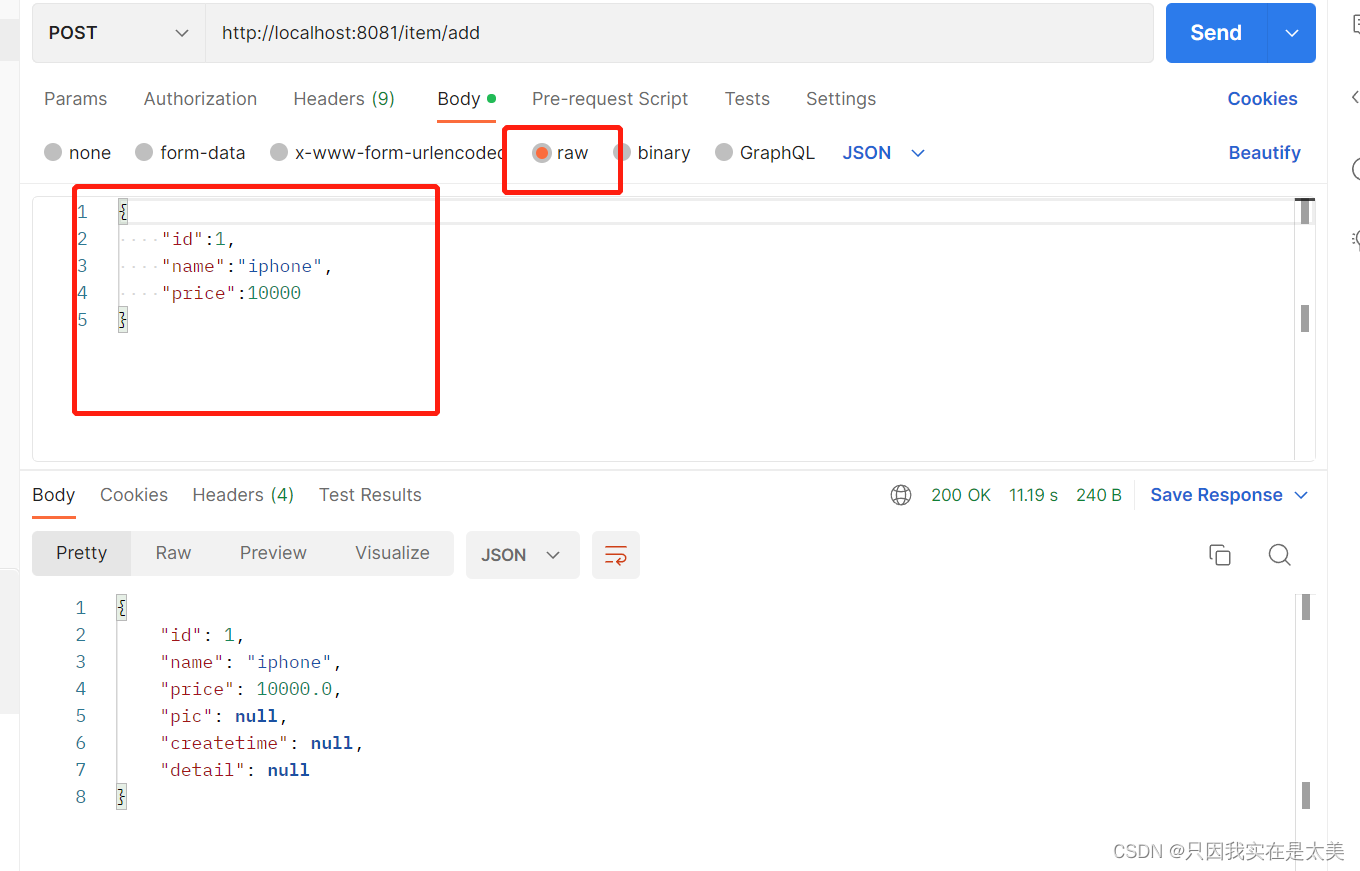
postman测试前端向后端发送json
controller处理器
    @RequestMapping(value = "/add",method = RequestMethod.POST)
    @ResponseBody
    public Item add(@RequestBody Item item){	//参数使用@RequestBody注解,就能将前端发送的json转换成JavaBean
        System.out.println(item);
        return item;
    }
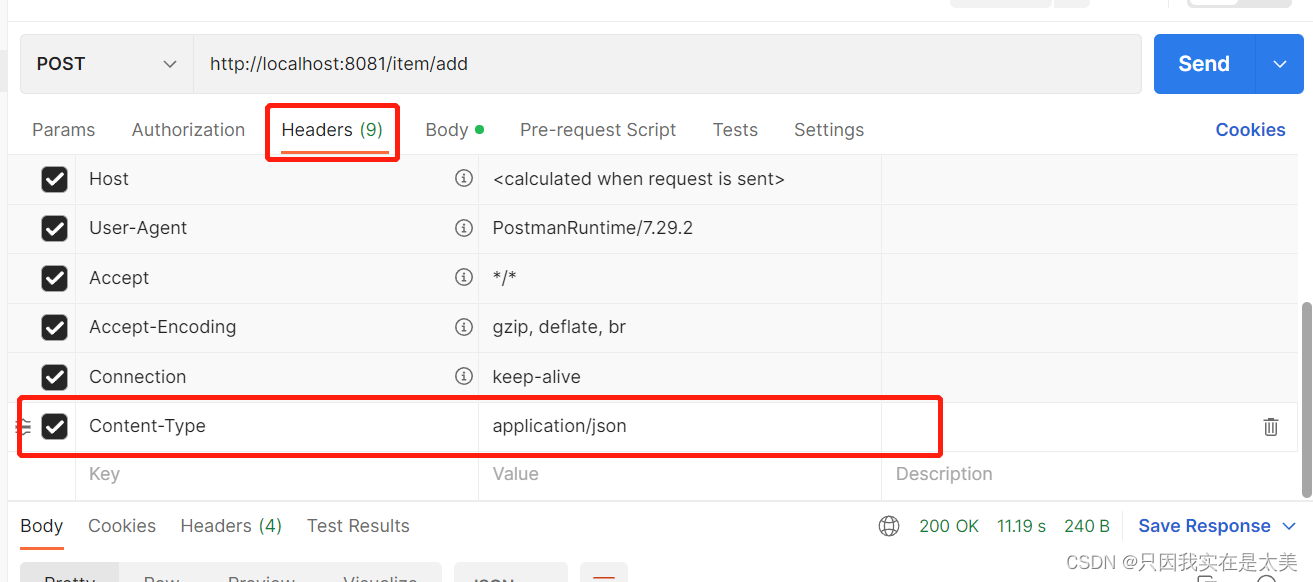
postman设置
11. ResultFul风格
resultful就是资源定位操作的风格
传统写法:
http://localhost:8080/ssm2/item/queryltemByld?id=1
http://localhost:8080/ssm2/item/queryltemByld?id=2
其中http://localhost:8080/ssm2/item/queryltemByld才是url路径
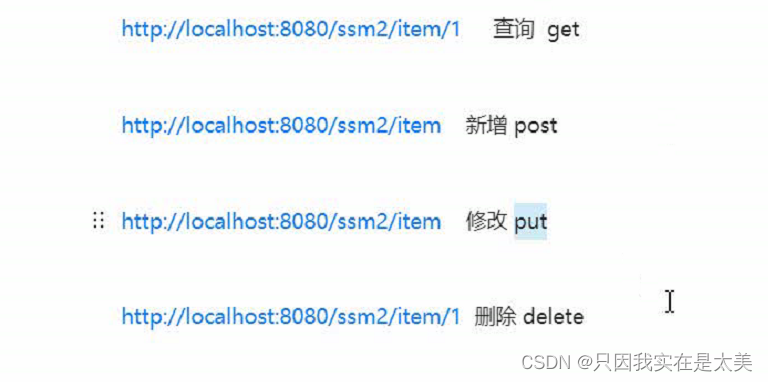
resultful风格
http://localhost:8080/ssm2/item/1
http://localhost:8080/ssm2/item/2
不同资源的url不一样
resultful针对资源操作
分别用post,delete,put,get代替增删改查的数据请求方式,针对同一资源的增删改查的url完全一致,只是通过请求方式进行区别
11.1 查询遵循Resultful风格
这里可以使用**@PathVariable**注解用于获取resultful风格动态获取路径上的参数
注意与@RequestParam区别
@RequestParam用于传统方式,限制参数必传,默认值,前后端参数名不一致等情况
    //下面的处理器可以通过localhost:8081/item/1访问到id为1的item
    //当其他RequestMapping路径匹配不到时就会进入这里进行占位符匹配
    @RequestMapping(value = "/{id}",method = RequestMethod.GET)
    @ResponseBody
    public Item find(@PathVariable("id") Integer id){ //PathVariable注解可以将resultful风格的对应参数传递给方法的形参
        Item item = itemService.findItemById(id);
        return item;
    }
可以简化为
    @RequestMapping(value = "/{id}",method = RequestMethod.GET)
    @ResponseBody
    public Item find(@PathVariable Integer id){ //PathVariable注解可以将resultful风格的对应参数传递给方法的形参
        Item item = itemService.findItemById(id);
        return item;
    }
12.拦截器
在springmvc中替代过滤器(除了解决编码问题的过滤器),拦截器由处理器映射器返回给处理器适配器进行调用
12.1 编写拦截器
public class MyInterceptor implements HandlerInterceptor {
//在处理器调用之前执行的方法,handler为拦截的处理器
@Override
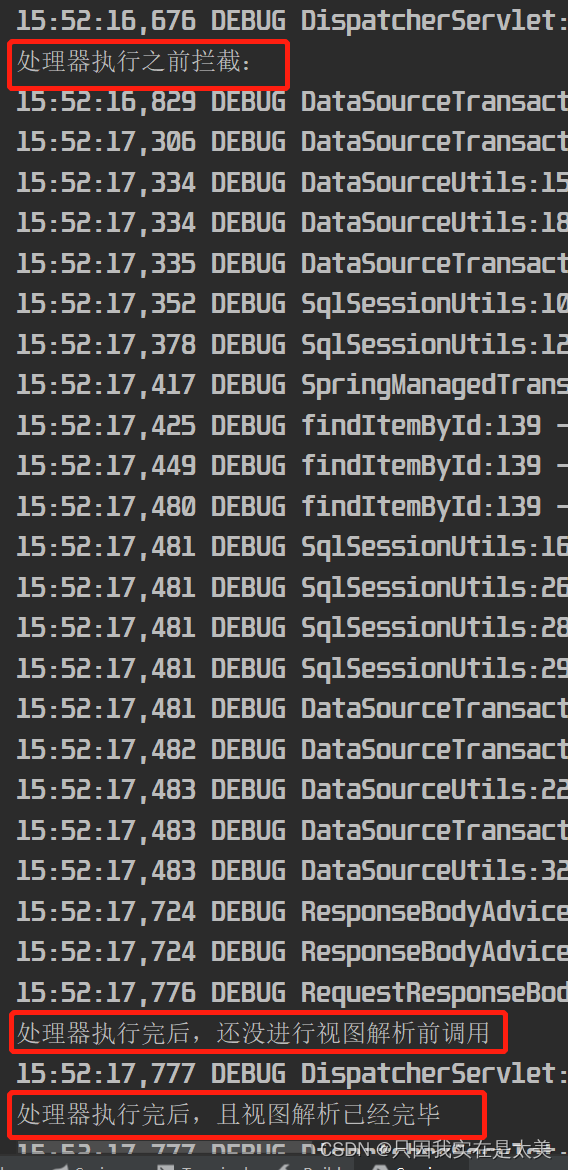
public boolean preHandle(HttpServletRequest request, HttpServletResponse response, Object handler) throws Exception {
System.out.println("处理器执行之前拦截:");
//返回true代表放行,执行处理器
return true;
}
//处理器执行完后,还没进行视图解析前调用
//可以在同步中针对ModelAndView进行同一加工
@Override
public void postHandle(HttpServletRequest request, HttpServletResponse response, Object handler, ModelAndView modelAndView) throws Exception {
System.out.println("处理器执行完后,还没进行视图解析前调用");
}
//处理器执行完后,且视图解析已经完毕
@Override
public void afterCompletion(HttpServletRequest httpServletRequest, HttpServletResponse httpServletResponse, Object o, Exception e) throws Exception {
System.out.println("处理器执行完后,且视图解析已经完毕");
}
}
12.2 配置拦截器
springmvc.xml
	<!--配置拦截器,可配置拦截器,按配置的先后顺序拦截,必须所有拦截器都放行才能执行处理器-->
	<mvc:interceptors>
		<mvc:interceptor>
			<!--配置拦截路径-->
			<mvc:mapping path="/**"/>
			<!--配置具体拦截器-->
			<bean class="com.gxa.interceptor.MyInterceptor"/>
		</mvc:interceptor>
	</mvc:interceptors>
12.3 测试


 581
581


 被折叠的 条评论
为什么被折叠?
被折叠的 条评论
为什么被折叠?
 到【灌水乐园】发言


