


如何优雅正确的用Spring boot集成MobileIMSDK,并且把离线消息存到Sql里,该Demo代码地址在文章最下面。
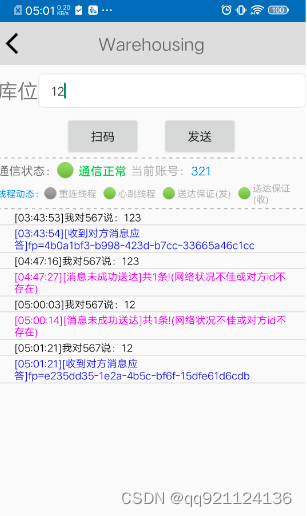
运行效果:
第一步:去gitee上面下载MobileIMSDK
第二步:创建Spring boot项目
第三步:把下载好的MobileIMSDK里的gson-2.8.6.jar,MobileIMSDKServer.jar,netty-all-4.1.50.Final.jar这3个jar包build add到自己项目
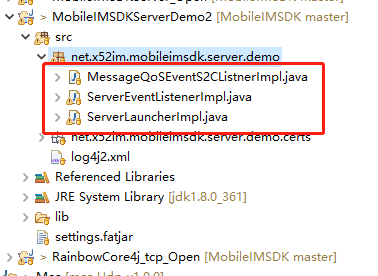
第四步:把下载过来的MobileIMSDK里Demo的3个java文件拷贝到自己的项目里,可以根据自己需求存放位置
|
01
02
03
04
05
06
07
08
09
10
11
12
13
14
15
16
17
|
@Component
@Order(value = 1)
public class ChatServerRunner implements CommandLineRunner {
@Autowired
private ServerLauncherImpl sli;
@Override
public void run(String... strings) throws Exception {
// 启动MobileIMSDK服务端的Demo
sli.startup();
// 加一个钩子,确保在JVM退出时释放netty的资源
Runtime.getRuntime().addShutdownHook(new Thread(sli::shutdown));
}
}
|
第六步:由于我们是Spring boot去启动,所以ServerLauncherImpl.java这个类里的Main启动方法就要干掉,并且由于ServerLauncherImpl加入了IOC,还要在ServerLauncherImpl上面加一个@Component注解,代码如下:
|
01
02
03
04
05
06
07
08
09
10
11
12
13
14
15
16
17
18
19
20
21
22
23
24
25
26
27
28
29
30
31
32
33
34
35
36
37
38
39
40
41
42
43
44
45
|
@Component
public class ServerLauncherImpl extends ServerLauncher
{
@Autowired
private ServerEventListenerImpl serverEventListenerImpl;
@Autowired
private MessageQoSEventS2CListnerImpl MessageQoSEventS2CListnerImpl;
/**
* 静态类方法:进行一些全局配置设置。
*/
static
{
// 设置MobileIMSDK服务端的UDP网络监听端口
GatewayUDP.PORT = 7901;
ServerLauncher.supportedGateways = Gateway.SOCKET_TYPE_UDP;
// 开/关Demog日志的输出
QoS4SendDaemonS2C.getInstance().setDebugable(true);
QoS4ReciveDaemonC2S.getInstance().setDebugable(true);
}
/**
* 实例构造方法。
*
* @throws IOException
*/
public ServerLauncherImpl() throws IOException
{
super();
}
/**
* 初始化消息处理事件监听者.
*/
@Override
protected void initListeners()
{
// ** 设置各种回调事件处理实现类
this.setServerEventListener(serverEventListenerImpl);
this.setServerMessageQoSEventListener(MessageQoSEventS2CListnerImpl);
}
}
|
第七步:细心的同学会发现,由于第六步的serverEventListenerImpl和MessageQoSEventS2CListnerImpl都依赖注入了,所以serverEventListenerImpl类和MessageQoSEventS2CListnerImpl类上加一个@Service注解就行了,目的是把这两个类加入到IOC才能依赖注入成功。
第八步:在ServerEventListenerImpl.java这个类的onTransferMessage_RealTimeSendFaild方法里可以做离线消息储存,这个方法的意思是消息发生出去没有回调通知就会触发,比如对方不在线,你给对方发消息,就会触发该方法。我们在这个方法里调用一个依赖注入的Dao层的接口,如果ImDao爆红不用慌,这是还没到下一步。代码如下:
|
01
02
03
04
05
06
07
08
09
10
11
12
13
14
15
16
17
18
19
|
@Autowired
private ImDao imdao;
@Override
public boolean onTransferMessage_RealTimeSendFaild(Protocal p)
{
// 接收者uid
String userId = p.getTo();
// 发送者uid
String from_user_id = p.getFrom();
// 消息或指令内容
String dataContent = p.getDataContent();
// 消息或指令指纹码(即唯一ID)
String fingerPrint = p.getFp();
// 【重要】用户定义的消息或指令协议类型(开发者可据此类型来区分具体的消息或指令)
int typeu = p.getTypeu();
return imdao.saveMsgFaild(p);
}
|
第九步:我们在onTransferMessage_RealTimeSendFaild方法里调用了一个依赖注入过来的imdao接口里的saveMsgFaild方法,用来保存离线记录,如果保存成功,则返回true,如果保存失败,则返回fasle,这就对应了客户端那边,如果返回为true就表示回调消息发送出去成功。然后我们在创建一个ImDao接口,代码如下:
|
1
2
3
4
5
6
7
8
|
@Mapper
public interface ImDao {
/**
* 储存离线
*/
boolean saveMsgFaild(Protocal p);
}
|
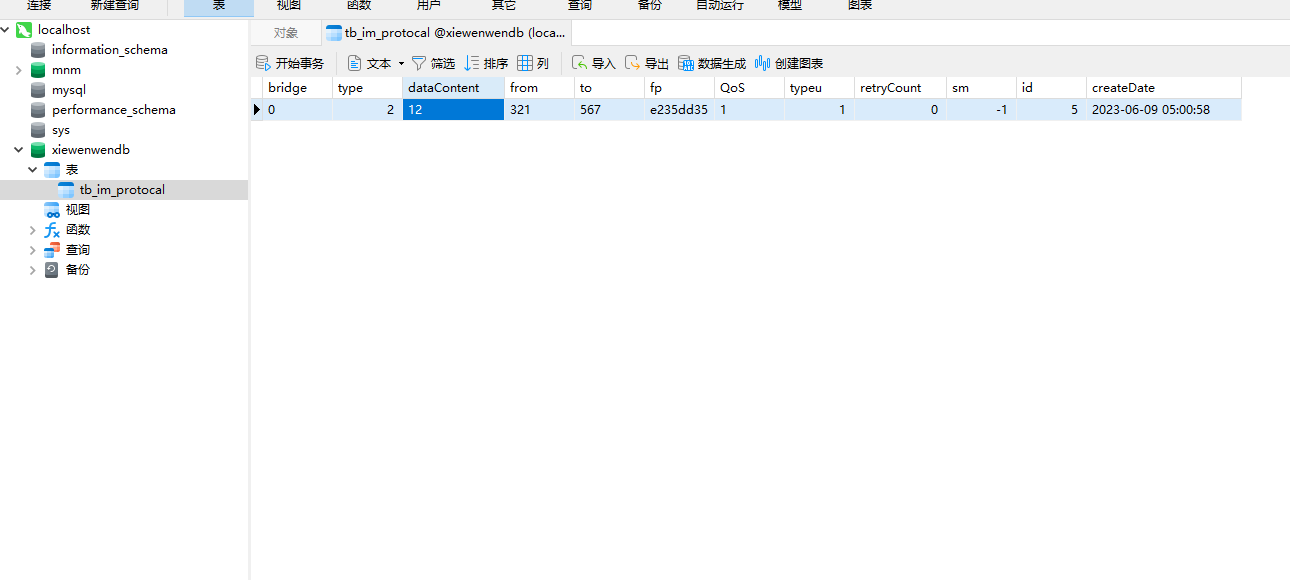
第十步:没在Pom导入mybatis和的话,需要导入一下,要不然Mybatis不起作用,还有数据库驱动,这个根据你用什么数据库就导入什么驱动就行了,我以MySql为列,在yml配置好数据库后,在创建数据库,表名自定义,用于存Protocal对象的值就行,记得要在resources文件夹里写上Mapper sql语句。
Springboot集成MobileIMSDK的Demo地址


 992
992


 被折叠的 条评论
为什么被折叠?
被折叠的 条评论
为什么被折叠?
 到【灌水乐园】发言


