


Feign整合Hystrix
整体结构

新建项目导入依赖
        <dependency>
            <groupId>org.springframework.boot</groupId>
            <artifactId>spring-boot-starter-web</artifactId>
        </dependency>
        <dependency>
            <groupId>org.springframework.cloud</groupId>
            <artifactId>spring-cloud-starter-netflix-eureka-client</artifactId>
        </dependency>
        <dependency>
            <groupId>org.springframework.cloud</groupId>
            <artifactId>spring-cloud-starter-netflix-hystrix</artifactId>
        </dependency>
         <dependency>
             <groupId>org.springframework.boot</groupId>
             <artifactId>spring-boot-starter-actuator</artifactId>
         </dependency>
        <dependency>
            <groupId>org.springframework.cloud</groupId>
            <artifactId>spring-cloud-starter-openfeign</artifactId>
        </dependency>
配置属性
server.port=9002
spring.application.name=service-hystrix-feign
eureka.client.serviceUrl.defaultZone=http://localhost:8761/eureka/
feign.hystrix.enabled=true
management.endpoints.web.exposure.include=*
management.endpoints.web.exposure.include=*/这里是个坑,因为新的版本actuator没有把hystrix.stream端点暴露出来
所以我们需要配置为/*号暴露出所有端点,如果是yml文件需要加上双引号或者单引号,都可以
启动类开启Feign支持
package com.xfgg.demo;

import org.springframework.boot.SpringApplication;
import org.springframework.boot.autoconfigure.SpringBootApplication;
import org.springframework.cloud.netflix.hystrix.EnableHystrix;
import org.springframework.cloud.openfeign.EnableFeignClients;

@SpringBootApplication
@EnableFeignClients
@EnableHystrix
public class DemoApplication {

    public static void main(String[] args) {
        SpringApplication.run(DemoApplication.class, args);
    }

}
添加Feign接口
package com.xfgg.demo.feign;

import org.springframework.cloud.openfeign.FeignClient;
import org.springframework.web.bind.annotation.GetMapping;

@FeignClient(name = "service-producer", fallback = ConsumerFeignFallback.class)
public interface ConsumerFeignClient {

    @GetMapping("/getPortInfo")
    public String produce();
}
添加fallback类
package com.xfgg.demo.feign;

import org.springframework.stereotype.Component;

@Component
public class ConsumerFeignFallback implements ConsumerFeignClient {

    @Override
    public String produce() {
        return "服务调用失败!";
    }

}
控制层注入Feign接口
package com.xfgg.demo.controller;

import com.xfgg.demo.feign.ConsumerFeignClient;
import org.springframework.beans.factory.annotation.Autowired;
import org.springframework.web.bind.annotation.GetMapping;
import org.springframework.web.bind.annotation.RestController;

@RestController
public class ConsumerController {

    @Autowired
    private ConsumerFeignClient feignClient;

    @GetMapping("/getPoducerInfoByFeign")
    public String getPoducerInfoByFeign() {
        return feignClient.produce();
    }

}
测试
服务提供者和注册中心用的是前几天搭建好的


创建Hystrix DashBoard
添加依赖
       <dependency>
            <groupId>org.springframework.cloud</groupId>
            <artifactId>spring-cloud-starter-netflix-hystrix</artifactId>
        </dependency>
        <dependency>
            <groupId>org.springframework.cloud</groupId>
            <artifactId>spring-cloud-starter-netflix-hystrix-dashboard</artifactId>
        </dependency>
属性配置
spring:
  application:
    name: service-hystrix-dashboard
server:
  port: 11000
hystrix:
  dashboard:
    proxy-stream-allow-list: localhost
这里也有一个坑 hystrix.dashboard.proxy-stream-allow-list:localhost这个一定要写,不然启动hystrixboard的时候会出现错误
显示没有加入到允许的队列当中,从而导致hystrixboard无法显示的问题
启动类添加@EnableHystrixDashboard
package com.xfgg.demo;

import org.springframework.boot.SpringApplication;
import org.springframework.boot.autoconfigure.SpringBootApplication;
import org.springframework.cloud.netflix.hystrix.dashboard.EnableHystrixDashboard;

@SpringBootApplication
@EnableHystrixDashboard
public class DemoApplication {

    public static void main(String[] args) {
        SpringApplication.run(DemoApplication.class, args);
    }

}
启动应用输入http://localhost:11000/hystrix
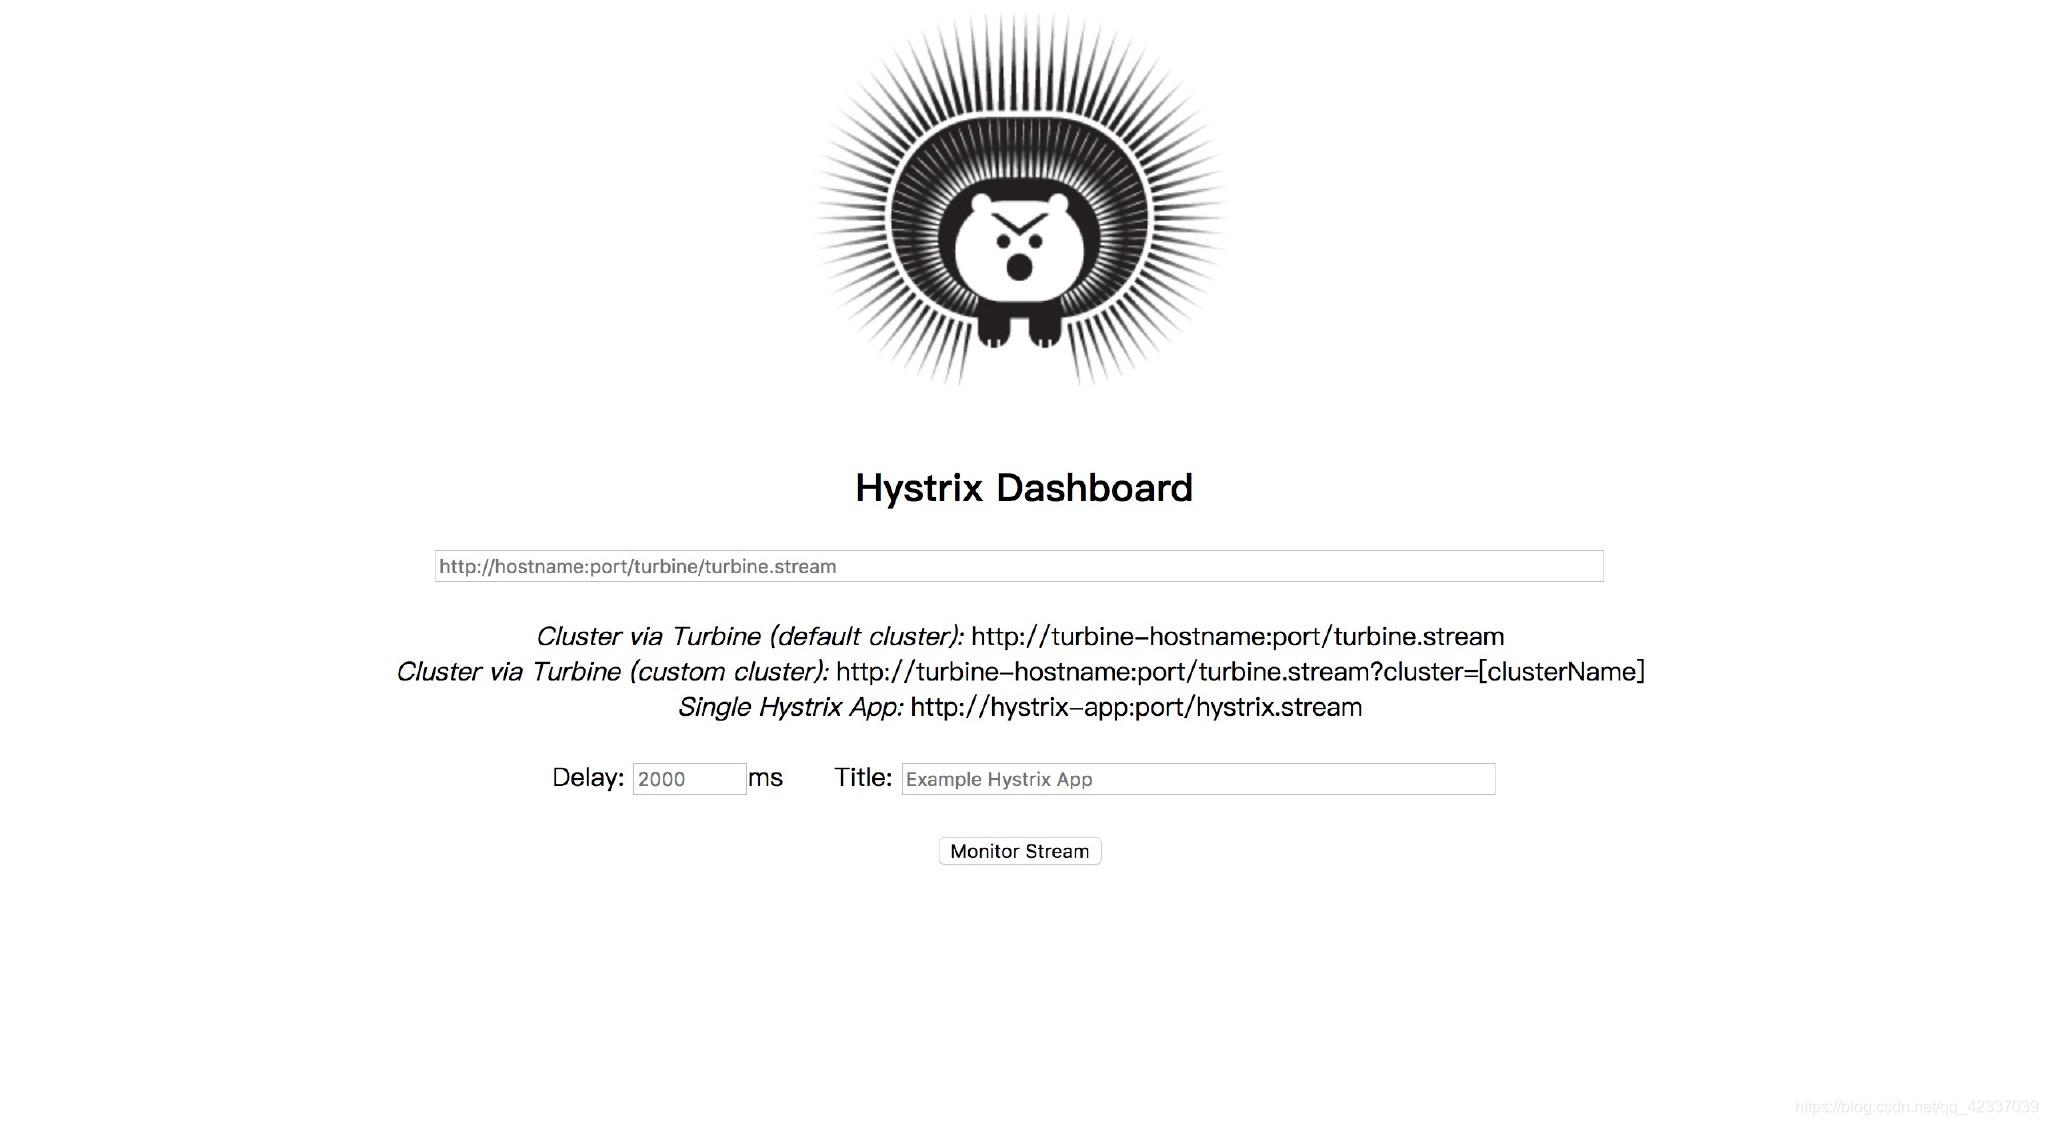
通过 Hystrix Dashboard 主页面的文字介绍,我们可以知道,Hystrix Dashboard 共支持三种不同的监控方式:
- 默认的集群监控:通过 URL:http://turbine-hostname:port/turbine.stream 开启,实现对默认集群的监控。
- 指定的集群监控:通过 URL:http://turbine-hostname:port/turbine.stream?cluster=[clusterName] 开启,实现对 clusterName 集群的监控。
- 单体应用的监控: 通过 URL:http://hystrix-app:port/actuator/hystrix.stream 开启,实现对具体某个服务实例的监控。(可通过management.endpoints.web.base-path修改)
前两者都对集群的监控,需要整合 Turbine 才能实现。这一部分我们先实现对单体应用的监控,这里的单体应用就用我们之前使用 Feign 和 Hystrix 实现的服务消费者——service-hystrix-feign。
页面上的另外两个参数:
Delay:控制服务器上轮询监控信息的延迟时间,默认为 2000 毫秒,可以通过配置该属性来降低客户端的网络和 CPU 消耗。
Title:该参数可以展示合适的标题。
为服务实例service-hystrix-feign添加endpoint
Hystrix Dashboard 监控单实例节点需要通过访问实例的/actuator/hystrix.stream接口来实现,所以我们需要为服务实例添加这个 endpoint
添加依赖
       <dependency>
             <groupId>org.springframework.boot</groupId>
             <artifactId>spring-boot-starter-actuator</artifactId>
         </dependency>
启动类添加@EnableHystrix注解,开启断路功能
package com.xfgg.demo;

import org.springframework.boot.SpringApplication;
import org.springframework.boot.autoconfigure.SpringBootApplication;
import org.springframework.cloud.netflix.hystrix.EnableHystrix;
import org.springframework.cloud.openfeign.EnableFeignClients;

@SpringBootApplication
@EnableFeignClients
@EnableHystrix
public class DemoApplication {

    public static void main(String[] args) {
        SpringApplication.run(DemoApplication.class, args);
    }

}
配置文件就是添加前面说的那个坑,management…
management.endpoints.web.exposure.include这个是用来暴露 endpoints 的,由于 endpoints 中会包含很多敏感信息,除了 health 和 info 两个支持 web 访问外,其他的默认不支持 web 访问。


到了最坑的一个地方,第一次运行时可能会出现Unable to connect to Command Metric Stream.
这里就需要停掉服务生产者service-producer,继续多次访问http://localhost:9002/getPoducerInfoByFeign,最终发现Circuit的值变成Open,此时说明断路器已经打开
hystrix dashboard界面解读
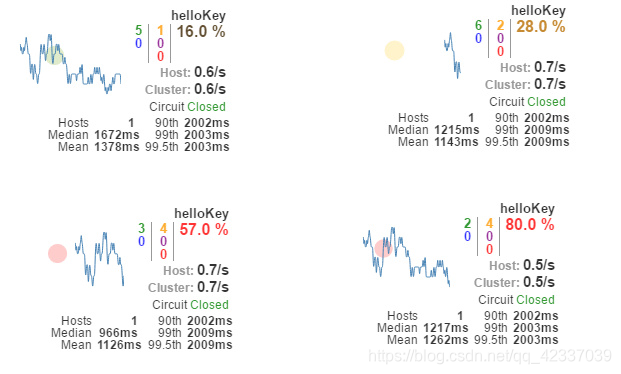
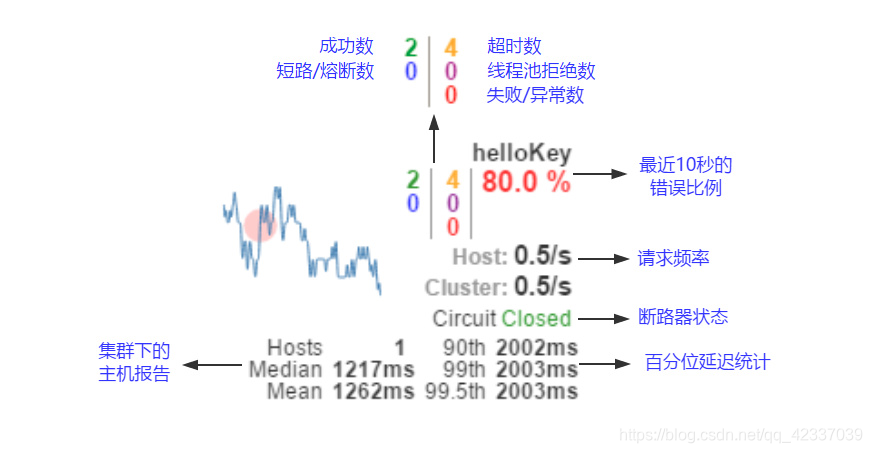
根据上图来说明各个元素的具体含义
- 实心圆:它有颜色和大小之分,分别代表实例的监控程度和流量大小。如上图所示,它的健康度从绿色、黄色、橙色、红色递减。通过该实心圆的展示,我们就可以在大量的实例中快速的发现故障实例和高压力实例。
- 曲线:用来记录 2 分钟内流量的相对变化,我们可以通过它来观察到流量的上升和下降趋势。
其他一些数量指标如下图所示
Hystrix监控数据聚合Turbine
准备工作
我们将用到之前实现的几个应用,包括:
- eureka-server:服务注册中心
- service-producer:服务提供者
- service-hystrix-feign:使用 Feign 和 Hystrix 实现的服务消费者
- service-hystrix-ribbon:使用 Ribbon 和 Hystrix 实现的服务消费者
- service-hystrix-dashboard:用于展示 service-hystrix-feign 和 service-hystrix-ribbon 服务的 Hystrix 数据
添加依赖
        <dependency>
            <groupId>org.springframework.cloud</groupId>
            <artifactId>spring-cloud-starter-netflix-turbine</artifactId>
        </dependency>
配置文件
spring:
  application:
    name: service-turbine
server:
  port: 8090
eureka:
  client:
    service-url:
      defaultZone: http://localhost:8761/eureka/

turbine:
  app-config: service-hystrix-feign,service-consumer-ribbon #多个用逗号隔开
  cluster-name-expression: new String("default")
  combine-host-port: true
参数说明
- turbine.app-config参数指定了需要收集监控信息的服务名
- turbine.cluster-name-expression参数指定了集群名称为default,当我们服务数量非常多的时候,可以启动多个 Turbine 服务来构建不同的聚合集群,而该参数可以用来区分这些不同的聚合集群,同时该参数值可以在 Hystrix 仪表盘中用来定位不同的聚合集群,只需要在 Hystrix Stream 的 URL 中通过 cluster 参数来指定
- turbine.combine-host-port参数设置为true,可以让同一主机上的服务通过主机名与端口号的组合来进行区分,默认情况下会以 host 来区分不同的服务,这会使得在本地调试的时候,本机上的不同服务聚合成一个服务来统计
注意:new String(“default”)这个一定要用 String 来包一下,否则启动的时候会抛出异常:
启动类上添加@@EnableTurbine注解开启Turbine
package com.xfgg.demo;

import org.springframework.boot.SpringApplication;
import org.springframework.boot.autoconfigure.SpringBootApplication;
import org.springframework.cloud.netflix.turbine.EnableTurbine;

@SpringBootApplication
@EnableTurbine
public class DemoApplication {

    public static void main(String[] args) {
        SpringApplication.run(DemoApplication.class, args);
    }

}
服务 service-hystrix-ribbon 需要跟 service-hystrix-feign 一样暴露 hystrix.stream 端口
测试
management.endpoints.web.exposure.include=*
分别启动
eureka-server
service-producer
service-hystrix-feign
service-hystrix-ribbon
service-hystrix-dashboard
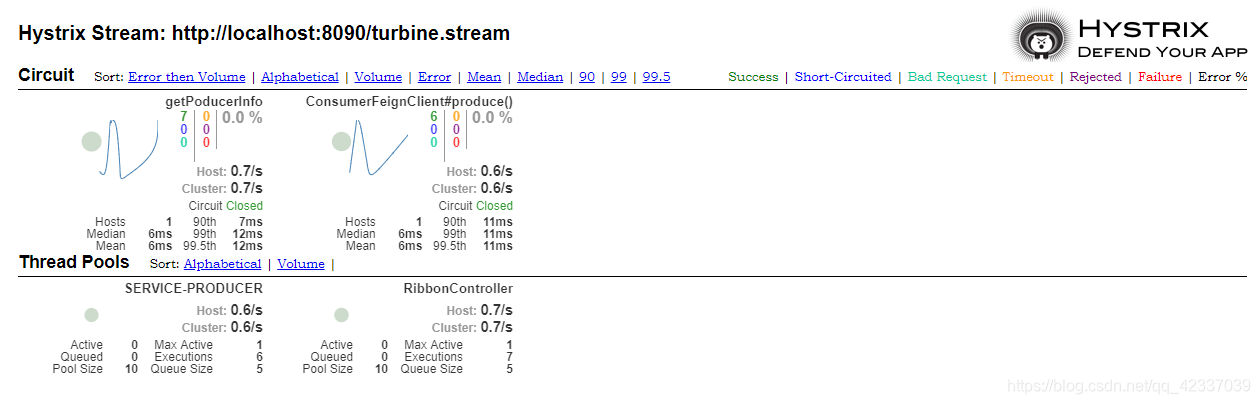
service-turbine
访问service-hystrix-dashboard并开启对 http://localhost:8090/turbine.stream 可以看到针对服务 service-hystrix-feign 与 service-hystrix-ribbon 的聚合监控数据
服务网关Zuul(路由)
Spring Cloud Zuul是微服务架构的不可或缺的一部分,提供动态路由、监控、弹性、安全等的边缘服务。Zuul 是 Netflix 出品的一个基于 JVM 路由和服务端的负载均衡器。
准备工作
用到之前的eureka-server,service-producer,service-consumer-ribbon,
首先创建一个基本项目
添加依赖
        <dependency>
            <groupId>org.springframework.cloud</groupId>
            <artifactId>spring-cloud-starter-netflix-eureka-client</artifactId>
        </dependency>
        <dependency>
            <groupId>org.springframework.cloud</groupId>
            <artifactId>spring-cloud-starter-netflix-zuul</artifactId>
        </dependency>
配置文件
server:
  port: 9100
spring:
  application:
    name: service-api-gateway
eureka:
  client:
    service-url:
      defaultZone: http://localhost:8761/eureka/
启动类中添加@EnableZuulProxy注解开启 Zuul 的功能
package com.xfgg.demo;

import org.springframework.boot.SpringApplication;
import org.springframework.boot.autoconfigure.SpringBootApplication;
import org.springframework.cloud.netflix.zuul.EnableZuulProxy;

@SpringBootApplication
@EnableZuulProxy
public class DemoApplication {

    public static void main(String[] args) {
        SpringApplication.run(DemoApplication.class, args);
    }

}
测试
依次启动
eureka-server
service-producer
service-consumer-ribbon
service-api-gateway

由于 Spring Cloud Zuul 在整合了 Eureka 之后,具备默认的服务路由功能,即:当我们这里构建的service-api-gateway应用启动并注册到 Eureka 之后,服务网关会发现上面我们启动的两个服务service-producer和service-consumer-ribbon,这时候 Zuul 就会创建两个路由规则。每个路由规则都包含两部分,一部分是外部请求的匹配规则,另一部分是路由的服务 ID。针对当前示例的情况,Zuul 会创建下面的两个路由规则:
- 转发到service-producer服务的请求规则为:/service-producer/**
- 转发到service-consumer-ribbon服务的请求规则为:/service-consumer-ribbon/**
通过9100端口的服务来验证

服务网关Zuul(过滤器)
Filter的生命周期
Filter的生命周期有4个,分别是PRE,ROUTING,POST,ERROR,整个生命周期如图

Zuul大部分功能都是通过过滤器来实现的,这些过滤器类型对应于请求的生命周期
- PRE:这种过滤器在请求被路由之前调用。我们可利用这种过滤器实现身份验证、在集群中选择请求的微服务、记录调试信息等。
- ROUTING:这种过滤器将请求路由到微服务。这种过滤器用于构建发送给微服务的请求,并使用 Apache HttpClient 或 Netfilx Ribbon 请求微服务。
- POST:这种过滤器在路由到微服务以后执行。这种过滤器可用来为响应添加标准的 HTTP Header、收集统计信息和指标、将响应从微服务发送给客户端等。
- ERROR:在其他阶段发生错误时执行该过滤器。 除了默认的过滤器类型,Zuul 还允许我们创建自定义的过滤器类型。例如,我们可以定制一种 STATIC 类型的过滤器,直接在 Zuul 中生成响应,而不将请求转发到后端的微服务。
Zuul中默认实现的过滤器

自定义Filter
package com.xfgg.demo.filter;

import com.netflix.zuul.ZuulFilter;
import com.netflix.zuul.context.RequestContext;
import com.netflix.zuul.exception.ZuulException;

import javax.servlet.http.HttpServletRequest;

public class MyFilter extends ZuulFilter {
    /**
     * 过滤器的类型决定过滤器在请求的哪个生命周期中执行,这里定义为pre,代表会在请求被路由之前执行
     * @return
     */
    @Override
    public String filterType() {
        return "pre";
    }

    /**
     * filter执行顺序,通过数字制定数字越大,优先级越低
     * @return
     */
    @Override
    public int filterOrder() {
        return 0;
    }

    /**
     * 判断该过滤器是否需要被执行,返回true,表示对所有请求都会生效,指定过滤器的有效范围
     * @return
     */
    @Override
    public boolean shouldFilter() {
        return true;
    }

    /**
     * 过滤器的具体逻辑
     * @return
     * @throws ZuulException
     */
    @Override
    public Object run() throws ZuulException {
        RequestContext ctx = RequestContext.getCurrentContext();
        HttpServletRequest request = ctx.getRequest();
        String token = request.getParameter("token");
        if (token == null || token.isEmpty()) {
            ctx.setSendZuulResponse(false);
            ctx.setResponseStatusCode(401);
            ctx.setResponseBody("token is empty");
        }
            return null;
    }
}
过滤器的具体逻辑:通过ctx.setSendZuulResponse(false)令 Zuul 过滤该请求,不对其进行路由,然后通过ctx.setResponseStatusCode(401)设置了其返回的错误码
实现了过滤器功能并不会立即生效,需要创建具体的Bean才能启动过滤器
在主类中创建过滤器的bean
package com.xfgg.demo;

import com.xfgg.demo.filter.MyFilter;
import org.springframework.boot.SpringApplication;
import org.springframework.boot.autoconfigure.SpringBootApplication;
import org.springframework.cloud.netflix.zuul.EnableZuulProxy;
import org.springframework.context.annotation.Bean;

@SpringBootApplication
@EnableZuulProxy
public class DemoApplication {

    public static void main(String[] args) {
        SpringApplication.run(DemoApplication.class, args);
    }
    @Bean
    public MyFilter myFilter(){
        return new MyFilter();
    }
}
重启服务,再次访问

过滤器起作用
访问http://localhost:9100/service-consumer-ribbon/getPoducerInfo?token=123

可以进行正确路由


 被折叠的 条评论
为什么被折叠?
被折叠的 条评论
为什么被折叠?
 到【灌水乐园】发言


