


一、声明式事务之全注解式开发
基于之前的银行转账系统,将spring.xml配置文件嘎掉,变成全注解式开发。
加入事务的银行转账
原spring.xml文件:
<?xml version="1.0" encoding="UTF-8"?>
<beans xmlns="http://www.springframework.org/schema/beans"
       xmlns:xsi="http://www.w3.org/2001/XMLSchema-instance"
       xmlns:context="http://www.springframework.org/schema/context"
       xmlns:tx="http://www.springframework.org/schema/tx"
       xsi:schemaLocation="http://www.springframework.org/schema/beans http://www.springframework.org/schema/beans/spring-beans.xsd
                            http://www.springframework.org/schema/context http://www.springframework.org/schema/context/spring-context.xsd
                            http://www.springframework.org/schema/tx http://www.springframework.org/schema/tx/spring-tx.xsd">

    <context:component-scan base-package="com.powernode.bank"></context:component-scan>

    <!--配置数据源-->
    <bean id="dataSource" class="com.alibaba.druid.pool.DruidDataSource">
        <property name="driverClassName" value="com.mysql.jdbc.Driver"></property>
        <property name="url" value="jdbc:mysql://localhost:3306/dududu"></property>
        <property name="username" value="root"></property>
        <property name="password" value="123456"></property>
    </bean>
    <!--配置JDBCTemplate-->
    <bean id="jdbcTemplate" class="org.springframework.jdbc.core.JdbcTemplate">
        <property name="dataSource" ref="dataSource"></property>
    </bean>
    <!--配置事务管理器-->
    <bean id="txManager" class="org.springframework.jdbc.datasource.DataSourceTransactionManager">
        <property name="dataSource" ref="dataSource"></property>
    </bean>

    <!--事务注解驱动器-->
    <tx:annotation-driven transaction-manager="txManager"></tx:annotation-driven>

</beans>
1、新建springConfig类
1、@Configuration:表示代替spring.xml配置文件,在这个类当中完成配置
2、@ComponentScan(“com.powernode.bank”):代替spring.xml文件中的组件扫描
3、@EnableTransactionManagement:代替spring.xml文件中的事务注解驱动器
@Configuration  //表示代替spring.xml配置文件,在这个类当中完成配置
@ComponentScan("com.powernode.bank")
@EnableTransactionManagement //代替事务注解驱动器
public class springConfig {
}
spring.xml文件中还剩余3个bean,都有属性、值。
<!--配置数据源-->
    <bean id="dataSource" class="com.alibaba.druid.pool.DruidDataSource">
        <property name="driverClassName" value="com.mysql.jdbc.Driver"></property>
        <property name="url" value="jdbc:mysql://localhost:3306/dududu"></property>
        <property name="username" value="root"></property>
        <property name="password" value="123456"></property>
    </bean>
    <!--配置JDBCTemplate-->
    <bean id="jdbcTemplate" class="org.springframework.jdbc.core.JdbcTemplate">
        <property name="dataSource" ref="dataSource"></property>
    </bean>
    <!--配置事务管理器-->
    <bean id="txManager" class="org.springframework.jdbc.datasource.DataSourceTransactionManager">
        <property name="dataSource" ref="dataSource"></property>
    </bean>
4、@Bean+get方法,并且get方法执行结束的返回值要求是spring.xml文件里bean标签的class对象
//spring框架看到这个@Bean注解后,会调用这个被标注的方法,这个方法的返回值是一个Java对象,这个Java对象会自动纳入IoC容器管理
    //返回的对象就是spring容器当中Bean对象
    @Bean(name = "dataSource")
    public DruidDataSource getDataSource(){
        DruidDataSource dataSource = new DruidDataSource();
        dataSource.setDriverClassName("com.mysql.jdbc.Driver");
        dataSource.setUrl("jdbc:mysql://localhost:3306/dududu");
        dataSource.setUsername("root");
        dataSource.setPassword("123456");
        return dataSource;
    }
    @Bean(name = "jdbcTemplate")
    public JdbcTemplate getJdbcTemplate(DataSource dataSource){
        //spring在调用这个方法的时候会自动给我们传递过来一个dataSource对象
        JdbcTemplate jdbcTemplate = new JdbcTemplate();
        jdbcTemplate.setDataSource(dataSource);
        return jdbcTemplate;
    }
    @Bean(name = "txManager")
    public DataSourceTransactionManager getTxManager(DataSource dataSource){
        DataSourceTransactionManager txManager = new DataSourceTransactionManager();
        txManager.setDataSource(dataSource);
        return txManager;
    }
2、测试程序

    @Test
    public void testNoXML(){
        ApplicationContext ac = new AnnotationConfigApplicationContext(springConfig.class);
        AccountService accountService = (AccountService) ac.getBean("accountService");
        try {
            accountService.transfer("act_001","act_002",10000);
            System.out.println("转账成功");
        }catch (Exception e){
            e.printStackTrace();
            System.out.println("转账失败");
        }
    }
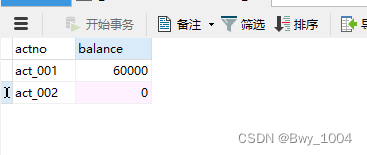
3、测试结果

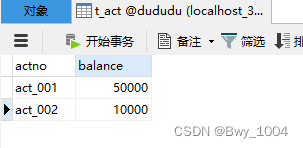
模拟异常,事务依然可以起作用,钱不会丢。


二、声明式事务之XML实现方式
全XML式开发,不使用注解。
那么原spring.xml文件中的事务注解驱动就需要嘎掉
    <!--事务注解驱动器-->
    <tx:annotation-driven transaction-manager="txManager"></tx:annotation-driven>
嘎掉之后,那应该怎么添加事务?
再创建一个工程 为了不和原来的混在一起

AccountServiceImpl业务实现类中,基于事务的注解@Transactional删掉,原spring.xml文件中的事务注解驱动就需要嘎掉,pom文件中添加aspectj依赖,
1、配置步骤
- 第一步:配置事务管理器
- 第二步:配置通知
- 第三步:配置切面
pps:需要添加AspectJ的依赖、添加aop命名空间
    <!--配置通知-->
    <tx:advice id="txAdvice" transaction-manager="txManager">
        <!--配置通知的相关属性-->
        <tx:attributes>
            <!--之前所讲的事务属性,都可以在这个标签中配置-->
            <tx:method name="transfer" propagation="REQUIRED" rollback-for="java.lang.Throwable"/>
        </tx:attributes>
    </tx:advice>

    <!--配置切面-->
    <aop:config>
        <aop:pointcut id="txPointcut" expression="execution(* com.powernode.service..* (..))"/>
        <aop:advisor advice-ref="txAdvice" pointcut-ref="txPointcut"></aop:advisor>
    </aop:config>
<tx:method name=“transfer” propagation=“REQUIRED” rollback-for=“java.lang.Throwable”/>这里一般不会写具体的方法,可以采用通配符的方式。
<tx:method name=“save*” propagation=“REQUIRED” rollback-for=“java.lang.Throwable”/>
<tx:method name=“delete*” propagation=“REQUIRED” rollback-for=“java.lang.Throwable”/>
<tx:method name=“insert*” propagation=“REQUIRED” rollback-for=“java.lang.Throwable”/>
<tx:method name=“modify*” propagation=“REQUIRED” rollback-for=“java.lang.Throwable”/>
<tx:method name=“query*” propagation=“REQUIRED” rollback-for=“java.lang.Throwable”/>
<tx:method name=“find*” propagation=“REQUIRED” rollback-for=“java.lang.Throwable”/>
<tx:method name=“get*” propagation=“REQUIRED” rollback-for=“java.lang.Throwable”/>
等等
2、测试程序
    @Test
    public void testNoAnnotation(){
        ApplicationContext ac = new ClassPathXmlApplicationContext("spring.xml");
        AccountService accountService = ac.getBean("accountService", AccountService.class);
        try{
            accountService.transfer("act_001","act_002",20000);
            System.out.println("转账成功");
        }catch(Exception e){
            e.printStackTrace();
            System.out.println("转账失败");
        }
    }
3、运行结果


模拟异常:
空指针异常 事务回滚


钱不会丢
附
spring.xml配置文件
<?xml version="1.0" encoding="UTF-8"?>
<beans xmlns="http://www.springframework.org/schema/beans"
       xmlns:xsi="http://www.w3.org/2001/XMLSchema-instance"
       xmlns:context="http://www.springframework.org/schema/context"
       xmlns:aop="http://www.springframework.org/schema/aop"
       xmlns:tx="http://www.springframework.org/schema/tx"
       xsi:schemaLocation="http://www.springframework.org/schema/beans http://www.springframework.org/schema/beans/spring-beans.xsd
                            http://www.springframework.org/schema/context http://www.springframework.org/schema/context/spring-context.xsd
                            http://www.springframework.org/schema/aop http://www.springframework.org/schema/aop/spring-aop.xsd
                            http://www.springframework.org/schema/tx http://www.springframework.org/schema/tx/spring-tx.xsd">

    <context:component-scan base-package="com.powernode"></context:component-scan>

    <!--配置数据源-->
    <bean id="dataSource" class="com.alibaba.druid.pool.DruidDataSource">
        <property name="driverClassName" value="com.mysql.jdbc.Driver"></property>
        <property name="url" value="jdbc:mysql://localhost:3306/dududu"></property>
        <property name="username" value="root"></property>
        <property name="password" value="123456"></property>
    </bean>
    <!--配置JDBCTemplate-->
    <bean id="jdbcTemplate" class="org.springframework.jdbc.core.JdbcTemplate">
        <property name="dataSource" ref="dataSource"></property>
    </bean>
    <!--配置事务管理器-->
    <bean id="txManager" class="org.springframework.jdbc.datasource.DataSourceTransactionManager">
        <property name="dataSource" ref="dataSource"></property>
    </bean>

    <!--配置通知-->
    <tx:advice id="txAdvice" transaction-manager="txManager">
        <!--配置通知的相关属性-->
        <tx:attributes>
            <!--之前所讲的事务属性,都可以在这个标签中配置-->
            <tx:method name="transfer" propagation="REQUIRED" rollback-for="java.lang.Throwable"/>
        </tx:attributes>
    </tx:advice>

    <!--配置切面-->
    <aop:config>
        <aop:pointcut id="txPointcut" expression="execution(* com.powernode.service..* (..))"/>
        <aop:advisor advice-ref="txAdvice" pointcut-ref="txPointcut"></aop:advisor>
    </aop:config>
</beans>


 521
521


 被折叠的 条评论
为什么被折叠?
被折叠的 条评论
为什么被折叠?
 到【灌水乐园】发言


