


定时执行任务:是指在约定好的时间执行已经计划好的工作,如系统周期性所要执行的备份系统数据、清理缓存等。
常用与定时执行任务的命令:at命令,batch命令(batch命令的用法和at相似),与周期性任务相关的crontab命令,CentOS7的新特性timer命令。
一、at命令
1、at命令的准备工作
1)安装 at 软件包
[root@centos7 ~]# yum install -y at2)需要 atd 服务的支持。atd 服务是独立的服务
查看atd服务状态:# systemctl status atd
开启atd服务:# systemctl start atd
关闭atd服务:# systemctl stop atd
查看是否开始开机启动服务:如果弹出enabled,说明开机启动此服务
[root@centos7 ~]# systemctl is-enabled atd
enabled
安装好 at 软件包并开启 atd 服务之后,at 命令才可以正常使用。
[root@centos7 ~]# systemctl start atd
[root@centos7 ~]# systemctl status atd
● atd.service - Job spooling tools
   Loaded: loaded (/usr/lib/systemd/system/atd.service; enabled; vendor preset: enabled)
   Active: active (running) since 六 2020-04-25 21:41:37 CST; 4s ago
 Main PID: 21972 (atd)
   CGroup: /system.slice/atd.service
           └─21972 /usr/sbin/atd -f

4月 25 21:41:37 centos7.6 systemd[1]: Started Job spooling tools.
2、at 命令的访问控制
访问控制:是指允许哪些用户使用 at 命令设定定时任务,或者不允许哪些用户使用 at 命令。可以将其想象成设定黑名单或白名单。
at 命令的访问控制是依靠 /etc/at.allow(白名单)和 /etc/at.deny(黑名单)这两个文件来实现的,具体规则如下:
如果系统中有 /etc/at.allow 文件,那么只有写入 /etc/at.allow 文件(白名单)中的用户可以使用 at 命令,其他用户不能使用 at 命令(注意,/etc/at.allow 文件的优先级更高,也就是说,如果同一个用户既写入 /etc/at.allow 文件,又写入 /etc/at.deny 文件,那么这个用户是可以使用 at 命令的)。
如果系统中没有 /etc/at.allow 文件,只有 /etc/at.deny 文件,那么写入 /etc/at.deny 文件(黑名单)中的用户不能使用 at 命令,其他用户可以使用 at 命令。不过这个文件对 root 用户不生效。
如果系统中这两个文件都不存在,那么只有 root 用户可以使用 at 命令。
系统中默认只有 /etc/at.deny 文件,而且这个文件是空的,因此,系统中所有的用户都可以使用 at 命令。如果我们打算控制用户的 at 命令权限,那么只需把用户名写入 /etc/at.deny 文件即可。
[root@centos7 ~]# ll /etc/at.deny
-rw-r--r-- 1 root root 1 10月 31 2018 /etc/at.deny
[root@centos7 ~]# cat /etc/at.deny

[root@centos7 ~]#
3、at 命令语法添加定时执行任务
基本格式为:[root@centos7 ~]# at [选项] [时间]
| 选项 | 含义 |
|---|---|
| -m | 当 at 工作完成后,无论命令是否输出,都用 E-mail 通知执行 at 命令的用户。 |
| -c 工作标识号 | 显示该 at 工作的实际内容。 |
| -t 时间 | 在指定时间提交工作并执行,时间格式为 [[CC]YY]MMDDhhmm。 |
| -d | 删除某个工作,需要提供相应的工作标识号(ID),同 atrm 命令的作用相同。 |
| -l | 列出当前所有等待运行的工作,和 atq 命令具有相同的额作用。 |
| -f 脚本文件 | 指定所要提交的脚本文件。 |
此命令中关于时间参数可用的以下格式:
| 格式 | 用法 |
|---|---|
| HH:MM | 比如 04:00 AM。如果时间已过,则它会在第二天的同一时间执行。 |
| Midnight(midnight) | 代表 12:00 AM(也就是 00:00)。 |
| Noon(noon) | 代表 12:00 PM(相当于 12:00)。 |
| Teatime(teatime) | 代表 4:00 PM(相当于 16:00)。 |
| 英文月名 日期 年份 | 比如 January 15 2018 表示 2018 年 1 月 15 号,年份可有可无。 |
| MMDDYY、MM/DD/YY、MM.DD.YY | 比如 011518 表示 2018 年 1 月 15 号。 |
| now+时间 | 以 minutes、hours、days 或 weeks 为单位,例如 now+5 days 表示命令在 5 天之后的此时此刻执行。 |
at 命令只要指定正确的时间,就可以输入需要在指定时间执行的命令。这个命令可以是系统命令,也可以是 Shell 脚本。最好使用绝对路径来写命令(其他几个命令一样),这样不容易报错。每次使用 at 命令指定延时执行的命令,at 命令都会给其分配一个job号。
具体的使用方法:
at命令后想要输入执行程序的确切时间,然后回车,接着在 > 后输入想要执行的命令,最后用 Ctrl+d 组合键退出 at 命令。
实例一:延迟执行 ls /root 命令,把结果写入到 at.txt 文件中。
[root@centos7 ~]# at 21:50
at> ls /root > /root/at.txt
at> <EOT>
job 1 at Sat Apr 25 21:50:00 2020
[root@centos7 ~]# ll
总用量 4
drwxr-xr-x  5 root root  144 1月  10 16:43 abc
-rw-------. 1 root root 1440 12月  1 20:34 anaconda-ks.cfg
drwxr-xr-x  5 lisi lisi  256 7月   9 2011 manpages-zh-1.5.2
[root@centos7 ~]# ll
总用量 8
drwxr-xr-x  5 root root  144 1月  10 16:43 abc
-rw-------. 1 root root 1440 12月  1 20:34 anaconda-ks.cfg
-rw-r--r--  1 root root   45 4月  25 21:50 at.txt
drwxr-xr-x  5 lisi lisi  256 7月   9 2011 manpages-zh-1.5.2
[root@centos7 ~]# cat at.txt
abc
anaconda-ks.cfg
at.txt
manpages-zh-1.5.2
4、查看和删除 at 任务
先添加两个 任务
[root@centos7 ~]# at 21:00 2020-4-26
at> ll > ll.txt
at> <EOT>
job 2 at Sun Apr 26 21:00:00 2020
[root@centos7 ~]# at 21:00:01 2020-4-26
syntax error. Last token seen: :
Garbled time
[root@centos7 ~]# at 21:00:01 2020-4-26
syntax error. Last token seen: :
Garbled time
[root@centos7 ~]# at 21:01 2020-4-26
at> ls > at.txt
at> <EOT>
job 3 at Sun Apr 26 21:01:00 2020
a用于查看当前等待运行的工作任务:tq 命令(# atq)或者 # at -l
[root@centos7 ~]# atq
2       Sun Apr 26 21:00:00 2020 a root
3       Sun Apr 26 21:01:00 2020 a root
[root@centos7 ~]# at -l
2       Sun Apr 26 21:00:00 2020 a root
3       Sun Apr 26 21:01:00 2020 a root
删除指定的工作任务:atrm 命令(# atrm [工作号])或者 # at -d [工作号]
[root@centos7 ~]# atrm 2
[root@centos7 ~]# at -l
3       Sun Apr 26 21:01:00 2020 a root
[root@centos7 ~]# at -d 3
二、crontab 命令
at 命令:是在指定的时间只能执行一次任务。 crontab 命令:可以循环重复的执行定时任务。
1、crontab 命令的准备工作
crontab 命令需要 crond 服务支持。crond 是 Linux 下用来周期地执行某种任务或等待处理某些事件的一个守护进程,在安装完成操作系统后,默认会安装 crond 服务工具,且 crond 服务默认就是自启动的。crond 进程每分钟会定期检查是否有要执行的任务,如果有,则会自动执行该任务。
crontab 命令和 at 命令类似,也是通过 /etc/cron.allow 和 /etc/cron.deny 文件来限制某些用户是否可以使用 crontab 命令的。
启动crond服务之后才能使用crontab 命令: # systemctl start crond 或者 # systemctl enable crond
[root@centos7 ~]# systemctl enable crond
[root@centos7 ~]# systemctl status crond
● crond.service - Command Scheduler
   Loaded: loaded (/usr/lib/systemd/system/crond.service; enabled; vendor preset: enabled)
   Active: active (running) since 三 2020-04-22 14:20:10 CST; 3 days ago
 Main PID: 8821 (crond)
   CGroup: /system.slice/crond.service
           └─8821 /usr/sbin/crond -n

4月 22 14:20:10 centos7.6 systemd[1]: Started Command Scheduler.
4月 22 14:20:10 centos7.6 crond[8821]: (CRON) INFO (RANDOM_DELAY will be scaled with factor 25%...ed.)
4月 22 14:20:10 centos7.6 crond[8821]: (CRON) INFO (running with inotify support)
Hint: Some lines were ellipsized, use -l to show in full.
3、crontab 命令语法
基本格式为:[root@centos7 ~]# crontab [选项] [file]
| 选项 | 功能 |
|---|---|
| -u user | 用来设定某个用户的 crontab 服务,例如 "-u demo" 表示设备 demo 用户的 crontab 服务,此选项一般有 root 用户来运行。 |
| -e | 编辑某个用户的 crontab 文件内容。如果不指定用户,则表示编辑当前用户的 crontab 文件。 |
| -l | 显示某用户的 crontab 文件内容,如果不指定用户,则表示显示当前用户的 crontab 文件内容。 |
| -r | 从 /var/spool/cron 删除某用户的 crontab 文件,如果不指定用户,则默认删除当前用户的 crontab 文件。 |
| -i | 在删除用户的 crontab 文件时,给确认提示。 |
crontab 定时任务非常简单,只需执“crontab -e”命令,然后输入想要定时执行的任务即可。注意文件格式如下:
[root@centos7 ~]## crontab -e
#进入 crontab 编辑界面。会打开Vim编辑你的任务
* * * * * 执行的任务| 项目 | 含义 | 范围 |
|---|---|---|
| 第一个"*" | 一小时当中的第几分钟(minute) | 0~59 |
| 第二个"*" | 一天当中的第几小时(hour) | 0~23 |
| 第三个"*" | 一个月当中的第几天(day) | 1~31 |
| 第四个"*" | 一年当中的第几个月(month) | 1~12 |
| 第五个"*" | 一周当中的星期几(week) | 0~7(0和7都代表星期日) |
在这个时间的表达式中,还有一些特殊符号如下:
| 特殊符号 | 含义 |
|---|---|
| *(星号) | 代表任何时间。比如第一个"*"就代表一小时种每分钟都执行一次的意思。 |
| ,(逗号) | 代表不连续的时间。比如"0 8,12,16***命令"就代表在每天的 8 点 0 分、12 点 0 分、16 点 0 分都执行一次命令。 |
| -(中杠) | 代表连续的时间范围。比如"0 5 ** 1-6命令",代表在周一到周六的凌晨 5 点 0 分执行命令。 |
| /(正斜线) | 代表每隔多久执行一次。比如"*/10****命令",代表每隔 10 分钟就执行一次命令。 |
当“crontab -e”编辑完成之后,一旦保存退出,那么这个定时任务实际就会写入 /var/spool/cron/ 目录中,每个用户的定时任务用自己的用户名进行区分。而且 crontab 命令只要保存就会生效,只要 crond 服务是启动的。
这里举几个时间的例子来熟悉一下时间字段(星期几和几日最好不要同时出现,非常容易让管理员混淆):
| 时间 | 含义 |
|---|---|
| 1 2 * * * | 在每天凌晨 2 点 1 分执行命令 |
| 0 17 * * 1 | 在每周一的 17 点 0 分执行命令 |
| 0 5 1,15 * * | 在每月 1 日和 15 日的凌晨 5 点 0 分执行命令 |
| 40 4 * * 1-5 | 在每周一到周五的凌晨 4 点 40 分执行命令 |
| */10 4 * * * | 在每天的凌晨 4 点,每隔 10 分钟执行命令 |
| 3,15 8-11 */2 * * | 在每隔两天的上午 8 点到 11 点的第 3 和第 15 分钟执行命令。 |
实例一:用户计划任务
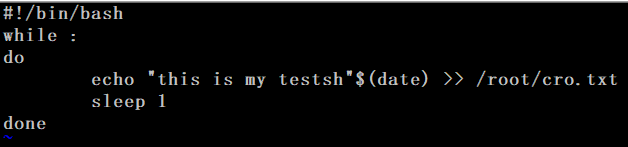
vi 编写一个 test.sh 的sheel脚本,并执行测试结果ok
[root@centos7 ~]# sh test.sh 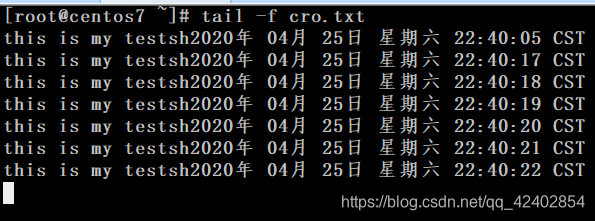
创建任务(只需执“crontab -e”命令):只要 crond 服务是启动的,crontab 命令只要保存就会生效。
![]()
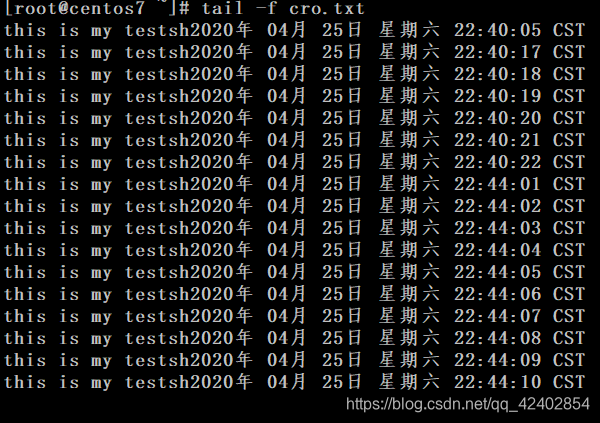
查看与删除用户任务之后,任务还在执行,需要通过结束进程:
[root@centos7 ~]# crontab -l
*/1 * * * * sh /root/test.sh
[root@centos7 ~]# crontab -r
[root@centos7 ~]# crontab -l
no crontab for root
[root@centos7 ~]# ps -aux | grep test
root      46838  0.1  0.0 113180  1448 ?        Ss   22:44   0:00 sh /root/test.sh
root      46960  0.1  0.0 113180  1448 ?        Ss   22:45   0:00 sh /root/test.sh
root      47228  0.1  0.0 113180  1444 ?        Ss   22:46   0:00 sh /root/test.sh
root      47591  0.1  0.0 113180  1444 ?        Ss   22:47   0:00 sh /root/test.sh
root      48072  0.1  0.0 113180  1444 ?        Ss   22:48   0:00 sh /root/test.sh
root      48488  0.0  0.0 112728   988 pts/0    S+   22:48   0:00 grep --color=auto test
[root@centos7 ~]# kill -9 46838
[root@centos7 ~]# kill -9 46960 47228 47591 48072
[root@centos7 ~]# ps -aux | grep test
root      49321  0.0  0.0 112724   984 pts/0    S+   22:50   0:00 grep --color=auto test
[root@centos7 ~]#
4、系统级别的计划任务
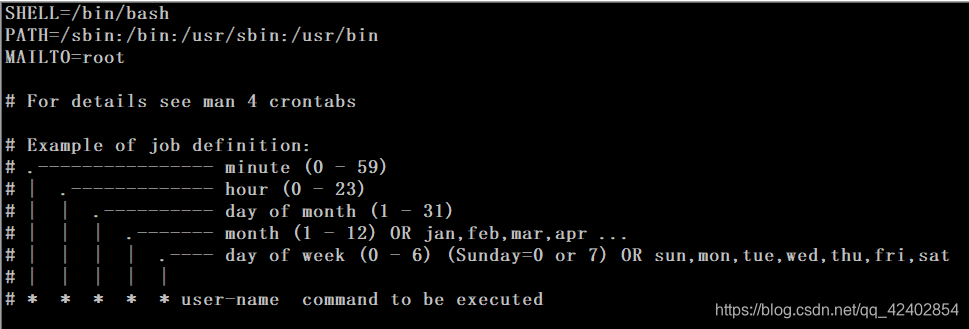
系统级计划任务的主配置文件/etc/crontab
仅能通过 root定义,不过可以以普通用户的身份去执行计划任务中的命令。在文件的最后一行添加定时执行的任务即可。
SHELL=/bin/bash #指定操作系统使用哪个shell
PATH=/sbin:/bin:/usr/sbin:/usr/bin #系统执行命令的搜索路径
MAILTO=root #将执行任务的信息通过邮件发送给xx用户
ends~


 被折叠的 条评论
为什么被折叠?
被折叠的 条评论
为什么被折叠?
 到【灌水乐园】发言


