


在Springboot中使用Mail通过邮箱验证码实现注册验证
在注册用户的时候一般都会使用邮箱验证码进行验证注册,那么是如何实现的呢?
如果是使用QQ邮箱 则需要开启smtp服务
首先在springboot项目中引入mail依赖
<dependency>
    <groupId>javax.mail</groupId>
    <artifactId>mail</artifactId>
    <version>1.4.7</version>
</dependency>
配置application.yml
# 配置数据库
spring:
  datasource:
    driver-class-name: com.mysql.cj.jdbc.Driver
    password: root
    username: root                        # 数据库连接信息
    url: jdbc:mysql:///swzl?useSSL=true&serverTimezone=UTC&characterEncoding=utf-8
# 这个///斜杠意思就是 省去了localhost:3306/
--------------------------------------------------------------------------------

mail:
  account: xxxxxx          # 发送邮箱的账号,@前面的内容
  password: xxxxxxxxxxxxxxxxx   # 授权码,qq邮箱中开启smtp服务,就能查看
  from: xxxxxxx@qq.com      # 发送者邮箱
编写一个json转map的工具类便于使用
SimpleJson.java
@Component
public class SimpleJson {

    @Autowired
    private ObjectMapper mapper;

    public Map<String,String> JsonToMap(String json) throws JsonProcessingException {

        Map<String,String> map = mapper.readValue(json, Map.class);
        return map;
    }

}
编写一个Jmail工具类
Jmail.java
@Component
public class Jmail {

    @Value("${mail.account}")
    private String mailName;

    @Value("${mail.password}")
    private String password;

    @Value("${mail.from}")
    private String fromMail;

    private String toMail;

    private String content;

    private String topic;

    public void setToMail(String toMail) {
        this.toMail = toMail;
    }

    public void setTopic(String topic) {
        this.topic = topic;
    }

    public void setContent(String content) {
        this.content = content;
    }

    // 邮件发送
    public void send() throws MessagingException {

        Properties properties = new Properties();
        properties.setProperty("mail.host","smtp.qq.com");
        properties.setProperty("mail.smtp.auth","true");
        Session session = Session.getInstance(properties, new Authenticator() {
            @Override
            protected PasswordAuthentication getPasswordAuthentication() {
                return new PasswordAuthentication(mailName,password);
            }
        });
        MimeMessage message = new MimeMessage(session);
        message.setFrom(new InternetAddress(fromMail));
        message.addRecipient(Message.RecipientType.TO,new InternetAddress(toMail));
        message.setSubject(topic);
        message.setContent(content,"text/html;charset=utf-8;");
        Transport.send(message);
    }

    @Override
    public String toString() {
        return "Jmail{" +
                "mailName='" + mailName + '\'' +
                ", password='" + password + '\'' +
                ", fromMail='" + fromMail + '\'' +
                ", toMail='" + toMail + '\'' +
                ", content='" + content + '\'' +
                ", topic='" + topic + '\'' +
                '}';
    }
}
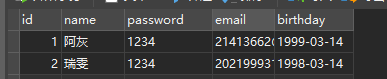
预先准备好了User表以及实体类等

编写UserController进行测试
@Controller
public class UserController {
@Autowired
private UserService userService;
@Autowired
private SimpleJson simpleJson;
@Autowired
private Jmail jmail;
@GetMapping("/")
public String register(){
return "register";
}
@ResponseBody
@PostMapping("/register")
public String register(@RequestParam("username")String username,
@RequestParam("password")String password,
@RequestParam("mail")String mail,
@RequestParam("code")String coding,
HttpServletRequest request) throws JsonProcessingException {
User user = new User();
user.setName(username)
//将密码进行MD5加密
.setPassword(DigestUtils.md5DigestAsHex(password.getBytes()))
.setEmail(mail);
//获取刚才存入session中的验证码
String code = (String) request.getSession().getAttribute("code");
System.err.println("code=>" + code);
if (code==null||!code.equals(coding)){
return "2"; // 验证码错误,返回2
}
boolean user1 = false;
try {
user1 = userService.addUser(user);
} catch (Exception e) {
e.printStackTrace();
return "0"; // 添加失败,返回0,一般是用户名重复问题
}
return "1"; // 注册成功,返回1
}
@ResponseBody
@PostMapping("/getcode") //邮箱验证码
public void getCode(HttpServletRequest request,
@RequestBody String body) throws Exception {
//将传过来的邮箱信息(JSON)格式转换为Map
Map<String,String> data = simpleJson.JsonToMap(body);
//生成6位随机验证码
Random random = new Random();
String code = "";
for (int i=0;i<6;i++) {
code += random.nextInt(9);
}
request.getSession().setAttribute("code",code);
jmail.setToMail(data.get("mail")); //得到邮箱
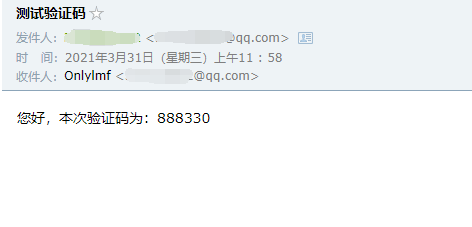
jmail.setTopic("测试验证码"); //邮件名
jmail.setContent("您好,本次验证码为:"+code); //消息信息
try {
jmail.send(); //发送
} catch (MessagingException e) {
throw new RuntimeException("邮箱发送失败!");
}
}
}
页面注册表单
register.html
<form id="app" class="ui large form">
    <div class="ui stacked segment">
        <div class="field">
            <div class="ui left icon input">
                <i class="user icon"></i>
                <input type="text" v-model="username" placeholder="账号">
                <label v-if=" username.length==0 " v-text="umessage"></label>
            </div>
        </div>
        <div class="field">
            <div class="ui left icon input">
                <i class="lock icon"></i>
                <input type="password" v-model="password" placeholder="密码">
                <label v-if=" password.length==0 " v-text="pmessage"></label>
            </div>
        </div>
        <div class="field">
            <div class="ui left icon input">
                <i class="envelope icon"></i>
                <input type="text" v-model="mail" placeholder="邮箱地址">
                <label v-if=" mail.length==0 " v-text="mmessage"></label>
            </div>
        </div>
        <div class="field ">
            <div class="ui input ">
                <input type="text" v-model="code" placeholder="填写验证码" style="margin-right: 1em;">
                <label v-if=" code.length==0 " v-text="cmessage"></label>


                <input id="codeBtn" type="button" @click="getCode()" class="ui button" value="获取验证码">
            </div>

        </div>
        <div @click="doRegister()" class="ui fluid large teal submit button">注册</div>
    </div>


</form>
register.js 使用了vue以及ajax进行数据的提交
var app = new Vue({
    el:"#app",
    data:{
        username:"",
        password:"",
        mail:"",
        code:"",
        umessage: "",
        pmessage: "",
        mmessage:"",
        cmessage:""
    },
    methods:{
        getCode:function () {
            if (this.mail==""){this.mmessage = "请输入邮箱";return false;}
            var mail = this.mail;
            $("#codeBtn").attr('disabled','disabled');
            $("#codeBtn").val("已发送");
            axios.post("getcode",
                {mail:mail}
            ).then(function (response) {
                alert("邮箱已发送,请注意查收!")
            },function (error) {
                alert(error);
            });
        },
        doRegister:function () {
            if (this.username==""){this.umessage = "请输入用户名";return false;}
            if (this.password==""){this.pmessage = "请输入密码";return false;}
            if (this.mail==""){this.mmessage = "请输入邮箱";return false;}
            if (this.code==""){this.cmessage = "请输入邮箱";return false;}

            var uname = this.username;
            var passwd = this.password;
            var mail = this.mail;
            var code = this.code;

            $.ajax({
                url:"register",
                type:"post",
                dataType:"JSON",
                async:false,
                data:{
                    username:uname,password:passwd,mail:mail,code:code
                },
                success:function (response) {
                    if (response==1){
                        window.location.href = "sy";
                    }if(response==0){
                        alert("用户名已经被注册,请更换后提交!");
                    }if (response==2){
                        alert("验证码错误!");
                    }
                },
                error:function (error) {
                    console.error(error);
                }
            });
        }
    }
});


 2647
2647


 被折叠的 条评论
为什么被折叠?
被折叠的 条评论
为什么被折叠?
 到【灌水乐园】发言


