


思路: 1.登录认证oauth/token拦截器 2找到user信息 3.利用user字段得到token,返回赋值给session 4请求权限信息,网管拦截 ,用token去经过网关解析成id 5、跳转微服务getinfo,获取id查询用户权限角色。
开发技巧:代码一点一点的加,一点一点的测试,如果错了可以返回上一步。有时候加多了,他会报不相干的错误,比如因为加了dao层进行了跨域。
网关不过滤就重启
1.网关配置:拦截器实现,要放行oauth/token,所有请求接口经过网关ip转发。
网关白名单放行/yz/oauth/token,也经过网关拦截过滤器, (网关都要加前缀,好进行分发),其他请求都要经过网关拦截器验证token。
第一次请求自带的token参数代表了clientid 和clientsecret
网关拦截器,把token 存在request中

    @Override
    public Mono<Void> filter(ServerWebExchange exchange, GatewayFilterChain chain) {
        String token = exchange.getRequest().getHeaders().getFirst("Authorization");
        if (StrUtil.isEmpty(token)) {
            return chain.filter(exchange);
        }
        if (token.startsWith("bearer")) {
            try {
                //从token中解析用户信息并设置到Header中去
                System.out.println("从token中解析用户信息并设置到Header中去");
                String realToken = token.replace("bearer ", "");
                JWSObject jwsObject = JWSObject.parse(realToken);
                String userStr = jwsObject.getPayload().toString();
                System.out.println(userStr);
                //信息加入到head里面。
                ServerHttpRequest request = exchange.getRequest().mutate().header("user", userStr).build();
                try {
                    userStr= URLEncoder.encode(userStr, "UTF-8");
                }catch (Exception e){
                    e.printStackTrace();
                }
                request = exchange.getRequest().mutate().header("enuser", userStr).build();
                exchange = exchange.mutate().request(request).build();
            } catch (ParseException e) {
                e.printStackTrace();
            }
        }
        return chain.filter(exchange);
    }

大坑,ip不要用前端映射,其实是需要重启。有缓存。
网关搭建

2.配置认证服务器
任何接口资源/users/me都要微服务这里放行,不带yz网关前缀,因为是网关转过来的。
认证服务器请求拦截器,每个服务都有
@Configuration
@EnableWebSecurity
public class WebSecurityConfig extends WebSecurityConfigurerAdapter {

    @Override
    protected void configure(HttpSecurity http) throws Exception {
        http.authorizeRequests()
                .requestMatchers(EndpointRequest.toAnyEndpoint()).permitAll()
                // @link https://gitee.com/xiaoym/knife4j/issues/I1Q5X6 (接口文档knife4j需要放行的规则)
                .antMatchers("/webjars/**","/doc.html","/swagger-resources/**","/v2/api-docs").permitAll()
                .antMatchers("/rsa/publicKey","/decode" ,"/users/me","/sys/menus","/sys/menus_cbs","/redirect").permitAll()
                .anyRequest().authenticated()
                .and()
                .csrf().disable();
    }

oauth2配置客户端
    public void configure(ClientDetailsServiceConfigurer clients) throws Exception {
        System.out.println("[2]----加载认证服务配置");
        clients.inMemory()
             .withClient("client-api")
                .secret(passwordEncoder.encode("123456"))
                .scopes("all")
                .authorizedGrantTypes("password", "refresh_token")
                .accessTokenValiditySeconds(60 * 60 * 5)//token 有效期15分钟
                .refreshTokenValiditySeconds(60 * 60 * 10)//有效期内可以刷新token
                .and()
             .withClient("client-jump")
                .secret(passwordEncoder.encode("123456"))
                .scopes("all")
                .authorizedGrantTypes("password", "refresh_token")
                .accessTokenValiditySeconds(60 * 15)//token 有效期15分钟
                .refreshTokenValiditySeconds(60 * 30)//有效期内可以刷新token
                .and()
             .withClient("client-app")
                .secret(passwordEncoder.encode("123456"))
                .scopes("all")
                .authorizedGrantTypes("password", "refresh_token")
                .accessTokenValiditySeconds(60 * 15)//token 有效期15分钟
                .refreshTokenValiditySeconds(60 * 30);//有效期内可以刷新token
    }
oauth2配令牌服务,产生token,需要userDetailsService作为生成token的参数
    @Override
    public void configure(AuthorizationServerEndpointsConfigurer endpoints) throws Exception {
        TokenEnhancerChain enhancerChain = new TokenEnhancerChain();
        List<TokenEnhancer> delegates = new ArrayList();
        delegates.add(tokenEnhancer());
        delegates.add(accessTokenConverter());
        enhancerChain.setTokenEnhancers(delegates); //配置JWT的内容增强器
        endpoints.authenticationManager(authenticationManager)
                .userDetailsService(userDetailsService) //配置加载用户信息的服务,对比的用的userDetailsService查找信息
                .accessTokenConverter(accessTokenConverter())
                .reuseRefreshTokens(false)
                .tokenEnhancer(enhancerChain);
    }
token生成的字段
    public TokenEnhancer tokenEnhancer() {
        return (accessToken, authentication) -> {
            Map<String, Object> additionalInfo = CollectionUtil.newHashMap();
            SecurityUser OAuthUserDetails = (SecurityUser) authentication.getPrincipal();
//            additionalInfo.put("userId", OAuthUserDetails.getId());
            additionalInfo.put("oilfield", OAuthUserDetails.getOilfield());
            additionalInfo.put("dataSource", OAuthUserDetails.getDataSource());
            additionalInfo.put("unitid", OAuthUserDetails.getUnitid());
            additionalInfo.put("user_Id", OAuthUserDetails.getUser_Id());
            additionalInfo.put("truename", OAuthUserDetails.getRealname());
            additionalInfo.put("unitname", OAuthUserDetails.getUnitname());
            additionalInfo.put("username", OAuthUserDetails.getUsername());
//            additionalInfo.put("id", OAuthUserDetails.getId());
            ((DefaultOAuth2AccessToken) accessToken).setAdditionalInformation(additionalInfo);
            return accessToken;
        };
    }

3.前端 js认证请求post
 loginForm: {
          username: 'admin',
          password: '123456',
          grant_type:'passwrod',//密码认证模式,passwrod写错了,错一个字母,就要排查好一会错误bug
          client_secret:'123456',
          client_id:'client-app'
        },


 axios.post(`/api/yz/oauth/token?username=${loginForm.username}&password=${loginForm.password}&grant_type=${loginForm.grant_type}`,
            loginForm, { headers: { Authorization: 'Basic Y2xpZW50LWFwcDoxMjM0NTY=' } }
          ).then((res) => {
            debugger;
               if (res.msg === "success") {
            //使用session存储token值
                 sessionStorage.setItem('cloud-ida-token',res.data);
            //cookie中保存前端登录状态
                 setToken();
                }
               resolve(res);
            }).finally(() => {
              this.loading = false
            })
            setTimeout(() => {
              // console.log(this.$route.params.from)
              //  window.location.replace(this.$route.params.from || '/jxzy02')
            })
          }).finally(() => {
            //this.loadin
          });

返回参数跳转
     handleLogin() {
        this.$refs.loginForm.validate(valid => {
          if (valid) {
            this.loading = true
            this.$store.dispatch('Login', this.loginForm).then(data => {
              console.log('获取到的data: '+data.msg);
              this.loading = false
              if ("success" === data.msg) {
                this.$router.push({path: '/'})
              } else {
                this.$message.error("账号/密码错误");
              }
            }).catch(() => {
              this.loading = false
            })
          } else {
            return false
          }
        })
      }
    }
  }

4.认证后台,对比账号,先用username查询,后面用userid查询
 `    @Override
    public UserDetails loadUserByUsername(String username) throws UsernameNotFoundException {
        System.out.println("[4]---loadUserByUsername");
//        List<UserDTO> findUserList = userList.stream().filter(item -> item.getUsername().equals(username)).collect(Collectors.toList());
        UserDTO userDTO=new UserDTO();//实体类
        userDTO.setUser_name(username);
        List<UserDTO> findUserList = dao.find("loadUserByUsername",userDTO);//查询
        if (CollUtil.isEmpty(findUserList)) {
            throw new UsernameNotFoundException(MessageConstant.USERNAME_PASSWORD_ERROR);
        }
        userDTO = findUserList.get(0);
        userDTO.setStatus(1);
        userDTO.setRoles(CollUtil.toList("ADMIN"));
        //数据库中的密码(需前端传递过来md5加密的密码)
      userDTO.setPassword(passwordEncoder.encode(userDTO.getPassword().toLowerCase()));

        SecurityUser securityUser = new SecurityUser(userDTO);
        if (!securityUser.isEnabled()) {
            throw new DisabledException(MessageConstant.ACCOUNT_DISABLED);
        } else if (!securityUser.isAccountNonLocked()) {
            throw new LockedException(MessageConstant.ACCOUNT_LOCKED);
        } else if (!securityUser.isAccountNonExpired()) {
            throw new AccountExpiredException(MessageConstant.ACCOUNT_EXPIRED);
        } else if (!securityUser.isCredentialsNonExpired()) {
            throw new CredentialsExpiredException(MessageConstant.CREDENTIALS_EXPIRED);
        }
        return securityUser;
    }
`


跳转到配置里的token 生成,把需要的字段添加进去,然后在第二次请求token解析的时候可以拿到字段
   @Bean
    public TokenEnhancer tokenEnhancer() {
        return (accessToken, authentication) -> {
            Map<String, Object> additionalInfo = CollectionUtil.newHashMap();
            SecurityUser OAuthUserDetails = (SecurityUser) authentication.getPrincipal();
//            additionalInfo.put("userId", OAuthUserDetails.getId());
            additionalInfo.put("oilfield", OAuthUserDetails.getOilfield());
            additionalInfo.put("dataSource", OAuthUserDetails.getDataSource());
            additionalInfo.put("unitid", OAuthUserDetails.getUnitid());
            additionalInfo.put("user_Id", OAuthUserDetails.getUser_Id());
            additionalInfo.put("truename", OAuthUserDetails.getRealname());
            additionalInfo.put("unitname", OAuthUserDetails.getUnitname());
            additionalInfo.put("username", OAuthUserDetails.getUsername());
//            additionalInfo.put("id", OAuthUserDetails.getId());
            ((DefaultOAuth2AccessToken) accessToken).setAdditionalInformation(additionalInfo);
            return accessToken;
        };
    }

5.返回js处理,保存token到session下次发送请求带上,设置cookie已经登录的状态。
token的保存格式要和图中一样。中间加个空格。。


  // 登录返回处理
    Login({commit, state}, loginForm) {
      return new Promise((resolve, reject) => {
          this.loading = true
          axios.post(`/api/oauth/token?username=${loginForm.username}&password=${loginForm.password}&grant_type=${loginForm.grant_type}&client_secret=${loginForm.client_secret}&client_id=${loginForm.client_id}`,
            loginForm, { headers: { Authorization: 'Basic Y2xpZW50LWFwcDoxMjM0NTY=' } }
          ).then((r) => {
            debugger;
            r=r.data;
               if (r.msg === "操作成功") {
            //使用session存储token值,,,,,,有一定的格式
                 sessionStorage.setItem('cloud-ida-token',r.data.access_token);
            //cookie中保存前端登录状态
                 setToken();
                }
               resolve(r);
            }).finally(() => {
              this.loading = false
            })
            setTimeout(() => {
              // console.log(this.$route.params.from)
              //  window.location.replace(this.$route.params.from || '/jxzy02')
            })
          }).finally(() => {
            //this.loadin
          });
cookie在登出的时候得清除掉,否则自动去getinfo,,, setToken()方法
import Cookies from 'js-cookie'
const LoginKey = 'hasLogin'//设置coolie已经登录
export function getToken() {
  return Cookies.get(LoginKey);
}
export function setToken() {
  return Cookies.set(LoginKey, "1")
}
export function removeToken() {
  return Cookies.remove(LoginKey)
}

每次请求的axios处理

import axios from 'axios'
import {Message, MessageBox} from 'element-ui'
import {getToken} from '@/utils/auth'
import store from '../store'
// 创建axios实例
const service = axios.create({
  baseURL: process.env.BASE_URL, // api的base_url
  timeout: 15000                  // 请求超时时间2
})
// request拦截器
service.interceptors.request.use(config => {
  config.headers.Authorization=sessionStorage.getItem('cloud-ida-token');//每次请求都要加token
  return config
}, error => {
  // Do something with request error
  console.error(error) // for debug
  Promise.reject(error)
})
// respone拦截器
service.interceptors.response.use(
  response => {
    const res = response.data;
    if (res.code == "200") {
      return res
    }

    if (res.code == '10002') {
      Message({
        showClose: true,
        message: res.msg,
        type: 'error',
        duration: 3 * 1000,
        onClose: () => {
          store.dispatch('FedLogOut').then(() => {
            location.reload()// 为了重新实例化vue-router对象 避免bug
          })
        }
      });
      return Promise.reject(res.msg)
    }else{
      Message({
        message: res.msg,
        type: 'error',
        duration: 3 * 1000
      })
      return res
    }
  },
  error => {
    console.error('err' + error)// for debug
    Message({
      message: error.message,
      type: 'error',
      duration: 3 * 1000
    })
    return Promise.reject(error)
  }
)
export default service
7前端配置
跨域设置,认证完经过网关跳转不了微服务可能是跨域问题,,,也可能是接口输错了user/mehhhe和users、me、()dakeng大坑
8,getinfo带着token去网关验证得到id,放在request的header里,跳转到微服务中取出,然后获取信息。
先建表,bean,mapper接口和xml,service,controull层。一步步建立,学习架子里的语法。
springboot找不到dao
跨域问题

看返回,返回失败,跳转到login


import router from './router'
import store from './store'
import NProgress from 'nprogress' // Progress 进度条
import 'nprogress/nprogress.css' // Progress 进度条样式
import {getToken} from '@/utils/auth' // 验权
const whiteList = ['/login', '/404'] //白名单,不需要登录的路由
router.beforeEach((to, from, next) => {
  NProgress.start()
  if (getToken()) {
    //如果已经登录

    if (to.path === '/login') {
      next({path: '/'})
      NProgress.done() // 结束Progress
    } else if (!store.getters.role) {
      //跳转后台
      store.dispatch('GetInfo').then(() => {
        next({...to})
      })
    } else {
      next()
    }
  } else if (whiteList.indexOf(to.path) !== -1) {
    //如果前往的路径是白名单内的,就可以直接前往
    next()
  } else {
    //如果路径不是白名单内的,而且又没有登录,就跳转登录页面
    next('/login')
    NProgress.done() // 结束Progress
  }
})
router.afterEach(() => {
  NProgress.done() // 结束Progress
})
9.dao层,对应好mapper命名空间去查,先测试通sql语句


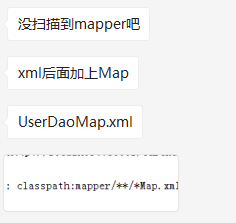
没扫描到:看扫描配置文件,必须加后缀
用户表和角色表中间有用户角色关系表


角色表和权限表中间有角色和权限关系表,权限表里有父权限字段,可以当作条件


menu是小权限,他没有表,是权限表的限定,比如限定条件是父id15,返回类型是STRING,返回list一个个转成set即可。

10更新权限
更新权限
    @Transactional
    @Override
    public Integer batchInsert(List<RolePermission> rolepermissions) {
        RolePermission rolepermission=rolepermissions.get(0);
        rolepermissionMapper.deleteByRoleId(rolepermission.getRoleId());
        return rolepermissionMapper.batchInsert(rolepermissions);
    }


 429
429


 被折叠的 条评论
为什么被折叠?
被折叠的 条评论
为什么被折叠?
 到【灌水乐园】发言


