


本地运行kubesphere后端代码遇到的问题以及解决方法
本地运行kubesphere教程:
本地运行 KubeSphere :: KubeSphere 开发指南
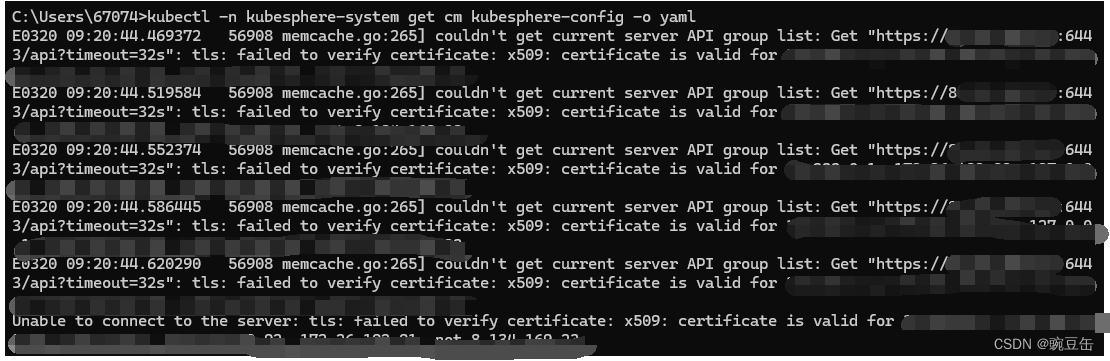
表明TLS证书验证失败,因为证书并没有为IP地址master节点的IP地址(报错中的第一个IP地址)签发,而只为列出的其他IP有效。
更新证书:重新生成包括正确SAN字段的TLS证书,包含(master节点的IP地址)这个IP地址,并更新Kubernetes中使用这个证书的相关组件。
这可能需要使用诸如kubeadm这样的工具来完成,命令:
kubeadm init phase certs all --apiserver-advertise-address=master节点的IP地址 --apiserver-cert-extra-sans=master节点的IP地址上述问题解决后报错:
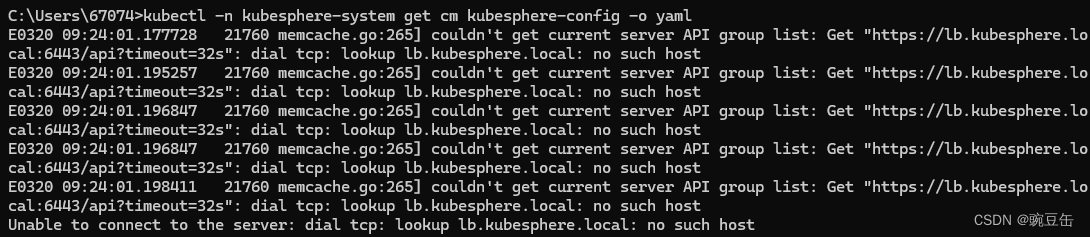
DNS解析失败,因为无法找到lb.kubesphere.local这个主机名。
直接在本机的hosts文件中添加一行(C:\Windows\System32\drivers\etc\hosts),将lb.kubesphere.local指向API服务器的IP地址。例如:
master节点的IP地址 lb.kubesphere.local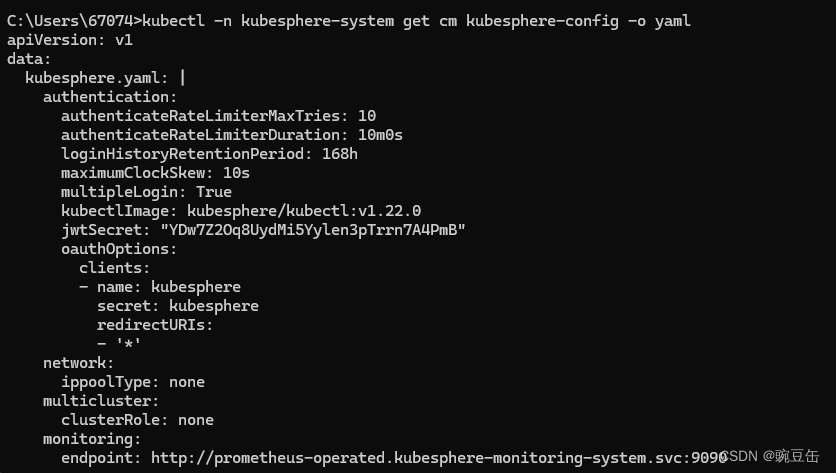
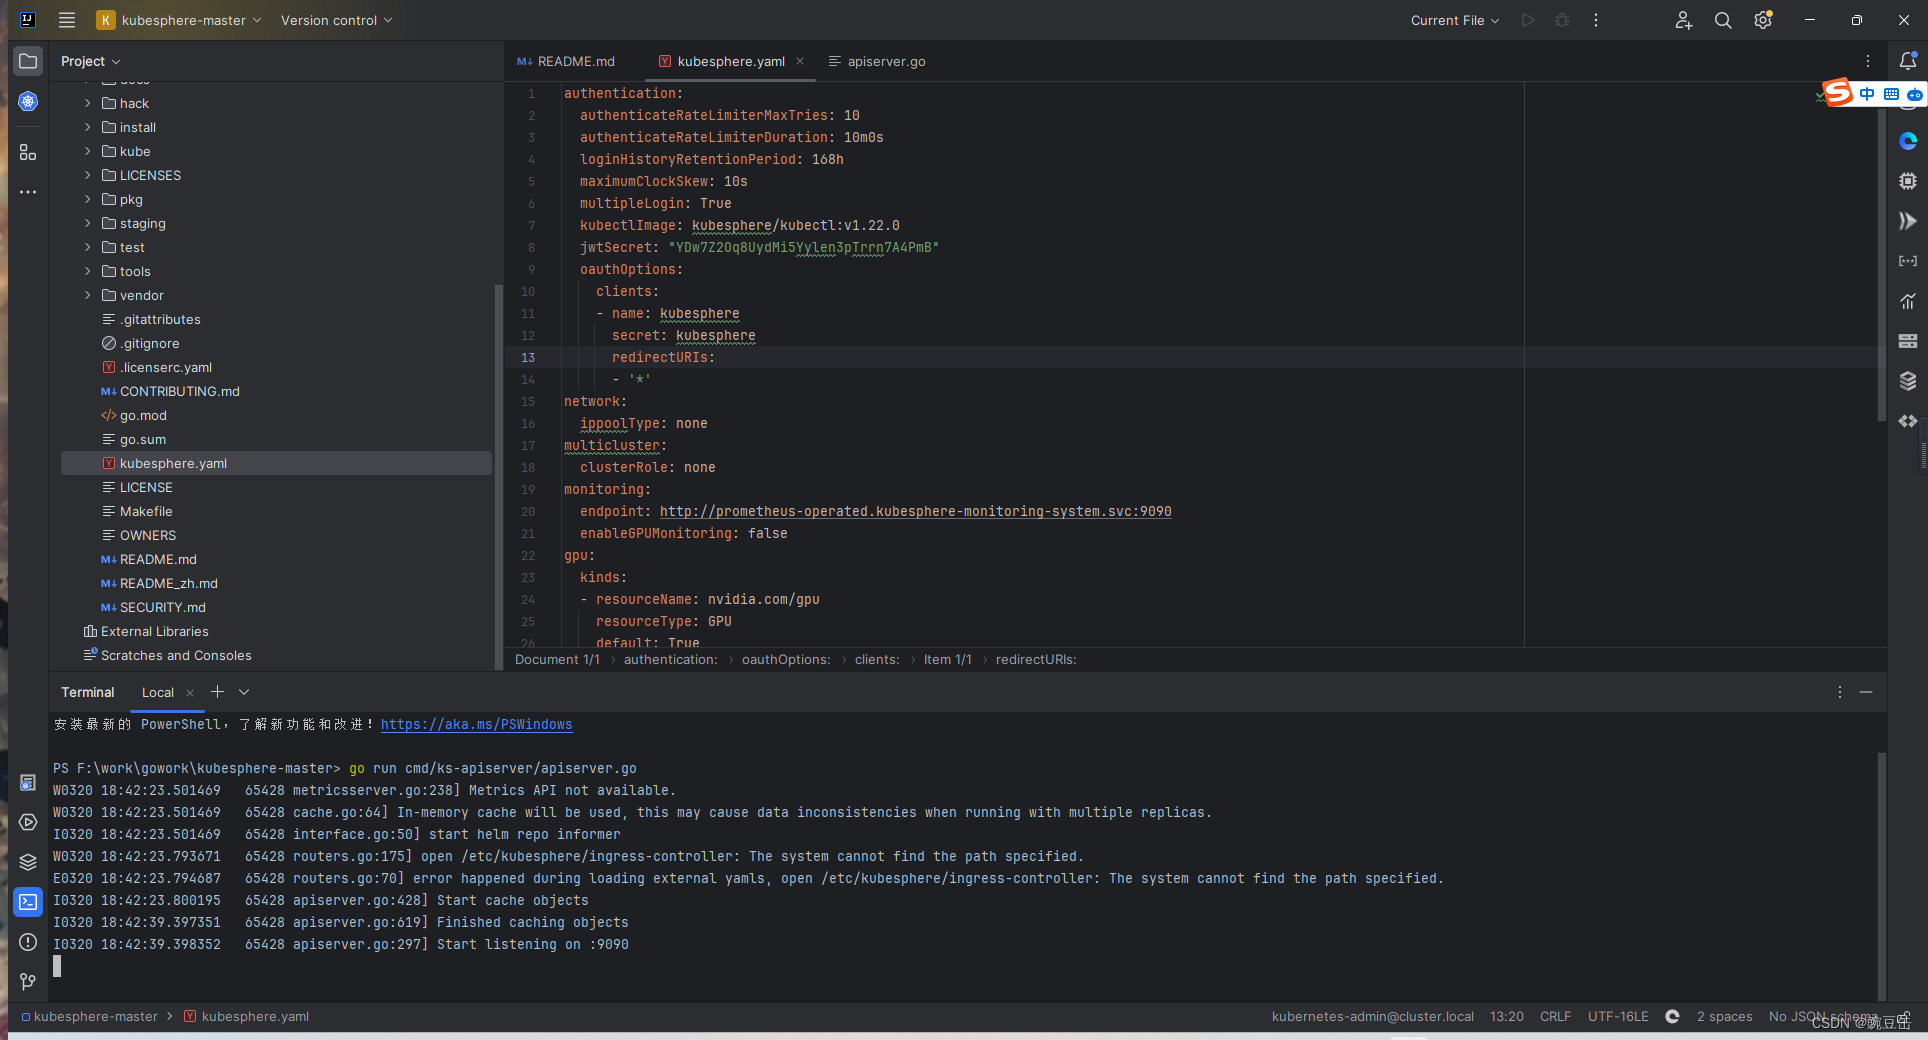
将上面输出存为kubesphere.yaml文件,然后放在后端代码的根目录(此文件需要修改,修改的在下面)。
apiVersion: v1
data:
kubesphere.yaml: |
authentication:
  authenticateRateLimiterMaxTries: 10
  authenticateRateLimiterDuration: 10m0s
  loginHistoryRetentionPeriod: 168h
  maximumClockSkew: 10s
  multipleLogin: True
  kubectlImage: kubesphere/kubectl:v1.22.0
  jwtSecret: "YDw7Z2Oq8UydMi5Yylen3pTrrn7A4PmB"
  oauthOptions:
    clients:
    - name: kubesphere
      secret: kubesphere
      redirectURIs:
      - '*'
network:
  ippoolType: none
multicluster:
  clusterRole: none
monitoring:
  endpoint: http://prometheus-operated.kubesphere-monitoring-system.svc:9090
  enableGPUMonitoring: false
gpu:
  kinds:
  - resourceName: nvidia.com/gpu
    resourceType: GPU
    default: True
notification:
  endpoint: http://notification-manager-svc.kubesphere-monitoring-system.svc:19093


terminal:
  image: alpine:3.14
  timeout: 600
gateway:
  watchesPath: /var/helm-charts/watches.yaml
  repository: kubesphere/nginx-ingress-controller
  tag: v1.3.1
  namespace: kubesphere-controls-system
kind: ConfigMap
metadata:
annotations:
kubectl.kubernetes.io/last-applied-configuration: |
{"apiVersion":"v1","data":{"kubesphere.yaml":"authentication:\n authenticateRateLimiterMaxTries: 10\n authenticateRateLimiterDuration: 10m0s\n loginHistoryRetentionPeriod: 168h\n maximumClockSkew: 10s\n multipleLogin: True\n kubectlImage: kubesphere/kubectl:v1.22.0\n jwtSecret: \"YDw7Z2Oq8UydMi5Yylen3pTrrn7A4PmB\"\n oauthOptions:\n clients:\n - name: kubesphere\n secret: kubesphere\n redirectURIs:\n - '*'\nnetwork:\n ippoolType: none\nmulticluster:\n clusterRole: none\nmonitoring:\n endpoint: http://prometheus-operated.kubesphere-monitoring-system.svc:9090\n enableGPUMonitoring: false\ngpu:\n kinds:\n - resourceName: nvidia.com/gpu\n resourceType: GPU\n default: True\nnotification:\n endpoint: http://notification-manager-svc.kubesphere-monitoring-system.svc:19093\n\n\nterminal:\n image: alpine:3.14\n timeout: 600\ngateway:\n watchesPath: /var/helm-charts/watches.yaml\n repository: kubesphere/nginx-ingress-controller\n tag: v1.3.1\n namespace: kubesphere-controls-system\n"},"kind":"ConfigMap","metadata":{"annotations":{},"name":"kubesphere-config","namespace":"kubesphere-system"}}
creationTimestamp: "2024-03-07T09:25:18Z"
name: kubesphere-config
namespace: kubesphere-system
resourceVersion: "2455"
uid: 1f4fb028-c877-47a4-88c8-5f2901bab722
在IDE中运行以下命令
go run cmd/ks-apiserver/apiserver.go
输入以下命令重新生成vendor目录:
go mod vendor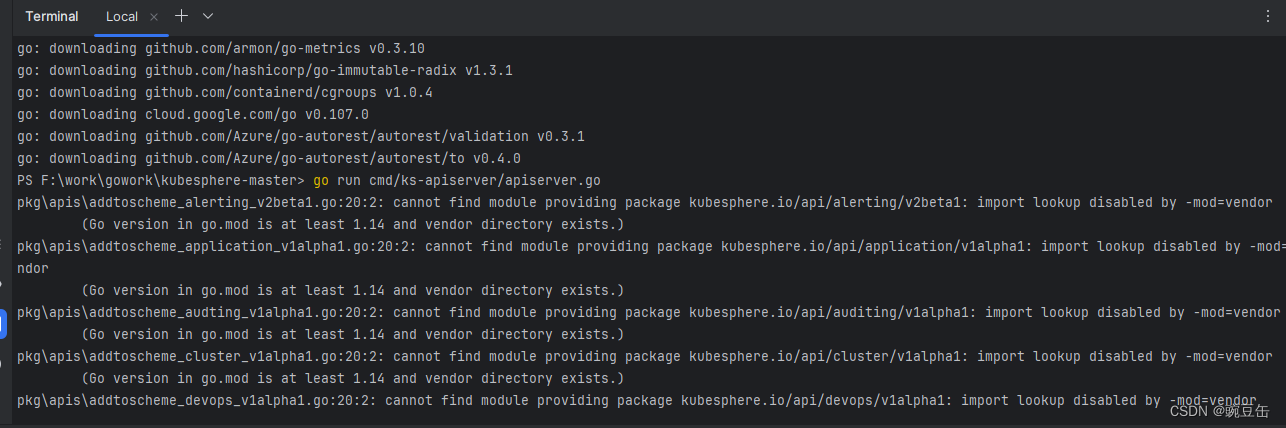
更换Go模块代理
如果你无法访问proxy.golang.org,可以尝试更换其他的Go模块代理服务器。例如,goproxy.cn是一个在中国大陆地区比较快的代理:
go env -w GOPROXY=https://goproxy.cn,direct直接访问源
如果以上方法都不奏效,你还可以尝试设置环境变量GOPROXY=direct,这会让Go工具链直接从源代码仓库获取模块,绕过模块代理:
go env -w GOPROXY=directgo mod tidy命令会添加缺失的模块,移除不需要的模块,并重新计算依赖的版本和校验。
go mod tidy
密钥问题是kubesphere.yaml文件问题,需要修改为:
authentication:
authenticateRateLimiterMaxTries: 10
authenticateRateLimiterDuration: 10m0s
loginHistoryRetentionPeriod: 168h
maximumClockSkew: 10s
multipleLogin: True
kubectlImage: kubesphere/kubectl:v1.22.0
jwtSecret: "YDw7Z2Oq8UydMi5Yylen3pTrrn7A4PmB"
oauthOptions:
clients:
- name: kubesphere
secret: kubesphere
redirectURIs:
- '*'
network:
ippoolType: none
multicluster:
clusterRole: none
monitoring:
endpoint: http://prometheus-operated.kubesphere-monitoring-system.svc:9090
enableGPUMonitoring: false
gpu:
kinds:
- resourceName: nvidia.com/gpu
resourceType: GPU
default: True
notification:
endpoint: http://notification-manager-svc.kubesphere-monitoring-system.svc:19093
terminal:
image: alpine:3.14
timeout: 600
gateway:
watchesPath: /var/helm-charts/watches.yaml
repository: kubesphere/nginx-ingress-controller
tag: v1.3.1
namespace: kubesphere-controls-system运行 ks-apiserver
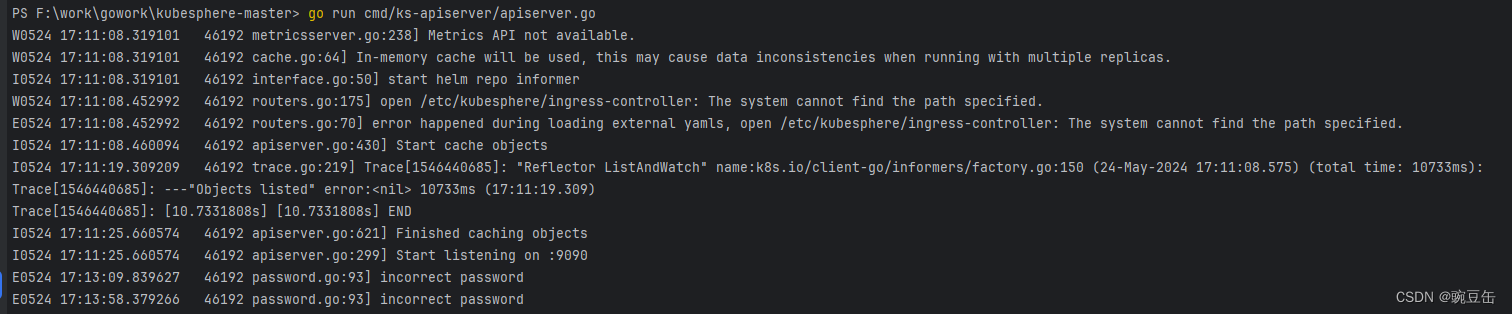
在 kubesphere 代码根目录下运行
go run cmd/ks-apiserver/apiserver.go
然后管理员终端运行命令连接telepresence:
telepresence connect --namespace kubesphere-system
然后可以拦截某项服务:
telepresence intercept --port 9090 ks-apiserver
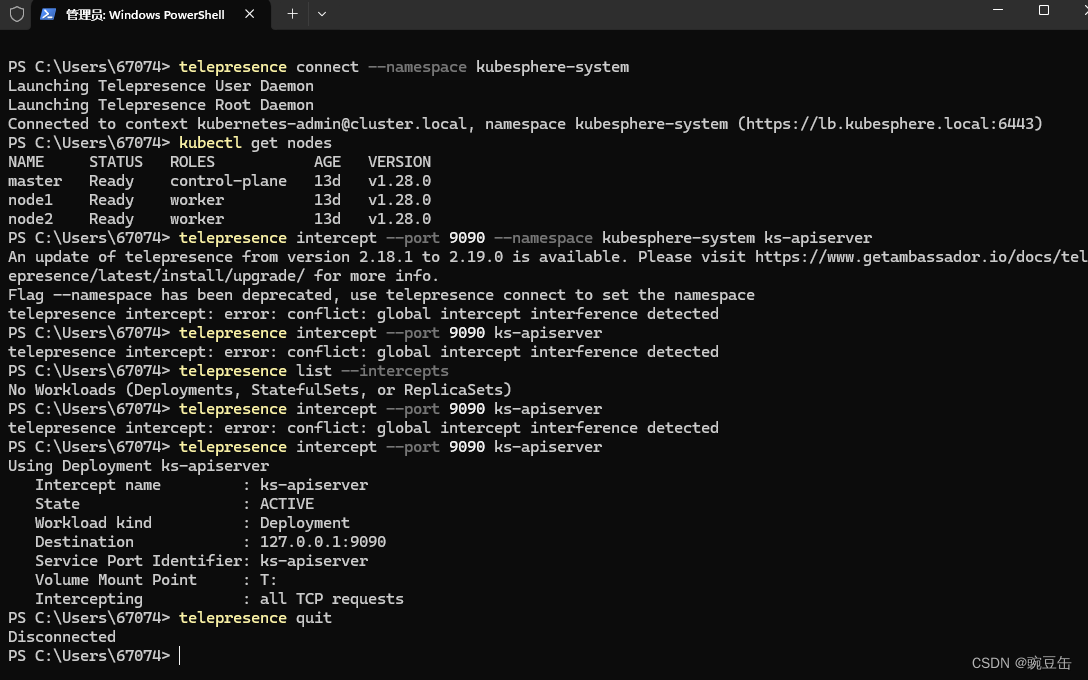
连接成功后,在远程登录kubesphere环境时,如果密码输入错误,后端会有提示incorrect password,如下图所示:
调试教程:参考教程:Kubesphere 后端开发环境搭建_kubesphere怎么开发-CSDN博客


 4124
4124

 被折叠的 条评论
为什么被折叠?
被折叠的 条评论
为什么被折叠?
 到【灌水乐园】发言


