


游戏仍在开发中,还有很多功能未实现(试玩地址:方圆·齐物)
游戏功能模块
通用模块
1、事件的监听与广播
其核心为利用“字典+委托”的方式实现代码的高度解耦,应用场景示例:调用多个游戏对象相同功能的方法(如方法带有参数需要每个游戏对象方法的参数类型和数量都一致),并且方法无返回值。具体实现如下:
public delegate void CallBack();
public delegate void CallBack<T>(T arg);
public delegate void CallBack<T, X>(T arg1, X arg2);
public delegate void CallBack<T, X, Y>(T arg1, X arg2, Y arg3);
......
首先自定义委托,实现不同个数的参数,如果参数数量不需要那么多也可以直接使用内置的“Action”委托类型,其效果完全一致,只是内置的“Action”的参数数量有限制,自定义的话可以任意多个参数。
public enum EventType
{
      UpdateUserInfo,
      UpdatePropInfo,
      UpdateTitleInfo,
      ......
}
然后定义实际需要用到的事件类型,用作字典中的“键”,这些枚举类型表示了具有相同功能的方法。
public class EventCenter
{
    private static Dictionary<EventType, Delegate> m_EventTable = new Dictionary<EventType, Delegate>();

    private static void OnListenerAdding(EventType eventType, Delegate callBack)
    {
        if (!m_EventTable.ContainsKey(eventType))
        {
            m_EventTable.Add(eventType, null);
        }
        Delegate d = m_EventTable[eventType];
        if (d != null && d.GetType() != callBack.GetType())
        {
            throw new Exception(string.Format("尝试为事件{0}添加不同类型的委托,当前事件所对应的委托是{1},要添加的委托类型为{2}", eventType, d.GetType(), callBack.GetType()));
        }
    }
    private static void OnListenerRemoving(EventType eventType, Delegate callBack)
    {
        if (m_EventTable.ContainsKey(eventType))
        {
            Delegate d = m_EventTable[eventType];
            if (d == null)
            {
                throw new Exception(string.Format("移除监听错误:事件{0}没有对应的委托", eventType));
            }
            else if (d.GetType() != callBack.GetType())
            {
                throw new Exception(string.Format("移除监听错误:尝试为事件{0}移除不同类型的委托,当前委托类型为{1},要移除的委托类型为{2}", eventType, d.GetType(), callBack.GetType()));
            }
        }
        else
        {
            throw new Exception(string.Format("移除监听错误:没有事件码{0}", eventType));
        }
    }
    private static void OnListenerRemoved(EventType eventType)
    {
        if (m_EventTable[eventType] == null)
        {
            m_EventTable.Remove(eventType);
        }
    }
    //no parameters
    public static void AddListener(EventType eventType, CallBack callBack)
    {
        OnListenerAdding(eventType, callBack);
        m_EventTable[eventType] = (CallBack)m_EventTable[eventType] + callBack;
    }
    //Single parameters
    public static void AddListener<T>(EventType eventType, CallBack<T> callBack)
    {
        OnListenerAdding(eventType, callBack);
        m_EventTable[eventType] = (CallBack<T>)m_EventTable[eventType] + callBack;
    }
    //后面多个参数的做法相同......
    //no parameters
    public static void RemoveListener(EventType eventType, CallBack callBack)
    {
        OnListenerRemoving(eventType, callBack);
        m_EventTable[eventType] = (CallBack)m_EventTable[eventType] - callBack;
        OnListenerRemoved(eventType);
    }
    //single parameters
    public static void RemoveListener<T>(EventType eventType, CallBack<T> callBack)
    {
        OnListenerRemoving(eventType, callBack);
        m_EventTable[eventType] = (CallBack<T>)m_EventTable[eventType] - callBack;
        OnListenerRemoved(eventType);
    }
    //后面多个参数的做法相同......
    //no parameters
    public static void Broadcast(EventType eventType)
    {
        Delegate d;
        if (m_EventTable.TryGetValue(eventType, out d))
        {
            CallBack callBack = d as CallBack;
            if (callBack != null)
            {
                callBack();
            }
            else
            {
                throw new Exception(string.Format("广播事件错误:事件{0}对应委托具有不同的类型", eventType));
            }
        }
    }
    //single parameters
    public static void Broadcast<T>(EventType eventType, T arg)
    {
        Delegate d;
        if (m_EventTable.TryGetValue(eventType, out d))
        {
            CallBack<T> callBack = d as CallBack<T>;
            if (callBack != null)
            {
                callBack(arg);
            }
            else
            {
                throw new Exception(string.Format("广播事件错误:事件{0}对应委托具有不同的类型", eventType));
            }
        }
    }
    //后面多个参数的做法相同......
}
最后实现事件的监听、移除和广播,这里作几点说明:
·由于使用字典存储委托,而不同类型的委托参数不一致,故这里是用委托类型的基类“Delegate”作为字典的值,实际操作的时候需要转换为某个具体的委托类型(如上面已经定义过的CallBack、CallBack<T>等)。
·添加/移除委托事件的时候需要检查委托类型是否一致。
2、行为树
详细介绍参照链接: AI 行为树的工作原理.这里不过多赘述(主要还是因为都差不多没啥特别的),下面附上代码实现:
using System;
using System.Collections.Generic;

namespace MyBehaviorTree
{
    //状态枚举类型
    public enum BTNodeResult
    {
        Failure,
        Success,
        Running,
    }
    public enum BTNodeType
    {
        Condition,
        Action,
        Selector,
        Sequence,
        Parallel,
        Decorator,
    }
    //一些初始化的静态方法
    public class BT
    {
        public static ConditionNode ConditionNode(Func<bool> conditionFunc)
        {
            return new ConditionNode(conditionFunc);
        }
        public static ActionNode ActionNode(Action immediateAction)
        {
            return new ActionNode(immediateAction);
        }
        public static ActionNode ActionNode(Func<IEnumerator<BTNodeResult>> continuousAction)
        {
            return new ActionNode(continuousAction);
        }
        public static SelectorNode SelectorNode()
        {
            return new SelectorNode();
        }
        public static SequenceNode SequenceNode()
        {
            return new SequenceNode();
        }
        public static ParallelNode ParallelNode()
        {
            return new ParallelNode();
        }
        public static InverseDecoratorNode InverseDecoratorNode(BaseNode childeNode)
        {
            return new InverseDecoratorNode(childeNode);
        }
    }
    /// <summary>
    /// 所有节点的基类
    /// </summary>
    public abstract class BaseNode
    {
        public BTNodeType nodeType;//节点类型
        public int nodeIndex; //在父节点的子节点列表里的索引号
        public BaseNode(BTNodeType nodeType)
        {
            this.nodeType = nodeType;
        }
        public abstract BTNodeResult Execute(); //执行方法
    }
    /// <summary>
    /// 组合节点类
    /// </summary>
    public abstract class CombinerNode : BaseNode
    {
        protected List<BaseNode> childNodeList = new List<BaseNode>();
        public CombinerNode(BTNodeType nodeType) : base(nodeType) { }
        public CombinerNode AddNode(params BaseNode[] nodes)
        {
            int startIndex = childNodeList.Count;
            for (int i = 0; i < nodes.Length; i++)
            {
                nodes[i].nodeIndex = startIndex + i;
                childNodeList.Add(nodes[i]);
            }
            return this;
        }
    }
    /// <summary>
    /// 条件节点
    /// </summary>
    public class ConditionNode : BaseNode
    {
        Func<bool> conditionFunc;
        public ConditionNode(Func<bool> conditionFunc) : base(BTNodeType.Condition) {
            this.conditionFunc = conditionFunc;
        }
        public override BTNodeResult Execute()
        {
            return conditionFunc() ? BTNodeResult.Success : BTNodeResult.Failure;
        }
    }
    /// <summary>
    /// 行为节点
    /// </summary>
    public class ActionNode : BaseNode
    {
        Action immediateAction; //瞬时行为
        Func<IEnumerator<BTNodeResult>> continuousAction;//持续行为
        IEnumerator<BTNodeResult> coroutine;

        public ActionNode(Action immediateAction) : base(BTNodeType.Action) {
            this.immediateAction = immediateAction;
        }
        public ActionNode(Func<IEnumerator<BTNodeResult>> continuousAction) : base(BTNodeType.Action)
        {
            this.continuousAction = continuousAction;
        }
        public override BTNodeResult Execute()
        {
            if (immediateAction != null)
            {
                immediateAction();
                return BTNodeResult.Success;
            }
            if (coroutine == null)
            {
                coroutine = continuousAction();
                return BTNodeResult.Running;
            }
            coroutine.MoveNext();
            BTNodeResult result = coroutine.Current;
            if(result != BTNodeResult.Running)
            {
                coroutine = null;
            }
            return result;
        }
    }
    /// <summary>
    /// 选择节点
    /// </summary>
    public class SelectorNode : CombinerNode
    {
        private BaseNode lastRunningNode;
        public SelectorNode() : base(BTNodeType.Selector) { }
        public override BTNodeResult Execute()
        {
            int index = 0;
            if (lastRunningNode != null)
            {
                index = lastRunningNode.nodeIndex;
            }
            lastRunningNode = null;
            BTNodeResult resultType = BTNodeResult.Failure;
            for (int i = index; i < childNodeList.Count; i++)
            {
                BaseNode tempNode = childNodeList[i];
                resultType = tempNode.Execute();
                if (resultType == BTNodeResult.Failure)
                {
                    continue;
                }
                if (resultType == BTNodeResult.Success)
                {
                    break;
                }
                if (resultType == BTNodeResult.Running)
                {
                    lastRunningNode = tempNode;
                    break;
                }
            }
            return resultType;
        }
    }
    /// <summary>
    /// 顺序节点
    /// </summary>
    public class SequenceNode : CombinerNode
    {
        private BaseNode lastRunningNode;
        public SequenceNode() : base(BTNodeType.Sequence) { }
        public override BTNodeResult Execute()
        {
            int index = 0;
            if (lastRunningNode != null)
            {
                index = lastRunningNode.nodeIndex;
            }
            lastRunningNode = null;
            BTNodeResult resultType = BTNodeResult.Failure;
            for (int i = index; i < childNodeList.Count; i++)
            {
                BaseNode tempNode = childNodeList[i];
                resultType = tempNode.Execute();

                if (resultType == BTNodeResult.Failure)
                {
                    break;
                }
                if (resultType == BTNodeResult.Success)
                {
                    continue;
                }
                if (resultType == BTNodeResult.Running)
                {
                    lastRunningNode = tempNode;
                    break;
                }
            }
            return resultType;
        }
    }
    /// <summary>
    /// 并行节点
    /// </summary>
    public class ParallelNode : CombinerNode
    {
        public ParallelNode() : base(BTNodeType.Parallel) { }
        public override BTNodeResult Execute()
        {
            int successCount = 0;
            int runningCount = 0;
            for (int i = 0; i < childNodeList.Count; i++)
            {
                BaseNode tempNode = childNodeList[i];
                BTNodeResult tempResult = tempNode.Execute();
                if(tempResult == BTNodeResult.Success)
                {
                    successCount++;
                }else if (tempResult == BTNodeResult.Running)
                {
                    runningCount++;
                }
            }
            if (runningCount > 0)
            {
                return BTNodeResult.Running;
            }else if (successCount > 0)
            {
                return BTNodeResult.Success;
            }
            else
            {
                return BTNodeResult.Failure;
            }
        }
    }
    /// <summary>
    /// 修饰节点(取反)
    /// </summary>
    public class InverseDecoratorNode : BaseNode
    {
        private BaseNode childNode;
        public InverseDecoratorNode(BaseNode childNode) : base(BTNodeType.Decorator) {
            this.childNode = childNode;
        }
        public override BTNodeResult Execute()
        {
            BTNodeResult tempResult = childNode.Execute();
            if(tempResult == BTNodeResult.Failure)
            {
                return BTNodeResult.Success;
            }
            else
            {
                return BTNodeResult.Failure;
            }
        }
    }
}
3、自定义的工具类
说明见注释:
using System;
using System.Collections.Generic;
using UnityEngine;

public class Utils
{
    /// <summary>
    /// 在XOZ平面上旋转一个Vector3
    /// </summary>
    public static Vector3 RotateVector3(Vector3 v3, float angle)
    {
        angle = -angle;
        float x = v3.x * Mathf.Cos(Mathf.Deg2Rad * angle) - v3.z * Mathf.Sin(Mathf.Deg2Rad * angle);
        float z = v3.x * Mathf.Sin(Mathf.Deg2Rad * angle) + v3.z * Mathf.Cos(Mathf.Deg2Rad * angle);
        return new Vector3(x, 0, z);
    }
    /// <summary>
    /// 计算两个向量之间的夹角,带符号,n为旋转轴
    /// </summary>
    public static float AngleSigned(Vector3 v1, Vector3 v2, Vector3 n)
    {
        return Mathf.Atan2(
            Vector3.Dot(n, Vector3.Cross(v1, v2)),
            Vector3.Dot(v1, v2)) * Mathf.Rad2Deg;
    }
    /// <summary>
    /// 计算给定的时期(不超过现在的时间)到现在过去了多久
    /// </summary>
    public static string CalDateDeltaFromNow(DateTime dateTime)
    {
        TimeSpan timeSpan = DateTime.Now - dateTime;
        if(timeSpan.Days == 0)
        {
            return "今天";
        }
        else if(timeSpan.Days < 7)
        {
            return timeSpan.Days + "天前";
        }
        else if (timeSpan.Days < 30)
        {
            return timeSpan.Days / 7 + "周前";
        }
        else if (timeSpan.Days < 365)
        {
            return timeSpan.Days / 30 + "月前";
        }
        else
        {
            return timeSpan.Days / 365 + "年前";
        }
    }
    /// <summary>
    /// 合并相同类型的道具
    /// </summary>
    public static List<Prop> MergePropList(List<Prop> propList)
    {
        if(propList.Count <= 1)
        {
            return propList;
        }
        Dictionary<int, int> keyValuePairs = new Dictionary<int, int>();
        foreach(Prop ownedPropData in propList)
        {
            if (keyValuePairs.ContainsKey(ownedPropData.id))
            {
                keyValuePairs[ownedPropData.id] += ownedPropData.num;
            }
            else
            {
                keyValuePairs.Add(ownedPropData.id, ownedPropData.num);
            }
        }
        List<Prop> mergedPropList = new List<Prop>();
        foreach(KeyValuePair<int,int> keyValuePair in keyValuePairs)
        {
            mergedPropList.Add(new Prop(keyValuePair.Key, keyValuePair.Value));
        }
        return mergedPropList;
    }
    /// <summary>
    /// 计算当前等级还需要多少经验才能升级
    /// </summary>
    public static float CalNeededExp(int lv)
    {
        return 50.0f + lv * 50.0f;
    }
}
数据配置
除了用户数据以外的所有游戏数据都通过Json文件配置,Json文件的解析使用JSONObject插件,Asset Store里可免费下载,具体操作详见插件内说明(这个其实稍微用用就会了)。
资源加载
所有需要热更的资源都使用Addressables提供的方法加载,这些资源包括了图片、预制件、音频、配置文件(Json)、场景、模型等。(注:Addressables是对AssetBundle的封装,后面介绍热更的时候会详细说明)由于Addressables已经弃用了同步加载的方式故以后都需要通过异步的方式加载资源,这里可以选择使用回调或者异步/等待的方式(这里我选择了后面一个,因为用起来更方便点),下面是异步/等待方法的示例:
private async void LoadAsset(){
  //这里T表示资源的类型,AssetName里对应Addressables里存的资源的名称(即地址)
  T	asset = await Addressables.LoadAssetAsync<T>("AssetName").Task;
}
注意:一旦使用了异步/等待的操作需要十分小心代码的执行顺序。
用户数据操作
所有对用户数据的操作(读写)都封装在DataBase类里,对外提供相应操作的静态方法(因为不需要实例他),外部不直接访问用户数据对象(UserData)。此外用户数据使用序列化存储,反序列化读取。同时DataBase类还负责游戏数据的初始化工作和提供读取Json文件数据的方法。
场景异步加载
将需要跳转的场景名称先存在一个静态变量里,然后同步跳转到“场景加载中”的场景(这个场景里包含的东西很少,所以直接同步跳转速度也很快),在这个场景里异步加载真正需要跳转的场景(即之前在静态变量里存的场景名称)。这里如果要做一个加载的进度条的话需要注意获得到的加载进度最大只能到0.9,并且加载的进度只能导出程序后才能真正获取到,编辑器下运行会从0直接跳到0.9。
UI界面数据的显示与更新
这块是基于开头讲到的事件的监听与广播做的,下面举其中一个例子(其他地方都大同小异):
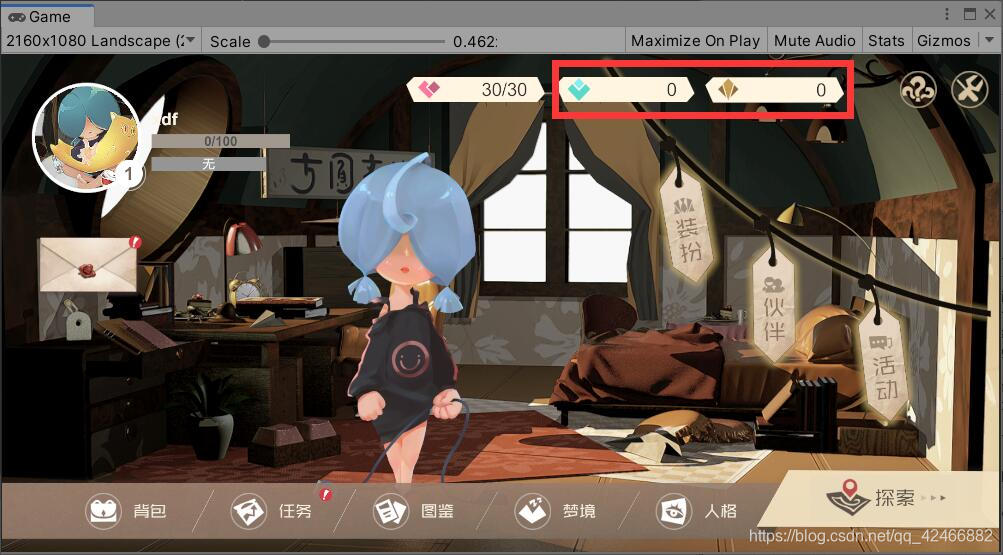
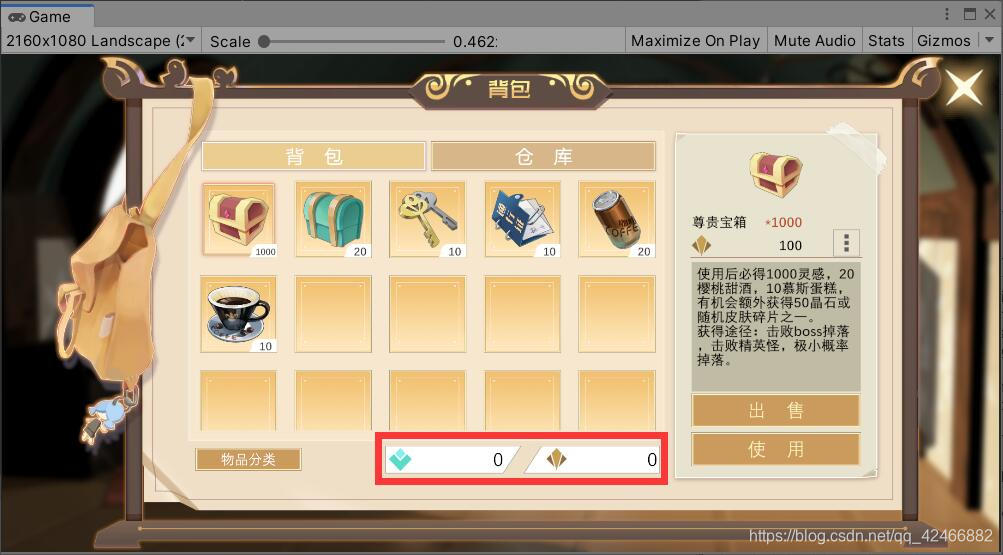
上面两张图里分别是在主界面中和背包中用户金币和钻石数量的显示,他们的数据来源都相同,但控制显示的方法位于两个不同的脚本中,这时候利用事件的监听和广播就能很好的解耦。首先在主界面显示用户数据的脚本中定义一个更新数据显示的方法:
	public async void UpdateUserData()
    {
        ......
        //钻石数量的显示
        crystal.text = DataBase.GetCrystalNum().ToString();
        //金币数量的显示
        gold.text = DataBase.GetGoldNum().ToString();
		......
    }
然后将这个方法添加到事件监听中去(当然还得加上移除的代码,因为事件的监听和广播是全局的):
	//这里定义了一个事件码(EvenType)UpdateUserInfo,用于统一更新用户的数据信息
    private void Start()
    {
        EventCenter.AddListener(Wzb.EventType.UpdateUserInfo, UpdateUserData);
        UpdateUserData();
    }
    private void OnDestroy()
    {
        EventCenter.RemoveListener(Wzb.EventType.UpdateUserInfo, UpdateUserData);
    }
背包里显示的代码和上面类似,最后当需要更新用户数据的显示时只需调用以下代码即可:
EventCenter.Broadcast(Wzb.EventType.UpdateUserInfo);
其他类似的情况都可以这么处理,这样既保证了单一原则又做到了高度解耦。
道具系统
首先需要定义道具的数据结构,我们的道具目前一共分为4类,类别0表示恢复药剂,类别1表示功能道具,类别2表示材料,类别3表示人格碎片(即角色碎片),每条属性的作用基本看下名字就知道了,所以不再赘述,以下为每类的数据结构(金币和钻石作为特殊的道具也一并放入其中,只不过没有类别,并且id为负数;xxxFileName表示相应资源的文件名(地址)):
·特殊的道具(目前只有金币和钻石)
| id | name | iconFileName | flatIconFileName(扁平化的小图标) | description |
|---|---|---|---|---|
| -2 | “钻石” | “钻石” | “interface_ico_jingshi” | “用于抽卡” |
·恢复药剂
| id | class | name | iconFileName | flatIconFileName(扁平化的小图标) | description | price(出售的价格) | hpRecovery | coolTime | buffs(后面会涉及到buff的数据结构) |
|---|---|---|---|---|---|---|---|---|---|
| 0 | 0 | “慕斯蛋糕” | “慕斯蛋糕” | “慕斯蛋糕” | “回复100生命值。\n获得途径:开宝箱、每日任务、回血树桩小概率刷新。” | 100 | 100 | 3 | [{“id”: 1}] |
·功能道具
| id | class | name | iconFileName | flatIconFileName(扁平化的小图标) | description | price(出售的价格) | fixedContents(固定获得的物品) | randomContents(随机获得的物品) |
|---|---|---|---|---|---|---|---|---|
| 3 | 1 | “初级宝箱” | “初级宝箱” | “初级宝箱” | “使用后必得50灵感,1~3樱桃甜酒,1慕斯蛋糕,有较小概率获得5晶石。获得途径:击败小怪有几率掉落、击败精英怪大概率掉落。” | 100 | “props”:[{“id”:0,“num”:1},{“id”:-1,“num”:50}] | “props”:[{“id”:1,“num”:5,“range”:{“min”:1, “max”:3} },{“id”:-2,“num”:5,“probability”:0.05}]} |
·材料
| id | class | name | iconFileName | flatIconFileName(扁平化的小图标) | description | price(出售的价格) |
|---|---|---|---|---|---|---|
| 4 | 2 | “万能钥匙” | “万能钥匙” | “万能钥匙” | “开启上锁的宝箱。\n获得途径:NPC任务获得、每日可在商人喵一见出购买。” | 100 |
·人格碎片
| id | personalityId(后面会涉及到人格(角色)的数据结构) | class | name | iconFileName | flatIconFileName(扁平化的小图标) | description | price(出售的价格) |
|---|---|---|---|---|---|---|---|
| 5 | 0 | 3 | “Player1的碎片” | “人格碎片0” | “人格碎片0” | “50个碎片获得对应角色,后续可以用来角色升星。\n获得途径:抽奖、精英怪boss掉落、NPC任务。” | 1 |
然后我们就能愉快的使用道具了(并不是),为了减少数据的冗余,用户数据里道具这部分只需存储相应的id和num就行了,具体要用到某个道具时通过DataBase读取详细的道具信息。
//因为要用序列化保存用户数据所以自定义的类要添加可序列化的标记,其他类似的类同理
[Serializable]
public class Prop
{
	//这里其实可以用属性封装一下但感觉也没啥用就懒得改了
    public int id;
    public int num;

    public Prop(int id,int num)
    {
        this.id = id;
        this.num = num;
    }
}
背包系统
我们的背包长这个样子:
主要功能为物体分类显示、道具使用、丢弃、出售和放入仓库/背包(最后这个设定是因为背包有容量上限,目前设定是如果超出背包的容量上限则把超出部分的道具转发到系统邮件里,此时玩家需要清理一下背包空出位置才能将邮件里的道具取出来),下面详细介绍一下具体的功能实现:
首先是背包里道具的读取,这个目前的设定是按照格子的排列顺序依次按索引读取,道具信息的更新同样采用【UI界面数据的显示与更新】中的方法(后面涉及到类似的功能时就不再赘述了),每个格子对应的脚本都存有当前的道具信息,该脚本内容如下:
using UnityEngine;
using UnityEngine.UI;
using UnityEngine.AddressableAssets;

public class PropInBag : MonoBehaviour
{
    public Prop ownedPropData;
    public Image icon;
    public Text num;
    public static PropPos propPos;
    public static PropPos toPos;

    private void Start()
    {
        EventCenter.AddListener(Wzb.EventType.UpdatePropInfo, UpdateInfo);
        UpdateInfo();
    }
    private void OnDestroy()
    {
        EventCenter.RemoveListener(Wzb.EventType.UpdatePropInfo, UpdateInfo);
    }
    public async void UpdateInfo()
    {
        if(ItemClassification.instance == null)
        {
        	//在所有拥有的道具中依次按索引取出
            ownedPropData = DataBase.GetOwnedPropByIndex(transform.GetSiblingIndex(), propPos);
        }
        else
        {
        	//在筛选了的道具中依次按索引取出
            ownedPropData = DataBase.GetOwnedPropByIndex(transform.GetSiblingIndex(),
                            ItemClassification.instance.classTags, propPos);
        }

        if (ownedPropData != null)
        {
        	//这里是因为显示num的文本还有个背景,下同
            num.transform.parent.gameObject.SetActive(true);
            num.text = ownedPropData.num.ToString();

            icon.gameObject.SetActive(true);
            icon.sprite = await Addressables.LoadAssetAsync<Sprite>
            (DataBase.GetPropInfoById(ownedPropData.id)["iconFileName"].str).Task;
        }
        else
        {
            icon.gameObject.SetActive(false);
            icon.sprite = null;
            //没有道具信息时需要把num的背景给隐藏了
            num.transform.parent.gameObject.SetActive(false);
            num.text = "";
        }
    }
}
道具信息的变量为引用类型,保证了不同地方访问到的都是相同的数据,其他的说明见注释(代码也很简单)。
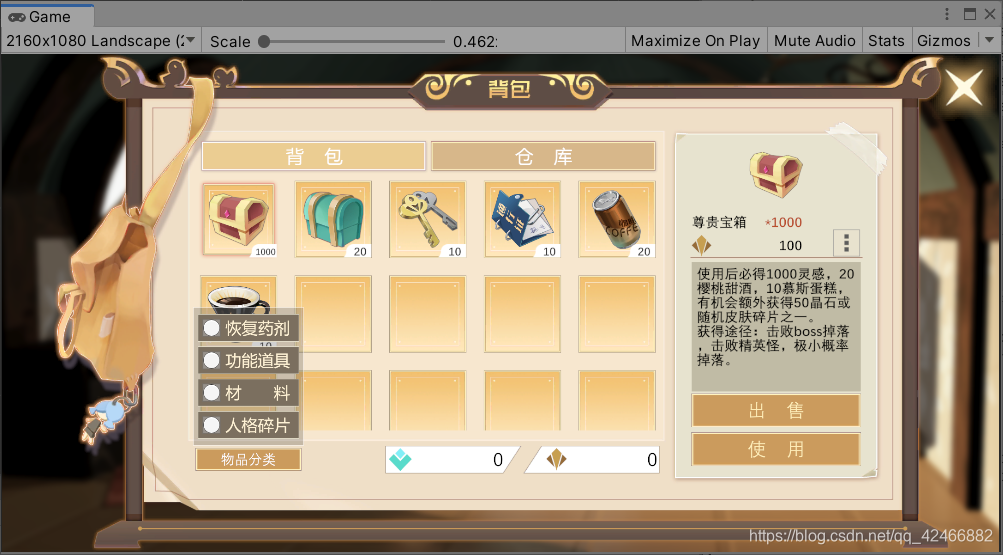
分类显示使用的是Toggle ,也都是些基本的用法,代码如下:
using System.Collections.Generic;
using UnityEngine;
using UnityEngine.UI;

public class ItemClassification : MonoBehaviour
{
    public static ItemClassification instance;
    public List<Toggle> toggles;
    public List<int> classTags;

    private void Awake()
    {
        instance = this;
        classTags = new List<int>();
        for (int i = 0; i < toggles.Count; i++)
        {
            if (toggles[i].isOn)
            {
                classTags.Add(i);
            }
        }
    }
    public void UpdateItems(Toggle toggle)
    {
        int classTag = toggles.IndexOf(toggle);
        if(classTag >= 0)
        {
            if (toggle.isOn)
            {
                classTags.Add(classTag);
            }
            else
            {
                classTags.Remove(classTag);
            }
        }
        EventCenter.Broadcast(Wzb.EventType.UpdatePropInfo);
    }
}
每次触发勾选事件时会广播道具信息更新的事件用来更新道具的显示。
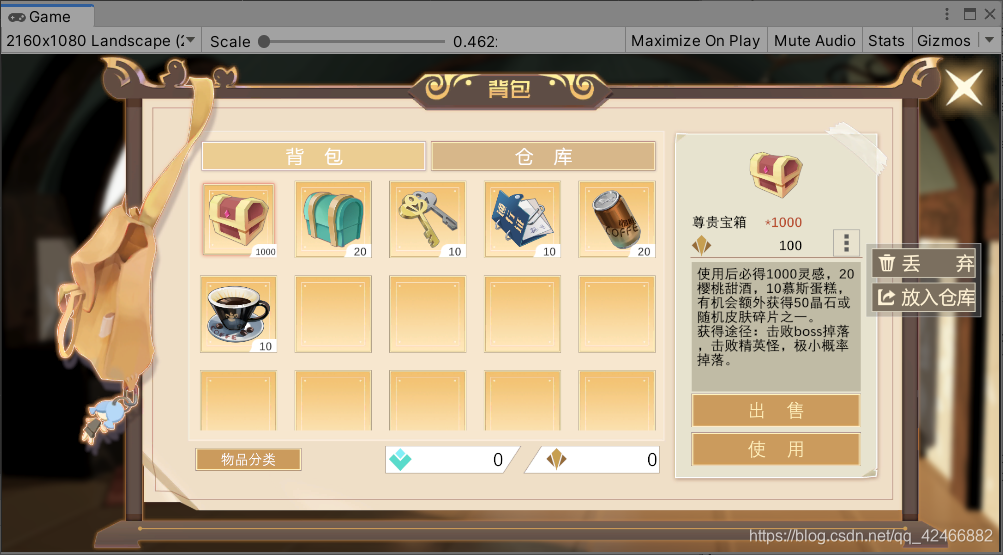
使用、丢弃、出售和放入仓库/背包的具体逻辑也比较简单就不详细介绍了。然后由于前面那些操作需要显示数量确认的界面(如下图所示),
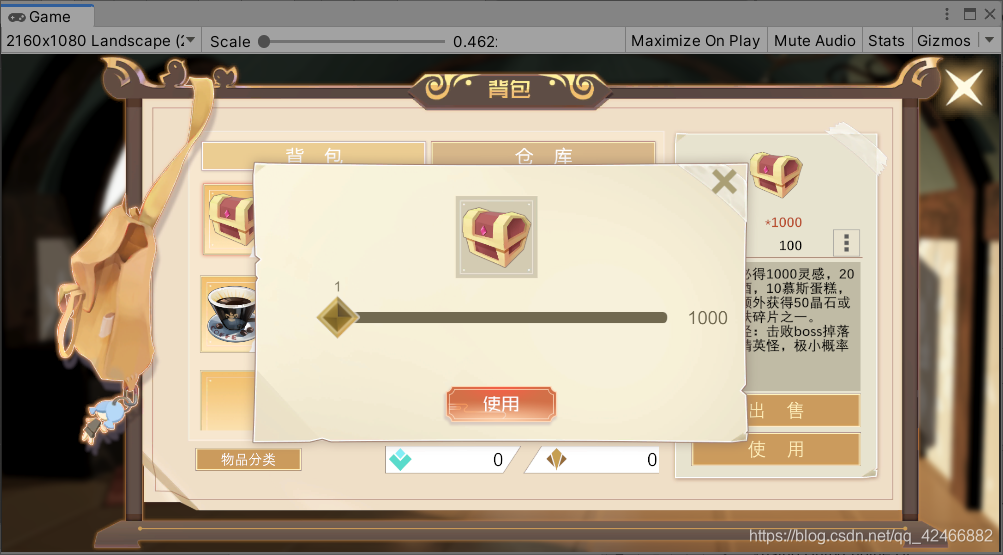
确认数量的代码如下:
using System;
using UnityEngine;
using UnityEngine.AddressableAssets;
using UnityEngine.UI;

//执行的操作类型
public enum CBType
{
    出售,
    使用,
    丢弃,
    确认,
}
public class PropConfirmation : MonoBehaviour
{
    public Text ok;
    public Text tip;
    public Text maxNum;
    public Slider slider;
    public Text currentNum;
    public Image propIcon;
    private CBType cbType;
    private Action<int> callback;
    private JSONObject propInfo;
    // Start is called before the first frame update
    public async void Open(CBType cbType, int num,JSONObject propInfo, Action<int> callback)
    {
        this.cbType = cbType;
        //确认后执行的方法使用Action委托封装,使得代码更加灵活
        this.callback = callback;
        this.propInfo = propInfo;
        switch (cbType)
        {
        	//出售的话还需要额外显示当前总的售价
            case CBType.出售:
                {
                    tip.text = "总价:" + propInfo["price"].n;
                    break;
                }
            default:
                {
                    tip.text = "";
                    break;
                }
        }
        ok.text = cbType.ToString();
        //这里由于确认界面的UI和背包的UI处于同一个Canvas下,而这两个的适配方式不一样(确认界面的UI比较特殊),所以需要单独适配
        float rate = 0.5f * Screen.width / Screen.height;
        Vector2 newSize = GetComponent<RectTransform>().sizeDelta;
        if (rate > 1.0f)
        {
            newSize.x *= rate;
        }
        else
        {
            newSize.y /= rate;
        }
        GetComponent<RectTransform>().sizeDelta = newSize;
        maxNum.text = num.ToString();
        slider.maxValue = num;
        slider.value = 0;
        gameObject.SetActive(true);

        propIcon.sprite = await Addressables.LoadAssetAsync<Sprite>
        (propInfo["iconFileName"].str).Task;
    }
    public void Cancel()
    {
        SetCallback(0);
    }
    public void Confirm()
    {
        SetCallback((int)slider.value);
    }
    private void SetCallback(int num)
    {
        callback(num);
        gameObject.SetActive(false);
    }
    public void UpdateCurrentSliderNum()
    {
        currentNum.text = slider.value.ToString();
        switch (cbType)
        {
            case CBType.出售:
                {
                    float totalPrice = slider.value * propInfo["price"].n;
                    tip.text = "总价:" + totalPrice;
                    break;
                }
        }
    }
}
一些重点已在注释里说明,这里关键点在于使用Action委托增加代码的灵活性(因为刚刚那些操作所需要的参数都相同所以才能用Action)。
最后由于是手游所以没有加移动道具位置的功能(明日方舟的仓库里的道具也是固定好位置的),感觉加了用处也不大,现在是按照道具获取的先后顺序依次排列的。
任务系统
1、任务的数据结构
同样我们需要先定义任务的数据结构,目前我们的任务一共分为4大类,分别是每日任务、主线任务、成就任务、支线任务,下面为任务类的通用代码(一些要点详见注释):
using System;
using System.Collections.Generic;
using UnityEngine;
using UnityEngine.AddressableAssets;

namespace Wzb
{
	//定义了任务当前的状态:未接受、执行中、已达成任务目标、完成任务
    public enum TaskState
    {
        Inactive,
        InProcess,
        Completed,
        Final,
    }
    //任务类型,即上面所说的4大类,每类对应的int值为0、1、2、3
    public enum TaskType
    {
        DailyTask,
        MainStoryTask,
        AchievementTask,
        SideTask,
    }
    //定义了一些任务的需求类型,如收集xx个xx道具、和xx对话、击杀xx个xx怪物等
    public enum RequirementType
    {
        PropNum,
        NPCDialogue,
        MonsterKill,
        DailyTask,
        MainStoryTask,
        AchievementTask,
        Exp,
        Lv,
        PersonalityNum,
        ActiveSideTaskNum,
        SurvivalTimeInMap,
        ShopInTrolley,
        EnterMap,
        OpenTreasureBoxInMap,
    }
    //任务需求类,除了包含任务需求外还有一些额外的属性
    [Serializable]
    public class TaskRequirement
    {
        public int flag;//flag=-1表示使用多少某某物品,flag=1表示获得多少某某物品(包括杀怪数、完成任务数),flag=0表示拥有某种东西
        public bool isConsume;//完成任务后是否消耗所需物品(收集道具类型的需求用)
        public int requirementId;//需要的东西的id
        public bool isIgnoreId;//是否忽略id(比如有个任务是击杀xx个小怪,那么不同id的小怪都满足条件)
        public string description;//需求的描述
        public RequirementType type;//需求的类型
        public int requiredNum;//需求的数量
        public int currentNum;//当前已达成的数量

		//用来判断是否已达成需求的目标
        public bool Check()
        {
            return currentNum >= requiredNum;
        }
    }
    //任务的奖励,包括经验、称号、活跃度和道具
    [Serializable]
    public class TaskReward
    {
        public int exp;
        public int titleId;
        public int activityValue;
        public List<Prop> props;
    }
    //任务类,对上面所有数据的整合
    [Serializable]
    public class Task
    {
        public int id;
        public string title; //任务的标题
        public TaskType type;
        public TaskState state;
        public int activeTaskId; //有些任务完成后会自动接受其他的任务
        public string description;
        public TaskReward taskRewards;
        public bool isIncludeDialogue; //这个是针对主线任务而言的,有些主线任务没有对话
        public bool isAutoComplete; //是否当达成任务目标后自动完成
        public TaskType activeTaskType;
        public List<TaskRequirement> taskRequirements;

		//更新任务状态
        public void Update(string type,int id,int num)
        {
            foreach (TaskRequirement requirement in taskRequirements)
            {
                if (requirement.type.ToString() == type && (requirement.requirementId == id || requirement.isIgnoreId))
                {
                    switch (requirement.flag)
                    {
                        case -1:
                            {
                                requirement.currentNum -= num < 0 ? num : 0;
                                break;
                            }
                        case 0:
                            {
                                SyncTaskRequirement(requirement);
                                break;
                            }
                        case 1:
                            {
                                requirement.currentNum += num > 0 ? num : 0;
                                break;
                            }
                    }
                }
            }
            Check();
        }
        //同步当前已完成的数量,只适用于诸如拥有xxx类型的任务需求
        public void SyncTaskRequirement(TaskRequirement requirement)
        {
            switch (requirement.type)
            {
                case RequirementType.PropNum:
                    {
                        requirement.currentNum = DataBase.GetPropNumById(requirement.requirementId);
                        break;
                    }
                case RequirementType.Exp:
                    {
                        requirement.currentNum = (int)DataBase.GetUserExp();
                        break;
                    }
                case RequirementType.Lv:
                    {
                        requirement.currentNum = DataBase.GetLevel();
                        break;
                    }
                case RequirementType.PersonalityNum:
                    {
                        requirement.currentNum = DataBase.GetUnlockedPersonalityNum();
                        break;
                    }
                case RequirementType.SurvivalTimeInMap:
                    {
                        requirement.currentNum = PlayerStateManager.currentLiveTime;
                        break;
                    }
            }
        }
        //检查任务状态
        public void Check()
        {
            if (state == TaskState.InProcess || state == TaskState.Completed) {
                bool completed = true;
                foreach (TaskRequirement requirement in taskRequirements)
                {
                    completed = completed && requirement.Check();
                }
                if (completed && state == TaskState.InProcess)
                {
                    state = TaskState.Completed;
                    MessageCenter.AddMessage(new Message(MessageStyle.ColorFade, string.Format("任务:{0} 已完成!", title)));
                    if (isAutoComplete)
                    {
                        DataBase.CompleteTask(this);
                    }
                }
                else if (!completed && state == TaskState.Completed)
                {
                    state = TaskState.InProcess;
                }
            }
        }
        //完成任务
        public async void Complete()
        {
            state = TaskState.Final;
            if (taskRewards.exp > 0)
            {
                DataBase.AddExp(taskRewards.exp);
            }
            if(taskRewards.titleId >= 0)
            {
                DataBase.AddTitleById(taskRewards.titleId);
            }
            if (taskRewards.activityValue > 0)
            {
                DataBase.AddActivityValue(taskRewards.activityValue);
            }
            foreach (Prop prop in taskRewards.props)
            {
                DataBase.AddPropById(prop.id, prop.num);
                JSONObject propInfo = DataBase.GetPropInfoById(prop.id);
                Sprite propIcon = await Addressables.LoadAssetAsync<Sprite>(propInfo["iconFileName"].str).Task;
                //任务完成的消息提示,这个后面会提到
                MessageCenter.AddMessage(new Message(MessageStyle.ColorFade,string.Format("获得{0}*{1}", propInfo["name"].str, prop.num), propIcon));
            }
            if (activeTaskId >= 0)
            {
                DataBase.ActiveTask(activeTaskType, activeTaskId);
            }
            foreach(TaskRequirement taskRequirement in taskRequirements)
            {
                if (taskRequirement.isConsume && taskRequirement.type == RequirementType.PropNum)
                {
                    DataBase.ConsumePropById(-2, taskRequirement.requirementId, taskRequirement.requiredNum);
                }
            }
        }
    }
}
此外,玩家所有的任务的初始化和更新统一由“任务中心类”(TaskCenter)执行,代码如下:
using System.Collections.Generic;

namespace Wzb
{
    public class TaskCenter
    {
        private static List<List<Task>> tasks;

        public static void Init()
        {
            tasks = DataBase.GetTaskList();
            foreach (List<Task> taskList in tasks)
            {
                foreach (Task task in taskList)
                {
                    if (task.state == TaskState.InProcess)
                    {
                        InitTask(task);
                    }
                }
            }
        }
        public static void InitTask(Task task)
        {
            foreach (TaskRequirement requirement in task.taskRequirements)
            {
                if (requirement.flag == 0)
                {
                    task.SyncTaskRequirement(requirement);
                    task.Check();
                }
            }
        }
        public static void UpdateTaskState(string type, int id, int num)
        {
            foreach (List<Task> taskList in tasks)
            {
                foreach (Task task in taskList)
                {
                    if (task.state == TaskState.InProcess || task.state == TaskState.Completed)
                    {
                        task.Update(type, id, num);
                    }
                }
            }
            //更新任务视图
            EventCenter.Broadcast(EventType.UpdateTaskView);
            //更新有可完成的任务的提示
            EventCenter.Broadcast(EventType.UpdateNewContentTip,
            DataBase.IsExistUnclaimedTask(), NewContentType.Task);
        }
    }
}
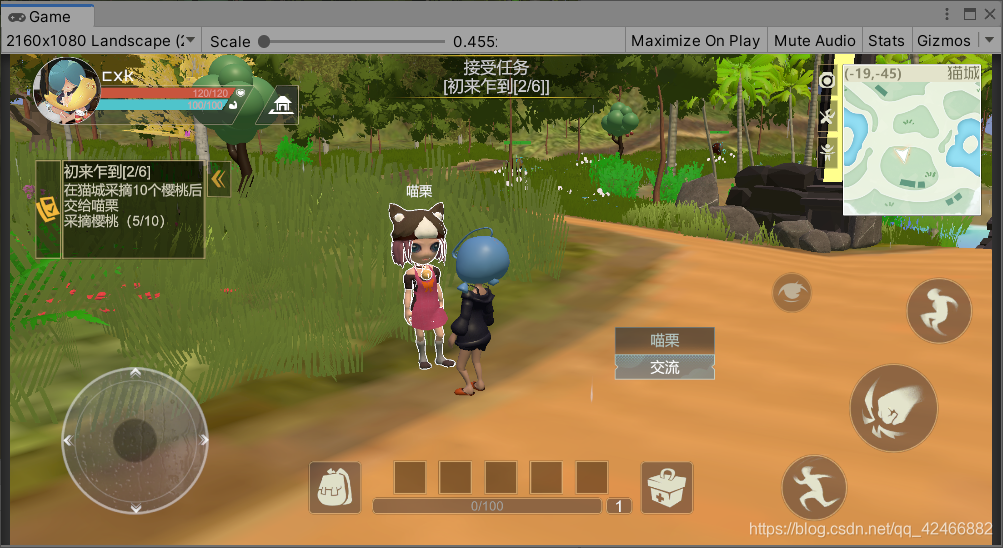
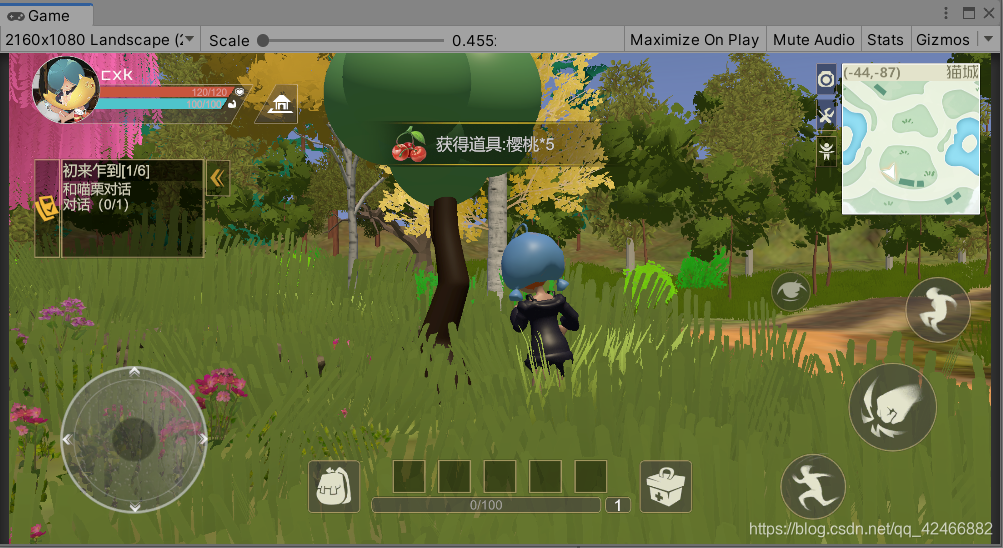
2、NPC的任务流程设计
因为主线任务里有部分任务是有对话的,并且也是通过对话接受的,每个NPC都是整个主线任务系列的一部分,所以我们需要设计好每个NPC每个阶段的对话和任务,对话内容配置文件的名称与其任务id和状态相关,NPC的数据结构如下:
| id | name | handbookIconFileName(图鉴里显示的图标文件名) | illustrations(对话中用到的一些立绘) | dialogueList |
|---|---|---|---|---|
| 0 | “喵栗” | “NPC_喵栗_图鉴” | [{“fileName”: “NPC_喵栗_正常状态”},{“fileName”: “NPC_喵栗_叙述任务状态”}] | [{“taskType”: 1,“taskId”: 1}, {“taskType”: 1,“taskId”: 2},{“taskType”: 1, “taskId”: 3,“isTransfer”: true, “requiredTask”: { “type”: 1,“id”: 2, “stateFlag”: 3}}] |
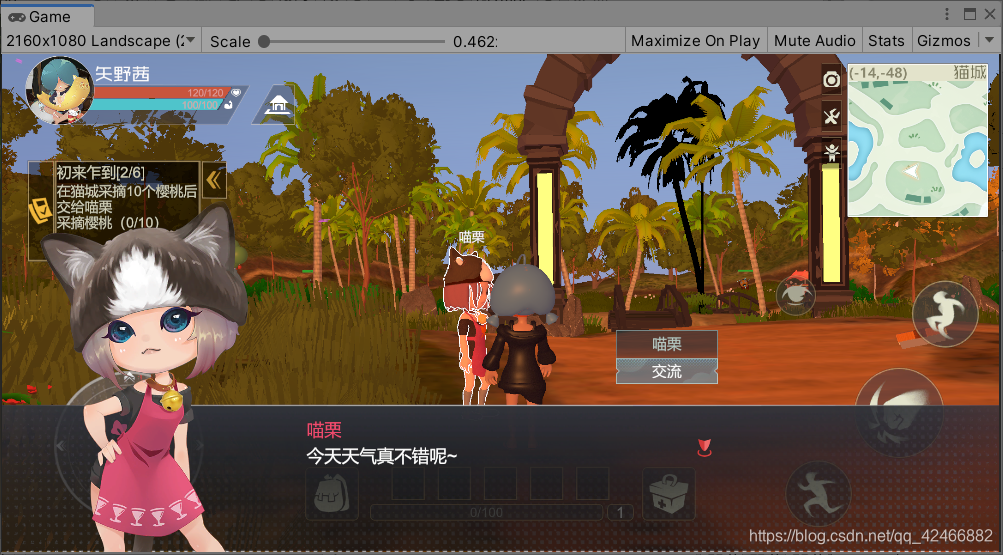
其中对“对话列表”(dialogueList)一栏作一些说明:“isTransfer”字段表示完成任务的对话由其他NPC执行(包含对话的主线任务的完成需要和相应的NPC进行对话),“requiredTask”字段表示当前的任务对话需要完成前置任务才能进行。另一方面NPC的任务对话只存在于任务未接受(0)和已达成任务目标(2)这两个状态中,故NPC对话内容的配置文件路径格式为:Dialogue/[NPC的id]/dialogue_[主线任务的id]_[主线任务的状态(int)],当NPC无任务对话内容时则使用日常的对话内容,文件路径格式为:Dialogue/[NPC的id]/dialogue_normal。最终效果如下图所示:
·完成任务
·接受任务
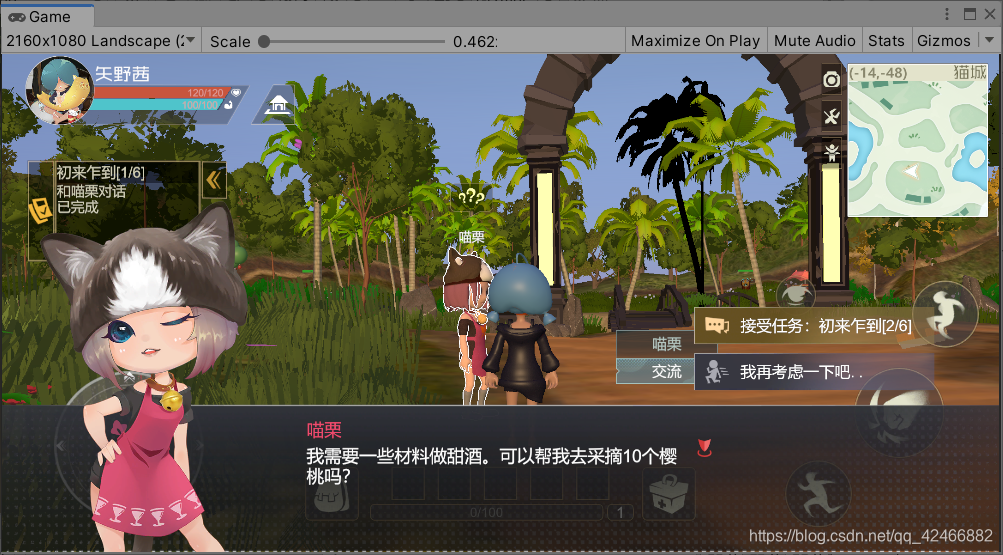
·无任务
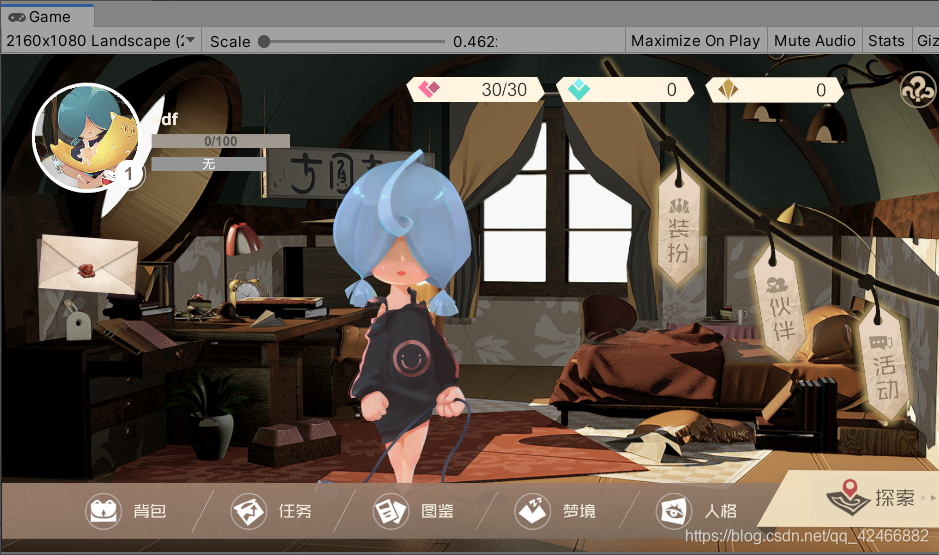
邮件系统
由于业务需求在邮件类之上又加了一个“信件类”,作为“邮件类”的父类,其实他们的区别只在于“邮件类”多了三个属性:是否已读、是否已领取、附件(道具),具体结构如下:
using System.Collections.Generic;
using System;

public enum MailType
{
    MainStory,
    System,
}

[Serializable]
public class Mail : Letter
{
    public bool isRead;
    public bool isReceived;
    public List<Prop> attachments;

    public Mail()
    {
        dateTime = DateTime.Now;
    }
    public Mail(string title,string text, string signature, params Prop[] attachments)
    {
        this.text = text;
        this.title = title;
        this.signature = signature;
        this.attachments = attachments == null ? new List<Prop>() : new List<Prop>(attachments);
        isReceived = this.attachments.Count == 0;
        isRead = false;
    }
}
[Serializable]
public class Letter
{
    public string title;
    public string text;
    public string signature;
    public DateTime dateTime;

    public Letter()
    {
        dateTime = DateTime.Now;
    }
    public Letter(string title, string text,string signature)
    {
        this.title = title;
        this.text = text;
        this.signature = signature;
        dateTime = DateTime.Now;
    }
    public Mail ToMail()
    {
        Mail mail = new Mail(title, text, signature);
        mail.isRead = true;
        mail.isReceived = true;
        return mail;
    }
}
其中,信件是作为游戏主线进程中的一部分,用于提示主线剧情,在主界面可以看到,当有新的主线剧情时左边的信封会来回晃动,此时点击后看到的就是主线剧情的提示:
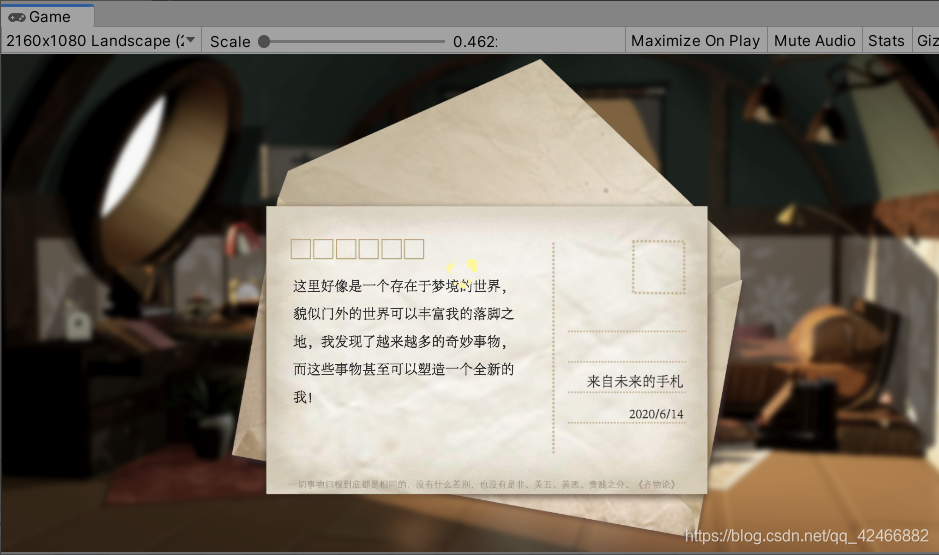
当阅读完后再次点击左边的信封进入的就是邮件界面了:

邮件的添加也是基于事件的监听和广播,然后界面交互和显示的代码也比较简单就不详细介绍了。由于邮件(信件)也属于用户数据的一部分,所以对这些的操作(阅读、领取、删除、添加等)也是通过DataBase类提供的方法完成的。
消息提示
类似以下的效果,目前分为两种:
·滑动型(消息从最上端移入,经过一定的时间后移出屏幕)
·渐变型(消息固定在某个位置渐变显现,经过一定的时间后渐变消失)
消息类如下:
public enum MessageStyle
    {
        Slide, //滑动型
        ColorFade, //渐变型
    }
    public class Message
    {
        public MessageStyle messageStyle; //消息的显示风格
        public string description; //消息内容
        public Sprite img; //显示的图片
        public float duration; //滑动/渐变等效果持续的时间
        public float delay; //显示停留的时间
        public bool isShowImg; //是否有图片需要显示


        public Message(MessageStyle messageStyle, string description, Sprite img, float duration = 0.5f, float delay = 1.0f)
        {
            this.messageStyle = messageStyle;
            this.description = description;
            this.duration = duration;
            this.delay = delay;
            this.img = img;
            isShowImg = true;
        }
        public Message(MessageStyle messageStyle, string description, float duration = 0.8f, float delay = 1.6f)
        {
            this.messageStyle = messageStyle;
            this.description = description;
            this.duration = duration;
            this.delay = delay;
            isShowImg = false;
        }
    }
各个属性的作用还是比较清楚的就不详细介绍了。
消息的显示控制统一由“消息中心类”完成,对外只需要将定义好的消息对象使用“消息中心类”提供的添加消息方法添加进去即可,对于添加的消息“消息中心类”会检查是否有一模一样的消息内容,如有则不会继续添加。“消息中心类”显示消息的顺序类似队列的结构,即最先被添加的消息最先被显示。
输入系统
为了适配不同平台的操作这里对Unity自带的InputSystem进行了二次封装,代码如下:
using System;
using UnityEngine;

public enum ButtonType
{
    Jump,
    Dash,
    Attack,
}
public enum Direction
{
    Horizontal,
    Vertical
}
public class InputManager
{
    public static float GetAxisRaw(Direction direction)
    {
        switch (Application.platform)
        {
            case RuntimePlatform.Android:
            case RuntimePlatform.IPhonePlayer:
                {
                    return MoveController.GetAxis(Mathf.Clamp((int)direction, 0, 1));
                }
            case RuntimePlatform.WindowsEditor:
            case RuntimePlatform.WindowsPlayer:
                {
                    return Input.GetAxisRaw(direction.ToString());
                }
            default:
                {
                    return 0;
                }
        }
    }
    public static float GetAxis(Direction direction)
    {
        switch (Application.platform)
        {
            case RuntimePlatform.Android:
            case RuntimePlatform.IPhonePlayer:
                {
                    return MoveController.GetAxis(Mathf.Clamp((int)direction, 0, 1));
                }
            case RuntimePlatform.WindowsEditor:
            case RuntimePlatform.WindowsPlayer:
                {
                    return Input.GetAxis(direction.ToString());
                }
            default:
                {
                    return 0;
                }
        }
    }
    public static bool GetButton(ButtonType buttonType)
    {
        switch (Application.platform)
        {
            case RuntimePlatform.Android:
            case RuntimePlatform.IPhonePlayer:
                {
                    return ButtonController.GetClick(buttonType);
                }
            case RuntimePlatform.WindowsEditor:
            case RuntimePlatform.WindowsPlayer:
                {
                    return Input.GetButton(buttonType.ToString());
                }
            default:
                {
                    return false;
                }
        }
    }
}
MoveController和ButtonController指下面这两处(仅限移动端使用的):

由于只需要一个实例所以通过静态方法访问变量会更方便点,MoveController里的变量是浮点型的,保存了移动的参数;ButtonController里的变量是布尔型的,保存了按钮的参数。主要封装的是移动、攻击、跳跃、闪避操作,之后如果要更换输入方式只需修改InputManager类即可。
角色操作
和输入系统相对应,角色的操作分为移动、攻击(目前只有一个键,之后会扩展)、跳跃、闪避,所有的操作根据角色的动画状态来判断是否能执行,而这些判断由另一个类“PlayerStateManager”来处理,同时角色的属性(包括能否移动、跳跃、攻击等)也由单独的类“PlayerProperty”负责存储管理。上述关系可以用下图表示:

角色的移动跳跃是用Unity自带的CharacterController组件(以下简称CC)实现的,这里有几个地方需要注意一下:
1、CC里移动角色有两个方法:Move和SimpleMove,区别在于前一个移动包括y方向上的速度,后一个则会忽略,由CC自己计算重力的作用(只能计算下落)。由于SimpleMove无法模拟跳跃的效果故只能选择Move方法来控制角色的移动并计算重力。(补充:SimpleMove移动速度的单位是m/s,而Move则是以帧为单位计算的)
2、CC里有一个属性叫isGrounded,用来判断角色是否在地面上,但这个属性会受Move方法中传入的三维向量影响,当传入的三维向量为零向量或者数值不规则变化时(比如你想要在角色落地时将y方向的速度置为0,这时候就是不规则变化了,因为之前都是每帧里y方向的速度加上重力加速度),isGrounded会变为false,即使你实际上已经落到地面上了。由于角色可能会从不同的高度落下,然后落地时y方向的速度就会各不相同,这会导致角色在下一次直接从高处往下落(没有按跳跃键)时初始的速度不一致(当然如果是由于跳跃导致的下落就没这个问题了,因为在跳跃的一瞬间y方向的速度都是一致的,后面计算的结果也都一样),为了解决这个问题只能曲线救国了(毕竟不想再用射线检测了)。具体做法如下:
		//落地、能否跳跃的判断和重力计算
        currentJumpSpeed = playerProperty.GetCurrentJumpSpeed();
        if (!cc.isGrounded)
        {
            currentJumpSpeed -= playerProperty.GetGravity();
        }
        else if (currentJumpSpeed < -2.0f * playerProperty.GetGravity() ||
                 currentJumpSpeed > -1.0f * playerProperty.GetGravity())
        {
            currentJumpSpeed = 0;
        }
当角色落地(即isGrounded为true)并且y方向的速度满足上述条件时就将y方向的速度置为0,这时候同时也会触发角色落地的动画,但由于此时y方向的速度变为0(不规则变化)会导致下一帧里isGrounded又变为false了,不过由于此时已经进入角色落地的动画,而角色的操作又是依据角色动画状态来的,所以实际上并无影响,接着在两帧后(因为isGrounded已经变false了所以会继续计算重力,同时也解释了为什么y方向的速度需要满足上述条件才能将其置为0),CC检测到速度的变化是规则的了,isGrounded又重新变为true,另外角色落地动画的持续时间肯定是大于两帧的所以无需担心会有影响,这样一来就实现了一个稳定的循环。
PS:实际上落地后最终角色y方向上的速度大小其实也不是0而是2*重力加速度大小(以帧为单位计算),不过上述做法已经确保了每次落地后y方向的速度都一致,而且这个速度也比较小对最终效果影响不大(倒不如说有点初速度效果还更好一点,尽管不太符合物理规律)。
相机控制
相机这块是用Cinemachine做的(有关Cinemachine的详细介绍参考这篇博客:Unity Cinemachine插件全功能详解),在此基础上进行一些改动,这里用的是“ FreeLook”类型的相机,对于我们来说主要关心这两个参数:
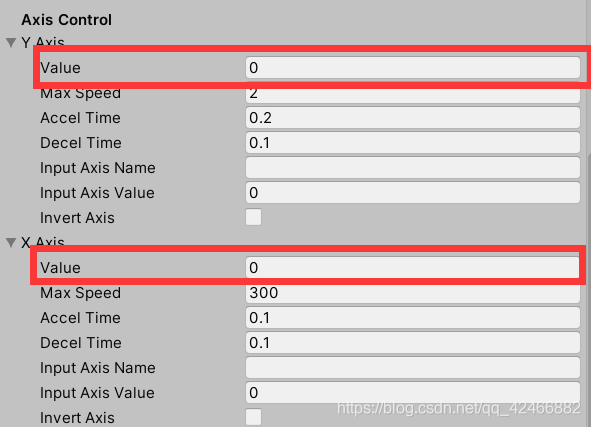
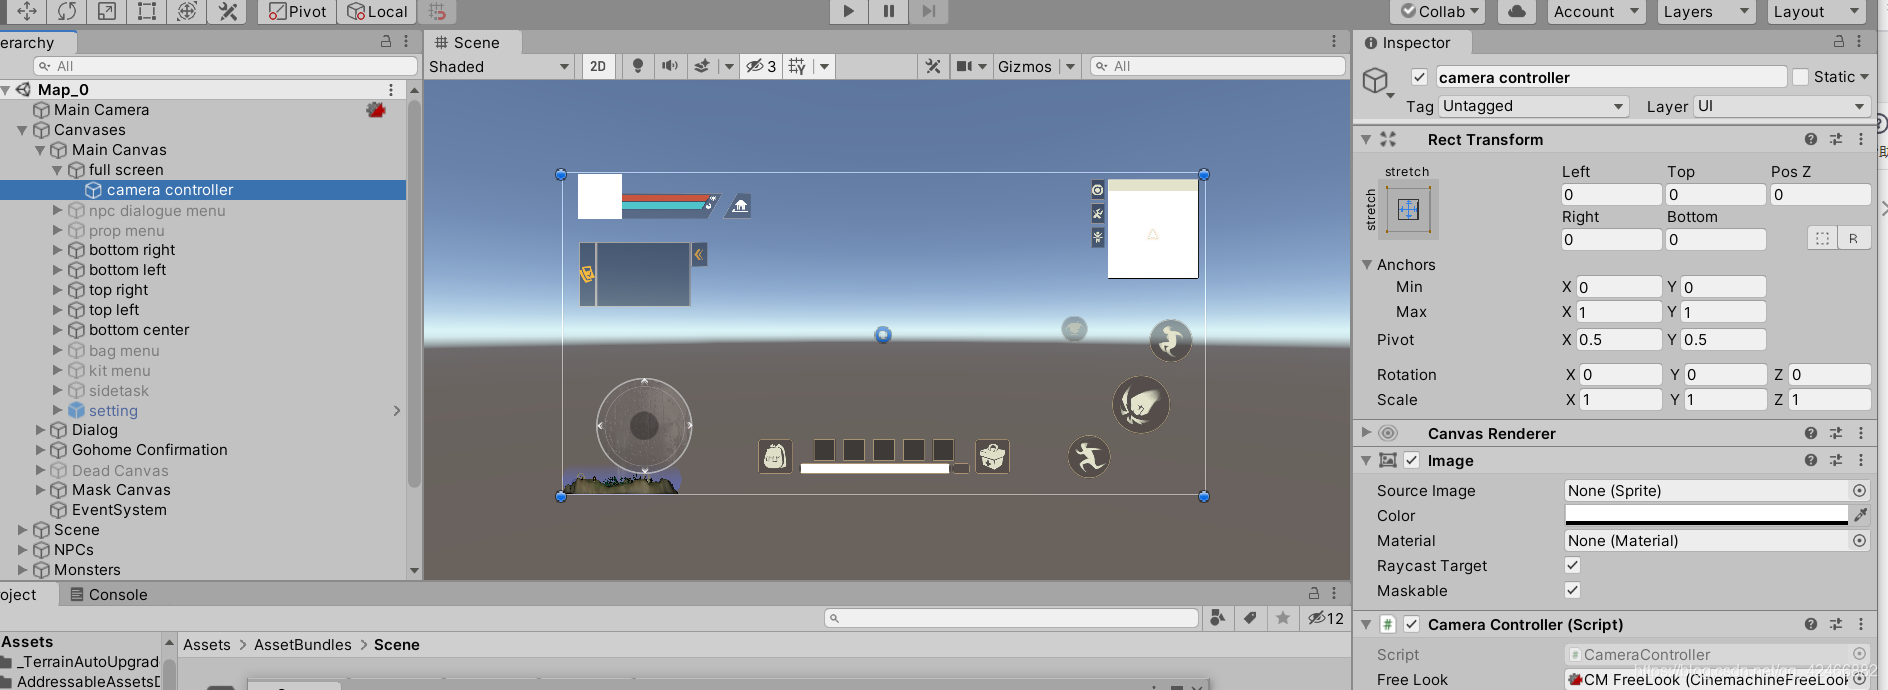
分别在垂直方向和水平方向上控制相机的移动,为了适配移动端,这里我们是通过在屏幕上非UI位置的滑动来控制这两个参数的(参考大部分3D游戏的视角控制),具体做法是在UI的最下层放置一个铺满整个屏幕的全透明的空白图片:
作为触发相机移动的载体,具体由“CameraController”类实现:
using UnityEngine;
using Cinemachine;
using UnityEngine.EventSystems;

public class CameraController : MonoBehaviour, IDragHandler, IPointerDownHandler, IPointerUpHandler
{
    public CinemachineFreeLook freeLook;
    private PointerEventData currentPointer;
    private Vector2 lastPressedPos;
    protected int cameraFlag; //表明自身是何种类型的相机
    public static int operateCameraFlag;//当前谁在操作相机
    protected virtual void Start()
    {
        cameraFlag = 1;
    }
    public void OnDrag(PointerEventData eventData)
    {
        if (operateCameraFlag == cameraFlag && currentPointer == eventData)
        {
            Vector2 delta = eventData.position - lastPressedPos;
            delta.y *= -1.0f;
            float deltaX = 360.0f * (delta.x / Screen.width);
            float deltaY = delta.y / Screen.height;
            freeLook.m_XAxis.Value = (deltaX + freeLook.m_XAxis.Value + 360.0f) % 360.0f;
            freeLook.m_YAxis.Value = Mathf.Clamp(freeLook.m_YAxis.Value + deltaY, 0, 1.0f);
            lastPressedPos = eventData.position;
            OtherDragDeal(eventData);
        }
    }
    public void OnPointerDown(PointerEventData eventData)
    {
        if (operateCameraFlag == 0)
        {
            currentPointer = eventData;
            lastPressedPos = eventData.position;
            operateCameraFlag = cameraFlag;
            OtherPointerDownDeal(eventData);
        }
    }

    public void OnPointerUp(PointerEventData eventData)
    {
        if (operateCameraFlag == cameraFlag && currentPointer == eventData)
        {
            currentPointer = null;
            operateCameraFlag = 0;
            OtherPointerUpDeal(eventData);
        }
    }

    protected virtual void OtherDragDeal(PointerEventData eventData) { }
    protected virtual void OtherPointerDownDeal(PointerEventData eventData) { }
    protected virtual void OtherPointerUpDeal(PointerEventData eventData) { }
}
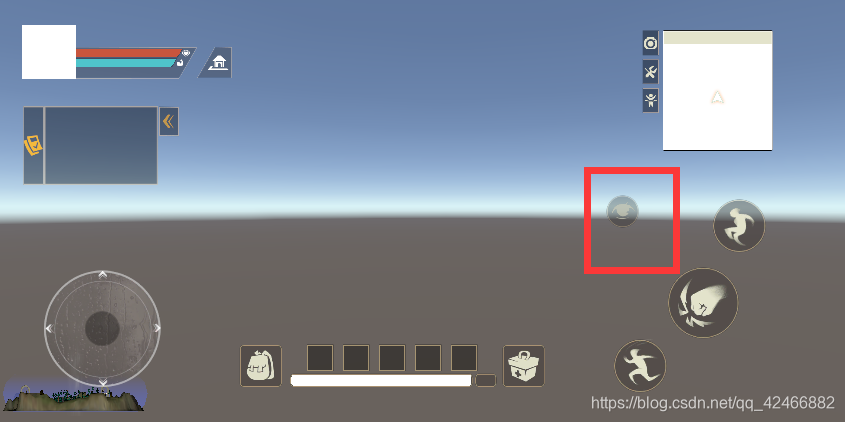
由于业务需求还需要一个功能是环顾角色四周但不改变角色的方向,并在松手后恢复原来的视角,即下面这个按钮:
故“CameraController”类中额外增加了一个整型变量“cameraFlag”用来表示是哪一种情况,同时增加了3个虚函数用于子类功能的扩展,上述这个功能由“LookAround”类实现,该类继承自“CameraController”类:
using UnityEngine;
using UnityEngine.EventSystems;
using UnityEngine.UI;

public class LookAround : CameraController
{
    public RectTransform centerPoint;
    private Image img;
    private float maxDist; //这个和方向键那个类似
    private Vector2 oPos;
    private Vector2 oAxisValue;
    public static Vector3 oCameraAngle;
    protected override void Start()
    {
        cameraFlag = 2;
        maxDist = GetComponent<RectTransform>().rect.width / 2.0f;
        img = GetComponent<Image>();
        oPos = centerPoint.position;
    }
    protected override void OtherDragDeal(PointerEventData eventData)
    {
        centerPoint.position = oPos + Vector2.ClampMagnitude(eventData.position - oPos, maxDist);
    }
    protected override void OtherPointerDownDeal(PointerEventData eventData)
    {
        img.enabled = true;
        centerPoint.GetComponent<Image>().color = Color.white;
        oAxisValue = new Vector2(freeLook.m_XAxis.Value, freeLook.m_YAxis.Value);
        oCameraAngle = Camera.main.transform.eulerAngles;
    }
    protected override void OtherPointerUpDeal(PointerEventData eventData)
    {
        centerPoint.GetComponent<Image>().color = Color.white * 0.8f;
        freeLook.m_XAxis.Value = oAxisValue.x;
        freeLook.m_YAxis.Value = oAxisValue.y;
        centerPoint.position = oPos;
        img.enabled = false;
    }
}
上面两个代码相对也比较简单,不过需要注意一点,由于移动端有多指触控,为了防止多个手指滑动带来的干扰需要验证当前“PointerEventData”类的对象是否是同一个。
Buff系统
同样buff也需要有相应的数据结构(这里我将debuff也归到buff里了,方便统一处理):
| id | name | iconFileName | description | duration | maxStackNum(最大叠加数) | isDebuff | effects |
|---|---|---|---|---|---|---|---|
| 0 | “移动加成” | “status_ico_yisujiacheng” | “提升30%移动速度,持续20秒。(可叠加)” | 20 | 5 | false | [{“classTag”: 1,“value”: 0.3,“description”: “提升移动速度。”}] |
这里作几点说明:
1、有些buff可以叠加有些则不能,具体通过maxStackNum判断(不能叠加的buff这个属性值就是1了)
2、effects里的classTag表示这个buff效果作用于哪个角色属性,目前只设定了两种:0表示HP,1表示移动速度
buff系统的逻辑可以用下图表示:
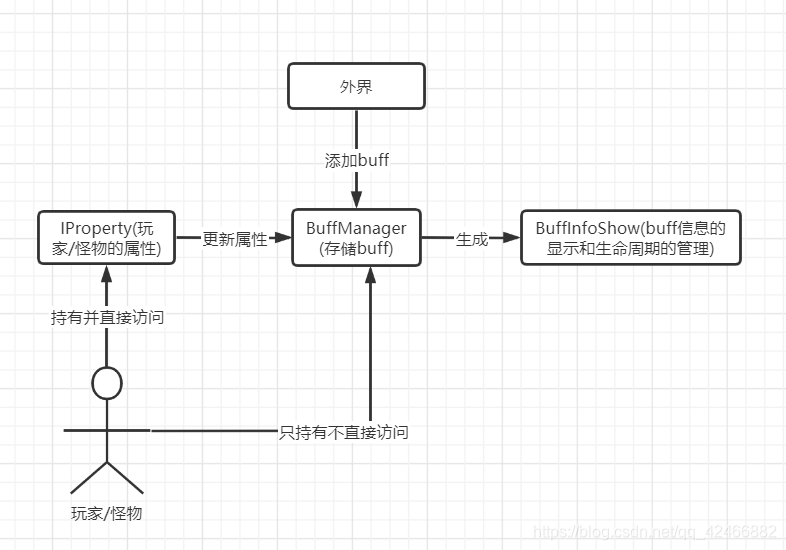
玩家/怪物身上持有“IProperty”和“BuffManager”组件,外界通过“BuffManager”组件向玩家/怪物添加buff,之后“BuffManager”组件生成一个包含“BuffInfoShow”组件的UI对象用于buff信息的显示和buff生命周期的管理。“IProperty”组件(其实这是一个玩家和怪物属性共有的接口)通过访问“BuffManager”组件来获得buff效果,更新当前的属性。
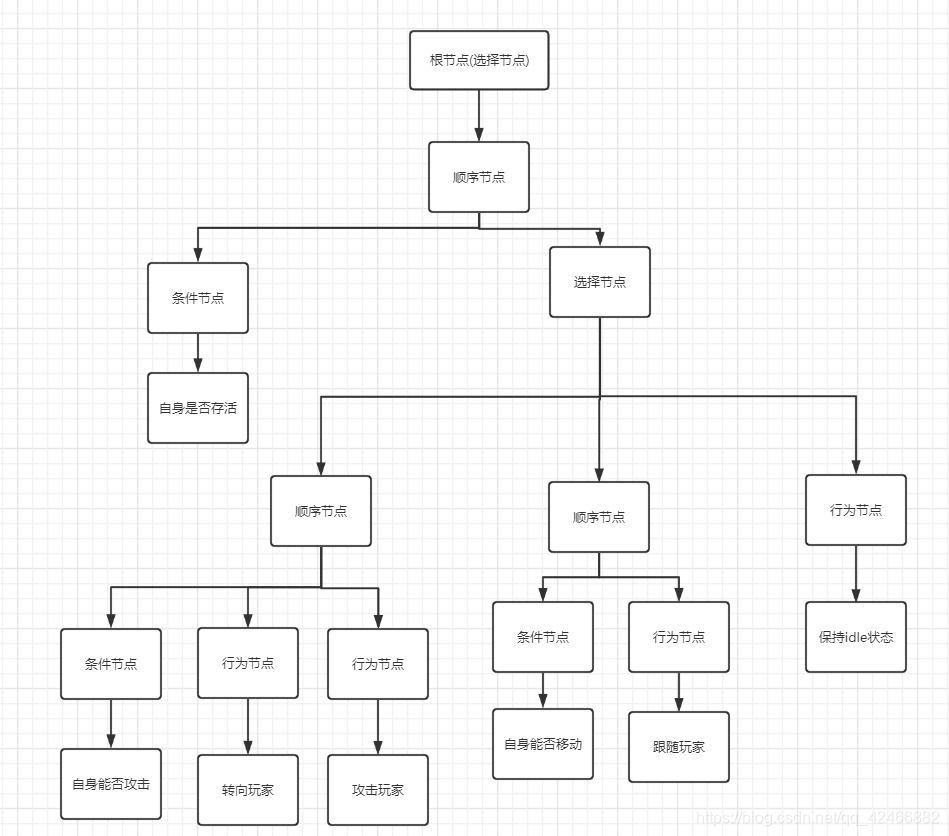
怪物AI
基于行为树设定为以下逻辑:
游戏设置
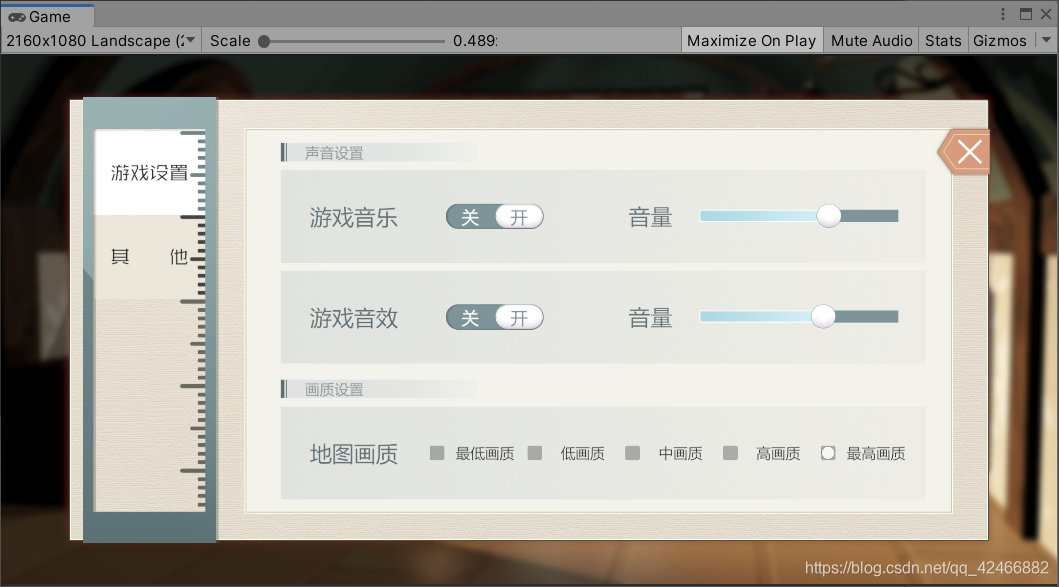
这里的设置主要就是声音和画质方面的(以后可能会加新的设置),游戏设置的数据都用“PlayerPrefs”类提供的方法存储,游戏音乐和游戏音效分别用一个物体统一管理(即做成单例)。
自定义UI交互反馈
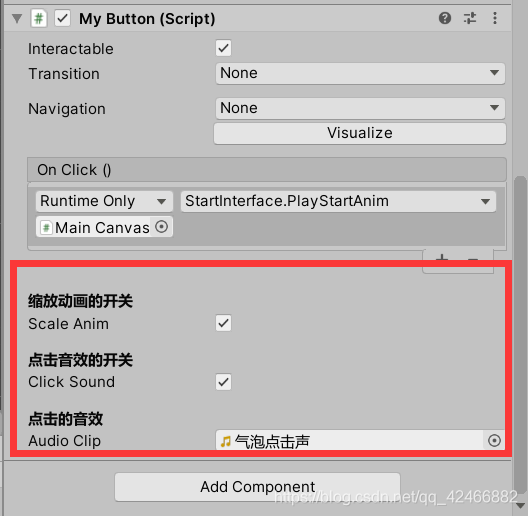
这里我主要是通过继承ugui的组件来扩展交互的,以按钮为例:
using DG.Tweening;
using UnityEngine;
using UnityEngine.EventSystems;
using UnityEngine.UI;

public class MyButton : Button
{
    [Header("缩放动画的开关")]
    public bool scaleAnim = true;
    [Header("点击音效的开关")]
    public bool clickSound = true;
    [Header("点击的音效")]
    public AudioClip audioClip;
    private Tween tween;

    public override void OnPointerDown(PointerEventData eventData)
    {
        base.OnPointerDown(eventData);
        if (interactable)
        {
            if(tween != null)
            {
                tween.Complete();
            }
            if (scaleAnim)
            {
                tween = transform.DOScale(0.92f, 0.1f).OnComplete(() => tween = null);
            }
            if (clickSound && audioClip != null)
            {
                SoundManager.Play(audioClip);
            }
        }
    }
    public override void OnPointerUp(PointerEventData eventData)
    {
        base.OnPointerUp(eventData);
        if(tween != null)
        {
            tween.Complete();
        }
        tween = transform.DOScale(1.0f, 0.1f).OnComplete(() => tween = null);
    }
}
继承自ugui的“Button”类,添加按下抬起时按钮缩放的动画效果和按下时的音效,由于子类新加了一些属性,为了能在Inspector上编辑,需要自己重新定义editor:
using UnityEditor;
using UnityEditor.UI;

//指定我们要自定义编辑器的脚本
[CustomEditor(typeof(MyButton), true)]
//使用了 SerializedObject 和 SerializedProperty 系统,因此,可以自动处理“多对象编辑”,“撤销undo” 和 “预制覆盖prefab override”。
[CanEditMultipleObjects]
public class MyButtonEditor : ButtonEditor
{
    //对应我们在MyButton中创建的字段
    //PS:需要注意一点,使用SerializedProperty 必须在类的字段前加[SerializeField]
    private SerializedProperty scaleAnim;
    private SerializedProperty clickSound;
    private SerializedProperty audioClip;

    protected override void OnEnable()
    {
        base.OnEnable();
        scaleAnim = serializedObject.FindProperty("scaleAnim");
        clickSound = serializedObject.FindProperty("clickSound");
        audioClip = serializedObject.FindProperty("audioClip");
    }
    //并且特别注意,如果用这种序列化方式,需要在 OnInspectorGUI 开头和结尾各加一句 serializedObject.Update();  serializedObject.ApplyModifiedProperties();
    public override void OnInspectorGUI()
    {
        base.OnInspectorGUI();
        serializedObject.Update();
        //显示我们创建的属性
        EditorGUILayout.PropertyField(scaleAnim);
        EditorGUILayout.PropertyField(clickSound);
        EditorGUILayout.PropertyField(audioClip);
        serializedObject.ApplyModifiedProperties();
    }
}
这样Inspector上才能显示我们自己定义的属性:
美术资源的热更
关于Addressables使用的详细介绍可以参考这篇博客:Unity Addressable发布至服务器流程与自动打包代码。当然Addressables只能更新美术资源,代码的热更还是需要lua等方案。


 401
401


 被折叠的 条评论
为什么被折叠?
被折叠的 条评论
为什么被折叠?
 到【灌水乐园】发言


