


1、ssm+maven多模块开发
1.1分模块开发的原因
随着项目的进行,我们可能遇到下面一系列的问题:
(1) 大部分的domain或者一些service以及mapper在多个项目中是通用的
(2) Pom.xml中的依赖越来越长
(3) Build整个项目的时间越来越长,尽管你只是一直在web层工作,但是不得不build整个项目
(4) 某个模块,比如mapper,你只想让一些经验丰富的人来维护,但是现在每个开发者都能修改这个模块,这导致关键模块的代码质量达不到你的要求
(5)一个大项目拆分为多个小项目(maven模块)组成,而且它们是有依赖关系的.
1.3 怎么去分模块开发
写项目写代码 尽量满足下面内容:
(1)开闭原则
对扩展开放
对修改关闭 – 公共的不要乱修改
(2)低耦合: 尽量的分层开发 service mapper controller --为了维护
高内聚: 比如一个方法 (方法就应该完成一个方法该干的事情 save ) --最多40行
2.多模块搭建
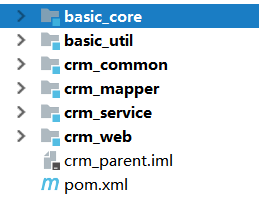
2.1 代码拆分
basic-util 工具类
basic-core 公共内容
crm-common 具体项目公共内容
crm-mapper 项目里面具体mapper
crm-service 项目里面service类
crm-web 项目的controller层
2.2 配置文件拆分
web.xml
applicationContext-mvc.xml -->crm-web模块
applicationContext.xml–crm-service模块
3.restful风格
简单点说就是访问后台时的请求路径与请求的方式有所不同.
传统的请求路径如:http://localhost:8080/user/getUser.do?id=1
Restful风格的请求路径为:http://localhost:8080/user/1
3.1 概念
Restful就是一个资源定位及资源操作的风格。不是标准也不是协议,只是一种风格。基于这个风格设计的软件可以更简洁,更有层次,更易于实现缓存等机制。
使用POST、DELETE、PUT、GET,使用不同方法对资源进行操作。
分别对应 添加、 删除、修改、查询。
3.2 代码实现
@Controller
@RequestMapping("/department")
public class DepartmentController {

    @Autowired
    private IDepartmentService departmentService;

    @RequestMapping(value="/list",method=RequestMethod.PATCH)
    @ResponseBody
    public List<Department> list(){
        return departmentService.queryAll();
    }

    // /department {...} 新增
    @RequestMapping(method = RequestMethod.PUT)
    @ResponseBody
    public AjaxResult add(@RequestBody Department department){
        System.out.println("新增:"+department);
        return new AjaxResult();

    }
    //修改
    @RequestMapping(method = RequestMethod.POST)
    @ResponseBody
    public AjaxResult update(@RequestBody Department department){
        System.out.println("修改:"+department);
        return new AjaxResult();
    }
    //删除
    @RequestMapping(value="/{id}",method = RequestMethod.DELETE)
    @ResponseBody
    public AjaxResult delete(@PathVariable Long id){
        System.out.println("删除数据的id为:"+id);
        return new AjaxResult();
    }

    //查询
    @RequestMapping(value="/{id}",method = RequestMethod.GET)
    @ResponseBody
    public AjaxResult queryOne(@PathVariable Long id){
        System.out.println("查询数据的id为:"+id);
        return new AjaxResult();
    }

}
4.接口规范swagger
package cn.itsource.crm.web.config;

import org.springframework.context.annotation.Bean;
import org.springframework.context.annotation.ComponentScan;
import org.springframework.context.annotation.Configuration;
import org.springframework.web.servlet.config.annotation.EnableWebMvc;
import springfox.documentation.builders.PathSelectors;
import springfox.documentation.builders.RequestHandlerSelectors;
import springfox.documentation.service.ApiInfo;
import springfox.documentation.spi.DocumentationType;
import springfox.documentation.spring.web.plugins.Docket;
import springfox.documentation.swagger2.annotations.EnableSwagger2;

@Configuration //相当于写一个配置文件 application.xml
@EnableWebMvc // 开启springmvc
@EnableSwagger2 //开启swagger2
@ComponentScan(basePackages="cn.itsource.crm.web.controller")
public class SwaggerConfig {
    //相当于 <bean ><property name="">   </bean>
    @Bean
    public Docket api(){
        //生成接口信息
        return new Docket(DocumentationType.SWAGGER_2)
                .apiInfo(this.apiInfo())
                .select()
                .apis(RequestHandlerSelectors.basePackage("cn.itsource.crm.web.controller"))
                .paths(PathSelectors.any())
                .build();
    }

    //api的 注解 javaweb 文档的描述信息
    private ApiInfo apiInfo(){
         @SuppressWarnings("deprecation")
        ApiInfo info=new ApiInfo(
                 "API接口测试文档",
                 "接口测试",
                 "1.0",
                 "http://www.itsource.cn",
                 "itsource",
                 "111",
                 "http://www.itsource.cn");
         return info;
    }
}
4.2导包
2.2、实现
  <springfox.version>2.4.0</springfox.version>
    </properties>

    <dependencies>
        <dependency>
            <groupId>io.springfox</groupId>
            <artifactId>springfox-swagger2</artifactId>
            <version>${springfox.version}</version>
        </dependency>
        <dependency>
            <groupId>io.springfox</groupId>
            <artifactId>springfox-swagger-ui</artifactId>
            <version>${springfox.version}</version>
        </dependency>
!不要忘记扫描包
  <!-- 自动扫描该包,使SpringMVC认为包下用了@controller注解的类是控制器 -->
    <context:component-scan base-package="cn.itsource.crm.web.controller" />
    <!--扫描swagger配置-->
    <context:component-scan base-package="cn.itsource.crm.web.config" />
5、接口测试
我们基于springmvc写的controller对于前端来说就是接口,而且都是通过http协议访问,那后台写完后怎么测试呢?浏览器,只支持get。 要使用一些能够发送http各种请求的工具,其中postman就是很重要的一个。
5.1、什么是postman
就是一个工具,可以来发送各种http请求,可以用它来测试http协议接口.
postman就是httm协议接口测试工具
5.2测试crud

6 前端vue-element-admin
基于 vue-cli 和 elementui 搭建出来一个模块框架, 框架基本功能 ,路由,插件 ,国际化等
6.1 下载模板源代码
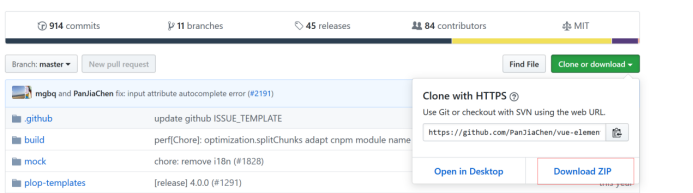
Github地址:
https://github.com/PanJiaChen/vue-element-admin
6.2 解压文件 --启动项目
(1)使用idea 打开
(2)执行命令 npm install 安装依赖
(3)启动 npm run dev
(4) 访问


 314
314


 被折叠的 条评论
为什么被折叠?
被折叠的 条评论
为什么被折叠?
 到【灌水乐园】发言


