


1 小电视目前的功能有:
- 显示当地今天和明天的天气、温度
- 显示年月日星期及时间
- 循环播放128*128像素的照片
- 通过网页切换连接不同的wifi
- 通过网页上传功能3中的照片
小电视网络相册主要通过ESP32模组+TFT显示屏+分光棱镜+SD卡模块+三轴加速度计陀螺仪实现以上功能。其中ESP32模组用于数据处理,TFT+分光棱镜用于立体显示图像,SD卡模块用于存储要显示的图片,三轴加速度计陀螺仪用于实现主要功能的切换。
主要参考了稚晖君的HoloCubic、DID迪的透明小电视教程以及哔哩哔哩@退役熬夜选手的WIFI天气+相册,代码在各位大佬的基础上进行了修改并增加新功能,感谢各位大佬的资料。
本文将分为硬件部分和软件部分来介绍此网络小电视。
2 硬件部分
本项目所包含的硬件有:Goouuu-ESP32模块开发板、分光棱镜 25.4mm实验教学仪器半透半反1:1、高清OLED液晶屏 st7735 1.44寸、基于SPI的SD卡读写模块、闪迪SD卡、MPU-6050模块 三轴加速度陀螺仪、带帽大按键轻触开关模块以及连接杜邦导线,这里由于我没有3D打印装置,因此我在淘宝上买了一种类似乐高的玩具积木打造了一个外壳,会3D打印的朋友可以通过3D打印来打造外壳。
下面上某宝链接
分光棱镜https://item.taobao.com/item.htm?spm=a1z09.2.0.0.61692e8dh4MbaE&id=583924549232&_u=jvq1ceff198
ESP32模块开发板
https://item.taobao.com/item.htm?spm=a1z09.2.0.0.61692e8dh4MbaE&id=547082402418&_u=jvq1cef91de
开关模块
https://item.taobao.com/item.htm?spm=a1z09.2.0.0.61692e8dh4MbaE&id=651180760420&_u=jvq1cef0353
OLED显示屏
https://detail.tmall.com/item.htm?id=618484375951&spm=a1z09.2.0.0.61692e8dh4MbaE&_u=jvq1cefdd7f
SD卡模块
https://item.taobao.com/item.htm?spm=a1z09.2.0.0.61692e8dh4MbaE&id=580583745767&_u=jvq1cef076f
三轴陀螺仪
https://item.taobao.com/item.htm?spm=a1z09.2.0.0.61692e8dh4MbaE&id=16630417522&_u=jvq1cef37b8
其他物品某宝都有卖的,大家可以随便买。
2.1 电子硬件连接介绍
连接关系如下图所示:
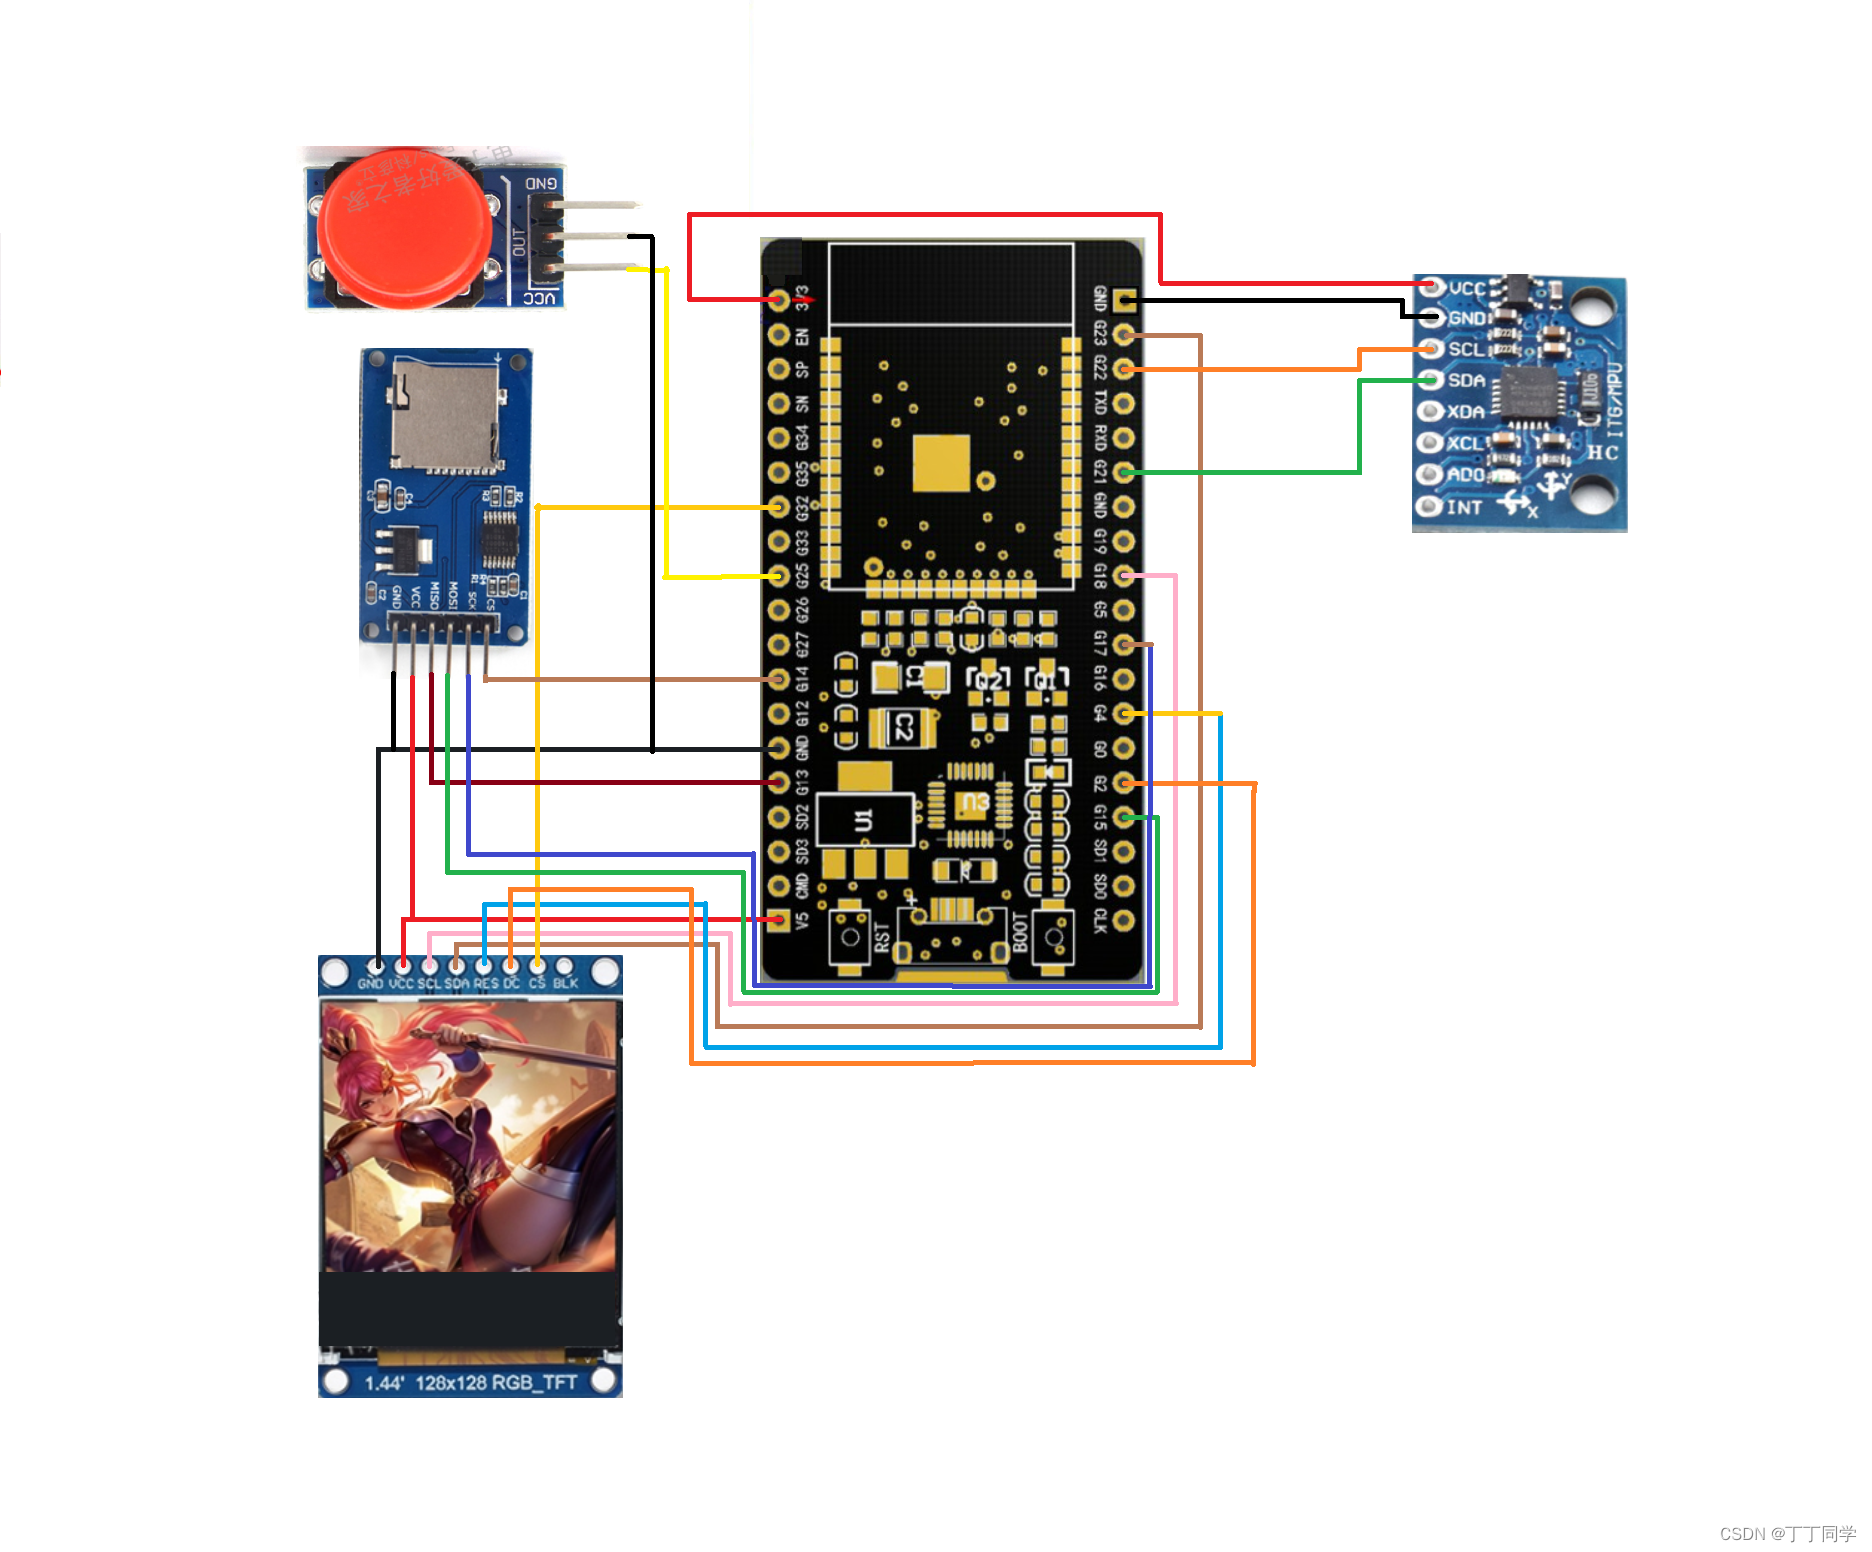
这里的连接方式和软件以及芯片驱动程序强相关的,如果大家想要更改管脚,需要更改芯片驱动程序及代码即可。
OLED屏的驱动芯片st7735以及SD卡模块用的是SPI传输,mpu6050用的是I2C传输。之前看到网上说SPI可以分时复用,如果分时复用可以节约一些管脚,我的模块里并没有这样做,因为怕读写SD卡会影响屏幕显示,如果有大佬可以做分时复用的接口可以教一下小弟,非常感谢!
2.2 分光棱镜介绍
分光棱镜是一种用于分离光线的水平偏振和垂直偏振的光学元件,是由两个三棱镜组成,中间镀制了多层膜结构,其中透射和反射是1:1,这样可以保证人眼看到的光线一半是反射过来的光线,一半是投射过来的光线,可以达到透明显示的效果。
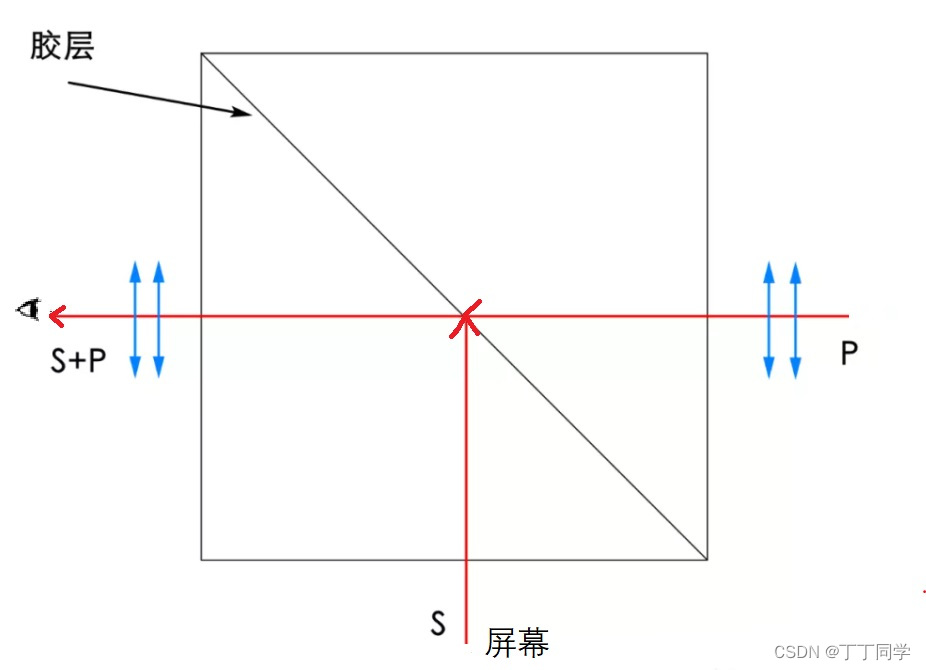
由于我们的屏幕在下方,因此分光棱镜对我们屏幕的投影是上下颠倒的,因此需要在程序中设置镜像显示,在第3章软件部分我会详细介绍。
3 软件部分
3.1 软件环境搭建
1.官网下载Arduino 1.8.15 https://www.arduino.cc/en/software
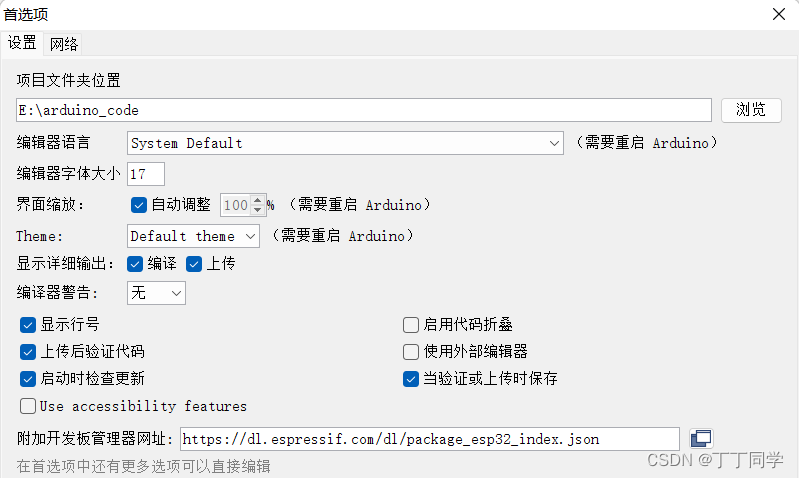
2.安装ESP32开发包 文件->首选项->附加开发板管理器输入
https://dl.espressif.com/dl/package_esp32_index.json
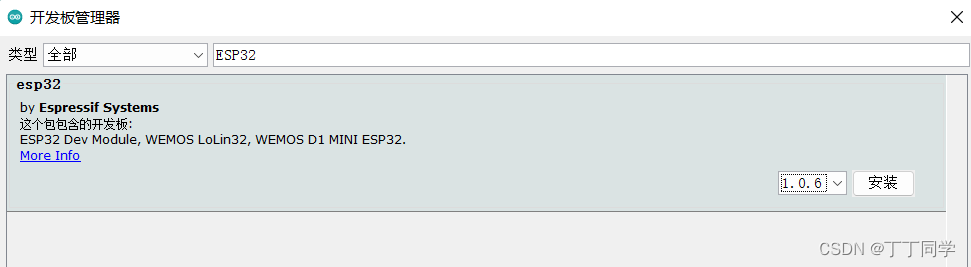
3.重启Arduino 工具->开发板->开发板管理 搜索ESP32下载
也可以下载https://pan.baidu.com/s/1DQ2MfChzsLiTKjYmowqEXA?pwd=edcv 提取码edcv
放到Arduino安装目录/hardware下
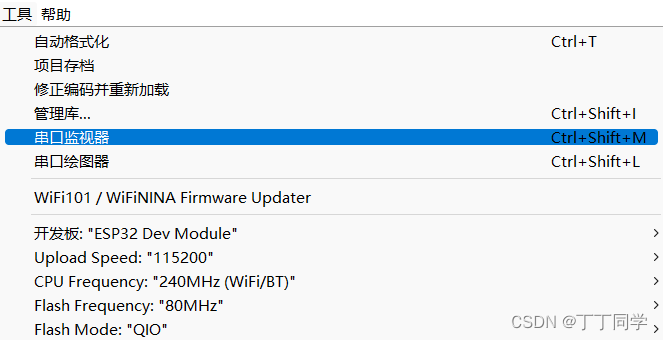
4. 工具-> 下载速度配置成115200 频率为80MHz.
此时开发环境就搭建好了。
3.2 硬件模块测试
此时我们把我们需要的硬件模块买回来,在淘宝商铺那里都有对应的测试程序,下载下来跑一下,看看各个模块能不能正常运转,如果可以,那你很幸运,可以开始编写代码了,如果有问题要联系商家第一时间更换模块。(PS:不然等调代码的时候才发现模块坏了就比较麻烦,也浪费时间)
另外也要注意管脚约束的问题,定义的管脚和实际连接的管脚一定要一样。
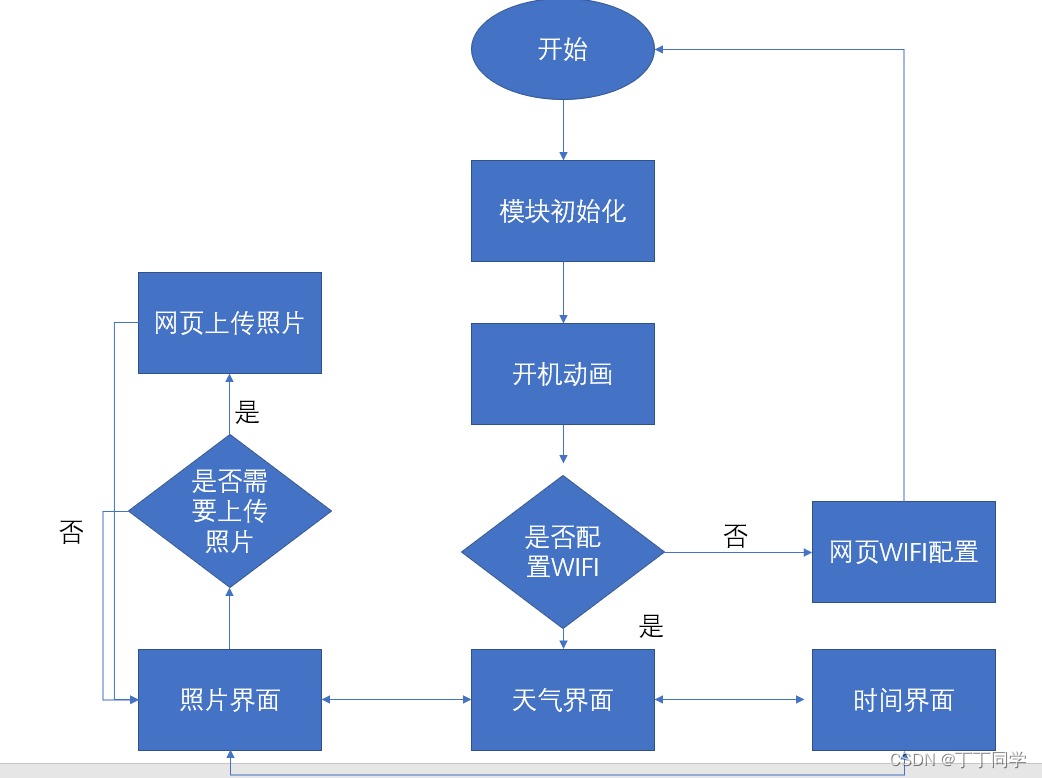
3.3 代码说明
代码框架如图所示:
模块初始化步骤用于初始化ESP32、SD卡、mpu6050、TFT显示屏以及网络。
开机动画是自己找的GIF拆分成单张图片,再保存在SD卡中并通过TFT屏显示。
配置WIFI和上传照片是通过简单的网页实现的。
天气界面我用的是心知天气的URL。
初始化代码如下所示(代码都有注释我就不一一介绍了):
void setup() {
mpu6050_setup();//6050陀螺仪初始化
TFT_setup();//TFT初始化
SD_setup();//SD初始化
magic(); //开机动画
WIFI_setup();//WIFI初始化
client.setTimeout(5000);//设置天气服务器连接超时时间
//EEPROM
EEPROM.begin(512);
tft_num = EEPROM.read(20);
Serial.print("the tft number is");Serial.println(tft_num);
WEB_setup();//网页初始化
timeClient.begin();
timeClient.setTimeOffset(28800); //设置偏移时间(以秒为单位)以调整时区
}
void mpu6050_setup(){
#define LED_PIN 13
Wire.begin();
Serial.begin(115200);
Serial.println("Initializing I2C devices...");
accelgyro.initialize();
Serial.println("Testing device connections...");
Serial.println(accelgyro.testConnection() ? "MPU6050 connection successful" : "MPU6050 connection failed");
pinMode(LED_PIN, OUTPUT);
}
// TFT初始化
//####################################################################################################
void TFT_setup(){
tft.init(); //初始化显示寄存器
tft.fillScreen(TFT_WHITE); //屏幕颜色
tft.setTextColor(TFT_BLACK); //设置字体颜色黑色
tft.setCursor(15, 100, 1); //设置文字开始坐标(15,30)及1号字体
tft.setTextSize(1);
tft.setSwapBytes(true);
tft.setRotation(4);//屏幕内容镜像显示或者旋转屏幕0-4 ST7735_Rotation中设置
}
// SD初始化
//####################################################################################################
void SD_setup(){
sdSPI.begin(SD_SCLK, SD_MISO, SD_MOSI, SD_CS);
if (!SD.begin(SD_CS, sdSPI))
{
Serial.println("存储卡挂载失败");
return;
}
uint8_t cardType = SD.cardType();
if (cardType == CARD_NONE)
{
Serial.println("未连接存储卡");
return;
}
else if (cardType == CARD_MMC)
{
Serial.println("挂载了MMC卡");
}
else if (cardType == CARD_SD)
{
Serial.println("挂载了SDSC卡");
}
else if (cardType == CARD_SDHC)
{
Serial.println("挂载了SDHC卡");
}
else
{
Serial.println("挂载了未知存储卡");
}
//打印存储卡信息
Serial.printf("存储卡总大小是: %lluMB \n", SD.cardSize() / (1024 * 1024)); // "/ (1024 * 1024)"可以换成">> 20"
Serial.printf("文件系统总大小是: %lluB \n", SD.totalBytes());
Serial.printf("文件系统已用大小是: %lluB \n", SD.usedBytes());
}
/*******************开机画面****************/
int image_num = 1;
void magic() {
//播放magic,共128帧,每秒30帧
while(image_num<=128)
{
drawSdJpeg(image_num, 0, 0, 2); // This draws a jpeg pulled off the SD Card
image_num=image_num+1;
}
}
// WIFI初始化
//####################################################################################################
void wifi_Config()
{
Serial.println("scan start");
// 扫描附近WiFi
int n = WiFi.scanNetworks();
Serial.println("scan done");
if (n == 0) {
Serial.println("no networks found");
scanNetworksID = "no networks found";
} else {
Serial.print(n);
Serial.println(" networks found");
for (int i = 0; i < n; ++i) {
// Print SSID and RSSI for each network found
Serial.print(i + 1);
Serial.print(": ");
Serial.print(WiFi.SSID(i));
Serial.print(" (");
Serial.print(WiFi.RSSI(i));
Serial.print(")");
Serial.println((WiFi.encryptionType(i) == WIFI_AUTH_OPEN) ? " " : "*");
scanNetworksID += "<P>" + WiFi.SSID(i) + "</P>";
delay(10);
}
}
Serial.println("");
WiFi.mode(WIFI_AP);//配置为AP模式
boolean result = WiFi.softAP(AP_SSID, AP_PASS); //开启WIFI热点
if (result)
{
IPAddress myIP = WiFi.softAPIP();
//打印相关信息
Serial.println("");
Serial.print("Soft-AP IP address = ");
Serial.println(myIP);
Serial.println(String("MAC address = ") + WiFi.softAPmacAddress().c_str());
Serial.println("waiting ...");
} else { //开启热点失败
Serial.println("WiFiAP Failed");
delay(3000);
ESP.restart(); //复位esp32
}
if (MDNS.begin("esp32")) {
Serial.println("MDNS responder started");
}
//首页
server.on("/", []() {
server.send(200, "text/html", ROOT_HTML + scanNetworksID + "</body></html>");
});
//连接
server.on("/connect", []() {
server.send(200, "text/html", "<html><body><font size=\"10\">successd,wifi connecting...<br />Please close this page manually.</font></body></html>");
WiFi.softAPdisconnect(true);
//获取输入的WIFI账户和密码
wifi_ssid = server.arg("ssid");
wifi_pass = server.arg("pass");
city_location = server.arg("city");
server.close();
WiFi.softAPdisconnect();
Serial.println("WiFi Connect SSID:" + wifi_ssid + " PASS:" + wifi_pass);
//设置为STA模式并连接WIFI
WiFi.mode(WIFI_STA);
WiFi.begin(wifi_ssid.c_str(), wifi_pass.c_str());
uint8_t Connect_time = 0; //用于连接计时,如果长时间连接不成功,复位设备
while (WiFi.status() != WL_CONNECTED) { //等待WIFI连接成功
delay(500);
Serial.print(".");
Connect_time ++;
if (Connect_time > 80) { //长时间连接不上,复位设备
Serial.println("Connection timeout, check input is correct or try again later!");
delay(3000);
ESP.restart();
}
}
Serial.println("");
Serial.println("WIFI Config Success");
Serial.printf("SSID:%s", WiFi.SSID().c_str());
Serial.print(" LocalIP:");
Serial.print(WiFi.localIP());
Serial.println("");
tft.fillScreen(TFT_WHITE);
tft.setCursor(20, 100, 1); //设置文字开始坐标(20,30)及1号字体
tft.setTextSize(1);
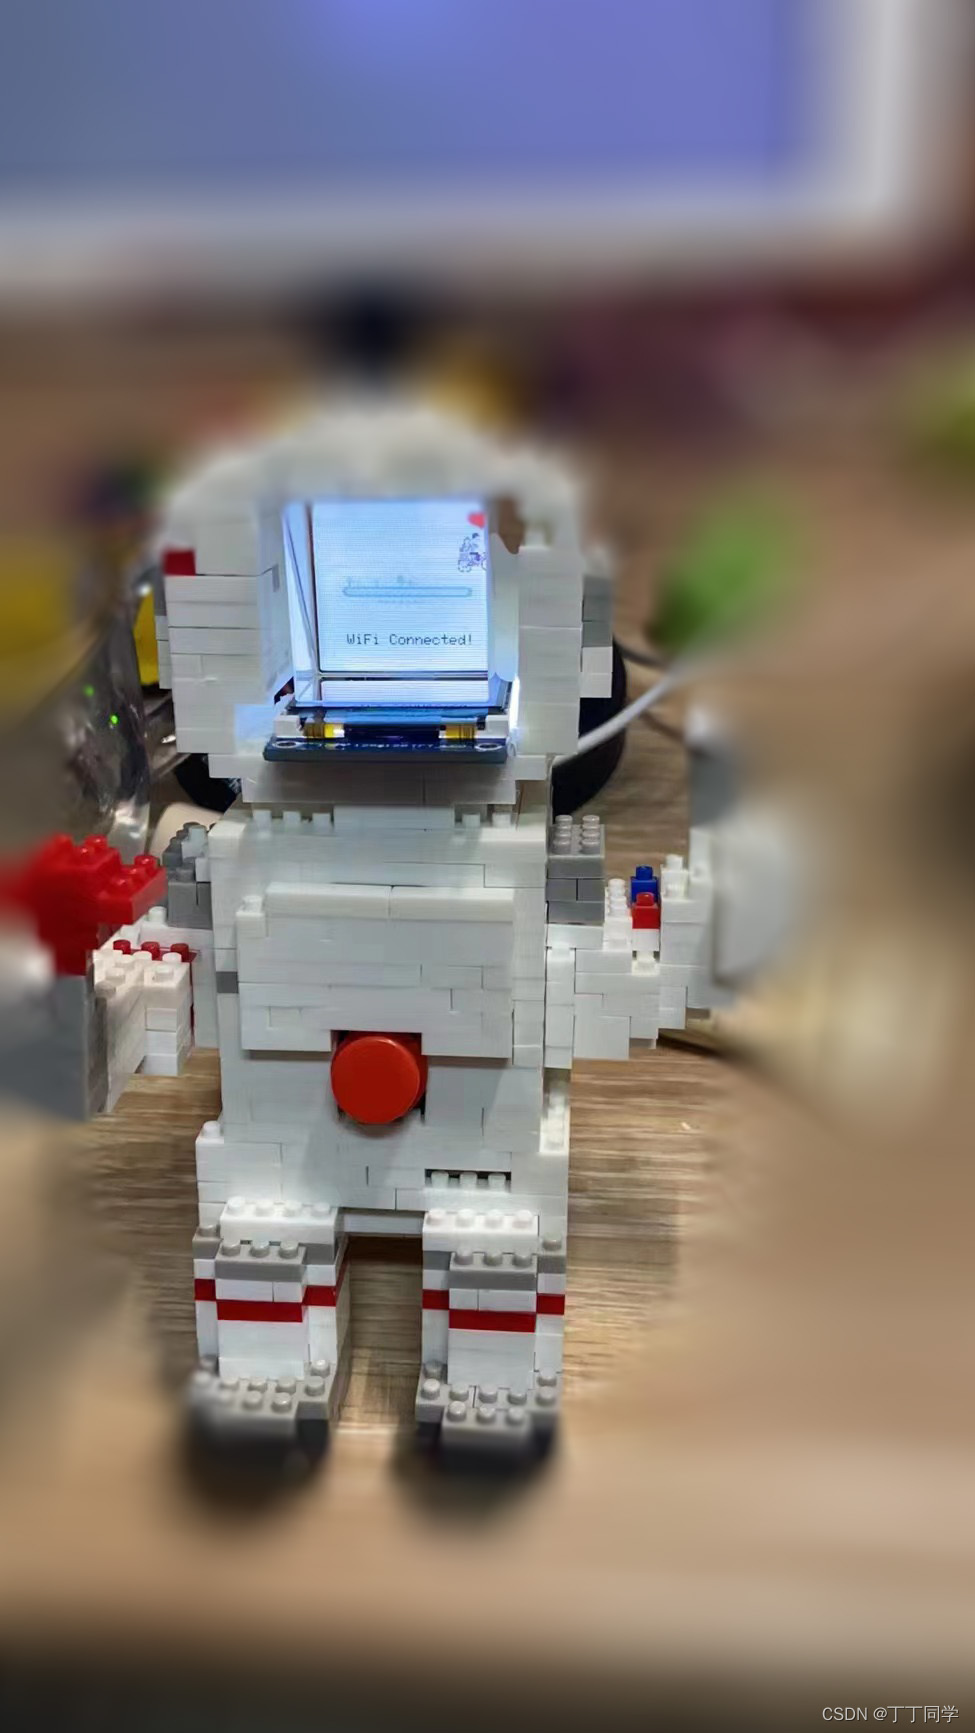
tft.println("WiFi Connected!");
drawSdJpeg(6, 0, 0, 5);
});
}
//用于上电自动连接WiFi
bool AutoConfig()
{
WiFi.begin();
for (int i = 0; i < 20; i++)
{
int wstatus = WiFi.status();
uint8_t wifi_image_num = 1;
if (wstatus == WL_CONNECTED)
{
Serial.println("WIFI SmartConfig Success");
Serial.printf("SSID:%s", WiFi.SSID().c_str());
Serial.printf(", PSW:%s\r\n", WiFi.psk().c_str());
Serial.print("LocalIP:");
Serial.print(WiFi.localIP());
Serial.print(" ,GateIP:");
Serial.println(WiFi.gatewayIP());
tft.fillScreen(TFT_WHITE);
tft.println("Connecting Wifi...");
tft.setSwapBytes(true); //使图片颜色由RGB->BGR
while(wifi_image_num<=5)
{
drawSdJpeg(wifi_image_num, 0, 0, 5); // This draws a jpeg pulled off the SD Card
wifi_image_num=wifi_image_num+1;
delay(400);
}
tft.fillScreen(TFT_WHITE);
tft.setCursor(20, 100, 1); //设置文字开始坐标(20,30)及1号字体
tft.setTextSize(1);
tft.println("WiFi Connected!");
drawSdJpeg(6, 0, 0, 5);
delay(600);
return true;
}
else
{
Serial.print("WIFI AutoConfig Waiting......");
Serial.println(wstatus);
delay(1000);
}
}
Serial.println("WIFI AutoConfig Faild!" );
return false;
}
void WIFI_setup() {
pinMode(RESET_PIN, INPUT_PULLUP);
// 连接WiFi
if (!AutoConfig())
{
wifi_Config();
}
//用于删除已存WiFi
if (digitalRead(RESET_PIN) == LOW) {
delay(1000);
esp_wifi_restore();
delay(10);
ESP.restart(); //复位esp32
}
//WiFi.mode(WIFI_STA);
//WiFi.begin(wifi_ssid.c_str(), wifi_pass.c_str());
}
// web服务初始化
//####################################################################################################
void WEB_setup(){
server.on("/", HTTP_GET, handleRoot);//发送开始获取
//把上传的数据保存到spiffs
server.on("/", HTTP_POST,[](){uplaodFinish();}, handleFileUpload);//下载文件
//访问的url没有在找spiffs中找到回复404
server.onNotFound([](){if(!handleFileRead(server.uri()))server.send(404, "text/plain", "FileNotFound");});
server.begin();//网络服务开启
}
主循环中有3个界面,时钟界面、照片界面和天气界面。当界面加载完成后需要查找陀螺仪是否有移动,检查上传的位置坐标来决定是否切换界面。同时,需要全程开启网页上传图片的网页服务,以便随时上传图片。上传图片有个超时计时器t,当超时之后会返回显示界面。
主功能代码如下所示:
// 主循环
//####################################################################################################
void loop(){
  if(upload_flag == false)
  {
    if(flag_finsh == 0)//页面未加载
    {
      switch(flag_page % 3)
      {
      case 0://时钟界面
        {
          tft.fillScreen(0x0000);//背景颜色
          flag_finsh = 1;//完成加载
          while(mpu_update()==9)
          {display_time();}
        }
        break;
        case 1://天气界面
        {
          //tft.fillScreen(0x0000);//背景颜色
          flag_finsh = 1;//完成加载
          weather_api();
        }
        break;
        case 2://照片界面
        {
          flag_finsh = 1;//完成加载
          jpg_draw(flag_pic);
          limit();//形成循环
          while(timer<=2500)
          {
            timer++;
            if(mpu_update() >= 3 && mpu_update() <=6)
            {
            break;
            }
          }
          timer=0;
        }
        break;
      }
    }
    else if(flag_finsh == 1)//页面已加载,进入手势扫描 和网络服务处理
    {
      uint8_t num = 0;
      num = mpu_update();//扫描手势传感器
      if(num >= 3 && num <=6)
      {
        if(num == Right)
        {
          flag_page++;
        }
        else if(num == Left)
        {
          flag_page--;
        }
        if(flag_page % 3==2)//处在照片界面
        {
          if(num == Up)
          {
            flag_pic++;
          }
          else if(num == Down)
          {
            flag_pic--;
          }
        }
        server.handleClient();
        flag_finsh =0;
        Serial.print(flag_page);
      }
      else if(num == 9)
      {
        if (flag_page % 3==2)
        {
        flag_pic++;
        flag_finsh =0;
        }
      }
    }
  }
  server.handleClient();//上传图片服务处理
  if(upload_flag == true)//防止未上传超时
  {
    t++;
    delay(5);
    server.handleClient();//上传图片服务处理
  }
  else
  {
    t=0;
  }

  if(t > 6000)
  {
    upload_flag = false;
    t = 0;
  }
  //Serial.print(t);
}
Mpu6050扫描的代码中定义了几个参数,用于表示位置到底是向左、向右、向上、向下还是没变,作为函数反馈值返回回去。
//  MPU6050传感器扫描
//####################################################################################################
uint8_t mpu_update()
{
  uint8_t num = 0;
  uint8_t data = 0, successful;
  accelgyro.getMotion6(&ax, &ay, &az, &gx, &gy, &gz);
  if(gy>5000)
  {
    data = GES_RIGHT_FLAG;
    }
   else if(gy<-5000)
   {
    data = GES_LEFT_FLAG;
    }
   else if(gx>5000)
   {
    data = GES_UP_FLAG;
    }
   else if(gx<-5000)
   {
    data = GES_DOWN_FLAG;
    }

successful = accelgyro.testConnection();
 if (successful)
  {
    switch (data)                   // When different gestures be detected, the variable 'data' will be set to different values by paj7620ReadReg(0x43, 1, &data).
    {
      case GES_RIGHT_FLAG:
        {
         // Serial.println("Right");
          num = Right;
        }
        break;
      case GES_LEFT_FLAG:
        {
          //Serial.println("Left");
          num = Left;
        }
        break;
      case GES_UP_FLAG:
        {
          //Serial.println("Up");
          num = Up;
        }
        break;
      case GES_DOWN_FLAG:
        {
          //Serial.println("Down");
          num = Down;
        }
        break;
      default:
   //accelgyro.getMotion6(&ax, &ay, &az, &gx, &gy, &gz);
       num=not_change;
       //Serial.println("num not change");
       break;
    }
  }
  return num;
  delay(100);
}
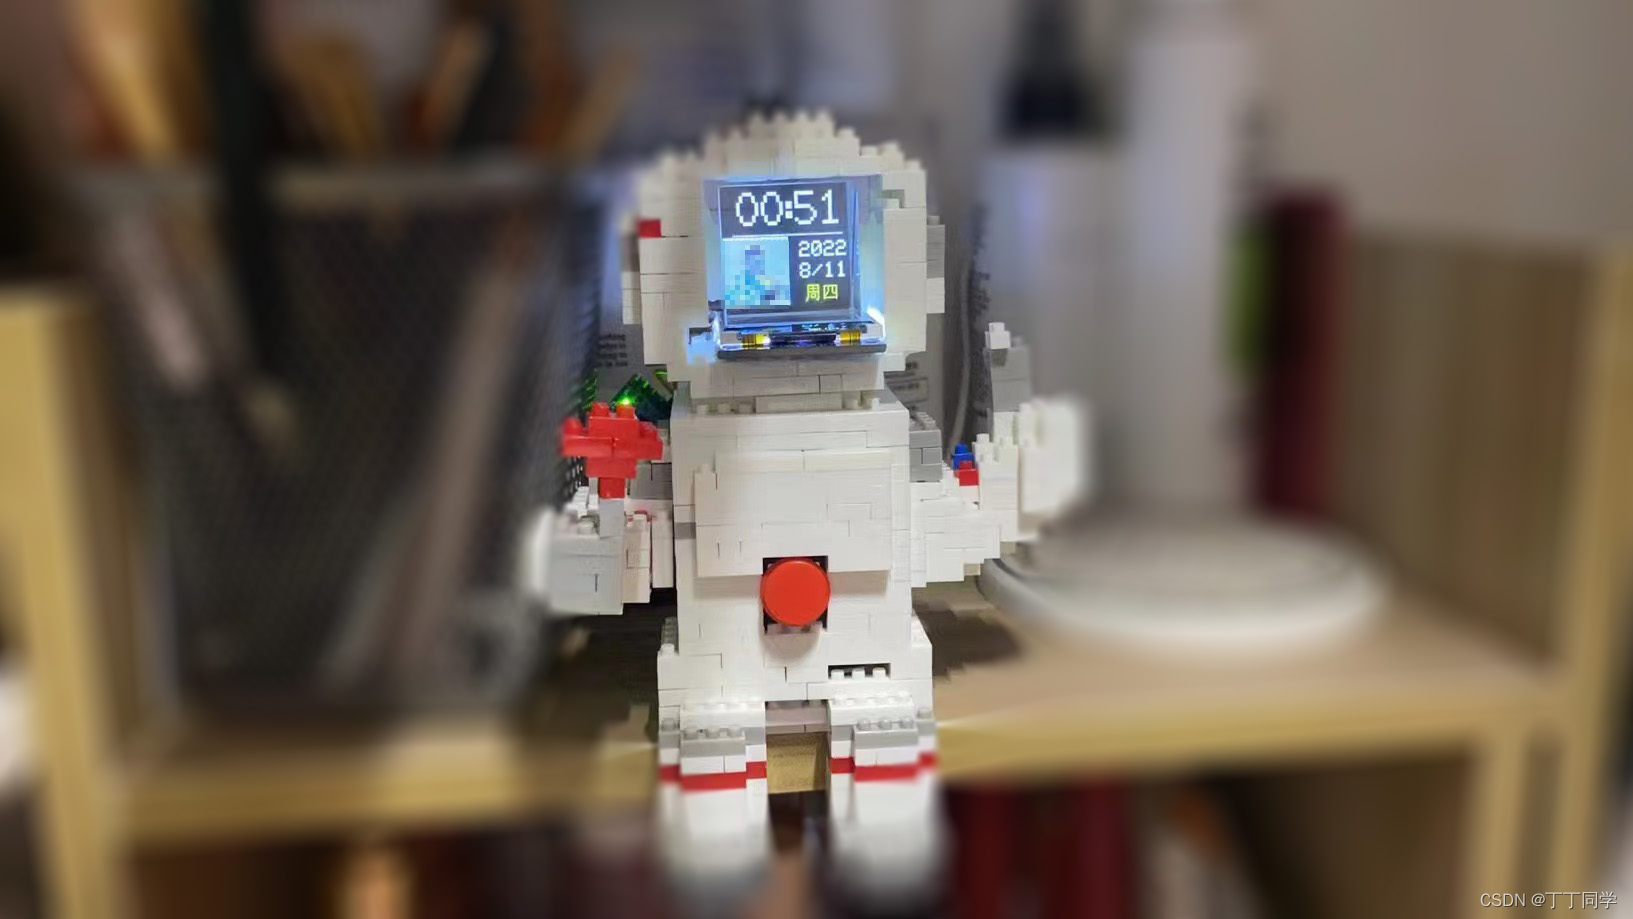
时间界面的程序,显示汉字是通过字模程序来实现的。
/*******************时间界面显示****************/
void showtext(int16_t x,int16_t y,uint8_t font,uint8_t s,uint16_t fg,uint16_t bg,const String str)
{
  //设置文本显示坐标,和文本的字体,默认以左上角为参考点,
    tft.setCursor(x, y, font);
  // 设置文本颜色为白色,文本背景黑色
    tft.setTextColor(fg,bg);
  //设置文本大小,文本大小的范围是1-7的整数
    tft.setTextSize(s);
  // 设置显示的文字,注意这里有个换行符 \n 产生的效果
    tft.println(str);
}
/*******************单个汉字显示****************/
void showMyFont(int32_t x, int32_t y, const char c[3], uint32_t color) {
  for (int k = 0; k < 32; k++)// 根据字库的字数调节循环的次数
    if (hanzi[k].Index[0] == c[0] && hanzi[k].Index[1] == c[1] && hanzi[k].Index[2] == c[2])
    { tft.drawBitmap(x, y, hanzi[k].hz_Id, hanzi[k].hz_width, 16, color);
    }
}
/*******************整句汉字显示****************/
void showMyFonts(int32_t x, int32_t y, const char str[], uint32_t color) { //显示整句汉字,字库比较简单,上下、左右输出是在函数内实现
  int x0 = x;
  for (int i = 0; i < strlen(str); i += 3) {
    showMyFont(x0, y, str+i, color);
    x0 += 17;
  }
}
void show_time(uint16_t fg,uint16_t bg, String currentTime, String currentDate, int tm_Year,const char* week)
{
    //tft.fillRect(10, 55,  64, 64, bg);
    tft.setSwapBytes(true);             //使图片颜色由RGB->BGR
    drawSdJpeg(face_num,0,55,3);//加载今天天气
    delay(100);
    face_num++;
    if(face_num>58){face_num=1;}
    tft.drawFastHLine(10, 53, 108, tft.alphaBlend(0, bg,  fg));
    showtext(15,5,2,3,fg,bg,currentTime);
    showtext(75,60,1,2,fg,bg, String(tm_Year));
    showtext(75,80,1,2,fg,bg, currentDate);
    showMyFonts(80, 100, week, TFT_YELLOW);
}
void display_time()
{
    timeClient.update();
    unsigned long epochTime = timeClient.getEpochTime();
    currentSec = epochTime;
    String formattedTime = timeClient.getFormattedTime();
    int tm_Hour = timeClient.getHours();
    int tm_Minute = timeClient.getMinutes();
    int tm_Second = timeClient.getSeconds();
    String weekDay = weekDays[timeClient.getDay()];
    char week[weekDay.length() + 1];
    weekDay.toCharArray(week,weekDay.length() + 1);

    struct tm *ptm = gmtime ((time_t *)&epochTime);
    int monthDay = ptm->tm_mday;
    int tm_Month = ptm->tm_mon+1;
    String currentMonthName = months[tm_Month-1];
    int tm_Year = ptm->tm_year+1900;
    String currentDate = String(tm_Month) + "/" + String(monthDay);
    String currentTime, hour, minute;
    if (tm_Hour < 10)
      hour = "0" + String(tm_Hour);
    else
      hour = String(tm_Hour);
    if (tm_Minute < 10)
      minute = "0" + String(tm_Minute);
    else
      minute = String(tm_Minute);
    currentTime = hour + ":" + minute;
      tft.setSwapBytes(true);
       if(epochTime - currentSec >= 5)
       {currentSec = timeClient.getEpochTime();}
       else
       {
    show_time(TFT_WHITE, TFT_BLACK, currentTime, currentDate, tm_Year, week); // 显示时间界面
       }
    delay(50);
  }
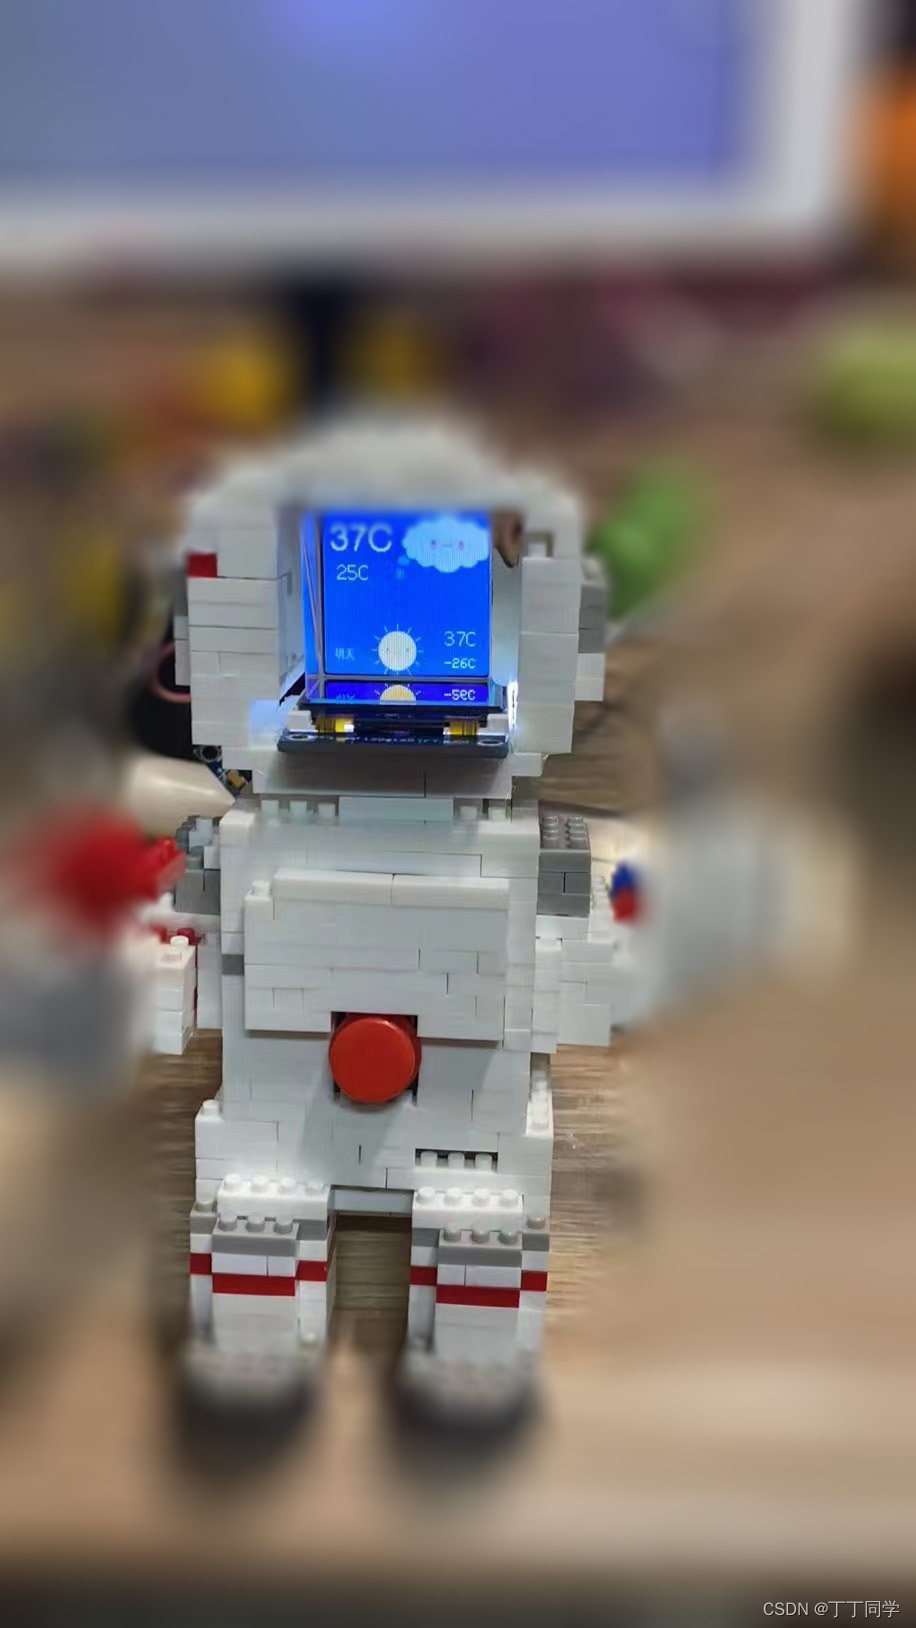
心知天气API获取今明天气,最高温度,最低温度,通过图片和数字显示天气和温度。
// 显示数字
//####################################################################################################
void tft_showstring(int x,int y,int c,String z){
  tft.setCursor(x, y, c);
  tft.setTextSize(1);
  tft.setTextColor(TFT_WHITE);
  tft.println(z);
}
// JOSN解析函数
//####################################################################################################
void parseUserData(String content){   // Json数据解析并串口打印.可参考https://www.bilibili.com/video/av65322772
 int weather_num[2];
 const size_t capacity = JSON_ARRAY_SIZE(1) + JSON_OBJECT_SIZE(1) + 2*JSON_OBJECT_SIZE(3) + JSON_OBJECT_SIZE(6) + 210;
 DynamicJsonBuffer jsonBuffer(1660);

 JsonObject& root = jsonBuffer.parseObject(content);

 JsonObject& results_0 = root["results"][0];

 JsonObject& results_daily0 = results_0["daily"][0];
 JsonObject& results_daily1 = results_0["daily"][1];
 JsonObject& results_daily2 = results_0["daily"][2];

 const char* results_0_now_data = results_daily0["date"];//天气时间
 const char* results_0_now_text = results_daily0["text_day"];//天气时间

 const char* results_0_now_code = results_daily0["code_day"];//天气现象数值
 const char* results_1_now_code = results_daily1["code_day"];//天气现象数值

 String high_tem_0= results_daily0["high"];//天气温度最高数值
 String high_tem_1= results_daily1["high"];//天气温度最高数值

 String low_tem_0= results_daily0["low"];//天气温度最低数值
 String low_tem_1= results_daily1["low"];//天气温度最低数值

 String hum= results_daily0["humidity"];//天气湿度数值

 const char* wind_speed0 = results_daily0["wind_speed"];//天气风速数值
 const char* wind_speed1 = results_daily1["wind_speed"];//天气风速数值

 const char* rain= results_daily0["rainfall"];//天气降雨量数值

 //atoi()函数将字符转换为数字
 weather_num[0] = atoi(results_0_now_code);
 weather_num[1] = atoi(results_1_now_code);
 drawSdJpeg(weather_num[0],0,0,1);//加载今天天气
 drawSdJpeg(weather_num[1],35,88,4);//加载明天天气
 tft_showstring(5,19,4,high_tem_0+"C");
 tft_showstring(10,45,2,low_tem_0+"C");//显示今日温度


 tft_showstring(90,90,2,high_tem_1+"C");
 tft_showstring(90,112,1,"-"+low_tem_1+"C");//显示明日温度

}
// 天气获取并显示
//####################################################################################################
void weather_api(){//天气API获取
  if(client.connect("api.seniverse.com",80)==1)//连接服务器并判断是否连接成功,若成功就发送GET 请求数据下发
  {                                             //换成你自己在心知天气申请的私钥//改成你所在城市的拼音
   //client.print("GET  /v3/weather/now.json?key=*********&location=beijing&language=zh-Hans&unit=c HTTP/1.1\r\n"); //心知天气的URL格式
   client.print("Host:api.seniverse.com\r\n");
   client.print("Accept-Language:zh-cn\r\n");
   client.print("Connection:close\r\n\r\n"); //向心知天气的服务器发送请求。


   String status_code = client.readStringUntil('\r');        //读取GET数据,服务器返回的状态码,若成功则返回状态码200
   //Serial.println(status_code);
   /*
    * {"results":
    * [
    * {"location":
    * {"id":"WX4FBXXFKE4F","name":"北京","country":"CN","path":"北京,北京,中国","timezone":"Asia/Shanghai","timezone_offset":"+08:00"}
    * ,"now":{"text":"晴","code":"1","temperature":"10"},"last_update":"2020-04-04T23:10:00+08:00"}
    * ]
    * }
   */
   if(client.find("{")==1)//跳过返回的数据头,直接读取后面的JSON数据
   //if(client.available())
    {
      String json_from_server=client.readStringUntil(']');  //读取返回的JSON数据
      json_from_server = "{"+json_from_server+"]}]}";
      Serial.println(json_from_server);
      parseUserData(json_from_server);                      //将读取的JSON数据,传送到JSON解析函数中进行显示。
    }
    else
    {
       Serial.println("Not find.");
    }
  }
  else
  {
   Serial.println("connection failed this time");
   delay(500);                                            //请求失败等5秒
  }
  client.stop(); //关闭HTTP客户端,采用HTTP短链接,数据请求完毕后要客户端要主动断开
}
在显示照片的过程中,加入了计时器timer可以让照片每8s自动切换到下一张,limit函数用于用于控制照片显示当显示到最后一张时又会回到第一张。同时照片的切换也可以手动控制,当检测到陀螺仪的位置信息为朝上时,照片会切换至下一张,当检测到陀螺仪的位置信息为朝下时,照片会切换至上一张,照片存放的位置参考drawSdJpeg函数。
void jpg_draw(int bmp_screen_num){
  //tft.setRotation(2);  //设置旋转
  tft.fillScreen(0x0000);//背景颜色
  drawSdJpeg(bmp_screen_num,0,0,0);     // This draws a jpeg pulled off the SD Card
  //delay(5000);
}
void drawSdJpeg(int bmp_screen_num, int xpos, int ypos,int mode_pic) {
  char filename1[20];
  int mode_ = 0;
  switch(mode_pic){
    case 0://加载照片
      //filename = "/loge"+String(bmp_screen_num)+".jpg";
      sprintf(filename1,"/loge%d.jpg",bmp_screen_num);
      mode_ =1;
       break;
    case 1://加载128x128天气图片
      //filename = "/img/64x64/"+String(bmp_screen_num)+".jpg";//重定向文件
      sprintf(filename1,"/img/128x128/%d.jpg",bmp_screen_num);
      break;
    case 2://开机画面
     //filename = "/magic/"+String(bmp_screen_num)+".jpg";
     sprintf(filename1,"/magic/%d.jpg",bmp_screen_num);
      break;
    case 3://加载face图片
      sprintf(filename1,"/face/%d.jpg",bmp_screen_num);
      break;
    case 4://加载40x40天气图片
      //filename = "/img/40x40/"+String(bmp_screen_num)+".jpg";//重定向文件
      sprintf(filename1,"/img/40x40/%d.jpg",bmp_screen_num);
      break;
    case 5://WIFI连接
      //filename = "/wifi/"+String(bmp_screen_num)+".jpg";//重定向文件
      sprintf(filename1,"/wifi/%d.jpg",bmp_screen_num);
      break;
    }
  const char *filename = filename1;
  File jpegFile = SD.open(filename1,FILE_READ);  // or, file handle reference for SD library

  if ( !jpegFile ) {
    Serial.print("ERROR: File \""); Serial.print(filename); Serial.println ("\" not found!");
    return;
  }

  Serial.println("===========================");
  Serial.print("Drawing file: "); Serial.println(filename);
  Serial.println("===========================");

  // Use one of the following methods to initialise the decoder:
  boolean decoded = JpegDec.decodeSdFile(jpegFile);  // Pass the SD file handle to the decoder,
  //boolean decoded = JpegDec.decodeSdFile(filename);  // or pass the filename (String or character array)

  if (decoded) {
    // print information about the image to the serial port
    jpegInfo();
    // render the image onto the screen at given coordinates
    jpegRender(xpos, ypos,mode_);
  }
  else {
    Serial.println("Jpeg file format not supported!");
  }
}
//####################################################################################################
// 在TFT上绘图片
//####################################################################################################
void jpegRender(int xpos, int ypos,int mode_) {

  //jpegInfo(); // Print information from the JPEG file (could comment this line out)

  uint16_t *pImg;
  uint32_t mcu_w = JpegDec.MCUWidth;
  uint32_t mcu_h = JpegDec.MCUHeight;
  uint32_t max_x = JpegDec.width;
  uint32_t max_y = JpegDec.height;
  //调整选转角度并且居中显示
  if(mode_ == 1)
  {
    if(max_x > max_y)
    {
      //tft.setRotation(1);
      xpos = (128-max_x)/2; //居中显示
      ypos = (128-max_y)/2; //居中显示
      if(xpos < 0 ||xpos > 128)
       xpos = 0;
      if(ypos < 0 || ypos >128)
       ypos = 0;
    }
    else if(max_x <= max_y)
    {
      //tft.setRotation(2);
      xpos = (128-max_x)/2; //居中显示
      ypos = (128-max_y)/2; //居中显示
      if(xpos < 0 ||xpos > 128)
       xpos = 0;
      if(ypos < 0 || ypos >128)
       ypos = 0;
    }
  }
  else
  {
    //tft.setRotation(2);
  }
  bool swapBytes = tft.getSwapBytes();
  tft.setSwapBytes(true);


  // Jpeg images are draw as a set of image block (tiles) called Minimum Coding Units (MCUs)
  // Typically these MCUs are 16x16 pixel blocks
  // Determine the width and height of the right and bottom edge image blocks
  uint32_t min_w = min(mcu_w, max_x % mcu_w);
  uint32_t min_h = min(mcu_h, max_y % mcu_h);

  // save the current image block size
  uint32_t win_w = mcu_w;
  uint32_t win_h = mcu_h;


  // record the current time so we can measure how long it takes to draw an image
  uint32_t drawTime = millis();

  // save the coordinate of the right and bottom edges to assist image cropping
  // to the screen size
  max_x += xpos;
  max_y += ypos;

    // Fetch data from the file, decode and display
    while (JpegDec.read()) {    // While there is more data in the file
      pImg = JpegDec.pImage ;   // Decode a MCU (Minimum Coding Unit, typically a 8x8 or 16x16 pixel block)

    // Calculate coordinates of top left corner of current MCU
    int mcu_x = JpegDec.MCUx * mcu_w + xpos;
    int mcu_y = JpegDec.MCUy * mcu_h + ypos;

    // check if the image block size needs to be changed for the right edge
    if (mcu_x + mcu_w <= max_x) win_w = mcu_w;
    else win_w = min_w;

    // check if the image block size needs to be changed for the bottom edge
    if (mcu_y + mcu_h <= max_y) win_h = mcu_h;
    else win_h = min_h;

    // copy pixels into a contiguous block
    if (win_w != mcu_w)
    {
      uint16_t *cImg;
      int p = 0;
      cImg = pImg + win_w;
      for (int h = 1; h < win_h; h++)
      {
        p += mcu_w;
        for (int w = 0; w < win_w; w++)
        {
          *cImg = *(pImg + w + p);
          cImg++;
        }
      }
    }

    // calculate how many pixels must be drawn
    uint32_t mcu_pixels = win_w * win_h;

    // draw image MCU block only if it will fit on the screen
    if (( mcu_x + win_w ) <= tft.width() && ( mcu_y + win_h ) <= tft.height())
      tft.pushImage(mcu_x, mcu_y, win_w, win_h, pImg);
    else if ( (mcu_y + win_h) >= tft.height())
      JpegDec.abort(); // Image has run off bottom of screen so abort decoding
  }

  tft.setSwapBytes(swapBytes);
}
这个是加载网页和上传照片的函数,打开html文件后上传照片会给照片命名并存放到SD卡中。
// 将上传的文件发送回SD卡
//####################################################################################################
bool handleFileRead(String path){
  int upload_ = tft_num - 1;
  if(upload_<0)
    upload_ = 0;
  path = "/loge"+String(upload_)+".jpg";//上传JPG文件
  Serial.println("handleFileRead: " + path);
  if(path.endsWith("/")) path += "index.htm";
  String contentType = getContentType(path);
  String pathWithGz = path + ".gz";
  if(SD.exists(pathWithGz) || SD.exists(path)){
    if(SD.exists(pathWithGz))
      path += ".gz";
    File file = SD.open(path, "r");
    size_t sent = server.streamFile(file, contentType);
    file.close();
    upload_flag = false;//完成一次写入
    return true;
  }
  upload_flag = false;//完成一次写入
  return false;
}
//####################################################################################################
// 文件上传SD卡
//####################################################################################################
void handleFileUpload(){//网络服务处理函数
  upload_flag = true;//正在进行上传
  if(server.uri() != "/") return;
  HTTPUpload& upload = server.upload();
  String filename;
  char *file_sd;
  if(upload.status == UPLOAD_FILE_START){//开启下载上传的文件
    filename = upload.filename;
    if(!filename.startsWith("/"))
    {
      filename = "/loge"+String(tft_num)+".jpg";//如果文件开头没有/则添加/ 并且对该图片添加计数尾缀
      tft_num++;//文件数+1
      EEPROM.write(20,tft_num);//将数据保存
      EEPROM.commit();
    }
    Serial.print("handleFileUpload Name: "); Serial.println(filename);//打印文件名

    SD.remove(filename);
    fsUploadFile = SD.open(filename, "w");//将上传的文件保存
    filename = String();
  } else if(upload.status == UPLOAD_FILE_WRITE){
    if(fsUploadFile)
      fsUploadFile.write(upload.buf, upload.currentSize);//将上传文件写入SD卡
  } else if(upload.status == UPLOAD_FILE_END){
    if(fsUploadFile)
      fsUploadFile.close();
  }
}
//####################################################################################################
// 加载网页
//####################################################################################################
void handleRoot(){
  upload_flag = true;//进入上传就绪状态(打开了网页)
  server.send(200, "text/html", mainPageString);
  server.client().stop();
}
//####################################################################################################
// 上传完成函数
//####################################################################################################
void uplaodFinish(){
  server.send(200, "text/html", uploadString);//重新发送网页
  upload_flag = true;//上传完成,但是网页回复仍未完成
}
//####################################################################################################
// 限幅函数
//####################################################################################################
uint8_t limit(){
  if(flag_pic >= tft_num)
  {
    flag_pic = flag_pic - tft_num;
  }
  else if(flag_pic < 0)
  {
    flag_pic = flag_pic + tft_num;
  }
}
以上就是代码讲解部分。。。
代码调试过程遇到的BUG以及解决办法:
1.软件定时器的使用问题
在WIFI配置的功能中,一开始我使用软件定时回调函数ATimerCallback( TimerHandle_t xTimer );来回调上传WIFI名称和密码的函数,后面发现软件定时回调函数只会在指定的时间点才会执行函数,而上传WIFI名称和密码功能在这段时间必须一直打开,而且一直回调程序不会继续下去,非常占用CPU资源,因此我放弃了使用软件回调函数,改成目前的实现方式。
2.在加载SD卡图片时串口总是打印找不到SD卡中的图片
主要原因是SD卡模块供电应该是5V,而我用成了3.3V,因此导致SD卡读取不正常,另外用于存储SD卡中文件路径的变量char filename1[20]设置过短,无法存储那么长的字符串。
3.镜像显示的问题
打开文件
E:\Arduino\hardware\espressif\esp32\libraries\TFT_eSPI\TFT_Drivers\ST7735_Rotation.h
	case 4:
		writedata(0x48);
		_width = _init_height;
		_height = _init_width;
		break;
并将最前面改为rotation = m % 5; // Limit the range of values to 0-4
至于为什么是0x48大家可以去看ST7735的数据手册,这里就不再赘述了。
最后在你的TFT初始化函数中添加:
tft.setRotation(4);//屏幕内容镜像显示或者旋转屏幕0-4 ST7735_Rotation中设置
写在后面
此外还有分光棱镜的安装问题,如何将分光棱镜安装在屏幕上呢?
- 我用了热熔胶枪,先将分光棱镜固定好(这一步很重要,因为分光棱镜比较贵,所以固定不好粘上去了之后又要重新买)
- 在积木和分光棱镜中间我特意留了空隙,将热熔胶打入空隙中,这一步可以慢点
- 最后用热熔胶将空隙填满,这样就固定好了
我看有的同学用的是粘手机屏幕的干胶,但是这种胶需要专门的工具,我没有这种工具,所以就没用,有同学如果会用的话可以用这种,效果能好一些。


 3万+
3万+


 被折叠的 条评论
为什么被折叠?
被折叠的 条评论
为什么被折叠?
 到【灌水乐园】发言


