


Mybatis-Plus
简介
MyBatis-Plus (opens new window)(简称 MP)是一个 MyBatis (opens new window)的增强工具,在 MyBatis 的基础上只做增强不做改变,为简化开发、提高效率而生。
愿景
我们的愿景是成为 MyBatis 最好的搭档,就像 魂斗罗 中的 1P、2P,基友搭配,效率翻倍。
特性
- 无侵入:只做增强不做改变,引入它不会对现有工程产生影响,如丝般顺滑
- 损耗小:启动即会自动注入基本 CURD,性能基本无损耗,直接面向对象操作
- 强大的 CRUD 操作:内置通用 Mapper、通用 Service,仅仅通过少量配置即可实现单表大部分 CRUD 操作,更有强大的条件构造器,满足各类使用需求
- 支持 Lambda 形式调用:通过 Lambda 表达式,方便的编写各类查询条件,无需再担心字段写错
- 支持主键自动生成:支持多达 4 种主键策略(内含分布式唯一 ID 生成器 - Sequence),可自由配置,完美解决主键问题
- 支持 ActiveRecord 模式:支持 ActiveRecord 形式调用,实体类只需继承 Model 类即可进行强大的 CRUD 操作
- 支持自定义全局通用操作:支持全局通用方法注入( Write once, use anywhere )
- 内置代码生成器:采用代码或者 Maven 插件可快速生成 Mapper 、 Model 、 Service 、 Controller 层代码,支持模板引擎,更有超多自定义配置等您来使用
- 内置分页插件:基于 MyBatis 物理分页,开发者无需关心具体操作,配置好插件之后,写分页等同于普通 List 查询
- 分页插件支持多种数据库:支持 MySQL、MariaDB、Oracle、DB2、H2、HSQL、SQLite、Postgre、SQLServer 等多种数据库
- 内置性能分析插件:可输出 Sql 语句以及其执行时间,建议开发测试时启用该功能,能快速揪出慢查询
- 内置全局拦截插件:提供全表 delete 、 update 操作智能分析阻断,也可自定义拦截规则,预防误操作
支持数据库
任何能使用
mybatis进行 crud, 并且支持标准 sql 的数据库
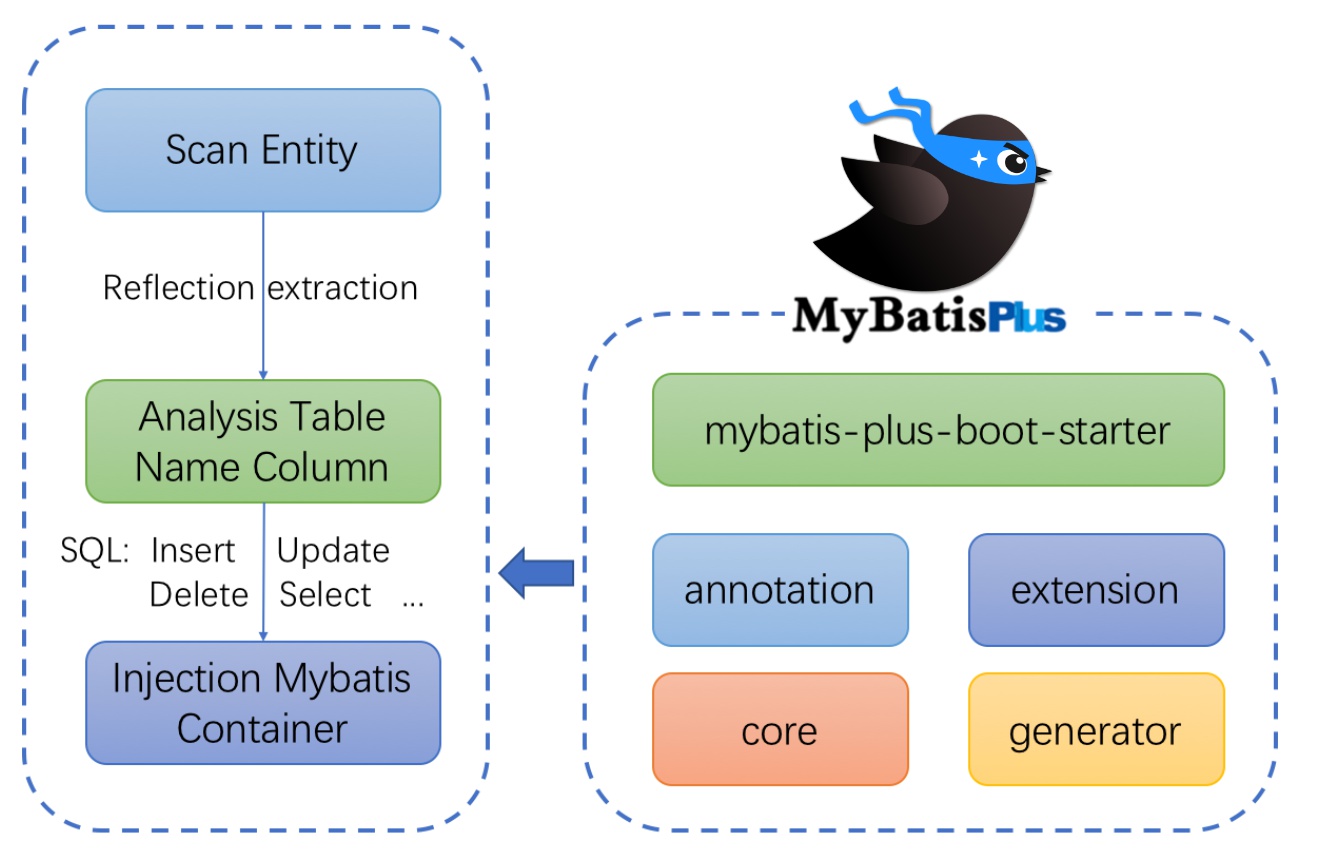
框架结构
快速开始
我们将通过一个简单的 Demo 来阐述 MyBatis-Plus 的强大功能,在此之前,我们假设您已经:
- 拥有 Java 开发环境以及相应 IDE
- 熟悉 Spring Boot
- 熟悉 Maven
现有一张 User 表,其表结构如下:
| id | name | age | |
|---|---|---|---|
| 1 | Jone | 18 | test1@baomidou.com |
| 2 | Jack | 20 | test2@baomidou.com |
| 3 | Tom | 28 | test3@baomidou.com |
| 4 | Sandy | 21 | test4@baomidou.com |
| 5 | Billie | 24 | test5@baomidou.com |
其对应的数据库 Schema 脚本如下:
DROP TABLE IF EXISTS user;

CREATE TABLE user
(
	id BIGINT(20) NOT NULL COMMENT '主键ID',
	name VARCHAR(30) NULL DEFAULT NULL COMMENT '姓名',
	age INT(11) NULL DEFAULT NULL COMMENT '年龄',
	email VARCHAR(50) NULL DEFAULT NULL COMMENT '邮箱',
	PRIMARY KEY (id)
);
其对应的数据库 Data 脚本如下:
DELETE FROM user;

INSERT INTO user (id, name, age, email) VALUES
(1, 'Jone', 18, 'test1@baomidou.com'),
(2, 'Jack', 20, 'test2@baomidou.com'),
(3, 'Tom', 28, 'test3@baomidou.com'),
(4, 'Sandy', 21, 'test4@baomidou.com'),
(5, 'Billie', 24, 'test5@baomidou.com');
Question
如果从零开始用 MyBatis-Plus 来实现该表的增删改查我们需要做什么呢?
初始化工程
创建一个空的 Spring Boot 工程(工程将以 H2 作为默认数据库进行演示)
TIP
可以使用 Spring Initializer (opens new window)快速初始化一个 Spring Boot 工程
添加依赖
引入 Spring Boot Starter 父工程:
<parent>
    <groupId>org.springframework.boot</groupId>
    <artifactId>spring-boot-starter-parent</artifactId>
    <version>2.4.3</version>
    <relativePath/>
</parent>
引入 spring-boot-starter、spring-boot-starter-test、mybatis-plus-boot-starter、mysql 依赖:
    <dependencies>
        <dependency>
            <groupId>org.springframework.boot</groupId>
            <artifactId>spring-boot-starter-web</artifactId>
        </dependency>

        <dependency>
            <groupId>mysql</groupId>
            <artifactId>mysql-connector-java</artifactId>
            <scope>runtime</scope>
        </dependency>
        <dependency>
            <groupId>org.projectlombok</groupId>
            <artifactId>lombok</artifactId>
            <optional>true</optional>
        </dependency>
        <dependency>
            <groupId>org.springframework.boot</groupId>
            <artifactId>spring-boot-starter-test</artifactId>
            <scope>test</scope>
        </dependency>

        <dependency>
            <groupId>org.springframework.boot</groupId>
            <artifactId>spring-boot-starter</artifactId>
        </dependency>
        <dependency>
            <groupId>com.baomidou</groupId>
            <artifactId>mybatis-plus-boot-starter</artifactId>
            <version>3.4.2</version>
        </dependency>
    </dependencies>
添加配置
在 application.yml 配置文件中添加 mysql 数据库的相关配置:
# DataSource Config
spring:
  datasource:
    driver-class-name: com.mysql.cj.jdbc.Driver
    url: jdbc:mysql://localhost:3306/test?useSSL=false&serverTimezone=Asia/Shanghai
    username: root
    password: 			#  根据数据库配置
在application.yml中配置日志
# 配置日志 (系统自带的,控制台输出)
mybatis-plus:
  configuration:
    log-impl: org.apache.ibatis.logging.stdout.StdOutImpl
启动类配置@MapperScan注解,扫描mapper包
@SpringBootApplication
@MapperScan("com.kunchi.mybatisplus.mapper")
public class SpringBootMybatisPlusTestApplication {

    public static void main(String[] args) {
        SpringApplication.run(SpringBootMybatisPlusTestApplication.class, args);
    }

}
编码
实体类User.java
@Data
public class User {
    private Long id;
    private String name;
    private Integer age;
    private String email;
}
Mapper类,UserMapper.java
public interface UserMapper extends BaseMapper<User> {

}
测试
测试类
@SpringBootTest
public class UserMapperTest {
@Autowired
UserMapper userMapper;
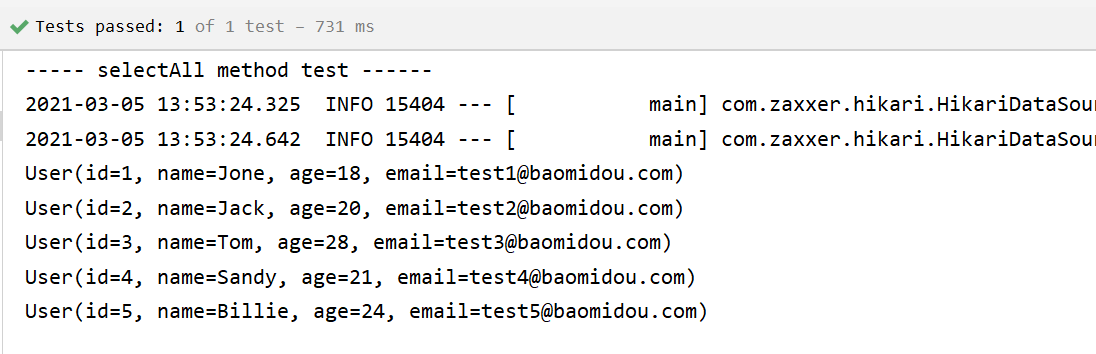
@Test
public void testSelect() {
System.out.println(("----- selectAll method test ------"));
List<User> userList = userMapper.selectList(null);
userList.forEach(System.out::println);
}
}
TIP
UserMapper 中的
selectList()方法的参数为 MP 内置的条件封装器Wrapper,所以不填写就是无任何条件
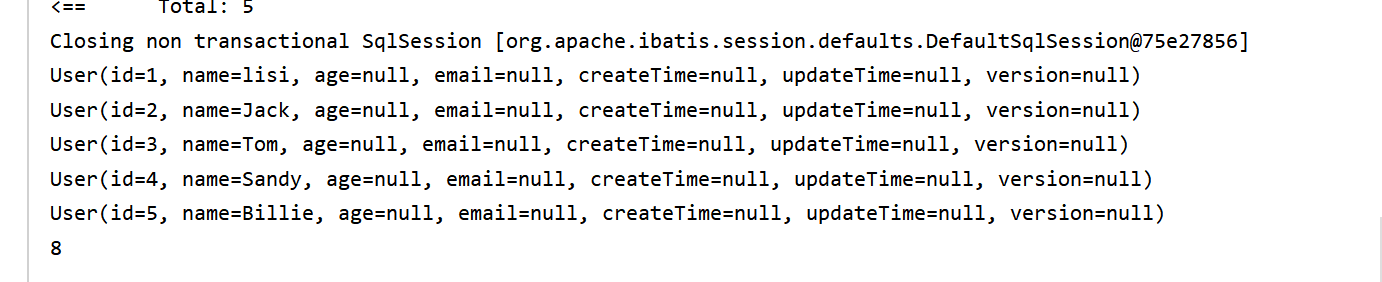
控制台结果:
小结
通过以上几个简单的步骤,我们就实现了 User 表的 CRUD 功能,甚至连 XML 文件都不用编写!
从以上步骤中,我们可以看到集成MyBatis-Plus非常的简单,只需要引入 starter 工程,并配置 mapper 扫描路径即可。
拓展
插入操作
@Test
    void testInsert(){
        User user = new User();
        user.setName("laoliu");
        user.setAge(22);
        user.setEmail("laoliu0402@163.com");
        int insert = userMapper.insert(user);
        System.out.println(insert);
    }
控制台结果:
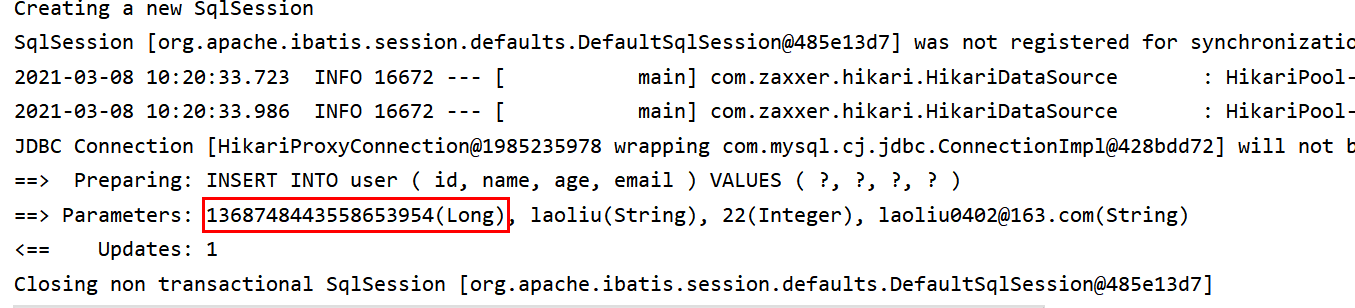
代码中并没有插入id,结果会自动生成一个id
数据库插入的id的默认值为:全局的唯一id
分布式系统唯一id生成:https://www.cnblogs.com/haoxinyue/p/5208136.html
雪花算法:
snowflake是Twitter开源的分布式ID生成算法,结果是一个long型的ID。其核心思想是:使用41bit作为 毫秒数,10bit作为机器的ID(5个bit是数据中心,5个bit的机器ID),12bit作为毫秒内的流水号(意味 着每个节点在每毫秒可以产生 4096 个 ID),最后还有一个符号位,永远是0。可以保证几乎全球唯 一!
主键自增
我们需要配置主键自增:
实体类字段上 @TableId(type = IdType.AUTO)
数据库中id字段一定要设置自增!
再次测试插入即可
其余源码解释
public enum IdType {
    AUTO(0), // 数据库id自增
    NONE(1), // 未设置主键
    INPUT(2), // 手动输入
    ID_WORKER(3), // 默认的全局唯一id
    UUID(4), // 全局唯一id uuid
    ID_WORKER_STR(5); //ID_WORKER 字符串表示法
}
自动填充
创建时间、修改时间!这些个操作一遍都是自动化完成的,我们不希望手动更新!
阿里巴巴开发手册:所有的数据库表:gmt_create、gmt_modified几乎所有的表都要配置上!而且需要自动化!
方式一:数据库级别(工作中不允许你修改数据库)
-
在表中新增字段 create_time, update_time
-
再次测试插入方法,我们需要先把实体类同步!
private Date createTime; private Date updateTime; -
再次更新查看结果即可

方式二:代码级别,推荐使用
-
删除数据库的默认值、更新操作!
-
实体类字段属性上需要增加注解
@TableField(fill = FieldFill.INSERT)
private Date createTime;
@TableField(fill = FieldFill.INSERT_UPDATE)
private Date updateTime;
public enum FieldFill { /** * 默认不处理 */ DEFAULT, /** * 插入时填充字段 */ INSERT, /** * 更新时填充字段 */ UPDATE, /** * 插入和更新时填充字段 */ INSERT_UPDATE } -
创建一个
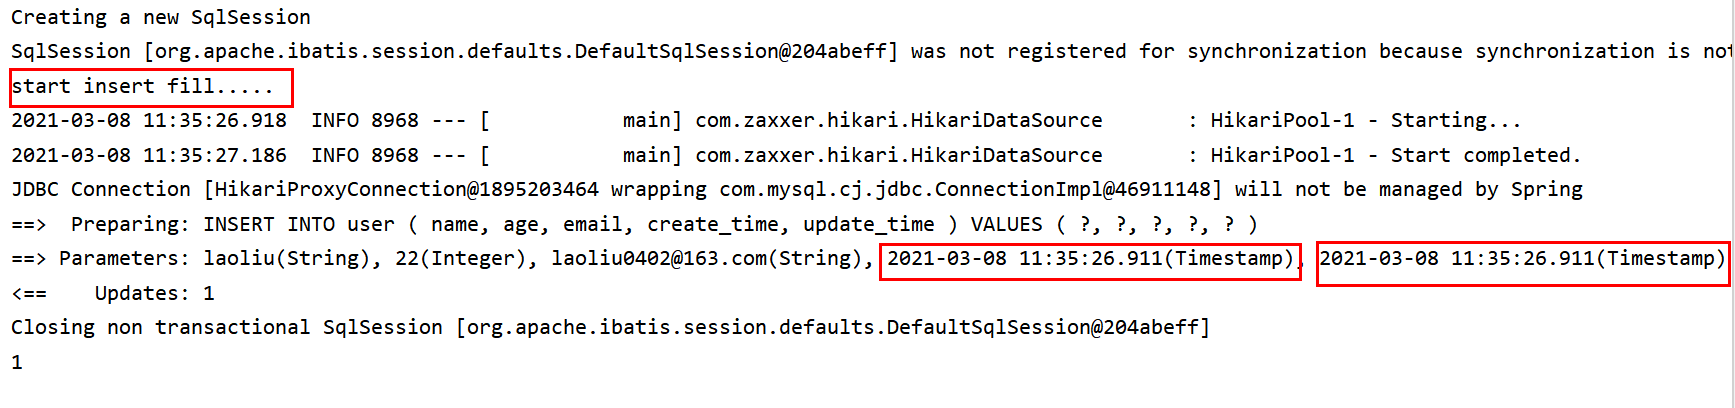
MyMetaObjectHandler类,编写处理器来处理这个@TableField注解即可!@Component public class MyMetaObjectHandler implements MetaObjectHandler { //插入填充策略 @Override public void insertFill(MetaObject metaObject) { System.out.println("start insert fill....."); this.setFieldValByName("createTime",new Date(),metaObject); this.setFieldValByName("updateTime",new Date(),metaObject); } //更新时填充策略 @Override public void updateFill(MetaObject metaObject) { System.out.println("start update fill....."); this.setFieldValByName("updateTime",new Date(),metaObject); } } -
测试
控制台输出:
-
乐观锁
在面试过程中,我们经常会被问到乐观锁,悲观锁!这个其实非常简单!
乐观锁 : 故名思意十分乐观,它总是认为不会出现问题,无论干什么不去上锁!如果出现了问题, 再次更新值测试
悲观锁:故名思意十分悲观,它总是认为总是出现问题,无论干什么都会上锁!再去操作!
我们这里主要讲解 乐观锁机制!
乐观锁实现方式:
取出记录时,获取当前 version
更新时,带上这个version
执行更新时, set version = newVersion where version = oldVersion
如果version不对,就更新失败
乐观锁:1、先查询,获得版本号 version = 1
-- A
update user set name = "kuangshen", version = version + 1
where id = 2 and version = 1
-- B 线程抢先完成,这个时候 version = 2,会导致 A 修改失败!
update user set name = "kuangshen", version = version + 1
where id = 2 and version = 1
测试一下MP的乐观锁插件
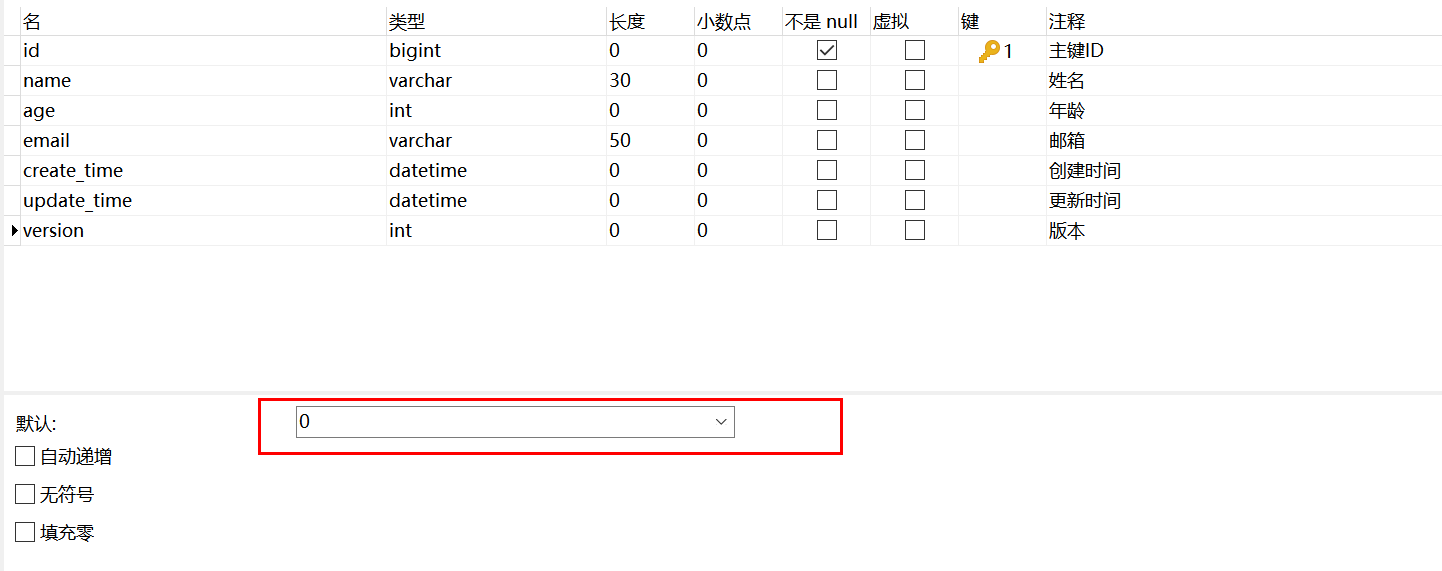
-
给数据库中增加version字段!给version设置一个默认值
-
我们实体类加对应的字段
@Version //乐观锁Version注解 private Integer version; -
注册组件,创建一个配置类
MybatisPlusConfig@EnableTransactionManagement @Configuration @MapperScan("con.kunchi.mybatisplus.mapper") public class MyBatisPlusConfig { @Bean public MybatisPlusInterceptor mybatisPlusInterceptor() { MybatisPlusInterceptor interceptor = new MybatisPlusInterceptor(); //分页插件 interceptor.addInnerInterceptor(new PaginationInnerInterceptor(DbType.MYSQL)); //乐观锁插件 interceptor.addInnerInterceptor(new OptimisticLockerInnerInterceptor()); return interceptor; } } -
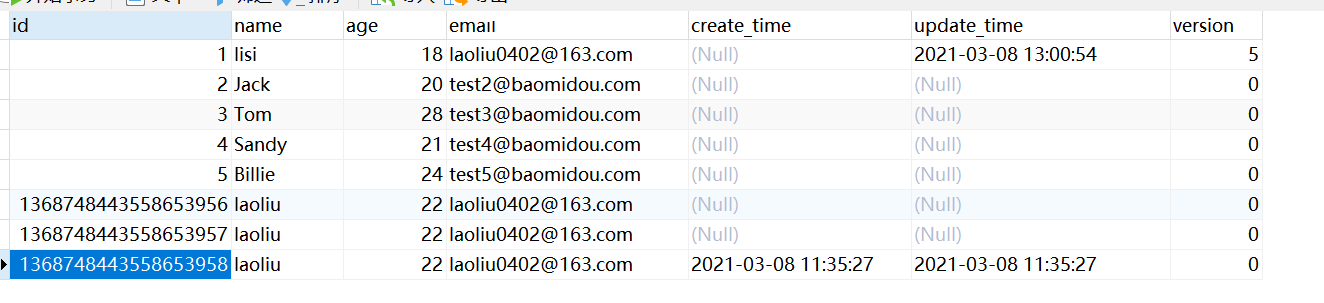
测试乐观锁
// 测试乐观锁成功! @Test public void testOptimisticLocker(){ // 1、查询用户信息 User user = userMapper.selectById(1L); // 2、修改用户信息 user.setName("zhangsan"); user.setEmail("laoliu0402@163.com"); // 3、执行更新操作 userMapper.updateById(user); } // 测试乐观锁失败!多线程下 @Test public void testOptimisticLocker2(){ // 线程 1 User user = userMapper.selectById(1L); user.setName("laoliu0402"); user.setEmail("1416476402@qq.com"); // 模拟另外一个线程执行了插队操作 User user2 = userMapper.selectById(1L); user2.setName("lisi"); user2.setEmail("laoliu0402@163.com"); userMapper.updateById(user2); //这里是user2 // 自旋锁来多次尝试提交! userMapper.updateById(user); // 如果没有乐观锁就会覆盖插队线程的值! }查看数据库结果
安装
全新的 MyBatis-Plus 3.0 版本基于 JDK8,提供了 lambda 形式的调用,所以安装集成 MP3.0 要求如下:
- JDK 8+
- Maven or Gradle
Release
Spring Boot
Maven:
<dependency>
<groupId>com.baomidou</groupId>
<artifactId>mybatis-plus-boot-starter</artifactId>
<version>3.4.2</version>
</dependency>
Gradle:
compile group: 'com.baomidou', name: 'mybatis-plus-boot-starter', version: '3.4.2'
Spring MVC
Maven:
<dependency>
<groupId>com.baomidou</groupId>
<artifactId>mybatis-plus</artifactId>
<version>3.4.2</version>
</dependency>
Gradle:
compile group: 'com.baomidou', name: 'mybatis-plus', version: '3.4.2'
WARNING
引入
MyBatis-Plus之后请不要再次引入MyBatis以及MyBatis-Spring,以避免因版本差异导致的问题。
Snapshot
快照 SNAPSHOT 版本需要添加仓库,且版本号为快照版本
配置
MyBatis-Plus 的配置异常的简单,我们仅需要一些简单的配置即可使用 MyBatis-Plus 的强大功能!
-
Spring Boot 工程:
-
配置 MapperScan 注解
@SpringBootApplication @MapperScan("com.baomidou.mybatisplus.samples.quickstart.mapper") public class Application { public static void main(String[] args) { SpringApplication.run(Application.class, args); } }
-
-
Spring 工程:
-
配置 MapperScan
<bean class="org.mybatis.spring.mapper.MapperScannerConfigurer"> <property name="basePackage" value="com.baomidou.mybatisplus.samples.quickstart.mapper"/> </bean> -
调整 SqlSessionFactory 为 MyBatis-Plus 的 SqlSessionFactory
<bean id="sqlSessionFactory" class="com.baomidou.mybatisplus.extension.spring.MybatisSqlSessionFactoryBean"> <property name="dataSource" ref="dataSource"/> </bean>
-
通常来说,一般的简单工程,通过以上配置即可正常使用 MyBatis-Plus
同时 MyBatis-Plus 提供了大量的个性化配置来满足不同复杂度的工程,大家可根据自己的项目按需取用
注解
介绍
MybatisPlus注解包相关类详解(更多详细描述可点击查看源码注释)
注解类包:
👉 mybatis-plus-annotation(opens new window)
@TableName
- 描述:表名注解
| 属性 | 类型 | 必须指定 | 默认值 | 描述 |
|---|---|---|---|---|
| value | String | 否 | “” | 表名 |
| schema | String | 否 | “” | schema |
| keepGlobalPrefix | boolean | 否 | false | 是否保持使用全局的 tablePrefix 的值(如果设置了全局 tablePrefix 且自行设置了 value 的值) |
| resultMap | String | 否 | “” | xml 中 resultMap 的 id |
| autoResultMap | boolean | 否 | false | 是否自动构建 resultMap 并使用(如果设置 resultMap 则不会进行 resultMap 的自动构建并注入) |
| excludeProperty | String[] | 否 | {} | 需要排除的属性名(@since 3.3.1) |
关于autoResultMap的说明:
mp会自动构建一个ResultMap并注入到mybatis里(一般用不上).下面讲两句: 因为mp底层是mybatis,所以一些mybatis的常识你要知道,mp只是帮你注入了常用crud到mybatis里 注入之前可以说是动态的(根据你entity的字段以及注解变化而变化),但是注入之后是静态的(等于你写在xml的东西) 而对于直接指定typeHandler,mybatis只支持你写在2个地方:
- 定义在resultMap里,只作用于select查询的返回结果封装
- 定义在
insert和updatesql的#{property}里的property后面(例:#{property,typehandler=xxx.xxx.xxx}),只作用于设置值而除了这两种直接指定typeHandler,mybatis有一个全局的扫描你自己的typeHandler包的配置,这是根据你的property的类型去找typeHandler并使用.
@TableId
- 描述:主键注解
| 属性 | 类型 | 必须指定 | 默认值 | 描述 |
|---|---|---|---|---|
| value | String | 否 | “” | 主键字段名 |
| type | Enum | 否 | IdType.NONE | 主键类型 |
#IdType(opens new window)
| 值 | 描述 |
|---|---|
| AUTO | 数据库ID自增 |
| NONE | 无状态,该类型为未设置主键类型(注解里等于跟随全局,全局里约等于 INPUT) |
| INPUT | insert前自行set主键值 |
| ASSIGN_ID | 分配ID(主键类型为Number(Long和Integer)或String)(since 3.3.0),使用接口IdentifierGenerator的方法nextId(默认实现类为DefaultIdentifierGenerator雪花算法) |
| ASSIGN_UUID | 分配UUID,主键类型为String(since 3.3.0),使用接口IdentifierGenerator的方法nextUUID(默认default方法) |
| ID_WORKER | 分布式全局唯一ID 长整型类型(please use ASSIGN_ID) |
| UUID | 32位UUID字符串(please use ASSIGN_UUID) |
| ID_WORKER_STR | 分布式全局唯一ID 字符串类型(please use ASSIGN_ID) |
@TableField
- 描述:字段注解(非主键)
| 属性 | 类型 | 必须指定 | 默认值 | 描述 |
|---|---|---|---|---|
| value | String | 否 | “” | 数据库字段名 |
| el | String | 否 | “” | 映射为原生 #{ ... } 逻辑,相当于写在 xml 里的 #{ ... } 部分 |
| exist | boolean | 否 | true | 是否为数据库表字段 |
| condition | String | 否 | “” | 字段 where 实体查询比较条件,有值设置则按设置的值为准,没有则为默认全局的 %s=#{%s},参考(opens new window) |
| update | String | 否 | “” | 字段 update set 部分注入, 例如:update="%s+1":表示更新时会set version=version+1(该属性优先级高于 el 属性) |
| insertStrategy | Enum | N | DEFAULT | 举例:NOT_NULL: insert into table_a(<if test="columnProperty != null">column</if>) values (<if test="columnProperty != null">#{columnProperty}</if>) |
| updateStrategy | Enum | N | DEFAULT | 举例:IGNORED: update table_a set column=#{columnProperty} |
| whereStrategy | Enum | N | DEFAULT | 举例:NOT_EMPTY: where <if test="columnProperty != null and columnProperty!=''">column=#{columnProperty}</if> |
| fill | Enum | 否 | FieldFill.DEFAULT | 字段自动填充策略 |
| select | boolean | 否 | true | 是否进行 select 查询 |
| keepGlobalFormat | boolean | 否 | false | 是否保持使用全局的 format 进行处理 |
| jdbcType | JdbcType | 否 | JdbcType.UNDEFINED | JDBC类型 (该默认值不代表会按照该值生效) |
| typeHandler | Class<? extends TypeHandler> | 否 | UnknownTypeHandler.class | 类型处理器 (该默认值不代表会按照该值生效) |
| numericScale | String | 否 | “” | 指定小数点后保留的位数 |
关于jdbcType和typeHandler以及numericScale的说明:
numericScale只生效于 update 的sql. jdbcType和typeHandler如果不配合@TableName#autoResultMap = true一起使用,也只生效于 update 的sql. 对于typeHandler如果你的字段类型和set进去的类型为equals关系,则只需要让你的typeHandler让Mybatis加载到即可,不需要使用注解
#FieldStrategy(opens new window)
| 值 | 描述 |
|---|---|
| IGNORED | 忽略判断 |
| NOT_NULL | 非NULL判断 |
| NOT_EMPTY | 非空判断(只对字符串类型字段,其他类型字段依然为非NULL判断) |
| DEFAULT | 追随全局配置 |
#FieldFill(opens new window)
| 值 | 描述 |
|---|---|
| DEFAULT | 默认不处理 |
| INSERT | 插入时填充字段 |
| UPDATE | 更新时填充字段 |
| INSERT_UPDATE | 插入和更新时填充字段 |
@Version
- 描述:乐观锁注解、标记
@Verison在字段上
@EnumValue
- 描述:通枚举类注解(注解在枚举字段上)
@TableLogic
- 描述:表字段逻辑处理注解(逻辑删除)
| 属性 | 类型 | 必须指定 | 默认值 | 描述 |
|---|---|---|---|---|
| value | String | 否 | “” | 逻辑未删除值 |
| delval | String | 否 | “” | 逻辑删除值 |
@SqlParser
see @InterceptorIgnore
@KeySequence
- 描述:序列主键策略
oracle - 属性:value、resultMap
| 属性 | 类型 | 必须指定 | 默认值 | 描述 |
|---|---|---|---|---|
| value | String | 否 | “” | 序列名 |
| clazz | Class | 否 | Long.class | id的类型, 可以指定String.class,这样返回的Sequence值是字符串"1" |
@InterceptorIgnore
see 插件主体
核心功能
代码生成器
AutoGenerator 是 MyBatis-Plus 的代码生成器,通过 AutoGenerator 可以快速生成 Entity、Mapper、Mapper XML、Service、Controller 等各个模块的代码,极大的提升了开发效率。
特别说明:
自定义模板有哪些可用参数?Github (opens new window)AbstractTemplateEngine 类中方法 getObjectMap 返回 objectMap 的所有值都可用。
演示效果图:
// 演示例子,执行 main 方法控制台输入模块表名回车自动生成对应项目目录中
public class CodeGenerator {
/**
* <p>
* 读取控制台内容
* </p>
*/
public static String scanner(String tip) {
Scanner scanner = new Scanner(System.in);
StringBuilder help = new StringBuilder();
help.append("请输入" + tip + ":");
System.out.println(help.toString());
if (scanner.hasNext()) {
String ipt = scanner.next();
if (StringUtils.isNotBlank(ipt)) {
return ipt;
}
}
throw new MybatisPlusException("请输入正确的" + tip + "!");
}
public static void main(String[] args) {
// 代码生成器
AutoGenerator mpg = new AutoGenerator();
// 全局配置
GlobalConfig gc = new GlobalConfig();
String projectPath = System.getProperty("user.dir");
gc.setOutputDir(projectPath + "/src/main/java");
gc.setAuthor("laoliu");
gc.setOpen(false);
// gc.setSwagger2(true); 实体属性 Swagger2 注解
mpg.setGlobalConfig(gc);
// 数据源配置
DataSourceConfig dsc = new DataSourceConfig();
dsc.setUrl("jdbc:mysql://localhost:3306/test?useUnicode=true&useSSL=false&characterEncoding=utf8");
// dsc.setSchemaName("public");
dsc.setDriverName("com.mysql.cj.jdbc.Driver");
dsc.setUsername("root");
dsc.setPassword("");
mpg.setDataSource(dsc);
// 包配置
PackageConfig pc = new PackageConfig();
pc.setModuleName(scanner("模块名"));
pc.setParent("com.baomidou.ant");
mpg.setPackageInfo(pc);
// 自定义配置
InjectionConfig cfg = new InjectionConfig() {
@Override
public void initMap() {
// to do nothing
}
};
// 如果模板引擎是 freemarker
String templatePath = "/templates/mapper.xml.ftl";
// 如果模板引擎是 velocity
// String templatePath = "/templates/mapper.xml.vm";
// 自定义输出配置
List<FileOutConfig> focList = new ArrayList<>();
// 自定义配置会被优先输出
focList.add(new FileOutConfig(templatePath) {
@Override
public String outputFile(TableInfo tableInfo) {
// 自定义输出文件名 , 如果你 Entity 设置了前后缀、此处注意 xml 的名称会跟着发生变化!!
return projectPath + "/src/main/resources/mapper/" + pc.getModuleName()
+ "/" + tableInfo.getEntityName() + "Mapper" + StringPool.DOT_XML;
}
});
/*
cfg.setFileCreate(new IFileCreate() {
@Override
public boolean isCreate(ConfigBuilder configBuilder, FileType fileType, String filePath) {
// 判断自定义文件夹是否需要创建
checkDir("调用默认方法创建的目录,自定义目录用");
if (fileType == FileType.MAPPER) {
// 已经生成 mapper 文件判断存在,不想重新生成返回 false
return !new File(filePath).exists();
}
// 允许生成模板文件
return true;
}
});
*/
cfg.setFileOutConfigList(focList);
mpg.setCfg(cfg);
// 配置模板
TemplateConfig templateConfig = new TemplateConfig();
// 配置自定义输出模板
//指定自定义模板路径,注意不要带上.ftl/.vm, 会根据使用的模板引擎自动识别
// templateConfig.setEntity("templates/entity2.java");
// templateConfig.setService();
// templateConfig.setController();
templateConfig.setXml(null);
mpg.setTemplate(templateConfig);
// 策略配置
StrategyConfig strategy = new StrategyConfig();
strategy.setNaming(NamingStrategy.underline_to_camel);
strategy.setColumnNaming(NamingStrategy.underline_to_camel);
strategy.setSuperEntityClass("你自己的父类实体,没有就不用设置!");
strategy.setEntityLombokModel(true);
strategy.setRestControllerStyle(true);
// 公共父类
strategy.setSuperControllerClass("你自己的父类控制器,没有就不用设置!");
// 写于父类中的公共字段
strategy.setSuperEntityColumns("id");
strategy.setInclude(scanner("表名,多个英文逗号分割").split(","));
strategy.setControllerMappingHyphenStyle(true);
strategy.setTablePrefix(pc.getModuleName() + "_");
mpg.setStrategy(strategy);
mpg.setTemplateEngine(new FreemarkerTemplateEngine());
mpg.execute();
}
}
更多详细配置,请参考代码生成器配置一文。
使用教程
添加依赖
MyBatis-Plus 从 3.0.3 之后移除了代码生成器与模板引擎的默认依赖,需要手动添加相关依赖:
-
添加 代码生成器 依赖
<dependency> <groupId>com.baomidou</groupId> <artifactId>mybatis-plus-generator</artifactId> <version>3.4.2</version> </dependency> -
添加 模板引擎 依赖,MyBatis-Plus 支持 Velocity(默认)、Freemarker、Beetl,用户可以选择自己熟悉的模板引擎,如果都不满足您的要求,可以采用自定义模板引擎。
Velocity(默认):
<dependency> <groupId>org.apache.velocity</groupId> <artifactId>velocity-engine-core</artifactId> <version>2.2</version> </dependency>Freemarker:
<dependency> <groupId>org.freemarker</groupId> <artifactId>freemarker</artifactId> <version>2.3.31</version> </dependency>Beetl:
<dependency> <groupId>com.ibeetl</groupId> <artifactId>beetl</artifactId> <version>3.3.2.RELEASE</version> </dependency>注意!如果您选择了非默认引擎,需要在 AutoGenerator 中 设置模板引擎。
AutoGenerator generator = new AutoGenerator(); // set freemarker engine generator.setTemplateEngine(new FreemarkerTemplateEngine()); // set beetl engine generator.setTemplateEngine(new BeetlTemplateEngine()); // set custom engine (reference class is your custom engine class) generator.setTemplateEngine(new CustomTemplateEngine()); // other config ...
编写配置
MyBatis-Plus 的代码生成器提供了大量的自定义参数供用户选择,能够满足绝大部分人的使用需求。
-
配置 GlobalConfig
GlobalConfig globalConfig = new GlobalConfig(); globalConfig.setOutputDir(System.getProperty("user.dir") + "/src/main/java"); globalConfig.setAuthor("jobob"); globalConfig.setOpen(false); -
配置 DataSourceConfig
DataSourceConfig dataSourceConfig = new DataSourceConfig(); dataSourceConfig.setUrl("jdbc:mysql://localhost:3306/ant? useUnicode=true&useSSL=false&characterEncoding=utf8"); dataSourceConfig.setDriverName("com.mysql.jdbc.Driver"); dataSourceConfig.setUsername("root"); dataSourceConfig.setPassword("password");
自定义模板引擎
请继承类 com.baomidou.mybatisplus.generator.engine.AbstractTemplateEngine
自定义代码模板
//指定自定义模板路径, 位置:/resources/templates/entity2.java.ftl(或者是.vm)
//注意不要带上.ftl(或者是.vm), 会根据使用的模板引擎自动识别
TemplateConfig templateConfig = new TemplateConfig()
.setEntity("templates/entity2.java");
AutoGenerator mpg = new AutoGenerator();
//配置自定义模板
mpg.setTemplate(templateConfig);
自定义属性注入
InjectionConfig injectionConfig = new InjectionConfig() {
//自定义属性注入:abc
//在.ftl(或者是.vm)模板中,通过${cfg.abc}获取属性
@Override
public void initMap() {
Map<String, Object> map = new HashMap<>();
map.put("abc", this.getConfig().getGlobalConfig().getAuthor() + "-mp");
this.setMap(map);
}
};
AutoGenerator mpg = new AutoGenerator();
//配置自定义属性注入
mpg.setCfg(injectionConfig);
entity2.java.ftl
自定义属性注入abc=${cfg.abc}
entity2.java.vm
自定义属性注入abc=$!{cfg.abc}
字段其他信息查询注入
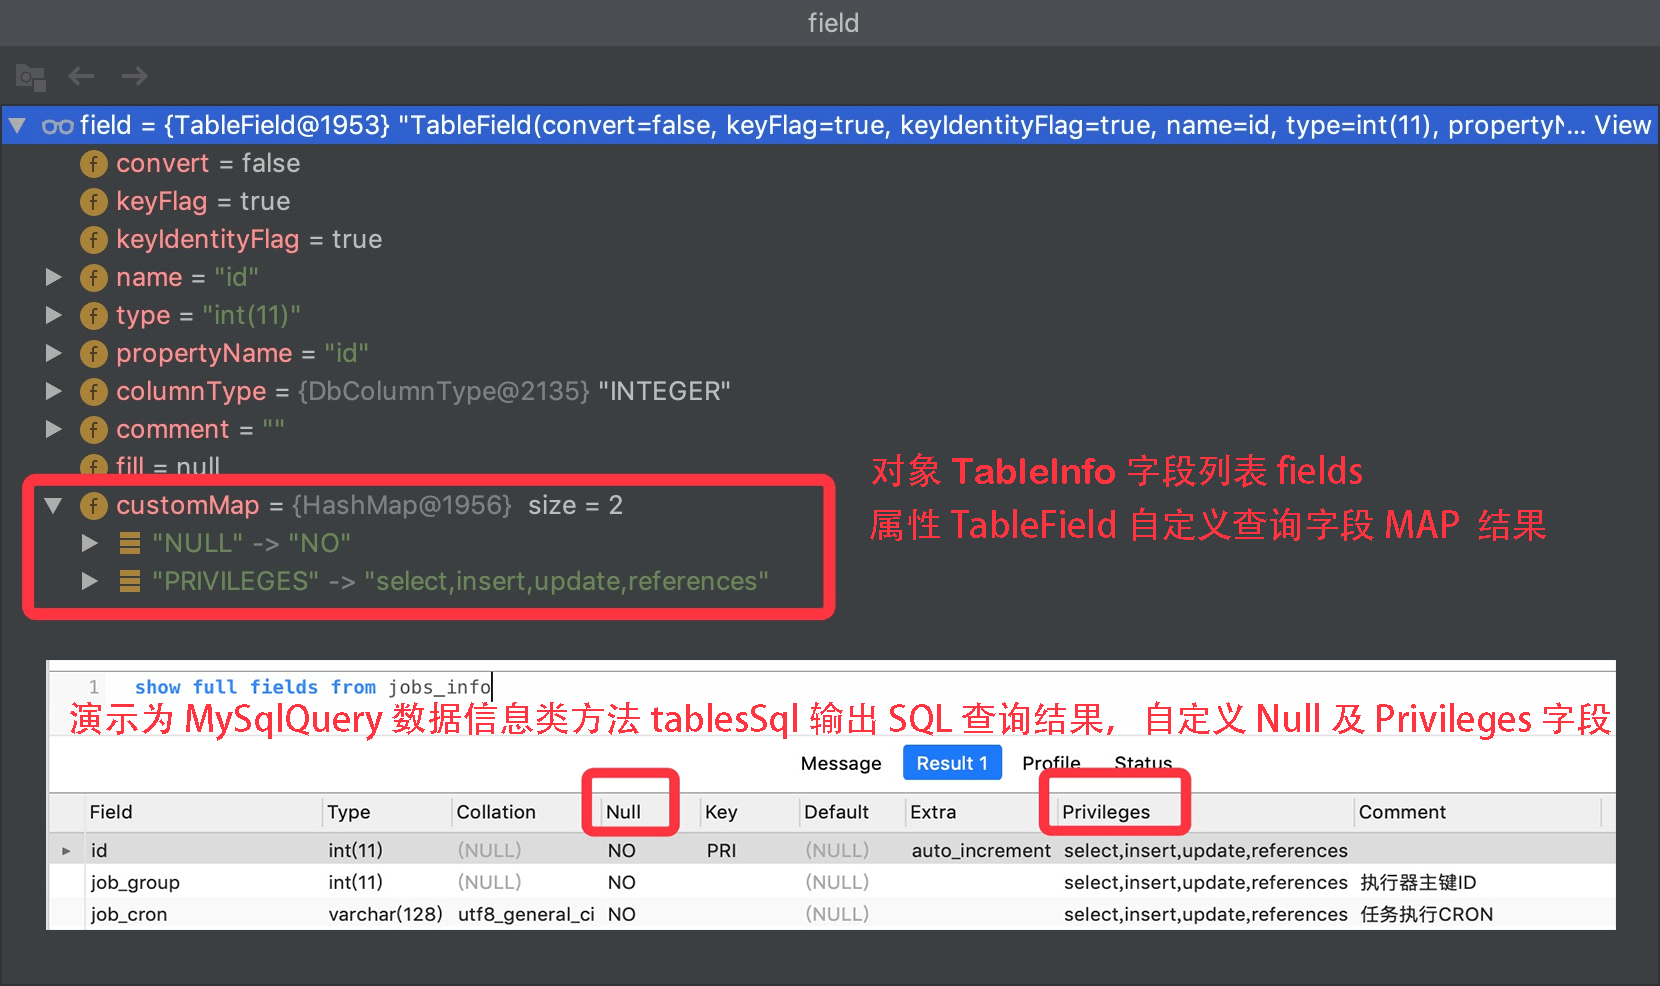
new DataSourceConfig().setDbQuery(new MySqlQuery() {
/**
* 重写父类预留查询自定义字段<br>
* 这里查询的 SQL 对应父类 tableFieldsSql 的查询字段,默认不能满足你的需求请重写它<br>
* 模板中调用: table.fields 获取所有字段信息,
* 然后循环字段获取 field.customMap 从 MAP 中获取注入字段如下 NULL 或者 PRIVILEGES
*/
@Override
public String[] fieldCustom() {
return new String[]{"NULL", "PRIVILEGES"};
}
})
测试模板
-
导入依赖
<!-- https://mvnrepository.com/artifact/com.baomidou/mybatis-plus-generator --> <dependency> <groupId>com.baomidou</groupId> <artifactId>mybatis-plus-generator</artifactId> <version>3.4.1</version> </dependency> <!-- 模板引擎 --> <dependency> <groupId>org.apache.velocity</groupId> <artifactId>velocity-engine-core</artifactId> <version>2.0</version> </dependency> -
新建一个
CodeGenerator.java类public class CodeGenerator { public static void main(String[] args) { // 需要构建一个 代码自动生成器 对象 AutoGenerator mpg = new AutoGenerator(); // 配置策略 // 1、全局配置 GlobalConfig gc = new GlobalConfig(); String projectPath = System.getProperty("user.dir"); gc.setOutputDir(projectPath+"/src/main/java"); gc.setAuthor("laoliu"); gc.setOpen(false); gc.setFileOverride(false); // 是否覆盖 gc.setServiceName("%sService"); // 去Service的I前缀 gc.setIdType(IdType.ID_WORKER); gc.setDateType(DateType.ONLY_DATE); gc.setSwagger2(true); mpg.setGlobalConfig(gc); //2、设置数据源 DataSourceConfig dsc = new DataSourceConfig(); dsc.setUrl("jdbc:mysql://localhost:3306/test? useSSL=false&useUnicode=true&characterEncoding=utf-8&serverTimezone=GMT%2B8"); dsc.setDriverName("com.mysql.cj.jdbc.Driver"); dsc.setUsername("root"); dsc.setPassword(""); dsc.setDbType(DbType.MYSQL); mpg.setDataSource(dsc); //3、包的配置 PackageConfig pc = new PackageConfig(); //只需要改实体类名字 和包名 还有 数据库配置即可 pc.setModuleName("generator"); pc.setParent("com.kunchi"); pc.setEntity("entity"); pc.setMapper("mapper"); pc.setService("service"); pc.setController("controller"); mpg.setPackageInfo(pc); //4、策略配置 StrategyConfig strategy = new StrategyConfig(); strategy.setInclude("user"); // 设置要映射的表名 strategy.setNaming(NamingStrategy.underline_to_camel); strategy.setColumnNaming(NamingStrategy.underline_to_camel); strategy.setEntityLombokModel(true); // 自动lombok; strategy.setLogicDeleteFieldName("deleted"); // 自动填充配置 TableFill gmtCreate = new TableFill("gmt_create", FieldFill.INSERT); TableFill gmtModified = new TableFill("gmt_modified", FieldFill.INSERT_UPDATE); ArrayList<TableFill> tableFills = new ArrayList<>(); tableFills.add(gmtCreate); tableFills.add(gmtModified); strategy.setTableFillList(tableFills); // 乐观锁 strategy.setVersionFieldName("version"); strategy.setRestControllerStyle(true); strategy.setControllerMappingHyphenStyle(true); // localhost:8080/hello_id_2 mpg.setStrategy(strategy); mpg.execute(); //执行 } } -
运行
CodeGenerator.java中的main方法 -
生成效果图

CRUD接口
Service CRUD 接口
说明:
- 通用ServiceCRUD封装IService接口,进一步封装CRUD采用
get查询单行remove删除list查询集合page分页前缀命名方式区分Mapper层避免混淆- 泛型
T为任意实体对象- 建议如果存在自定义通用Service方法的可能,请创建自己的
IBaseService继承Mybatis-Plus提供的基类- 对象
Wrapper为条件构造器
Save
// 插入一条记录(选择字段,策略插入)
boolean save(T entity);
// 插入(批量)
boolean saveBatch(Collection<T> entityList);
// 插入(批量)
boolean saveBatch(Collection<T> entityList, int batchSize);
参数说明
| 类型 | 参数名 | 描述 |
|---|---|---|
| T | entity | 实体对象 |
| Collection | entityList | 实体对象集合 |
| int | batchSize | 插入批次数量 |
SaveOrUpdate
// TableId 注解存在更新记录,否插入一条记录
boolean saveOrUpdate(T entity);
// 根据updateWrapper尝试更新,否继续执行saveOrUpdate(T)方法
boolean saveOrUpdate(T entity, Wrapper<T> updateWrapper);
// 批量修改插入
boolean saveOrUpdateBatch(Collection<T> entityList);
// 批量修改插入
boolean saveOrUpdateBatch(Collection<T> entityList, int batchSize);
参数说明
| 类型 | 参数名 | 描述 |
|---|---|---|
| T | entity | 实体对象 |
| Wrapper | updateWrapper | 实体对象封装操作类 UpdateWrapper |
| Collection | entityList | 实体对象集合 |
| int | batchSize | 插入批次数量 |
Remove
// 根据 entity 条件,删除记录
boolean remove(Wrapper<T> queryWrapper);
// 根据 ID 删除
boolean removeById(Serializable id);
// 根据 columnMap 条件,删除记录
boolean removeByMap(Map<String, Object> columnMap);
// 删除(根据ID 批量删除)
boolean removeByIds(Collection<? extends Serializable> idList);
参数说明
| 类型 | 参数名 | 描述 |
|---|---|---|
| Wrapper | queryWrapper | 实体包装类 QueryWrapper |
| Serializable | id | 主键ID |
| Map<String, Object> | columnMap | 表字段 map 对象 |
| Collection<? extends Serializable> | idList | 主键ID列表 |
Update
// 根据 UpdateWrapper 条件,更新记录 需要设置sqlset
boolean update(Wrapper<T> updateWrapper);
// 根据 whereEntity 条件,更新记录
boolean update(T entity, Wrapper<T> updateWrapper);
// 根据 ID 选择修改
boolean updateById(T entity);
// 根据ID 批量更新
boolean updateBatchById(Collection<T> entityList);
// 根据ID 批量更新
boolean updateBatchById(Collection<T> entityList, int batchSize);
参数说明
| 类型 | 参数名 | 描述 |
|---|---|---|
| Wrapper | updateWrapper | 实体对象封装操作类 UpdateWrapper |
| T | entity | 实体对象 |
| Collection | entityList | 实体对象集合 |
| int | batchSize | 更新批次数量 |
Get
// 根据 ID 查询
T getById(Serializable id);
// 根据 Wrapper,查询一条记录。结果集,如果是多个会抛出异常,随机取一条加上限制条件 wrapper.last("LIMIT 1")
T getOne(Wrapper<T> queryWrapper);
// 根据 Wrapper,查询一条记录
T getOne(Wrapper<T> queryWrapper, boolean throwEx);
// 根据 Wrapper,查询一条记录
Map<String, Object> getMap(Wrapper<T> queryWrapper);
// 根据 Wrapper,查询一条记录
<V> V getObj(Wrapper<T> queryWrapper, Function<? super Object, V> mapper);
参数说明
| 类型 | 参数名 | 描述 |
|---|---|---|
| Serializable | id | 主键ID |
| Wrapper | queryWrapper | 实体对象封装操作类 QueryWrapper |
| boolean | throwEx | 有多个 result 是否抛出异常 |
| T | entity | 实体对象 |
| Function<? super Object, V> | mapper | 转换函数 |
List
// 查询所有
List<T> list();
// 查询列表
List<T> list(Wrapper<T> queryWrapper);
// 查询(根据ID 批量查询)
Collection<T> listByIds(Collection<? extends Serializable> idList);
// 查询(根据 columnMap 条件)
Collection<T> listByMap(Map<String, Object> columnMap);
// 查询所有列表
List<Map<String, Object>> listMaps();
// 查询列表
List<Map<String, Object>> listMaps(Wrapper<T> queryWrapper);
// 查询全部记录
List<Object> listObjs();
// 查询全部记录
<V> List<V> listObjs(Function<? super Object, V> mapper);
// 根据 Wrapper 条件,查询全部记录
List<Object> listObjs(Wrapper<T> queryWrapper);
// 根据 Wrapper 条件,查询全部记录
<V> List<V> listObjs(Wrapper<T> queryWrapper, Function<? super Object, V> mapper);
参数说明
| 类型 | 参数名 | 描述 |
|---|---|---|
| Wrapper | queryWrapper | 实体对象封装操作类 QueryWrapper |
| Collection<? extends Serializable> | idList | 主键ID列表 |
| Map<?String, Object> | columnMap | 表字段 map 对象 |
| Function<? super Object, V> | mapper | 转换函数 |
Page
// 无条件分页查询
IPage<T> page(IPage<T> page);
// 条件分页查询
IPage<T> page(IPage<T> page, Wrapper<T> queryWrapper);
// 无条件分页查询
IPage<Map<String, Object>> pageMaps(IPage<T> page);
// 条件分页查询
IPage<Map<String, Object>> pageMaps(IPage<T> page, Wrapper<T> queryWrapper);
参数说明
| 类型 | 参数名 | 描述 |
|---|---|---|
| IPage | page | 翻页对象 |
| Wrapper | queryWrapper | 实体对象封装操作类 QueryWrapper |
Count
// 查询总记录数
int count();
// 根据 Wrapper 条件,查询总记录数
int count(Wrapper<T> queryWrapper);
参数说明
| 类型 | 参数名 | 描述 |
|---|---|---|
| Wrapper | queryWrapper | 实体对象封装操作类 QueryWrapper |
Chain(链式查询、链式更改)
query
// 链式查询 普通
QueryChainWrapper<T> query();
// 链式查询 lambda 式。注意:不支持 Kotlin
LambdaQueryChainWrapper<T> lambdaQuery();
// 示例:
query().eq("column", value).one();
lambdaQuery().eq(Entity::getId, value).list();
update
// 链式更改 普通
UpdateChainWrapper<T> update();
// 链式更改 lambda 式。注意:不支持 Kotlin
LambdaUpdateChainWrapper<T> lambdaUpdate();
// 示例:
update().eq("column", value).remove();
lambdaUpdate().eq(Entity::getId, value).update(entity);
Mapper CRUD 接口
说明:
- 通过CRUD封装BaseMapper,为Mybatis-Plus启动自动解析实体表关系映射转换为Mybatis内部对象注入容器
- 泛型T为任意实体对象
- 参数Serializable为任意类型的主键Mybatis-Plus
不推荐使用复合主键约定每一张表都有自己唯一id主键- 对象Wrapper为条件构造器
Insert
// 插入一条记录
int insert(T entity);
参数说明
| 类型 | 参数名 | 描述 |
|---|---|---|
| T | entity | 实体对象 |
Delete
// 根据 entity 条件,删除记录
int delete(@Param(Constants.WRAPPER) Wrapper<T> wrapper);
// 删除(根据ID 批量删除)
int deleteBatchIds(@Param(Constants.COLLECTION) Collection<? extends Serializable> idList);
// 根据 ID 删除
int deleteById(Serializable id);
// 根据 columnMap 条件,删除记录
int deleteByMap(@Param(Constants.COLUMN_MAP) Map<String, Object> columnMap);
参数说明
| 类型 | 参数名 | 描述 |
|---|---|---|
| Wrapper | wrapper | 实体对象封装操作类(可以为 null) |
| Collection<? extends Serializable> | idList | 主键ID列表(不能为 null 以及 empty) |
| Serializable | id | 主键ID |
| Map<String, Object> | columnMap | 表字段 map 对象 |
Update
// 根据 whereEntity 条件,更新记录
int update(@Param(Constants.ENTITY) T entity, @Param(Constants.WRAPPER) Wrapper<T> updateWrapper);
// 根据 ID 修改
int updateById(@Param(Constants.ENTITY) T entity);
参数说明
| 类型 | 参数名 | 描述 |
|---|---|---|
| T | entity | 实体对象 (set 条件值,可为 null) |
| Wrapper | updateWrapper | 实体对象封装操作类(可以为 null,里面的 entity 用于生成 where 语句) |
Select
// 根据 ID 查询
T selectById(Serializable id);
// 根据 entity 条件,查询一条记录
T selectOne(@Param(Constants.WRAPPER) Wrapper<T> queryWrapper);
// 查询(根据ID 批量查询)
List<T> selectBatchIds(@Param(Constants.COLLECTION) Collection<? extends Serializable> idList);
// 根据 entity 条件,查询全部记录
List<T> selectList(@Param(Constants.WRAPPER) Wrapper<T> queryWrapper);
// 查询(根据 columnMap 条件)
List<T> selectByMap(@Param(Constants.COLUMN_MAP) Map<String, Object> columnMap);
// 根据 Wrapper 条件,查询全部记录
List<Map<String, Object>> selectMaps(@Param(Constants.WRAPPER) Wrapper<T> queryWrapper);
// 根据 Wrapper 条件,查询全部记录。注意: 只返回第一个字段的值
List<Object> selectObjs(@Param(Constants.WRAPPER) Wrapper<T> queryWrapper);
// 根据 entity 条件,查询全部记录(并翻页)
IPage<T> selectPage(IPage<T> page, @Param(Constants.WRAPPER) Wrapper<T> queryWrapper);
// 根据 Wrapper 条件,查询全部记录(并翻页)
IPage<Map<String, Object>> selectMapsPage(IPage<T> page, @Param(Constants.WRAPPER) Wrapper<T> queryWrapper);
// 根据 Wrapper 条件,查询总记录数
Integer selectCount(@Param(Constants.WRAPPER) Wrapper<T> queryWrapper);
参数说明
| 类型 | 参数名 | 描述 |
|---|---|---|
| Serializable | id | 主键ID |
| Wrapper | queryWrapper | 实体对象封装操作类(可以为 null) |
| Collection<? extends Serializable> | idList | 主键ID列表(不能为 null 以及 empty) |
| Map<String, Object> | columnMap | 表字段 map 对象 |
| IPage | page | 分页查询条件(可以为 RowBounds.DEFAULT) |
mapper 层 选装件
说明:
选装件位于
com.baomidou.mybatisplus.extension.injector.methods包下需要配合Sql注入器使用使用详情见``源码注释`
alwaysUpdateSomeColumnById
int alwaysUpdateSomeColumnById(T entity);
insertBatchSomeColumn
int insertBatchSomeColumn(List<T> entityList);
deleteByIdWithFill
int deleteByIdWithFill(T entity);
条件构造器(Wrapper)
详情见官网地址
说明:
- 以下出现的第一个入参
boolean condition表示该条件是否加入最后生成的sql中,例如:query.like(StringUtils.isNotBlank(name),Entity::getName,name).eq(age!=null&&age>=0,Entity::getAge,age)- 以下代码块内的多个方法均为从上往下补全个别
Boolean类型的入参,默认为true- 以下出现的泛型
Param均为Wrapper的子类实例(均具有AbstractWrapper的所有方法)- 下下方法在入参中出现的
R为泛型,在普通wrapper中是String,在LambdaWrapper中是函数(例:Entity::getId,Entity为实体类,getId为字段id的getMethod)- 以下方法入参中的
R column均表示数据库字段,当R具体类型为String时则为数据库字段名(字段名是数据库关键字的自己用转义符包裹)而不是实体数据字段名,另外当R具体类型为SFunction时项目runtime不支持eclipse自家的编译器- 以下举例均为使用普通wrapper,入参为Map和List的均以json形式表现
- 使用中如果入参的Map或者List为空,则不加入最后生成的sql中
- 有任何疑问就点开源码看
警告:
不支持以及不赞成在 RPC 调用中把 Wrapper 进行传输
- wrapper 很重
- 传输 wrapper 可以类比为你的 controller 用 map 接收值(开发一时爽,维护火葬场)
- 正确的 RPC 调用姿势是写一个 DTO 进行传输,被调用方再根据 DTO 执行相应的操作
- 我们拒绝接受任何关于 RPC 传输 Wrapper 报错相关的 issue 甚至 pr
AbstractWrapper
说明:
QueryWrapper(LambdaQueryWrapper) 和 UpdateWrapper(LambdaUpdateWrapper) 的父类
用于生成 sql 的 where 条件, entity 属性也用于生成 sql 的 where 条件
注意: entity 生成的 where 条件与 使用各个 api 生成的 where 条件没有任何关联行为
QueryWrapper
说明:
继承自 AbstractWrapper ,自身的内部属性 entity 也用于生成 where 条件
及 LambdaQueryWrapper, 可以通过 new QueryWrapper().lambda() 方法获取
UpdateWrapper
说明:
继承自 AbstractWrapper ,自身的内部属性 entity 也用于生成 where 条件
及 LambdaUpdateWrapper, 可以通过 new UpdateWrapper().lambda() 方法获取!
使用 Wrapper 自定义SQL
注意事项:
需要
mybatis-plus版本 >=3.0.7param 参数名要么叫ew,要么加上注解@Param(Constants.WRAPPER)使用${ew.customSqlSegment}不支持Wrapper内的entity生成where语句
用注解
@Select("select * from mysql_data ${ew.customSqlSegment}")
List<MysqlData> getAll(@Param(Constants.WRAPPER) Wrapper wrapper);
用XML
List<MysqlData> getAll(Wrapper ew);
<select id="getAll" resultType="MysqlData">
SELECT * FROM mysql_data ${ew.customSqlSegment}
</select>
kotlin使用wrapper
kotlin 可以使用
QueryWrapper和UpdateWrapper但无法使用LambdaQueryWrapper和LambdaUpdateWrapper
如果想使用 lambda 方式的 wrapper 请使用KtQueryWrapper和KtUpdateWrapper
分页插件
SpringBoot方式,配置
@EnableTransactionManagement
@Configuration
@MapperScan("con.kunchi.mybatisplus.mapper")
public class MyBatisPlusConfig {
    @Bean
    public MybatisPlusInterceptor mybatisPlusInterceptor() {
        MybatisPlusInterceptor interceptor = new MybatisPlusInterceptor();
        //分页插件
        interceptor.addInnerInterceptor(new PaginationInnerInterceptor(DbType.MYSQL));
        //乐观锁插件
        interceptor.addInnerInterceptor(new OptimisticLockerInnerInterceptor());
        return interceptor;
    }
}
自定义分页
- Dao层
UserMapper.java
public interface UserMapper extends BaseMapper<User> {
    /**
     * <p>
     * 查询 : 根据state状态查询用户列表,分页显示
     * </p>
     *
     * @param page 分页对象,xml中可以从里面进行取值,传递参数 Page 即自动分页,必须放在第一位(你可以继承Page实现自己的分页对象)
     * @param state 状态
     * @return 分页对象
     */
    @Select("SELECT id,name FROM user")
    IPage<User> selectPageVo(Page<?> page, Integer state);
}
- Service层
IUserService.java
public interface IUserService extends IService<User> {
    IPage<User> selectUserPage(Page<User> page, Integer state);
}
- Service层实现类
UserServiceImpl.java
@Service
public class UserServiceImpl extends ServiceImpl<UserMapper,User> implements IUserService {
    @Autowired
    UserMapper userMapper;

    @Override
    public IPage<User> selectUserPage(Page<User> page, Integer state) {
        // 不进行 count sql 优化,解决 MP 无法自动优化 SQL 问题,这时候你需要自己查询 count 部分
        // page.setOptimizeCountSql(false);
        // 当 total 为小于 0 或者设置 setSearchCount(false) 分页插件不会进行 count 查询
        // 要点!! 分页返回的对象与传入的对象是同一个
        return userMapper.selectPageVo(page, state);
    }
}
- 测试类
//测试分页
@Test
void testPage() {
    // 参数一:当前页
    // 参数二:页面大小
    // 使用了分页插件之后,所有的分页操作也变得简单的!
    Page<User> page = new Page<>(1,5);
    IPage<User> userPage = userService.selectUserPage(page, null);
    userPage.getRecords().forEach(System.out::println);
    System.out.println(page.getTotal());
}
- 控制台:
逻辑删除
说明:
只对自动注入的sql起效:
- 插入: 不作限制
- 查找: 追加where条件过滤掉已删除数据,且使用 wrapper.entity 生成的where条件会忽略该字段
- 更新: 追加where条件防止更新到已删除数据,且使用 wrapper.entity 生成的where条件会忽略该字段
- 删除: 转变为 更新
例如:
- 删除:
update user set deleted=1 where id = 1 and deleted=0- 查找:
select id,name,deleted from user where deleted=0字段类型支持说明:
- 支持所有数据类型(推荐使用
Integer,Boolean,LocalDateTime)- 如果数据库字段使用
datetime,逻辑未删除值和已删除值支持配置为字符串null,另一个值支持配置为函数来获取值如now()附录:
- 逻辑删除是为了方便数据恢复和保护数据本身价值等等的一种方案,但实际就是删除。
- 如果你需要频繁查出来看就不应使用逻辑删除,而是以一个状态去表示。
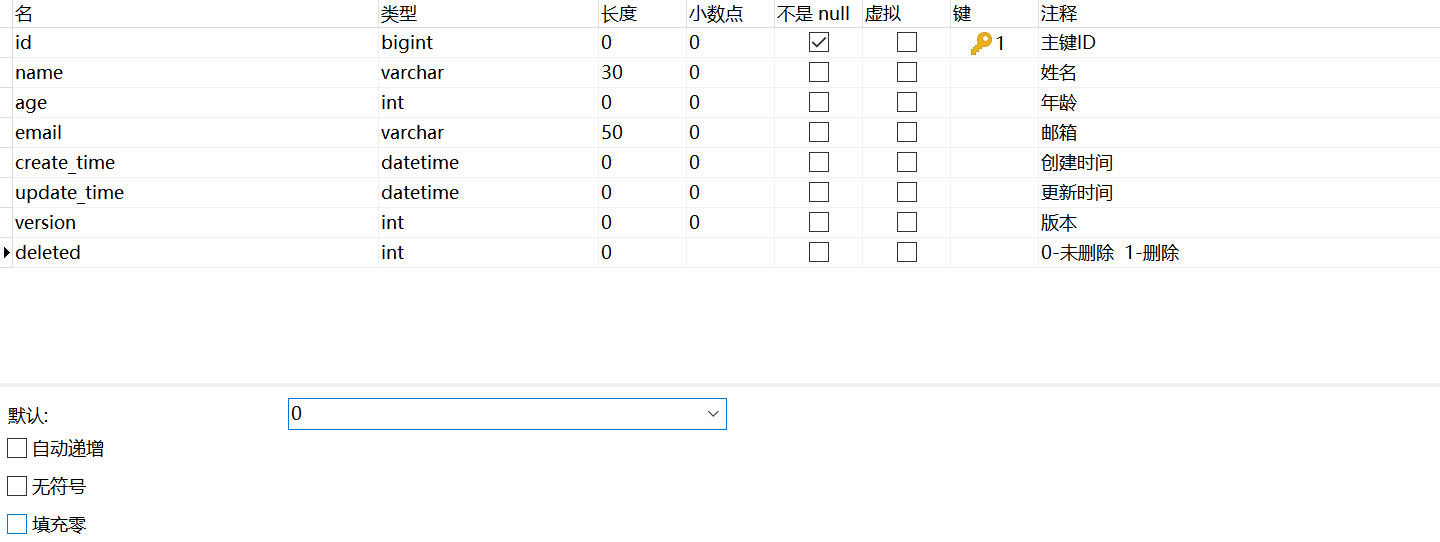
使用方法
-
数据库添加deleted字段
-
配置application.yml
# 配置日志 (系统自带的,控制台输出) mybatis-plus: configuration: log-impl: org.apache.ibatis.logging.stdout.StdOutImpl global-config: db-config: logic-delete-field: flag # 全局逻辑删除的实体字段名(since 3.3.0,配置后可以忽略不配置步骤2) logic-delete-value: 1 # 逻辑已删除值(默认为 1) logic-not-delete-value: 0 # 逻辑未删除值(默认为 0) -
实体字段上加上
@TableLogic注解@TableLogic private Integer deleted; -
测试
//测试逻辑删除
@Test
void testDelete(){
    userService.removeById(1368748443558653957l);
    userMapper.deleteById(1368748443558653958l);
}
结果


常见问题
1. 如何 insert ?
- 字段在数据库定义默认值(推荐)
- insert 前自己 set 值
- 使用自动填充功能
2. 删除接口自动填充功能失效
- 使用
update方法并:UpdateWrapper.set(column, value)(推荐)- 使用
update方法并:UpdateWrapper.setSql("column=value")- 使用Sql注入器注入
com.baomidou.mybatisplus.extension.injector.methods.LogicDeleteByIdWithFill并使用(推荐)
其他功能
ate user set deleted=1 where id = 1 and deleted=0`
- 查找:
select id,name,deleted from user where deleted=0字段类型支持说明:
- 支持所有数据类型(推荐使用
Integer,Boolean,LocalDateTime)- 如果数据库字段使用
datetime,逻辑未删除值和已删除值支持配置为字符串null,另一个值支持配置为函数来获取值如now()附录:
- 逻辑删除是为了方便数据恢复和保护数据本身价值等等的一种方案,但实际就是删除。
- 如果你需要频繁查出来看就不应使用逻辑删除,而是以一个状态去表示。
使用方法
-
数据库添加deleted字段
[外链图片转存中…(img-IJHJMEOE-1615187649564)]
-
配置application.yml
# 配置日志 (系统自带的,控制台输出) mybatis-plus: configuration: log-impl: org.apache.ibatis.logging.stdout.StdOutImpl global-config: db-config: logic-delete-field: flag # 全局逻辑删除的实体字段名(since 3.3.0,配置后可以忽略不配置步骤2) logic-delete-value: 1 # 逻辑已删除值(默认为 1) logic-not-delete-value: 0 # 逻辑未删除值(默认为 0) -
实体字段上加上
@TableLogic注解@TableLogic private Integer deleted; -
测试
//测试逻辑删除
@Test
void testDelete(){
    userService.removeById(1368748443558653957l);
    userMapper.deleteById(1368748443558653958l);
}
结果
[外链图片转存中…(img-l1haCj59-1615187649565)]
[外链图片转存中…(img-TlkoMAba-1615187649565)]
常见问题
1. 如何 insert ?
- 字段在数据库定义默认值(推荐)
- insert 前自己 set 值
- 使用自动填充功能
2. 删除接口自动填充功能失效
- 使用
update方法并:UpdateWrapper.set(column, value)(推荐)- 使用
update方法并:UpdateWrapper.setSql("column=value")- 使用Sql注入器注入
com.baomidou.mybatisplus.extension.injector.methods.LogicDeleteByIdWithFill并使用(推荐)


 1730
1730


 被折叠的 条评论
为什么被折叠?
被折叠的 条评论
为什么被折叠?
 到【灌水乐园】发言


