


参考文章:
Ubuntu16.04 Caffe 安装步骤记录(超详尽)
Ubuntu 18.04配置OpenCV 4.2.0
Caffe - Ubuntu 安装及问题解决
参考上面三个博客,记录一下我自己的步骤:
我的CUDA10.0与gcc都已经装好。
1、安装依赖
来源于:[Ubuntu 18.04配置OpenCV 4.2.0](https://www.cnblogs.com/chenzhen0530/p/12109868.html)

sudo apt-get update -y # Update the list of packages
sudo apt-get remove -y x264 libx264-dev # Remove the older version of libx264-dev and x264
sudo apt-get install -y build-essential checkinstall cmake pkg-config yasm
sudo apt-get install -y git gfortran
sudo add-apt-repository -y "deb http://security.ubuntu.com/ubuntu xenial-security main"
sudo apt-get install -y libjpeg8-dev libjasper-dev libpng12-dev
sudo apt-get install -y libtiff5-dev
sudo apt-get install -y libavcodec-dev libavformat-dev libswscale-dev libdc1394-22-dev
sudo apt-get install -y libxine2-dev libv4l-dev
sudo apt-get install -y libgstreamer1.0-dev libgstreamer-plugins-base1.0-dev
sudo apt-get install -y qt5-default libgtk2.0-dev libtbb-dev
sudo apt-get install -y libatlas-base-dev
sudo apt-get install -y libfaac-dev libmp3lame-dev libtheora-dev
sudo apt-get install -y libvorbis-dev libxvidcore-dev
sudo apt-get install -y libopencore-amrnb-dev libopencore-amrwb-dev
sudo apt-get install -y x264 v4l-utils

# Some Optional Dependencies
sudo apt-get install -y libprotobuf-dev protobuf-compiler
sudo apt-get install -y libgoogle-glog-dev libgflags-dev
sudo apt-get install -y libgphoto2-dev libeigen3-dev libhdf5-dev doxygen
2、下载opencv
我的CUDA版本是10.0,我选择安装了opencv3.4.0
从官网http://opencv.org/releases.html 下载opencv(选择source)。
附上百度网盘链接: https://pan.baidu.com/s/1H8VOa9C8sDbWh19R4-e-AA 密码: dd73
解压后进入opencv文件夹,依次输入:
来源于:[Ubuntu16.04 Caffe 安装步骤记录(超详尽)](https://blog.csdn.net/yhaolpz/article/details/71375762?utm_medium=distribute.pc_relevant.none-task-blog-BlogCommendFromBaidu-7&depth_1-utm_source=distribute.pc_relevant.none-task-blog-BlogCommendFromBaidu-7)

mkdir build # 创建编译的文件目录

cd build

cmake -D CMAKE_BUILD_TYPE=Release -D CMAKE_INSTALL_PREFIX=/usr/local ..

make -j8  #编译
3、报错


解决:
已解决Makefile:162:recipe for target ‘all’
4、sudo make install
5、用pkg-config --modversion opencv检查版本。
显示出3.4.0则安装成功。
6、安装caffe
直接看Ubuntu16.04 Caffe 安装步骤记录(超详尽)的第九步。
附上caffe的百度网盘链接:https://pan.baidu.com/s/136rSSq3tbZ3Kh-IbMHi7Hg 密码: bwuq
注意:make all -j8后出现的错误:
(1)make: *** [.build_release/cuda/src/caffe/solvers/adadelta_solver.o] Error 1

解决:https://blog.csdn.net/qq_18649781/article/details/89047437
Makefile.config是只读文件,得用命令行打开:sudo gedit Makefile.config.
小提示:在每次重新make all -j8之前,需要sudo make clean一下。
(2)fatal error: google/protobuf/port_def.inc: 没有那个文件或目录

解决:参考here和here
-
安装Google Logging Library(glog):
下载链接:https://github.com/google/glog/releases
附上glog0.3.3的百度网盘链接:https://pan.baidu.com/s/1Ci8rhKlctrpQm8_ditBhUA 密码: wr74 -
tar zxvf glog-0.3.3.tar.gz -
cd glog-0.3.3 -
./configure -
make
出错:
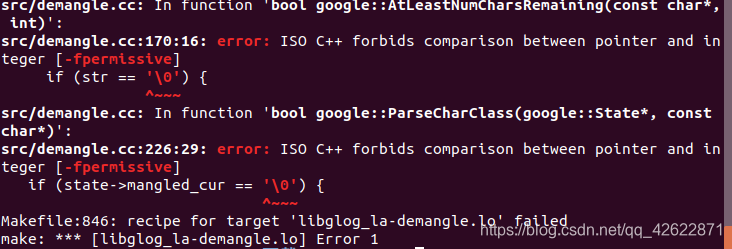 解决:将glog-o.3.3/src/demangle.cc中的
if (str == '\0')    改为:if (str == "\0")
if (state->mangled_cur == '\0' ) 改为:if (state->mangled_cur == "\0" )
保存退出。
sudo make install- 然后又重新修改了一下Makefile.config
贴上 Makefile.config
## Refer to http://caffe.berkeleyvision.org/installation.html
# Contributions simplifying and improving our build system are welcome!

# cuDNN acceleration switch (uncomment to build with cuDNN).
USE_CUDNN := 1

# CPU-only switch (uncomment to build without GPU support).
# CPU_ONLY := 1

# uncomment to disable IO dependencies and corresponding data layers
# USE_OPENCV := 0
# USE_LEVELDB := 0
# USE_LMDB := 0
# This code is taken from https://github.com/sh1r0/caffe-android-lib
# USE_HDF5 := 0

# uncomment to allow MDB_NOLOCK when reading LMDB files (only if necessary)
#	You should not set this flag if you will be reading LMDBs with any
#	possibility of simultaneous read and write
# ALLOW_LMDB_NOLOCK := 1

# Uncomment if you're using OpenCV 3
OPENCV_VERSION := 3

# To customize your choice of compiler, uncomment and set the following.
# N.B. the default for Linux is g++ and the default for OSX is clang++
# CUSTOM_CXX := g++

# CUDA directory contains bin/ and lib/ directories that we need.
CUDA_DIR := /usr/local/cuda
# On Ubuntu 14.04, if cuda tools are installed via
# "sudo apt-get install nvidia-cuda-toolkit" then use this instead:
# CUDA_DIR := /usr

# CUDA architecture setting: going with all of them.
# For CUDA < 6.0, comment the *_50 through *_61 lines for compatibility.
# For CUDA < 8.0, comment the *_60 and *_61 lines for compatibility.
# For CUDA >= 9.0, comment the *_20 and *_21 lines for compatibility.
CUDA_ARCH := -gencode arch=compute_30,code=sm_30 \
		-gencode arch=compute_35,code=sm_35 \
		-gencode arch=compute_50,code=sm_50 \
		-gencode arch=compute_52,code=sm_52 \
		-gencode arch=compute_60,code=sm_60 \
		-gencode arch=compute_61,code=sm_61 \
		-gencode arch=compute_61,code=compute_61
#-gencode arch=compute_20,code=sm_20 \
	#	-gencode arch=compute_20,code=sm_21 \
# BLAS choice:
# atlas for ATLAS (default)
# mkl for MKL
# open for OpenBlas
#BLAS := mkl
BLAS := atlas
# Custom (MKL/ATLAS/OpenBLAS) include and lib directories.
# Leave commented to accept the defaults for your choice of BLAS
# (which should work)!
# BLAS_INCLUDE := /path/to/your/blas
# BLAS_LIB := /path/to/your/blas

# Homebrew puts openblas in a directory that is not on the standard search path
# BLAS_INCLUDE := $(shell brew --prefix openblas)/include
# BLAS_LIB := $(shell brew --prefix openblas)/lib

# This is required only if you will compile the matlab interface.
# MATLAB directory should contain the mex binary in /bin.
# MATLAB_DIR := /usr/local
# MATLAB_DIR := /Applications/MATLAB_R2012b.app

# NOTE: this is required only if you will compile the python interface.
# We need to be able to find Python.h and numpy/arrayobject.h.
PYTHON_INCLUDE := /usr/include/python2.7 \
		/usr/lib/python2.7/dist-packages/numpy/core/include
# Anaconda Python distribution is quite popular. Include path:
# Verify anaconda location, sometimes it's in root.
# ANACONDA_HOME := $(HOME)/anaconda
ANACONDA_HOME := /home/tcy/anaconda3
PYTHON_INCLUDE := $(ANACONDA_HOME)/include \
		 $(ANACONDA_HOME)/include/python2.7 \
		 $(ANACONDA_HOME)/lib/python2.7/site-packages/numpy/core/include

# Uncomment to use Python 3 (default is Python 2)
# PYTHON_LIBRARIES := boost_python3 python3.5m
# PYTHON_INCLUDE := /usr/include/python3.5m \
#                 /usr/lib/python3.5/dist-packages/numpy/core/include

# We need to be able to find libpythonX.X.so or .dylib.
PYTHON_LIB := /usr/lib
PYTHON_LIB := $(ANACONDA_HOME)/lib

# Homebrew installs numpy in a non standard path (keg only)
# PYTHON_INCLUDE += $(dir $(shell python -c 'import numpy.core; print(numpy.core.__file__)'))/include
# PYTHON_LIB += $(shell brew --prefix numpy)/lib

# Uncomment to support layers written in Python (will link against Python libs)
WITH_PYTHON_LAYER := 1

# Whatever else you find you need goes here.
INCLUDE_DIRS := $(PYTHON_INCLUDE) /usr/local/include /usr/include/hdf5/serial
LIBRARY_DIRS := $(PYTHON_LIB) /usr/local/lib /usr/lib /usr/lib/x86_64-linux-gnu/hdf5/serial

# If Homebrew is installed at a non standard location (for example your home directory) and you use it for general dependencies
# INCLUDE_DIRS += $(shell brew --prefix)/include
# LIBRARY_DIRS += $(shell brew --prefix)/lib

# NCCL acceleration switch (uncomment to build with NCCL)
# https://github.com/NVIDIA/nccl (last tested version: v1.2.3-1+cuda8.0)
# USE_NCCL := 1

# Uncomment to use `pkg-config` to specify OpenCV library paths.
# (Usually not necessary -- OpenCV libraries are normally installed in one of the above $LIBRARY_DIRS.)
# USE_PKG_CONFIG := 1

# N.B. both build and distribute dirs are cleared on `make clean`
BUILD_DIR := build
DISTRIBUTE_DIR := distribute

# Uncomment for debugging. Does not work on OSX due to https://github.com/BVLC/caffe/issues/171
# DEBUG := 1

# The ID of the GPU that 'make runtest' will use to run unit tests.
TEST_GPUID := 0

# enable pretty build (comment to see full commands)
Q ?= @
- 再重新编译。首先在caffe文件夹下
sudo make clean其次make all -j8
(3)fatal error: pyconfig.h: 没有那个文件或目录
 解决:fatal error: pyconfig.h: 没有那个文件或目录
最后最好使用:make all -j8
7、使用sudo make runtest -j8测试一下。
(1)出错1:
 解决:参考libcudart.so.8.0: cannot open shared object file: No such file or directory 的解决办法
记录一下我的步骤:
- 检查/usr/local/cuda-10.0/lib64目录是否存在libcudart.so.10.0,若存在则:
make cleanexport LD_LIBRARY_PATH=$LD_LIBRARY_PATH:/usr/local/cuda-10.0/lib64make all -j8
(2)出错2:libprotobuf.so.22: cannot open shared object file: No such file or directory
 解决:protobuf简单介绍和ubuntu 16.04环境下安装
(3)出错3:libhdf5_hl.so.100: cannot open shared object file: No such file or directory
 解决:解决libhdf5_hl.so.100(XXX): cannot open shared object file: No such file or directory,Error127问题 caffe
改完错后,再重新进行编译
make cleanmake all -j8sudo make runtest -j8
8、成功
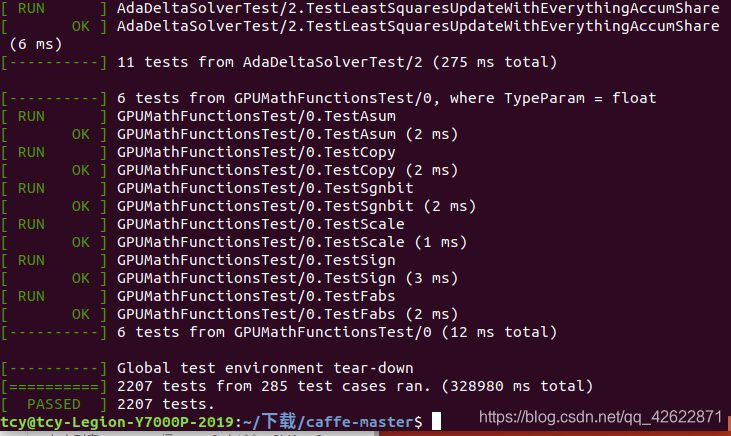 啦啦啦真开心。


 2704
2704


 被折叠的 条评论
为什么被折叠?
被折叠的 条评论
为什么被折叠?
 到【灌水乐园】发言


