


Spring笔记,第一遍,不全
day01
1、spring配置
1、maven导入spring依赖坐标
<dependency>
<groupId>org.springframework</groupId>
<artifactId>spring-context</artifactId>
<version>5.0.2.RELEASE</version>
</dependency>
2、创建bean的xml配置
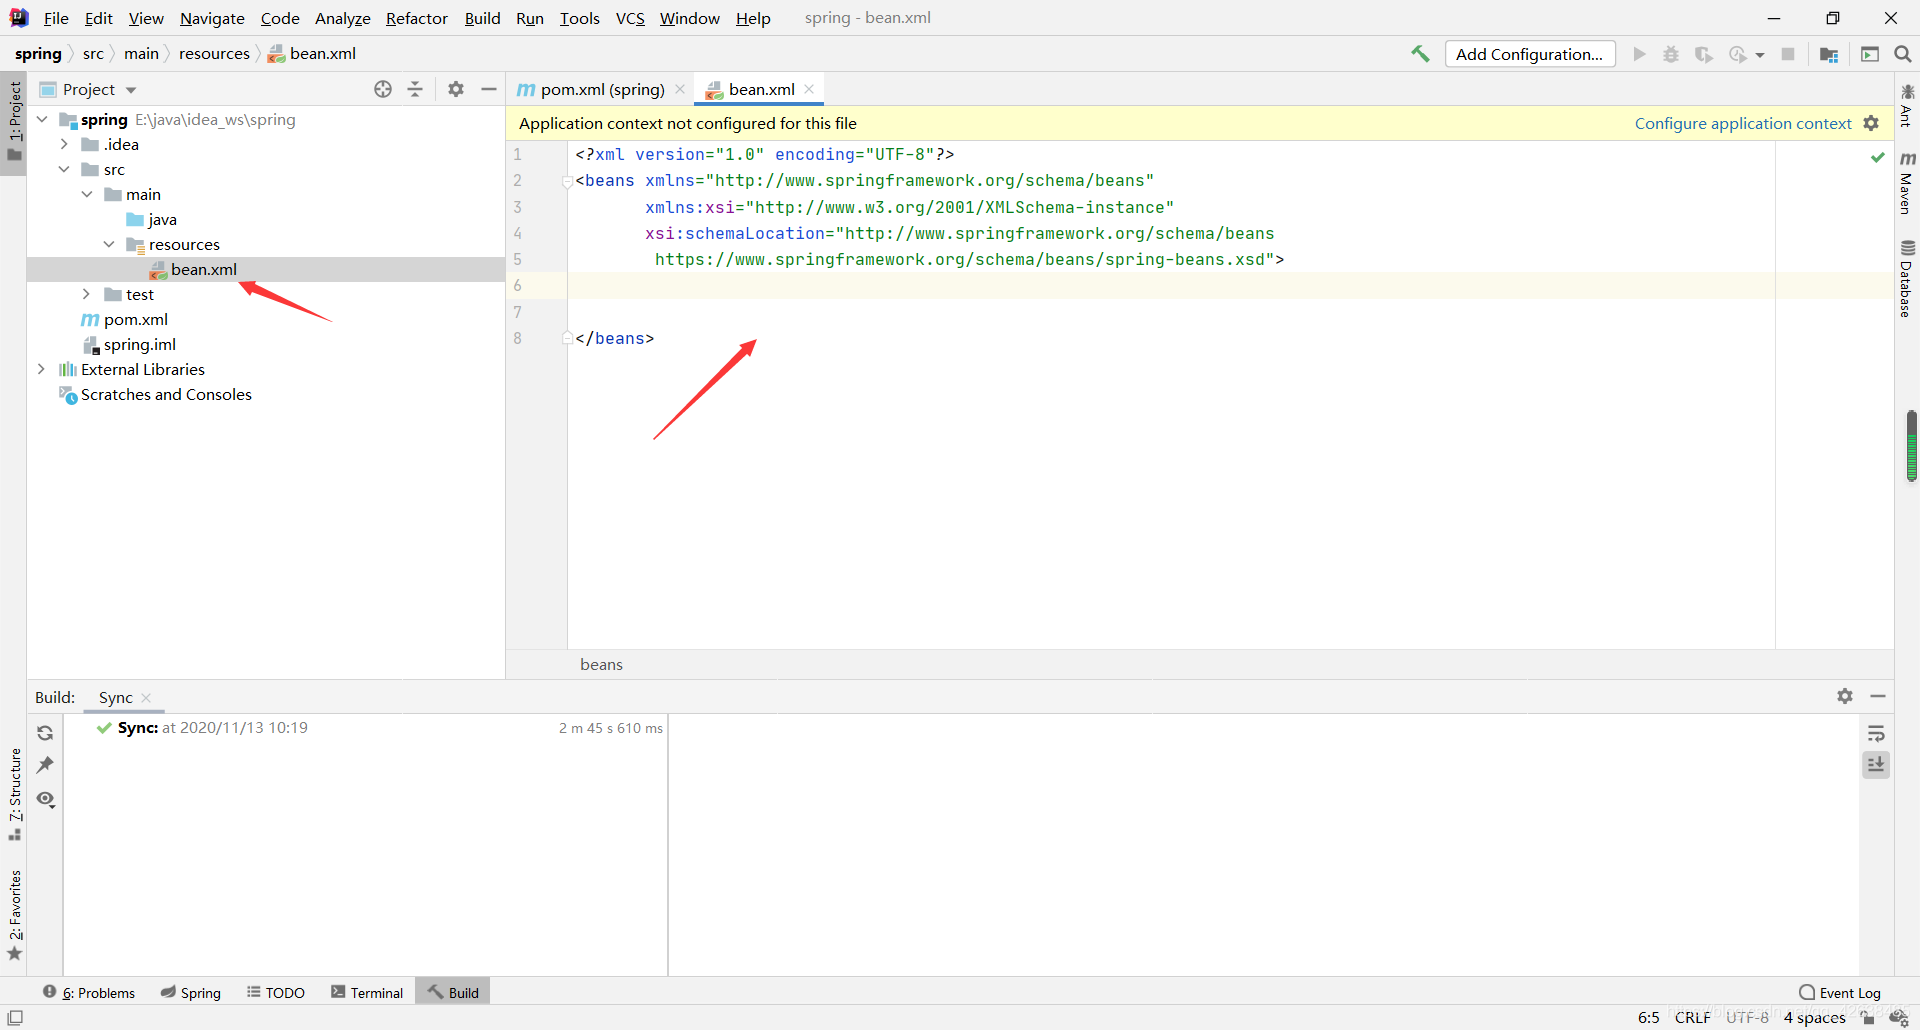
<?xml version="1.0" encoding="UTF-8"?>
<beans xmlns="http://www.springframework.org/schema/beans"
xmlns:xsi="http://www.w3.org/2001/XMLSchema-instance"
xsi:schemaLocation="http://www.springframework.org/schema/beans
https://www.springframework.org/schema/beans/spring-beans.xsd">
</beans>
3、之后配置bean
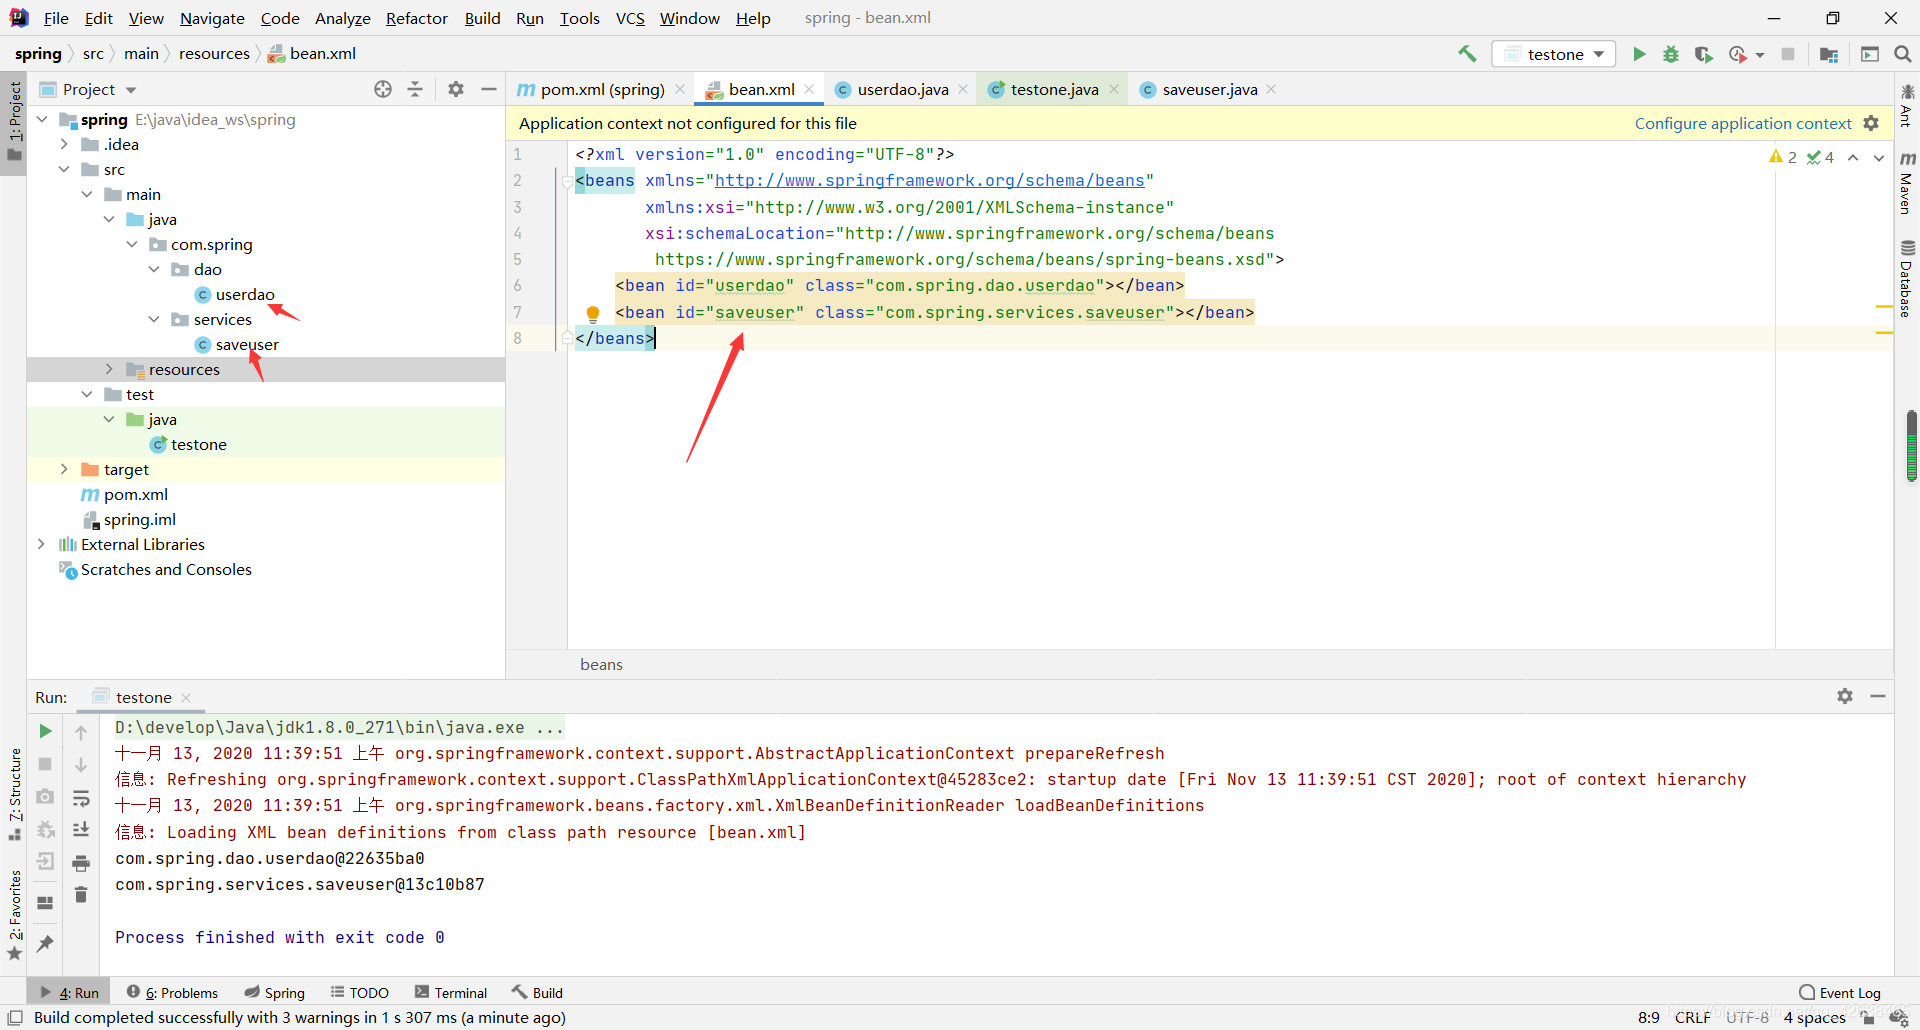
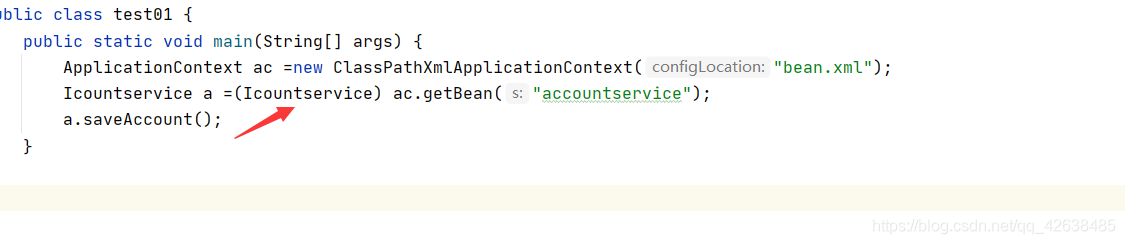
配置之后,则不用自己手动new对象,在需要的时候,spring会从容器中调
//创建容器
ApplicationContext c = new ClassPathXmlApplicationContext("bean.xml");
//从容器中获取对象,第一种方法,需要强制转换,第二种不需要
userdao dao = (userdao)c.getBean("userdao");
saveuser save = c.getBean("saveuser",saveuser.class);

获取spring的ioc核心容器

容器的两个接口引发的问题

ApplicationContext

BeanFactory

spring创建bean对象三种方法
一、使用类的默认构造函数创建
如果不存在默认构造函数,则无法创建bean对象

二、使用类中的方法获取

三、使用类中的静态方法获取

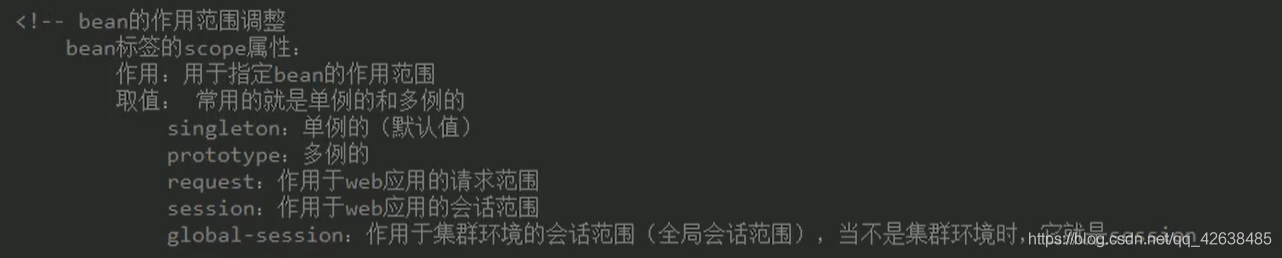
bean的作用范围
spring依赖注入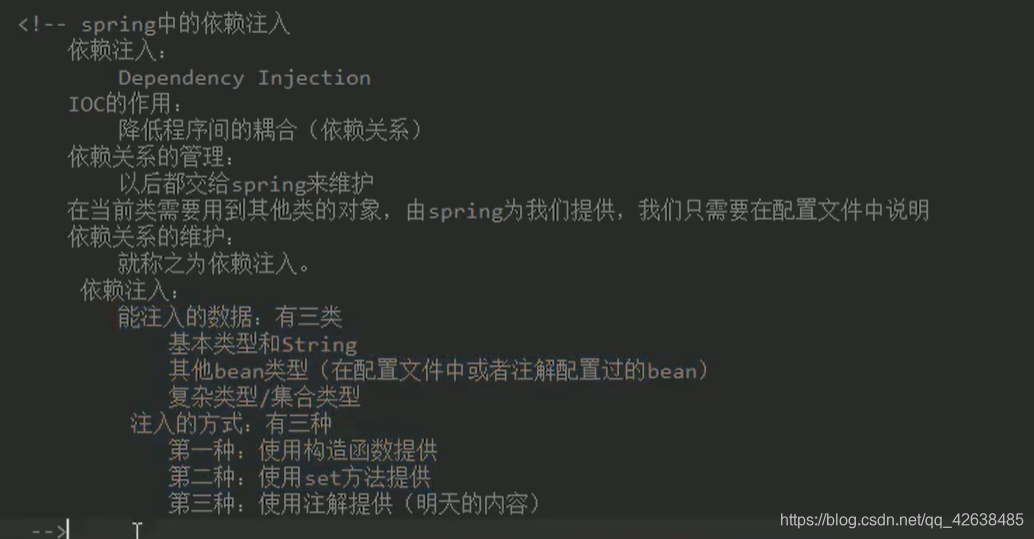
一、构造函数注入,必须在实体类中写构造方法,不需要写get和set方法
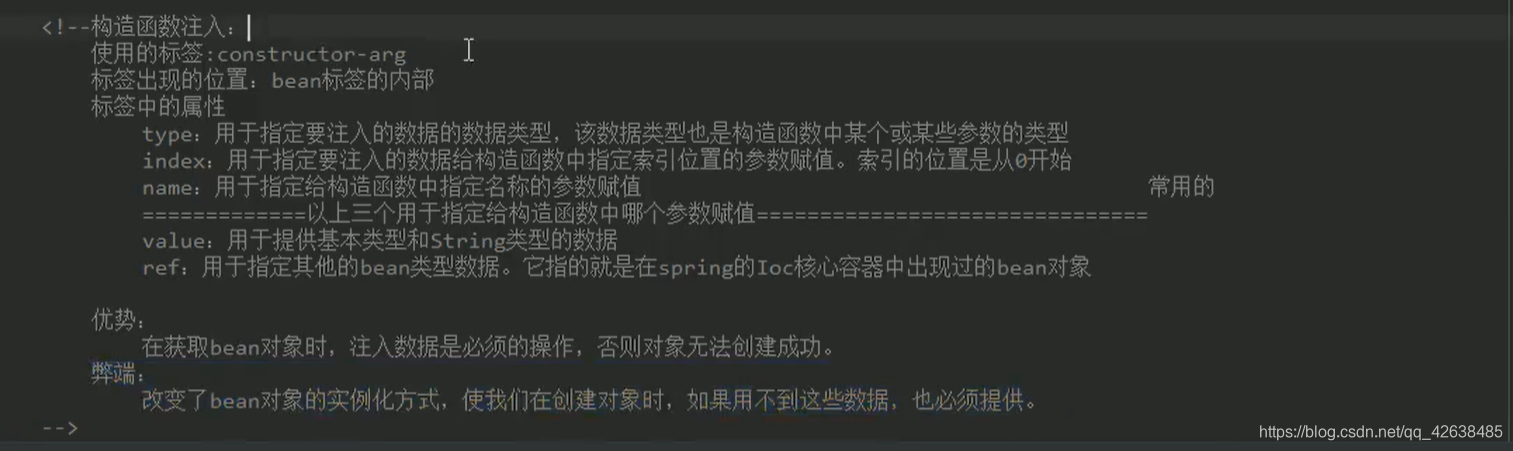
在bean中使用constructor-arg标签,name获取的是实体类的属性名

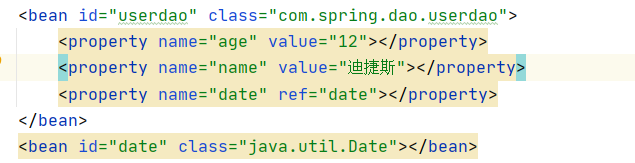
第二种、set方法注入,不能够重写构造方法,需要写get和set方法
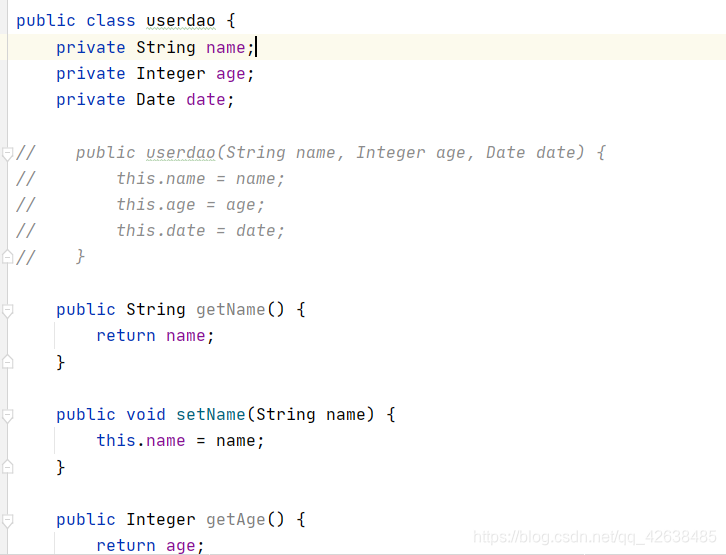
在bean标签中使用property标签,name获取的实体类的set方法名
复杂数据类型的注入,集合类型
注入方式同上,有两种,set注入和构造器注入
配置:
数组用array标签,List用list标签,Map用map标签,Properties用props标签,Set用set标签
<!--复杂类型注入-->
<bean id="users" class="com.spring.dao.users">
<property name="names">
<array>
<value>AAA</value>
<value>AAA</value>
<value>AAA</value>
</array>
</property>
<property name="myList">
<list>
<value>BBB</value>
<value>BBB</value>
<value>BBB</value>
</list>
</property>
<property name="mySet">
<set>
<value>CCC</value>
<value>DDD</value>
<value>EEE</value>
</set>
</property>
<property name="myMap">
<map>
<entry key="keyA" value="AAA"></entry>
<entry key="keyB" value="BBB"></entry>
<entry key="keyC" value="CCC"></entry>
</map>
</property>
<property name="myPropertis">
<props>
<prop key="keyA">aaa</prop>
<prop key="keyB">bbb</prop>
<prop key="keyC">ccc</prop>
</props>
</property>
</bean>
day02,注解
使用注解代替xml配置
注解开发,需要重新配置bean.xml
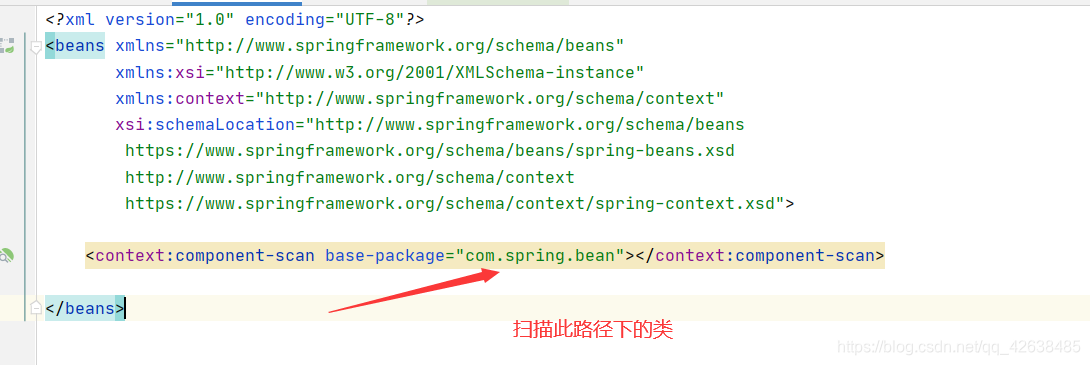
<?xml version="1.0" encoding="UTF-8"?>
<beans xmlns="http://www.springframework.org/schema/beans"
xmlns:xsi="http://www.w3.org/2001/XMLSchema-instance"
xmlns:context="http://www.springframework.org/schema/context"
xsi:schemaLocation="http://www.springframework.org/schema/beans
https://www.springframework.org/schema/beans/spring-beans.xsd
http://www.springframework.org/schema/context
https://www.springframework.org/schema/context/spring-context.xsd">

<context:component-scan base-package="com.spring.bean"></context:component-scan>

</beans>
@Component(value=“指定id”)


测试
结果
@Controller @Service @Repository 注解,是Component的衍生

自动注入数据
@Autowried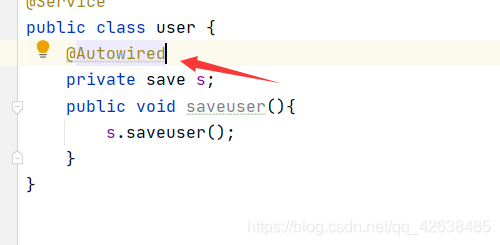
解析:现根据类型从spring的容器中查找,(save) ,如果该类型存在多个实现类,那么在根据变量名查找,(例如s1,s2)

@Qualifier
需要和Autowired一起使用,注入指定名称的对象
@Resource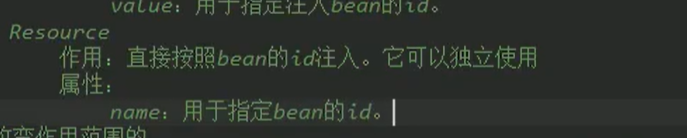
@Autowried @Qualifier @Resource只能注入bean对象,基本类型无法注入
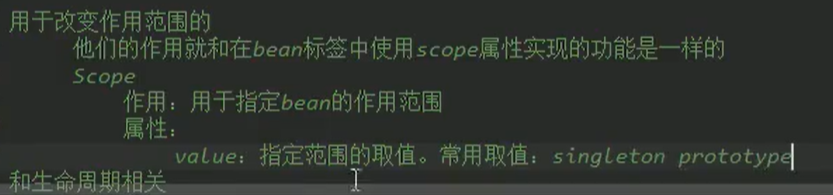
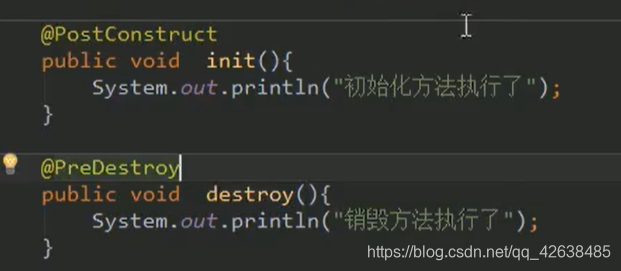
@Scope

例子:
使用注解开发
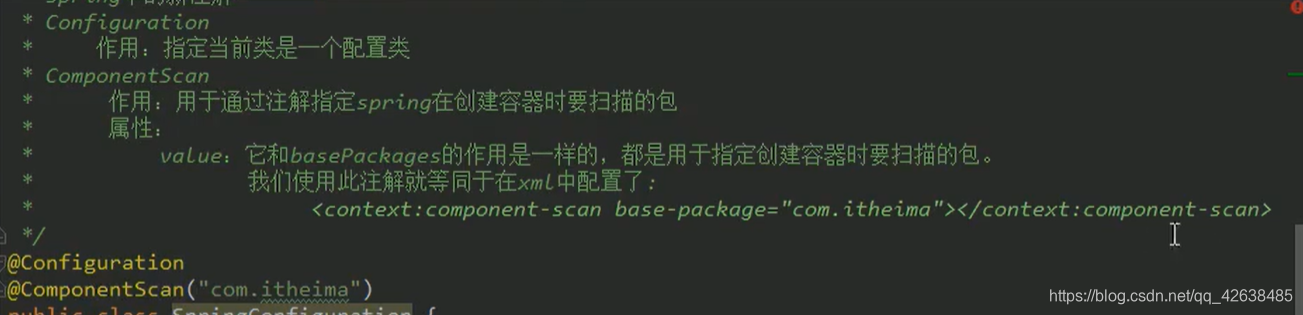
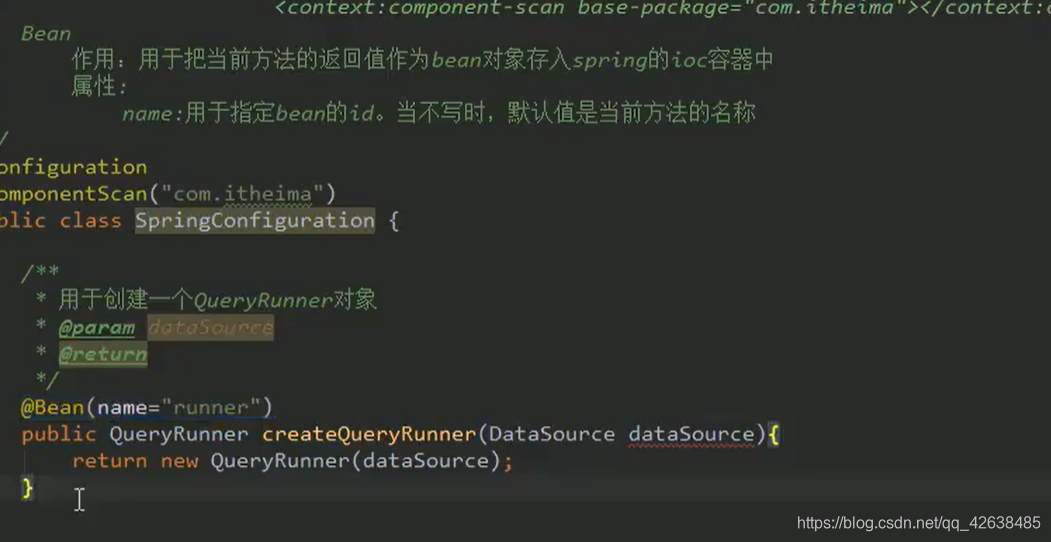
@Import,加入其他注解类
注解配置
day03 AOP
导入约束配置
<?xml version="1.0" encoding="UTF-8"?>
<beans xmlns="http://www.springframework.org/schema/beans"
xmlns:xsi="http://www.w3.org/2001/XMLSchema-instance"
xmlns:aop="http://www.springframework.org/schema/aop"
xsi:schemaLocation="http://www.springframework.org/schema/beans
https://www.springframework.org/schema/beans/spring-beans.xsd
http://www.springframework.org/schema/aop
https://www.springframework.org/schema/aop/spring-aop.xsd">
<!--配置基于xml的aop
第一步:配置通知类
第二步:使用aop:config标签开始配置aop
第三步:使用aop:aspect标签表明配置切面
id:给切面提供一个唯一标识
ref:指定通知类bean的id
第四步:在aop:aspect内部使用对应的标签来配置通知类型
在切入点方法执行之前执行,所以是前置通知
aop:before method用来指定类中的哪一个方法是前置通知

切入点表达式:execution(表达式)
修饰符 返回值 包名。。。类名。方法名(参数)
例子:public void com.service.accountservice.saveAccount()
-->


动态代理细节,如果代理对象强转为实现类,那么需要在aop:comfig中加入 proxy-target-class=“true” ,或者强转为接口类型,否则会报错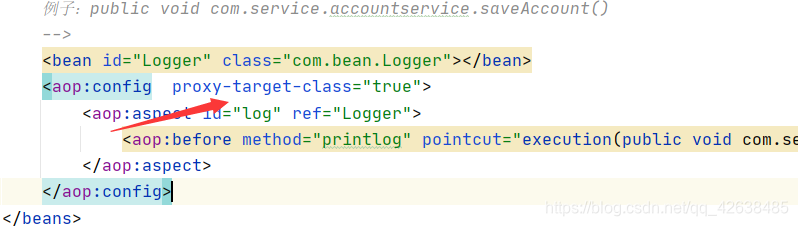
切点表达式通配符
- ….*(…) 表示 修饰符 返回类型 任意包 任意类 任意方法(任意参数)
四种通知类型
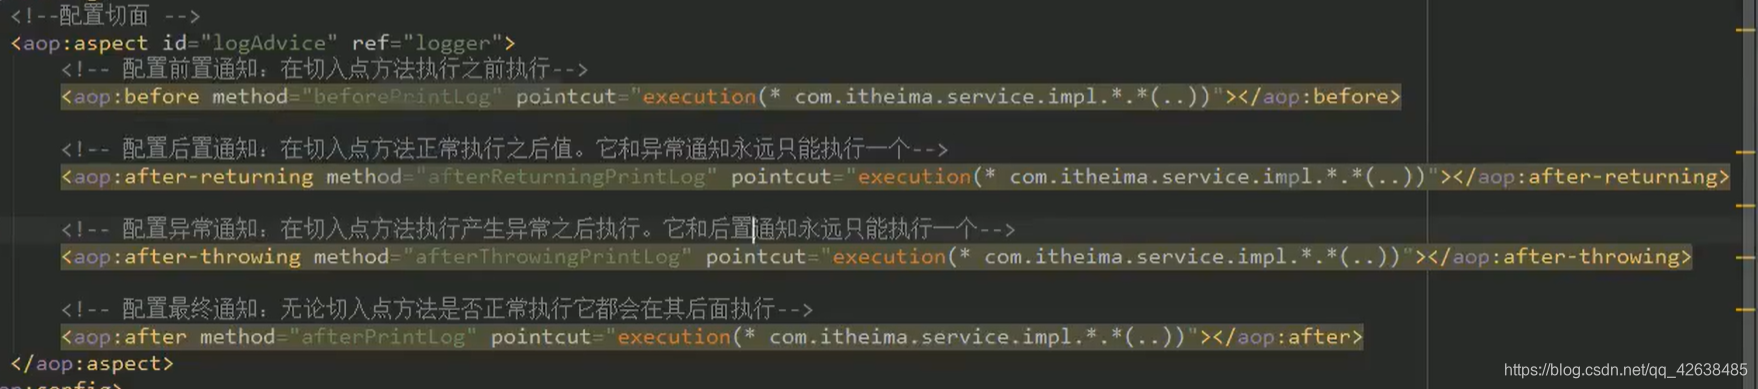
<!--
四种常用通知类型
aop:before 前置通知
aop:after-returning 后置通知
aop:after-throwing 异常通知 后置和异常通知只运行一个
aop:after 最终通知
通用切入点配置
标签:aop:pointcut id="标识" expression="切入点表达式"
写在aop:aspect 只有当前切面可以用,写在上边所有前面可用
aop:around 环绕通知
-->
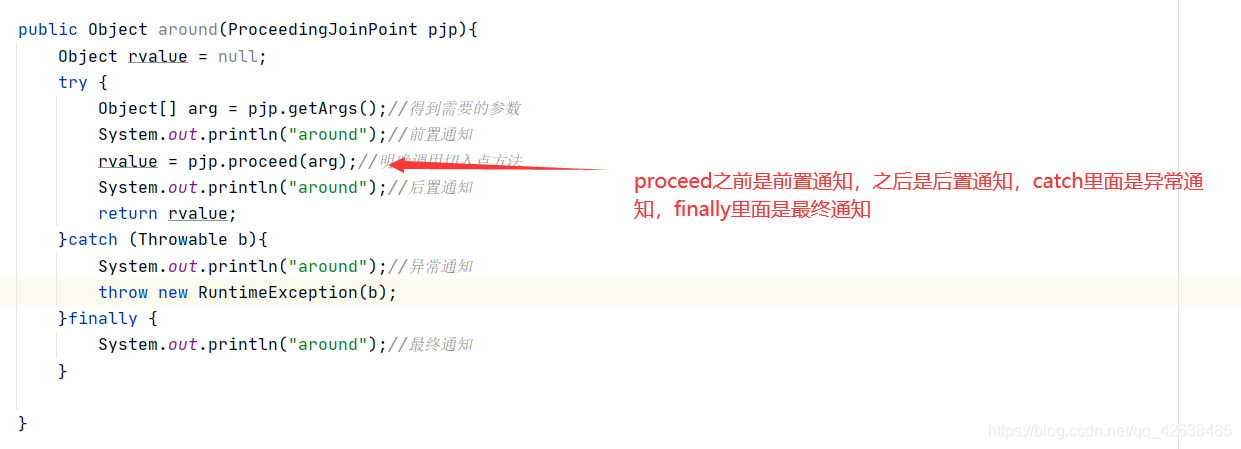
环绕通知
基于注解的AOP
day04事务控制
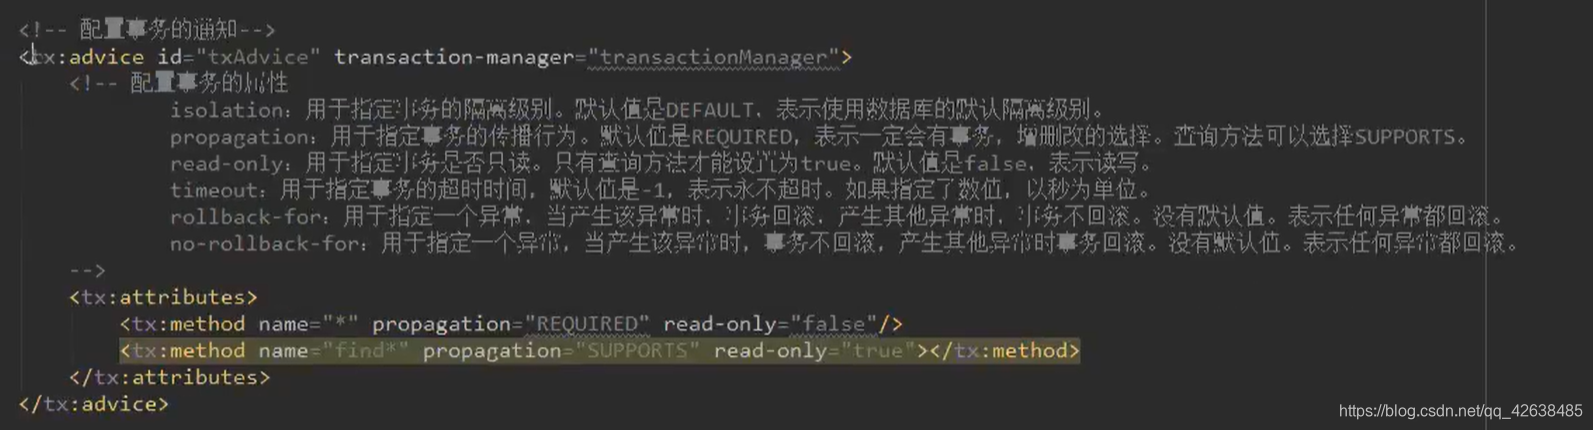
使用tx:attributes配置事务管理通知
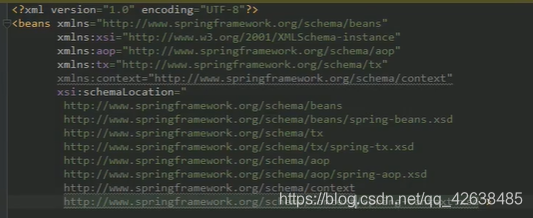
<?xml version="1.0" encoding="UTF-8"?>
<beans xmlns="http://www.springframework.org/schema/beans"
    xmlns:xsi="http://www.w3.org/2001/XMLSchema-instance"
    xmlns:aop="http://www.springframework.org/schema/aop"
    xmlns:tx="http://www.springframework.org/schema/tx"
    xmlns:context="http://www.springframework.org/schema/context"
    xsi:schemaLocation="
        http://www.springframework.org/schema/beans
        https://www.springframework.org/schema/beans/spring-beans.xsd
        http://www.springframework.org/schema/tx
        https://www.springframework.org/schema/tx/spring-tx.xsd
        http://www.springframework.org/schema/aop
        https://www.springframework.org/schema/aop/spring-aop.xsd">
       http://www.springframework.org/schema/context
       https://www.springframework.org/schema/context/spring-context.xsd">
       ```


 20万+
20万+


 被折叠的 条评论
为什么被折叠?
被折叠的 条评论
为什么被折叠?
 到【灌水乐园】发言


