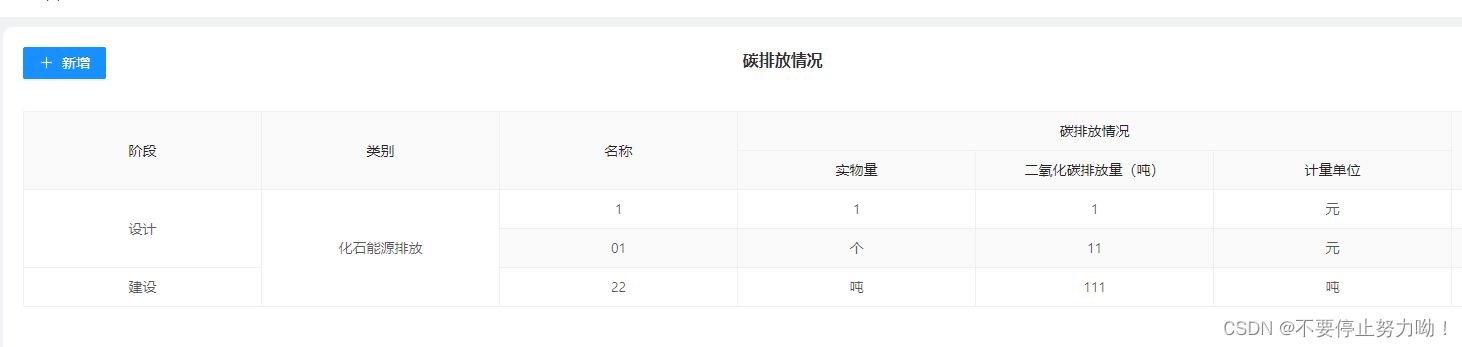
jeecgboot 、vue3 、BasicTable 表格单元格合并

实现效果

在这里插入图片描述

列表数据

// 列表数据
export const columns: BasicColumn[] = [
  {
    title: '阶段',
    align: 'center',
    dataIndex: 'projectStage',
  },
  {
    title: '类别',
    align: 'center',
    dataIndex: 'emissionsType',
  },
  ....
]

js文件定义表格单元格合并公共方法

//  表格合并
export const getSpanArr = (tableData, itemProperty) => {
  if (tableData.length === 0) {
    return false;
  }

  const spanArr = [];
  let pos;
  for (let i = 0; i < tableData.length; i++) {
    if (i === 0) {
      spanArr.push(1);
      pos = 0;
    } else {
      // 判断当前元素与上一个元素是否相同 相同则加 1
      if (tableData[i][itemProperty] && tableData[i][itemProperty] === tableData[i - 1][itemProperty]) {
        spanArr[pos] += 1;
        spanArr.push(0);
      } else {
        spanArr.push(1);
        pos = i;
      }
    }
  }

  return spanArr;
};

组件界面引入

import { ref, computed } from 'vue';
import { getSpanArr } from './jsfile.fun.js';
import { columns } from './jsfile.data.js';
 // 表格列设置单元格合并
  const newColumns = computed(() => {
  	// 获取表格数据
    const tableDataSource = getDataSource();
    // 设置需要合并的列
    const needTomergeColumnsIndex = ['projectStage', 'emissionsType'];
    let newColumnsData = columns.map((item) => {
      if (needTomergeColumnsIndex.includes(item.dataIndex)) {
        // 计算合并单元格数量
        const spanArr = getSpanArr(tableDataSource, item.dataIndex);
        item.customCell = (record, rowIndex, column) => {
          // 设置单元格合并数量
          return { rowSpan: spanArr[rowIndex] };
        };
      }
      return item;
    });
    return newColumnsData;
  });
  • 8
    点赞
  • 8
    收藏
    觉得还不错? 一键收藏
  • 1
    评论
在使用 Vue3 和 JeecgBoot 开发时,如果您想要实现操作栏固定的功能,可以尝试以下步骤: 1. 安装 element-plus 和 @vueuse/core,可以使用 npm 或 yarn 安装。 2. 在代码中导入需要的组件和方法: ```javascript import { useTable, useColumns, useSortBy, usePagination } from '@vueuse/table' import { defineComponent } from 'vue' import { ElButton } from 'element-plus' ``` 3. 在组件中设置表格的数据和列信息: ```javascript export default defineComponent({ setup() { const { columns, rows } = useTable( data.value, // 表格数据 useColumns(columns.value), // 表格列信息 useSortBy(), // 排序 usePagination() // 分页 ) // 定义表格列信息 const columns = ref([ { key: 'name', label: '姓名' }, { key: 'age', label: '年龄' }, { key: 'address', label: '地址' }, { key: 'action', label: '操作', actions: { view: { label: '查看', icon: 'el-icon-view', onClick: (row) => console.log(row) }, edit: { label: '编辑', icon: 'el-icon-edit', onClick: (row) => console.log(row) }, delete: { label: '删除', icon: 'el-icon-delete', onClick: (row) => console.log(row) } } } ]) return { columns, rows } } }) ``` 4. 在模板中渲染表格: ```html <template> <div> <el-table :data="rows"> <el-table-column v-for="column in columns" :key="column.key" :label="column.label"> <template #default="{ row }"> <span v-if="!column.actions">{{ row[column.key] }}</span> <span v-else> <el-button v-for="(action, key) in column.actions" :key="key" :icon="action.icon" @click="action.onClick(row)" > {{ action.label }} </el-button> </span> </template> </el-table-column> </el-table> </div> </template> ``` 5. 在 CSS 中设置操作栏固定: ```css .el-table__fixed-right .el-table__fixed-body-wrapper { overflow: visible; } .el-table__fixed-right .el-table__fixed-body-wrapper .el-table__body { overflow: visible; } .el-table__fixed-right .el-table__fixed-right-patch { display: none; } .el-table__fixed-right .el-table__fixed-body-wrapper .el-table__fixed { position: sticky; right: 0; } ``` 以上步骤可以实现固定操作栏的功能,您可以根据自己的需求进行调整和修改。

“相关推荐”对你有帮助么?

  • 非常没帮助
  • 没帮助
  • 一般
  • 有帮助
  • 非常有帮助
提交
评论 1
添加红包

请填写红包祝福语或标题

红包个数最小为10个

红包金额最低5元

当前余额3.43前往充值 >
需支付:10.00
成就一亿技术人!
领取后你会自动成为博主和红包主的粉丝 规则
hope_wisdom
发出的红包
实付
使用余额支付
点击重新获取
扫码支付
钱包余额 0

抵扣说明:

1.余额是钱包充值的虚拟货币,按照1:1的比例进行支付金额的抵扣。
2.余额无法直接购买下载,可以购买VIP、付费专栏及课程。

余额充值