three.js学习总结超详细附带素材及源码
vue安装three.js
npm install --save three
引入three.js
import * as THREE from 'three'
three.js结构

### three.js坐标

创建一个场景
scene场景,camera相机,renderer渲染器
- 创建一个场景
this.scene = new THREE.Scene()
- 创建一个透视摄像机
this.camera = new THREE.PerspectiveCamera(75,800/800,0.1,700)
PerspectiveCamera:
参数一:视野角度,无论在什么时候,你所能再显示器上看到的场景的范围,单位是角度。
参数二:长宽比,一个物体的宽除以她的高
参数三:近截面和远截面,当某些部分比摄像机的远截面或者近截面近的时候,该部分将不会被渲染到场景中。
- 创建渲染器,加上抗锯齿
当您使用纹理时,使用更高分辨率的纹理可以减少锯齿
renderer = new THREE.WebGLRenderer({antialias: true});
- 创建渲染器的宽高
renderer.setSize( 800, 800 );
- 创建一个立方体物体
const geometry = new THREE.BoxGeometry( 1, 1, 1 );
BoxGeometry(x轴上的宽度,y轴上的高度,z轴上的深度) 默认为1
- 确定立方体的材质和颜色
MeshBasicMaterial材质,颜色绿色
const material = new THREE.MeshBasicMaterial( { color: 0x00ff00 } );
- 创建一个网格
表示基于以三角形为
polygon mesh(多边形网格)的物体的类。
同时也作为其他类的基类Mesh( geometry:
BufferGeometry, material : Material )
geometry ——(可选)BufferGeometry的实例,默认值是一个新的BufferGeometry。
material——(可选)一个Material,或是一个包含有Material的数组,默认是一个新的MeshBasicMaterial。
mesh = new THREE.Mesh( geometry, material );
- 插入元素,执行渲染操作
 //元素中插入canvas对象
   container.appendChild(this.renderer.domElement);
- WebGL兼容性检查(
WebGL compatibility check)
某些设备以及浏览器直到现在仍然不支持
WebGL。
以下的方法可以帮助你检测当前用户所使用的环境是否支持WebGL,如果不支持,将会向用户提示一条信息。
// webGL兼容
import WebGL from 'three/examples/jsm/capabilities/WebGL.js';
if ( WebGL.isWebGLAvailable() ) {
  this.animate();
} else {
 const warning = WebGL.getWebGLErrorMessage();
 document.getElementById( 'container' ).appendChild( warning );
}
- 执行旋转函数,执行渲染
 animate() {
   requestAnimationFrame( this.animate );
   this.mesh.rotation.x += 0.01;
   this.mesh.rotation.y += 0.01;
   this.renderer.render( this.scene, this.camera );
 }
- 加入坐标辅助器
// 看的方向
this.camera.lookAt(0,0,0)
//添加世界坐标辅助器
const axesHelper = new THREE.AxesHelper(3)
this.scene.add( axesHelper );
- 引入并加入轨道控制器,并设置阻尼效果
// 轨道控制器
import { OrbitControls } from "three/examples/jsm/controls/OrbitControls.js"
//添加轨道控制器
this.controls = new OrbitControls(this.camera,this.renderer.domElement)
//设置带阻尼的惯性
this.controls.enableDamping = true
//设置阻尼系数,惯性的大小
this.controls.dampingFactor = 0.05
//设置自动旋转
this.controls.autoRotate = true
//更新
this.controls.update()
运行效果:

完整代码:
<template>
  <div id="container">

  </div>
</template>

<script>
import * as THREE from 'three'
// webGL兼容
import WebGL from 'three/examples/jsm/capabilities/WebGL.js';
// 轨道控制器
import { OrbitControls } from "three/examples/jsm/controls/OrbitControls.js"
export default {
  name: 'HomeView',
  components: {
  },
  mounted(){
    this.init()
  },
  data(){
    return {
      camera: null,  //相机对象
      scene: null,  //场景对象
      renderer: null,  //渲染器对象
      mesh: null,  //网格模型对象Mesh
      controls:null, //轨道控制器
    }
  },
  methods:{
    init(){
      let container = document.getElementById('container');
      //创建一个场景
      this.scene = new THREE.Scene()
      //透视摄像机
      this.camera = new THREE.PerspectiveCamera(75,1000/1000,0.1,700)
      //创建渲染器
      this.renderer = new THREE.WebGLRenderer();
      this.renderer.setSize(window.innerWidth, window.innerHeight);
      // 让物体渲染的没有楼梯纹
      this.renderer.setPixelRatio(window.devicePixelRatio)
      //创建一个立方体
      const geometry = new THREE.BoxGeometry( 1, 1, 1 );
      //我们需要给它一个MeshBasicMaterial材质,来让它有绿色颜色
      const material = new THREE.MeshBasicMaterial( { color: 0x00ff00 } );
      //需要一个 Mesh(网格)
      this.mesh = new THREE.Mesh( geometry, material );
      // 添加物体到网格
      this.scene.add( this.mesh );
      // 设置相机位置
      this.camera.position.z = 5;
      this.camera.position.y =2;
      this.camera.position.x = 2;
      // 看的方向
      this.camera.lookAt(0,0,0)
      //添加世界坐标辅助器
      const axesHelper = new THREE.AxesHelper(3)
      this.scene.add( axesHelper );
      //添加轨道控制器
      this.controls = new OrbitControls(this.camera,this.renderer.domElement)
      //添加阻尼带有惯性
      this.controls.enableDamping = true
      //设置阻尼系数
      this.controls.dampingFactor = 0.05
      //设置自动旋转
      this.controls.autoRotate = true
      //元素中插入canvas对象
      container.appendChild(this.renderer.domElement);
      if ( WebGL.isWebGLAvailable() ) {
        this.animate();
      } else {
        const warning = WebGL.getWebGLErrorMessage();
        document.getElementById( 'container' ).appendChild( warning );
      }
    },
    //旋转起来
    animate() {
      this.controls.update()
      requestAnimationFrame( this.animate );
      this.mesh.rotation.x += 0.01;
      this.mesh.rotation.y += 0.01;
      this.renderer.render( this.scene, this.camera );
    }
  }
}
</script>
three.js物体位移与父子元素
//子元素材质绿色
const material = new THREE.MeshBasicMaterial( { color: 0x00ff00 } );
//父元素材质红色
const material2 = new THREE.MeshBasicMaterial( { color: "red" } );
this.mesh2 = new THREE.Mesh( geometry, material2 );
this.mesh = new THREE.Mesh( geometry, material );
 //父元素添加子元素
this.mesh2.add(this.mesh)
//设置父元素位置
this.mesh2.position.set(-3,0,0)
//设置子元素位置
this.mesh.position.set(3,0,0)
效果:

three.js物体的缩放与旋转
属性及其方法
- 物体距离另一个物体的距离
.distanceTo()
this.mesh.position.distanceTo(this.camera.position)
- 添加
XYZ世界坐标辅助器.AxesHelper()
//添加世界坐标辅助器
const axesHelper = new THREE.AxesHelper(3)
this.scene.add( axesHelper );
- 物体的缩放
.scale.set(x,y,z)
this.mesh.scale.set(2,2,2)
- 物体的旋转,根据xyz轴旋转
.rotation.xyz
this.mesh.rotation.x = Math.PI / 4
- 当xyz轴一起同时旋转的时候,会出现万向锁,
axis不在工作,需要设置xyz轴的旋转顺序
object.rotation.reorder("YXZ"),YXZ是执行的旋转顺序
this.mesh.rotation.reorder("YXZ")  //旋转顺序
this.mesh.rotation.x = Math.PI / 4
this.mesh.rotation.y = Math.PI / 4
this.mesh.rotation.Z = Math.PI / 4
- 计算相机视线方向
.lookAt(),改变.position属性后,如果不执行.lookAt()方法,相机的观察方向默认不变。
// 看的方向
this.camera.lookAt(0,0,0)
- 组
new THREE.Group(),将多个物体放在一组中进行移动等动画操作
const group = new THREE.Group()
//
this.scene.add(group)
three.js物体的缩放与旋转实例
物体的局部缩放。默认值是
Vector3( 1, 1, 1 )。父元素被放大了,子元素也根着进行放大。
物体的局部旋转,以弧度来表示,欧拉角秒是一个旋转变换,通过指定轴顺序和各个轴上的指定旋转角度来旋转一个物体,对Euler实例进行遍历将按相应的顺序生成她的分量(x,y,z,order)。
也属于局部旋转,跟父元素有关联。会叠加父元素的旋转
Euler(0,1,1,"YXZ")
x:用弧度表示x轴旋转的量,默认是0
y:用弧度表示y轴旋转的量,默认是0
z:用弧度表示z轴旋转的量,默认是0
order:表示旋转顺序的字符串,默认为'XYZ'(必须是大写)
 //子物体放大两倍
  this.mesh.scale.set(2,2,2)
  //物体绕着X轴旋转45°
  this.mesh.rotation.x = Math.PI / 4

three.js的Animation动画
介绍
Threejs为我们提供了强大的动画系统接口API,通过这些接口,我们可以很轻松的实现物体的移动、旋转、缩放、颜色变化、透明度变化等各种效果。
安装gsap
npm install --save gasp@3.5.1
引入
import gsap from "gsap"
使用:
 gsap.to(this.mesh2.position,{duration:1,delay:1,x:3})
 gsap.to(this.mesh2.position,{duration:1,delay:3,x:0})

 animate() {
      this.controls.update()
      // 每一帧请求调用
      requestAnimationFrame( this.animate );
      // this.mesh.rotation.x += 0.01;
      // this.mesh.rotation.y += 0.01;
      this.renderer.render( this.scene, this.camera );
    }
three.js相机Cameras
three.js相机介绍
`Camera`类就是我们所说的抽象类。你不应该直接使用它,但你可以继承它来访问公共属性和方法。以下一些类继承自`Camera`类。
three.js相机类型
- 正交相机
正交相机
(OrthographicCamera)使用正交投影进行渲染。在正交投影中,物体的大小不会随着距离的增加而减小,这意味着所有物体在渲染时保持相同的尺寸,不受距离的影响。这种相机在制作
2D游戏和CAD工具等应用中非常有用。
属性参数:
left渲染空间的左边界。right渲染空间的右边界。top渲染空间的上边界。bottom渲染空间的下边界。nearnear属性表示的是从距离相机多远的位置开始渲染,一般情况会设置一个很小的值。 默认值0.1。farfar属性表示的是距离相机多远的位置截止渲染,如果设置的值偏小小,会有部分场景看不到。 默认值2000。
const camera = new THREE.OrthographicCamera(left, right, top, bottom, near, far);

// 正投影相机案例
const width = window.innerWidth; //canvas画布宽度
const height = window.innerHeight; //canvas画布高度
const k = width / height; //canvas画布宽高比
const s = 600;//控制left, right, top, bottom范围大小
const camera = new THREE.OrthographicCamera(-s * k, s * k, s, -s, 1, 8000);
- 透视相机
透视相机
(PerspectiveCamera)使用透视投影进行渲染。在透视投影中,物体的大小会随着距离的增加而减小,这使得远离相机的物体看起来更小,符合现实世界中的透视效果。这种相机在制作 3D 游戏和仿真应用中非常常见。
属性参数:
fov相机视锥体竖直方向视野角度,垂直视角。aspect相机视锥体水平方向和竖直方向长度比,一般设置为Canvas画布宽高比width / height。near相机视锥体近裁截面相对相机距离。far相机视锥体远裁截面相对相机距离,far-near构成了视锥体高度方向。
const camera = new THREE.PerspectiveCamera(fov, aspect, near, far);
//透视相机案例
// width和height用来设置Three.js输出的Canvas画布尺寸(像素px)
const width = 800; //宽度
const height = 500; //高度
// 30:视场角度, width / height:Canvas画布宽高比, 1:近裁截面, 3000:远裁截面
const camera = new THREE.PerspectiveCamera(30, width / height, 1, 3000);
three.js相机属性
1..FOV 视角:
仅透视相机具有视角属性(FOV)。视角表示相机的垂直视野范围,单位为度。较大的视角值会导致更大的视野,但可能会产生畸变。较小的视角值则会产生更窄的视野和更低的畸变。
2. Aspect宽高比:
仅透视相机具有宽高比属性。宽高比表示相机水平视野范围与垂直视野范围的比值。通常,宽高比应该与渲染目标(如 Canvas 或 WebGLRenderTarget)的宽高比相同,以避免图像被拉伸或压缩。
3. 近裁剪面(Near)和远裁剪面(Far)
近裁剪面和远裁剪面定义了相机的渲染范围。位于近裁剪面之前的物体和位于远裁剪面之后的物体都不会被渲染。为了提高渲染性能,通常应该尽量将近裁剪面和远裁剪面之间的距离设置得较小。
three.js不同方向的投影视图
1.x轴方向观察
// 通过UI按钮改变相机观察角度
document.getElementById('x').addEventListener('click', function () {
    camera.position.set(500, 0, 0); //x轴方向观察
    camera.lookAt(0, 0, 0); //重新计算相机视线方向
})
y轴方案观察
// 通过UI按钮改变相机观察角度
document.getElementById('y').addEventListener('click', function () {
    camera.position.set(0, 500, 0); //y轴方向观察
    camera.lookAt(0, 0, 0); //重新计算相机视线方向
})
z轴方向观察z轴方向观察
// 通过UI按钮改变相机观察角度
document.getElementById('z').addEventListener('click', function () {
    camera.position.set(0, 0, 500); //z轴方向观察
    camera.lookAt(0, 0, 0); //重新计算相机视线方向
})
three.js相机轨道控制器
- 引入
OrbitControls
import { OrbitControls } from "three/examples/jsm/controls/OrbitControls.js"
- 添加轨道控制,添加轨道控制的阻尼何阻尼级别
//添加轨道控制器
this.controls = new OrbitControls(this.camera,this.renderer.domElement)
//添加阻尼带有惯性
this.controls.enableDamping = true
//设置阻尼系数
this.controls.dampingFactor = 0.05
three.js 几何
BufferGeomeetry属性
attributes:分量,分量属性将数据直接送往cpu进行处理,定义一个形体,你需要至少创建一个Float32Array数组,其中每三个要素定义一个顶点的三维空间坐标,每个三维定点即数组中的九个要素,确定一个面,该数组可以创建并传到分量中。
geometry.setAttribute("position", new THREE.BufferAttribute(pointsArray, 3));
index:索引,一般不需要特意指定面,因为默认情况下position分量中,每三个空间坐标确定一个面,但是我们可以通过index属性,像THREE.gemotry类一样去指定用于组成每个面的顶点。
BufferGeomeetry也就这两个重要的属性,其余的2d几何和3d几何three.js官网写的很详细。
实例效果:

实例代码:
const geometry = new THREE.BufferGeometry();
const tempArr = [];
for (let i = 0; i < 120; i++) {
  const x = Math.random() * 2 - 1;
  const y = Math.random() * 2 - 1;
  const z = Math.random() * 2 - 1;
  tempArr.push(x, y, z);
}
const pointsArray =  new Float32Array([...tempArr]);
//创建顶点属性
geometry.setAttribute("position", new THREE.BufferAttribute(pointsArray, 3));

const material = new THREE.MeshBasicMaterial({
  color: 0x00ff00,
  wireframe: true,
  transparent: true, //开启透明
  // opacity: 0.5, //设置透明度
  side: THREE.DoubleSide, //两面可见
});
//需要一个 Mesh(网格)
this.mesh = new THREE.Mesh(geometry, material);
// 添加物体到网格
this.scene.add(this.mesh);
材质
介绍
材质+Geometry = Mesh,材质就像物体的皮肤,决定了几何体的外表,材质可以定义一个几何体的看起来是木头还是金属,还是透明的,各种颜色的,然后添加到场景中进行渲染。
材质名称与描述
MeshBasicMaterial(基础材质) 基础材质,可显示几何体线框,可赋予简单的颜色。MeshDepthMaterial(网格法向材质) 一种按深度绘制几何体的材质。深度基于相机远近平面。白色最近,黑色最远。MeshNormalMaterial(网格法向材质) 一种把法向量映射到RGB颜色的材质。MeshLambertMaterial(网格Lambert材质) 一种非光泽表面的材质,没有镜面高光。用于创建暗淡的、不光亮的物体。MeshPhongMaterial(网格Phong材质) 一种用于具有镜面高光的光泽表面的材质。MeshStandardMaterial(网格标准材质) 一种基于物理的标准材质,使用Metallic-Roughness工作流程。它可以计算表面与光线的正确互动关系,从而使渲染出来的物体更加真实。MeshPhysicalMaterial(网格物体材质)MeshStandardMaterial的扩展,能够更好地控制反射率。MeshToonMaterial(网格卡通材质)MeshPhongMaterial卡通着色的扩展。ShadowMaterial(阴影材质) 此材质可以接收阴影,但在其他方面完全透明。ShaderMaterial(着色器材质) 允许使用自定义着色器材质,直接控制顶点的放置方式和像素的着色方式。LineBasicMaterial(直线基础材质) 一种用于绘制线框样式几何体的材质。可用THREE.Line几何体,创建着色的直线。LineDashedMaterial(虚线材质) 一种用于绘制虚线样式几何体的材质。
材质分类
- 基础属性:控制物体不透明度、是否可用、自定义名称或者
ID等 。 - 融合属性:物体如何与背景融合。
- 高级属性:控制底层
WEBGL上下文对象渲染物体的方式,大多数情况我们不会使用这些属性。
材质属性
| 属性 | 描述 |
|---|---|
id | 标识符 |
uuid | 唯一通用识别码 |
name | 自定义材质名称 |
opacity(不透明度) | 在0.0 - 1.0的范围内的浮点数,表明材质的透明度。值0.0表示完全透明,1.0表示完全不透明。如果材质的transparent属性未设置为true,则材质将保持完全不透明,此值仅影响其颜色。 默认值为1.0。 |
transparent(是否透明) | 定义此材质是否透明。这对渲染有影响,因为透明对象需要特殊处理,并在非透明对象之后渲染。设置为true时,通过设置材质的opacity属性来控制材质透明的程度。默认值为false。 |
overdraw(过度描绘) | 当使用THREE.CanvasRender时,多边形会被渲染的稍微大些,当使用这个渲染器渲染的物体有间隙时,可以设置为true。 |
visible(是否可见) | 此材质是否可见。默认为true。 |
side(侧面) | 定义将要渲染哪一面 - 正面,背面或两者。 默认为THREE.FrontSide。其他选项有THREE.BackSide和THREE.DoubleSide。 |
needsUpdate(是否更新) | 指定需要重新编译材质。实例化新材质时,此属性自动设置为true。 |
colorWrite(是否输出颜色) | 为false时,具有该材质的物体不会被真正绘制到场景。该物体不可见,其它物体被遮挡的部分也不可见。 |
flatShading(平面着色) | 定义材质是否使用平面着色进行渲染。默认值为false。 |
lights(光照) | 材质是否受到光照的影响。默认为true。 |
premultipliedAlpha(预计算Alpha混合) | 是否预乘alpha(透明度)值,默认false |
dithering(抖动) | 是否启用颜色抖动模式。该模式可以一定程度减少颜色不均匀问题,默认false |
shadowSide(投影面) | 定义投影的面。设置时,可以是THREE.FrontSide, THREE.BackSide, 或Materials。默认值为 null。如果为null, 则面投射阴影确定如下:THREE.FrontSide 背面THREE.BackSide 前面THREE.DoubleSide 双面 |
vertexColors(顶点颜色) | 可以为物体的每一个顶点指定特有颜色。是否使用顶点着色。默认值为THREE.NoColors。 其他选项有THREE.VertexColors 和 THREE.FaceColors。 |
fog(雾) | 材质是否受雾影响。默认为true。 |
材质的融合属性
| 名称 | 描述 |
|---|---|
blending(融合) | 决定物体材质如何与背景融合,一般融合模式为THREE.NormalBlending,这种模式下只显示材质的上层。 |
blendSrc(融合源) | 混合源。默认值为THREE.SrcAlphaFactor。 |
blendSrcAlpha(融合源透明度) | blendSrc的透明度。 默认值为 null。 |
blendDst(融合目标) | 定义了融合时使用何种背景(目标),默认为THREE.OneMinusSrcAlphaFactor,其含义是目标也使用源的alpha通道进行融合,只是使用的值为1(源的aloha通道值)。 |
blendDstAlpha(融合目标透明度) | 为blendDst的指定透明度,默认为null。 |
blendEquation(融合公式) | 使用混合时所采用的混合方程式。默认值为使它们相加(AddEquation),也可以创建自定义融合模式。 |
材质的高级属性(只作了解)
| 名称 | 描述 |
|---|---|
| `depthTest | 是否在渲染此材质时启用深度测试。默认为 true。 |
| `depthWrite | 渲染此材质是否对深度缓冲区有任何影响。默认为true。在绘制2D叠加时,将多个事物分层在一起而不创建z-index时,禁用深度写入会很有用。 |
depthFunc | 使用何种深度函数。默认为LessEqualDepth。 |
polygonOffset | 是否使用多边形偏移。默认值为false。 |
polygonOffsetFactor、polygonOffsetUnits | 设置多边形偏移系数。默认值为0。 |
alphaTest | 设置运行alphaTest时要使用的alpha值。如果不透明度低于此值,则不会渲染材质。默认值为0。 |
precision | 重写此材质渲染器的默认精度。可以是"highp", "mediump" 或 "lowp"。默认值为null。 |
three.js画布自适应窗口变化
当窗口缩小的时候会出现如下效果:

自适应代码,监听窗口变化
 window.addEventListener("resize",()=>{
      console.log("我改变了")
      //重置渲染器宽高比
      this.renderer.setSize(window.innerWidth,window.innerHeight)
      //重置相机宽高比
      this.camera.aspect = window.innerWidth/window.innerHeight
      //更新相机投影矩阵
      this.camera.updateProjectionMatrix()
      // 更新renderer
      this.renderer.render(this.scene, this.camera);
    })

全屏显示,添加一个按钮带有全屏显示
 //全屏
allView(){
   this.renderer.domElement.requestFullscreen()
 },
 //退出全屏
 backAllView(){
   this.renderer.domElement.exitFullscreen()
 },

双击进入全屏和退出全屏

方法
requestFullscreen():使用该方法可以将页面进入全屏模式,所有元素会充满整个浏览器窗口exitFullscreen():使用该方法可以退出全屏模式,使页面回到正常的窗口模式。fullscreenEnabled该属性返回一个布尔值,表示当前浏览器是否支持全屏模式
if (document.fullscreenEnabled) {
  // 当前浏览器支持全屏模式
} else {
  // 当前浏览器不支持全屏模式
}
fullscreenElement:该属性返回当前处于全屏模式的元素。
var fullscreenElement = document.fullscreenElement || document.mozFullScreenElement || document.webkitFullscreenElement || document.msFullscreenElement;
事件
fullscreenchange:该事件在全屏模式状态发生改变时触发。
document.addEventListener('fullscreenchange', function() {
  if (document.fullscreenElement) {
    console.log('进入全屏模式');
  } else {
    console.log('退出全屏模式');
  }
});
fullscreenerror:该事件在进入全屏模式失败时候触发
document.addEventListener('fullscreenerror', function() {
  console.log('进入全屏模式失败');
});
 // 双击进入全屏和退出全屏
    window.addEventListener("dblclick", () => {
      this.renderer.domElement
      console.log("aaa")
      const fullscreenElement =
        document.fullscreenElement || document.webkitFullScreenElement;
      let container = document.getElementById("container");
      if (!fullscreenElement) {
        if (container.requestFullscreen) {
          container.requestFullscreen();
        } else if (container.webkitRequestFullscreen) {
          container.webkitRequestFullscreen();
        }
      } else {
        if(document.exitFullscreen){
          document.exitFullscreen()
        }else if(document.webkitExitFullscreen){
          document.exitFullscreen()
        }
      }
    });
辅助对象
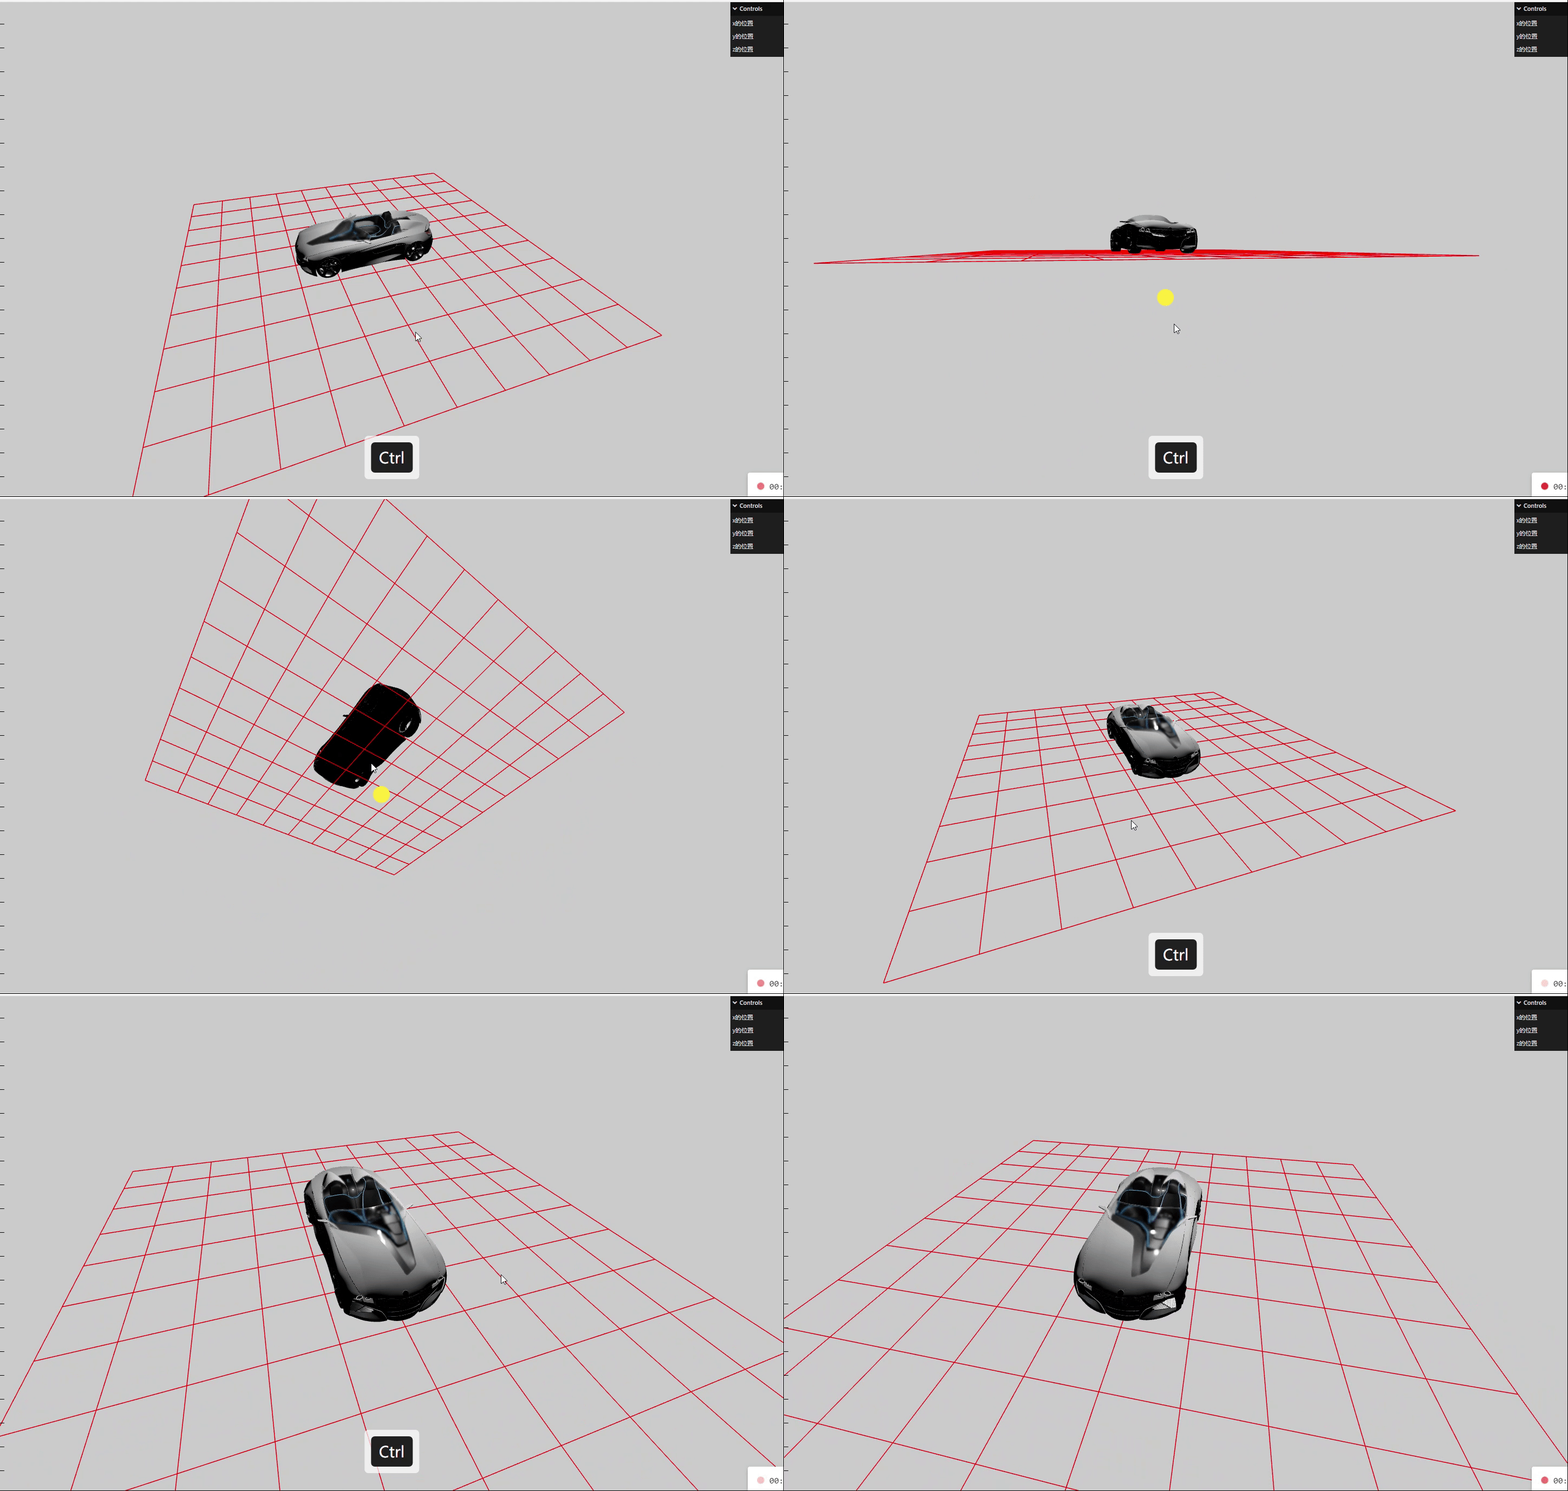
GridHelper坐标格辅助对象
在使用
threejs默认的GridHelper时, 只可以设置网格的整体大小和份数,不可以设置单个格子的大小, 网上没有找到这方面的解决方案,决定自己根据官方代码进行修改。
属性参数
GridHelper( size : number, divisions : Number, colorCenterLine : Color, colorGrid : Color )
size– 坐标格尺寸. 默认为10.divisions– 坐标格细分次数. 默认为10.colorCenterLine– 中线颜色. 值可以为Color类型,16进制和CSS颜色名. 默认为0x444444colorGrid– 坐标格网格线颜色. 值可以为Color类型,16进制和CSS颜色名. 默认为0x888888
创建一个尺寸为'size'和 每个维度细分'divisions'次的坐标格. 颜色可选.
 //添加网格地面
this.gridHeloer = new THREE.GridHelper(10,10,0xff0000,0xff0000)
this.scene.add(this.gridHeloer)
three.js应用lil-GUI调试开发3D效果
为了能够快速的搭建
three.js的交互,three.js社区就出现了lil-gui,语法简介,上手快,主要作用获取一个对象和该对象上的属性名,并根据属性的类型自动生成一个界面组件来操作该属性,使用lil-gui,可以通过界面组件来控制场景中的物体,提高调试效率。
方便编写代码时对相机,灯光等对象的参数进行实时调节,使用lil-GUI库,可以快速创建控制三维场景的UI交互界面,threejs三维空间很多参数都需要通过GUI的方式调试出来。
导入GUI
//导入GUI
import { GUI } from 'three/examples/jsm/libs/lil-gui.module.min.js';
//实例化一个gui对象
const gui = new GUI()
add()
xxx.add()方法用于向GUI中添加要控制的对象及其属性
// Object.add(控制对象,对象具体属性,属性参数最小值,属性参数最大值)
 folder.add(vector3, 'x', -1000, 100, 0.01)
 folder.add(vector3, 'y', -1000, 100, 0.1)
 folder.add(vector3, 'z', -1000, 100, 0.01)
 folder.open()
示例:

onChange()
Object.onChange方法方法用于监听控件的改变,它接收一个回调函数作为参数,在回调函数中可以接收改变的值,并处理相关的业务逻辑。
 gui.onChange(function(val){
  console.log(val);
 })
当加入add后,该表物体位置会触发gui.onChange的回调。

step()
Object.step()方法可以设置每次改变属性值间隔是多少。
folder.add(vector3, 'z', -1000, 100).step(0.1)
addColor()
Object.addColor()方法生成颜色值改变的交互界面,它接收两个参数,一个是控制对象,一个是颜色属性。
  const material = new THREE.MeshBasicMaterial( { color: 0x00ff00 } );
  gui.addColor(params, 'color').onChange( function() { material.color.set( params.color ); } );

name()
Object.name()方法让gui界面显示的中文名称。
gui.addColor(params, 'color').name("颜色").onChange( function() { material.color.set( params.color ); } );
folder.add(vector3, 'x', -1000, 100, 0.1).step(0.1).name("x轴")
folder.add(vector3, 'y', -1000, 100, 0.1).step(0.1).name("y轴")
folder.add(vector3, 'z', -1000, 100, 0.1).step(0.1).name("z轴")

addFolder()
Object.addFolder()创建一个分组,我们可以将同一对象的属性通过.addFolder()方法创建在同一个分组中。
//创建颜色和位置分组
 const groupPositoinGui = gui.addFolder("位置")
 const groupColorGui = gui.addFolder("颜色")
 groupPositoinGui.add(vector3, 'x', -1000, 100, 0.1).step(0.1).name("x轴")
 groupPositoinGui.add(vector3, 'y', -1000, 100, 0.1).step(0.1).name("y轴")
 groupPositoinGui.add(vector3, 'z', -1000, 100, 0.1).step(0.1).name("z轴")
 groupColorGui.addColor(params, 'color').name("颜色").onChange( function() { material.color.set( params.color ); } );

Object.close()和Object.open()交互界面
默认情况下,GUI创建的所有菜单都是打开的,我们可以通过.close()方法控制其关闭,通过.open()方法控制其打开。

three.js几何体顶点
- 创建一个
Buffer类型几何体对象
var geometry = new THREE.BufferGeometry();
- 创建顶点数据
// 创建顶点数据
const vertices = new Float32Array([
  -1.0,-1.0,0.0,1.0,-1.0,0.0,1.0,1.0,0.0,
  1.0,1.0,0,-1.0,1.0,0,-1.0,-1.0,0
])
- 创建顶点属性
3个为一组,表示一个顶点的xyz坐标
geometry.setAttribute( 'position', new THREE.BufferAttribute( vertices, 3 ) );
- 创建材质
可设置材质的颜色,是否正反面都可看,线框
//创建材质
const material = new THREE.MeshBasicMaterial({
  color: 0xffff00,  //材质颜色
  // side:THREE.DoubleSide,  //是否正反面都可看
  wireframe:true,//线框
 })
this.mesh = new THREE.Mesh( geometry, material );
// 添加物体到网格
this.scene.add( this.mesh );

5. 共用顶点使用并绘制索引,两个点面重合公用一个线
//使用索引绘制
const vertices = new Float32Array([
  -1.0,-1.0,0.0,
  1.0,-1.0,0.0,
  1.0,1.0,0.0,
  -1.0,1.0,0
])
//创建顶点属性
geometry.setAttribute( 'position', new THREE.BufferAttribute( vertices, 3 ) );
//创建索引
const indice = new Uint16Array([0,1,2,2,3,0])
//设置索引
geometry.setIndex(new THREE.BufferAttribute(indice,1))
//创建材质
const material = new THREE.MeshBasicMaterial({
  color: 0xffff00,  //材质颜色
  side:THREE.DoubleSide,  //是否正反面都可看
  wireframe:true,//线框
 })

几何体顶点位置数据和点模型对象
概念:
缓冲类型几何体
threeJS的长方体BoxGeometry,球体SphereGeometry等于几何体都是基于BufferGeometry类构建的,BuggerGeometry是一个没有任何形状的空几何体,你可以通过BufferGeometry自定义任何几何形状,具体一点说就是定义顶点数据。
const geometry = new THREE.BufferGeometry();
BufferAttribute定义几何体顶点数据
通过javaScript类型化数组Float32Array创建一组xyz坐标数据来表示几何体坐标。

通过threejs的属性缓冲区对象BufferAttribute表示threejs几何顶点数据。

设置几何体顶点.attributes.position
通过geometry.attributes.position设置几何体顶点位置属性的值BufferAttribute。

点模型Points
点模型Points和网格模型Mesh一样,都是Threejs的一种模型对象,只是大部分情况下都是用Mesh表示物体。
网格模型Mesh有自己对应的材质,同样点模型Points有自己对应的点材质PointsMaterial
// 点材质
const material = new THREE.PointsMaterial({
    color:0xff0000,
    size:20
})
几何体geometry作为模型的Points参数,会把几何体渲染为点,把几何体作为Mesh的参数会把几何体渲染为面
const points = new THREE.Points(geometry,material)

实现
-
创建一个几何体对象
const geometry = new THREE.BufferGeometry(); -
创建数组顶点数据
// 添加一个顶点数据 const vertices = new Float32Array([ 0,0,0, 50,0,0, 0,100,0, 0,0,10, 0,0,100, 50,0,10 ]) -
创建缓冲区对象
//BufferAttribute属性缓冲对象表示顶点数据 const attribute = new THREE.BufferAttribute(vertices,3) -
设置几何体属性的位置和属性
//设置几何体的顶点位置属性 geometry.attributes.position = attribute -
点渲染模式
// 点材质 const material = new THREE.PointsMaterial({ color:0xff0000, size:20 }) -
点模型对象创建
const points = new THREE.Points(geometry,material)
效果:

线模型渲染顶点数据
概念:
先模型Line
把几何体作为线模型Line的参数,你会发现渲染效果是从第一个点开始到最后一个点,依次连成线。
// 创建一个空的几何体对象
const geometry = new THREE.BufferGeometry();

// 添加一个顶点数据
const vertices = new Float32Array([
    0,0,0,
    50,0,0,
    0,100,0,
    0,0,10,
    0,0,100,
    50,0,10
])
//BufferAttribute属性缓冲对象表示顶点数据
const attribute = new THREE.BufferAttribute(vertices,3)

//设置几何体的顶点位置属性
geometry.attributes.position = attribute
// 线材质
const material = new THREE.LineBasicMaterial({
    color:0xffff00,
})
const Line = new THREE.LineSegments(geometry,material)

线模型其他LineLoop、LineSegments
threejs除了Line,还提供了LineLoop,LineSegments,区别在于绘制线条的规则不同。
LineLoop实现:闭合线。
// 线材质
const material = new THREE.LineBasicMaterial({
    color:0xffff00,
})
const Line = new THREE.LineLoop(geometry,material)

LineSegments实现:非连续线,跳过中间一段。
// 线材质
const material = new THREE.LineBasicMaterial({
    color:0xffff00,
})
const Line = new THREE.LineSegments(geometry,material)

三角形面
概念
网格模型Mesh其实就是一个一个三角形面拼接构成,使用网格模型Mesh渲染几何体Geometry,就是几何体所有顶点坐标三个为一组,构成一个三角形,多定点构成多个三角形,就可以用来模拟物体的表面。

网络模型三角形:正反面
正面:逆时针,反面顺时针
空间中一个三角形有正反两个面,那么Threejs区分正反面是你的眼睛就是相机对着三角形的一个面,如果三个顶点的顺序是逆时针方向,该面视为正面,如果三个顶点的顺序是顺时针方向,则该面为反面。
例子
import * as THREE from 'three'
// 创建一个空的几何体对象
const geometry = new THREE.BufferGeometry();
// 添加一个顶点数据
const vertices = new Float32Array([
    0,0,0,
    50,0,0,
    0,100,0,
    0,0,10,
    0,0,100,
    50,0,10
])

//BufferAttribute属性缓冲对象表示顶点数据
const attribute = new THREE.BufferAttribute(vertices,3)

//设置几何体的顶点位置属性
geometry.attributes.position = attribute
// 使用网格模型来渲染几何体
const material = new THREE.MeshBasicMaterial({
    color:0x00ffff,
})
const Line = new THREE.Mesh(geometry,material)


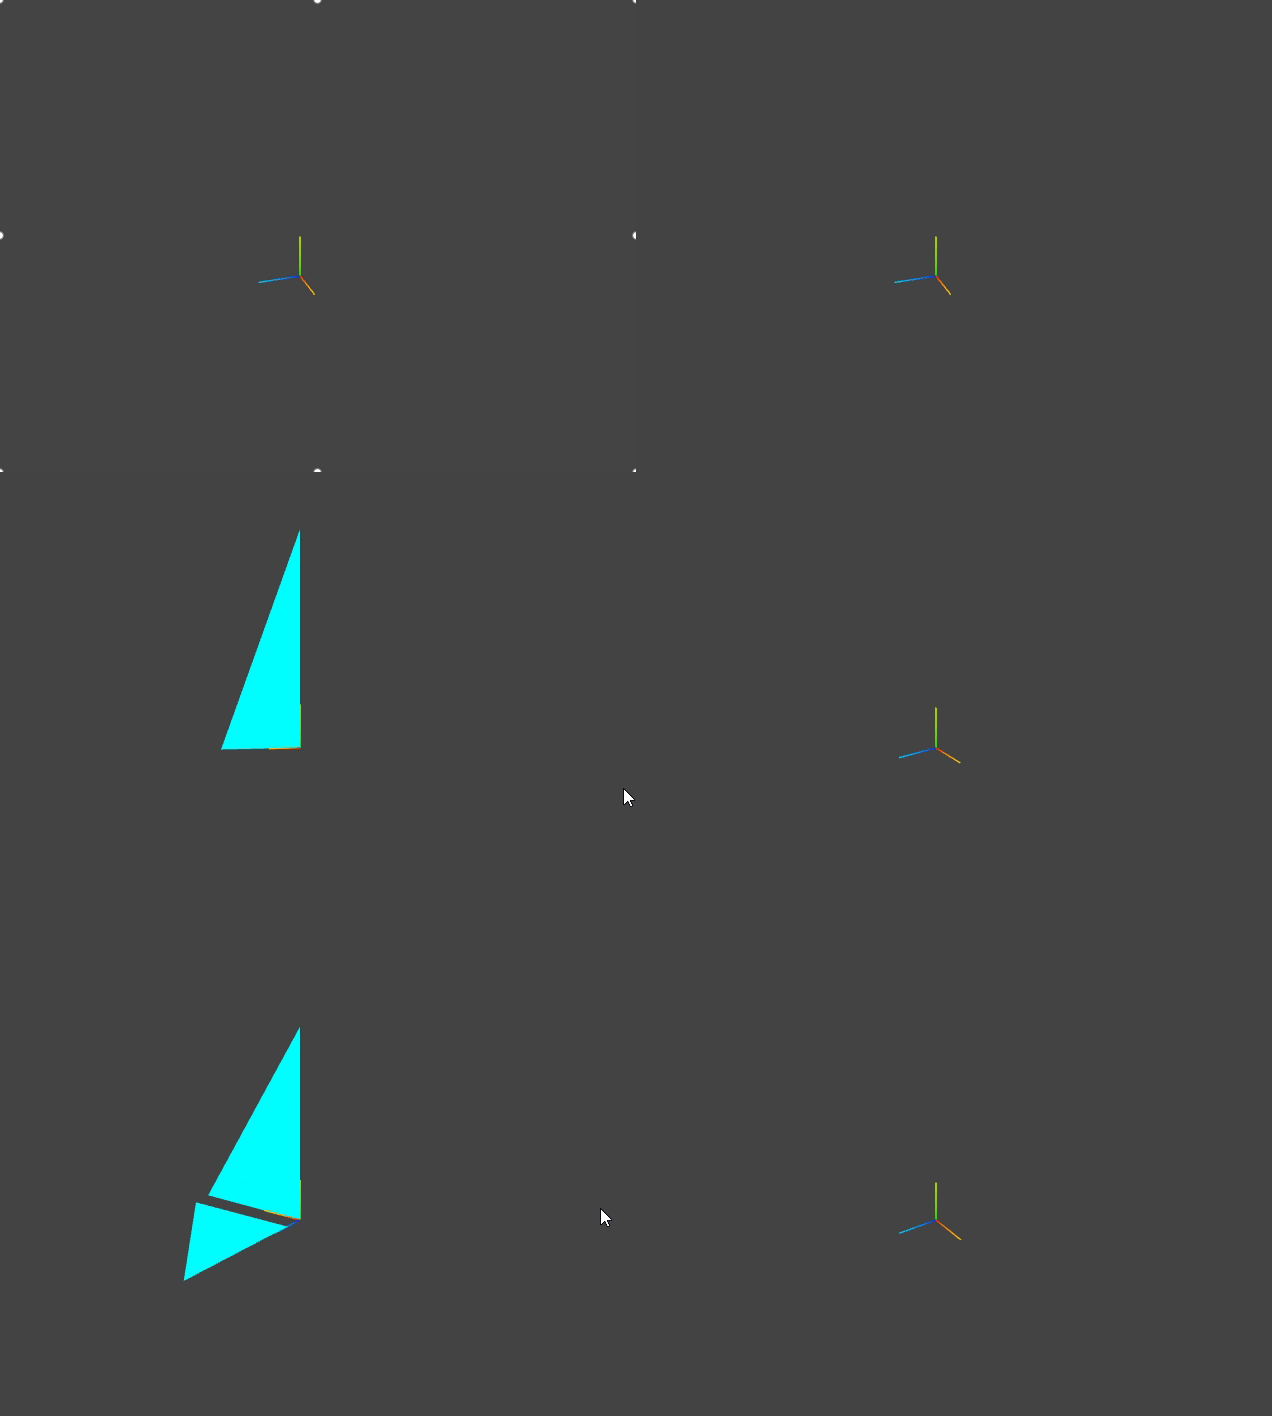
发现只能看到一个面,需要设置双面可见side属性的THREE.DoubleSide值。
const material = new THREE.MeshBasicMaterial({
    color:0x00ffff,
    side:THREE.DoubleSide,
})
const Line = new THREE.Mesh(geometry,material)

side的属性值有:
side:THREE.DoubleSide, // 两面都可见
side:THREE.FrontSide, // 默认只有正面可见
side:THREE.BackSide, //设置只有背面可见
设置只有背面可见效果:
矩形平面几何体
概念:
一个矩形平面,可以至少通过两个三角形拼接而成,而且两个三角形有两个顶点坐标是重合的,注意三角形的正反面问题,确保矩形平面两个三角形的正面是一样的,也就是从一个方向观察,两个三角形都是逆时针或顺时针。

import * as THREE from 'three'

// 创建一个空的几何体对象
const geometry = new THREE.BufferGeometry();

// 添加一个顶点数据
const vertices = new Float32Array([
    0, 0, 0, //顶点1坐标
    80, 0, 0, //顶点2坐标
    80, 80, 0, //顶点3坐标
    0, 0, 0, //顶点4坐标   和顶点1位置相同
    80, 80, 0, //顶点5坐标  和顶点3位置相同
    0, 80, 0, //顶点6坐标
]);
//BufferAttribute属性缓冲对象表示顶点数据
const attribute = new THREE.BufferAttribute(vertices,3)

//设置几何体的顶点位置属性
geometry.attributes.position = attribute

// 使用网格模型来渲染几何体
const material = new THREE.MeshBasicMaterial({
    color:0x00ffff,
    side:THREE.DoubleSide,
})
const Line = new THREE.Mesh(geometry,material)

export default Line

BufferAttribute定义顶点索引.index数据
通过JavaScript类型化数组Uint16Array创建顶点索引.index数据。
例子
import * as THREE from 'three'

// 创建一个空的几何体对象
const geometry = new THREE.BufferGeometry();

// 添加一个顶点数据
const vertices = new Float32Array([
    0, 0, 0, //顶点1坐标 0
    80, 0, 0, //顶点2坐标 1
    80, 80, 0, //顶点3坐标 2
    0, 80, 0, //顶点6坐标 3
]);
// 类型化数组创建顶点数据
const indexes = new Uint16Array([
    0,1,2,0,2,3
])
// 几何体顶点索引定义
geometry.indexes = new THREE.BufferAttribute(indexes,1)

//BufferAttribute属性缓冲对象表示顶点数据
const attribute = new THREE.BufferAttribute(vertices,3)

//设置几何体的顶点位置属性
geometry.attributes.position = attribute

// 使用网格模型来渲染几何体
const material = new THREE.MeshBasicMaterial({
    color:0x00ffff,
    side:THREE.DoubleSide,
})
const Line = new THREE.Mesh(geometry,material)
export default Line


顶点法线数据
概念
数学中,一个平面,法线就是该平面的垂线,如果是光滑曲面,一点的法线就是该点的切面的法线。
threeJs中法线和数学中发现概念相似,只是定义的时候更灵活,会根据需要进行调整。threeJs中法线是通过定点定义,默认情况下,每个定点都有一个法线数据,就像每一个定点都有一个位置数据。
在Three.js中,顶点法线(vertex normals)是用来定义模型表面每个点的出射方向,这对于光照计算是非常重要的。在Three.js中,每个几何体都可以包含顶点法线信息,这些信息用于在渲染时计算光照。
顶点法线指定了几何体表面各个点的出射方向。在光照的计算中,这些信息用于确定表面对光源的反射程度,进而决定了每个像素的颜色。
如果没有顶点法线,几何体将不会受到光照的影响,因为它们的颜色将始终保持统一。
例子
// 设置法线向量
const norlmals = new Float32Array([
  0,  0,  1, //顶点1法线
  0,  0,  1, //顶点2法线
  0,  0,  1, //顶点3法线

  0,  0,  1, //顶点4法线
  0,  0,  1, //顶点5法线
  0,  0,  1, //顶点6法线
]);
// 定义了顶点法线数据或者说顶点法向量数据
geometry.attributes.norlmals = new THREE.BufferAttribute(norlmals,3)
// 使用网格模型来渲染几何体
const material = new THREE.MeshLambertMaterial({
  color: 0x0000ff,
  side: THREE.DoubleSide,
});
const Line = new THREE.Mesh(geometry, material);

几何体顶点结构BufferGeometry基类
three.js提供的矩形平面PlaneGeometry,长方体BoxGeometry,球体SphereGeometry等各种形状的几何体,他们都有一个共同的父类BufferGeometry,这代表这些几何体有哪些属性或方法。
《待完善~》
three.js几何体划分顶点设置不同材质
//创建索引
const indice = new Uint16Array([0,1,2,2,3,0])
//设置索引
geometry.setIndex(new THREE.BufferAttribute(indice,1))
//设置两个顶点组,形成两个素材
geometry.addGroup(0,3,0)
geometry.addGroup( 3,3,1)
//创建材质
const material = new THREE.MeshBasicMaterial({
  color: 0xffff00,  //材质颜色
  side:THREE.DoubleSide,  //是否正反面都可看
 })
 const material2 = new THREE.MeshBasicMaterial({
  color: 0xff00,  //材质颜色
  side:THREE.DoubleSide,  //是否正反面都可看
 })
this.mesh = new THREE.Mesh( geometry, [material,material2] );
// 添加物体到网格
this.scene.add( this.mesh );
其中/设置两个顶点组,形成两个素材
geometry.addGroup(0,3,0),geometry.addGroup(3,3,1)。this.mesh = new THREE.Mesh( geometry, [material,material2] );中应使用参数标识第一和第二个素材。

three.js几何顶点组成一个立方体,划分定点组设置不同材质
 const cubeGemoetry = new THREE.BoxGeometry( 1, 1, 1 );//创建材质
 const material0 = new THREE.MeshBasicMaterial({
   color: 0x00ff00,  //材质颜色
   side:THREE.DoubleSide,  //是否正反面都可看
  })
  const material1 = new THREE.MeshBasicMaterial({
   color: 0xff0000,  //材质颜色
   side:THREE.DoubleSide,  //是否正反面都可看
  })
  const material2 = new THREE.MeshBasicMaterial({
   color: 0x00ffff,  //材质颜色
   side:THREE.DoubleSide,  //是否正反面都可看
  })
  const material3 = new THREE.MeshBasicMaterial({
   color: 0x000f00,  //材质颜色
   side:THREE.DoubleSide,  //是否正反面都可看
  })
  const material4 = new THREE.MeshBasicMaterial({
   color: 0xf0ff00,  //材质颜色
   side:THREE.DoubleSide,  //是否正反面都可看
  })
  const material5 = new THREE.MeshBasicMaterial({
   color: 0xff00ff,  //材质颜色
   side:THREE.DoubleSide,  //是否正反面都可看
  })
 this.mesh = new THREE.Mesh( cubeGemoetry, [material0,material1,material2,material3,material4,material5] );
 // 添加物体到网格
 this.scene.add( this.mesh );

three贴图的加载与环境遮蔽贴图强度设置
- 创建一个平面
let planeGeometry = new THREE.PlaneGeometry(1,1)

2. 加载纹理加载器
let textureLoader = new THREE.TextureLoader()
- 加载纹理加载`ao贴图
 //加载纹理
 let texture = textureLoader.load(require("../../public/map.png"))
  // 加载ao贴图
  let aoMap = textureLoader.load(require("../../public/aomap.jpg"))
素材:
map.png纹理

roughness.png:粗糙度贴图

置换贴图 作位移使用displacementMap.png

aomap.png该纹理的红色通道用作环境遮挡贴图。默认值为null。aoMap需要第二组UV

normal.png 法线贴图

metalness金属贴图

alpha.ng,alpha贴图是一张灰度纹理,用于控制整个表面的不透明度

- 设置平面材质,允许透明度,设置
ao贴图
 //设置平面材质
let planeMaterial = new THREE.MeshBasicMaterial( {
  color: 0xffffff,
  map:texture,  //贴图
  transparent:true, //允许透明度
  aoMap:aoMap,//设置ao贴图
});
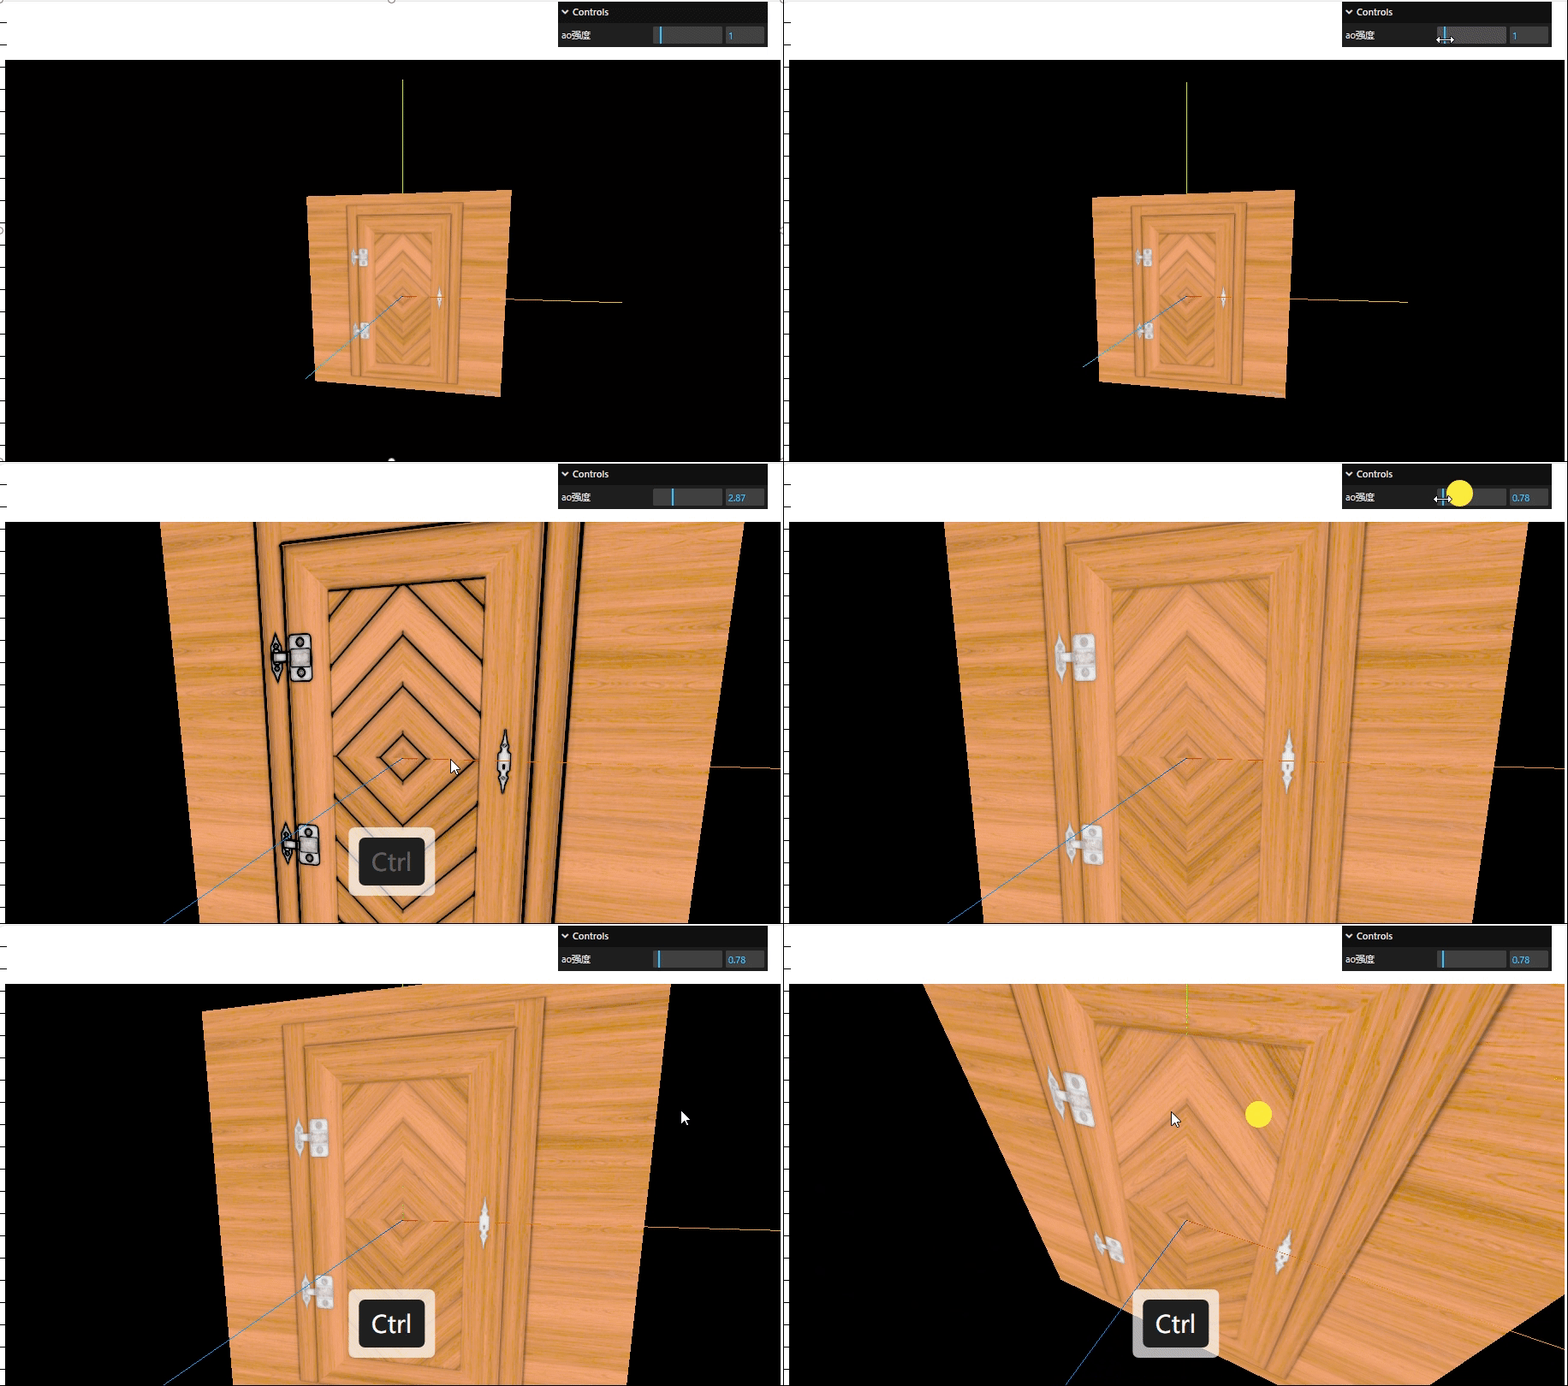
gui.add(planeMaterial,"aoMapIntensity").min(0).max(10).name("ao强度")
this.planeMesh = new THREE.Mesh( planeGeometry, planeMaterial );
this.scene.add( this.planeMesh );
效果:
纹理常用属性
- 偏移属性:让纹理贴图在物体上做偏移
texture.offset.set(0.5, 0.5, 0)

2. 旋转属性:纹理将围绕中心点旋转多少度,单位为弧度(rad),正值为逆时针旋转,默认值问为 0
texture.rotation = Math.PI / 6
由于没有设置中心点导致旋转后的问题

3. 设置旋转中心点:对应纹理的中心,默认为 (0, 0)
texture.center.set(0.5, 0.5)

4. 纹理的重复:repeat 让纹理在物体上重复
// 设置纹理的重复(x 轴方向重复2次,y 轴方向重复3次)
texture.repeat.set(2, 3)
// 设置纹理重复的模式(重复到无穷大)
texture.wrapS = THREE.MirroredRepeatWrapping
texture.wrapT = THREE.RepeatWrapping

纹理采样方式magFilter
纹理贴图的时候,很重要的一步就是纹理采样
采样就是如上图中所示,根据片元的纹理坐标,到纹理图中提取对应位置颜色的过程
. magFilter属性
checkerboard-8x8.png

minecraft.png

一张小纹理贴到一个大空间(例如
16X16的纹理映射到32X32的像素空间),相当于纹理拉大
透视关系下近处的片元 上述情况下一个片元会覆盖不到一个纹理像素(图中红圈
THREE.NearestFilter最近点采样
2.THREE.LinearFilter线性采样 默认值
NearestFilter 最近点采样方法:返回与指定纹理坐标(在曼哈顿距离之内)最接近的纹理像素的值。如图纹理的S,T坐标范围是0-1,纹理本身是由一个个离散的像素组成的,将每个纹理像素看成一个小方块,则每个像素都占一定的纹理坐标。
根据片元的纹理坐标,计算出落在哪个像素中(小方块),最近点采样就直接取此像素的颜色值为采样值
 const colorTexture = textureLoader.load(require("/public/checkerboard-8x8.png"))
colorTexture.magFilter = THREE.NearestFilter
不加colorTexture.magFilter = THREE.NearestFilter


加上加colorTexture.magFilter = THREE.NearestFilter之后


LinearFilter 线性采样方法:返回距离指定的纹理坐标最近的四个纹理元素的加权平均值,线性采样会考虑纹理坐标点附近的4个纹理像素值,一般根据面积比例加权计算出最终采样结果,因为对像素做了加权平均,所以过度比较平滑
纹理采样方式magFilter缩小滤镜
介绍
一张大纹理贴到一个小空间(例如
32X32的纹理映射到16X16的像素空间),相当于纹理缩小
透视关系下远处的片元 上述情况下一个片元会覆盖多个纹理像素
可设置的属性值
THREE.NearestFilterTHREE.NearestMipmapNearestFilterTHREE.NearestMipmapLinearFilterTHREE.LinearFilterTHREE.LinearMipmapNearestFilterTHREE.LinearMipmapLinearFilter默认值
-
NearestFilter、LinearFilter上面已经介绍过了, 其他四种属性就是增加了mipmap相关操作,后面会介绍mipmap \ NearestMipmapNearestFilter选择与被纹理化像素的尺寸最匹配的mipmap, 并以NearestFilter为标准来生成纹理值。 -
NearestMipmapLinearFilter选择与被纹理化像素的尺寸最接近的两个mipmap, 并以NearestFilter为标准来从每个mipmap中生成纹理值。最终的纹理值是这两个值的加权平均值。 -
LinearMipmapNearestFilter选择与被纹理化像素的尺寸最匹配的mipmap, 并以LinearFilter(最靠近像素中心的四个纹理元素的加权平均值)为标准来生成纹理值。 -
LinearMipmapLinearFilter是默认值,它选择与被纹理化像素的尺寸最接近的两个mipmap,LinearFilter为标准来从每个mipmap中生成纹理值。最终的纹理值是这两个值的加权平均值。
checkerboard-1024x1024.png

例子,直写了一个单一的例子,其他的可以自行设置
const colorTexture = textureLoader.load(require("/public/checkerboard-1024x1024.png"))
colorTexture.minFilter = THREE.LinearMipmapNearestFilter

纹理优化技术
纹理优化指的是如何在最大化减小计算机资源的情况下,获得最好的视觉效果,和一切优化手段类似,最终我们要回到资源本身,即始终选择满足需求的情况下,更小的资源或将资源压缩到足够小。除此之外,还需要注意由于
mipmapping技术会二分的切割纹理,因此我们应该始终保障纹理的宽高是「偶数」!
使用过滤器和 Mipmapping
Three.js 会使用一种名为 mipmapping 的纹理优化技术,它通过预先生成一系列不同大小的纹理贴图(也称为 mipmap),来减少在渲染过程中的计算和内存消耗。
在使用 mipmapping 技术时,WebGL 将纹理图像分解成一系列递减的尺寸,从原始尺寸开始,每次缩小到原来的一半,直到缩小到一个像素。这些不同大小的纹理贴图被存储在 GPU 内存中,随着渲染距离的变远,GPU 会自动选择更小的贴图来显示,从而减少了纹理贴图在远处的像素数提高性能。
使用 mipmapping 技术可以减少因纹理采样而导致的失真和锯齿,提高纹理质量。同时,由于更小的纹理贴图需要更少的内存,因此也可以减少内存占用。
而 mipmapping 技术对于开发者的意义在于,当纹理图像的分辨率大于或小于模型的分辨率时,Three.js 让开发者能够通过 API 选择合适的过滤算法以取得计算速度与渲染效果之间的平衡。
缩小器过滤
通过纹理上的 minFilter 属性可以配置纹理的缩小过滤器,以应对纹理图像分辨率大于物体分辨率,需要缩小时的效果,有如下可选值:
THREE.LinearMipmapLinearFilter(默认):使用 MipMap 和线性插值,效果比较平滑,但是计算速度较慢;
THREE.NearestFilter:使用最近邻插值,这种插值方式会产生明显的马赛克效果,但是计算速度比较快;
THREE.LinearFilter:使用线性插值,效果比较平滑,但是计算速度比较慢;
THREE.NearestMipmapNearestFilter:使用最近邻插值和 MipMap,这种插值方式会产生明显的马赛克效果,但是计算速度较快;
THREE.NearestMipmapLinearFilter:使用 MipMap 和最近邻插值,这种插值方式会产生明显的马赛克效果,但是计算速度较快;
THREE.LinearMipmapNearestFilter:使用线性插值和 MipMap,效果比较平滑,但是计算速度较慢;
例如:
colorTexture.minFilter = THREE.LinearMipmapNearestFilter
放大器过滤
您可以通过 magFilter 属性配置放大过滤器,它的使用场景刚好和缩小过滤器相反,并且可选值也少的多,只有两个:
THREE.LinearFilter(默认):使用线性插值,效果比较平滑,但是计算速度比较慢;
THREE.NearestFilter:使用最近邻插值,这种插值方式会产生明显的马赛克效果,但是计算速度比较快。
环境遮挡贴图与强度
.aoMap该纹理的红色通道用作环境遮挡贴图。默认值为 null。aoMap 需要第二组UV,
UV:纹理坐标通常具有U和V两个坐标轴,因此称之为UV坐标。U代表横向坐标上的分布、V代表纵向坐标上的分布。
其实oa贴图就是让物体更具有立体感,加深三维感官,我就随便找了张图替代oa贴图
- 加载
oa贴图
  // 加载ao贴图
  let aoMap = textureLoader.load(require("../../public/ao.jpg"))
- 设置平面材质和
oa强度控制器
 //设置平面材质
let planeMaterial = new THREE.MeshBasicMaterial( {
   color: 0xffffff,
   map:texture,  //贴图
   transparent:true, //允许透明度
   aoMap:aoMap,//设置ao贴图
 });
 gui.add(planeMaterial,"aoMapIntensity").min(0).max(10).name("ao强度")

如果有井盖更深的oa图 立体感就会实现,井盖的凹凸之类的效果。
three.js透明度贴图、环境贴图加载与高光贴图配合使用
- 透明度贴图
//透明度贴图
let alphaMap = textureLoader.load(require("../../public/displacementMap.png"))
let planeMaterial = new THREE.MeshBasicMaterial( {
	color: 0xffffff,
	map:texture,  //贴图
	transparent:true, //允许透明度
	aoMap:aoMap,//设置ao贴图
	alphaMap:alphaMap//透明度贴图
});
处于一个半透明状态

2. 添加光照贴图
贴图网址:
https://ambientcg.com/
//环境贴图我是直接three的仓库中获取的
https://github.com/mrdoob/three.js/blob/master/examples/textures/equirectangular/venice_sunset_1k.hdr
- 导入
RGBRload加载器
import { RGBELoader } from "three/examples/jsm/loaders/RGBELoader.js"
- 加载
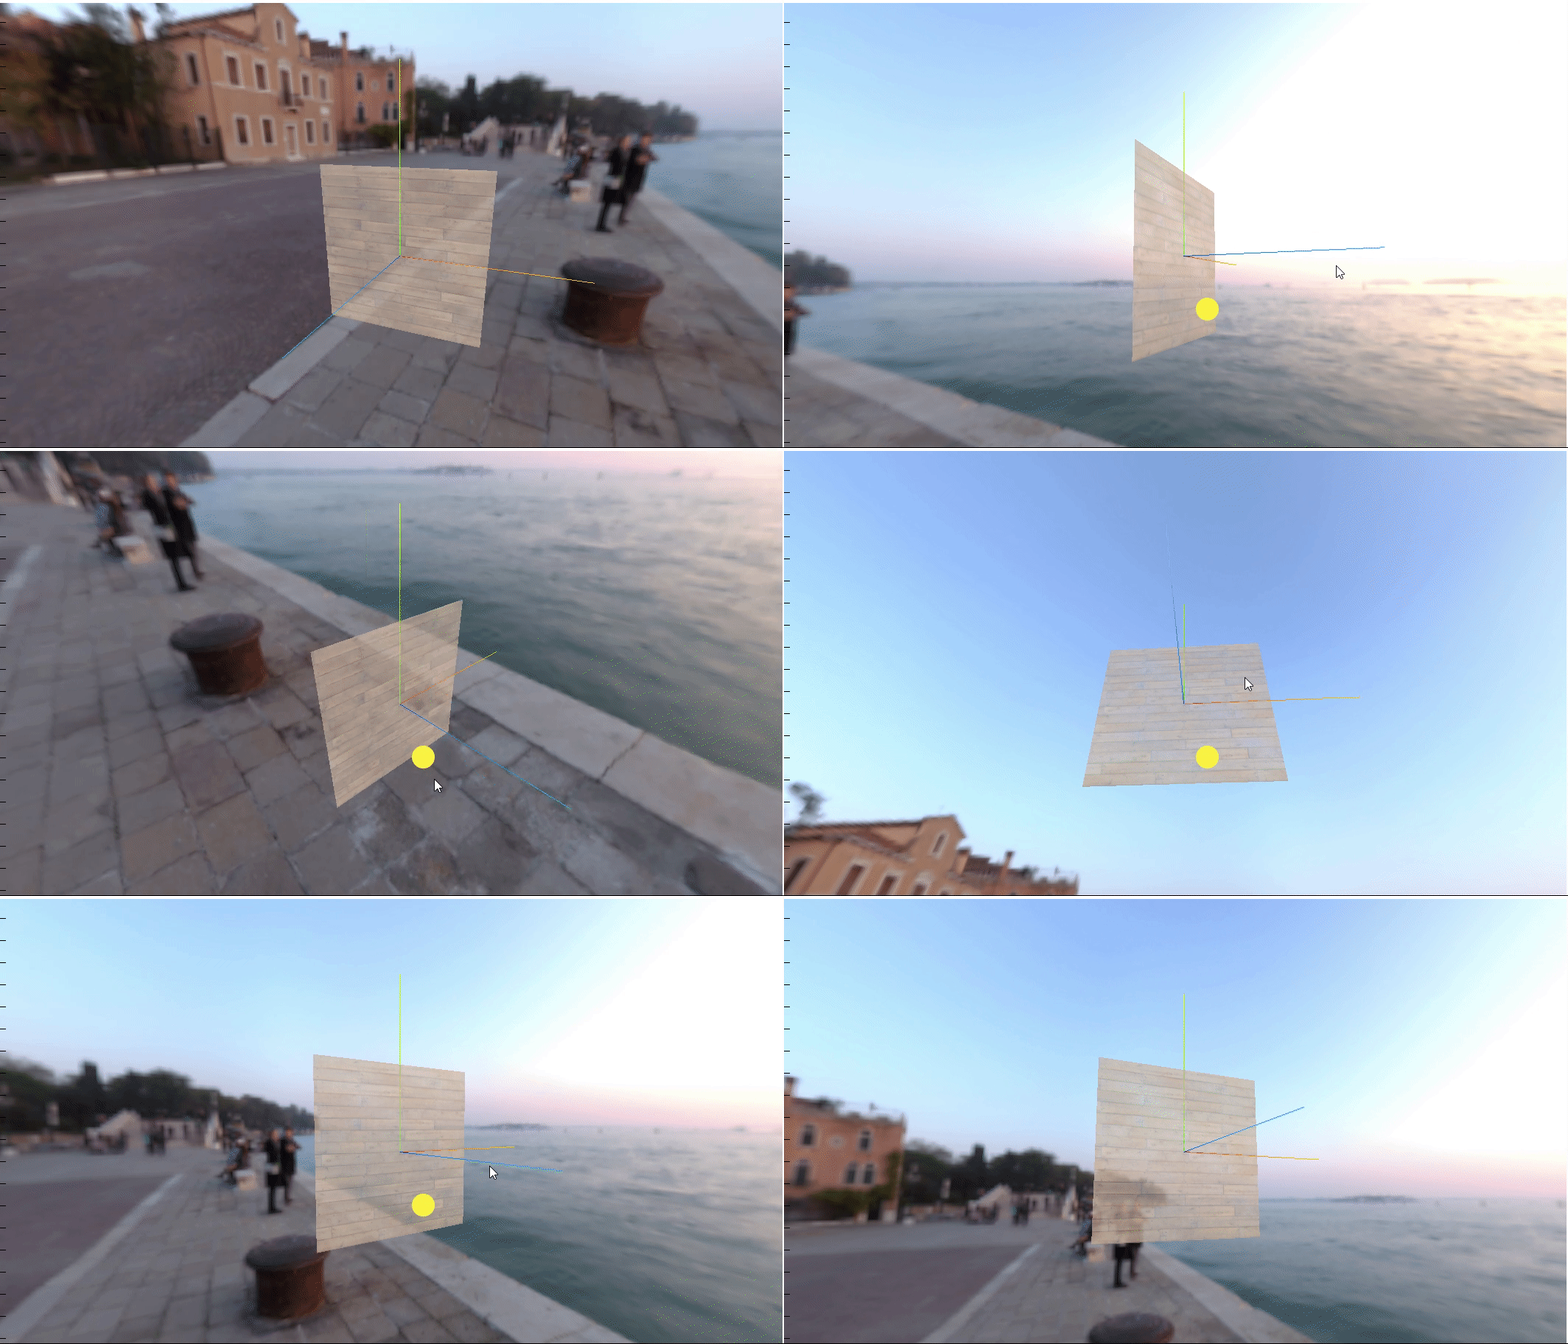
.hdr环境图设置为球形映射背景,资源较大,使用异步加载
let rgbeLoader = new RGBELoader()
rgbeLoader.loadAsync("../venice_sunset_1k.hdr").then((texture) => {
    //设置球形贴图
    texture.mapping = THREE.EquirectangularReflectionMapping;
    //将加载的材质texture设置给背景和环境
    this.scene.background = texture;
    this.scene.environment = texture;
});
效果:
three.js通过CubeTexture加载环境贴图
Three.js中可以通过使用CubeTexture进行环境贴图,CubeTexture需要将6张图片(正面、反面、上下左右)包装成一个立方体纹理。
//素材:
`https://github.com/mrdoob/three.js/tree/master/examples/textures/cube/pisa`
- 设置纹理加载器
 // 设置cube纹理加载器
const cubeTextureLoader = new THREE.CubeTextureLoader(); // 立方体纹理加载器
const envMapTexture = cubeTextureLoader.load([ // 设置环境贴图
  "../px.png",
  "../nx.png",
  "../py.png",
  "../ny.png",
  "../pz.png",
  "../nz.png",
]);
- 创建一个球体,和设置球体材质
let planeGeometry = new THREE.SphereGeometry(1, 32, 32);
let planeMaterial = new THREE.MeshStandardMaterial( {
metalness: 0.7, // 金属度
roughness: 0.1, // 粗糙度
envMap: envMapTexture, // 环境贴图
});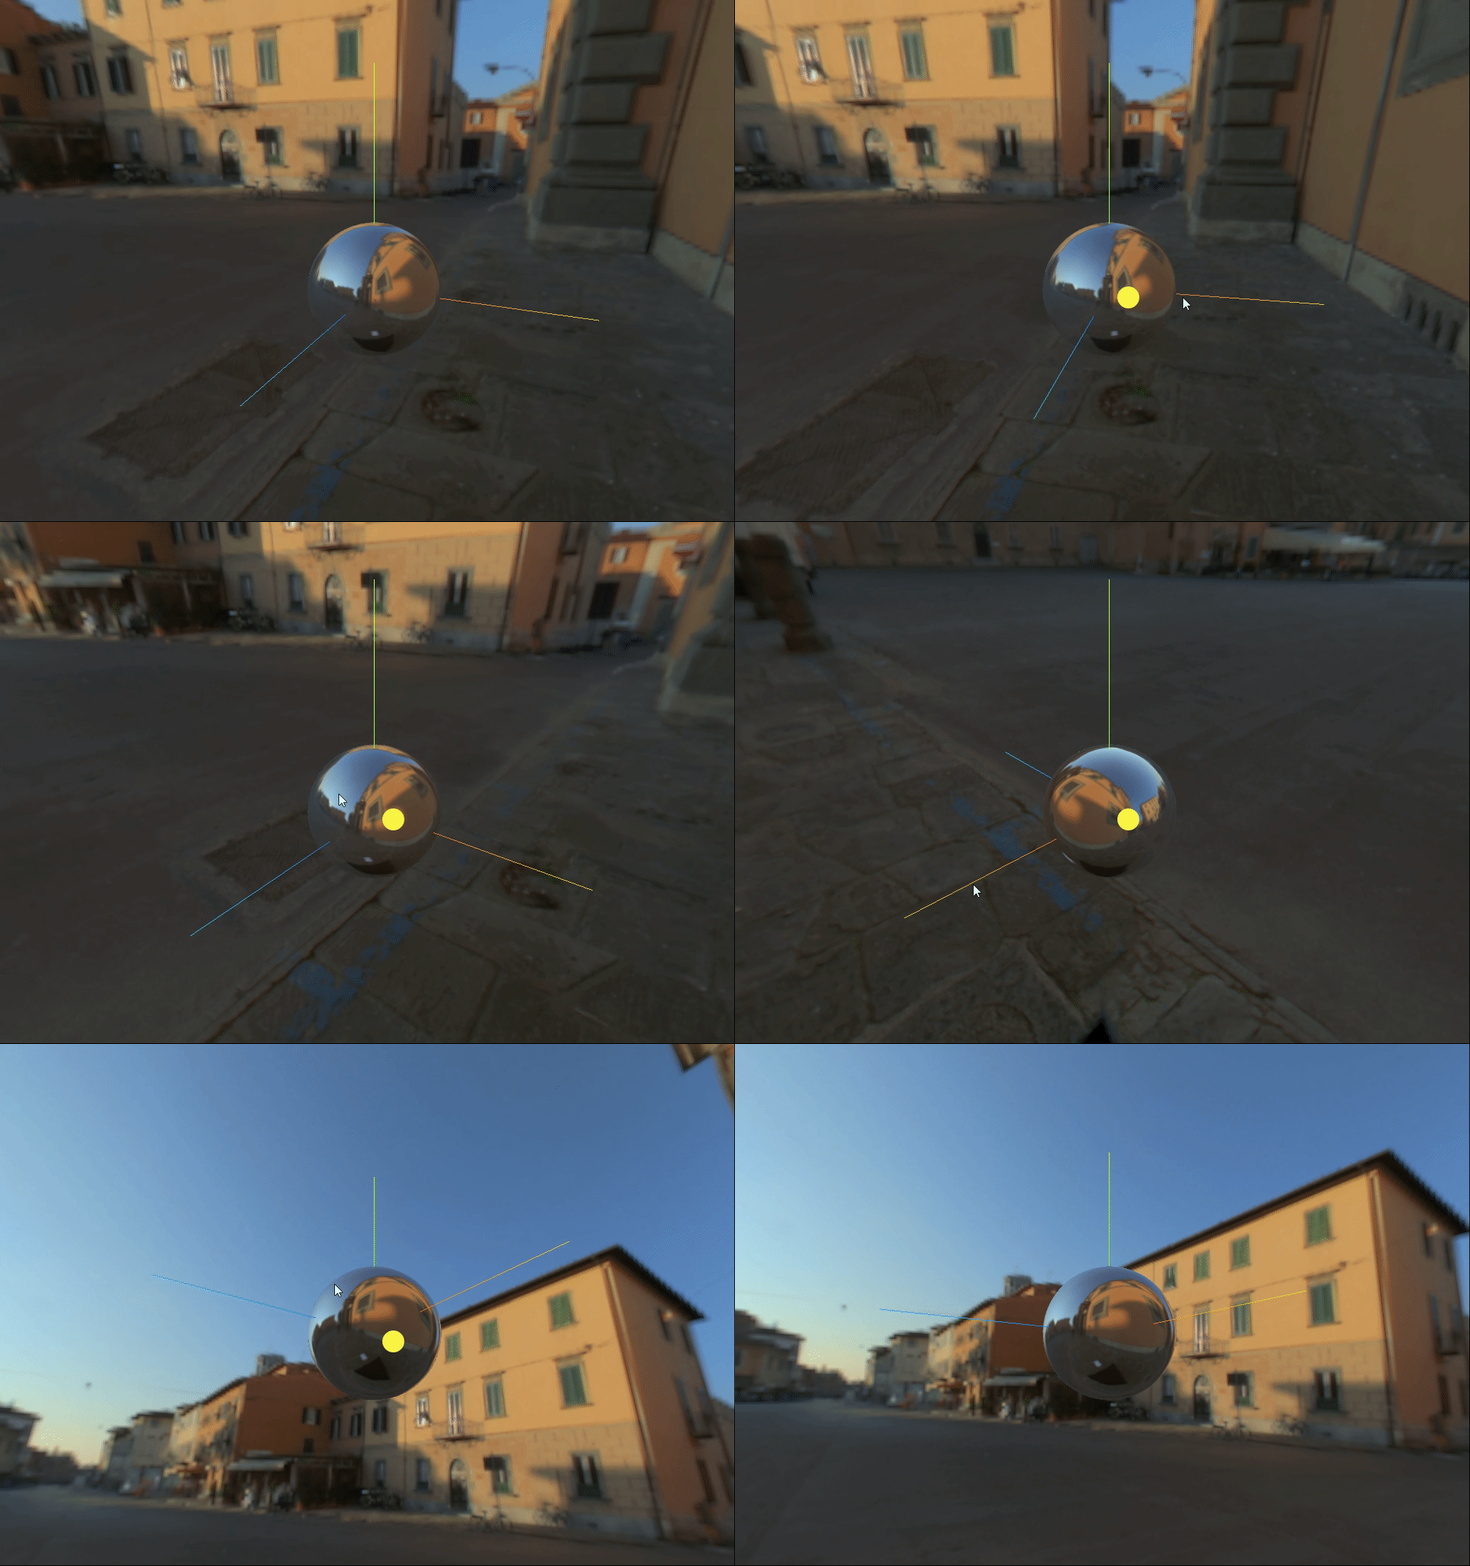
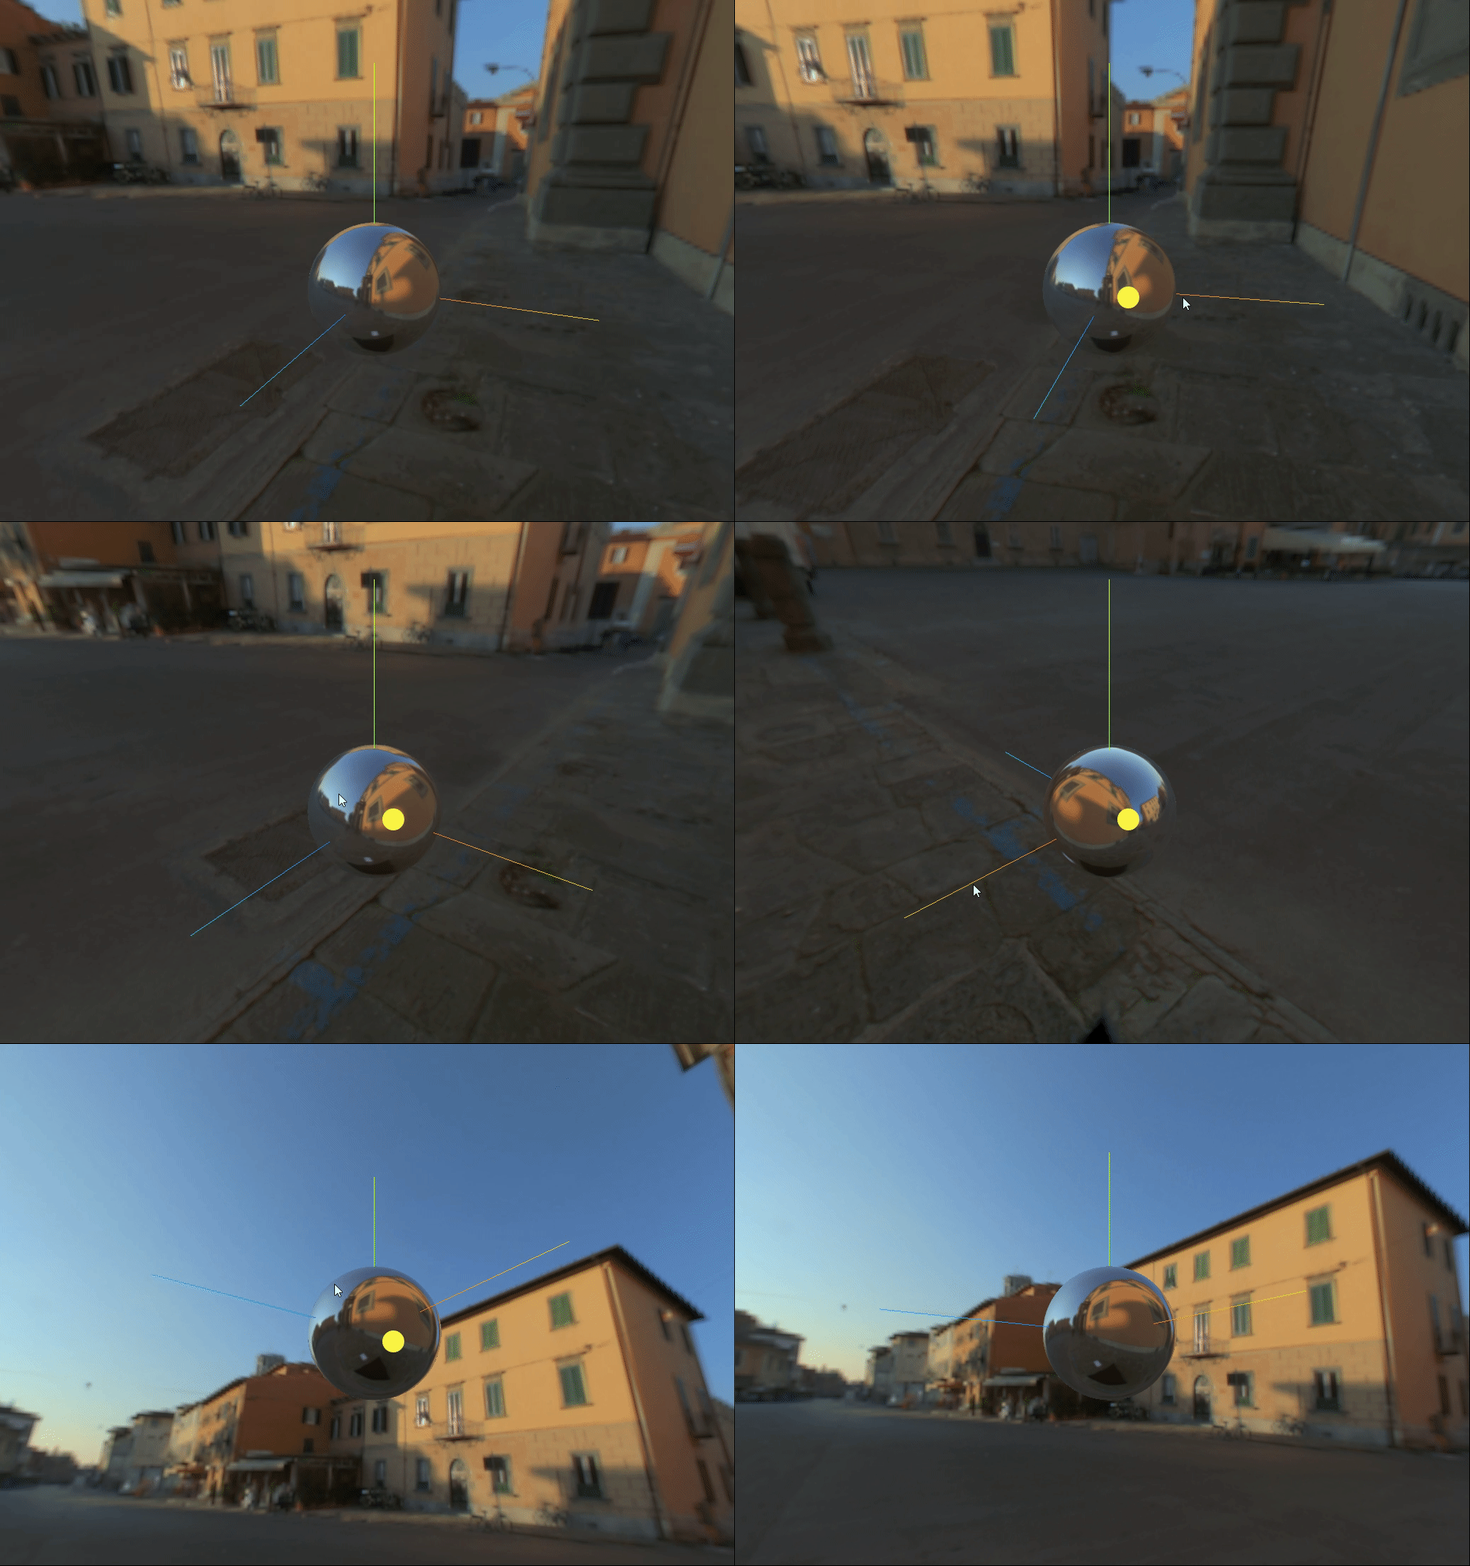
//给场景添加背景
this.scene.background = envMapTexture;
效果:
three.js通过RGBELoader加载环境贴图,光照贴图,高光贴图
colors.png

heightmap.png

//导入RGBRload加载器
import { RGBELoader } from  "three/examples/jsm/loaders/RGBELoader.js"
//加载纹理加载器
let  textureLoader = new THREE.TextureLoader()
 //加载纹理
let texture = textureLoader.load(require("../../public/Planks033A_1K-JPG_Color.jpg"))
// 加载ao贴图
let aoMap = textureLoader.load(require("../../public/Planks033A_1K-JPG_AmbientOcclusion.jpg"))
//透明度贴图
let alphaMap = textureLoader.load(require("../../public/Planks033A_1K-JPG_Displacement.jpg"))
// 光照贴图
let lightMap = textureLoader.load(require("../../public/colors.png"))
// 高光贴图
let specularMap = textureLoader.load(require("../../public/heightmap.png"))
//rebeLoader贴图,加载hdr贴图
let rgbeLoader = new RGBELoader()
 rgbeLoader.loadAsync("../venice_sunset_1k.hdr").then((texture) => {
   //设置球形贴图
    texture.mapping = THREE.EquirectangularReflectionMapping;
    //将加载的材质texture设置给背景和环境
    this.scene.background = texture;
    this.scene.environment = texture;
 });
 // 创建球体
let planeGeometry = new THREE.SphereGeometry(1, 32, 32);
 //设置球体材质
 let planeMaterial = new THREE.MeshStandardMaterial( {
   metalness: 0.7, // 金属度
   roughness: 0.1, // 粗糙度
   map:texture,  //贴图
   transparent:true, //允许透明度
   aoMap:aoMap,//设置ao贴图
   lightMap:lightMap, //光照贴图
   specularMap:specularMap // 设置高光贴图
   // alphaMap:alphaMap//透明度贴图
 });
this.planeMesh = new THREE.Mesh( planeGeometry, planeMaterial );
this.scene.add( this.planeMesh );

前两张完整代码:【如何设置加载RGPRload贴图,如何设置透明度贴图,如何设置光照贴图,高光贴图,如何设置纹理贴图,如何加载oa贴图,如何加载加载hdr贴图,如何创建一个球体,材质,】
<template>
  <div id="container">

  </div>
</template>

<script>
import * as THREE from 'three'
// webGL兼容
import WebGL from 'three/examples/jsm/capabilities/WebGL.js';
import { GUI } from 'three/examples/jsm/libs/lil-gui.module.min.js';
// 轨道控制器
import { OrbitControls } from "three/examples/jsm/controls/OrbitControls.js"
//导入RGBRload加载器
import { RGBELoader } from  "three/examples/jsm/loaders/RGBELoader.js"
export default {
  name: 'HomeView',
  components: {
  },
  mounted(){
    this.init()
  },
  data(){
    return {
      camera: null,  //相机对象
      scene: null,  //场景对象
      renderer: null,  //渲染器对象
      mesh: null,  //网格模型对象Mesh
      mesh2:null,
      controls:null, //轨道控制器
      material2:null, //父元素
      planeMesh:null, //平面
      rgbeLoacer:null,
    }
  },
  methods:{
    init(){
      const gui = new GUI()
      let container = document.body;
      //创建一个场景
      this.scene = new THREE.Scene()
      //透视摄像机
      this.camera = new THREE.PerspectiveCamera(75,window.innerWidth/window.innerHeight,0.1,700)
      //创建平面
      //加载纹理加载器
      let  textureLoader = new THREE.TextureLoader()

      // 设置cube纹理加载器
      // const cubeTextureLoader = new THREE.CubeTextureLoader(); // 立方体纹理加载器
      // const envMapTexture = cubeTextureLoader.load([ // 设置环境贴图
      //   "../px.png",
      //   "../nx.png",
      //   "../py.png",
      //   "../ny.png",
      //   "../pz.png",
      //   "../nz.png",
      // ]);
      //加载纹理
      let texture = textureLoader.load(require("../../public/Planks033A_1K-JPG_Color.jpg"))
      // 加载ao贴图
      let aoMap = textureLoader.load(require("../../public/Planks033A_1K-JPG_AmbientOcclusion.jpg"))
      //透明度贴图
      let alphaMap = textureLoader.load(require("../../public/Planks033A_1K-JPG_Displacement.jpg"))
      // 光照贴图
      let lightMap = textureLoader.load(require("../../public/colors.png"))
      // 高光贴图
      let specularMap = textureLoader.load(require("../../public/heightmap.png"))
      //rebeLoader贴图,加载hdr贴图
      let rgbeLoader = new RGBELoader()
      rgbeLoader.loadAsync("../venice_sunset_1k.hdr").then((texture) => {
          //设置球形贴图
          texture.mapping = THREE.EquirectangularReflectionMapping;
          //将加载的材质texture设置给背景和环境
          this.scene.background = texture;
          this.scene.environment = texture;
      });
      // 创建球体
      let planeGeometry = new THREE.SphereGeometry(1, 32, 32);
      //设置球体材质
      let planeMaterial = new THREE.MeshStandardMaterial( {
        metalness: 0.7, // 金属度
        roughness: 0.1, // 粗糙度
        map:texture,  //贴图
        transparent:true, //允许透明度
        aoMap:aoMap,//设置ao贴图
        lightMap:lightMap,
        specularMap:specularMap // 设置高光贴图
        // alphaMap:alphaMap//透明度贴图
      });
      // this.scene.background = envMapTexture;
      // gui.add(planeMaterial,"aoMapIntensity").min(0).max(10).name("ao强度")
      this.planeMesh = new THREE.Mesh( planeGeometry, planeMaterial );
      this.scene.add( this.planeMesh );
      //创建渲染器
      this.renderer = new THREE.WebGLRenderer();
      //渲染器尺寸
      this.renderer.setSize( window.innerWidth,  window.innerHeight );
      //创建一个立方体
      const geometry = new THREE.BoxGeometry( 1, 1, 1 );
      //我们需要给它一个MeshBasicMaterial材质,来让它有绿色颜色
      const material = new THREE.MeshBasicMaterial( { color: 0x00ff00 } );
      this.mesh = new THREE.Mesh( geometry, material );
      //设置子元素位置
      this.mesh.position.set(0,0,0)
      // 添加物体到网格
      // this.scene.add( this.mesh );
      // 设置相机位置
      this.camera.position.z = 5;
      this.camera.position.y =2;
      this.camera.position.x = 2;
      // 看的方向
      this.camera.lookAt(0,0,0)
      //添加世界坐标辅助器
      const axesHelper = new THREE.AxesHelper(3)
      this.scene.add( axesHelper );
      //添加轨道控制器
      this.controls = new OrbitControls(this.camera,this.renderer.domElement)
      //添加阻尼带有惯性
      this.controls.enableDamping = true
      //设置阻尼系数
      this.controls.dampingFactor = 0.05
      //设置自动旋转
      //元素中插入canvas对象
      container.appendChild(this.renderer.domElement);
      if ( WebGL.isWebGLAvailable() ) {
        this.animate();
      } else {
        const warning = WebGL.getWebGLErrorMessage();
        document.getElementById( document.body ).appendChild( warning );
      }
    },
    //旋转起来
    animate() {
      this.controls.update()
      requestAnimationFrame( this.animate );
      // this.mesh.rotation.x += 0.01;
      // this.mesh.rotation.y += 0.01;
      this.renderer.render( this.scene, this.camera );
    }
  }
}
</script>
three.js场景的线型和指数雾
在
Three.js中,fog类是用于创建线性雾的效果,雾效果常用于模拟真实世界中视觉深度递减的效果,也可以用于创建某些艺术效果,当物体距离观察者越远,雾就越密,物体的颜色就越接近雾的颜色。
雾通常是基于离摄像机的距离褪色至某种特定颜色的方式。 在`three.js中有两种设置雾的对象:
.Fog() 定义了线性雾。简单来说就是雾的密度是随着距离线性增大的。
	.color 雾的颜色。
	.near 应用雾的最小距离。任何物体比 near 近不会受到影响。
	.far 应用雾的最大距离。任何物体比 far 远则完全是雾的颜色。
.FogExp2(color,density) 定义了指数雾。在相机附近提供清晰的视野,且距离相机越远,雾的浓度随着指数增长越快。
	color代表雾的颜色
	density代表雾的增涨速度
<template>
  <div id="container">

  </div>
</template>

<script>
import * as THREE from 'three'
// webGL兼容
import WebGL from 'three/examples/jsm/capabilities/WebGL.js';
import { GUI } from 'three/examples/jsm/libs/lil-gui.module.min.js';
// 轨道控制器
import { OrbitControls } from "three/examples/jsm/controls/OrbitControls.js"
//导入RGBRload加载器
import { RGBELoader } from  "three/examples/jsm/loaders/RGBELoader.js"
export default {
  name: 'HomeView',
  components: {
  },
  mounted(){
    this.init()
  },
  data(){
    return {
      camera: null,  //相机对象
      scene: null,  //场景对象
      renderer: null,  //渲染器对象
      mesh: null,  //网格模型对象Mesh
      mesh2:null,
      controls:null, //轨道控制器
      material2:null, //父元素
      planeMesh:null, //平面
      rgbeLoacer:null,
    }
  },
  methods:{
    init(){
      let container = document.body;
      //创建一个场景
      this.scene = new THREE.Scene()
      //透视摄像机
      this.camera = new THREE.PerspectiveCamera(75,window.innerWidth/window.innerHeight,0.1,700)
      //创建渲染器
      this.renderer = new THREE.WebGLRenderer();
      //渲染器尺寸
      this.renderer.setSize( window.innerWidth,  window.innerHeight );
      //创建一个立方体
      const boxGeometry = new THREE.BoxGeometry( 1,1,100 );
      //我们需要给它一个MeshBasicMaterial材质,来让它有绿色颜色
      const material = new THREE.MeshBasicMaterial( {
        color: 0x00ff00
      });
      //添加到场景中
      this.mesh = new THREE.Mesh( boxGeometry, material );
      this.scene.add( this.mesh );
      //创建场景雾
      this.scene.fog = new THREE.Fog(0x999999,0.1,30)
      //创建场景指数雾
      // this.scene.fog = new THREE.FogExp2(0x999999,0.1)
      this.scene.background = new THREE.Color(0x999999)

      // 设置相机位置
      this.camera.position.z = 5;
      this.camera.position.y =2;
      this.camera.position.x = 2;
      // 看的方向
      this.camera.lookAt(0,0,0)
      //添加世界坐标辅助器
      const axesHelper = new THREE.AxesHelper(3)
      this.scene.add( axesHelper );
      //添加轨道控制器
      this.controls = new OrbitControls(this.camera,this.renderer.domElement)
      //添加阻尼带有惯性
      this.controls.enableDamping = true
      //设置阻尼系数
      this.controls.dampingFactor = 0.05
      //元素中插入canvas对象
      container.appendChild(this.renderer.domElement);
      if ( WebGL.isWebGLAvailable() ) {
        this.animate();
      } else {
        const warning = WebGL.getWebGLErrorMessage();
        document.getElementById( document.body ).appendChild( warning );
      }
    },
    //旋转起来
    animate() {
      this.controls.update()
      requestAnimationFrame( this.animate );
      // this.mesh.rotation.x += 0.01;
      // this.mesh.rotation.y += 0.01;
      this.renderer.render( this.scene, this.camera );
    }
  }
}
</script>
指数雾:

线性雾:

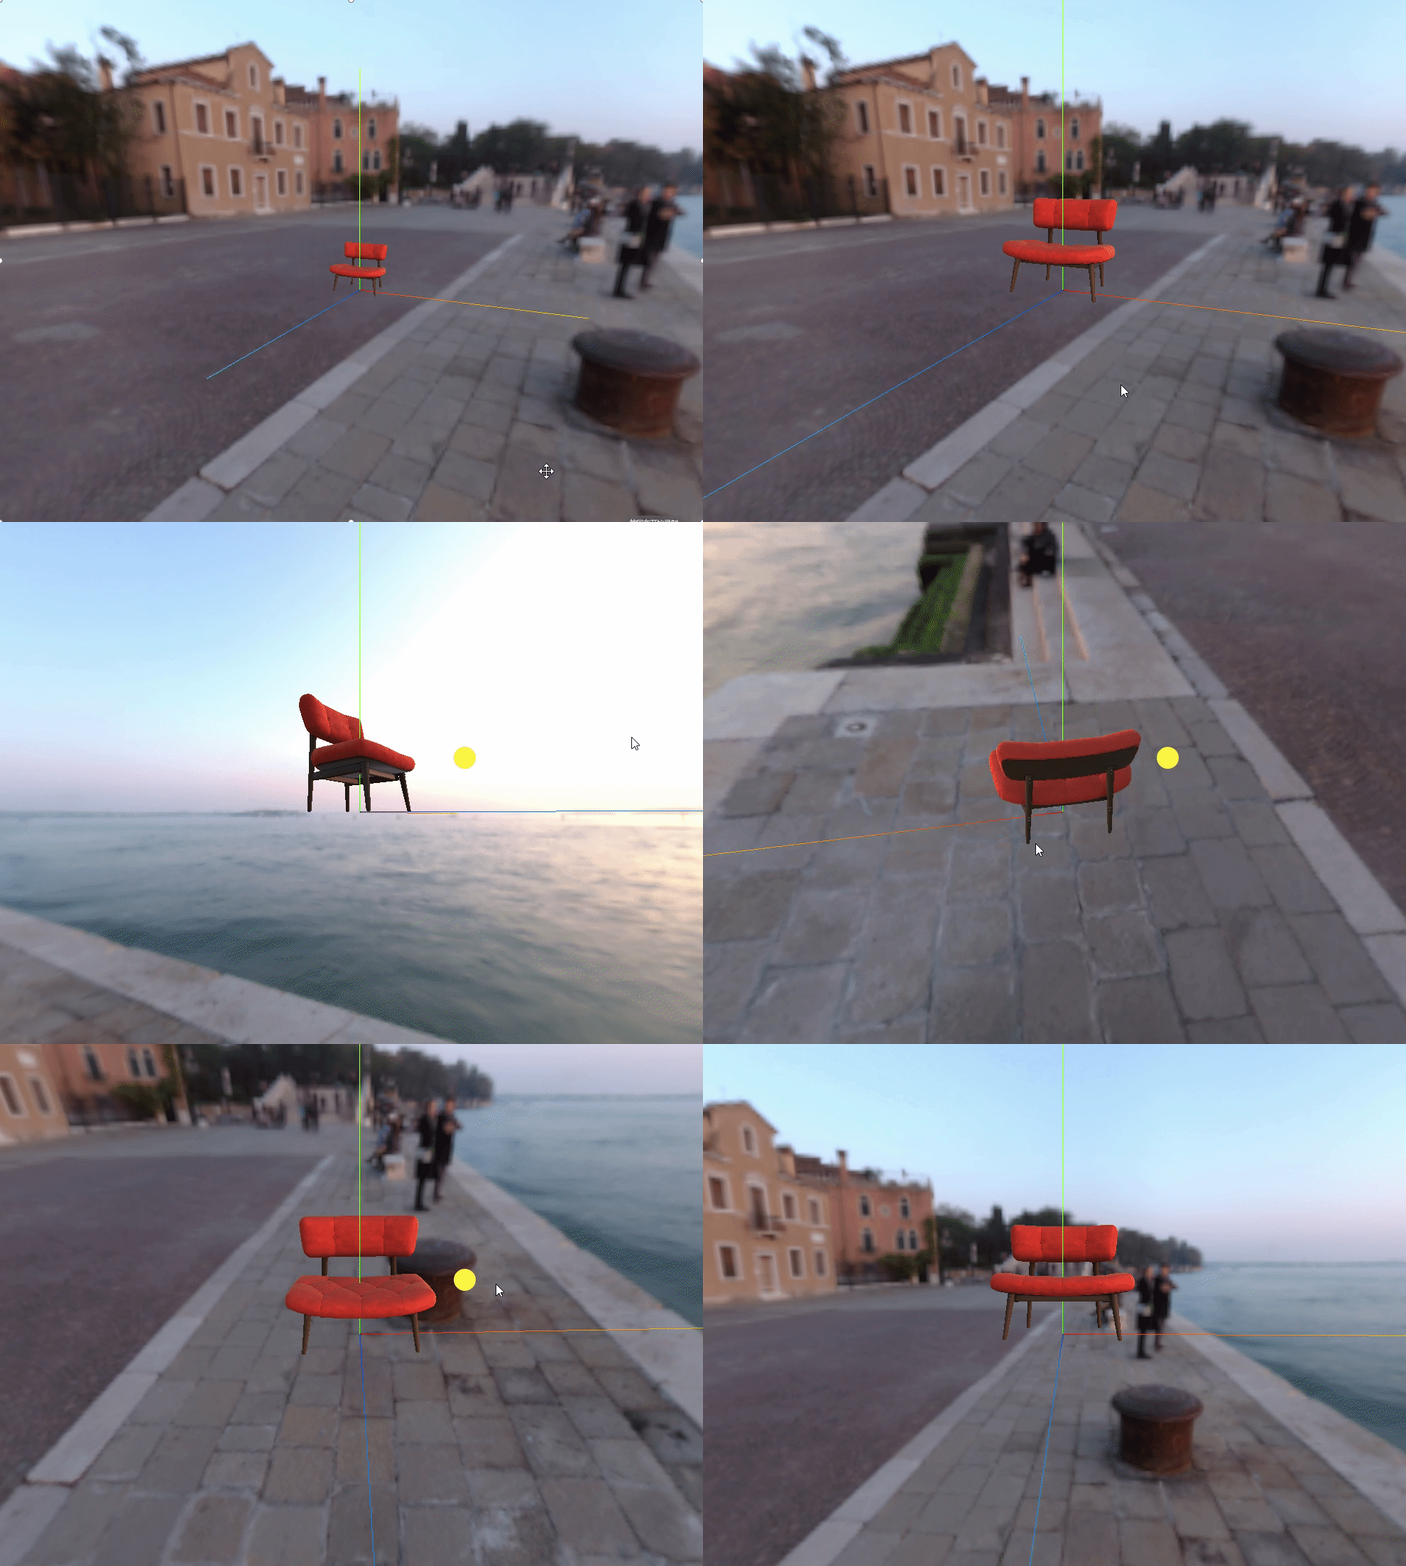
three.js加载gltf模型和加载压缩过的模型
GLTFLoader资源的加载器
用于载入glTF2.0资源的加载器。
glTF(gl传输格式)是一种开放格式的规范,用于高效的传输,加载3D内容,该类文件以JSON(.gltf)格式或二进制格式提供,外部文件存储贴图(.jps,.png)和额外的二进制数据(.bin)。一个glft组件可以传输一个活多个场景,包括网格,材质,贴图,股价,变形目标,动画,灯光及其摄影。
//gltf素材地址,直接下载使用
https://github.com/mrdoob/three.js/blob/master/examples/models/gltf/SheenChair.glb
//导入场景模型加载器
import {GLTFLoader} from "three/examples/jsm/loaders/GLTFLoader.js"
//实例化gltf加载器
  const gltgLoader = new GLTFLoader()
  gltgLoader.load(
    //模型路径
    "../SheenChair.glb",
    //加载完成后的回调函数
    (gltf)=>{
      console.log(gltf)
      this.scene.add( gltf.scene );
    }
  )
  this.scene.background=new THREE.Color(0x999999)

当前所看到的是纯黑色的,如果想要其颜色显示出来,要么设置环境贴图,或者设置光线,就会有四面八方的光照射进来,颜色就会亮起来。
其中HDE贴图上章节已经给出相关资源下载地址
//添加环境贴图
let rgbeLoader = new RGBELoader()
rgbeLoader.loadAsync("../venice_sunset_1k.hdr").then((texture) => {
    //设置球形贴图
    texture.mapping = THREE.EquirectangularReflectionMapping;
    //将加载的材质texture设置给背景和环境
    this.scene.background = texture;
    this.scene.environment = texture;
});
GLTF加载器GLTFLoader所有代码
<template>
  <div id="container">

  </div>
</template>

<script>
import * as THREE from 'three'
// webGL兼容
import WebGL from 'three/examples/jsm/capabilities/WebGL.js';
import { GUI } from 'three/examples/jsm/libs/lil-gui.module.min.js';
// 轨道控制器
import { OrbitControls } from "three/examples/jsm/controls/OrbitControls.js"
//导入RGBRload加载器
import { RGBELoader } from  "three/examples/jsm/loaders/RGBELoader.js"
//导入场景模型加载器
import {GLTFLoader} from "three/examples/jsm/loaders/GLTFLoader.js"
export default {
  name: 'HomeView',
  components: {
  },
  mounted(){
    this.init()
  },
  data(){
    return {
      camera: null,  //相机对象
      scene: null,  //场景对象
      renderer: null,  //渲染器对象
      mesh: null,  //网格模型对象Mesh
      mesh2:null,
      controls:null, //轨道控制器
      material2:null, //父元素
      planeMesh:null, //平面
      rgbeLoacer:null,
    }
  },
  methods:{
    init(){
      let container = document.body;
      //创建一个场景
      this.scene = new THREE.Scene()
      //透视摄像机
      this.camera = new THREE.PerspectiveCamera(75,window.innerWidth/window.innerHeight,0.1,700)
      //创建渲染器
      this.renderer = new THREE.WebGLRenderer();
      //渲染器尺寸
      this.renderer.setSize( window.innerWidth,  window.innerHeight );
      //实例化gltf加载器
      const gltgLoader = new GLTFLoader()
      gltgLoader.load(
        //模型路径
        "../SheenChair.glb",
        //加载完成后的回调函数
        (gltf)=>{
          console.log(gltf)
          this.scene.add( gltf.scene );
        }
      )
      let rgbeLoader = new RGBELoader()
      rgbeLoader.loadAsync("../venice_sunset_1k.hdr").then((texture) => {
          //设置球形贴图
          texture.mapping = THREE.EquirectangularReflectionMapping;
          //将加载的材质texture设置给背景和环境
          this.scene.background = texture;
          this.scene.environment = texture;
      });
      //加载纹理
      this.scene.background=new THREE.Color(0x999999)
      // 设置相机位置
      this.camera.position.z = 5;
      this.camera.position.y =2;
      this.camera.position.x = 2;
      // 看的方向
      this.camera.lookAt(0,0,0)
      //添加世界坐标辅助器
      const axesHelper = new THREE.AxesHelper(3)
      this.scene.add( axesHelper );
      //添加轨道控制器
      this.controls = new OrbitControls(this.camera,this.renderer.domElement)
      //添加阻尼带有惯性
      this.controls.enableDamping = true
      //设置阻尼系数
      this.controls.dampingFactor = 0.05
      //元素中插入canvas对象
      container.appendChild(this.renderer.domElement);
      if ( WebGL.isWebGLAvailable() ) {
        this.animate();
      } else {
        const warning = WebGL.getWebGLErrorMessage();
        document.getElementById( document.body ).appendChild( warning );
      }
    },
    //旋转起来
    animate() {
      this.controls.update()
      requestAnimationFrame( this.animate );
      // this.mesh.rotation.x += 0.01;
      // this.mesh.rotation.y += 0.01;
      this.renderer.render( this.scene, this.camera );
    }
  }
}
</script>
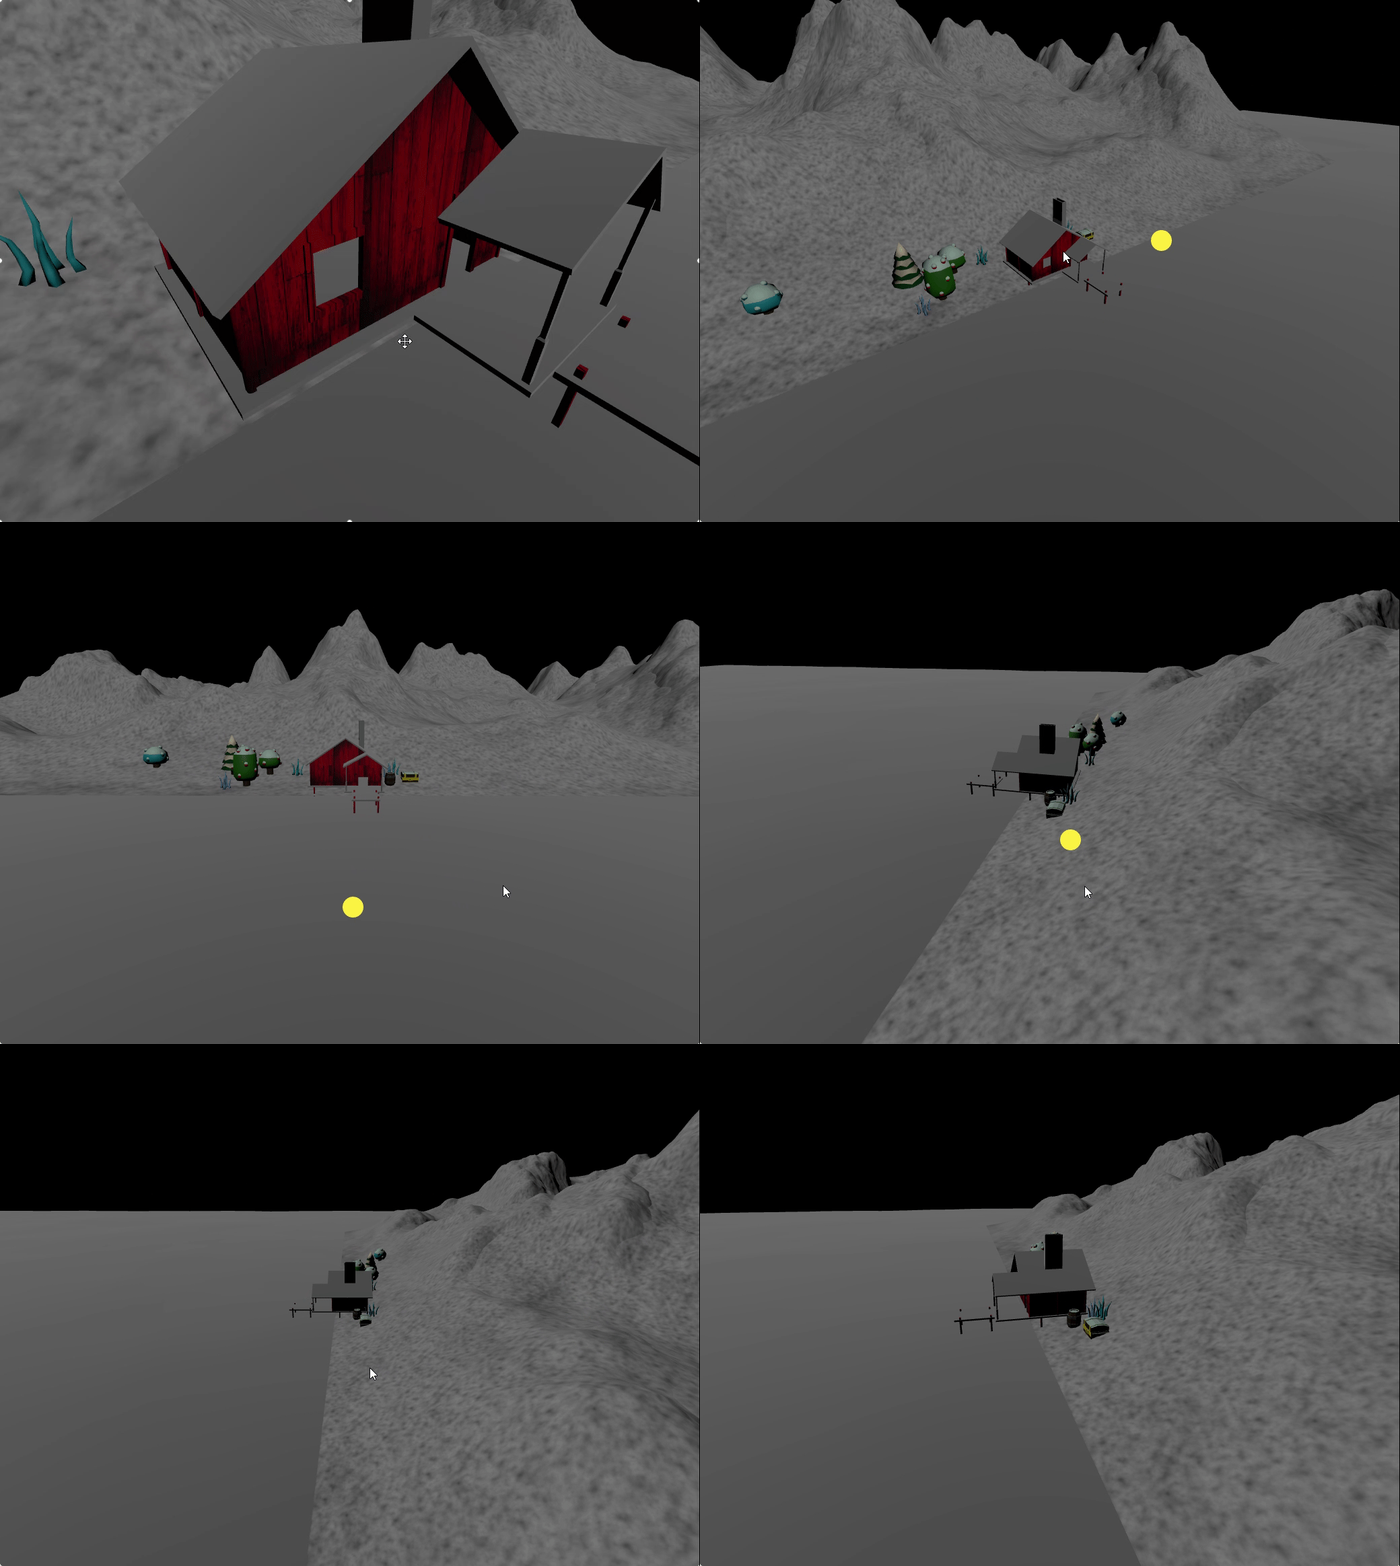
DracoLoader加载压缩过的模型
将draco文件复制到public静态资源中。


//导入模型解压器
import {DRACOLoader} from "three/examples/jsm/loaders/DRACOLoader.js"
const gltgLoader = new GLTFLoader()
gltgLoader.load(
  //模型路径
  "../SheenChair.glb",
  //加载完成后的回调函数
  (gltf)=>{
    this.scene.add( gltf.scene );
  }
)
// 实例化加载器draco
const dracoLoader = new DRACOLoader()
//设置文件路径
dracoLoader.setDecoderPath("../draco/")
//设置把gltf加载器draco解码器
gltgLoader.setDRACOLoader(dracoLoader)
//执行渲染函数
this.render()

render(){
  this.controls.update()
  requestAnimationFrame( this.render );
  this.renderer.render( this.scene, this.camera );
}
three光线投射实现3d场景交互事件Raycaster
光线投射原理及其属性介绍

这个类用于进行raycasting(光线投射)。 光线投射用于进行鼠标拾取(在三维空间中计算出鼠标移过了什么物体)。
- 创建光线投射对象
new THREE.Raycaster(origin, direction, near, far)
origin:光线投射的原点,Vector3类型。
direction-射线的方向,Vector3类型。
near-投射近点,不能为负值,应该小于far,其默认值为0。
far-投射远点,不能小于near,其默认值为无穷大。
- 获取射线交叉对象
创建的光线投射对象有一个
intersectObject()方法用来获取射线交叉的对象,使用方法如下
const raycaster = new THREE.Raycaster(origin, direction, near, far)
const arr= raycaster.intersectObjects(object, recursive,optionalTarget)
raycaster.intersectObjects()参数
object-要检查的是否与射线相交的对象,Object3D类型。recursive-是否检查所有后代,可选默认为false,Boolean类型。optionalTarget-可选参数,放置结果的目标数组。Array类型。若使用这个参数返回检查结果则在每次调用之前必须清空这个数组。
- raycaster.intersectObjects()的返回值

distance-射线投射原点和相交部分之间的距离。
point-相交部分的坐标。
face-相交的面。
faceIndex-相交的面的索引。
object-相交的物体。
uv-相交部分的点的UV坐标。
光线投射示例
创建三个球体,通过光线投射技术,光线射到那个球体,那个球体的颜色就会改变

- 创建射线
const raycaster = new THREE.Raycaster()
- 用一个二维向量保存鼠标点击画布上的位置
const mouse = new THREE.Vector2(1, 1)
- 监听窗口的点击事件,将
xy轴归“1”化坐标,通过摄像机和鼠标的位置更新色线,计算物体和射线的焦点能不能碰到物体,碰到物体后随机改变射线照射物体的颜色。
window.addEventListener("click",(e)=>{
  //设置鼠标向量的x,y值,将XY轴归一化,X从-1到1,Y为从-1到1,所以除以2
  mouse.x = (e.clientX/window.innerWidth)*2-1
  mouse.y = -(e.clientY/window.innerHeight)*2+1
  // 通过摄像机和鼠标的位置,更新涉嫌
  raycaster.setFromCamera(mouse,this.camera)
  //计算物体和射线的焦点能不能碰到物体
  const intersects = raycaster.intersectObjects([sphere1,sphere2,sphere3])
  if(intersects.length>0){
    intersects[0].object.material.color.set(this.color16())
  }
})
- 什么叫做
xy轴归一化坐标

归一化坐标,是一个二维坐标,仅有X/Y两个维度,且X和Y的取值范围均为[-1, 1],坐标原点位于three.js所创建的canvas的中心处。
归一化坐标公式:
// 则有公式如下:
mouse.x = ((event.clientX - container.getBoundingClientRect().left) / container.getBoundingClientRect().width) * 2 - 1;
mouse.y = - ((event.clientY - container.getBoundingClientRect().top) / container.getBoundingClientRect().height) * 2 + 1;
- 示例完整代码
<template>
  <div id="container">

  </div>
</template>

<script>
import * as THREE from 'three'
// webGL兼容
import WebGL from 'three/examples/jsm/capabilities/WebGL.js';
import { GUI } from 'three/examples/jsm/libs/lil-gui.module.min.js';
// 轨道控制器
import { OrbitControls } from "three/examples/jsm/controls/OrbitControls.js"
//导入RGBRload加载器
import { RGBELoader } from  "three/examples/jsm/loaders/RGBELoader.js"
//导入场景模型加载器
import {GLTFLoader} from "three/examples/jsm/loaders/GLTFLoader.js"
//导入模型解压器
import {DRACOLoader} from "three/examples/jsm/loaders/DRACOLoader.js"
export default {
  name: 'HomeView',
  components: {
  },
  mounted(){
    this.init()
  },
  data(){
    return {
      camera: null,  //相机对象
      scene: null,  //场景对象
      renderer: null,  //渲染器对象
      mesh: null,  //网格模型对象Mesh
      mesh2:null,
      controls:null, //轨道控制器
      material2:null, //父元素
      planeMesh:null, //平面
      rgbeLoacer:null,
    }
  },
  methods:{
    //随机生成十六进制颜色
    color16(){//十六进制颜色随机
			var r = Math.floor(Math.random()*256);
			var g = Math.floor(Math.random()*256);
			var b = Math.floor(Math.random()*256);
			var color = '#'+r.toString(16)+g.toString(16)+b.toString(16);
			return color;
    },
    init(){
      let container = document.body;
      //创建一个场景
      this.scene = new THREE.Scene()
      //透视摄像机
      this.camera = new THREE.PerspectiveCamera(75,window.innerWidth/window.innerHeight,0.1,700)
      //创建渲染器
      this.renderer = new THREE.WebGLRenderer();
      //渲染器尺寸
      this.renderer.setSize( window.innerWidth,  window.innerHeight );

      // 创建三个球
      const sphere1 = new THREE.Mesh(
        new THREE.SphereGeometry(1,32,32),
        new THREE.MeshBasicMaterial({
          color:0x00ff00
        })
      )
      sphere1.position.x = -3
      this.scene.add(sphere1)
      const sphere2 = new THREE.Mesh(
        new THREE.SphereGeometry(1,32,32),
        new THREE.MeshBasicMaterial({
          color:0xff0000
        })
      )
      sphere2.position.x = 0
      this.scene.add(sphere2)
      const sphere3 = new THREE.Mesh(
        new THREE.SphereGeometry(1,32,32),
        new THREE.MeshBasicMaterial({
          color:0x0000ff
        })
      )
      sphere3.position.x = 3
      this.scene.add(sphere3)
      //创建射线
      const raycaster = new THREE.Raycaster()
      //用一个二维向量保存鼠标点击画布上的位置
      const mouse = new THREE.Vector2(1, 1)
      window.addEventListener("click",(e)=>{
        //设置鼠标向量的x,y值,将XY轴归一化,X从-1到1,Y为从-1到1,所以除以2
        mouse.x = (e.clientX/window.innerWidth)*2-1
        mouse.y = -(e.clientY/window.innerHeight)*2+1
        console.log(mouse.x,mouse.y)
        // 通过摄像机和鼠标的位置,更新涉嫌
        raycaster.setFromCamera(mouse,this.camera)
        //计算物体和射线的焦点能不能碰到物体
        const intersects = raycaster.intersectObjects([sphere1,sphere2,sphere3])
        console.log("intersects",intersects)
        if(intersects.length>0){
          intersects[0].object.material.color.set(this.color16())
        }
      })
      this.scene.background=new THREE.Color(0x999999)
      // 设置相机位置
      this.camera.position.z = 15;
      this.camera.position.y =2;
      this.camera.position.x = 2;
      // 看的方向
      this.camera.lookAt(0,0,0)
      //添加世界坐标辅助器
      const axesHelper = new THREE.AxesHelper(3)
      this.scene.add( axesHelper );
      //添加轨道控制器
      this.controls = new OrbitControls(this.camera,this.renderer.domElement)
      //添加阻尼带有惯性
      this.controls.enableDamping = true
      //设置阻尼系数
      this.controls.dampingFactor = 0.05
      //元素中插入canvas对象
      container.appendChild(this.renderer.domElement);
      if ( WebGL.isWebGLAvailable() ) {
        this.animate();
      } else {
        const warning = WebGL.getWebGLErrorMessage();
        document.getElementById( document.body ).appendChild( warning );
      }
    },
    //旋转起来
    animate() {
      this.controls.update()
      requestAnimationFrame( this.animate );
      // this.mesh.rotation.x += 0.01;
      // this.mesh.rotation.y += 0.01;
      this.renderer.render( this.scene, this.camera );
    }
  }
}
</script>
效果以附上图
three.js补间动画Tween.js的应用
Tween.js是一个可以产生平滑动画效果的js库,其官方地址为:https://github.com/tweenjs/tween.js
当然threejs包中自带的包含tween.js
地址:node_moduls>three>examples>jsm>libs>tween.module.js
tween补间动画,是一个概念,允许你以平滑的方式更改对象的属性,你只需要告述它那些属性要更改,当补间动画结束运行时他们应该具有哪些最终值,补间引擎将负责计算从七十点到结束点的值。
tween.js的核心方法
-
.to()方法
控制补间的运动形式及方向.to(), 当tween启动时,Tween.js将读取当前属性值并 应用相对值来找出新的最终值 -
.start(time)方法
补间动画启动的方法,.start方法接受一个参数time, 如果加入这个参数,那么补间不会立即开始直到特定时刻才会开始
3. .stop()方法
关闭补间动画 .stop() , 关闭这个正在执行的补间动画
-
.repeat()方法
使用该方法可以使动画重复执行,它接受一个参数 , 描述需要重复多少次 -
.delay()方法
延迟执行动画的方法.delay(), 接受一个参数用于控制延迟的具体时间,表示延迟多少时间后才开始执行动画 -
.pause()方法
暂停动画.pause(), 暂停当前补间运动,与resume方法配合使用 -
.resume()方法
恢复动画.resume(), 恢复这个已经被暂停的补间运动 -
.yoyo()方法
控制补间重复的模式.yoyo(), 这个功能只有在使用repeat时才有效果 ,该动画像悠悠球一样来回运动 , 而不是重新开始
9. .update()方法
更新补间动画 TWEEN.update() , 动态更新补间运动一般配合 window.requestAnimationFrame 使用
10. .chain()方法
链式补间动画,当我们顺序排列不同的补间动画时,比如我们在上一个补间结束的时候立即启动另外一个补间动画,使用 .chain() 方法来做。
//tweenB动画在tweenA动画完成后执行
tweenA.chain(tweenB);
在一些情况下,可能需要将多个补间链接到另一个补间,以使它们(链接的补间)同时开始动画:
tweenA.chain(tweenB,tweenC);
注意:调用
tweenA.chain(tweenB)实际上修改了tweenA,所以tweenA总是在tweenA完成时启动。
chain的返回值只是tweenA,不是一个新的tween。
11. .getAll()方法
获取所有的补间组 TWEEN.getAll()
.removeAll()方法
删除所有的补间组 TWEEN.removeAll()
13. .add()方法
新增补间 TWEEN.add(tween) ,添加一个特定的补间 var tween=new TWEEN.Tween()
-
.remove()方法
删除补间TWEEN.remove(tween),删除一个特定的补间var tween=new TWEEN.Tween() -
.Group()方法
新增一个补间组,var Group=TWEEN.Group() , new TWEEN.Tween({ x: 1 }, Group) ,
将已经配置好的补间动画进行分组 , TWEEN.update()和TWEEN.removeAll() , 不会影响到已经分好组的补间动画
tween.js回调函数
-
.onStart()补间动画开始时执行,只执行一次,new TWEEN.Tween().onStart((obj)=>{}), 补间开始时执行,只执行一次, 当使用repeat()重复补间时,不会重复运行 ,onStart((obj)=>{})obj 补间对象作为第一个参数传入 -
.onStop()停止补间动画时执行
new TWEEN.Tween().onStop((obj)=>{}), 当通过onStop()显式停止补间时执行,但在正常完成时并且在停止任何可能的链补间之前执行补间,onStop((obj)=>{})obj 补间对象作为第一个参数传入 -
.onUpdate()每次更新时执行
new TWEEN.Tween().onUpdate((obj)=>{}), 每次补间更新时执行,返回实际更新后的值,onUpdate((obj)=>{})obj 补间对象作为第一个参数传入
4. .onComplete() 补间动画完成时执行
new TWEEN.Tween().onComplete((obj)=>{}) , 当补间正常完成(即不停止)时执行 , onComplete((obj)=>{}) obj 补间对象作为第一个参数传入
.onRepeat()重复补间动画时执行
new TWEEN.Tween().onRepeat((obj)=>{}), 当补间动画完成,即将进行重复动画的时候执行 ,onComplete((obj)=>{})obj 补间对象作为第一个参数传入
TWEEN.Easing 缓动函数
tween.js为我们封装好了常用的缓动动画,如线性,二次,三次,四次,五次,正弦,指数,圆形,弹性,下落和弹跳等缓动函数, 以及对应的缓动类型:In (先慢后快);Out (先快后慢)和InOut (前半段加速,后半段减速)
常见的缓动动画如下
Linear:线性匀速运动效果;Quadratic:二次方的缓动(t^2);Cubic:三次方的缓动(t^3);Quartic:四次方的缓动(t^4);Quintic:五次方的缓动(t^5);Sinusoidal:正弦曲线的缓动(sin(t));Exponential:指数曲线的缓动(2^t);Circular:圆形曲线的缓动(sqrt(1-t^2));Elastic:指数衰减的正弦曲线缓动;Back:超过范围的三次方缓动((s+1)t^3 – st^2);Bounce:指数衰减的反弹缓动。
以上每个效果都分三个缓动类型,分别是:
easeIn:从0开始加速的缓动,也就是先慢后快;easeOut:减速到0的缓动,也就是先快后慢;easeInOut:前半段从0开始加速,后半段减速到0的缓动。
Tween.JS和Three.js示例

- 导入动画组件库
//导入Tween动画组件库
import * as TWEEN from "three/examples/jsm/libs/tween.module.js"
- 创建一个圆柱几何
const sphere1 =  new THREE.Mesh(
new THREE.CylinderGeometry(1, 1, 1, 64),
  new THREE.MeshBasicMaterial( {color: 0xffff00} )
)
sphere1.position.set(0, 10, 0)
sphere1.position.x = 0
sphere1.position.y = 0
sphere1.position.z = 0
sphere1.scale.set(-1, -1, 1)
sphere1.rotation.z = -Math.PI/2
this.scene.add(sphere1)
- 创建
tween实例和tween动画
const tween = new TWEEN.Tween(sphere1.position)
const tweenXZ = new TWEEN.Tween(sphere1.rotation)
const tween2 = new TWEEN.Tween(sphere1.position)
const tween3 = new TWEEN.Tween(sphere1.position)
const tween4 = new TWEEN.Tween(sphere1.position)
//移动
tween.to({x:4},300).onUpdate(()=>{})
//旋转
tweenXZ.to({y:-Math.PI/2},150).onUpdate(()=>{})
//移动
tween2.to({y:-4},300).onUpdate(()=>{})
//移动
tween3.to({x:0},300).onUpdate(()=>{})
//移动
tween4.to({y:0},300).onUpdate(()=>{})
// 一边移动一边旋转,动画在tween动画完成后执行tween2,并带有旋转效果
tween.chain(tween2,tweenXZ)
tween2.chain(tween3,tweenXZ)
tween3.chain(tween4,tweenXZ)
tween4.chain(tween,tweenXZ)
- 设置动画速度运行曲线
tween.easing(TWEEN.Easing.Quadratic.Inout)
- 开启动画
tween.start()
- 开启动画后还不能完全动起来,还需要逐帧更新动画
 animate() {
      this.controls.update()
      TWEEN.update()
      requestAnimationFrame( this.animate );
      this.renderer.render( this.scene, this.camera );
    }
完整代码:
<template>
  <div id="container">

  </div>
</template>

<script>
import * as THREE from 'three'
// webGL兼容
import WebGL from 'three/examples/jsm/capabilities/WebGL.js';
import { GUI } from 'three/examples/jsm/libs/lil-gui.module.min.js';
// 轨道控制器
import { OrbitControls } from "three/examples/jsm/controls/OrbitControls.js"
//导入RGBRload加载器
import { RGBELoader } from  "three/examples/jsm/loaders/RGBELoader.js"
//导入场景模型加载器
import {GLTFLoader} from "three/examples/jsm/loaders/GLTFLoader.js"
//导入模型解压器
import {DRACOLoader} from "three/examples/jsm/loaders/DRACOLoader.js"
//导入Tween动画组件库
import * as TWEEN from "three/examples/jsm/libs/tween.module.js"
export default {
  name: 'Three9',
  components: {
  },
  mounted(){
    this.init()
  },
  data(){
    return {
      camera: null,  //相机对象
      scene: null,  //场景对象
      renderer: null,  //渲染器对象
      mesh: null,  //网格模型对象Mesh
      mesh2:null,
      controls:null, //轨道控制器
      material2:null, //父元素
      planeMesh:null, //平面
      rgbeLoacer:null,
    }
  },
  methods:{
    //随机生成十六进制颜色
    color16(){//十六进制颜色随机
			var r = Math.floor(Math.random()*256);
			var g = Math.floor(Math.random()*256);
			var b = Math.floor(Math.random()*256);
			var color = '#'+r.toString(16)+g.toString(16)+b.toString(16);
			return color;
    },
    init(){
      let container = document.body;
      //创建一个场景
      this.scene = new THREE.Scene()
      //透视摄像机
      this.camera = new THREE.PerspectiveCamera(75,window.innerWidth/window.innerHeight,0.1,700)
      //创建渲染器
      this.renderer = new THREE.WebGLRenderer();
      //渲染器尺寸
      this.renderer.setSize( window.innerWidth,  window.innerHeight );

      // 创建三个球
      const sphere1 =  new THREE.Mesh(
        new THREE.CylinderGeometry(1, 1, 1, 64),
        new THREE.MeshBasicMaterial( {color: 0xffff00} )
      )
      sphere1.position.set(0, 10, 0)
      sphere1.position.x = 0
      sphere1.position.y = 0
      sphere1.position.z = 0
      sphere1.scale.set(-1, -1, 1)
      sphere1.rotation.z = -Math.PI/2
      this.scene.add(sphere1)
      const tween = new TWEEN.Tween(sphere1.position)
      const tweenXZ = new TWEEN.Tween(sphere1.rotation)
      const tween2 = new TWEEN.Tween(sphere1.position)
      const tween3 = new TWEEN.Tween(sphere1.position)
      const tween4 = new TWEEN.Tween(sphere1.position)
      //移动
      tween.to({x:4},300).onUpdate(()=>{})
      //旋转
      tweenXZ.to({y:-Math.PI/2},150).onUpdate(()=>{})
      //移动
      tween2.to({y:-4},300).onUpdate(()=>{})
      //移动
      tween3.to({x:0},300).onUpdate(()=>{})
      //移动
      tween4.to({y:0},300).onUpdate(()=>{})
      // 一边移动一边旋转,动画在tween动画完成后执行tween2,并带有旋转效果
      tween.chain(tween2,tweenXZ)
      tween2.chain(tween3,tweenXZ)
      tween3.chain(tween4,tweenXZ)
      tween4.chain(tween,tweenXZ)
      //动画运行速度曲线
      tween.easing(TWEEN.Easing.Quadratic.Inout)
      tween.start()
      this.scene.background=new THREE.Color(0x999999)
      // 设置相机位置
      this.camera.position.z = 15;
      this.camera.position.y =2;
      this.camera.position.x = 2;
      // 看的方向
      this.camera.lookAt(0,0,0)
      //添加世界坐标辅助器
      const axesHelper = new THREE.AxesHelper(3)
      this.scene.add( axesHelper );
      //添加轨道控制器
      this.controls = new OrbitControls(this.camera,this.renderer.domElement)
      //添加阻尼带有惯性
      this.controls.enableDamping = true
      //设置阻尼系数
      this.controls.dampingFactor = 0.05
      //元素中插入canvas对象
      container.appendChild(this.renderer.domElement);
      if ( WebGL.isWebGLAvailable() ) {
        this.animate();
      } else {
        const warning = WebGL.getWebGLErrorMessage();
        document.getElementById( document.body ).appendChild( warning );
      }
    },
    //旋转起来
    animate() {
      this.controls.update()
      TWEEN.update()
      requestAnimationFrame( this.animate );
      this.renderer.render( this.scene, this.camera );
    }
  }
}
</script>
three.js灯光与阴影的关系与设置
灯光阴影
- 材质要满足能够对光照有反应 开启渲染器开启阴影计算this.renderer.shadowMap.enabled = true,shadowMap 包含阴影贴图的引用。
- 开启光照投射阴影directionalLight.castShadow = true,castShadow 设置为trhe,该平行光会产生动态阴影。
- 开启物体投射阴影sphere.castShadow = true,castShadow 物体是否被渲染到阴影贴图中。
- 开启物体接收投射阴影planeMesh.receiveShadow = true,receiveShadow 材质是否接收阴影。
线创建一个球体和平面,为球体阴影投影到平面上做准备,按照上面的步骤,(渲染器阴影计算,光照投射阴影,球体投射阴影,平面接受阴影)
 //创建一个场景
this.scene = new THREE.Scene()
let container = document.body;
//创建一个场景
this.scene = new THREE.Scene()
//透视摄像机
this.camera = new THREE.PerspectiveCamera(75,window.innerWidth/window.innerHeight,0.1,700)
// 设置相机位置
this.camera.position.z = 30;
this.camera.position.y =2;
this.camera.position.x = 2;
// 看的方向
this.camera.lookAt(0,2,2)
//创建渲染器
this.renderer = new THREE.WebGLRenderer();
// 渲染器尺寸
this.renderer.setSize( window.innerWidth,  window.innerHeight );
//创建一个球体
const sphereGeometry = new THREE.SphereGeometry(1, 20, 20)
//设置材质
const material = new THREE.MeshStandardMaterial()
const material1 = new THREE.MeshBasicMaterial()
const sphere = new THREE.Mesh(sphereGeometry, material1)
//球投射阴影,打开球体的投射阴影
sphere.castShadow = true
// 将球添加到场景中
this.scene.add(sphere)
//创建一个平面
const planeGeometry = new THREE.PlaneGeometry(15,15)
//设置平面材质,要求平面材质必须要可接收阴影的投射
const planeMesh = new THREE.Mesh(planeGeometry,material)
//平面位置位于球体的下方
planeMesh.position.set(0,-1,0)
//旋转平面位置
planeMesh.rotation.x = -Math.PI / 2
// 开启平面接收阴影
planeMesh.receiveShadow = true
//将平面添加到场景中
this.scene.add(planeMesh)
// 环境光均匀的照亮场景中的所有物体
const light = new THREE.AmbientLight( 0xffffff, 0.9 );
// 环境光添加到场景中
this.scene.add( light );
// 平行光,从一个平行光位置position到target位置
const directionalLight = new THREE.DirectionalLight( 0xffffff, 0.95 );
//设置平行光的位置
directionalLight.position.set(10, 3, 10)
//开启光照投射阴影
directionalLight.castShadow = true
//将光照添加到场景中
this.scene.add( directionalLight );
//场景背景图
this.scene.background=new THREE.Color(0x999999)
//开启场景中的阴影贴图
this.renderer.shadowMap.enabled = true
//添加世界坐标辅助器
const axesHelper = new THREE.AxesHelper(3)
this.scene.add( axesHelper );
//添加轨道控制器
this.controls = new OrbitControls(this.camera,this.renderer.domElement)
//添加阻尼带有惯性
this.controls.enableDamping = true
//设置阻尼系数
this.controls.dampingFactor = 0.05
//元素中插入canvas对象
container.appendChild(this.renderer.domElement);
if ( WebGL.isWebGLAvailable() ) {
  this.animate();
} else {
  const warning = WebGL.getWebGLErrorMessage();
  document.getElementById( document.body ).appendChild( warning );
}
效果:

平行光阴影属性与阴影相机原理
- 设置阴影模糊度
directionalLight.shadow.radius = 20;

2. 设置阴影贴图的分辨率
directionalLight.shadow.mapSize.set(4096, 4096)

3. 设置平行光投射相机的属性 
directionalLight.shadow.camera.near = 0.5;
directionalLight.shadow.camera.far = 500;
directionalLight.shadow.camera.top = 5;
directionalLight.shadow.camera.bottom = -5;
directionalLight.shadow.camera.left = -5;
directionalLight.shadow.camera.right = 5;
使用GUI控制left,near,x,y,z,修改后一定要调用updateProjectionMatrix方法进行相机投影的更新。
const gui = new GUI()
gui.add(directionalLight.position, 'x').min(0).max(30).step(1).onChange(()=>{directionalLight.shadow.camera.updateProjectionMatrix()})
gui.add(directionalLight.position, 'y').min(0).max(30).step(1).onChange(()=>{directionalLight.shadow.camera.updateProjectionMatrix()})
gui.add(directionalLight.position, 'z').min(0).max(30).step(1).onChange(()=>{directionalLight.shadow.camera.updateProjectionMatrix()})
gui.add(directionalLight.shadow.camera, 'left').min(0).max(1).step(0.1).onChange(()=>{directionalLight.shadow.camera.updateProjectionMatrix()})
gui.add(directionalLight.shadow.camera, 'near').min(0).max(10).step(0.1).onChange(()=>{directionalLight.shadow.camera.updateProjectionMatrix()})

three.js聚光灯各种属性与应用

光线从一个点沿一个方向射出,随着光线照射的变远,光线圆锥体的尺寸也逐渐增大。
聚光灯SpotLight属性
- color:聚光灯的颜色
- intensity:聚光灯的强度
- distance:聚光灯的有效距离
- angle:聚光灯的光锥角度
- penumbra:聚光灯锥形光圈的模糊半径
- decay:聚光灯的衰减系数
- position:聚光灯的位置
- target:聚光灯的目标位置,用于确定聚光灯的方向。
聚光灯SpotLight应用
- 创建一个立方体一个平面,立方体发出投影,平面接收投影
//创建一个立方体
const boxGeometry = new THREE.BoxGeometry(1, 1, 1 )
//设置材质
const boxMaterial = new THREE.MeshStandardMaterial({color: 0x00ff00})
//实例化立方体
const sphere = new THREE.Mesh(boxGeometry, boxMaterial)
//球投射阴影,打开球体的投射阴影
sphere.castShadow = true
// 将球添加到场景中
this.scene.add(sphere)
//创建一个平面
const planeGeometry = new THREE.PlaneGeometry(50,50)
//平面材质
const planeMaterial = new THREE.MeshStandardMaterial({color: 0xf0fff0})
//设置平面材质,要求平面材质必须要可接收阴影的投射
const planeMesh = new THREE.Mesh(planeGeometry,planeMaterial)
//平面位置位于球体的下方
planeMesh.position.set(0,-1,0)
//旋转平面位置
planeMesh.rotation.x = -Math.PI / 2
// 开启平面接收阴影
planeMesh.receiveShadow = true
//将平面添加到场景中
this.scene.add(planeMesh)
- 创建环境光和聚光灯
// 环境光均匀的照亮场景中的所有物体
const light = new THREE.AmbientLight( 0xffffff, 0.5 );
// 环境光添加到场景中
this.scene.add( light );
//聚光灯
const spotLight = new THREE.SpotLight(0xffffff, 1);
spotLight.position.set(5, 5, 5); // 设置聚光灯位置
spotLight.castShadow = true; // 设置聚光灯投射阴影
spotLight.intensity = 2; // 设置聚光灯强度
spotLight.shadow.mapSize.width = 1024;
spotLight.shadow.mapSize.height = 1024;
//开启光照投射阴影
spotLight.castShadow = true
// 设置阴影贴图模糊度
spotLight.shadow.radius = 20;
// 设置阴影贴图的分辨率
spotLight.shadow.mapSize.set(512, 512);
spotLight.target = sphere; // 设置聚光灯的目标为立方体 会自动对准目标
spotLight.angle = Math.PI / 6; // 设置聚光灯的角度
spotLight.distance = 0; // 设置聚光灯的距离
spotLight.penumbra = 0; // 设置聚光灯的边缘
spotLight.decay = 0; // 设置聚光灯的衰减
this.scene.add(spotLight);
const gui = new GUI()
gui.add(sphere.position, "x").min(-5).max(5).step(0.1);
gui
 .add(spotLight, "angle")
 .min(0)
 .max(Math.PI / 2)
 .step(0.01);
gui.add(spotLight, "distance").min(0).max(10).step(0.01);
gui.add(spotLight, "penumbra").min(0).max(1).step(0.01);
gui.add(spotLight, "decay").min(0).max(5).step(0.01);
效果如下:

完整代码:
<template>
  <div id="container">

  </div>
</template>

<script>
import * as THREE from 'three'
// webGL兼容
import WebGL from 'three/examples/jsm/capabilities/WebGL.js';
import { GUI } from 'three/examples/jsm/libs/lil-gui.module.min.js';
// 轨道控制器
import { OrbitControls } from "three/examples/jsm/controls/OrbitControls.js"
//导入RGBRload加载器
import { RGBELoader } from  "three/examples/jsm/loaders/RGBELoader.js"
//导入场景模型加载器
import {GLTFLoader} from "three/examples/jsm/loaders/GLTFLoader.js"
//导入模型解压器
import {DRACOLoader} from "three/examples/jsm/loaders/DRACOLoader.js"
//导入Tween动画组件库
import * as TWEEN from "three/examples/jsm/libs/tween.module.js"
export default {
  name: 'Three10',
  components: {
  },
  mounted(){
    this.init()
  },
  data(){
    return {
      camera: null,  //相机对象
      scene: null,  //场景对象
      renderer: null,  //渲染器对象
      mesh: null,  //网格模型对象Mesh
      mesh2:null,
      controls:null, //轨道控制器
      material2:null, //父元素
      planeMesh:null, //平面
      rgbeLoacer:null,
    }
  },
  methods:{
    init(){
      let container = document.body;
      //创建一个场景
      this.scene = new THREE.Scene()
      //透视摄像机
      this.camera = new THREE.PerspectiveCamera(75,window.innerWidth/window.innerHeight,0.1,700)
      // 设置相机位置
      this.camera.position.z = 10;
      this.camera.position.y =0;
      this.camera.position.x = 0;
      // 看的方向
      this.camera.lookAt(0,0,0)
      //创建渲染器
      this.renderer = new THREE.WebGLRenderer();
      // 渲染器尺寸
      this.renderer.setSize( window.innerWidth,  window.innerHeight );
      //创建一个立方体
      const boxGeometry = new THREE.BoxGeometry(1, 1, 1 )
      //设置材质
      const boxMaterial = new THREE.MeshStandardMaterial({color: 0x00ff00})
      //实例化立方体
      const sphere = new THREE.Mesh(boxGeometry, boxMaterial)
      //球投射阴影,打开球体的投射阴影
      sphere.castShadow = true
      // 将球添加到场景中
      this.scene.add(sphere)
      //创建一个平面
      const planeGeometry = new THREE.PlaneGeometry(50,50)
      //平面材质
      const planeMaterial = new THREE.MeshStandardMaterial({color: 0xf0fff0})
      //设置平面材质,要求平面材质必须要可接收阴影的投射
      const planeMesh = new THREE.Mesh(planeGeometry,planeMaterial)
      //平面位置位于球体的下方
      planeMesh.position.set(0,-1,0)
      //旋转平面位置
      planeMesh.rotation.x = -Math.PI / 2
      // 开启平面接收阴影
      planeMesh.receiveShadow = true
      //将平面添加到场景中
      this.scene.add(planeMesh)

      // 环境光均匀的照亮场景中的所有物体
      const light = new THREE.AmbientLight( 0xffffff, 0.5 );
      // 环境光添加到场景中
      this.scene.add( light );
      // 平行光,从一个平行光位置position到target位置
      const spotLight = new THREE.SpotLight(0xffffff, 1);
      spotLight.position.set(5, 5, 5); // 设置聚光灯位置
      spotLight.castShadow = true; // 设置聚光灯投射阴影
      spotLight.intensity = 2; // 设置聚光灯强度
      spotLight.shadow.mapSize.width = 1024;
      spotLight.shadow.mapSize.height = 1024;
      //设置平行光的位置
      // directionalLight.position.set(5,5,5)
      //开启光照投射阴影
      spotLight.castShadow = true
      // 设置阴影贴图模糊度
      spotLight.shadow.radius = 20;
      // 设置阴影贴图的分辨率
      spotLight.shadow.mapSize.set(512, 512);
      spotLight.target = sphere; // 设置聚光灯的目标为立方体 会自动对准目标
      spotLight.angle = Math.PI / 6; // 设置聚光灯的角度
      spotLight.distance = 0; // 设置聚光灯的距离
      spotLight.penumbra = 0; // 设置聚光灯的边缘
      spotLight.decay = 0; // 设置聚光灯的衰减
      //设置阴影模糊度
      // spotLight.shadow.radius = 20;
      //设置阴影贴图的分辨率
      // spotLight.shadow.mapSize.set(4096, 4096)
      // spotLight.shadow.camera.near = 500;
      // spotLight.shadow.camera.far = 4000;
      // spotLight.shadow.camera.fov = 30;
      //将光照添加到场景中
      this.scene.add(spotLight);
      const gui = new GUI()
      gui.add(sphere.position, "x").min(-5).max(5).step(0.1);
      gui
        .add(spotLight, "angle")
        .min(0)
        .max(Math.PI / 2)
        .step(0.01);
      gui.add(spotLight, "distance").min(0).max(10).step(0.01);
      gui.add(spotLight, "penumbra").min(0).max(1).step(0.01);
      gui.add(spotLight, "decay").min(0).max(5).step(0.01);
      //场景背景图
      this.scene.background=new THREE.Color(0x999999)
      //开启场景中的阴影贴图
      this.renderer.shadowMap.enabled = true
      this.renderer.physicallyCorrectLights = true; // 设置渲染器的物理正确性
      //添加世界坐标辅助器
      const axesHelper = new THREE.AxesHelper(3)
      this.scene.add( axesHelper );
      //添加轨道控制器
      this.controls = new OrbitControls(this.camera,this.renderer.domElement)
      //添加阻尼带有惯性
      this.controls.enableDamping = true
      //设置阻尼系数
      this.controls.dampingFactor = 0.05
      //元素中插入canvas对象
      container.appendChild(this.renderer.domElement);
      if ( WebGL.isWebGLAvailable() ) {
        this.animate();
      } else {
        const warning = WebGL.getWebGLErrorMessage();
        document.getElementById( document.body ).appendChild( warning );
      }
    },
    //旋转起来
    animate() {
      this.controls.update()
      TWEEN.update()
      requestAnimationFrame( this.animate );
      this.renderer.render( this.scene, this.camera );
    }
  }
}
</script>
three.js点光源属性与应用
three.js点光源介绍

从一个点向各个方向发射的光源。一个常见的例子是模拟一个灯泡发出的光,该光源可以投射阴影
,就像生活中的白炽灯,光线沿着发光核心向外发散,同一平面的不同位置与点光源光线入射角是不同的,点光源照射下,同一个平面不同区域是呈现出不同的明暗效果。
和环境光不同,环境光不需要设置光源位置,而点光源需要设置位置属性.position,光源位置不同,物体表面被照亮的面不同,远近不同因为衰减明暗程度不同。
你可以把案例源码中点光源位置从(400, 200, 300)位置改变到(-400, -200, -300),你会发现网格模型被照亮的位置从前面变到了后面,这很正常,光源只能照亮面对着光源的面,背对着光源的无法照射到,颜色会比较暗。
//点光源
var point = new THREE.PointLight(0xffffff);
//设置点光源位置,改变光源的位置
point.position.set(400, 200, 300);
scene.add(point);
three.js点光源实现白炽灯围绕物体旋转,投影物体
效果:代码在下方给出

- 创建平面,创建平面上物体,创建一个小物体当作灯
 //创建一个立方体
const boxGeometry = new THREE.BoxGeometry(1, 1, 1 )
//设置材质
const boxMaterial = new THREE.MeshStandardMaterial()
//实例化立方体
const sphere = new THREE.Mesh(boxGeometry, boxMaterial)
//投射阴影,打开物体的投射阴影
sphere.castShadow = true
// 将物体加到场景中
this.scene.add(sphere)
//创建一个平面
const planeGeometry = new THREE.PlaneGeometry(50,50)
//平面材质
const planeMaterial = new THREE.MeshStandardMaterial({color: 0xf0fff0})
//设置平面材质,要求平面材质必须要可接收阴影的投射
const planeMesh = new THREE.Mesh(planeGeometry,planeMaterial)
//平面位置位于球体的下方
planeMesh.position.set(0,-1,0)
//旋转平面位置
planeMesh.rotation.x = -Math.PI / 2
// 开启平面接收阴影
planeMesh.receiveShadow = true
//将平面添加到场景中
this.scene.add(planeMesh)
//创建一个灯
const boxGeometry1 = new THREE.BoxGeometry(0.3, 0.3, 0.3 )
//设置材质
const boxMaterial1 = new THREE.MeshBasicMaterial({color: 0xffffff})
//实例化立方体
this.sphere1 = new THREE.Mesh(boxGeometry1, boxMaterial1)
// 将球添加到场景中
this.scene.add(this.sphere1)
//灯位于物体的上方
this.sphere1.position.set(2,4,2)
- 把点光线赋予到小物体上,当作白炽灯
// 环境光均匀的照亮场景中的所有物体
const light = new THREE.AmbientLight( 0xffffff, 0.5 );
// 环境光添加到场景中
this.scene.add( light );
// 点光源,从一个平行光位置position到target位置
const pointLight = new THREE.PointLight(0xffffff, 1);
// pointLight.position.set(2, 2, 2); // 设置光源位置
pointLight.castShadow = true; // 设置光源投射阴影
pointLight.shadow.mapSize.set(1024,1024)
//将点光源添加到上面创建的小灯中
this.sphere1.add(pointLight)
- 设置时钟,做动画帧循环
//设置时钟
      this.clockTime = new THREE.Clock()
      this.animate()
- animate()方法
animate() {
  this.controls.update()
   const clock = new THREE.Clock();
   let time = this.clockTime.getElapsedTime()
   this.sphere1.position.x = Math.sin(time)*3
   this.sphere1.position.z = Math.cos(time)*3
   this.sphere1.position.y = 2+Math.sign(time)*0.5
   TWEEN.update()
   requestAnimationFrame( this.animate );
   this.renderer.render( this.scene, this.camera );
 }
完整代码:
<template>
  <div id="container">

  </div>
</template>

<script>
import * as THREE from 'three'
// webGL兼容
import WebGL from 'three/examples/jsm/capabilities/WebGL.js';
import { GUI } from 'three/examples/jsm/libs/lil-gui.module.min.js';
// 轨道控制器
import { OrbitControls } from "three/examples/jsm/controls/OrbitControls.js"
//导入RGBRload加载器
import { RGBELoader } from  "three/examples/jsm/loaders/RGBELoader.js"
//导入场景模型加载器
import {GLTFLoader} from "three/examples/jsm/loaders/GLTFLoader.js"
//导入模型解压器
import {DRACOLoader} from "three/examples/jsm/loaders/DRACOLoader.js"
//导入Tween动画组件库
import * as TWEEN from "three/examples/jsm/libs/tween.module.js"
export default {
  name: 'Three11',
  components: {
  },
  mounted(){
    this.init()
  },
  data(){
    return {
      camera: null,  //相机对象
      scene: null,  //场景对象
      renderer: null,  //渲染器对象
      mesh: null,  //网格模型对象Mesh
      mesh2:null,
      controls:null, //轨道控制器
      material2:null, //父元素
      planeMesh:null, //平面
      rgbeLoacer:null,
      clockTime:null,
      sphere1:null,
    }
  },
  methods:{
    init(){
      let container = document.body;
      //创建一个场景
      this.scene = new THREE.Scene()
      //透视摄像机
      this.camera = new THREE.PerspectiveCamera(75,window.innerWidth/window.innerHeight,0.1,700)
      // 设置相机位置
      this.camera.position.z = 10;
      this.camera.position.y =0;
      this.camera.position.x = 0;
      // 看的方向
      this.camera.lookAt(0,0,0)
      //创建渲染器
      this.renderer = new THREE.WebGLRenderer();
      // 渲染器尺寸
      this.renderer.setSize( window.innerWidth,  window.innerHeight );
      //创建一个立方体
      const boxGeometry = new THREE.BoxGeometry(1, 1, 1 )
      //设置材质
      const boxMaterial = new THREE.MeshStandardMaterial()
      //实例化立方体
      const sphere = new THREE.Mesh(boxGeometry, boxMaterial)
      //球投射阴影,打开球体的投射阴影
      sphere.castShadow = true
      // 将球添加到场景中
      this.scene.add(sphere)
      //创建一个灯
      const boxGeometry1 = new THREE.BoxGeometry(0.3, 0.3, 0.3 )
      //设置材质
      const boxMaterial1 = new THREE.MeshBasicMaterial({color: 0xffffff})
      //实例化立方体
      this.sphere1 = new THREE.Mesh(boxGeometry1, boxMaterial1)
      // 将球添加到场景中
      this.scene.add(this.sphere1)
      //平面位置位于球体的下方
      this.sphere1.position.set(2,4,2)
      //创建一个平面
      const planeGeometry = new THREE.PlaneGeometry(50,50)
      //平面材质
      const planeMaterial = new THREE.MeshStandardMaterial({color: 0xf0fff0})
      //设置平面材质,要求平面材质必须要可接收阴影的投射
      const planeMesh = new THREE.Mesh(planeGeometry,planeMaterial)
      //平面位置位于球体的下方
      planeMesh.position.set(0,-1,0)
      //旋转平面位置
      planeMesh.rotation.x = -Math.PI / 2
      // 开启平面接收阴影
      planeMesh.receiveShadow = true
      //将平面添加到场景中
      this.scene.add(planeMesh)
      // 环境光均匀的照亮场景中的所有物体
      const light = new THREE.AmbientLight( 0xffffff, 0.5 );
      // 环境光添加到场景中
      this.scene.add( light );
      // 点光源,从一个平行光位置position到target位置
      const pointLight = new THREE.PointLight(0xffffff, 1);
      pointLight.castShadow = true; // 设置点光源投射阴影
      pointLight.shadow.mapSize.set(1024,1024)
      this.sphere1.add(pointLight)
      //设置时钟
      this.clockTime = new THREE.Clock()
      //开启光照投射阴影
      pointLight.castShadow = true
      // 设置阴影贴图模糊度
      pointLight.shadow.radius = 20;
      // 设置阴影贴图的分辨率
      pointLight.shadow.mapSize.set(512, 512);
      pointLight.target = sphere; // 设置点光源的目标为立方体 会自动对准目标
      pointLight.angle = Math.PI / 6; // 设置点光源的角度
      pointLight.distance = 0; // 设置点光源的距离
      pointLight.decay = 0; // 设置点光源的衰减
      const gui = new GUI()
      gui.add(sphere.position, "x").min(-5).max(5).step(0.1);
      gui.add(pointLight, "distance").min(0).max(10).step(0.001);
      gui.add(pointLight, "decay").min(0).max(5).step(0.01);
      //场景背景图
      this.scene.background=new THREE.Color(0x999999)
      //开启场景中的阴影贴图
      this.renderer.shadowMap.enabled = true
      this.renderer.physicallyCorrectLights = true; // 设置渲染器的物理正确性
      //添加世界坐标辅助器
      const axesHelper = new THREE.AxesHelper(3)
      this.scene.add( axesHelper );
      //添加轨道控制器
      this.controls = new OrbitControls(this.camera,this.renderer.domElement)
      //添加阻尼带有惯性
      this.controls.enableDamping = true
      //设置阻尼系数
      this.controls.dampingFactor = 0.05
      //元素中插入canvas对象
      container.appendChild(this.renderer.domElement);
      if ( WebGL.isWebGLAvailable() ) {
        this.animate();
      } else {
        const warning = WebGL.getWebGLErrorMessage();
        document.getElementById( document.body ).appendChild( warning );
      }
    },
    //旋转起来
    animate() {
      this.controls.update()
      const clock = new THREE.Clock();
      let time = this.clockTime.getElapsedTime()
      this.sphere1.position.x = Math.sin(time)*3
      this.sphere1.position.z = Math.cos(time)*3
      this.sphere1.position.y = 2+Math.sign(time)*0.5
      TWEEN.update()
      requestAnimationFrame( this.animate );
      this.renderer.render( this.scene, this.camera );
    }
  }
}
</script>
实战一,汽车官网,改变汽车颜色
效果:
<template>
 <div>
  <div class="home">
    <div class="canvas-container" ref="canvasDom"></div>
    <div class="home-content">
      <h2>车身颜色</h2>
      <div class="select">
        <div
          class="select-item"
          v-for="(item, index) in colors"
          :key="index"
          @click="selectColor(index)"
        >
          <div
            class="select-item-color"
            :style="{'backgroundColor': item}"
          ></div>
        </div>
      </div>
      <h2>贴膜材质</h2>
      <div class="select">
        <div
          class="select-item"
          v-for="(item, index) in materials"
          :key="index"
          @click="selectMaterial(index)"
        >
          <div class="select-item-text">{{ item.name }}</div>
        </div>
      </div>
    </div>
  </div>
 </div>
</template>

<script>
// 引入three.js导入
import * as THREE from 'three'
// 补间动画库导入
import gsap from "gsap"
// webGL兼容
import WebGL from 'three/examples/jsm/capabilities/WebGL.js';
import { GUI } from 'three/examples/jsm/libs/lil-gui.module.min.js';
// 轨道控制器
import { OrbitControls } from "three/examples/jsm/controls/OrbitControls.js"
//导入RGBRload加载器
import { RGBELoader } from  "three/examples/jsm/loaders/RGBELoader.js"
//导入场景模型加载器
import { GLTFLoader } from "three/examples/jsm/loaders/GLTFLoader.js"
//导入模型解压器
import { DRACOLoader } from "three/examples/jsm/loaders/DRACOLoader"
//导入Tween动画组件库
import * as TWEEN from "three/examples/jsm/libs/tween.module.js"
// 导入水面
import { Water } from "three/examples/jsm/objects/Water"
//导入天空
import { Sky } from 'three/examples/jsm/objects/Sky';
export default {
  name: 'Three12',
  components: {
  },
  mounted(){
    this.init()
  },
  data(){
    return {
      colors:["green", "blue", "orange", "gray", "red", "purple","#FFD700"],
      materials:[{ name: "磨砂", value: 1 },{ name: "冰晶", value: 0 }],
      camera: null,  //相机对象
      scene: null,  //场景对象
      renderer: null,  //渲染器对象
      mesh: null,  //网格模型对象Mesh
      light:null, //平行光源
      light2:null, //平行光源
      light3:null, //平行光源
      light4:null, //平行光源
      light5:null, //平行光源
      light6:null, //平行光源
      wheels:[], //轮毂
      carBody:null, //车身
      forntCar:null, //前脸
      hoodCar:null, //引擎盖
      glassCar:null, //挡风玻璃
      water:null, //水面
      gridHeloer:null, //网格地面
      carBodyMaterial:new THREE.MeshPhysicalMaterial({
        color:0xff0000,
        metalness:1,//金属度
        roughness:0.1, //粗糙程度
      }),//创建材质
      wheelsMaterial:new THREE.MeshPhysicalMaterial({
        color:0xff0000,
        metalness:0.5,//金属度
        roughness:0.5, //粗糙程度
        clearcoat:1,  //清晰度,光滑透亮
        clearcoatRoughness:0, //coat层的粗糙度
      }),//创建材质
      forntCarMaterial:new THREE.MeshPhysicalMaterial({
        color:0xff0000,
        metalness:0.5,//金属度
        roughness:0.5, //粗糙程度
      }),//创建材质
      hoodCarMaterial:new THREE.MeshPhysicalMaterial({
        color:0xff0000,
        metalness:0.5,//金属度
        roughness:0.5, //粗糙程度
        clearcoat:1,  //清晰度,光滑透亮
        clearcoatRoughness:0, //coat层的粗糙度
      }),//创建材质
      glassCarMaterial:new THREE.MeshPhysicalMaterial({
        color: 0xffffff,
        metalness: 0.25,
        roughness: 0,
        transmission: 1.0
      }),//创建材质
      carModel:null, // 阴影
      gltfLoader:null,
      dracoLoader:null,
      controls:null, //轨道控制器
      rgbeLoacer:null,
    }
  },
  methods:{
    //选择颜色
    selectColor(index){
      this.carBodyMaterial.color.set(this.colors[index]);
      this.forntCarMaterial.color.set(this.colors[index]);
      this.hoodCarMaterial.color.set(this.colors[index]);
      this.wheelsMaterial.color.set(this.colors[index]);
    },
    selectMaterial(index){
      this.carBodyMaterial.clearcoatRoughness = this.materials[index].value;
      this.forntCarMaterial.clearcoatRoughness = this.materials[index].value;
      this.hoodCarMaterial.clearcoatRoughness = this.materials[index].value;
      this.wheelsMaterial.clearcoatRoughness = this.materials[index].value;
    },
    init(){
      //创建一个场景
      this.scene = new THREE.Scene()
      //初始化相机
      this.camera = new THREE.PerspectiveCamera(75,window.innerWidth/window.innerHeight,0.1,1000)
      //设置相机位置
      this.camera.position.set(0,2,6)
      //设置相机的宽高比
      this.camera.aspect = window.innerWidth/window.innerHeight
      //更新投影矩阵,设置后调用.updateProjectionMatrix()来使得改变生效
      this.camera.updateProjectionMatrix()
      //初始化渲染器
      this.renderer = new THREE.WebGLRenderer({
        //设置抗锯齿
        antialias: true,
        toneMapping:THREE.ACESFilmicToneMapping
      })
      // this.renderer.outputEncoding = THREE.sRGBEncoding;
      this.renderer.toneMapping = THREE.ACESFilmicToneMapping;
      this.renderer.toneMappingExposure = 0.5;
      this.renderer.shadowMap.enabled = true;
      this.renderer.physicallyCorrectLights = true;
      //设置渲染器
      this.renderer.setSize(window.innerWidth,window.innerHeight)
      //将渲染元素画布最佳到body中去
      // document.body.appendChild(this.renderer.domElement)
      // this.scene.background = new THREE.Color("#ccc")
      //初始化控制器
      this.controls = new OrbitControls(this.camera,this.renderer.domElement)
      // //添加阻尼带有惯性
      this.controls.enableDamping = true
      // //设置阻尼系数
      this.controls.dampingFactor = 0.05
      this.scene.background = new THREE.Color("#ccc");
      // this.scene.environment =  new THREE.Color("#ccc")
			this.scene.fog = new THREE.Fog( 0x333333, 10, 15 );
      this.scene.environment = new RGBELoader().load( 'venice_sunset_1k.hdr' );
      this.scene.environment.mapping = THREE.EquirectangularReflectionMapping;
      this.scene.fog = new THREE.Fog( 0x333333, 10, 15 );
      // 实例化加载器draco
      this.dracoLoader = new DRACOLoader()
      //初始化GLTF模式加载、
      this.gltfLoader = new GLTFLoader()
      //设置解压缩文件路径
      this.dracoLoader.setDecoderPath("draco/")
      //阴影纹理
      const shadow = new THREE.TextureLoader().load( 'ferrari_ao.png' );
      //设置把gltf加载器draco解码器
      this.gltfLoader.setDRACOLoader(this.dracoLoader)
      this.gltfLoader.load("model/bmw01.glb",(gltf)=>{
        const model = gltf.scene
        model.traverse((child)=>{
          if(child.isMesh){
            console.log(child.name)
          }
        //   this.carModel = gltf.scene.children[ 0 ];
        //   // shadow
				// 	const mesh = new THREE.Mesh(
				// 		new THREE.PlaneGeometry( 0.655 * 4, 1.3 * 4 ),
				// 		new THREE.MeshBasicMaterial( {
				// 			map: shadow, blending: THREE.MultiplyBlending, toneMapped: false, transparent: true
				// 		} )
				// 	);
				// 	mesh.rotation.x = - Math.PI / 2;
				// 	mesh.renderOrder = 2;
				// 	this.carModel.add( mesh );
        //   // 车轮
				// this.scene.add( this.carModel );
          if(child.isMesh&&child.name.includes("轮毂")){
            this.wheels.push(child)
            this.wheels.material = this.wheelsMaterial
          }
          //车身
          if(child.isMesh&&child.name.includes("Mesh002")){
            this.carBody = child
            this.carBody.material = this.carBodyMaterial
          }
          //前脸
          if(child.isMesh&&child.name.includes("前脸")){
            this.forntCar= child
            this.forntCar.material = this.forntCarMaterial
          }
          // 引擎盖       hoodCar:null, //引擎盖
          if(child.isMesh&&child.name.includes("引擎盖_1")){
            this.hoodCar = child
            this.hoodCar.material = this.hoodCarMaterial
          }
          //挡风玻璃
          if(child.isMesh&&child.name.includes("挡风玻璃")){
            this.glassCar = child
            this.glassCar.material = this.glassCarMaterial
          }
        })
        this.scene.add( gltf.scene );
      })
      //添第一灯光 上下左右前后都打光
      this.light = new THREE.DirectionalLight(0xffffff,1)
      this.light.position.set(0,0,10)
      this.scene.add(this.light)
      //第二栈灯
      this.light2 = new THREE.DirectionalLight(0xffffff,1)
      this.light2.position.set(0,0,-10)
      this.scene.add(this.light2)
      //第三栈灯
      this.light3 = new THREE.DirectionalLight(0xffffff,1)
      this.light3.position.set(-10,0,0)
      this.scene.add(this.light3)
      //第四栈灯
      this.light4 = new THREE.DirectionalLight(0xffffff,1)
      this.light4.position.set(10,0,0)
      this.scene.add(this.light4)
      //第五栈灯
      this.light5 = new THREE.DirectionalLight(0xffffff,1)
      this.light5.position.set(0,10,0)
      this.scene.add(this.light5)
      //第六栈灯
      this.light6 = new THREE.DirectionalLight(0xffffff,1)
      this.light6.position.set(5,-10,0)
      this.scene.add(this.light6)
      //添加点光源
      const pointLight = new THREE.PointLight(0xffffff,30)
      pointLight.position.set(0.5,2.3,0)
      pointLight.castShadow = true
      this.scene.add(pointLight)
      //实例化一个gui对象
      // const gui = new GUI()
      // gui.add(this.camera.position,'x').max(100).min(-10).name('x的位置').step(1)
      // gui.add(this.camera.position,'y').max(100).min(-10).name('y的位置').step(1)
      // gui.add(this.camera.position,'z').max(100).min(-10).name('z的位置').step(1)
       //添加网格地面
       this.gridHeloer = new THREE.GridHelper( 20, 40, 0xffffff, 0xffffff )
      this.gridHeloer.material.opacity = 0.2;
      this.gridHeloer.material.depthWrite = false;
      this.gridHeloer.material.transparent = true;
      this.scene.add(this.gridHeloer)
      // document.body.appendChild(this.renderer.domElement)
      console.log("canvasDom",this.$refs.canvasDom)
      this.$refs.canvasDom.appendChild(this.renderer.domElement);
      this.render()


    },
    //渲染函数  “”
    render(){
      const time = - performance.now() / 1000;
      for ( let i = 0; i < this.wheels.length; i ++ ) {
        // this.wheels[ i ].rotation.z = time * Math.PI * 2;
      }
      this.controls && this.controls.update()
      this.gridHeloer.position.z = - ( time ) % 1;
      requestAnimationFrame(this.render);
      this.renderer.render(this.scene, this.camera );
    },
  }
}
</script>
<style>
*{
 margin:0px;
 padding:0px;
}
canvas{
  width: 100%;
  height: 100%;
  position: fixed;
  left: 0;
  top: 0;
}

.home-content {
  position: fixed;
  top: 0;
  right: 20px;
}

.select-item-color {
  width: 50px;
  height: 50px;
  border: 1px solid #ccc;
  margin: 10px;
  display: inline-block;
  cursor: pointer;
  border-radius: 10px;
}
.select {
  display: flex;
}
</style>
实战二,海边小屋,可切换相机位置及其显示文字
效果:

<template>
  <div id="scenes"
  style="
      position: fixed;
      left: 0;
      top: 0;
      z-index: 10;
      pointer-events: none;
      transition: all 1s;
    "
     :style="{
      transform: `translate3d(0, ${-this.sceneIndex.value * 100}vh, 0)`,
    }">
      <div v-for="item in this.scenesArr" style="width: 100vw; height: 100vh">
      <h1 style="padding: 100px 50px; padding-left: -500; font-size: 50px; color: #fff">
        {{ item.text }}
      </h1>
    </div>
    </div>
</template>

<script>
// 引入three.js导入
import * as THREE from 'three'
// 补间动画库导入
import gsap from "gsap"
// webGL兼容
import WebGL from 'three/examples/jsm/capabilities/WebGL.js';
import { GUI } from 'three/examples/jsm/libs/lil-gui.module.min.js';
// 轨道控制器
import { OrbitControls } from "three/examples/jsm/controls/OrbitControls.js"
//导入RGBRload加载器
import { RGBELoader } from  "three/examples/jsm/loaders/RGBELoader.js"
//导入场景模型加载器
import { GLTFLoader } from "three/examples/jsm/loaders/GLTFLoader.js"
//导入模型解压器
import { DRACOLoader } from "three/examples/jsm/loaders/DRACOLoader"
//导入Tween动画组件库
import * as TWEEN from "three/examples/jsm/libs/tween.module.js"
// 导入水面
import { Water } from "three/examples/jsm/objects/Water"
//导入天空
import { Sky } from 'three/examples/jsm/objects/Sky';
export default {
  name: 'Three11',
  components: {
  },
  mounted(){
    // 监听鼠标滚轮事件
    window.addEventListener("wheel",(e)=>{
      if(this.isAnimate) return
      this.isAnimate = true
      if(e.deltaY>0){
        this.sceneIndex.value++
        if(this.sceneIndex.value>this.scenesArr.length-1){
          this.sceneIndex.value = 0
        }
      }
      console.log("this.sceneIndex.value",this.sceneIndex.value)
      this.scenesArr[this.sceneIndex.value].callback()
      setTimeout(() => {
        this.isAnimate = false;
      }, 1000);
    },false)
    this.init()
  },
  data(){
    return {
      // 滚轮的防抖节流
      isAnimate:false,
      sceneIndex:{
        value:0
      },
      scenesArr:[
        {
          text:"日子过得很慢",
          callback:()=>{
            //执行换位函数
            this.translateCamera(
              new THREE.Vector3(100, 100, 100),
              new THREE.Vector3(5, 3, 19)
            )
          }
        },
        {
          text:"生活过得很烂",
          callback:()=>{
            //执行换位函数
            this.translateCamera(
              new THREE.Vector3(5,3,19),
              new THREE.Vector3(0,0,0)
            )
          }
        },
        {
          text:"除了想你",
          callback:()=>{
            //执行换位函数
            this.translateCamera(
              new THREE.Vector3(10,3,0),
              new THREE.Vector3(5,2,0)
            )
          }
        },
        {
          text:"其他我什么都做不好",
          callback:()=>{
            //执行换位函数
            this.translateCamera(
              new THREE.Vector3(62,13,22),
              new THREE.Vector3(0,0,0)
            )
          }
        },
        {
          text:"我爱你玉玉子",
          callback:()=>{
            //执行换位函数
            this.translateCamera(
              new THREE.Vector3(38,24,25),
              new THREE.Vector3(5,2,0)
            )
          }
        }
      ],
      timeLine1:gsap.timeline(),
      timeline2:gsap.timeline(),
      camera: null,  //相机对象
      scene: null,  //场景对象
      renderer: null,  //渲染器对象
      mesh: null,  //网格模型对象Mesh
      light:null, //平行光源
      water:null, //水面
      hdrLoader:null,
      mesh2:null,
      gltfLoader:null,
      dracoLoader:null,
      controls:null, //轨道控制器
      material2:null, //父元素
      planeMesh:null, //平面
      rgbeLoacer:null,
      clockTime:null,
      sphere1:null,
    }
  },
  methods:{
    init(){
      // let container = document.body;
      //创建一个场景
      this.scene = new THREE.Scene()
      //初始化相机
      this.camera = new THREE.PerspectiveCamera(75,window.innerWidth/window.innerHeight,0.1,1000)
      //设置相机位置
      this.camera.position.set(100,100,100)
      //设置相机的宽高比
      this.camera.aspect = window.innerWidth/window.innerHeight
      //更新投影矩阵,设置后调用.updateProjectionMatrix()来使得改变生效
      this.camera.updateProjectionMatrix()
      //初始化渲染器
      this.renderer = new THREE.WebGLRenderer({
        //设置抗锯齿
        antialias: true,
        toneMapping:THREE.ACESFilmicToneMapping
      })
     this.renderer.outputEncoding = THREE.sRGBEncoding;
      this.renderer.toneMapping = THREE.ACESFilmicToneMapping;
      this.renderer.toneMappingExposure = 0.5;
      this.renderer.shadowMap.enabled = true;
      this.renderer.physicallyCorrectLights = true;
      //设置渲染器
      this.renderer.setSize(window.innerWidth,window.innerHeight)
      //将渲染元素画布最佳到body中去
      document.body.appendChild(this.renderer.domElement)
      // 设置水面效果

      //初始化控制器
      this.controls = new OrbitControls(this.camera,this.renderer.domElement)
      // //添加阻尼带有惯性
      this.controls.enableDamping = true
      // //设置阻尼系数
      this.controls.dampingFactor = 0.05

      //加载环境纹理
      // this.rgbeLoacer = new RGBELoader()
      // this.rgbeLoacer.load("textures/sky.hdr",(textures)=>{
      //   textures.mapping = THREE.EquirectangularReflectionMapping
      //   this.scene.background = textures
      //   // 设置场景中没有纹理物体的默认纹理
      //   this.scene.environment = textures
      // })
      // 实例化加载器draco
      this.dracoLoader = new DRACOLoader()
      //初始化GLTF模式加载
      this.gltfLoader = new GLTFLoader()
      //设置文件路径
      this.dracoLoader.setDecoderPath("draco/")
      //设置把gltf加载器draco解码器
      this.gltfLoader.setDRACOLoader(this.dracoLoader)
      this.gltfLoader.load("model/scene.glb",(gltf)=>{
        const model = gltf.scene
        model.traverse((child)=>{
          if(child.name=='Plane'){
            child.visible = false
          }
          if (child.isMesh) {
            child.castShadow = true;
            child.receiveShadow = true;
          }
          console.log("child",child.name)
        })
        this.scene.add( gltf.scene );
      })
      //添加一个水面
      const waterGeometry = new THREE.CircleGeometry(300,23)
      //创建睡眠实例
      this.water = new Water(waterGeometry,
       {
        textureWidth: 512,
        textureHeight: 512,
        // 纹理图片
        waterNormals: new THREE.TextureLoader().load(
          "textures/waternormals.jpg",
          function (texture) {
            texture.wrapS = texture.wrapT = THREE.RepeatWrapping;
          },
        ),
						sunDirection: new THREE.Vector3(),
						sunColor: 0xffffff,
						waterColor: 0x001e0f,
						distortionScale: 3.7,
						fog: this.scene.fog !== undefined
      });
      this.water.rotation.x = - Math.PI / 2;
			this.scene.add( this.water );
      const sky = new Sky();
      sky.scale.setScalar( 10000 );
      this.scene.add( sky );
      const skyUniforms = sky.material.uniforms;
      const sun = new THREE.Vector3();
      const sceneEnv = new THREE.Scene();
      const parameters = {
        elevation: 5,
        azimuth: 180
      };
      const pmremGenerator = new THREE.PMREMGenerator( this.renderer );
      let renderTarget;
      skyUniforms[ 'turbidity' ].value = 10;
      skyUniforms[ 'rayleigh' ].value = 2;
      skyUniforms[ 'mieCoefficient' ].value = 0.005;
      skyUniforms[ 'mieDirectionalG' ].value = 0.8;
      const phi = THREE.MathUtils.degToRad( 90 - parameters.elevation );
      const theta = THREE.MathUtils.degToRad( parameters.azimuth );

      sun.setFromSphericalCoords( 1, phi, theta );
      sky.material.uniforms[ 'sunPosition' ].value.copy( sun );
      this.water.material.uniforms[ 'sunDirection' ].value.copy( sun ).normalize();
      if ( renderTarget !== undefined ){
        renderTarget.dispose();
      }
      sceneEnv.add( sky );
      renderTarget = pmremGenerator.fromScene( sceneEnv );
      this.scene.add( sky );
      this.scene.environment = renderTarget.texture;
      //创建点光源组
      const pointLightGroup = new THREE.Group()
      pointLightGroup.position.set(-8, 2.5, -1.5);
      let pointLightArr = []
      let radius = 5;
      //循环渲染点光源
      for (let i = 0; i < 3; i++) {
        // 创建球体当灯泡
        const sphereGeometry = new THREE.SphereGeometry(0.2, 32, 32);
        const sphereMaterial = new THREE.MeshStandardMaterial({
          color: 0xffffff,
          emissive: 0xffffff,
          emissiveIntensity: 10,
        });
        const sphere = new THREE.Mesh(sphereGeometry, sphereMaterial);
        pointLightArr.push(sphere);
        sphere.position.set(
          radius * Math.cos((i * 2 * Math.PI) / 3),
          Math.cos((i * 2 * Math.PI) / 3),
          radius * Math.sin((i * 2 * Math.PI) / 3)
        );
        let pointLight = new THREE.PointLight(0xffffff, 50);
        sphere.add(pointLight);
        pointLightGroup.add(sphere);
      }
      this.scene.add(pointLightGroup);
      // 使用补间函数,从0到2π,使灯泡旋转
      let options = {
        angle: 0,
      };
      gsap.to(options, {
        angle: Math.PI * 2,
        duration: 10,
        repeat: -1,
        ease: "linear",
        onUpdate: () => {
          pointLightGroup.rotation.y = options.angle;
          pointLightArr.forEach((item, index) => {
            item.position.set(
              radius * Math.cos((index * 2 * Math.PI) / 3),
              Math.cos((index * 2 * Math.PI) / 3 + options.angle * 5),
              radius * Math.sin((index * 2 * Math.PI) / 3)
            );
          });
        },
      });
      //添加光源
      this.light = new THREE.DirectionalLight(0xffffff,1)
      this.light.position.set(0,50,0)
      this.scene.add(this.light)
      //添加点光源
      const pointLight = new THREE.PointLight(0xffffff,30)
      pointLight.position.set(0.5,2.3,0)
      pointLight.castShadow = true
      this.scene.add(pointLight)
      //实例化一个gui对象
      const gui = new GUI()
      gui.add(this.camera.position,'x').max(100).min(-10).name('x的位置').step(1)
      gui.add(this.camera.position,'y').max(100).min(-10).name('y的位置').step(1)
      gui.add(this.camera.position,'z').max(100).min(-10).name('z的位置').step(1)
      this.render()
    },
    //渲染函数  “”
    render(){
      this.controls.update()
      const time = performance.now() * 0.001;
      requestAnimationFrame( this.render );
      this.water.material.uniforms[ 'time' ].value += 1.0 / 60.0;
      this.renderer.render( this.scene, this.camera );
    },
    // 定义相机移动函数
    translateCamera(position, target){
      this.timeLine1.to(this.camera.position,{
        x:position.x,
        y:position.y,
        z:position.z,
        duration:1, //持续时间
        ease:"power2.inOut" //控制动画期间的变化率,默认"power1.out"
      })
      // this.timeline2.to(this.controls.target,{
      //   x:target.x,
      //   y:target.y,
      //   z:target.z,
      //   duration:1, //持续时间
      //   ease:"power2.inOut" //控制动画期间的变化率,默认"power1.out"
      // })
    },
  }
}
</script>
<style>
*{
  margin: 0;
  padding: 0;
}
canvas{
  width: 100%;
  height: 100%;
  position: fixed;
  left: 0;
  top: 0;
}
</style>
补充中~


 2466
2466

 被折叠的 条评论
为什么被折叠?


