Linux0.11操作系统(哈工大李治军老师)实验楼实验4-进程运行轨迹的跟踪与统计
实验内容
1.基于模板 process.c 编写多进程的样本程序,实现如下功能: + 所有子进程都并行运行,每个子进程的实际运行时间一般不超过 30 秒; + 父进程向标准输出打印所有子进程的 id,并在所有子进程都退出后才退出;
2.在 Linux0.11 上实现进程运行轨迹的跟踪。 + 基本任务是在内核中维护一个日志文件 /var/process.log,把从操作系统启动到系统关机过程中所有进程的运行轨迹都记录在这一 log 文件中
3.在修改过的 0.11 上运行样本程序,通过分析 log 文件,统计该程序建立的所有进程的等待时间、完成时间(周转时间)和运行时间,然后计算平均等待时间,平均完成时间和吞吐量。可以自己编写统计程序,也可以使用 python 脚本程序—— stat_log.py(在 /home/teacher/ 目录下) ——进行统计。
4.修改 0.11 进程调度的时间片,然后再运行同样的样本程序,统计同样的时间数据,和原有的情况对比,体会不同时间片带来的差异。
/var/process.log 文件的格式必须为:
pid X time
X 可以是 N、J、R、W 和 E 中的任意一个,分别表示进程新建(N)、进入就绪态(J)、进入运行态®、进入阻塞态(W) 和退出(E);
time 表示 X 发生的时间。这个时间不是物理时间,而是系统的滴答时间(tick)
1.process.c
process.c 的模板如下所示
#include <stdio.h>
#include <unistd.h>
#include <time.h>
#include <sys/times.h>
#define HZ 100
void cpuio_bound(int last, int cpu_time, int io_time);
int main(int argc, char * argv[])
{
return 0;
}
/*
* 此函数按照参数占用CPU和I/O时间
* last: 函数实际占用CPU和I/O的总时间,不含在就绪队列中的时间,>=0是必须的
* cpu_time: 一次连续占用CPU的时间,>=0是必须的
* io_time: 一次I/O消耗的时间,>=0是必须的
* 如果last > cpu_time + io_time,则往复多次占用CPU和I/O,直到总运行时间超过last为止
* 所有时间的单位为秒
*/
void cpuio_bound(int last, int cpu_time, int io_time)
{
struct tms start_time, current_time;
clock_t utime, stime;
int sleep_time;
while (last > 0)
{
/* CPU Burst */
times(&start_time);
/* 其实只有t.tms_utime是真正的CPU时间,但我们是在模拟一个只在用户状态运行的CPU大户
* 就像for(;;);所以把t.tms_stime加上很合理*/
do
{
times(¤t_time);
utime = current_time.tms_utime - start_time.tms_utime;
stime = current_time.tms_stime - start_time.tms_stime;
//这里借鉴别人的解释,一个系统中断10ms,相当于一个滴答,(utime + stime) / HZ相当于(utime + stime)*0.01
} while ( ( (utime + stime) / HZ ) < cpu_time );
last -= cpu_time;
if (last <= 0 )
break;
/* IO Burst */
/* 用sleep(1)模拟1sI/O操作 */
sleep_time=0;
while (sleep_time < io_time)
{
sleep(1);
sleep_time++;
}
last -= sleep_time;
}
}
它主要实现了一个函数:
/*
 * 此函数按照参数占用CPU和I/O时间
 * last: 函数实际占用CPU和I/O的总时间,不含在就绪队列中的时间,>=0是必须的
 * cpu_time: 一次连续占用CPU的时间,>=0是必须的
 * io_time: 一次I/O消耗的时间,>=0是必须的
 * 如果last > cpu_time + io_time,则往复多次占用CPU和I/O,直到总运行时间超过last为止
 * 所有时间的单位为秒
 */
cpuio_bound(int last, int cpu_time, int io_time);
下面是 4 个使用的例子:
// 比如一个进程如果要占用10秒的CPU时间,它可以调用:
cpuio_bound(10, 1, 0);
// 只要cpu_time>0,io_time=0,效果相同
// 以I/O为主要任务:
cpuio_bound(10, 0, 1);
// 只要cpu_time=0,io_time>0,效果相同
// CPU和I/O各1秒钟轮回:
cpuio_bound(10, 1, 1);
// 较多的I/O,较少的CPU:
// I/O时间是CPU时间的9倍
cpuio_bound(10, 1, 9);
process.c 中的struct tms的定义为:
/*
函数名: times
头文件: #include<sys/times>
函数声明: clock_t times(struct tms *buf);
man帮助查看: man 2 times
*/
//参数介绍:
//1. clock_t
typedef long int clock_t
//2. tms
struct tms {
    clock_t tms_utime; /* user time */
    clock_t tms_stime; /* system time */
    clock_t tms_cutime; /* user time of children */
    clock_t tms_cstime; /* system time of children */
};
/*
概念:
1.实际时间(real time):从命令行执行到运行终止的消逝时间

2.用户CPU时间(user CPU time):命令执行完成花费的系统CPU时间,即命令在用户态中执行时的总和

3.系统CPU时间(system CPU time):命令执行完成花费的系统CPU时间,即命令在核心态中执行时间的总和。

4.cutime是用户CPU时间+子进程用户CPU时间。cstime同理。
*/
times函数:
头文件:<sys/times.h>
原型:
clock_t times(struct tms *buf);
正确返回墙上时钟经过时间, 出错返回-1 ;可精确统计程序代码运行时间,区分用户态与内核态耗时。
接下来实现第一个任务
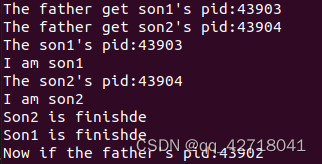
实现如下功能: + 所有子进程都并行运行,每个子进程的实际运行时间一般不超过 30 秒; + 父进程向标准输出打印所有子进程的 id,并在所有子进程都退出后才退出;也就是我们要编写main函数以实现上述任务
int main()
{

    pid_t father, son1, son2, son3, tmp1, tmp2, tmp3;
    tmp1 = fork();
    if(tmp1 == 0) //子进程
    {
        son1 = getpid();
        printf("The son1's pid:%d\n", son1);
        printf("I am son1\n");
        cpuid_bound(10, 3, 2);
        printf("Son1 is finishde\n");
    }
    else if(tmp1 > 0)    //父进程
    {
        son1 = tmp1;
        tmp2 = fork();  //父进程下创立子进程
        if(tmp2 == 0)   //子进程
        {
            son2 = getpid();
            printf("The son2's pid:%d\n", son2);
            printf("I am son2\n");
            cpuid_bound(5, 1, 2);
            printf("Son2 is finishde\n");
        }
        else if(tmp2 > 0) //父进程
        {
            son2 = tmp2;
            father = getpid();
            printf("The father get son1's pid:%d\n", tmp1);
            printf("The father get son2's pid:%d\n", tmp2);
            wait((int *)NULL);
            wait((int *)NULL);
            printf("Now if the father's pid:%d\n", father);
        }
        else
            printf("Creat son2 failed\n");
    }
    else
        printf("creat son1 failed\n");
    return 0;
}
在Ubuntu上编译:
gcc -o process process.c
./process

2.编写log文件
操作系统启动后先要打开 /var/process.log,然后在每个进程发生状态切换的时候向 log 文件内写入一条记录,其过程和用户态的应用程序没什么两样。然而,因为内核状态的存在,使过程中的很多细节变得完全不一样。
为了能尽早开始记录,应当在内核启动时就打开 log 文件。内核的入口是 init/main.c 中的 main()(Windows 环境下是 start()),其中一段代码是:
//……
move_to_user_mode();
if (!fork()) {        /* we count on this going ok */
    init();
}
//……
这段代码在进程 0 中运行,先切换到用户模式,然后全系统第一次调用 fork() 建立进程 1。进程 1 调用 init()。
在 init()中:
// ……
//加载文件系统
setup((void *) &drive_info);

// 打开/dev/tty0,建立文件描述符0和/dev/tty0的关联
(void) open("/dev/tty0",O_RDWR,0);

// 让文件描述符1也和/dev/tty0关联
(void) dup(0);

// 让文件描述符2也和/dev/tty0关联
(void) dup(0);

// ……
这段代码建立了文件描述符 0、1 和 2,它们分别就是 stdin、stdout 和 stderr。这三者的值是系统标准(Windows 也是如此),不可改变。
其中 dup(0)函数定义在include/unistd.h 531行:
/* Duplicate FD, returning a new file descriptor on the same file.  */
extern int dup (int __fd) __THROW __wur;
可以把 log 文件的描述符关联到 3。文件系统初始化,描述符 0、1 和 2 关联之后,才能打开 log 文件,开始记录进程的运行轨迹。
为了能尽早访问 log 文件,我们要让上述工作在进程 0 中就完成。所以把这一段代码从 init() 移动到 main() 中,放在 move_to_user_mode() 之后(不能再靠前了),同时加上打开 log 文件的代码。
修改后的 main() 如下:
setup((void *) &drive_info);
	(void) open("/dev/tty0",O_RDWR,0);
	(void) dup(0);
	(void) dup(0);
	(void) open("/var/process.log",O_CREAT|O_TRUNC|O_WRONLY,0666);

	if (!fork()) {		/* we count on this going ok */
		init();
	}
其中open函数中
//O_CREAT:如果没有前面的文件,就建立;
//O_TRUNC:将文件清空
//O_WRONLY:只写的方式打开
//0666:文件权限
log 文件将被用来记录进程的状态转移轨迹。所有的状态转移都是在内核进行的。
在内核状态下,write() 功能失效,其原理等同于《系统调用》实验中不能在内核状态调用 printf(),只能调用 printk()。编写可在内核调用的 write() 的难度较大,所以这里直接给出源码。它主要参考了 printk() 和 sys_write() 而写成的:
#include "linux/sched.h"
#include "sys/stat.h"

static char logbuf[1024];
int fprintk(int fd, const char *fmt, ...)
{
    va_list args;
    int count;
    struct file * file;
    struct m_inode * inode;

    va_start(args, fmt);
    count=vsprintf(logbuf, fmt, args);
    va_end(args);
/* 如果输出到stdout或stderr,直接调用sys_write即可 */
    if (fd < 3)
    {
        __asm__("push %%fs\n\t"
            "push %%ds\n\t"
            "pop %%fs\n\t"
            "pushl %0\n\t"
        /* 注意对于Windows环境来说,是_logbuf,下同 */
            "pushl $logbuf\n\t"
            "pushl %1\n\t"
        /* 注意对于Windows环境来说,是_sys_write,下同 */
            "call sys_write\n\t"
            "addl $8,%%esp\n\t"
            "popl %0\n\t"
            "pop %%fs"
            ::"r" (count),"r" (fd):"ax","cx","dx");
    }
    else
/* 假定>=3的描述符都与文件关联。事实上,还存在很多其它情况,这里并没有考虑。*/
    {
    /* 从进程0的文件描述符表中得到文件句柄 */
        if (!(file=task[0]->filp[fd]))
            return 0;
        inode=file->f_inode;

        __asm__("push %%fs\n\t"
            "push %%ds\n\t"
            "pop %%fs\n\t"
            "pushl %0\n\t"
            "pushl $logbuf\n\t"
            "pushl %1\n\t"
            "pushl %2\n\t"
            "call file_write\n\t"
            "addl $12,%%esp\n\t"
            "popl %0\n\t"
            "pop %%fs"
            ::"r" (count),"r" (file),"r" (inode):"ax","cx","dx");
    }
    return count;
}
关于printk函数的解析:printk解析
因为和 printk 的功能近似,建议将此函数放入到 kernel/printk.c 中。fprintk() 的使用方式类同与 C 标准库函数 fprintf(),唯一的区别是第一个参数是文件描述符,而不是文件指针。
例如:
// 向stdout打印正在运行的进程的ID
fprintk(1, "The ID of running process is %ld", current->pid);

// 向log文件输出跟踪进程运行轨迹
fprintk(3, "%ld\t%c\t%ld\n", current->pid, 'R', jiffies);
//X 可以是 N、J、R、W 和 E 中的任意一个,分别表示进程新建(N)、
//进入就绪态(J)、进入运行态®、进入阻塞态(W) 和退出(E);
jiffies 在 kernel/sched.c 文件中定义为一个全局变量:
long volatile jiffies=0;
必须找到所有发生进程状态切换的代码点,并在这些点添加适当的代码,来输出进程状态变化的情况到 log 文件中。
1.在kernel/fork.c中的 copy_process()中添加:
int copy_process(int nr,……)
{
    struct task_struct *p;	//PCB
//    ……
// 获得一个 task_struct 结构体空间
    p = (struct task_struct *) get_free_page();
//    ……
    p->pid = last_pid;
//    ……
// 设置 start_time 为 jiffies
    p->start_time = jiffies;
//       ……
/*******************************************/
//更改 向日志文件打印
    fprintk(3, "%ld\t%c\t%ld\n", p->pid, 'N', jiffies);
/* 设置进程状态为就绪。所有就绪进程的状态都是
   TASK_RUNNING(0),被全局变量 current 指向的
   是正在运行的进程。*/
    p->state = TASK_RUNNING;
//向日志打印,修改状态
    fprintk(3, "%ld\t%c\t%ld\n", p->pid, 'J', jiffies);
    return last_pid;
}
在kernel/sched.c 中添加:
//sleep_on不可中断睡眠:该进程只能被wake_up()函数明确唤醒,进入就绪态;
//该状态通常在不受干扰地等待或者所等待事件会很快发生时使用
void sleep_on(struct task_struct **p)	//task_struct:PCB,双指针为一个指向PCB表头的地址
{
    struct task_struct *tmp;
//    ……
    tmp = *p;
// 仔细阅读,实际上是将 current 插入“等待队列”头部,tmp 是原来的头部
    *p = current;
// 切换到睡眠态
    current->state = TASK_UNINTERRUPTIBLE;
// 让出 CPU
    schedule();
// 唤醒队列中的上一个(tmp)睡眠进程。0 换作 TASK_RUNNING 更好
// 在记录进程被唤醒时一定要考虑到这种情况,实验者一定要注意!!!
    if (tmp)
        tmp->state=0;

/*******************************************/
//更改,将信息存入log文件
    fprintk(3, "%ld\t%c\t%ld\n", (*p)->pid, 'J', jiffies);
}
/* TASK_UNINTERRUPTIBLE和TASK_INTERRUPTIBLE的区别在于不可中断的睡眠
 * 只能由wake_up()显式唤醒,再由上面的 schedule()语句后的
 *
 *   if (tmp) tmp->state=0;
 *
 * 依次唤醒,所以不可中断的睡眠进程一定是按严格从“队列”(一个依靠
 * 放在进程内核栈中的指针变量tmp维护的队列)的首部进行唤醒。而对于可
 * 中断的进程,除了用wake_up唤醒以外,也可以用信号(给进程发送一个信
 * 号,实际上就是将进程PCB中维护的一个向量的某一位置位,进程需要在合
 * 适的时候处理这一位。感兴趣的实验者可以阅读有关代码)来唤醒,如在
 * schedule()中:
 *
 *  for(p = &LAST_TASK ; p > &FIRST_TASK ; --p)
 *      if (((*p)->signal & ~(_BLOCKABLE & (*p)->blocked)) &&
 *         (*p)->state==TASK_INTERRUPTIBLE)
 *         (*p)->state=TASK_RUNNING;//唤醒
 *
 * 就是当进程是可中断睡眠时,如果遇到一些信号就将其唤醒。这样的唤醒会
 * 出现一个问题,那就是可能会唤醒等待队列中间的某个进程,此时这个链就
 * 需要进行适当调整。interruptible_sleep_on和sleep_on函数的主要区别就
 * 在这里。
 */
void interruptible_sleep_on(struct task_struct **p)
{
    struct task_struct *tmp;
       …
    tmp=*p;
    *p=current;
repeat:    current->state = TASK_INTERRUPTIBLE;
/*******************************************/
//更改,筛掉进程0, 在main()中,进程0进行完中断后,进入pause()状态
    if(current->pid != 0)
        fprintk(3, "%ld\t%c\t%ld\n", (*p)->pid, 'W', jiffies);	//阻塞
    schedule();
// 如果队列头进程和刚唤醒的进程 current 不是一个,
// 说明从队列中间唤醒了一个进程,需要处理
    if (*p && *p != current) {
 // 将队列头唤醒,并通过 goto repeat 让自己再去睡眠
        (**p).state=0;
        fprintk(3, "%ld\t%c\t%ld\n", (*p)->pid, 'J', jiffies);
        goto repeat;
    }
    *p=NULL;
//作用和 sleep_on 函数中的一样
    if (tmp){
        tmp->state=0;
        /*******************************************/
        //更改
    	fprintk(3, "%ld\t%c\t%ld\n", (*p)->pid, 'J', jiffies);}
}
在kernel/sched.c中添加:
void wake_up(struct task_struct **p)
{
	if (p && *p) {
        if((**p).state != TASK_RUNNING){
            (**p).state=TASK_RUNNING;
/*******************************************/
            fprintk(3, "%ld\t%c\t%ld\n", (*p)->pid, 'J', jiffies);
        }
    }
}
schedule() 调度函数中:
//后文有schedule算法的详细代码,这里仅仅说一下改动了什么
/* check alarm, wake up any interruptible tasks that have got a signal */
for(p = &LAST_TASK ; p > &FIRST_TASK ; --p)
		if (*p) {
			if ((*p)->alarm && (*p)->alarm < jiffies) {
					(*p)->signal |= (1<<(SIGALRM-1));
					(*p)->alarm = 0;
            }
//如果除了被阻塞信号外还有其他信号并且任务处于可中断状态,则将任务置为就绪状态
//~(_BLOCKABLE & (*p)->blocked   忽略被阻塞信号
			if (((*p)->signal & ~(_BLOCKABLE & (*p)->blocked)) &&
			(*p)->state==TASK_INTERRUPTIBLE){
				(*p)->state=TASK_RUNNING;	//置为就绪状态
                /*******************************************/
            	fprintk(3, "%ld\t%c\t%ld\n", (*p)->pid, 'J', jiffies);
            }
		}

while (1) {
    c = -1; next = 0; i = NR_TASKS; p = &task[NR_TASKS];

// 找到 counter 值最大的就绪态进程
    while (--i) {
        if (!*--p)    continue;
        if ((*p)->state == TASK_RUNNING && (*p)->counter > c)
            c = (*p)->counter, next = i;
    }

// 如果有 counter 值大于 0 的就绪态进程,则退出
    if (c) break;

// 如果没有:
// 所有进程的 counter 值除以 2 衰减后再和 priority 值相加,
// 产生新的时间片
    for(p = &LAST_TASK ; p > &FIRST_TASK ; --p)
          if (*p) (*p)->counter = ((*p)->counter >> 1) + (*p)->priority;
}
/*******************************************/
//更改,切换到相同的进程不输出
if(current != task[next])
{
    if(current->state == TASK_RUNNING)
        fprintk(3, "%ld\t%c\t%ld\n", current->pid, 'J', jiffies);
    fprintk(3, "%ld\t%c\t%ld\n", task[next]->pid, 'R', jiffies);
}
// 切换到 next 进程
switch_to(next);
sys_pause() 中:
//主动睡眠
int sys_pause(void)
{
	current->state = TASK_INTERRUPTIBLE;
/*******************************************/
//更改,除了进程0, 主动进入可中断睡眠的,都要记录
    if(current->pid != 0)
    	fprintk(3, "%ld\t%c\t%ld\n", current->pid, 'W', jiffies);
	schedule();
	return 0;
}
父进程执行kernel/exit.c,要等待当前进程的子进程退出,这时就挂起当前进程。如果子进程已经退出或者进入了僵死进程(指该进程已结束,但没有其父进程调用wait()函数询问其状态,为了要父进程获得其停止运行的信息,该进程的信息PCB一直保留),此次调用返回,并将资源释放。如果是僵死进程,父进程会将子进程的执行时间累加至自己的进程中。
在kernel/exit.c中添加:
int sys_waitpid(pid_t pid,unsigned long * stat_addr, int options)
{
	int flag, code;
	struct task_struct ** p;
//    ……
//    ……
	if (flag) {
		if (options & WNOHANG)
			return 0;
		current->state=TASK_INTERRUPTIBLE;
/*******************************************/
//更改,同样过滤进程0
		if(current->pid != 0)
        	fprintk(3, "%ld\t%c\t%ld\n", (*p)->pid,'W', jiffies);	//阻塞
		schedule();
		if (!(current->signal &= ~(1<<(SIGCHLD-1))))
			goto repeat;
		else
			return -EINTR;
	}
	return -ECHILD;
}
在kernel/exit.c中(是的,和sys_waitpid()一个函数),结束程序时,用户程序通过exit()函数调用系统调用do_exit():
int do_exit(long code)
{

	int i;
    //释放数据和代码段的内存页
	free_page_tables(get_base(current->ldt[1]),get_limit(0x0f));
	free_page_tables(get_base(current->ldt[2]),get_limit(0x17));
    //如果有子进程,将子进程的父进程置为1
    //如果处于僵死状态,向父进程发送终止信号SIGCHLD
	for (i=0 ; i<NR_TASKS ; i++)
		if (task[i] && task[i]->father == current->pid) {
			task[i]->father = 1;
			if (task[i]->state == TASK_ZOMBIE)
				/* assumption task[1] is always init */
				(void) send_sig(SIGCHLD, task[1], 1);
		}
    //关闭当前进程开打的所有文件
	for (i=0 ; i<NR_OPEN ; i++)
		if (current->filp[i])
			sys_close(i);
    //对当前进程的工作目录pwd、根目录root、运行程序i节点进行同步操作,分别置空
	iput(current->pwd);
	current->pwd=NULL;
	iput(current->root);
	current->root=NULL;
	iput(current->executable);
	current->executable=NULL;
    //如果当前进程是领头的leader,并且有控制的终端,释放终端
	if (current->leader && current->tty >= 0)
		tty_table[current->tty].pgrp = 0;
    //如果当前进程上次使用过协程处理器,将last_task_used_math置空
	if (last_task_used_math == current)
		last_task_used_math = NULL;
    //如果上leader,终止其相关的进程
	if (current->leader)
		kill_session();
    //将当前进程置为僵死状态,并设置退出码
	current->state = TASK_ZOMBIE;
/*******************************************/
	fprintk(3, "%ld\t%c\t%ld\n", current->pid, 'E', jiffies);
	current->exit_code = code;
	tell_father(current->father);
	schedule();
	return (-1);	/* just to suppress warnings */
}
Linux 0.11 支持四种进程状态的转移:就绪到运行、运行到就绪、运行到睡眠和睡眠到就绪,此外还有新建和退出两种情况。其中就绪与运行间的状态转移是通过 schedule()(它亦是调度算法所在)完成的;运行到睡眠依靠的是 sleep_on() 和 interruptible_sleep_on(),还有进程主动睡觉的系统调用 sys_pause() 和 sys_waitpid();睡眠到就绪的转移依靠的是 wake_up()。所以只要在这些函数的适当位置插入适当的处理语句就能完成进程运行轨迹的全面跟踪了。
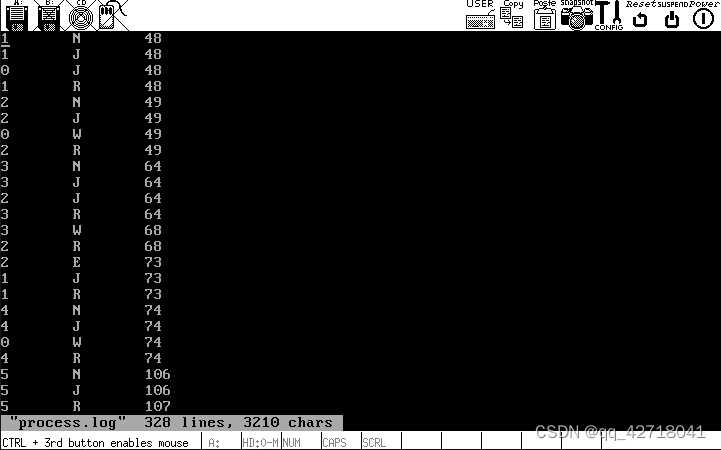
实验结果显示:

日志文件的管理与代码编写无关,有几个要点要注意:
每次关闭 bochs 前都要执行一下
sync命令,它会刷新 cache,确保文件确实写入了磁盘。
在 0.11 下,可以用ls -l /var或ll /var查看process.log是否建立,及它的属性和长度。
一定要实践《实验环境的搭建与使用》一章中关于文件交换的部分。最终肯定要把process.log文件拷贝到主机环境下处理。
在 0.11 下,可以用vi /var/process.log或more /var/process.log查看整个 log 文件。不过,还是拷贝到 Ubuntu 下看,会更舒服。
在 0.11 下,可以用tail -n NUM /var/process.log查看 log 文件的最后 NUM 行。
挂载hdc,在hdc/var中,将process.log移动到Ubuntu下查看:
sudo ./mount-hdc
cp hdc/var/process.log ./
code process.log
1    N    48    //进程1新建(init())。此前是进程0建立和运行,但为什么没出现在log文件里?
1    J    49    //新建后进入就绪队列
0    J    49    //进程0从运行->就绪,让出CPU
1    R    49    //进程1运行
2    N    49    //进程1建立进程2。2会运行/etc/rc脚本,然后退出
2    J    49
1    W    49    //进程1开始等待(等待进程2退出)
2    R    49    //进程2运行
3    N    64    //进程2建立进程3。3是/bin/sh建立的运行脚本的子进程
3    J    64
2    E    68    //进程2不等进程3退出,就先走一步了
1    J    68    //进程1此前在等待进程2退出,被阻塞。进程2退出后,重新进入就绪队列
1    R    68
4    N    69    //进程1建立进程4,即shell
4    J    69
1    W    69    //进程1等待shell退出(除非执行exit命令,否则shell不会退出)
3    R    69    //进程3开始运行
3    W    75
4    R    75
5    N    107    //进程5是shell建立的不知道做什么的进程
5    J    108
4    W    108
5    R    108
4    J    110
5    E    111    //进程5很快退出
4    R    111
4    W    116    //shell等待用户输入命令。
0    R    116    //因为无事可做,所以进程0重出江湖
4    J    239    //用户输入命令了,唤醒了shell
4    R    239
4    W    240
0    R    240
……
3.stat_log.py
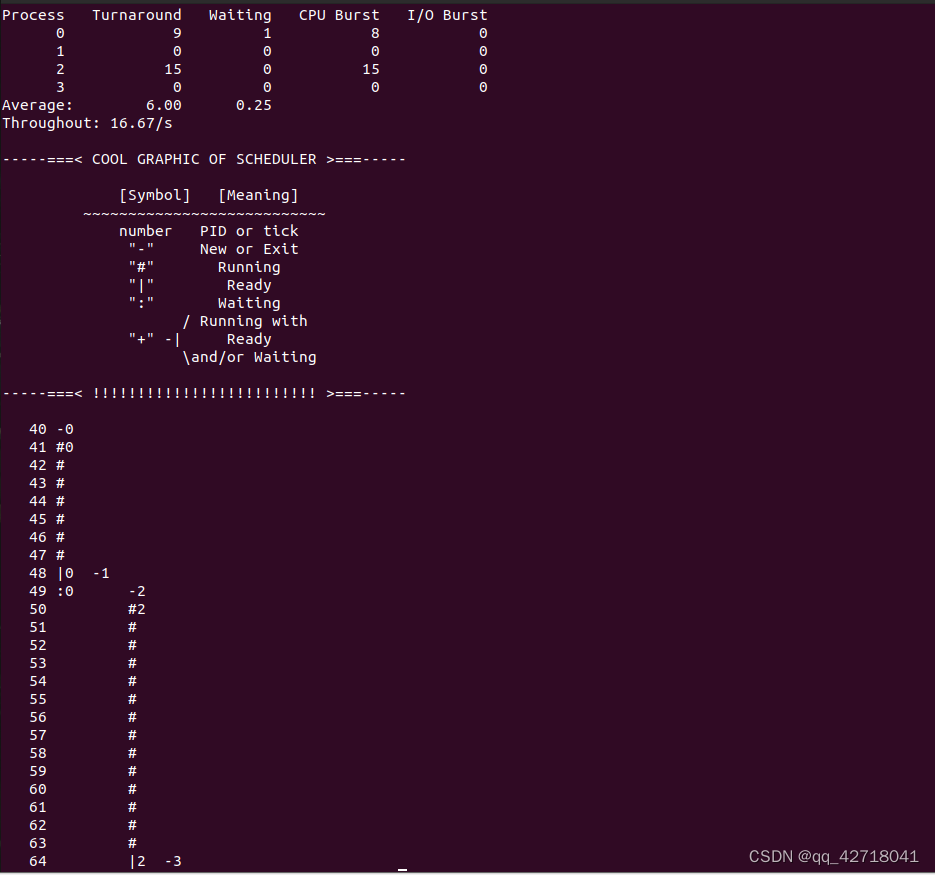
为展示实验结果,需要编写一个数据统计程序,它从 log 文件读入原始数据,然后计算平均周转时间、平均等待时间和吞吐率。
任何语言都可以编写这样的程序,实验者可自行设计。我们用 python 语言编写了一个——stat_log.py(这是 python 源程序,可以用任意文本编辑器打开)。
只要给 stat_log.py 加上执行权限(使用的命令为 chmod +x stat_log.py)就可以直接运行它。
./stat_log.py process.log 0 1 2 3 4 5 -g
得到运行结果

4.修改时间片
下面是 0.11 的调度函数 schedule,在文件 kernel/sched.c 中定义为:
while (1) {
    c = -1; next = 0; i = NR_TASKS; p = &task[NR_TASKS];

// 找到 counter 值最大的就绪态进程
    while (--i) {
        if (!*--p)    continue;
        if ((*p)->state == TASK_RUNNING && (*p)->counter > c)
            c = (*p)->counter, next = i;
    }

// 如果有 counter 值大于 0 的就绪态进程,则退出
    if (c) break;

// 如果没有:
// 所有进程的 counter 值除以 2 衰减后再和 priority 值相加,
// 产生新的时间片
    for(p = &LAST_TASK ; p > &FIRST_TASK ; --p)
          if (*p) (*p)->counter = ((*p)->counter >> 1) + (*p)->priority;
}

// 切换到 next 进程
switch_to(next);
分析代码可知,0.11 的调度算法是选取 counter 值最大的就绪进程进行调度。
其中运行态进程(即 current)的 counter 数值会随着时钟中断而不断减 1(时钟中断 10ms 一次),所以是一种比较典型的时间片轮转调度算法。
另外,由上面的程序可以看出,当没有 counter 值大于 0 的就绪进程时,要对所有的进程做 (*p)->counter = ((*p)->counter >> 1) + (*p)->priority。其效果是对所有的进程(包括阻塞态进程)都进行 counter 的衰减,并再累加 priority 值。这样,对正被阻塞的进程来说,一个进程在阻塞队列中停留的时间越长,其优先级越大,被分配的时间片也就会越大。
所以总的来说,Linux 0.11 的进程调度是一种综合考虑进程优先级并能动态反馈调整时间片的轮转调度算法。
此处要求实验者对现有的调度算法进行时间片大小的修改,并进行实验验证。
为完成此工作,我们需要知道两件事情:
进程 counter 是如何初始化的
当进程的时间片用完时,被重新赋成何值?
首先回答第一个问题,显然这个值是在 fork() 中设定的。Linux 0.11 的 fork() 会调用 copy_process() 来完成从父进程信息拷贝(所以才称其为 fork),看看 copy_process() 的实现(也在 kernel/fork.c 文件中),会发现其中有下面两条语句:
// 用来复制父进程的PCB数据信息,包括 priority 和 counter
*p = *current;

// 初始化 counter
p->counter = p->priority;
// 因为父进程的counter数值已发生变化,而 priority 不会,所以上面的第二句代码将p->counter 设置成 p->priority。
// 每个进程的 priority 都是继承自父亲进程的,除非它自己改变优先级。
// 查找所有的代码,只有一个地方修改过 priority,那就是 nice 系统调用。
int sys_nice(long increment)
{
    if (current->priority-increment>0)
        current->priority -= increment;
    return 0;
}
本实验假定没有人调用过 nice 系统调用,时间片的初值就是进程 0 的 priority,即宏 INIT_TASK 中定义的:
#define INIT_TASK \
    { 0,15,15,
// 上述三个值分别对应 state、counter 和 priority;
接下来回答第二个问题,当就绪进程的 counter 为 0 时,不会被调度(schedule 要选取 counter 最大的,大于 0 的进程),而当所有的就绪态进程的 counter 都变成 0 时,会执行下面的语句:
(*p)->counter = ((*p)->counter >> 1) + (*p)->priority;
显然算出的新的 counter 值也等于 priority,即初始时间片的大小。
当priority为15的时候,

当priority为150的时候


 本文档详细介绍了如何在Linux 0.11操作系统中编写多进程程序,实现进程运行轨迹的跟踪与统计,包括创建log文件、分析进程状态转换、使用stat_log.py进行数据统计,以及修改时间片后的对比分析。


 6271
6271

 被折叠的 条评论
为什么被折叠?


