


目录
2.2 Generate key pairs and certificate
2.3 Configure XML files in Sectools
2.7 Flash signed image on device
写在前边
Secure Boot(一) 主要讲如何在实战中使能高通平台中的secure boot功能。本片文章适合不想深入了解secure boot功能,只想完成enable secure boot工作的嵌入式软件开发工程师。后续Secure Boot(二)中会讲SecureBoot原理以及使能secure boot之后的一些常见问题。
1. Secure Boot Overview
Secure Boot是为了安全应用程序建立受信任平台的启动序列。为了确保只执行已授权的软件,安全引导使用加密身份验证来去启动一个不可变序列,已验证代码的来源。启动序列将设备置于已知的安全状态,并保护其免受软件的二进制操作和重新刷新攻击。安全引导系统将向引导过程中的每个阶段添加加密检查,此过程由设备执行所有的安全软件镜像的真实性。该额外检查可以防止任何未经授权或者恶意修改的软件在设备上运行。通过一组硬件保险丝启用了安全启动。该代码在由硬件保险丝中标识的可信实体签名后执行
2. Enable Secure Boot
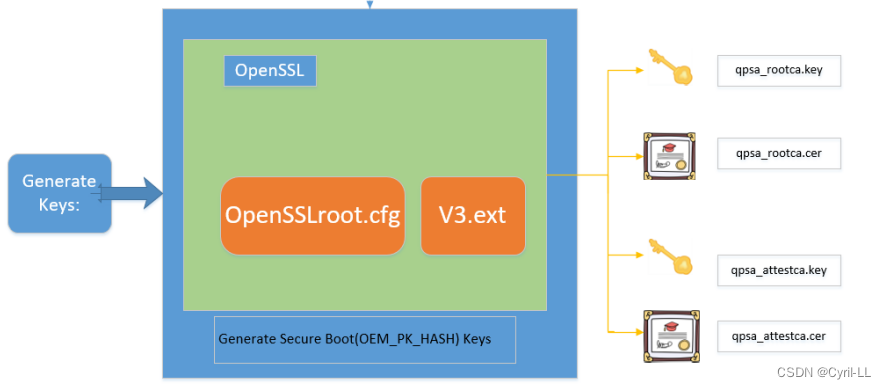
2.1 Generate secure boot keys
以MDM9X50平台为例,创建一个新的目录,例如:
cd sectools/resources/data_prov_assets/Signing/Local/ && mkdir OEM-KEYS复制sectools/resource/data_prov_assets/Signing/Local/OEM-KEYS/<sectools>
cd -
cp sectools/resources/data_prov_assets/General_Assets/Signing/openssl/opensslroot.cfg sectools/resources/data_prov_assets/Signing/Local/OEM-KEYS/
cp sectools/resources/data_prov_assets/General_Assets/Signing/openssl/v3.ext sectools/resources/data_prov_assets/Signing/Local/OEM-KEYS/
cp sectools/resources/data_prov_assets/General_Assets/Signing/openssl/v3_attest.ext sectools/resources/data_prov_assets/Signing/Local/OEM-KEYS/
cd sectools/resources/data_prov_assets/Signing/Local/OEM-KEYS/
touch config.xml && vim config.xml
编辑config.xml为:
<METACONFIG>
    <attestation_certificate_extensions>v3_attest.ext</attestation_certificate_extensions>
    <ca_certificate_extensions>v3.ext</ca_certificate_extensions>
    <openssl_configfile>opensslroot.cfg</openssl_configfile>
    <is_mrc>False</is_mrc>

    <root_pre>True</root_pre>
    <attest_ca_pre>True</attest_ca_pre>
    <attest_pre>False</attest_pre>

    <root_cert>qpsa_rootca.cer</root_cert>
    <root_private_key>qpsa_rootca.key</root_private_key>

    <attest_ca_cert>qpsa_attestca.cer</attest_ca_cert>
    <attest_ca_private_key>qpsa_attestca.key</attest_ca_private_key>

    <attest_cert_params>
    C=US
    ST=CA
    L=SANDIEGO
    O=OEM
    CN=OEM ROOT CA
    </attest_cert_params>
</METACONFIG>
2.2 Generate key pairs and certificate
我们可以根据镜像的要求选择签名算法,本文中以RSA算法为例。运行如下命令生成根CA密钥对和证书(所使用的秘钥的大小是2048,此外还支持4096)
openSSL genrsa -out qpsa_rootca.key 2048
openSSL req -new -sha256 -key qpsa_rootca.key -x509 -out rootca_pem.crt - subj /C=US/ST=California/L="San Diego"/OU="General Use Test Key (for testing 13 only)"/OU="CDMA Technologies"/O=QUALCOMM/CN="QCT Root CA 1" - days 7300 -set_serial 1 -config opensslroot.cfg -sigopt rsa_padding_mode:pss -sigopt rsa_pss_saltlen:-1 -sigopt digest:sha256
openSSL x509 -in rootca_pem.crt -inform PEM -out qpsa_rootca.cer -outform DER
openSSL x509 -text -inform DER -in qpsa_rootca.cer
运行如下命令生成认证CA密钥对和证书
openSSL genrsa -out qpsa_attestca.key 2048
openSSL req -new -key qpsa_attestca.key -out attestca.csr -subj /C=US/ ST=CA/L="San Diego"/OU="CDMA Technologies"/O=QUALCOMM/CN="QUALCOMM Attestation CA" -days 7300 -config opensslroot.cfg
openSSL x509 -req -in attestca.csr -CA rootca_pem.crt -CAkey qpsa_rootca.key -out attestca_pem.crt -set_serial 5 -days 7300 -extfile v3.ext –sha256 -sigopt rsa_padding_mode:pss -sigopt rsa_pss_saltlen:-1 - sigopt digest:sha256
openSSL x509 -inform PEM -in attestca_pem.crt -outform DER -out qpsa_attestca.cer
2.3 Configure XML files in Sectools
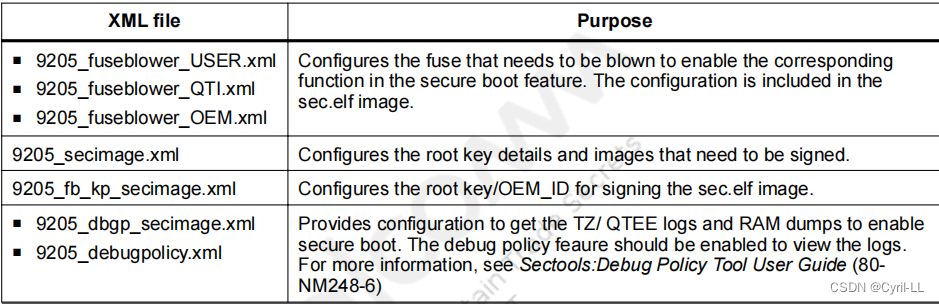
2.4 Configure PK hash in fuse
运行如下命令生成根证书的SHA-256
openssl dgst -sha256 qpsa_rootca.cer >sha256rootcert.txt更新 sectools/config/9x50/9x50_fuseblower_USER.xml
 <entry ignore="false">
 <description>SHA256 hash of the root certificate used for
signing</description>
 <name>root_cert_sha256_hash0_file</name>
 <value>./../../resources/data_prov_assets/Signing/Local/OEM-KEYS/qpsa_rootca.cer</value>
 </entry>

or
<entry ignore="false">
 <description>contains the OEM public key hash as set by OEM</
description>
 <name>root_cert_hash0</name>

<value>bdaf51b59ba21d8a243792c0e183e88bddd369ccca58bc792a3e4c22eff329e8a8c7
2d449559cd5f09ebfa5c7bf398c0</value>
 </entry>
设置OEM_Hardware_ID和OEM_Product_ID
<entry ignore="false">
<description>The OEM hardware ID</description>
<name>oem_hw_id</name>
<value>0x****</value> //Add the QTI OEM_ID.//
</entry>
<entry ignore="false">
<description>The OEM product ID</description>
<name>oem_product_id</name>
<value>0x****</value> //The OEM can select any value.//
使能 SEC_BOOT1,SEC_BOOT2,SEC_BOOT3
<entry ignore="false">
<description>PK Hash is in Fuse for SEC_BOOT1 : Apps</description>
<name>SEC_BOOT1_PK_Hash_in_Fuse</name>
<value>true</value>
</entry
<entry ignore="false">
<description>PK Hash is in Fuse for SEC_BOOT2 : MBA</description>
<name>SEC_BOOT2_PK_Hash_in_Fuse</name>
<value>true</value>
</entry
<entry ignore="false">
<description>PK Hash is in Fuse for SEC_BOOT3 : Modem</description>
<name>SEC_BOOT3_PK_Hash_in_Fuse</name>
<value>true</value>
</entry
配置sectools/config/9x50/9x50_secimage.xml
<general_properties>
 <selected_signer>local_v2</selected_signer>
 <selected_encryptor>unified_encryption_2_0</selected_encryptor>
 <selected_cert_config>OEM-KEYS</selected_cert_config>
 <cass_capability>secboot_sha2_pss_subca2</cass_capability>
 <key_size>2048</key_size>
 <exponent>65537</exponent>
设置oem_id和model_id
<oem_id>0x****</ome_id>
<model_id>0x****</model_id>
2.5 Generate sec.mbn image
运行如下命令生成sec.mbn
Python sectools.py fuseblower -p 9x50 -g -d -a --sign2.6 Sign the images
运行如下命令查看哪些镜像需要签名
python sectools.py secimage --help --chipset=9x50 --sign_id LIST以TZ镜像为例,
Python sectools.py secimage -s -i "input/tz.mbn" -g tz -p 9x50 --cfg_selected_cert_config=OEM-KEYS -o ./output_directory-s是镜像的符号
-i是镜像文件的路径
-g是与提供的镜像文件对应的标签
-p是与镜像文件对应的芯片组ID,以MDM9x50为例
--cfg_selected_cert_config是证书配置选择文件
运行如下命令签名所有的meta build中的镜像
python sectool.py secimage --meta_build=<meta_build> --chipset=9x50 --output_dir=<output_dir> --sign2.7 Flash signed image on device
1.通过qfil或者pcat烧录所有签过名的镜像至设备中,在以这一步先不要烧录sec.mbn。此时,secure boot并没有生效
2.通过qfil或者其他烧录方式,将sec.mbn烧录至设备中
fastboot flash secdata <path to sec.mbn>此时,secdata是sec.mbn在分区表中的名字
重新启动是,efuse将被熔断,设备再次重启,设备将使用签名镜像启动


 2018
2018


 被折叠的 条评论
为什么被折叠?
被折叠的 条评论
为什么被折叠?
 到【灌水乐园】发言


