


文章目录
1. 缓存简介
1. 缓存概念
缓存是介于应用程序和物理数据源之间,其作用是为了降低应用程序对物理数据源访问的频次,从而提高了应用的运行性能。缓存内的数据是对物理数据源中的数据的复制,应用程序在运行时从缓存读写数据,在特定的时刻或事件会同步缓存和物理数据源的数据。比如我们通常是直接查询MySQL数据库,那在高并发情况下,大量查询MySQL数据库会导致数据库性能变慢,因此我们在应用层与MySQL之间搭建一个Cache层,让请求先访问Cache,这样就能大大降低数据库的压力,提高性能。
2. 分布式缓存
在分布式系统开发中,系统与系统之间都属于进程级别,缓存系统也能跨进程叫分布式缓存,市面上分布式缓存技术有Memcached和Redis这两种。二者区别大致如下:
① 性能
性能上都很出色,具体到细节,由于Redis只使用单核,而Memcached可以使用多核,所以平均每一个核上Redis在存储小数据时比Memcached性能更高。而在100K以上的数据中,Memcached性能要高于Redis,虽然Redis最近也在存储大数据的性能上进行优化,但是比起 Memcached,还是稍有逊色。
② 内存空间和数据量大小
MemCached可以修改最大内存,采用LRU算法。Redis增加了VM的特性,突破了物理内存的限制。
③ 操作比较
MemCached数据结构单一,仅用来缓存数据,而Redis支持更加丰富的数据类型,也可以在服务器端直接对数据进行丰富的操作,这样可以减少网络IO次数和数据体积。
④ 可靠性
MemCached不支持数据持久化,断电或重启后数据消失,但其稳定性是有保证的。Redis支持数据持久化和数据恢复,允许单点故障,但是同时也会付出性能的代价。
⑤ 应用场景
Memcached:动态系统中减轻数据库负载,提升性能;做缓存,适合多读少写。
Redis:适用于对读写效率要求都很高,数据处理业务复杂和对安全性要求较高的系统。
⑥ 需要慎重考虑的部分
Memcached单个key-value大小有限,一个value最大只支持1MB,而Redis最大支持512MB
Memcached只是个内存缓存,对可靠性无要求;而Redis更倾向于内存数据库,因此对对可靠性方
面要求比较高
从本质上讲,Memcached只是一个单一key-value内存Cache;而Redis则是一个数据结构内存数据
库,支持多种数据类型,因此Redis除单纯缓存作用外,还可以处理一些简单的逻辑运算,Redis不
仅可以缓存,而且还可以作为数据库用
Redis还可以集群分布式,也就是说集群本身均衡客户端请求,各个节点可以交流,可拓展行、可
维护性更强大。而Memcached的集群则通过第三方才能搭建
3. 存储方式
使用Redis做缓存的话,数据的存储结构有两种,一种采用strings存储,另外使用hashes存储。那使用哪种更好呢?得具体情况具体分析:
strings存储比较简单的,固定的数据,比如存储一个简单的用户信息(用户名、昵称、头像、年龄等)。存储时需要将数据进行序列化,获取时要反序列化。在数据量较小的情况下还是可以忽略这种开销的,但如果存储的的数据可能某些属性会有些变化,比如餐厅数据中,它有likeVotes(喜欢)和dislikeVotes(不喜欢)的数量,这类变的数据,那么我们采用hashes会更好,而且存储的时候没有序列化开销,官方推荐使用hashes
2. 创建 ms-restaurants
① 导入依赖
<dependencies>
    <!-- eureka client -->
    <dependency>
        <groupId>org.springframework.cloud</groupId>
        <artifactId>spring-cloud-starter-netflix-eureka-client</artifactId>
    </dependency>
    <!-- spring web -->
    <dependency>
        <groupId>org.springframework.boot</groupId>
        <artifactId>spring-boot-starter-web</artifactId>
    </dependency>
    <!-- mysql -->
    <dependency>
        <groupId>mysql</groupId>
        <artifactId>mysql-connector-java</artifactId>
    </dependency>
    <!-- spring data redis -->
    <dependency>
        <groupId>org.springframework.boot</groupId>
        <artifactId>spring-boot-starter-data-redis</artifactId>
    </dependency>
    <!-- mybatis -->
    <dependency>
        <groupId>org.mybatis.spring.boot</groupId>
        <artifactId>mybatis-spring-boot-starter</artifactId>
    </dependency>
    <!-- commons 公共项目 -->
    <dependency>
        <groupId>com.imooc</groupId>
        <artifactId>commons</artifactId>
        <version>1.0-SNAPSHOT</version>
    </dependency>
    <!-- swagger -->
    <dependency>
        <groupId>com.battcn</groupId>
        <artifactId>swagger-spring-boot-starter</artifactId>
    </dependency>
    <!-- 单元测试 -->
    <dependency>
        <groupId>org.springframework.boot</groupId>
        <artifactId>spring-boot-starter-test</artifactId>
        <scope>test</scope>
        <exclusions>
            <exclusion>
                <groupId>org.junit.vintage</groupId>
                <artifactId>junit-vintage-engine</artifactId>
            </exclusion>
        </exclusions>
    </dependency>
</dependencies>
② 配置文件:
server:
  port: 8087 # 端口

Spring:
  application:
    name: ms-restaurants # 应用名
  # 数据库
  datasource:
    driver-class-name: com.mysql.cj.jdbc.Driver
    username: root
    password: root
    url: jdbc:mysql://127.0.0.1:3306/orgnization?serverTimezone=Asia/Shanghai&characterEncoding=utf8&useUnicode=true&useSSL=false
  # Redis
  redis:
    port: 6379
    host: 192.168.38.22
    timeout: 3000
    database: 1

# 配置 Eureka Server 注册中心
eureka:
  instance:
    prefer-ip-address: true
    instance-id: ${spring.cloud.client.ip-address}:${server.port}
  client:
    service-url:
      defaultZone: http://localhost:8080/eureka/

service:
  name:
    ms-oauth-server: http://ms-oauth2-server/
    ms-diners-server: http://ms-diners/

mybatis:
  configuration:
    map-underscore-to-camel-case: true # 开启驼峰映射
③ 启动类:
@MapperScan("com.hh.restaurants.mapper")
@SpringBootApplication
public class RestaurantApplication {
    public static void main(String[] args) {
        SpringApplication.run(RestaurantApplication.class, args);
    }
}
④ RestTemplateConfiguration 配置类:
@Configuration
public class RestTemplateConfiguration {

    @LoadBalanced
    @Bean
    public RestTemplate restTemplate() {
        RestTemplate restTemplate = new RestTemplate();
        MappingJackson2HttpMessageConverter converter = new MappingJackson2HttpMessageConverter();
        converter.setSupportedMediaTypes(Collections.singletonList(MediaType.TEXT_PLAIN));
        restTemplate.getMessageConverters().add(converter);
        return restTemplate;
    }

}
⑤ RedisTemplateConfiguration 配置类:
@Configuration
public class RedisTemplateConfiguration {

    /**
     * redisTemplate 序列化使用的jdkSerializeable, 存储二进制字节码, 所以自定义序列化类
     */
    @Bean
    public RedisTemplate<Object, Object> redisTemplate(RedisConnectionFactory redisConnectionFactory) {
        RedisTemplate<Object, Object> redisTemplate = new RedisTemplate<>();
        redisTemplate.setConnectionFactory(redisConnectionFactory);

        // 使用Jackson2JsonRedisSerialize 替换默认序列化
        Jackson2JsonRedisSerializer jackson2JsonRedisSerializer = new Jackson2JsonRedisSerializer(Object.class);

        ObjectMapper objectMapper = new ObjectMapper();
        objectMapper.setVisibility(PropertyAccessor.ALL, JsonAutoDetect.Visibility.ANY);
        jackson2JsonRedisSerializer.setObjectMapper(objectMapper);

        // 设置key和value的序列化规则
        redisTemplate.setValueSerializer(jackson2JsonRedisSerializer);
        redisTemplate.setKeySerializer(new StringRedisSerializer());

        redisTemplate.setHashKeySerializer(new StringRedisSerializer());
        redisTemplate.setHashValueSerializer(jackson2JsonRedisSerializer);

        redisTemplate.afterPropertiesSet();
        return redisTemplate;
    }
}
3. 数据库表
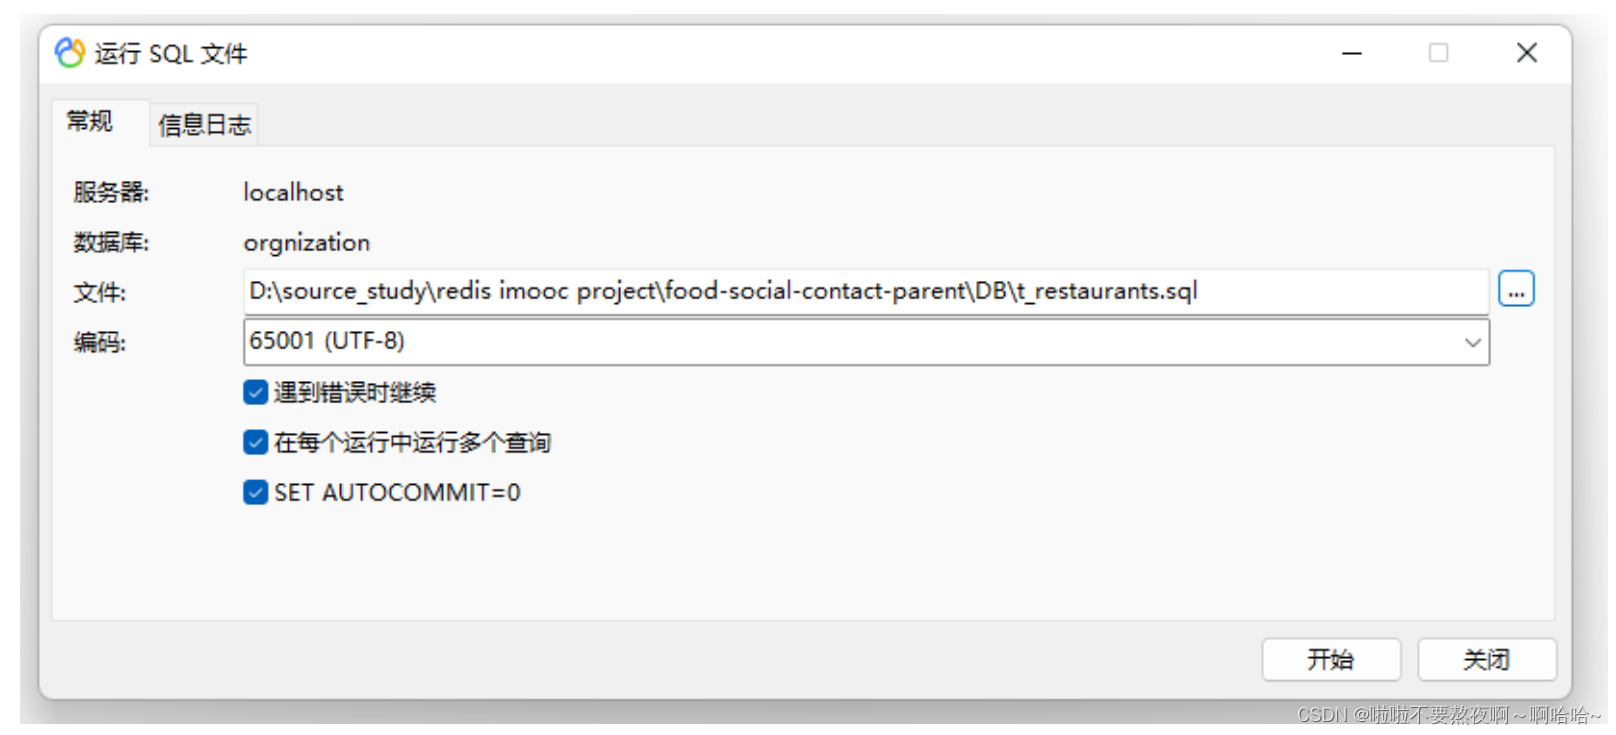
创建 t_restaurants 数据表,同时导入21W餐厅数据(数据进行了脱敏),直接运行 t_restaurants.sql SQL文件即可。
CREATE TABLE `t_restaurants` (
`id`  int(11) NOT NULL AUTO_INCREMENT ,
`name`  varchar(100) CHARACTER SET utf8 COLLATE utf8_general_ci NULL DEFAULT NULL COMMENT '餐厅英文名称' ,
`cnname`  varchar(100) CHARACTER SET utf8 COLLATE utf8_general_ci NULL DEFAULT NULL COMMENT '餐厅中文名称' ,
`x`  double NULL DEFAULT NULL COMMENT '经度' ,
`y`  double NULL DEFAULT NULL COMMENT '纬度' ,
`location`  varchar(200) CHARACTER SET utf8 COLLATE utf8_general_ci NULL DEFAULT NULL COMMENT '英文位置信息' ,
`cnlocation`  varchar(255) CHARACTER SET utf8 COLLATE utf8_general_ci NULL DEFAULT NULL COMMENT '中文位置信息' ,
`area`  varchar(100) CHARACTER SET utf8 COLLATE utf8_general_ci NULL DEFAULT NULL COMMENT '商圈,比如徐家汇' ,
`telephone`  varchar(50) CHARACTER SET utf8 COLLATE utf8_general_ci NULL DEFAULT NULL COMMENT '餐厅电话' ,
`email`  varchar(80) CHARACTER SET utf8 COLLATE utf8_general_ci NULL DEFAULT NULL COMMENT '餐厅邮箱' ,
`website`  varchar(100) CHARACTER SET utf8 COLLATE utf8_general_ci NULL DEFAULT NULL COMMENT '餐厅官网' ,
`cuisine`  varchar(80) CHARACTER SET utf8 COLLATE utf8_general_ci NULL DEFAULT NULL COMMENT '菜系' ,
`average_price`  varchar(20) CHARACTER SET utf8 COLLATE utf8_general_ci NULL DEFAULT NULL COMMENT '均价' ,
`introduction`  varchar(200) CHARACTER SET utf8 COLLATE utf8_general_ci NULL DEFAULT NULL COMMENT '介绍' ,
`thumbnail`  varchar(120) CHARACTER SET utf8 COLLATE utf8_general_ci NULL DEFAULT NULL COMMENT '缩略图' ,
`like_votes`  int(10) NULL DEFAULT 0 COMMENT '喜欢数量' ,
`dislike_votes`  int(10) NULL DEFAULT 0 COMMENT '不喜欢数量' ,
`city_id`  int(11) NULL DEFAULT 21 COMMENT '城市id' ,
`is_valid`  int(1) NULL DEFAULT 1 COMMENT '1=Valid 0=Invalid' ,
`create_date`  datetime NULL DEFAULT NULL ,
`update_date`  datetime NULL DEFAULT NULL ,
PRIMARY KEY (`id`),
INDEX `index_isvalid` (`is_valid`) USING BTREE
)
ENGINE=InnoDB
DEFAULT CHARACTER SET=utf8 COLLATE=utf8_general_ci
AUTO_INCREMENT=1
ROW_FORMAT=COMPACT
;
4. 数据库表实体类
/**
 * 实体对象公共属性
 */
@Getter
@Setter
public class BaseModel implements Serializable {
    private Integer id;
    private Date createDate;
    private Date updateDate;
    private int isValid;
}
@Getter
@Setter
@ToString
public class Restaurant extends BaseModel {
    @ApiModelProperty("英文名称")
    private String name;

    @ApiModelProperty("中文名称")
    private String cnName;

    @ApiModelProperty("纬度")
    private Float x;

    @ApiModelProperty("经度")
    private Float y;

    @ApiModelProperty("位置-英文")
    private String location;

    @ApiModelProperty("位置-中文")
    private String cnLocation;

    @ApiModelProperty("商圈")
    private String area;

    @ApiModelProperty("电话")
    private String telephone;

    @ApiModelProperty("邮箱")
    private String email;

    @ApiModelProperty("官网")
    private String website;

    @ApiModelProperty("菜系")
    private String cuisine;

    @ApiModelProperty("均价,不显示具体金额")
    private String averagePrice;

    @ApiModelProperty("介绍")
    private String introduction;

    @ApiModelProperty("缩略图")
    private String thumbnail;

    @ApiModelProperty("喜欢")
    private int likeVotes;

    @ApiModelProperty("不喜欢")
    private int dislikeVotes;

    @ApiModelProperty("城市")
    private Integer cityId;
}
5. 添加餐厅到缓存
将餐厅添加到缓存时有全量添加和增量添加
在某些特殊情况,比如初始化数据或缓存出现异常,没有将数据进行同步时,这时需要进行全量的数据同步。全量同步方式有两种,一种是逐条插入,另一种是批量插入,下面使用单元测试对两种方式进行对比。
1. 全量添加-逐条插入
① RestaurantMapper:
public interface RestaurantMapper {
    // 查询餐厅信息
    @Select("select id, name, cnName, x, y, location, cnLocation, area, telephone, " +
            "email, website, cuisine, average_price, introduction, thumbnail, like_votes," +
            "dislike_votes, city_id, is_valid, create_date, update_date" +
            " from t_restaurants")
    List<Restaurant> findAll();
}
② 单元测试:
package com.hh.restaurants;

@SpringBootTest
public class RestaurantApplicationTest {

}
逐条插入就是遍历数据集,使用redisTemplate.opsForHash().putAll(key, restaurantMap);插入即可
package com.hh.restaurants.service;

@Slf4j
public class RestaurantTest extends RestaurantApplicationTest {

    @Resource
    private RedisTemplate redisTemplate;

    @Resource
    private RestaurantMapper restaurantMapper;

    // 逐行插入
    @Test
    void testSyncForHash() {
        // 查询所有的餐厅
        List<Restaurant> restaurants = restaurantMapper.findAll();
        long start = System.currentTimeMillis();
        restaurants.forEach(restaurant -> {
            // 将每个对象转为 Map<String, Object>
            Map<String, Object> restaurantMap = BeanUtil.beanToMap(restaurant);
            String key = RedisKeyConstant.restaurants.getKey() + restaurant.getId();
            redisTemplate.opsForHash().putAll(key, restaurantMap);
        });
        long end = System.currentTimeMillis();
        log.info("执行时间:{}", end - start); // 执行时间:94218
    }
}
2. 全量添加-Pipeline管道批量插入
批量插入使用pipeline指令完成。
Redis 是一种基于客户端-服务端模型以及请求/响应协议的TCP服务。当请求进来以后,都是经过服务器进行返回,如果服务器没有响应时,其他请求进入等待。这时服务器也无法处理新请求,那有没有办法解决呢?
使用管道就能解决,即:将多个命令发送到服务器,而不用等待回复,最后在一个步骤中读取该答复。这种技术应用非常广泛比如MySQL的批量插入就如此。
package com.hh.restaurants.service;

@Slf4j
public class RestaurantTest extends RestaurantApplicationTest {

    @Resource
    private RedisTemplate redisTemplate;

    @Resource
    private RestaurantMapper restaurantMapper;

    // Pipeline 管道插入
    @Test
    void testSyncForHashPipeline() {
        // 查询所有的餐厅
        List<Restaurant> restaurants = restaurantMapper.findAll();
        long start = System.currentTimeMillis();
        List<Long> list = redisTemplate.executePipelined((RedisCallback<Long>) connection -> {
            for (Restaurant restaurant : restaurants) {
                try {
                    String key = RedisKeyConstant.restaurants.getKey() + restaurant.getId();
                    Map<String, Object> restaurantMap = BeanUtil.beanToMap(restaurant);
                    StringRedisSerializer stringRedisSerializer = new StringRedisSerializer();
                    Jackson2JsonRedisSerializer jackson2JsonRedisSerializer = new Jackson2JsonRedisSerializer(Object.class);
                    Map<byte[], byte[]> restaurantStringMap = Maps.newHashMap();
                    restaurantMap.forEach((k, v) -> {
                        restaurantStringMap.put(stringRedisSerializer.serialize(k), jackson2JsonRedisSerializer.serialize(v));
                    });
                    connection.hMSet(stringRedisSerializer.serialize(key), restaurantStringMap);
                } catch (Exception e) {
                    log.info(restaurant.toString());
                    continue;
                }
            }
            return null;
        });
        long end = System.currentTimeMillis();
        log.info("执行时间:{}", end - start); // 执行时间:22629
    }
}
3. 增量添加
当后台系统审核新餐厅通过以后,将数据写入Redis中,核心代码如下:
Map<String, Object> restaurantMap = BeanUtil.beanToMap(restaurant);
String key = RedisKeyConstant.restaurants.getKey() + restaurant.getId();
redisTemplate.opsForHash().putAll(key, restaurantMap);
6. 更新餐厅缓存
后台修改餐厅信息时(审核通过后),要进行修改,核心代码如下:
// 根据ID信息,查询餐厅信息

// 审核

// 审核通过
// 更新缓存
Map<String, Object> restaurantMap = BeanUtil.beanToMap(restaurant);
String key = RedisKeyConstant.restaurants.getKey() + restaurant.getId();
redisTemplate.opsForHash().putAll(key, restaurantMap);
当客户端食客给餐厅投票时(喜欢/不喜欢餐厅),要记得修改餐厅的likeVotes或dislikeVotes字段,跟修改餐厅不一样的地方就是,只需要修改其中likeVotes和dislikeVotes属性,不需要整体进行修改:
String key = RedisKeyConstant.restaurants.getKey() + restaurant.getId();
redisTemplate.opsForHash().increment(key, "likeVotes", 1);
redisTemplate.opsForHash().increment(key, "dislikeVotes", 1);
当用户查询餐厅时,如果餐厅没有,会查询数据库,然后在更新缓存。
7. 读取餐厅信息
1. RestaurantController
@RestController
public class RestaurantController {

    @Resource
    private RestaurantService restaurantService;
    @Resource
    private HttpServletRequest request;

    /**
     * 根据餐厅 ID 查询餐厅数据
     */
    @GetMapping("{restaurantId}")
    public ResultInfo<Restaurant> findById(@PathVariable Integer restaurantId) {
        Restaurant restaurant = restaurantService.findById(restaurantId);
        return ResultInfoUtil.buildSuccess(request.getServletPath(), restaurant);
    }
}
2. RestaurantService
@Service
@Slf4j
public class RestaurantService {

    @Resource
    public RestaurantMapper restaurantMapper;
    @Resource
    public RedisTemplate redisTemplate;

    /**
     * 根据餐厅 ID 查询餐厅数据
     */
    public Restaurant findById(Integer restaurantId) {
        // 请选择餐厅
        AssertUtil.isTrue(restaurantId == null, "请选择餐厅查看");
        // 获取 Key
        String key = RedisKeyConstant.restaurants.getKey() + restaurantId;
        // 获取餐厅缓存
        LinkedHashMap restaurantMap = (LinkedHashMap) redisTemplate.opsForHash().entries(key);
        // 如果缓存不存在,查询数据库
        Restaurant restaurant = null;
        if (restaurantMap == null || restaurantMap.isEmpty()) {
            log.info("缓存失效了,查询数据库:{}", restaurantId);
            // 查询数据库
            restaurant = restaurantMapper.findById(restaurantId);
            if (restaurant != null) {
                // 数据库中有,更新缓存
                redisTemplate.opsForHash().putAll(key, BeanUtil.beanToMap(restaurant));
            } else {
                // 数据库中没有,写入缓存一个空数据,设置一个失效时间,60s
            }
        } else {
            // 从缓存中查询到了,直接返回
            restaurant = BeanUtil.fillBeanWithMap(restaurantMap, new Restaurant(),false);
        }
        return restaurant;
    }
}
3. RestaurantMapper
public interface RestaurantMapper {

    // 根据餐厅 ID 查询餐厅信息
    @Select("select id, name, cnName, x, y, location, cnLocation, area, telephone, " +
            "email, website, cuisine, average_price, introduction, thumbnail, like_votes," +
            "dislike_votes, city_id, is_valid, create_date, update_date" +
            " from t_restaurants where id = #{id}")
    Restaurant findById(@Param("id") Integer id);
}
4. 网关 ms-gateway 配置
server:
  port: 80

spring:
  application:
    name: ms-gateway
  cloud:
    gateway:
      discovery:
        locator:
          enabled: true # 开启配置注册中心进行路由功能
          lower-case-service-id: true # 将服务名称转小写
      routes:
        - id: ms-restaurants
          uri: lb://ms-restaurants
          predicates:
            - Path=/restaurants/**
          filters:
            - StripPrefix=1

secure:
  ignore:
    urls: # 配置白名单路径
      - /restaurants/**
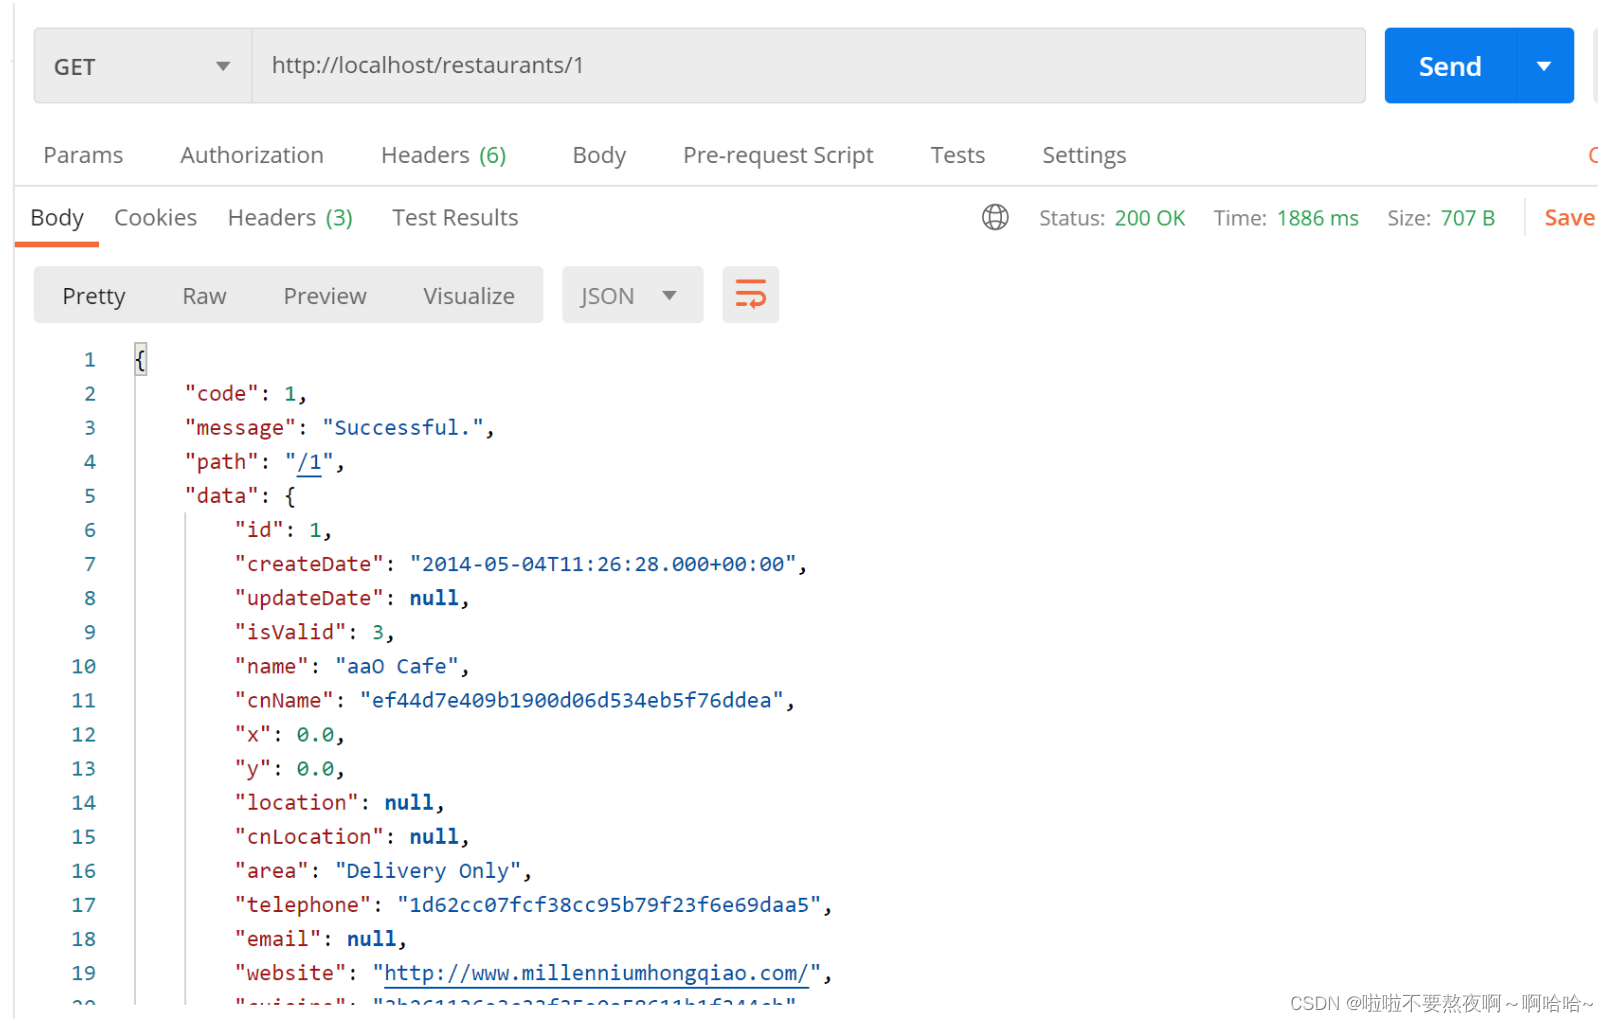
5. 启动项目测试
http://localhost/restaurants/1
8. 缓存异常解决方案
这三个问题,说句实在话,一般中小型传统软件企业,很难碰到这个问题。如果有大并发的项目,流量有几百万左右。这三个问题一定要深刻考虑。
1. 缓存击穿
缓存击穿,是指一个key非常热点,在不停的扛着大并发,大并发集中对这一个点进行访问,当这个key在失效的瞬间,持续的大并发就穿破缓存,直接请求数据库,就像在一个屏障上凿开了一个洞。做类电商项目的时候,把这货就称为“爆款”。
解决方案:
其实,大多数情况下这种爆款很难对数据库服务器造成压垮性的压力。达到这个级别的公司没有几家的。所以,对主打商品都是早早的做好了准备,让缓存永不过期。即便某些商品自己发酵成了爆款,也是直接设为永不过期就好了。
(1) 从redis上看,确实没有设置过期时间,这就保证了,不会出现热点key过期问题,也就是“物理”不过期。
(2) 从功能上看,如果不过期,那不就成静态的了吗?所以我们把过期时间存在key对应的value里,如果发现要过期了,通过一个后台的异步线程进行缓存的构建,也就是“逻辑”过期。
2. 缓存穿透
缓存穿透,是指查询一个数据库一定不存在的数据。正常的使用缓存流程大致是,数据查询先进行缓存查询,如果key不存在或者key已经过期,再对数据库进行查询,并把查询到的对象,放进缓存。如果数据库查询对象为空,则不放进缓存,就会每次都去查询数据库,而每次查询都是空,每次又都不会进行缓存。假如有恶意攻击,就可以利用这个漏洞,对数据库造成压力,甚至压垮数据库,导致所有的请求都怼到数据库上,从而数据库连接异常。
解决方案:
(1) 利用互斥锁,缓存失效的时候,先去获得锁,得到锁了,再去请求数据库。没得到锁,则休眠一段时间重试。(不推荐)
(2) 采用异步更新策略,无论key是否取到值,都直接返回。value值中维护一个缓存失效时间,缓存如果过期,异步起一个线程去读数据库,更新缓存。需要做缓存预热(项目启动前,先加载缓存)操作。
(3) 提供一个能迅速判断请求是否有效的拦截机制,比如,利用布隆过滤器,内部维护一系列合法有效的key。迅速判断出,请求所携带的Key是否合法有效。如果不合法,则直接返回。
(4) 如果从数据库查询的对象为空,也放入缓存,只是设定的缓存过期时间较短,比如设置为60秒。
3. 缓存雪崩
缓存雪崩,是指缓存同一时间大面积的失效,这个时候又来了一波请求,结果请求都怼到数据库上,从而导致数据库连接异常。
产生雪崩的原因之一,比如商城马上就要到双十一零点,很快就会迎来一波抢购,这波商品时间比较集中的放入了缓存,假设缓存一个小时。那么到了凌晨一点钟的时候,这批商品的缓存就都过期了。而对这批商品的访问查询,都落到了数据库上,对于数据库而言,就会产生周期性的压力波峰。
其实集中过期,倒不是非常致命,比较致命的缓存雪崩,是缓存服务器某个节点宕机或断网。因为自然形成的缓存雪崩,一定是在某个时间段集中创建缓存,那么那个时候数据库也是可以顶住压力的,无非就是对数据库产生周期性的压力而已。而缓存服务节点的宕机,对数据库服务器造成的压力是不可预知的,很有可能瞬间就把数据库压垮。
解决方案:
做电商项目的时候,一般是采取不同分类商品,缓存不同周期。在同一分类中的商品,加上一个随机因子。这样能尽可能分散缓存过期时间,而且,热门类目的商品缓存时间长一些,冷门类目的商品缓存时间短一些,也能节省缓存服务的资源。
(1) 给缓存的失效时间,加上一个随机值,避免集体失效。
(2) 使用互斥锁,但是该方案吞吐量明显下降了。
(3) 双缓存。我们有两个缓存,缓存A和缓存B。缓存A的失效时间为20分钟,缓存B不设失效时间。自己做缓存预热操作。然后细分以下几个小点:
a. 从缓存A读数据库,有则直接返回
b. A没有数据,直接从B读数据,直接返回,并且异步启动一个更新线程。
c. 更新线程同时更新缓存A和缓存B
9. 缓存淘汰
1. 最大内存参数
我们的redis数据库的最大缓存、主键失效、淘汰机制等参数都是通过配置文件来配置的。这个文件是我们的redis.config文件。
maxmemory :设置最大内存;

2. 内存淘汰策略
截至目前 redis 一共为我们提供了八个不同的内存置换策略。很早之前提供了6种。
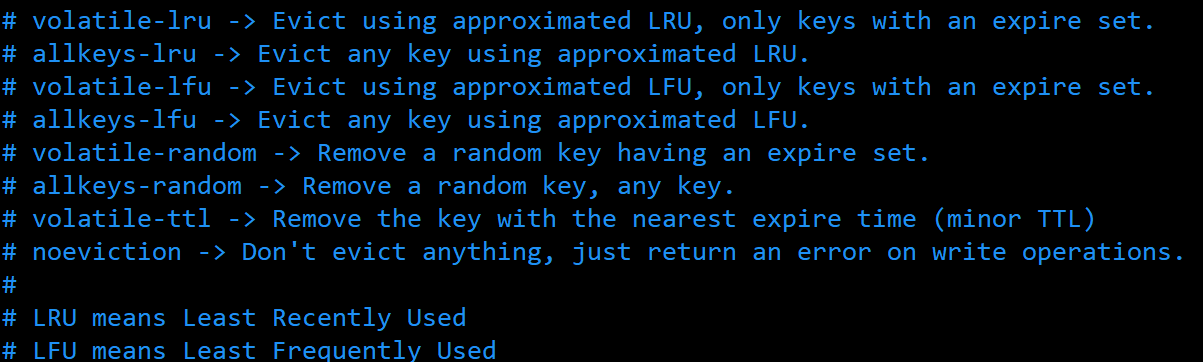
(1)volatile-lru:从已设置过期时间的数据集中挑选最近最少使用的数据淘汰。
(2)volatile-ttl:从已设置过期时间的数据集中挑选将要过期的数据淘汰。
(3)volatile-random:从已设置过期时间的数据集中任意选择数据淘汰。
(4)volatile-lfu:从已设置过期时间的数据集挑选使用频率最低的数据淘汰。
(5)allkeys-lru:从数据集中挑选最近最少使用的数据淘汰
(6)allkeys-lfu:从数据集中挑选使用频率最低的数据淘汰
(7)allkeys-random:从数据集(server.db[i].dict)中任意选择数据淘汰
(8) no-enviction(驱逐):禁止驱逐数据,这也是默认策略。意思是当内存不足以容纳新入数据时,新写入操作就会报错,请求可以继续进行,线上任务也不能持续进行,采用no-enviction策略可以保证数据不被丢失。
3. 淘汰机制的实现
既然是淘汰,那就需要把这些数据给删除,然后保存新的。Redis 删除策略主要有以下几种:
**惰性删除:**master 节点每次读取命令时都会检查键是否超时,如果超时则执行 del 命令删除键对象,之后异步把 del 命令 slave 节点,这样可以保证数据复制的一致性,slave 节点是永远不会主动去删除超时数据的。
**定时删除:**Redis 的 master 节点在内部定时任务,会循环采样一定数量的键,当发现采样的键过期时,会执行 del 命令,之后再同步个 slave 节点。
主动删除:当前已用内存超过 maxMemory 限定时,触发主动清理策略。主动设置的前提是设置了maxMemory 的值。


 1956
1956


 被折叠的 条评论
为什么被折叠?
被折叠的 条评论
为什么被折叠?
 到【灌水乐园】发言


