


前言:安装或升级SSH和SSL有一定的危险系数,要保证设备除SSH要有其他连接方式。出现问题时要有救急通道。可以参考我的另一篇文章:
CentOS升级OpenSSH_9.3p2(RPM升级+源码升级)-CSDN博客
当前版本:
系统版本:CentOS Linux release 7.6.1810 (Core)
SSH版本:OpenSSH_7.4p1 升级至 OpenSSH_9.6p1(SHA256)
SSL版本:OpenSSL_1.0.2k-fips 升级至 OpenSSL-1.1.1k
一、安装OpenSSL
1、下载安装包,上传到服务器
https://artfiles.org/openssl.org/source/old/ (openssl-1.1.1k.tar.gz)
2、备份老版本SSL
shell> whereis openssl

shell> mv /usr/bin/openssl /usr/bin/openssl_1.0.2k
shell> mv /usr/lib64/openssl /usr/lib64/openssl_bak
shell> mv /usr/share/man/man1/openssl.1ssl.gz /usr/share/man/man1/openssl.1ssl.gz_bak
shell> mv /usr/include/openssl /usr/include/openssl.bak
注意:不要卸载系统自带的openssl或执行一些rm命令,卸载后会出现各种环境问题,甚至会无法远程登录到设备,包含ssh、telnet协议(非常危险)
3、编译安装SSL
shell> tar -zxvf openssl-1.1.1k.tar.gz -C /usr/src/ 解压路径自定义
shell> cd /usr/src/openssl-1.1.1k/
shell> yum install -y zlib-devel.x86_64 openssl-devel.x86_64 pam-devel.x86_64 perl-Test-Simple perl perl-CPAN.noarch gcc
shell> ./config --prefix=/usr/local/openssl && ./config -t
shell> make -j4
shell> make install
3、添加环境变量
shell> vim /etc/profile 文件后追加
# OpenSSL
export PATH=/usr/local/openssl/bin:$PATH
export LD_LIBRARY_PATH=/usr/local/openssl/lib:$LD_LIBRARY_PATH
shell> ln -s /usr/local/openssl/include/openssl /usr/include/ 如果已生成,忽略
shell> openssl version

二、安装OpenSSH
1、下载安装包,上传到服务器
https://www.openssh.com/releasenotes.html (openssh-9.6p1.tar.gz)
或
https://ftp.openbsd.org/pub/OpenBSD/OpenSSH/
2、卸载老版本SSH
注意:危险操作,一定要安装好telnet。确保有其他方式能够连接到设备(选择性操作)
telnet安装可以参考开头的链接
shell> systemctl stop sshd.service
shell> cp /etc/pam.d/sshd /etc/pam.d/sshd_bak 该文件一定要备份,缺少该文件ssh登不上设备
shell> cp -r /etc/ssh /etc/ssh_7.4p1_bak
shell> rpm -qa | grep openssh

shell> rpm -e $(rpm -qa | grep openssh) --nodeps 卸载7.4p1版本
3、编译安装SSH
shell> tar -zxvf openssh-9.6p1.tar.gz -C /usr/src/ 解压路径自定义
shell> cd /usr/src/openssh-9.6p1/
shell> yum install -y zlib-devel.x86_64 openssl-devel.x86_64 pam-devel.x86_64 gcc 如果在安装SSL时已安装依赖包,这里可以忽略
shell> ./configure --prefix=/usr --sysconfdir=/etc/ssh --with-pam --with-ssl-dir=/usr/local/openssl --with-md5-passwords --with-openssl-include=/usr/local/openssl/include
shell> make -j4
shell> make install
看到以下信息暂时忽略
Permissions 0640 for '/etc/ssh/ssh_host_rsa_key' are too open.
Permissions 0640 for '/etc/ssh/ssh_host_ecdsa_key' are too open.
Permissions 0640 for '/etc/ssh/ssh_host_ed25519_key' are too open.
make: [check-config] 错误 1 (忽略)
shell> cp /usr/src/openssh-9.6p1/contrib/redhat/sshd.init /etc/init.d/sshd
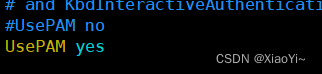
shell> vim /etc/ssh/sshd_config

shell> mv /etc/pam.d/sshd_bak /etc/pam.d/sshd 还原备份的pam文件
shell> cd /etc/ssh/
shell> chmod 600 ssh_host_rsa_key ssh_host_ecdsa_key ssh_host_ed25519_key 修改在安装时提示这三个文件权限太开放的问题
shell> /etc/init.d/sshd restart
启动时报错,执行systemctl status sshd.service查看错误信息

找不到 libcrypto.so.1.1 这个文件
shell> ln -s /usr/local/openssl/lib/libcrypto.so.1.1 /usr/lib64/
在重新执行:/etc/init.d/sshd restart
shell> systemctl enable sshd.service && /sbin/chkconfig sshd on && chkconfig --add sshd && systemctl restart sshd.service 一定要加入开机自启
shell> ssh -V


 3648
3648


 被折叠的 条评论
为什么被折叠?
被折叠的 条评论
为什么被折叠?
 到【灌水乐园】发言


