


一、安装配置Nginx
1、安装
[root@x4d000003 /]# yum install -y epel-* 安装第三方epel源
[root@x4d000003 /]# yum update 更新yum源
[root@x4d000003 /]# yum -y install nginx*6
2、查看Nginx版本
[root@localhost /]# nginx -v
nginx version: nginx/1.16.1
3、备份Nginx文件
[root@localhost /]# cp /etc/nginx/nginx.conf /etc/nginx/nginx.conf.bak
4、进入编辑配置文件,提供Nginx对php的支持
[root@localhost html]# vi /etc/nginx/nginx.conf
5、设置开机自启
[root@localhost html]# systemctl start nginx
[root@localhost html]# systemctl enable nginx
二、安装mysql
1、更新yum源
[root@localhost /]# rpm -Uvh http://dev.mysql.com/get/mysql57-community-release-el7-9.noarch.rpm
2、安装mysql
[root@localhost /]# yum -y install mysql-community-server
[root@localhost /]# mysql -V 查看版本号
[root@localhost /]# systemctl start mysqld 启动数据库
[root@localhost /]# systemctl enable mysqld && systemctl daemon-reload 设为开机自启
[root@localhost /]# cat /var/log/mysqld.log |grep password 查看初始密码
3、进入数据库修改密码策略
[root@localhost /]# mysql -uroot -p
mysql> set global validate_password_policy=0;
mysql> set global validate_password_length=1;
4、更改密码
mysql> ALTER USER ‘root’@’%’ IDENTIFIED BY ‘123456’;
mysql> flush privileges; 刷新
三、安装php
1、更新yum源添加epl
[root@localhost /]# yum install \
<?php $link = mysqli_connect('localhost', 'wordpress', '123456'); if (!$link) { die('Could not connect: ' . mysqli_error()); } echo 'Connected successfully'; mysqli_close($link); ?>https://repo.ius.io/ius-release-el7.rpm
https://dl.fedoraproject.org/pub/epel/epel-release-latest-7.noarch.rpm
2、添加webtatic源
[root@localhost /]# rpm -Uvh https://mirror.webtatic.com/yum/el7/webtatic-release.rpm
3、安装php
[root@localhost /]# yum -y install php70w-devel php70w.x86_64 php70w-cli.x86_64 php70w-common.x86_64 php70w-gd.x86_64 php70w-ldap.x86_64 php70w-mbstring.x86_64 php70w-mcrypt.x86_64 php70w-pdo.x86_64 php70w-mysqlnd php70w-fpm php70w-opcache php70w-pecl-redis php70w-pecl-mongodb
[root@localhost /]# php -v 查看版本
4、新建index.php用于展示php信息
[root@localhost /]# vi /usr/share/nginx/html/index.php
5、启动php-fpm服务并设置开机自启
[root@localhost /]# systemctl start php-fpm
[root@localhost /]# systemctl enable php-fpm
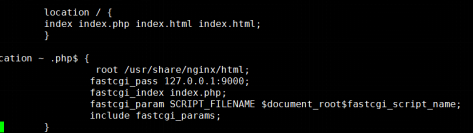
6、配置动静分离
[root@localhost /]# vi /etc/nginx/nginx.conf
server {
listen 80;
server_name www.wordpress.com;
location / {
root /usr/share/nginx/html/wordpress;
index index.php index.html index.htm;
}
location ~* ..(php|php5)?$ {
root /usr/share/nginx/html/wordpress;
fastcgi_pass 127.0.0.1:9000;
fastcgi_index index.php;
include fastcgi.conf;
}
[root@localhost /]# nginx -t 测试语法错误
7、}编辑php与mysql连通性测试文件,并进行测试
(1)连接mysql数据库
[root@localhost /]# mysql -h localhost -u root -p
(2)创建wordpress数据库
mysql> create database wordpress;
(3)授权
mysql> grant all on wordpress. to ‘wordpress’@‘localhost’ identified by ‘123456’; mysql> flush privileges;
(4)编写php与数据库测试连通性文件
[root@localhost /]# vi /usr/share/nginx/html/index-mysql.php

(5)测试成功

四、部署网站
1、传入wordpress网站包并解压
[root@localhost /]# tar xzf wordpress-4.9.4-zh_CN.tar.gz
[root@localhost /]# chmod -R o+w /usr/share/nginx/html/ 授予可写权限
2、编辑虚拟主机配置文件
[root@localhost /]# vi /etc/nginx/conf.d/wordpress.conf
server {
listen 80;
server_name www.wordpress.com;
location / {
root /usr/share/nginx/html/wordpress;
index index.php index.html index.htm;
}
location ~* .*.(php|php5)?$ {
root /usr/share/nginx/html/wordpress;
fastcgi_pass 127.0.0.1:9000;
fastcgi_index index.php;
include fastcgi.conf;
}
}
3、测试语法
[root@localhost /]# nginx -t
4、重新加载配置
[root@localhost /]# nginx -s reload
5、修改host文件
加上:77.0.0.7 www.wordpress.com
6、上下文授权
[root@localhost html]# getenforce
Enforcing
[root@localhost html]# chcon -R --reference=/usr/share/nginx/html /usr/share/nginx/html/wordpress
7、访问成功http://www.wordpress.com


 1559
1559


 被折叠的 条评论
为什么被折叠?
被折叠的 条评论
为什么被折叠?
 到【灌水乐园】发言


