


文章目录
spring
1.spring的体系结构

2.spring程序的开发步骤
- 导入spring开发的基本包坐标
<dependency>
   <groupId>org.springframework</groupId>
   <artifactId>spring-context</artifactId>
   <version>5.0.5.RELEASE</version>
</dependency>
- 编写DAO接口和实现类
- 创建spring核心配置文件
<?xml version="1.0" encoding="UTF-8"?>
<beans xmlns="http://www.springframework.org/schema/beans"
       xmlns:xsi="http://www.w3.org/2001/XMLSchema-instance"
       xsi:schemaLocation=
       "http://www.springframework.org/schema/beans  http://www.springframework.org/schema/beans/spring-beans.xsd">
- 在spring配置文件中配置UserDaoImpl
- 使用spring的API获得bean实例
3.spring的配置文件
3.1 spring标签配置范围
singleton 默认,单例
prototype 多例
request web项目中,spring创建一个bean的对象,将对象存入request域中
session web项目中,spring创建一个bean的对象,将对象存入到session域中
global session web项目中,应用在portlet环境,如果没有portlet环境,那么global session 相当于session
3.2 bean生命周期配置
init-method: 指定类中的初始化方法名称
destroy-method: 指定类中销毁方法名称
3.3 bean实例化三种方式
- 使用无参构造方法实例化
它会根据默认无参构造方法来创建类对象,如果bean中没有默认无参构造函数,将会创建失败
<bean id="userDao" class="com.itheima.dao.impl.UserDaoImpl"/>
- 工厂静态方法实例化
工厂的静态方法返回bean实例
public class StaticFactoryBean {
    public static UserDao createUserDao(){
    return new UserDaoImpl();
    }
}
<bean id="userDao" class="com.itheima.factory.StaticFactoryBean"
      factory-method="createUserDao" />
- 工厂实例方法实例化
工厂的非静态方法返回bean实例
public class DynamicFactoryBean {
	public UserDao createUserDao(){
		return new UserDaoImpl();
	}
}
<bean id="factoryBean" class="com.itheima.factory.DynamicFactoryBean"/>
<bean id="userDao" factory-bean="factoryBean" factory-method="createUserDao"/>
3.4 bean的依赖注入
从spring容器中获得bean进行操作
ApplicationContext applicationContext = new ClassPathXmlApplicationContext("Spring配置文件名");
applicationContext.getBean("userService");
参数的数据类型是字符串时,表示根据Bean的id从容器中获得Bean实例,返回是Object,需要强转。
参数的数据类型是Class类型时,表示根据类型从容器中匹配Bean实例,当容器中相同类型的Bean有多个时,则此方法会报错
3.5 bean的依赖注入方式
- 构造方法
<bean id="userDao" class="com.itheima.dao.impl.UserDaoImpl"/>
<bean id="userService" class="com.itheima.service.impl.UserServiceImpl">    <constructor-arg name="userDao" ref="userDao"></constructor-arg>
</bean>
- set方法
类中必须要有相应的set方法
配置Spring容器调用set方法进行注入
<bean id="userDao" class="com.itheima.dao.impl.UserDaoImpl"/>
<bean id="userService" class="com.itheima.service.impl.UserServiceImpl">
	<property name="userDao" ref="userDao"/>
</bean>
set方法:P命名空间注入
P命名空间注入本质也是set方法注入,但比起上述的set方法注入更加方便,主要体现在配置文件中,如下:
首先,需要引入P命名空间:
xmlns:p="http://www.springframework.org/schema/p"
3.6 bean的依赖注入的数据类型
注入数据的三种数据类型
-
普通数据类型
value属性 -
引用数据类型
ref属性 -
集合数据类型
List类型:
 <list>
     <value>aaa</value>
     <value>bbb</value>
     <value>ccc</value>
 </list>
List类型:
<list>
 	<!--要么是bean的全限定名-->
    <bean class="com.itheima.domain.User"/>
    <!--要么是已经配置好的对象引用-->
    <ref bean="u1"/>
</list>
Map<String,User>类型:
<map>
    <entry key="user1" value-ref="u1"/>
    <entry key="user2" value-ref="u2"/>
</map>
集合数据类型 Properties:
<props>
    <prop key="p1">aaa</prop>
</props>
3.7 引入其他配置文件(分模块开发)
<import resource="applicationContext-xxx.xml"/>
4.spring相关API
4.1 ApplicationContext的继承体系
applicationContext:接口类型,代表应用上下文,可以通过其实例获得 Spring 容器中的 Bean 对象
4.2 ApplicationContext的实现类
- ClassPathXmlApplicationContext
它是从类的根路径下加载配置文件 推荐使用这种
- FileSystemXmlApplicationContext
它是从磁盘路径上加载配置文件,配置文件可以在磁盘的任意位置。
- AnnotationConfigApplicationContext
当使用注解配置容器对象时,需要使用此类来创建 spring 容器。它用来读取注解。
5. Spring的注解开发
Spring容器加载properties文件
<context:property-placeholder location="xx.properties"/>
<property name="" value="${key}"/>
1. Spring原始注解
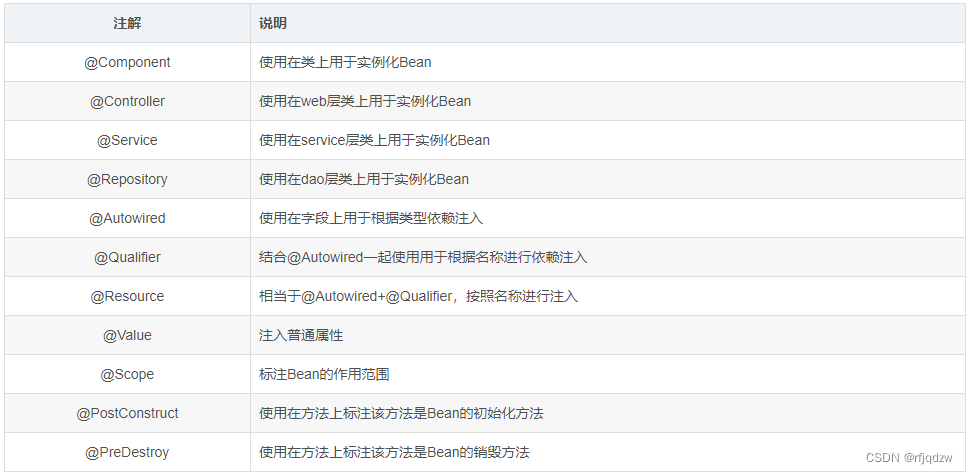
- @Autowired 是通过 byType 的方式去注入的, 使用该注解,要求接口只能有一个实现类。
- @Resource 可以通过 byName 和 byType的方式注入, 默认先按 byName的方式进行匹配,如果匹配不到,再按 byType的方式进行匹配。
- @Qualifier 注解可以按名称注入, 但是注意是 类名
还需要用注解替代的配置:
非自定义的Bean的配置:
加载properties文件的配置:context:property-placeholder
组件扫描的配置:context:component-scan
引入其他文件:
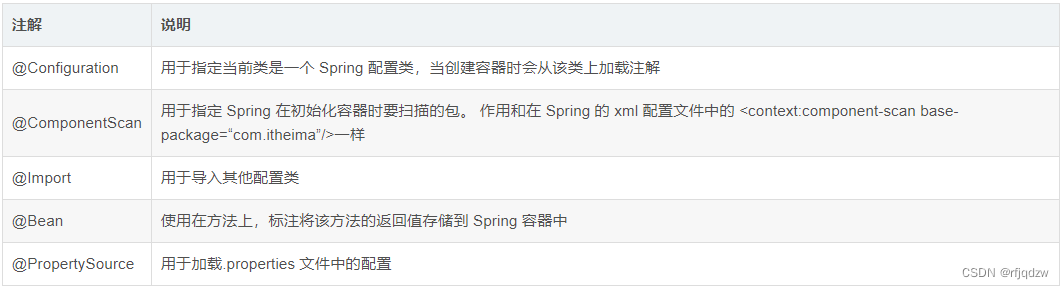
新注解:
前三个是配置在配置类上面的
6. Spring集成Junit
每个测试方法都有加载配置文件和从配置文件获取bean的代码
解决思路:
•让SpringJunit负责创建Spring容器,但是需要将配置文件的名称告诉它
•将需要进行测试Bean直接在测试类中进行注入
集成步骤:
- 导入spring集成Junit的坐标
<!--此处需要注意的是,spring5 及以上版本要求 junit 的版本必须是 4.12 及以上-->
<dependency>
    <groupId>org.springframework</groupId>
    <artifactId>spring-test</artifactId>
    <version>5.0.2.RELEASE</version>
</dependency>

<dependency>
    <groupId>junit</groupId>
    <artifactId>junit</artifactId>
    <version>4.12</version>
    <scope>test</scope>
</dependency>
- 使用@Runwith注解替换原来的运行期
@RunWith(SpringJUnit4ClassRunner.**class**)
 public class SpringJunitTest {
 }
- 使用@ContextConfiguration指定配置文件或配置类
@RunWith(SpringJUnit4ClassRunner.class)
//加载spring核心配置文件
//@ContextConfiguration(value = {"classpath:applicationContext.xml"})
//加载spring核心配置类
@ContextConfiguration(classes = {SpringConfiguration.class})
public class SpringJunitTest {}
- 使用@Autowired注入需要测试的对象
- 创建测试方法进行测试
7.AOP
动态代理
常用的动态代理技术
JDK 代理 : 基于接口的动态代理技术
cglib 代理:基于父类的动态代理技术
JDK 的动态代理
- 目标类接口
public interface TargetInterface {
   public void method();
}
- 目标类
public class Target implements TargetInterface {
    @Override
    public void method() {
        System.out.println("Target running....");
    }
}
- 动态代理代码
Target target = new Target(); //创建目标对象
//创建代理对象
TargetInterface proxy = (TargetInterface) Proxy.newProxyInstance(target.getClass()
.getClassLoader(),target.getClass().getInterfaces(),new InvocationHandler() {
            @Override
            public Object invoke(Object proxy, Method method, Object[] args)
            throws Throwable {
                System.out.println("前置增强代码...");
                Object invoke = method.invoke(target, args);
                System.out.println("后置增强代码...");
                return invoke;
            }
        }
);
- 调用代理对象的方法测试
// 测试,当调用接口的任何方法时,代理对象的代码都无序修改
proxy.method();
cglib 的动态代理
- 目标类
public class Target {
  public void method() {
      System.out.println("Target running....");
  }
}
- 动态代理代码
Target target = new Target(); //创建目标对象
Enhancer enhancer = new Enhancer();   //创建增强器
enhancer.setSuperclass(Target.class); //设置父类
enhancer.setCallback(new MethodInterceptor() { //设置回调
    @Override
    public Object intercept(Object o, Method method, Object[] objects,
    MethodProxy methodProxy) throws Throwable {
        System.out.println("前置代码增强....");
        Object invoke = method.invoke(target, objects);
        System.out.println("后置代码增强....");
        return invoke;
    }
});
Target proxy = (Target) enhancer.create(); //创建代理对象
- 调用代理对象的方法测试
//测试,当调用接口的任何方法时,代理对象的代码都无序修改
proxy.method();
1. AOP相关概念
- Target(目标对象):代理的目标对象
- Proxy (代理):一个类被 AOP 织入增强后,就产生一个结果代理类
- Joinpoint(连接点):所谓连接点是指那些被拦截到的点。在spring中,这些点指的是方法,因为spring只支持方法类型的连接点
- Pointcut(切入点):所谓切入点是指我们要对哪些 Joinpoint 进行拦截的定义
- Advice(通知/ 增强):所谓通知是指拦截到 Joinpoint 之后所要做的事情就是通知
- Aspect(切面):是切入点和通知(引介)的结合
- Weaving(织入):是指把增强应用到目标对象来创建新的代理对象的过程。spring采用动态代理织入,而AspectJ采用编译期织入和类装载期织入
AOP技术实现的内容
Spring 框架监控切入点方法的执行。一旦监控到切入点方法被运行,使用代理机制,动态创建目标对象的代理对象,根据通知类别,在代理对象的对应位置,将通知对应的功能织入,完成完整的代码逻辑运行。
AOP 底层使用哪种代理方式
在 spring 中,框架会根据目标类是否实现了接口来决定采用哪种动态代理的方式。
2. 基于XML的AOP开发
步骤:
- 导入AOP相关坐标
<!--导入spring的context坐标,context依赖aop-->
<dependency>
  <groupId>org.springframework</groupId>
  <artifactId>spring-context</artifactId>
  <version>5.0.5.RELEASE</version>
</dependency>
<!-- aspectj的织入 -->
<dependency>
  <groupId>org.aspectj</groupId>
  <artifactId>aspectjweaver</artifactId>
  <version>1.8.13</version>
</dependency>
- 创建目标接口和目标类(内部有切点)
public interface TargetInterface {
    public void method();
}

public class Target implements TargetInterface {
    @Override
    public void method() {
        System.out.println("Target running....");
    }
}
- 创建切面类(内部有增强方法)
public class MyAspect {
    //前置增强方法
    public void before(){
        System.out.println("前置代码增强.....");
    }
}
4.将目标类和切面类的对象创建权交给spring
<!--配置目标类-->
<bean id="target" class="com.itheima.aop.Target"></bean>
<!--配置切面类-->
<bean id="myAspect" class="com.itheima.aop.MyAspect"></bean>
- 在 applicationContext.xml 中配置织入关系
导入aop命名空间
<beans xmlns="http://www.springframework.org/schema/beans"
       xmlns:xsi="http://www.w3.org/2001/XMLSchema-instance"
       xmlns:context="http://www.springframework.org/schema/context"
       xmlns:aop="http://www.springframework.org/schema/aop"
       xsi:schemaLocation="
        http://www.springframework.org/schema/context
        http://www.springframework.org/schema/context/spring-context.xsd
        http://www.springframework.org/schema/aop
        http://www.springframework.org/schema/aop/spring-aop.xsd
        http://www.springframework.org/schema/beans
        http://www.springframework.org/schema/beans/spring-beans.xsd">
配置切点表达式和前置增强的织入关系
<aop:config>
    <!--引用myAspect的Bean为切面对象-->
    <aop:aspect ref="myAspect">
        <!--配置Target的method方法执行时要进行myAspect的before方法前置增强-->
        <aop:before method="before" pointcut="execution(public void com.itheima.aop.Target.method())"></aop:before>
    </aop:aspect>
</aop:config>
6.测试代码
@RunWith(SpringJUnit4ClassRunner.class)
@ContextConfiguration("classpath:applicationContext.xml")
public class AopTest {
    @Autowired
    private TargetInterface target;
    @Test
    public void test1(){
        target.method();
    }
}
2.1 XML 配置 AOP 详解
- 表达式语法
execution([修饰符] 返回值类型 包名.类名.方法名(参数))
- 访问修饰符可以省略
- 返回值类型、包名、类名、方法名可以使用星号* 代表任意
- 包名与类名之间一个点 . 代表当前包下的类,两个点 … 表示当前包及其子包下的类
- 参数列表可以使用两个点 … 表示任意个数,任意类型的参数列表
- 通知的类型
通知的配置语法:
<aop:通知类型 method=“切面类中方法名” pointcut=“切点表达式"></aop:通知类型>
- 切点表达式的抽取
当多个增强的切点表达式相同时,可以将切点表达式进行抽取,在增强中使用 pointcut-ref 属性代替 pointcut 属性来引用抽取后的切点表达式。
<aop:config>
    <!--引用myAspect的Bean为切面对象-->
    <aop:aspect ref="myAspect">
        <aop:pointcut id="myPointcut" expression="execution(* com.itheima.aop.*.*(..))"/>
        <aop:before method="before" pointcut-ref="myPointcut"></aop:before>
    </aop:aspect>
</aop:config>
2.2 知识要点
- aop织入的配置
<aop:config>
    <aop:aspect ref=“切面类”>
        <aop:before method=“通知方法名称” pointcut="切点表达式">					</aop:before>
</aop:config>
- 通知的类型:前置通知、后置通知、环绕通知、异常抛出通知、最终通知
- 切点表达式的写法:
execution([修饰符] 返回值类型 包名.类名.方法名(参数))
3. 基于注解的 AOP 开发
3.1 注解配置步骤
- 创建目标接口和目标类(内部有切点)
- 创建切面类(内部有增强方法)
- 将目标类和切面类的对象创建权交给 spring
@Component("target")
public class Target implements TargetInterface {
    @Override
    public void method() {
        System.out.println("Target running....");
    }
}
@Component("myAspect")
public class MyAspect {
    public void before(){
        System.out.println("前置代码增强.....");
    }
}
- 在切面类中使用注解配置织入关系
@Component("myAspect")
@Aspect
public class MyAspect {
    @Before("execution(* com.itheima.aop.*.*(..))")
    public void before(){
        System.out.println("前置代码增强.....");
    }
}
- 在配置文件中开启组件扫描和 AOP 的自动代理
<!--组件扫描-->
<context:component-scan base-package="com.itheima.aop"/>

<!--aop的自动代理-->
<aop:aspectj-autoproxy></aop:aspectj-autoproxy>
- 测试代码
@RunWith(SpringJUnit4ClassRunner.class)
@ContextConfiguration("classpath:applicationContext.xml")
public class AopTest {
    @Autowired
    private TargetInterface target;
    @Test
    public void test1(){
        target.method();
    }
}
3.2 注解配置 AOP 详解
-
注解通知的类型
通知的配置语法:@通知注解(“切点表达式") -
切点表达式的抽取
同 xml配置
aop 一样,我们可以将切点表达式抽取。抽取方式是在切面内定义方法,在该方法上使用@Pointcut注解定义切点表达式,然后在在增强注解中进行引用。具体如下:
@@Component("myAspect")
@Aspect
public class MyAspect {
    @Before("MyAspect.myPoint()")
    public void before(){
        System.out.println("前置代码增强.....");
    }
    @Pointcut("execution(* com.itheima.aop.*.*(..))")
    public void myPoint(){}
}
3.3 知识要点
- 注解aop开发步骤
1、使用@Aspect标注切面类
2、使用@通知注解标注通知方法
3、在配置文件中配置aop自动代理aop:aspectj-autoproxy/ - 通知注解类型
4. 声明式事务
1. 编程式事务控制相关对象
1.1 PlatformTransactionManager
PlatformTransactionManager 接口是 spring 的事务管理器,它里面提供了我们常用的操作事务的方法。
注意:
PlatformTransactionManager 是接口类型,不同的 Dao 层技术则有不同的实现类,例如:Dao 层技术是jdbc 或 mybatis 时:org.springframework.jdbc.datasource.DataSourceTransactionManager
Dao 层技术是hibernate时:org.springframework.orm.hibernate5.HibernateTransactionManager
1.2 TransactionDefinition
TransactionDefinition 是事务的定义信息对象,里面有如下方法:
- 事务隔离级别
设置隔离级别,可以解决事务并发产生的问题,如脏读、不可重复读和虚读。
ISOLATION_DEFAULT
ISOLATION_READ_UNCOMMITTED
ISOLATION_READ_COMMITTED
ISOLATION_REPEATABLE_READ
ISOLATION_SERIALIZABLE
- 事务传播行为
REQUIRED:如果当前没有事务,就新建一个事务,如果已经存在一个事务中,加入到这个事务中。一般的选择(默认值)
SUPPORTS:支持当前事务,如果当前没有事务,就以非事务方式执行(没有事务)
MANDATORY:使用当前的事务,如果当前没有事务,就抛出异常
REQUERS_NEW:新建事务,如果当前在事务中,把当前事务挂起。
NOT_SUPPORTED:以非事务方式执行操作,如果当前存在事务,就把当前事务挂起
NEVER:以非事务方式运行,如果当前存在事务,抛出异常
NESTED:如果当前存在事务,则在嵌套事务内执行。如果当前没有事务,则执行 REQUIRED 类似的操作
超时时间:默认值是-1,没有超时限制。如果有,以秒为单位进行设置
是否只读:建议查询时设置为只读
1.3 TransactionStatus
TransactionStatus 接口提供的是事务具体的运行状态,方法介绍如下。
1.4 知识要点
编程式事务控制三大对象
PlatformTransactionManager
TransactionDefinition
TransactionStatus
2. 基于 XML 的声明式事务控制
2.2 声明式事务控制的实现
声明式事务底层就是AOP
声明式事务控制明确事项:
谁是切点?
谁是通知?
配置切面?
- 引入tx命名空间
<beans xmlns="http://www.springframework.org/schema/beans"
       xmlns:xsi="http://www.w3.org/2001/XMLSchema-instance"
       xmlns:context="http://www.springframework.org/schema/context"
       xmlns:aop="http://www.springframework.org/schema/aop"
       xmlns:tx="http://www.springframework.org/schema/tx"
       xsi:schemaLocation="
        http://www.springframework.org/schema/context
        http://www.springframework.org/schema/context/spring-context.xsd
        http://www.springframework.org/schema/aop
        http://www.springframework.org/schema/aop/spring-aop.xsd
        http://www.springframework.org/schema/tx
        http://www.springframework.org/schema/tx/spring-tx.xsd
        http://www.springframework.org/schema/beans
        http://www.springframework.org/schema/beans/spring-beans.xsd">
- 配置事务增强
<!--平台事务管理器-->
<bean id="transactionManager" class="org.springframework.jdbc.datasource.DataSourceTransactionManager">
    <property name="dataSource" ref="dataSource"></property>
</bean>

<!--事务增强配置-->
<tx:advice id="txAdvice" transaction-manager="transactionManager">
    <tx:attributes>
        <tx:method name="*"/>
    </tx:attributes>
</tx:advice>
- 配置事务 AOP 织入
<!--事务的aop增强-->
<aop:config>
    <aop:pointcut id="myPointcut" expression="execution(* com.itheima.service.impl.*.*(..))"/>
    <aop:advisor advice-ref="txAdvice" pointcut-ref="myPointcut"></aop:advisor>
</aop:config>
- 测试事务控制转账业务代码
@Override
public void transfer(String outMan, String inMan, double money) {
    accountDao.out(outMan,money);
    int i = 1/0;
    accountDao.in(inMan,money);
}
2.3 切点方法的事务参数的配置
<!--事务增强配置-->
<tx:advice id="txAdvice" transaction-manager="transactionManager">
    <tx:attributes>
        <tx:method name="*"/>
    </tx:attributes>
</tx:advice>
其中,tx:method 代表切点方法的事务参数的配置,例如:
<tx:method name="transfer" isolation="REPEATABLE_READ" propagation="REQUIRED" timeout="-1" read-only="false"/>
name:切点方法名称
isolation:事务的隔离级别
propogation:事务的传播行为
timeout:超时时间
read-only:是否只读
2.4 知识要点
声明式事务控制的配置要点
平台事务管理器配置
事务通知的配置
事务aop织入的配置
3. 基于注解的声明式事务控制
3.1 使用注解配置声明式事务控制
- 编写 AccoutDao
@Repository("accountDao")
public class AccountDaoImpl implements AccountDao {
    @Autowired
    private JdbcTemplate jdbcTemplate;
    public void out(String outMan, double money) {
        jdbcTemplate.update("update account set money=money-? where name=?",money,outMan);
    }
    public void in(String inMan, double money) {
        jdbcTemplate.update("update account set money=money+? where name=?",money,inMan);
    }
}
- 编写 AccoutService
@Service("accountService")
@Transactional
public class AccountServiceImpl implements AccountService {
    @Autowired
    private AccountDao accountDao;
    @Transactional(isolation = Isolation.READ_COMMITTED,propagation = Propagation.REQUIRED)
    public void transfer(String outMan, String inMan, double money) {
        accountDao.out(outMan,money);
        int i = 1/0;
        accountDao.in(inMan,money);
    }
}
- 编写 applicationContext.xml 配置文件
<!—之前省略datsSource、jdbcTemplate、平台事务管理器的配置-->
<!--组件扫描-->
<context:component-scan base-package="com.itheima"/>
<!--事务的注解驱动-->
<tx:annotation-driven/>
3.2 注解配置声明式事务控制解析
- 使用 @Transactional 在需要进行事务控制的类或是方法上修饰,注解可用的属性同 xml 配置方式,例如隔离级别、传播行为等。
- 注解使用在类上,那么该类下的所有方法都使用同一套注解参数配置。
- 使用在方法上,不同的方法可以采用不同的事务参数配置。
- Xml配置文件中要开启事务的注解驱动<tx:annotation-driven />
3.3 知识要点
注解声明式事务控制的配置要点:
平台事务管理器配置(xml方式)
事务通知的配置(@Transactional注解配置)
事务注解驱动的配置 tx:annotation-driven/


 2463
2463


 被折叠的 条评论
为什么被折叠?
被折叠的 条评论
为什么被折叠?
 到【灌水乐园】发言


