


文章目录
简介
SpringBoot 是由 Pivotal 团队提供的全新框架,其设计目的是用来简化 Spring 应用的初始搭建以及开发过程。
SpringBoot快速入门
SpringBoot 开发起来特别简单,分为如下几步:
基本步骤
- 创建新模块,选择Spring初始化,并配置模块相关基础信息
- 选择当前模块需要使用的技术集
- 开发控制器类
- 运行自动生成的Application类
知道了 SpringBoot 的开发步骤后,接下来我们进行具体的操作
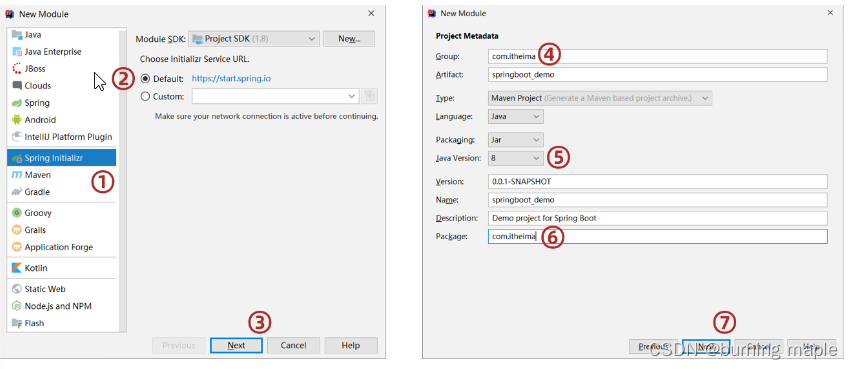
1. 创建新模块
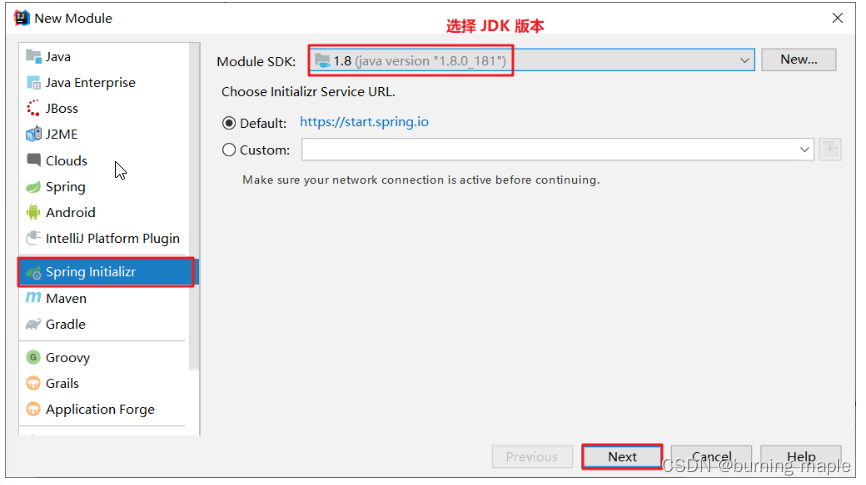
选择 Spring Initializr ,用来创建 SpringBoot 工程
以前我们选择的是 Maven ,今天选择 Spring Initializr 来快速构建 SpringBoot 工程。而在 Module SDK 这一项选择我们安装的 JDK 版本。
对 SpringBoot 工程进行相关的设置
我们使用这种方式构建的 SpringBoot 工程其实也是 Maven 工程,而该方式只是一种快速构建的方式而已。
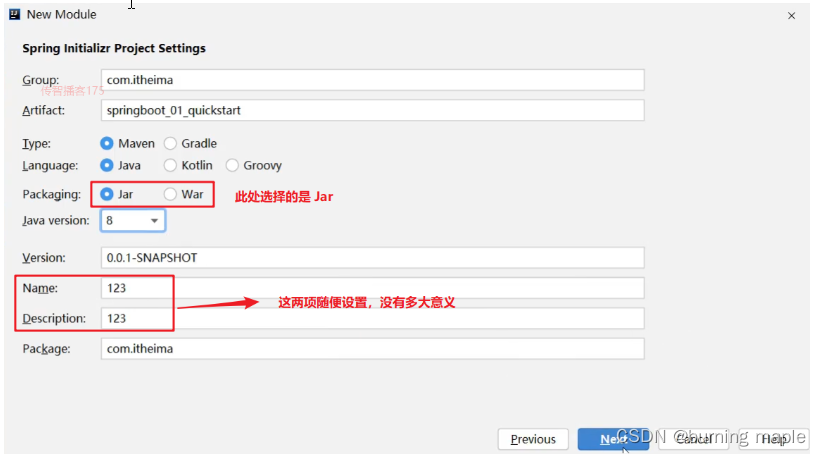
打包方式这里需要设置为 Jar
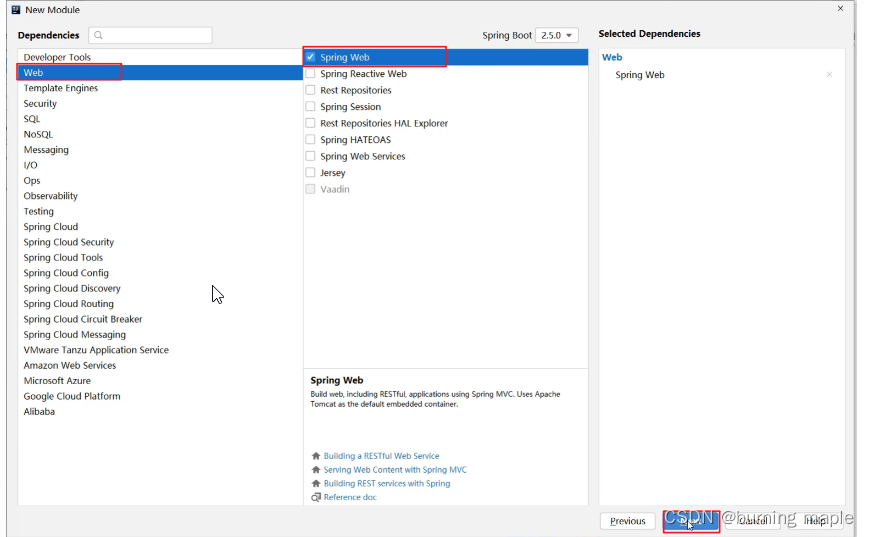
选中 Web,然后勾选 Spring Web
由于我们需要开发一个 web 程序,使用到了 SpringMVC 技术,所以按照下图红框进行勾选
直接点击 Finish 完成 SpringBoot 工程的构建
经过以上步骤后就创建了如下结构的模块,它会帮我们自动生成一个 Application 类,而该类一会再启动服务器时会用到
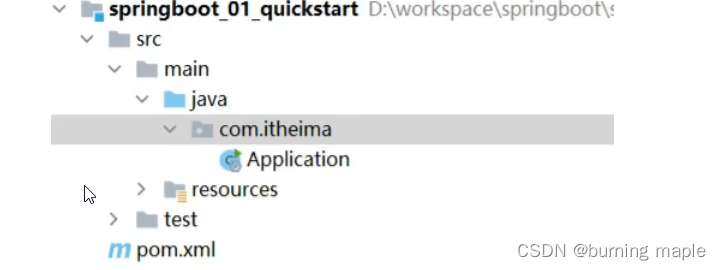
注:在创建好的工程中不需要配置类
创建好的项目会自动生成一些其他不需要的文件,可以自行删除
如:* .mvn
.gitignoreHELP.mdmvnwmvnw.cmd
2.创建controller
在 com.itheima.controller 包下创建 BookController ,代码如下:
@RestController
@RequestMapping("/books")
public class BookController {

    @GetMapping("/{id}")
    public String getById(@PathVariable Integer id){
        System.out.println("id ==> "+id);
        return "hello , spring boot!";
    }
}
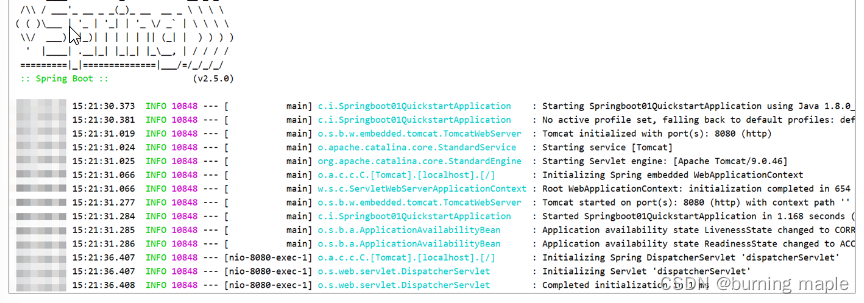
3.启动服务器
运行 SpringBoot 工程不需要使用本地的 Tomcat 和 插件,只运行项目 com.itheima 包下的 Application 类,我们就可以在控制台看出如下信息:
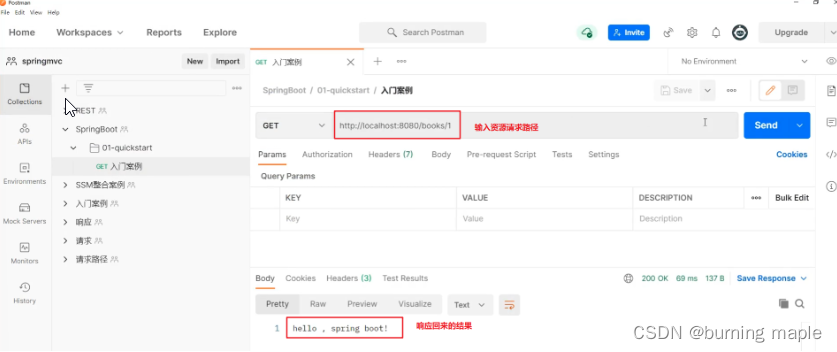
进行测试
使用 Postman 工具来测试我们的程序
与Spring对比
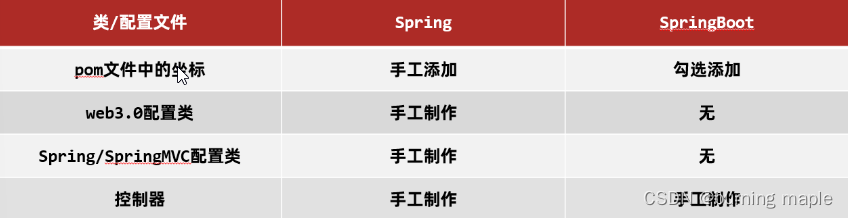
坐标
Spring 程序中的坐标需要自己编写,而且坐标非常多
SpringBoot 程序中的坐标是我们在创建工程时进行勾选自动生成的
web3.0配置类
Spring 程序需要自己编写这个配置类。这个配置类大家之前编写过,肯定感觉很复杂
SpringBoot 程序不需要我们自己书写
配置类
Spring/SpringMVC 程序的配置类需要自己书写。而 SpringBoot 程序则不需要书写。
注:基于Idea的 Spring Initializr 快速构建 SpringBoot 工程时需要联网.
Idea 中快速构建 SpringBoot 工程其实就是使用的官网的快速构建组件,那以后即使没有 Idea 也可以使用官网的方式构建 SpringBoot 工程。
SpringBoot工程快速启动
后端可以将 SpringBoot 工程打成 jar 包,该 jar 包运行不依赖于 Tomcat 和 Idea 这些工具也可以正常运行,只是这个 jar 包在运行过程中连接和我们自己程序相同的 Mysql 数据库即可。
配置了以下插件后
<plugin>
    <groupId>org.springframework.boot</groupId>
    <artifactId>spring-boot-maven-plugin</artifactId>
</plugin>
我们只需要使用 Maven 的 package 指令打包就会在 target 目录下生成对应的 Jar 包。
注:该插件必须配置,不然打好的 jar 包也是有问题的
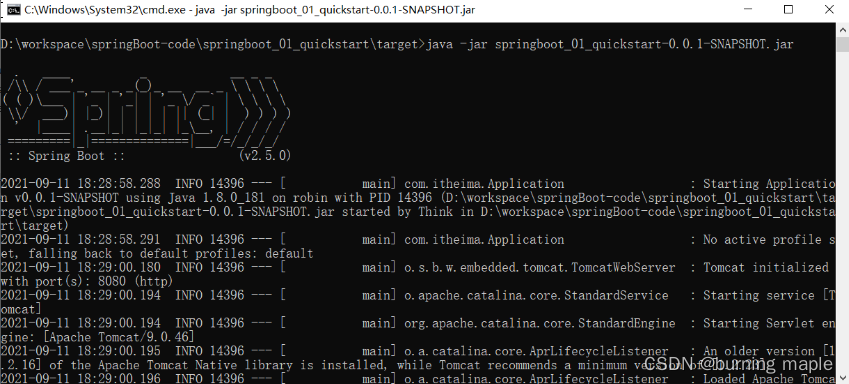
进入 jar 包所在位置,在 命令提示符 中输入如下命令
jar -jar springboot_01_quickstart-0.0.1-SNAPSHOT.jar
执行上述命令就可以看到 SpringBoot 运行的日志信息
SpringBoot概述
原始 Spring 环境搭建和开发存在以下问题:
-
配置繁琐
-
依赖设置繁琐
SpringBoot程序优点恰巧就是针对Spring的缺点 -
自动配置。这个是用来解决
Spring程序配置繁琐的问题 -
起步依赖。这个是用来解决
Spring程序依赖设置繁琐的问题 -
辅助功能(内置服务器,…)。我们在启动
SpringBoot程序时既没有使用本地的tomcat也没有使用tomcat插件,而是使用SpringBoot内置的服务器。
Springboot起步依赖
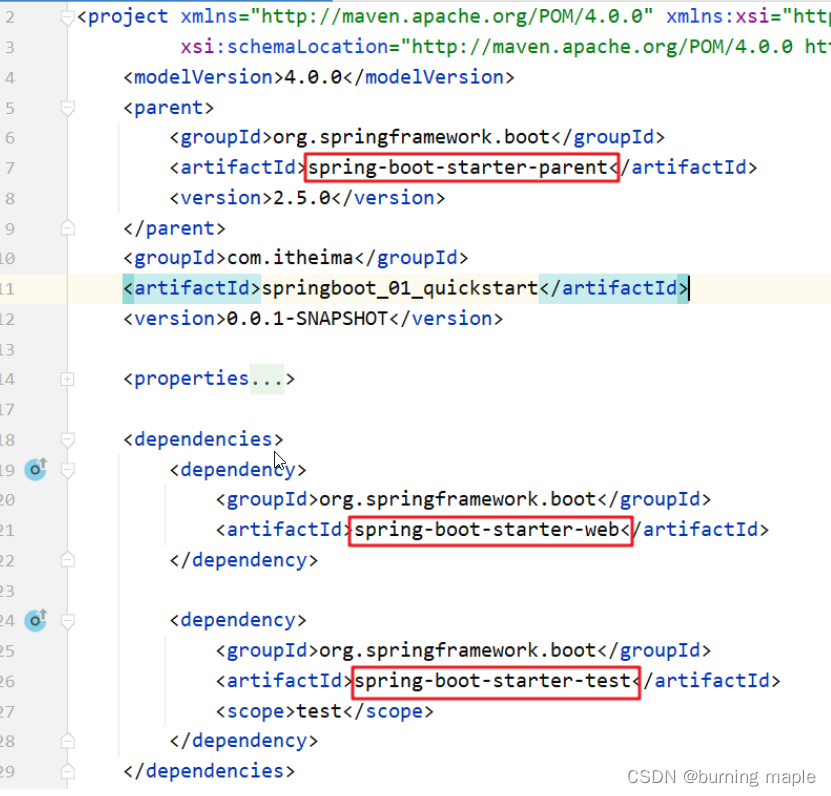
们使用 Spring Initializr 方式创建的 Maven 工程的的 pom.xml 配置文件中自动生成了很多包含 starter 的依赖
探索父工程
文件指定了一个父工程,进入到父工程中会发现还有一个父工程,再次进入可发现
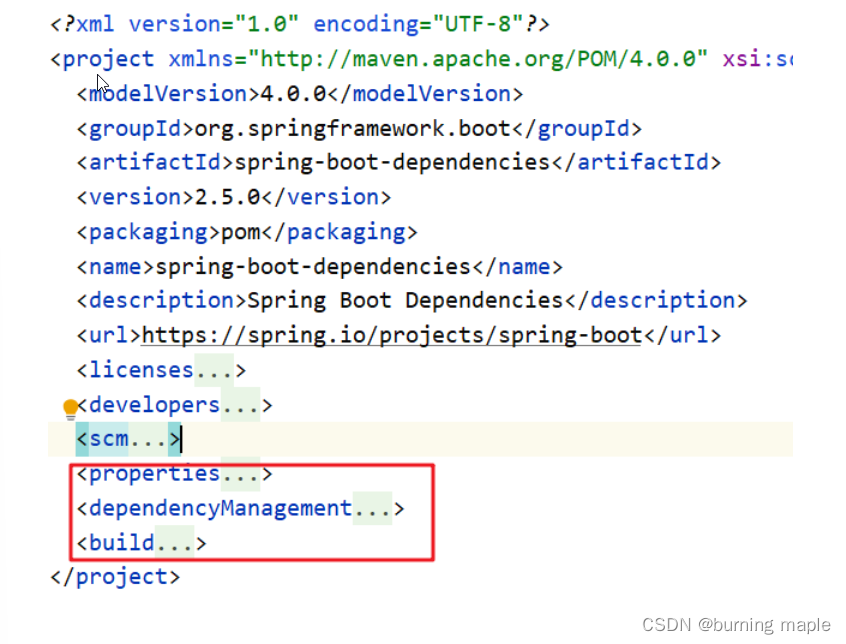
上图中的 properties 标签中定义了各个技术软件依赖的版本,避免了我们在使用不同软件技术时考虑版本的兼容问题。在 properties 中我们找 servlet 和 mysql 的版本如下图

dependencyManagement 标签是进行依赖版本锁定,但是并没有导入对应的依赖;如果我们工程需要那个依赖只需要引入依赖的 groupid 和 artifactId 不需要定义 version。
看完了父工程中 pom.xml 的配置后不难理解我们工程的的依赖为什么都没有配置 version。
依赖探索
在我们创建的工程中的 pom.xml 中配置了如下依赖
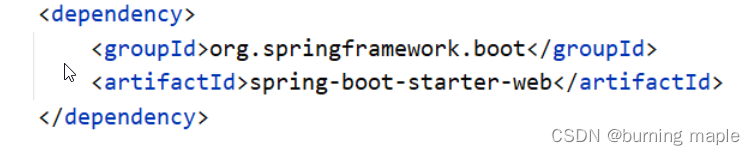
进入到该依赖,查看 pom.xml 的依赖会发现它引入了如下的依赖
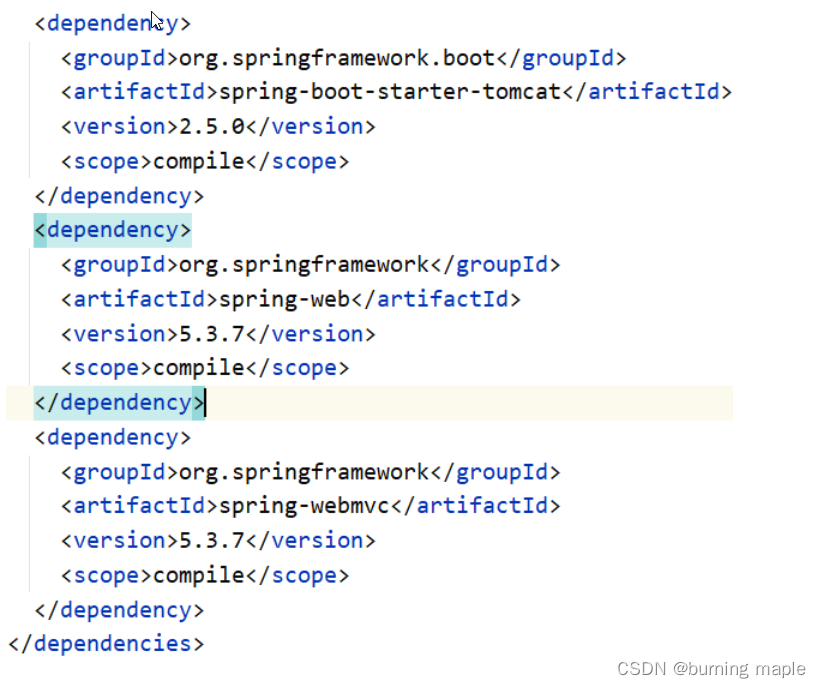
里面的引入了 spring-web 和 spring-webmvc 的依赖,这就是为什么我们的工程中没有依赖这两个包还能正常使用 springMVC 中的注解的原因。
结论:以后需要使用技术,只需要引入该技术对应的起步依赖即可
小结
starter:springboot中常见的项目名称,定义了当前项目使用的所有项目坐标,以达到减少依赖配置的目的。
parent:所有springboot项目要继承的项目,定义了若干个坐标的版本号,(依赖管理,而非依赖),以达到减少依赖冲突的目的
实际开发
使用任意坐标时,仅书写GAV中的G和A,V由SpringBoot提供
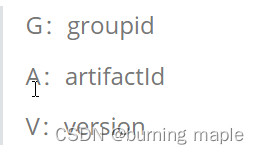
如发生坐标错误,再指定version(要小心版本冲突)
程序启动
创建的每一个 SpringBoot 程序时都包含一个类似与下面的类,我们将这个类称作引导类
@SpringBootApplication
public class Springboot01QuickstartApplication {

    public static void main(String[] args) {
        SpringApplication.run(Springboot01QuickstartApplication.class, args);
    }
}
-
SpringBoot在创建项目时,采用jar的打包方式 -
SpringBoot的引导类是项目的入口,运行main方法就可以启动项目因为我们在
pom.xml中配置了spring-boot-starter-web依赖,而该依赖通过前面的学习知道它依赖tomcat,所以运行main方法就可以使用tomcat启动咱们的工程。切换web服务器
现在我们启动工程使用的是
tomcat服务器,想要使用其他服务器,例如jetty时,需要使用exclusion标签将默认的tomcat服务器给排除掉。
排除tomcat
<dependency>
    <groupId>org.springframework.boot</groupId>
    <artifactId>spring-boot-starter-web</artifactId>
    <exclusions>
        <exclusion>
            <artifactId>spring-boot-starter-tomcat</artifactId>
            <groupId>org.springframework.boot</groupId>
        </exclusion>
    </exclusions>
</dependency>
引入 jetty 服务器
<dependency>
    <groupId>org.springframework.boot</groupId>
    <artifactId>spring-boot-starter-jetty</artifactId>
</dependency>
通过切换服务器,我们不难发现在使用 SpringBoot 换技术时只需要导入该技术的起步依赖即可。
配置文件
我们现在启动服务器默认的端口号是 8080,访问路径可以书写为
http://localhost:8080/books/1
想要修改端口号时就需要配置文件了:
在Springboot中,提供了三种配置方式
1.application.properties
server.port=80
2.application.yml
server:
	port: 81
3.application.yaml
server:
	port: 82
注:SpringBoot 程序的配置文件名必须是 application ,只是后缀名不同。
示例
环境准备
创建一个新工程 springboot_02_base_config 用来演示不同的配置文件,工程环境和入门案例一模一样,结构如下:
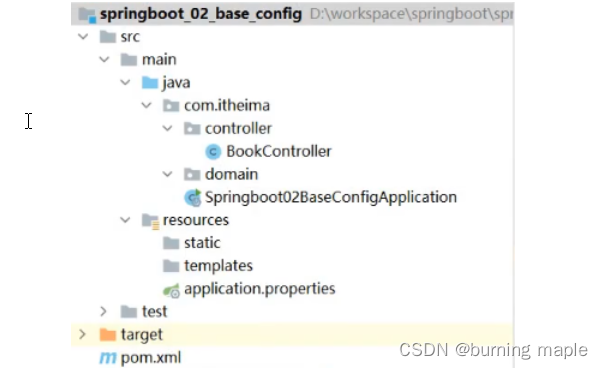
在该工程中的 com.itheima.controller 包下创建一个名为 BookController 的控制器。内容如下:
@RestController
@RequestMapping("/books")
public class BookController {

    @GetMapping("/{id}")
    public String getById(@PathVariable Integer id){
        System.out.println("id ==> "+id);
        return "hello , spring boot!";
    }
}
不同配置文件演示:
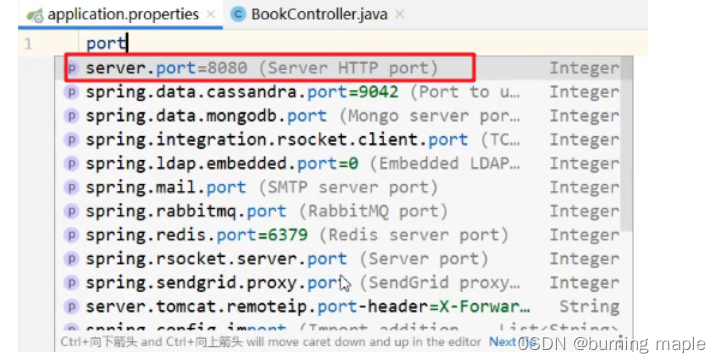
配合文件必须放在 resources 目录下,而该目录下有一个名为 application.properties 的配置文件,我们就可以在该配置文件中修改端口号,在该配置文件中书写 port ,Idea 就会提示,如下:
若无提示,则需要在项目结构中把新建的yml,yaml文件设置为配置文件
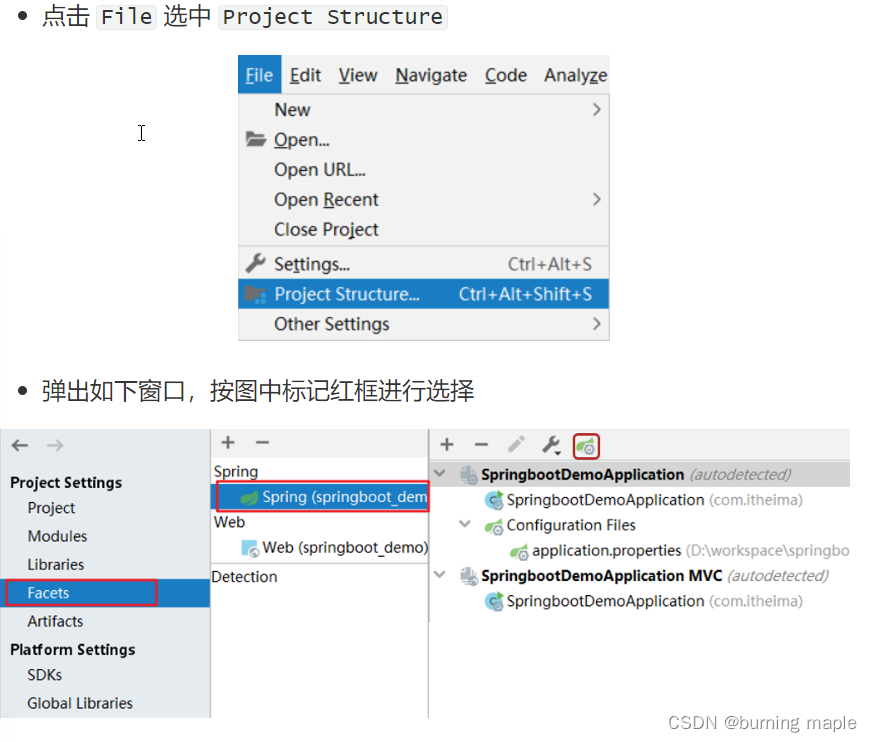
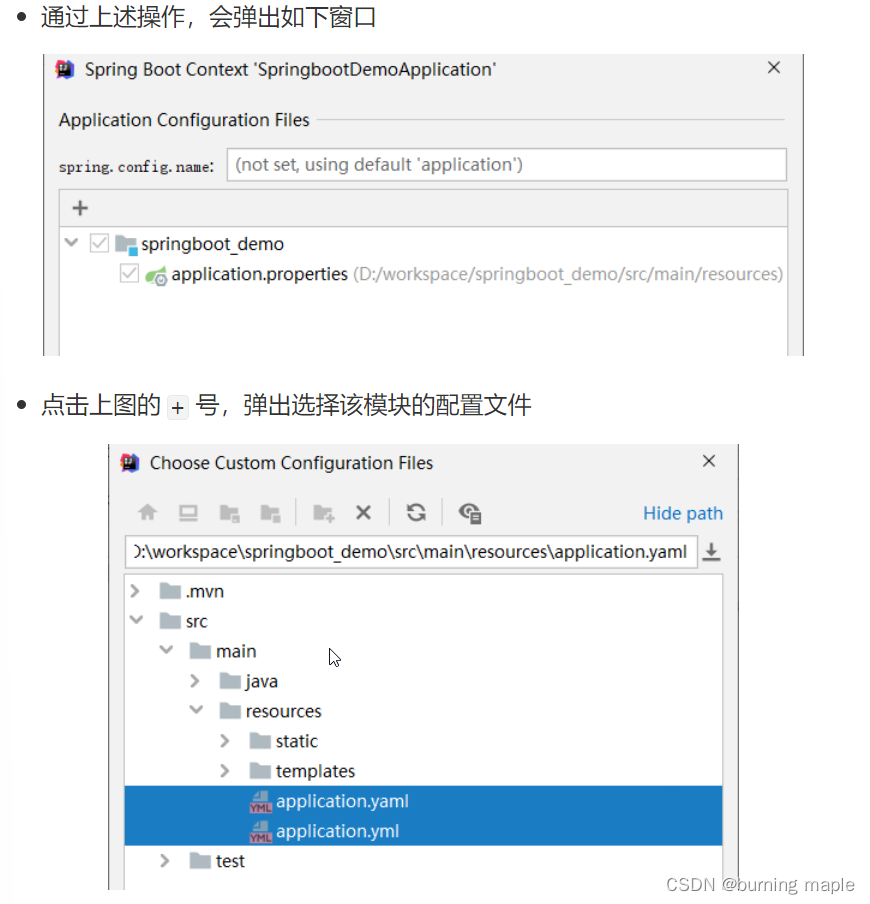
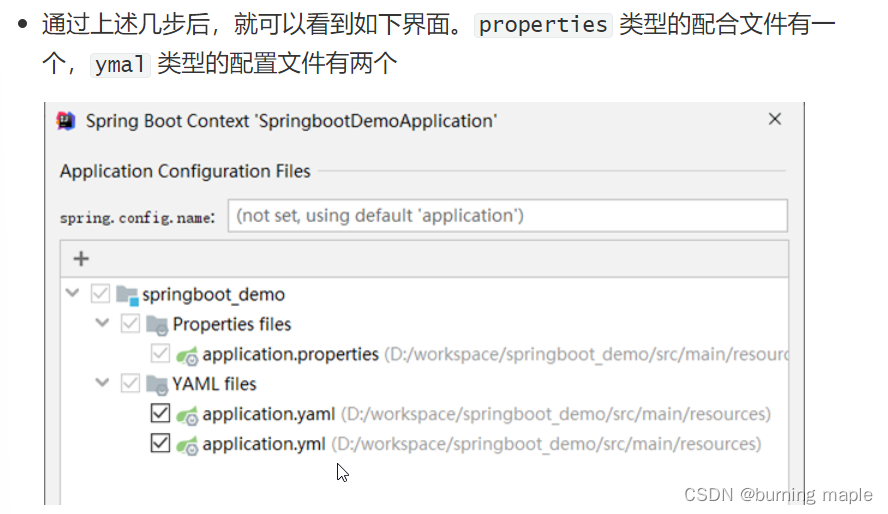
配置后就会有提示
按照之前的配置文件内容写配置文件即可,
当多个配置文件同时存在时,优先级:
.properties>yml>yaml
所以测试其他配置文件时要把其他配置文件先删除或移走。
yaml格式
一种数据序列化格式。这种格式的配置文件在近些年已经占有主导地位,那么这种配置文件和前期使用的配置文件是有一些优势的,我们先看之前使用的配置文件。
最开始我们使用的是 xml ,格式如下:
<enterprise>
    <name>itcast</name>
    <age>16</age>
    <tel>4006184000</tel>
</enterprise>
properties类型的配置文件如下
enterprise.name=itcast
enterprise.age=16
enterprise.tel=4006184000
yaml 类型的配置文件内容如下
enterprise:
	name: itcast
	age: 16
	tel: 4006184000
优点:
-
容易阅读
yaml类型的配置文件比xml类型的配置文件更容易阅读,结构更加清晰 -
容易与脚本语言交互
-
以数据为核心,重数据轻格式
yaml 更注重数据,而 xml 更注重格式
YAML 文件扩展名:
.yml:主流
.yaml:
上面两种后缀名都可以,以后使用更多的还是 yml 的。
yml/yaml语法规则
- 大小写敏感
- 属性层级关系使用多行描述,每行结尾用冒号结束
- 使用缩进表示层级关系,同层级左侧对其,之云希使用空格(不能用Tab)
- 空格个数不重要,保证左侧对其即可
- 属性名与属性值之间要使用冒号+空格作为分割
- #表示注释
核心规则:数据前面要加空格与冒号隔开(同第五条)
数组数据在数据书写位置的下方使用减号作为数据开始符号,每行书写一个数据,减号与数据间空格分隔,例如:
  enterprise:
  name: itcast
  age: 16
  tel: 4006184000
  subject:
    - Java
    - 前端
    - 大数据
yml配置文件数据读取
环境准备
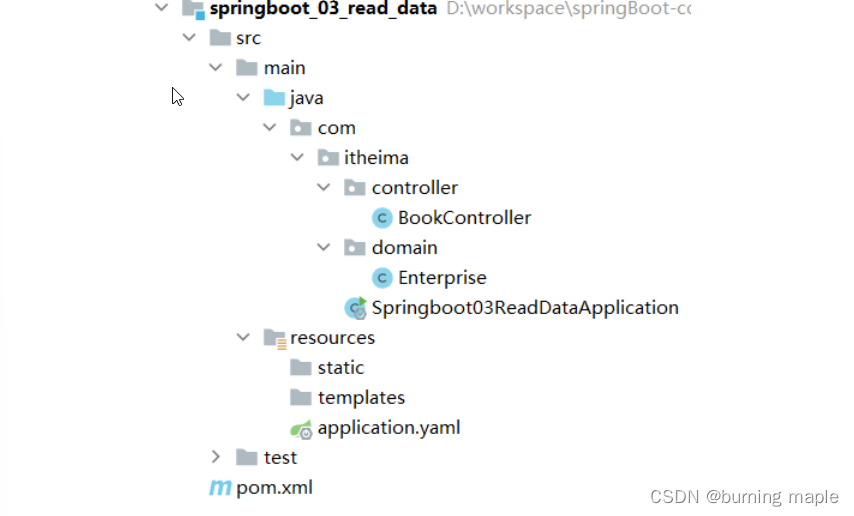
新创建一个名为 springboot_03_read_data 的 SpringBoot 工程,目录结构如下
在 com.itheima.controller 包写创建名为 BookController 的控制器,内容如下
@RestController
@RequestMapping("/books")
public class BookController {

    @GetMapping("/{id}")
    public String getById(@PathVariable Integer id){
        System.out.println("id ==> "+id);
        return "hello , spring boot!";
    }
}
在 com.itheima.domain 包下创建一个名为 Enterprise 的实体类等会用来封装数据,内容如下
public class Enterprise {
    private String name;
    private int age;
    private String tel;
    private String[] subject;

    //setter and getter

    //toString
}
在 resources 下创建一个名为 application.yml 的配置文件,里面配置了不同的数据,内容如下
lesson: SpringBoot

server:
  port: 80

enterprise:
  name: itcast
  age: 16
  tel: 4006184000
  subject:
    - Java
    - 前端
    - 大数据
读取配置数据
使用 @Value注解
使用 @Value("表达式") 注解可以从配合文件中读取数据,注解中用于读取属性名引用方式是:${一级属性名.二级属性名……}
@RestController
@RequestMapping("/books")
public class BookController {

    @Value("${lesson}")
    private String lesson;
    @Value("${server.port}")
    private Integer port;
    @Value("${enterprise.subject[0]}")
    private String subject_00;

    @GetMapping("/{id}")
    public String getById(@PathVariable Integer id){
        System.out.println(lesson);
        System.out.println(port);
        System.out.println(subject_00);
        return "hello , spring boot!";
    }
}
Environment对象
SpringBoot 还可以使用 @Autowired 注解注入 Environment 对象的方式读取数据
这种方式 SpringBoot 会将配置文件中所有的数据封装到 Environment 对象中,如果需要使用哪个数据只需要通过调用 Environment 对象的 getProperty(String name) 方法获取。
@RestController
@RequestMapping("/books")
public class BookController {

    @Autowired
    private Environment env;

    @GetMapping("/{id}")
    public String getById(@PathVariable Integer id){
        System.out.println(env.getProperty("lesson"));
        System.out.println(env.getProperty("enterprise.name"));
        System.out.println(env.getProperty("enterprise.subject[0]"));
        return "hello , spring boot!";
    }
}
这种方式在开发中我们很少使用
自定义对象
SpringBoot 还提供了将配置文件中的数据封装到我们自定义的实体类对象中的方式。具体操作如下:
- 将实体类bean交给Spring管理,在类上加入@component注解
- 使用@configurationProperties注解表示加载配置文件,在该注解中也可以使用
prefix属性指定只加载指定前缀的数据 - 在
BookController中进行注入
具体代码如下
Enterprise实体类内容如下:
@Component
@ConfigurationProperties(prefix = "enterprise")
@Data
public class Enterprise {
    private String name;
    private int age;
    private String tel;
    private String[] subject;
BookController 内容如下:
@RestController
@RequestMapping("/books")
public class BookController {

    @Autowired
    private Enterprise enterprise;

    @GetMapping("/{id}")
    public String getById(@PathVariable Integer id){
        System.out.println(enterprise.getName());
        System.out.println(enterprise.getAge());
        System.out.println(enterprise.getSubject());
        System.out.println(enterprise.getTel());
        System.out.println(enterprise.getSubject()[0]);
        return "hello , spring boot!";
    }
}
使用第三种方式,在实体类上有警告提示
在pom.xml添加如下依赖即可:
<dependency>
<groupId>org.springframework.boot</groupId>
    <artifactId>spring-boot-configuration-processor</artifactId>
    <optional>true</optional>
</dependency>
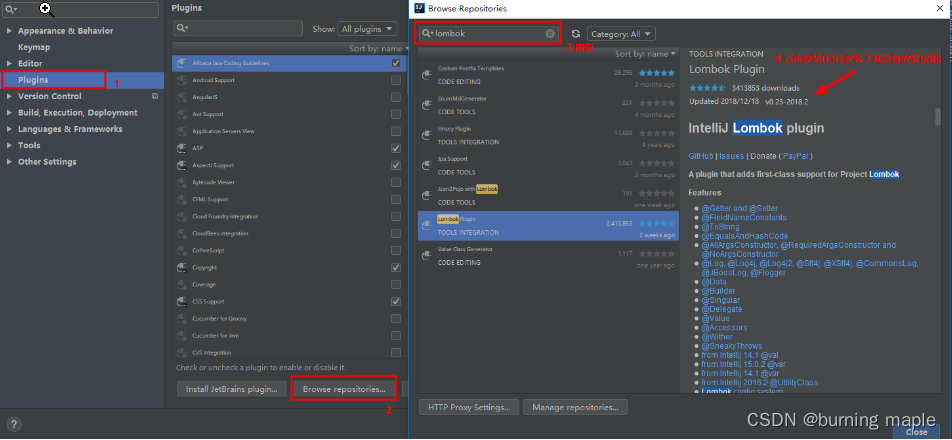
注:其中的@Data相当于提供了自动生成setter/getter、equals、canEqual、hashCode、toString方法
需要引入依赖
<dependency>
	<groupId>org.projectlombok</groupId>
	<artifactId>lombok</artifactId>
	<version>1.18.4</version>
	<scope>provided</scope>
</dependency>
同时安装插件:
若编译时出错,可能是没有enable注解处理器,进行以下设置即可
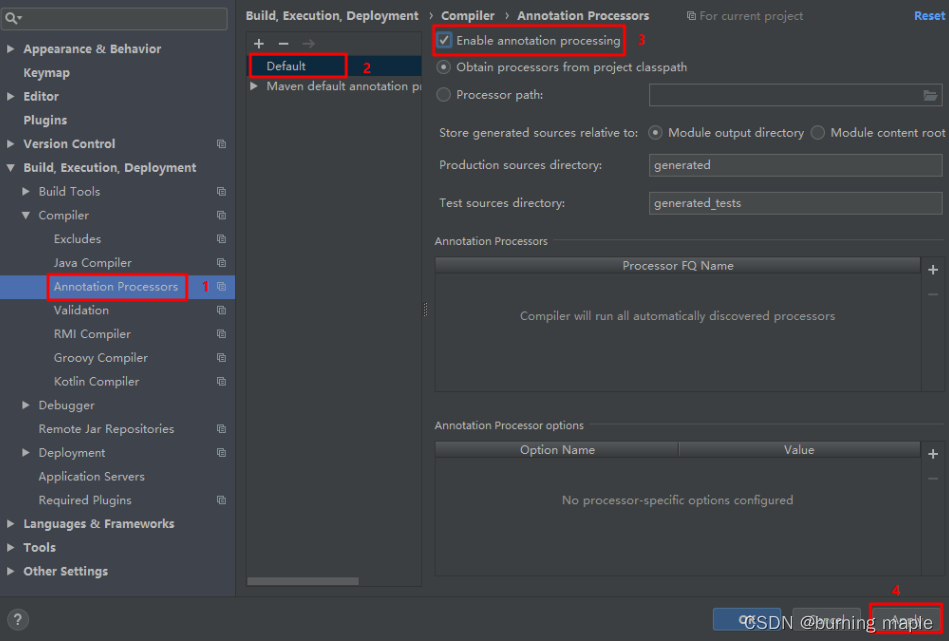
多环境配置
以后在工作中,对于开发环境、测试环境、生产环境的配置肯定都不相同
来回的修改配置会很麻烦,而 SpringBoot 给开发者提供了多环境的快捷配置,需要切换环境时只需要改一个配置即可。不同类型的配置文件多环境开发的配置都不相同,接下来对不同类型的配置文件进行说明
yaml/yml文件
在 application.yml 中使用 --- 来分割不同的配置,可以使用如下配置来启用都一段配置
#设置启用的环境
spring:
  profiles:
    active: dev  #表示使用的是开发环境的配置
综上所述,application.yml 配置文件内容如下
#设置启用的环境
spring:
  profiles:
    active: dev

---
#开发
spring:
  config:
    activate:
      on-profile: dev
---
#生产
spring:
  config:
    activate:
      on-profile: pro
server:
  port: 81
---
#测试
spring:
  config:
    activate:
      on-profile: test
server:
  port: 82
---
properties文件
properties 类型的配置文件配置多环境需要定义不同的配置文件
application-dev.properties 是开发环境的配置文件。我们在该文件中配置端口号为 80
server.port=80
application-test.properties 是测试环境的配置文件。我们在该文件中配置端口号为 81
server.port=81
application-pro.properties 是生产环境的配置文件。我们在该文件中配置端口号为 82
server.port=82
SpringBoot 只会默认加载名为 application.properties 的配置文件,所以需要在 application.properties 配置文件中设置启用哪个配置文件,配置如下:
spring.profiles.active=pro
命令行启动参数设置
使用 SpringBoot 开发的程序以后都是打成 jar 包,通过 java -jar xxx.jar 的方式启动服务的。
如何切换环境:
SpringBoot 提供了在运行 jar 时设置开启指定的环境的方式,如下
java –jar xxx.jar –-spring.profiles.active=test
修改端口号:
java –jar xxx.jar –-server.port=88
也可以同时设置多个配置,比如即指定启用哪个环境配置,又临时指定端口
java –jar springboot.jar –-server.port=88 –-spring.profiles.active=test
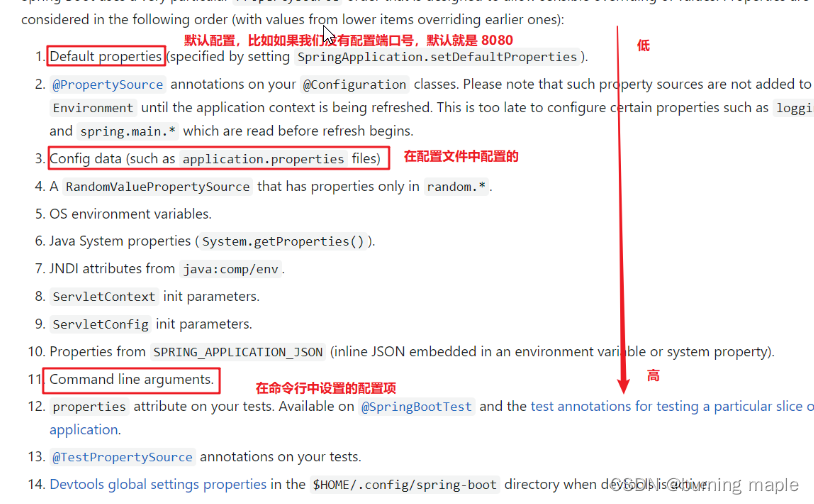
测试后就会发现命令行设置的端口号优先级高
配置的优先级其实 SpringBoot 官网已经进行了说明:
配置文件分类
SpringBoot 定义了配置文件不同的放置的位置;而放在不同位置的优先级时不同的。
SpringBoot 中4级配置文件放置位置:
- 1级:classpath:application.yml
路径下的配置文件 - 2级:classpath:config/application.yml
- 类路径下的
config下的配置文件 - 3级:file :application.yml
- file:下的配置文件
- 4级:file :config/application.yml
file:config下的配置文件
注:级别越高优先级越高
Springboot整合junit
回顾Spring整合junit
@RunWith(SpringJUnit4ClassRunner.class)
@ContextConfiguration(classes = SpringConfig.class)
public class UserServiceTest {

    @Autowired
    private BookService bookService;

    @Test
    public void testSave(){
        bookService.save();
    }
}
使用 @RunWith 注解指定运行器,使用 @ContextConfiguration 注解来指定配置类或者配置文件。而 SpringBoot 整合 junit 特别简单,分为以下三步完成
- 在测试类上添加
SpringBootTest注解 - 使用
@Autowired注入要测试的资源 - 定义测试方法进行测试
Springboot整合
环境准备
创建一个名为 springboot_07_test 的 SpringBoot 工程,工程目录结构如下:
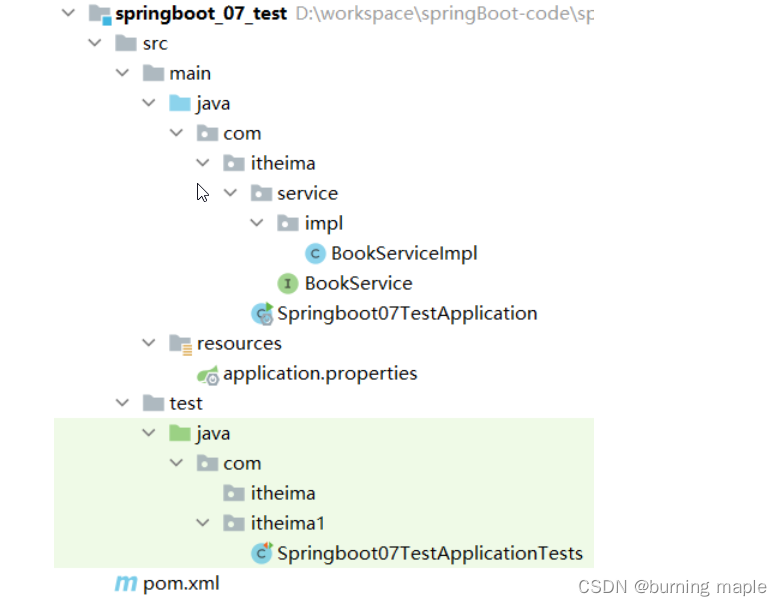
在 com.itheima.service 下创建 BookService 接口,内容如下
public interface BookService {
    public void save();
}
在 com.itheima.service.impl 包写创建一个 BookServiceImpl 类,使其实现 BookService 接口,内容如下
@Service
public class BookServiceImpl implements BookService {
    @Override
    public void save() {
        System.out.println("book service is running ...");
    }
}
编写测试类
在 test/java 下创建 com.itheima 包,在该包下创建测试类,将 BookService 注入到该测试类中
@SpringBootTest
class Springboot07TestApplicationTests {

    @Autowired
    private BookService bookService;

    @Test
    public void save() {
        bookService.save();
    }
}
注:这里的引导类所在包必须是测试类所在包及其子包
- 引导类所在包是
com.itheima - 测试类所在包是
com.itheima - 如果不满足这个要求的话,就需要在使用
@SpringBootTest注解时,使用classes属性指定引导类的字节码对象。如@SpringBootTest(classes = Springboot07TestApplication.class)
SpringBoot整合mybatis
Spring整合
Spring 整合 Mybatis 需要定义很多配置类
SpringConfig 配置类
-
导入
JdbcConfig配置类 -
导入
MybatisConfig配置类
@Configuration
@ComponentScan("com.itheima")
@PropertySource("classpath:jdbc.properties")
@Import({JdbcConfig.class,MyBatisConfig.class})
public class SpringConfig {
}
JdbcConfig 配置类
定义数据源(加载properties配置项:driver、url、username、password)
public class JdbcConfig {
    @Value("${jdbc.driver}")
    private String driver;
    @Value("${jdbc.url}")
    private String url;
    @Value("${jdbc.username}")
    private String userName;
    @Value("${jdbc.password}")
    private String password;

    @Bean
    public DataSource getDataSource(){
        DruidDataSource ds = new DruidDataSource();
        ds.setDriverClassName(driver);
        ds.setUrl(url);
        ds.setUsername(userName);
        ds.setPassword(password);
        return ds;
    }
}
MybatisConfig 配置类
- 定义
SqlSessionFactoryBean
定义映射配置
 @Bean
public MapperScannerConfigurer getMapperScannerConfigurer(){
    MapperScannerConfigurer msc = new MapperScannerConfigurer();
    msc.setBasePackage("com.itheima.dao");
    return msc;
}

@Bean
public SqlSessionFactoryBean getSqlSessionFactoryBean(DataSource dataSource){
    SqlSessionFactoryBean ssfb = new SqlSessionFactoryBean();
    ssfb.setTypeAliasesPackage("com.itheima.domain");
    ssfb.setDataSource(dataSource);
    return ssfb;
}
SpringBoot整合
创建模块
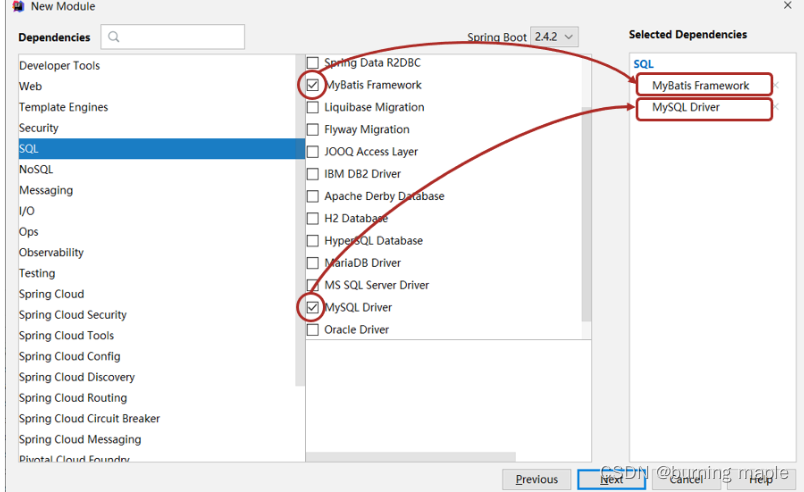
创建新模块,选择 Spring Initializr,并配置模块相关基础信息
选择当前模块需要使用的技术集(MyBatis、MySQL)
定义实体类
在 com.itheima.domain 包下定义实体类 Book,内容如下
public class Book {
    private Integer id;
    private String name;
    private String type;
    private String description;

    //setter and  getter

    //toString
}
定义dao接口
@Mapper
public interface BookDao {
    @Select("select * from tbl_book where id = #{id}")
    public Book getById(Integer id);
}
此处需要加@Mapper注解将Dao接口交给Spring管理
注:
若dao方法中含有多个参数,需要用@param注解隔开
@Mapper
public interface BookDao {
    @Select("select * from tbl_book where id = #{id} and name=#{name}")
    public Book getById(@Param("id")Integer id,@Param("name") String name);
}
编写配置
在 SpringBoot 的配置文件配置连接的数据库,用户名,密码
application.yml中配置如下内容
spring:
  datasource:
    driver-class-name: com.mysql.jdbc.Driver
    url: jdbc:mysql://localhost:3306/ssm_db
    username: root
    password: root
定义测试类
在 test/java 下定义包 com.itheima ,在该包下测试类,内容如下
@SpringBootTest
class Springboot08MybatisApplicationTests {

	@Autowired
	private BookDao bookDao;

	@Test
	void testGetById() {
		Book book = bookDao.getById(1);
		System.out.println(book);
	}
}
使用Druid数据源
现在我们并没有指定数据源,SpringBoot 有默认的数据源,我们也可以指定使用 Druid 数据源,按照以下步骤实现
导入 Druid 依赖
<dependency>
    <groupId>com.alibaba</groupId>
    <artifactId>druid</artifactId>
    <version>1.1.16</version>
</dependency>
在 application.yml 配置文件配置
可以通过 spring.datasource.type 来配置使用什么数据源。配置文件内容可以改进为
spring:
  datasource:
    driver-class-name: com.mysql.cj.jdbc.Driver
    url: jdbc:mysql://localhost:3306/ssm_db?serverTimezone=UTC
    username: root
    password: root
    type: com.alibaba.druid.pool.DruidDataSource


 1352
1352


 被折叠的 条评论
为什么被折叠?
被折叠的 条评论
为什么被折叠?
 到【灌水乐园】发言


