


ansible剧本进阶
一.剧本的高级特性
- 剧本高级特性是完全遵循python的循环结构来的
- 编程语言特有的逻辑控制语句
- 变量
- 循环
- 等等
你的剧本,可以考虑用高级特性,也可以不用
高级特性是为了简化剧本
比如,创建10个系统的用户
不用循环
手写
ansible bakcup -m user  -a "name=cc01"
ansible bakcup -m user  -a "name=cc02"
ansible bakcup -m user  -a "name=cc03"
ansible bakcup -m user  -a "name=cc04"

写在剧本中,ad-hoc命令转为剧本模式,转变为了剧本的四个tasks任务元素
- hosts: backup
  tasks:
    - name:  01 创建用户
      user:  "创建用户的参数"

    - name:  02 创建用户
      user:  "创建用户的参数"

    - name:  03 创建用户
      user:  "创建用户的参数"

    - name:  04 启动nginx
      systemd:  "启动服务的参数"

    - name:  04 启动nginx
      systemd:  "启动服务的参数"


这个写法太繁琐,可以优化
loop循环特性
直接用这种普通办法,也没毛病
关于剧本中模块的参数写法
有两个风格
风格1:是最正确的字典写法,参数,以字典形式去表示

---
- name: create user test1~5
  hosts: nfs
  tasks:
    - name: create test1
      user:
        name: test1
        state: present


风格2:简写,这个写法不属于yaml的语法,只是ansible剧本认识.
这叫做一个 缩写写法,简写写法
因为在剧本中,有单独的 关键字vars定义剧本变量

---
- name: create user test1~5
  hosts: nfs
  tasks:
    - name: create test1
      user: "name=test1  state=present"


#剧本注释
---
- name: create user test1~5    # Play的描述,说明此play的目的为创建用户test1至test5
  hosts: nfs                    # 指定此play将被执行的主机或主机组,这里是nfs组内的所有主机

  tasks:                        # 开始定义任务列表
    - name: create test1       # 任务的描述,简要说明此任务的目的,即创建用户test1
      user:                     # 使用user模块来管理用户账户
        name: test1             # user模块的参数,指定要创建的用户名为test1
        state: present          # user模块的另一个参数,指明用户账户的状态应为"存在"(present)
                                 # 这意味着如果用户test1尚不存在,Ansible将创建它;
                                 # 如果用户已存在,则该任务不会对现有用户做出改动,因为用户已经满足"存在"的状态要求。
二.循环
务必记住,对比理解
ad-hoc命令模式
转化为
yaml剧本模式
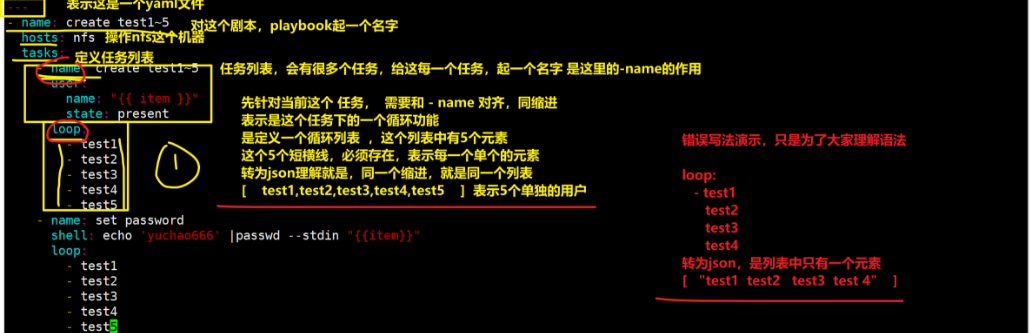
最新用法,循环的内置关键字是用loop定义循环变量
item关键字,去提取loop每次循环出来的值
简单理解为shell的for循环就行不用循环,去批量的创建,删除用户
[root@master-61 ~/my_scripts]#cat create_user.yml
- name: create user test1~5
  hosts: backup
  tasks:
    - name: create test1
      user:
        name: test1
        state: present
    - name: create test2
      user:
        name: test2
        state: present
    - name: create test3
      user:
        name: test3
        state: present
    - name: create tes4
      user:
        name: test4
        state: present
    - name: create test5
      user:
        name: test5
        state: present

[root@master-61 ~/my_scripts]#sed -i  's#present#absent#g'  create_user.yml
关于loop循环参数的语法
创建多个系统用户
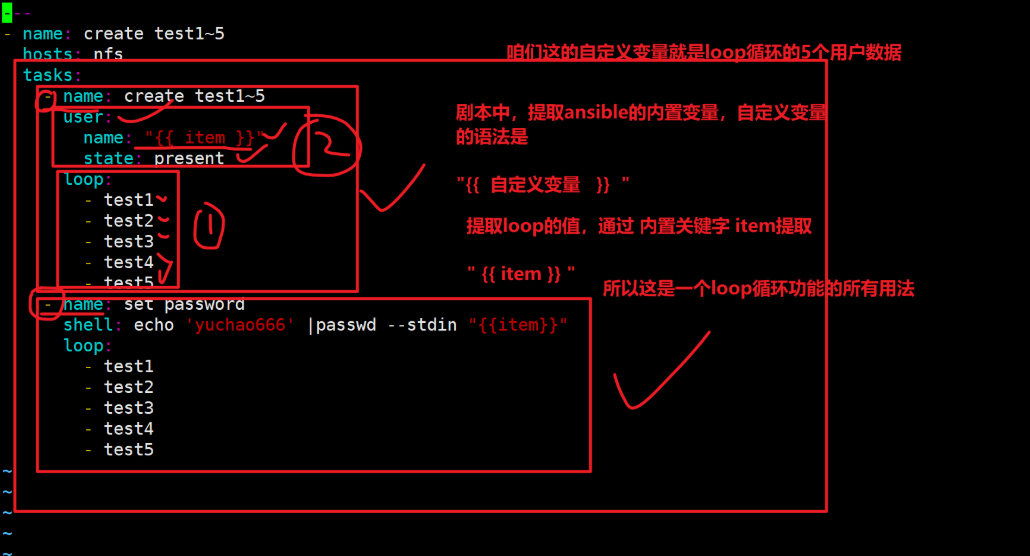
[root@master-61 ~/my_scripts]#cat create_user.yml
---
- name: create test1~5
  hosts: backup
  tasks:
    - name: create test1~5
      user:
        name: "{{ item }}"
        state: present
      loop:
        - test1
        - test2
        - test3
        - test4
        - test5
    - name: set password
      shell: echo 'yuchao666' |passwd --stdin "{{item}}"
      loop:
        - test1
        - test2
        - test3
        - test4
        - test5


      结果:
      [root@ansible-1 backup]# tail -5 /etc/passwd
test1:x:1005:1006::/home/test1:/bin/bash
test2:x:1006:1007::/home/test2:/bin/bash
test3:x:1007:1008::/home/test3:/bin/bash
test4:x:1008:1009::/home/test4:/bin/bash
test5:x:1009:1010::/home/test5:/bin/bash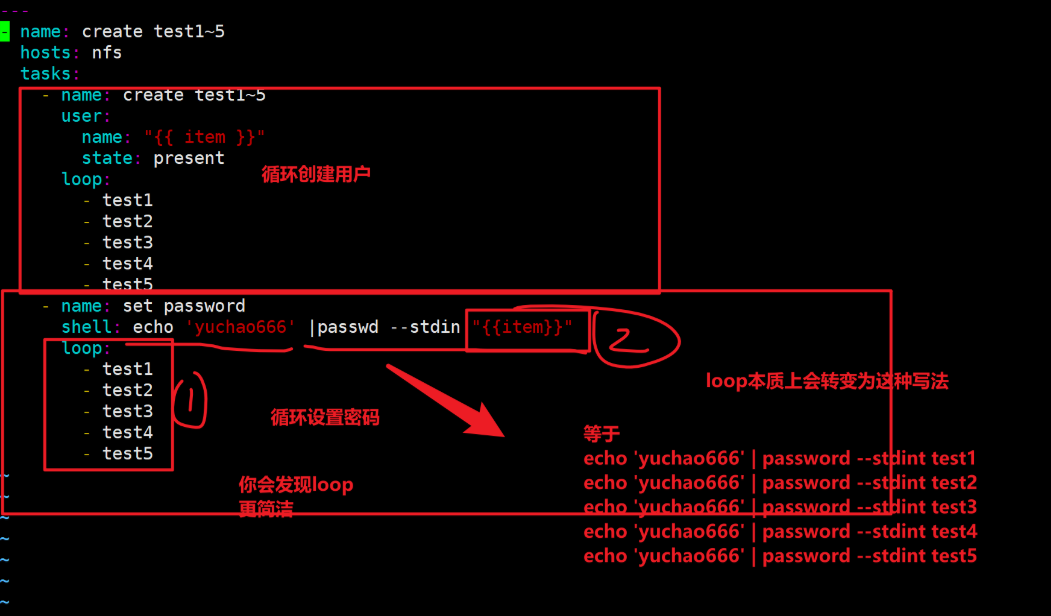
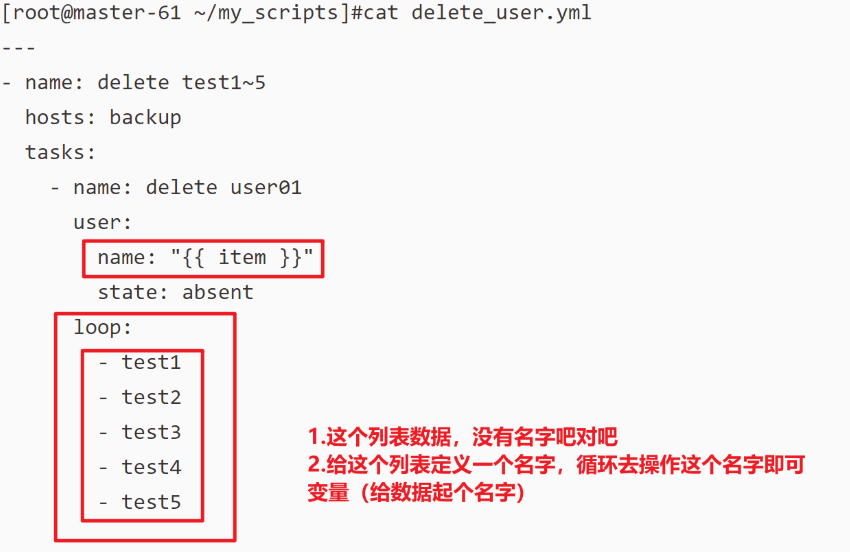
删除多个用户
[root@master-61 ~/my_scripts]#cat delete_user.yml
---
- name: delete test1~5
  hosts: backup
  tasks:
    - name: delete user01
      user:
        name: "{{ item }}"
        state: absent
      loop:
        - test1
        - test2
        - test3
        - test4
        - test5

   结果:
   [root@ansible-1 backup]# tail -5 /etc/passwd
test1:x:1005:1006::/home/test1:/bin/bash
test2:x:1006:1007::/home/test2:/bin/bash
test3:x:1007:1008::/home/test3:/bin/bash
test4:x:1008:1009::/home/test4:/bin/bash
test5:x:1009:1010::/home/test5:/bin/bash
[root@ansible-1 backup]# tail -5 /etc/passwd
rsync:x:998:1001::/home/rsync:/bin/bash
cc01:x:1001:1002::/home/cc01:/bin/bash
cc02:x:1002:1003::/home/cc02:/bin/bash
cc03:x:1003:1004::/home/cc03:/bin/bash
cc04:x:1004:1005::/home/cc04:/bin/bash
三.vars关键字定义循环变量
上面会发现已然有重复的变量,还可以再简化
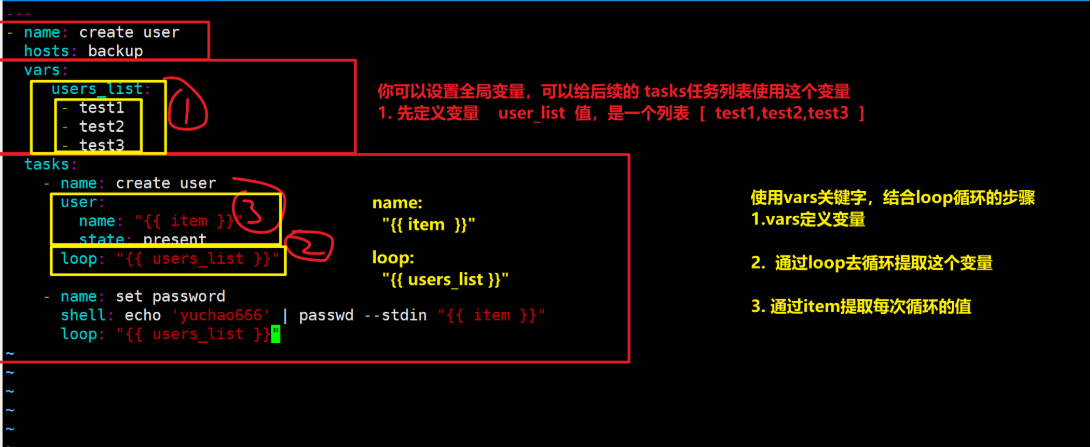
- 通过vars关键字定义用户列表,变量一般定义在任务开始之前
- 通过item关键字提取loop中每次循环的数据
循环创建用户且设置密码,通过vars关键字,定义好用户列表变量user_list
然后通过loop去循环变量
通过item去提取每次循环的值
这是在通过loop提取列表的值
loop还可以循环字典的值

---
- name: create user
hosts: backup
vars:
users_list:
- test1
- test2
- test3
tasks:
- name: create user
user:
name: "{{ item }}"
state: present
loop: "{{ users_list }}"
- name: set password
shell: echo 'yuchao666' | passwd --stdin "{{ item }}"
loop: "{{ users_list }}"
效果:
[root@ansible-1 backup]# tail -5 /etc/passwd
cc03:x:1003:1004::/home/cc03:/bin/bash
cc04:x:1004:1005::/home/cc04:/bin/bash
test1:x:1005:1006::/home/test1:/bin/bash
test2:x:1006:1007::/home/test2:/bin/bash
test3:x:1007:1008::/home/test3:/bin/bash
[root@ansible-1 backup]# su test1
[test1@backup backup]$ ip a
1: lo: <LOOPBACK,UP,LOWER_UP> mtu 65536 qdisc noqueue state UNKNOWN group default qlen 1000
link/loopback 00:00:00:00:00:00 brd 00:00:00:00:00:00
inet 127.0.0.1/8 scope host lo
valid_lft forever preferred_lft forever
inet6 ::1/128 scope host
valid_lft forever preferred_lft forever
2: eth0: <BROADCAST,MULTICAST,UP,LOWER_UP> mtu 1500 qdisc pfifo_fast state UP group default qlen 1000
link/ether 00:0c:29:5a:5f:57 brd ff:ff:ff:ff:ff:ff
inet 10.0.1.189/24 brd 10.0.1.255 scope global noprefixroute dynamic eth0
valid_lft 1485sec preferred_lft 1485sec
inet6 fe80::def:df2b:b8be:8dab/64 scope link noprefixroute
valid_lft forever preferred_lft forever
[test1@backup backup]$ exit
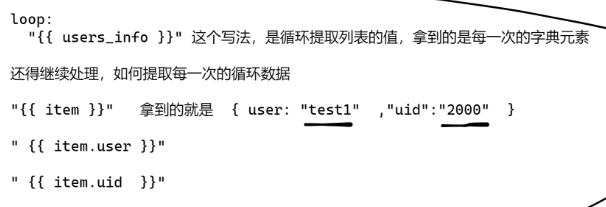
exitloop结合vars循环提取字典的值
循环创建用户,且设置用户uid
结合变量,循环,字典数据,创建用户信息
---
- name: create user
  hosts: backup
  vars:
    users_info:
      - {user: 't1', uid: '2000'}
      - {user: 't2', uid: '2001'}
      - {user: 't3', uid: '2002'}
      - {user: 't4', uid: '2003'}

  tasks:
  - name: create user and uid
    user:
        name: "{{ item.user }}"
        uid: "{{ item.uid }}"

    loop:
      "{{users_info}}"


      效果:
      [root@ansible-1 script]# ansible-playbook create_user_id.yaml

PLAY [create user] ****************************************************************************************

TASK [Gathering Facts] ************************************************************************************
ok: [10.0.1.189]

TASK [create user and uid] ********************************************************************************
changed: [10.0.1.189] => (item={u'user': u't1', u'uid': u'2000'})
changed: [10.0.1.189] => (item={u'user': u't2', u'uid': u'2001'})
changed: [10.0.1.189] => (item={u'user': u't3', u'uid': u'2002'})
changed: [10.0.1.189] => (item={u'user': u't4', u'uid': u'2003'})

PLAY RECAP ************************************************************************************************
10.0.1.189                 : ok=2    changed=1    unreachable=0    failed=0    skipped=0    rescued=0    ignored=0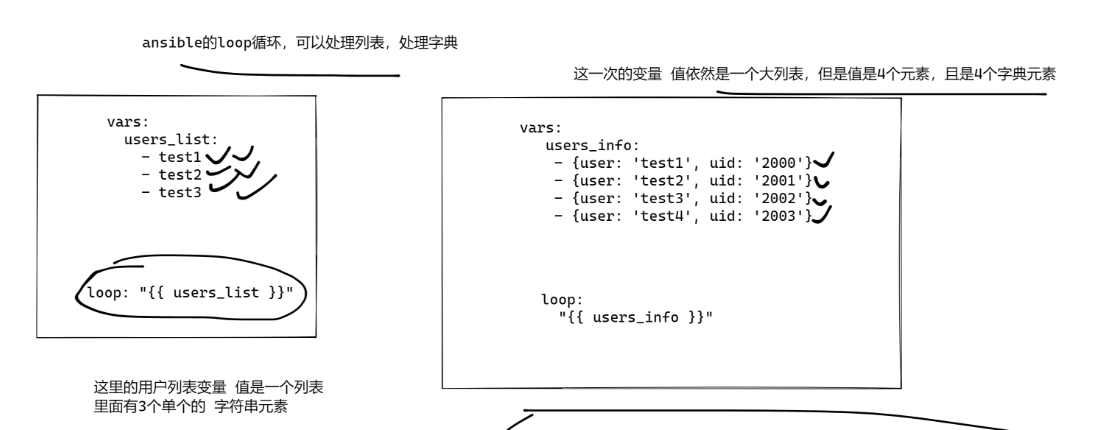
循环
1.  loop关键字用于对某变量进行循环提取值
2.  item去取值
3. "{{ item }}"

变量两个用法
例如rsync创建备份文件夹
比如部署nfs、rsync、nginx的综合剧本;
1.要安装多个软件  nfs-utils   rpcbind  nginx  wget  net-tools vim
(定义为列表,循环去提取列表中的值,)
loop循环的知识用在 yum安装多个软件

2.创建多个目录rsynd.conf设置了多个备份目录,
ad-hoc临时命令模式
file 创建文件夹
file 创建文件夹
file 创建文件夹

loop循环的知识用在 file创建多个文件

3.复制多个目录
loop循环的知识用在 copy拷贝多个文件

4.每个文件的权限都不一样
繁琐的写法
- hosts: backup
  tasks:
  - name: 01安装rsync
    yum:
      name: rsync
      state: installed
  - name: 02 发送配置文件模板
    copy:
      src: /script/rsyncd.conf
      dest: /etc/rsyncd.conf
  - name: 02 发送密码文件
    copy:
      src: /script/rsync.passwd
      dest: /etc/rsync.passwd
      mode: '600'

  - name: 03 创建www用户组
    group:
      name: www
      gid: 1000
  - name: 04 创建www用户
    user:
      name: www
      uid: 1000
      group: www
      create_home: no
      shell: /sbin/nologin
  - name: 05 备份目录创建与授权/data
    file:
      path: /data
      state: directory
      owner: www
      group: www
      mode: '755'
  - name: 06 备份目录创建与授权/backup
    file:
      path: /backup
      state: directory
      owner: www
      group: www
      mode: '755'
  - name: 07 启动服务
    systemd:
      name: rsyncd
      state: started
      enabled: yes
循环优化写法(利用loop循环的知识点,简化一些操作)
前提条件是,原本的动作是重复的,不是重复,就没办法
如下yaml
- name: yuchaoit.cn
  hosts: backup
  tasks:
  - name: create_data
    file:
      path: "{{ item.file_path }}"
      state: directory
      owner: www
      group: www
      mode: "{{ item.mode }}"
    loop:
      - { file_path:'/data' ,mode:'755' }
      - { file_path:'/backup' ,mode:'755' }
四.变量定义
vars自定义变量
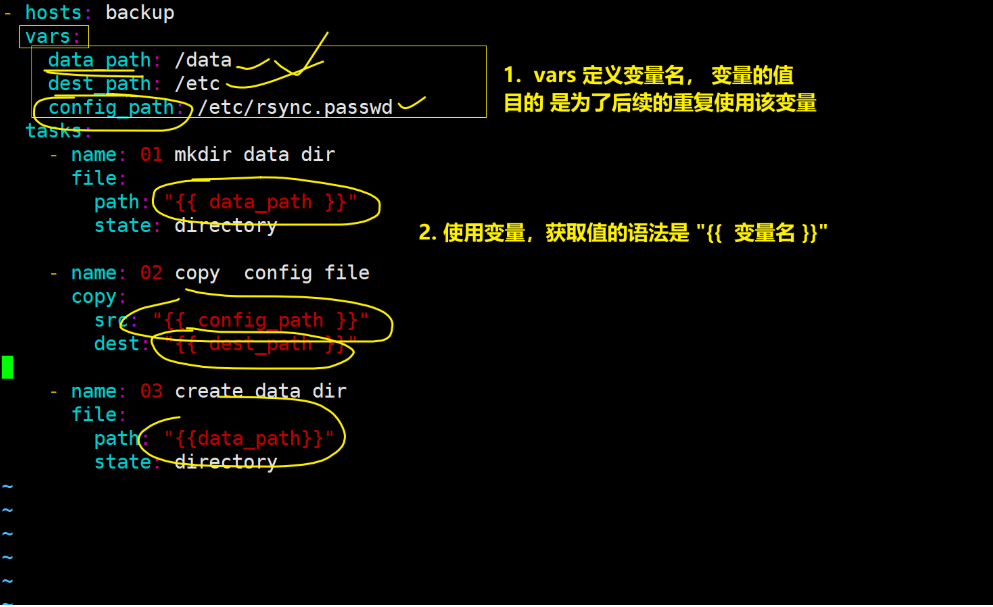
- hosts: backup
  vars:
    data_path: /data
    dest_path: /etc
    config_path: /etc/rsync.passwd
  tasks:
    - name: 01 mkdir data dir
      file:
        path: "{{ data_path }}"
        state: directory

    - name: 02 copy  config file
      copy:
        src: "{{ config_path }}"
        dest: "{{ dest_path }}"
ansible内置变量
ansible默认提供了一个模块,setup模块,
master-61在通过ssh远程连接,操作目标机器的时候
ansible会默认收集这个机器的所有信息,放入到一个setup模块中
这个机器的 主机名,ip地址,mac地址,磁盘数量,是否是虚拟化,cpu核数
所有的这些静态数据
ansible backup -m setup
这个模块会默认采集目标机器的所有静态信息
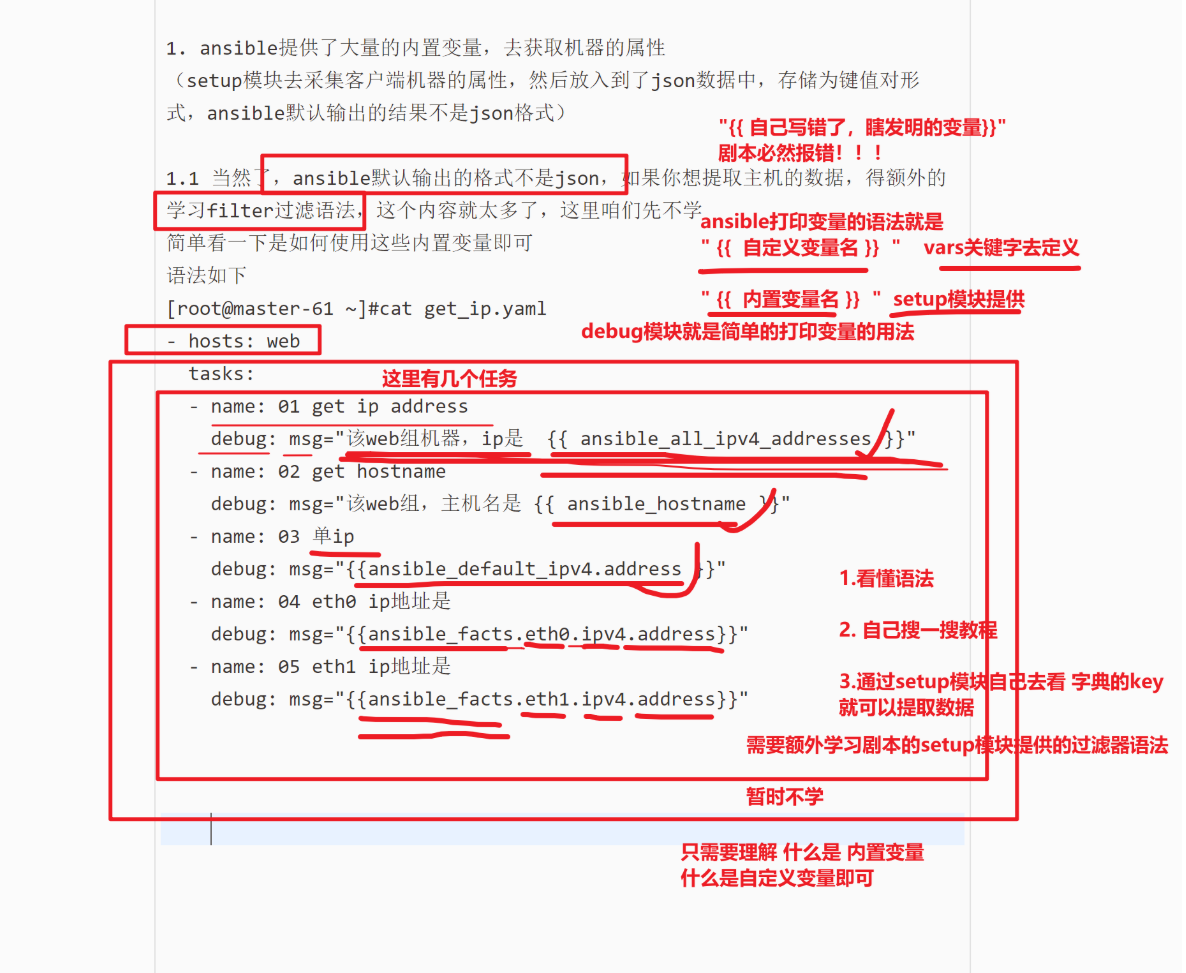
1. ansible提供了大量的内置变量,去获取机器的属性
(setup模块去采集客户端机器的属性,然后放入到了json数据中,存储为键值对形式,ansible默认输出的结果不是json格式)
1.1 当然了,ansible默认输出的格式不是json,如果你想提取主机的数据,得额外的学习filter过滤语法,这个内容就太多了,这里咱们先不学
简单看一下是如何使用这些内置变量即可
语法如下
[root@master-61 ~]#cat get_ip.yaml
- hosts: backup
tasks:
- name: 01 get ip address
debug: msg="该web组机器,ip是 {{ ansible_all_ipv4_addresses }}"
- name: 02 get hostname
debug: msg="该web组,主机名是 {{ ansible_hostname }}"
- name: 03 单ip
debug: msg="{{ansible_default_ipv4.address }}"
- name: 04 eth0 ip地址是
debug: msg="{{ansible_facts.eth0.ipv4.address}}"
- name: 05 eth1 ip地址是
debug: msg="{{ansible_facts.eth1.ipv4.address}}"
2. 修改ansible的配置文件,让命令输出的结果改为json
3. 后续的通过jq命令方便的提取数据
4.简单的构造了,模拟setup输出的数据,然后我可以根据key,提取value
{
"ansible_facts":{
"ansible_all_ipv4_addresses":[
"10.0.0.41",
"172.16.1.41",
"192.168.1.41"
]
}
}主机清单文件的变量
cat /etc/ansible/hosts

[web:vars]
ansible_port=22
ansible_password='123456'

[web]
192.168.106.[7:9]

[nfs]
192.168.106.31

[backup]
192.168.106.41  ansible_port=22  ansible_password='123456'
loop循环使用变量
[root@master-61 ~/my_scripts]#cat loop_install_rsync.yaml
- name: yuchaoit.cn
  hosts: backup
  vars:
    my_files:
      - { file_path: '/data' ,mode: '755' }
      - { file_path: '/backup' ,mode: '755' }

  tasks:
  - name: create_data
    file:
      path: "{{ item.file_path }}"
      state: directory
      owner: www
      group: www
      mode: "{{ item.mode }}"
    loop:
      "{{ my_files }}"
关于ansible变量的知识
1. vars定义自定义变量,可以在剧本中使用 ,结合loop循环提取
2. 学了ansible的内置变量,setup模块采集的静态属性,可以通过过滤器语法提取,也可以转为json输出格式,用jq命令提取
3. 主机清单中的变量  /etc/ansible/hosts
4. 注册变量
register注册变量

官网文档
讲解了 register模块的用法
https://docs.ansible.com/ansible/latest/user_guide/playbooks_variables.html#registering-variables

关于命令执行结果的返回值信息提取
关于ansible中的返回值提供了哪些参数
比如解释了 msg: "{{ about_ip_log.stdout_lines }}" 这个stdout_lines提取返回值的结果的用法
https://docs.ansible.com/ansible/latest/reference_appendices/common_return_values.html
获取内置变量的信息,写入到文件,然后读取该文件
- hosts: backup
  tasks:
  - name: echo ip address
    shell: "echo {{ ansible_default_ipv4.address }} >> /tmp/ip.log"

  - name: cat ip.log
    shell: "cat /tmp/ip.log"
    register: about_ip_log

  - name: debug about_ip_log
    debug:
      msg: "{{ about_ip_log.stdout_lines }}"
1. 执行了个命令,默认有返回值
2. 通过register提取该返回值,写入到变量
3. 通过debug模块,msg参数 ,打印了这个变量的信息
注册多个变量
执行多个命令,并且注册多个变量,提取多个返回值
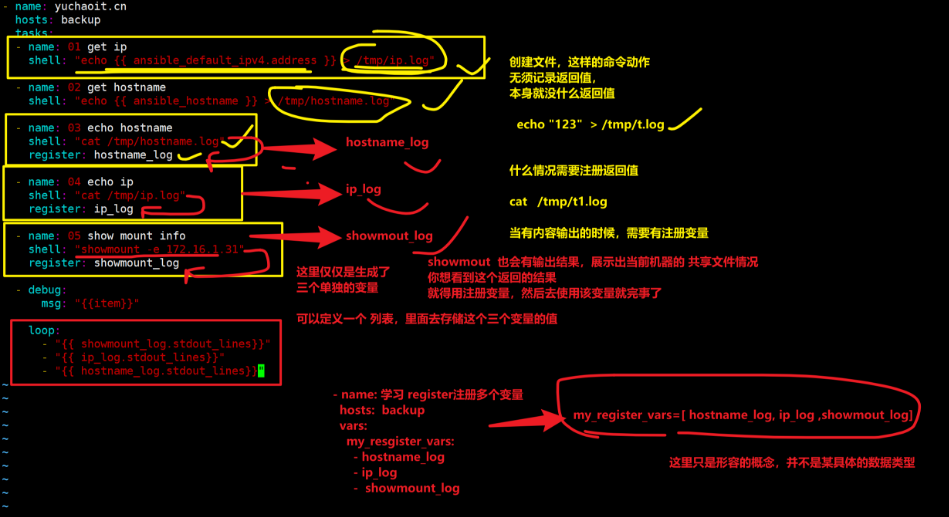
实践得出真知
[root@master-61 ~/my_scripts]#cat test2_register.yml
- name: yuchaoit.cn
hosts: backup
tasks:
- name: 01 get ip
shell: "echo {{ ansible_default_ipv4.address }} > /tmp/ip.log"
- name: 02 get hostname
shell: "echo {{ ansible_hostname }} > /tmp/hostname.log"
- name: 03 echo hostname
shell: "cat /tmp/hostname.log"
register: hostname_log
- name: 04 echo ip
shell: "cat /tmp/ip.log"
register: ip_log
- name: 05 show mount info
shell: "showmount -e 172.16.1.41"
register: showmount_log
- debug:
msg: "{{item}}"
loop:
- "{{ showmount_log.stdout_lines}}"
- "{{ ip_log.stdout_lines}}"
- "{{ hostname_log.stdout_lines}}"
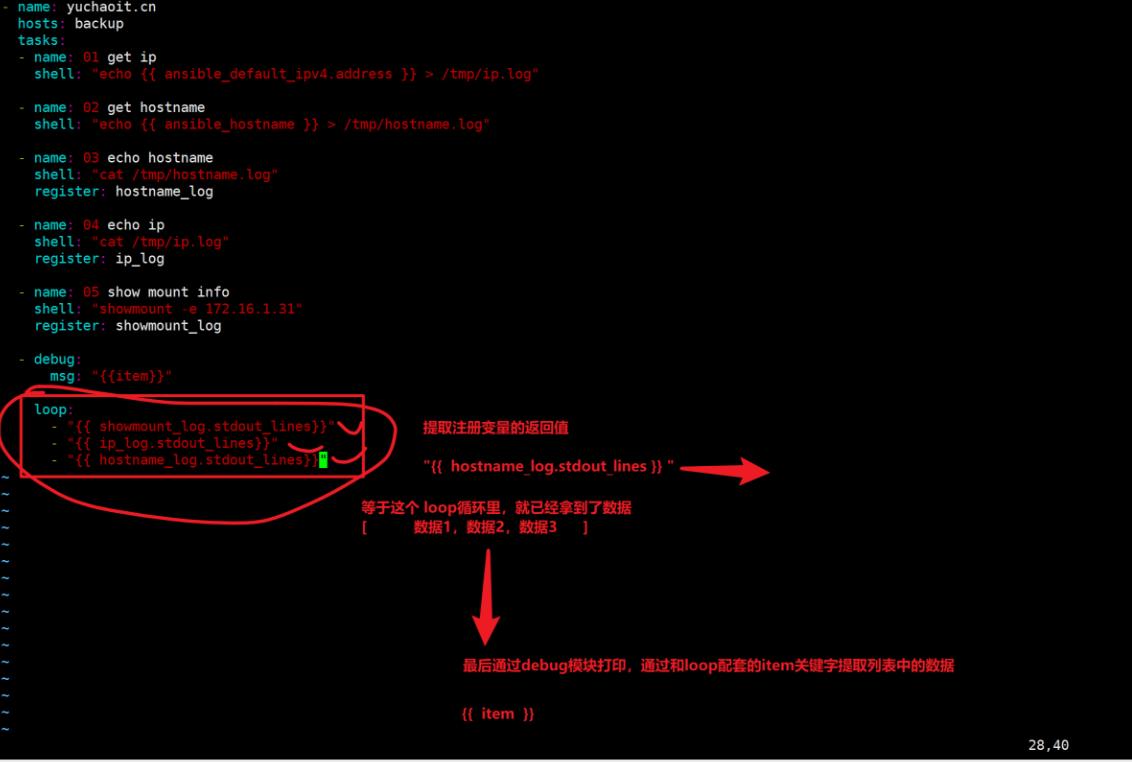
- name: yuchaoit.cn
hosts: backup
tasks:
- name: 01 get ip
shell: "echo {{ ansible_default_ipv4.address }} > /tmp/ip.log"
- name: 02 get hostname
shell: "echo {{ ansible_hostname }} > /tmp/hostname.log"
- name: 03 echo hostname
shell: "cat /tmp/hostname.log"
register: hostname_log
- name: 04 echo ip
shell: "cat /tmp/ip.log"
register: ip_log
- name: 05 show mount info
shell: "showmount -e 172.16.1.31"
register: showmount_log
- debug:
msg: "{{item}}"
loop:
- "{{ showmount_log.stdout_lines}}"
- "{{ ip_log.stdout_lines}}"
- "{{ hostname_log.stdout_lines}}"下一个知识点
register注册变量
1. 获取命令的执行结果(返回值)
2. 这个返回值被注册为变量之后,可以交给后续的任务去使用
3. 这个注册变量(命令的返回值),还提供了很多的功能去使用
3.1 获取返回值的文本信息
my_log.stdout_lines

写一个示例
copy:  src='xxx'   dest='/etc/rsyncd.conf'
shell:  "cat  /etc/rsyncd.conf"
register: my_config

my_config.changed   # 判断这个返回值,如果有更改,说明

4.想知道关于注册变量的返回值,可以用哪些方法,看这个官网即可
https://docs.ansible.com/ansible/latest/reference_appendices/common_return_values.html
关于命令的返回结果,可以使用的所有方法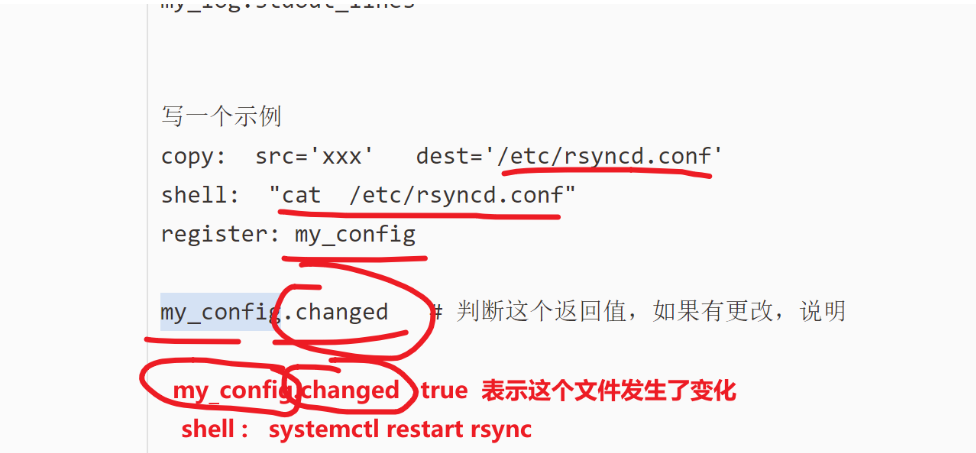
判断当配置文件变化后,就重启服务(register+when).
yaml作用是判断配置文件变化后,就重启服务
以前写的剧本
都是固定的,定义tasks任务列表
1. 修改配置文件(判断配置文件是否变化)
2. 重启服务(只有配置文件变化,才有必要重启服务,否则是没变要)
register和when都是针对tasks任务列表下,某一个任务设置的
- name: 01 修改配置文件
register
- name: 02 重启服务
作用分别是
1.获取某任务的命令执行结果(返回值) register
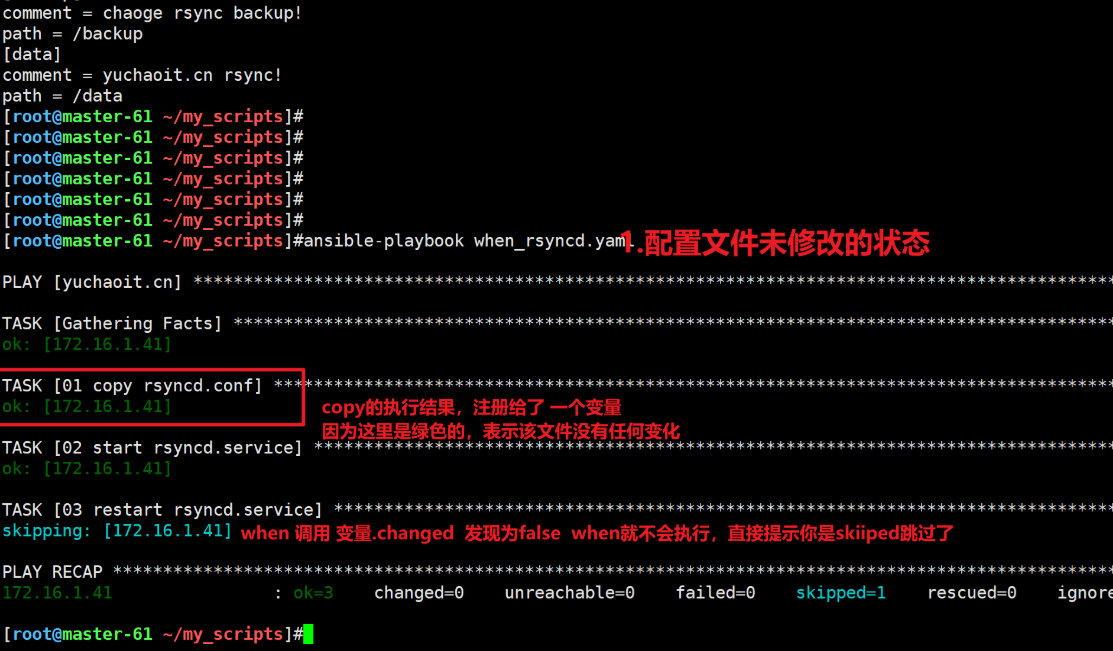
2.利用when条件判断,针对返回值的不同状态(决定做什么事) ,ansible进阶篇,都是在大量使用编程语言的特性,以及语法了我们重启配置服务的标准是,修改了配置文件,否则无须重启
例如,判断rsyncd.conf文件状态发生变化后,就重启服务。
- name: yuchaoit.cn
  hosts: backup
  tasks:
  - name: 01 copy rsyncd.conf
    copy: src=/script/rsyncd.conf dest=/etc/
    register: conf_status

  - name: 02 start rsyncd.service
    systemd: name=rsyncd state=started enabled=yes

  - name: 03 restart rsyncd.service
    systemd:
      name: rsyncd
      state: restarted
    when: conf_status.changed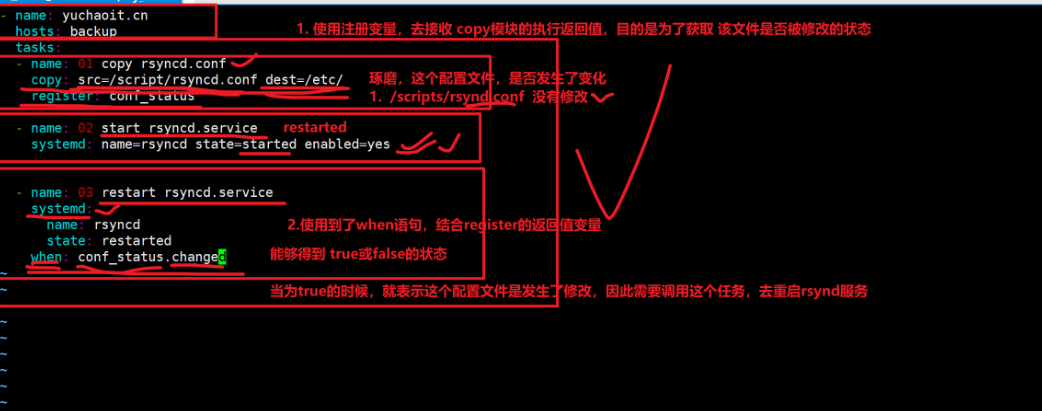

关于注册变量,以及注册变量.changed属性
结合when的一个实际应用成精1.2.
when条件语句
官网文档 https://docs.ansible.com/ansible/latest/user_guide/playbooks_conditionals.html
当nfs配置文件存在,就显示其内容
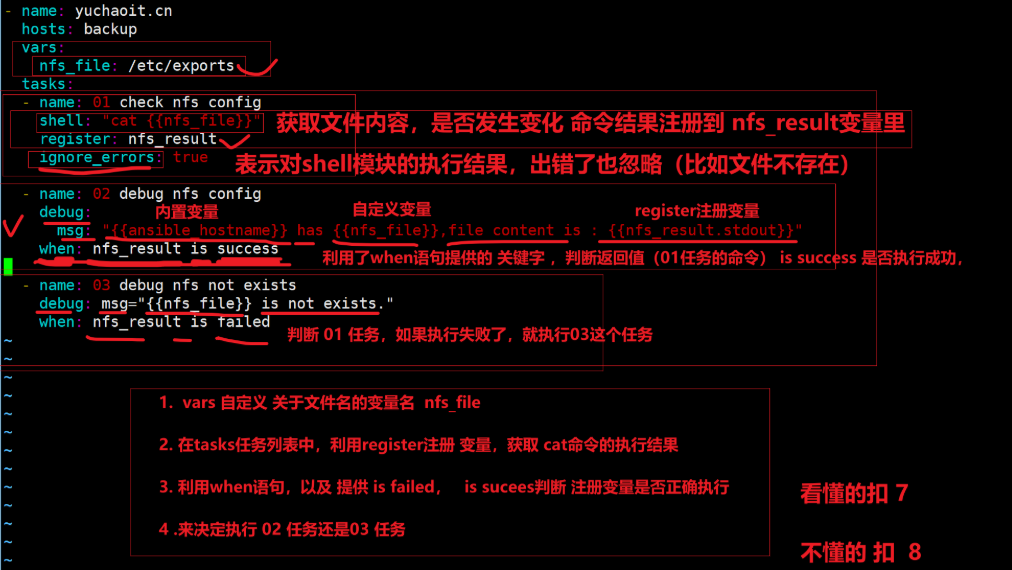
- name: yuchaoit.cn
  hosts: backup
  vars:
    nfs_file: /etc/exports
  tasks:
  - name: 01 check nfs config
    shell: "cat {{nfs_file}}"
    register: nfs_result
    ignore_errors: true

  - name: 02 debug nfs config
    debug:
      msg: "{{ansible_hostname}} has {{nfs_file}},file content is : {{nfs_result.stdout}}"
    when: nfs_result is success

  - name: 03 debug nfs not exists
    debug: msg="{{nfs_file}} is not exists."
    when: nfs_result is failed
1.剧本提供的handler特性,是专门用于实现,任务触发的模块,机制
- 当你改了配置文件,是必须得重启服务
- /etc/exports             systemctl restart nfs
- /etc/nginx/nginx.conf    systemctl restart nginx

文件变化,则重启
文化不变化,则无序重启

利用了register+when 这俩结合,实现了 判断文件变化,才重启程序
2.其实ansible还提供了更专业的 handler机制

官网文档
https://docs.ansible.com/ansible/latest/user_guide/playbooks_handlers.html
handler特性
有任务1,发生变化后 必须要执行任务2
使用handler特性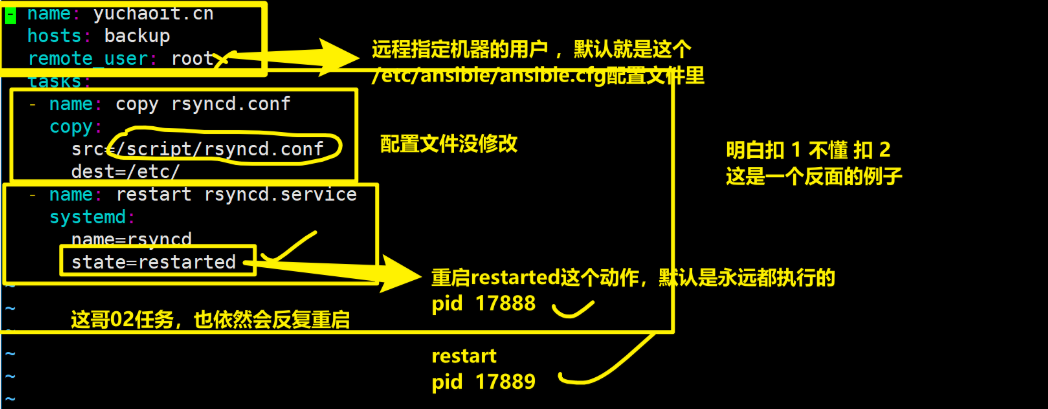
[root@master-61 ~]#cat restart_rsync.yaml
- name: yuchaoit.cn
  hosts: backup
  remote_user: root
  tasks:
  - name: copy rsyncd.conf
    copy:
      src=/script/rsyncd.conf
      dest=/etc/
  - name: restart rsyncd.service
    systemd:
      name=rsyncd
      state=restarted
当配置文件变化,就重启rsync
handler+ notify 这两个关键字,来组合定义一个
任务1,一旦发生变化
触发任务2的必然执行
具体的yaml
解读handler和notify的机制
解释
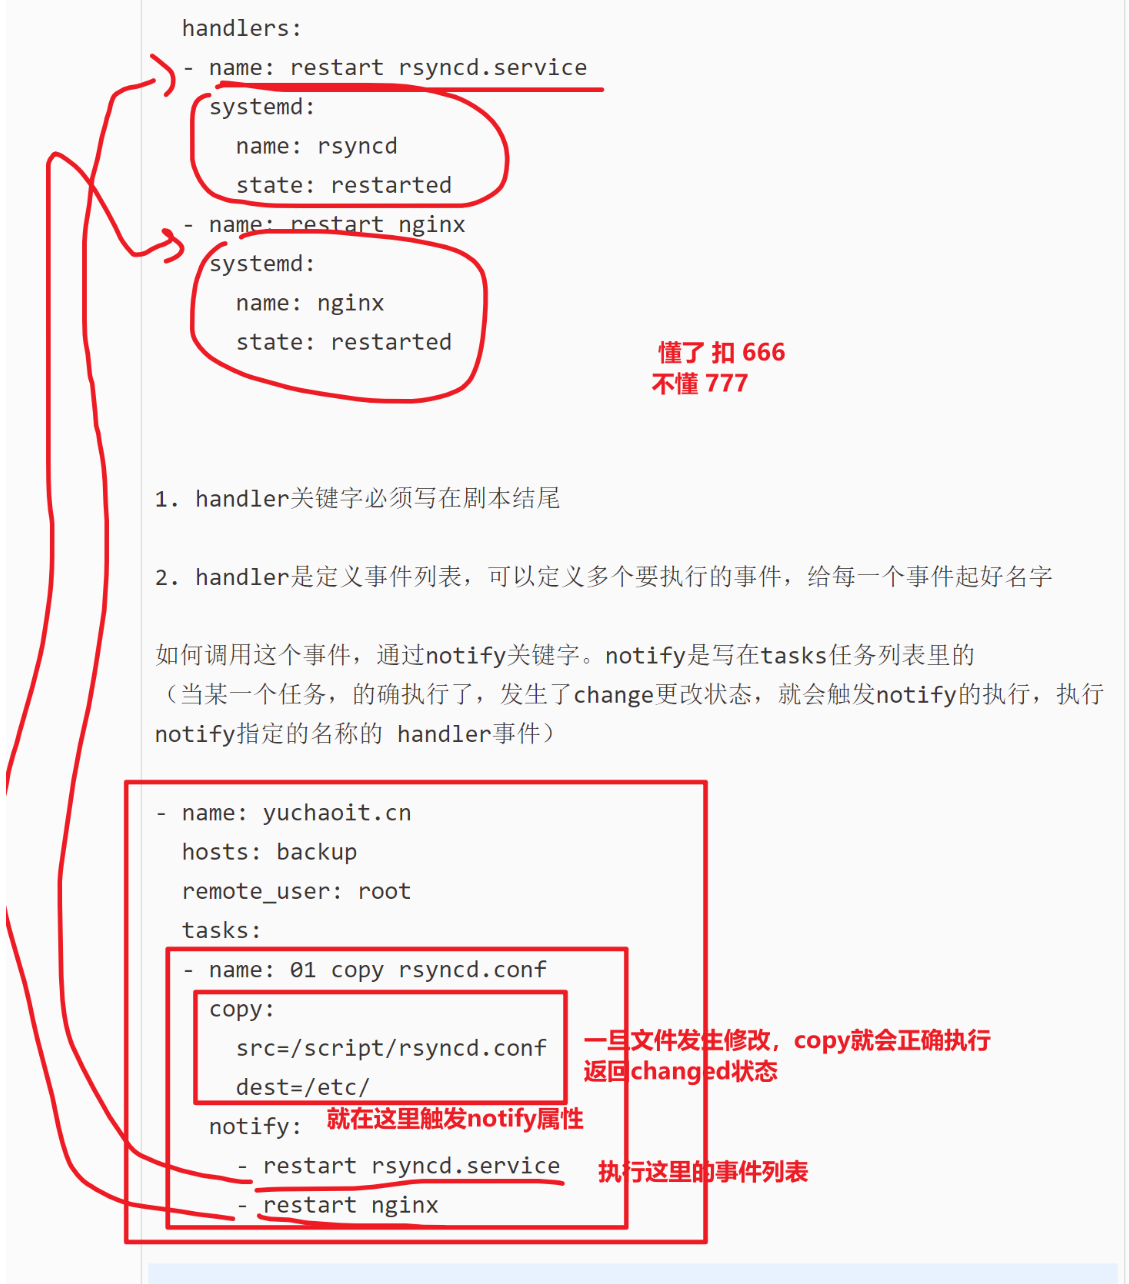
handlers:
- name: restart rsyncd.service
systemd:
name: rsyncd
state: restarted
- name: restart nginx
systemd:
name: nginx
state: restarted
1. handler关键字必须写在剧本结尾
2. handler是定义事件列表,可以定义多个要执行的事件,给每一个事件起好名字
如何调用这个事件,通过notify关键字。notify是写在tasks任务列表里的
(当某一个任务,的确执行了,发生了change更改状态,就会触发notify的执行,执行notify指定的名称的 handler事件)
- name: yuchaoit.cn
hosts: backup
remote_user: root
tasks:
- name: 01 copy rsyncd.conf
copy:
src=/script/rsyncd.conf
dest=/etc/
notify:
- restart rsyncd.service
- restart nginx
- name: yuchaoit.cn
hosts: backup
remote_user: root
tasks:
- name: 01 copy rsyncd.conf
copy:
src=/script/rsyncd.conf
dest=/etc/
notify:
- restart rsyncd.service
handlers:
- name: restart rsyncd.service
systemd:
name: rsyncd
state: restarted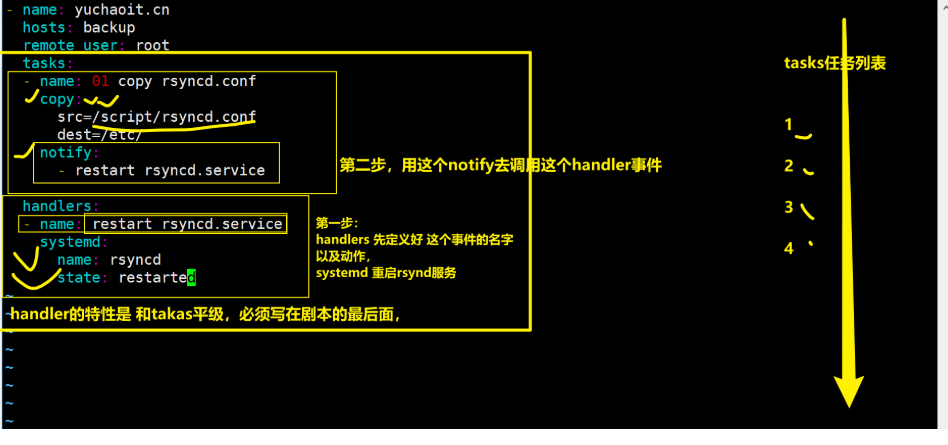
tag标签
给部署nfs-server的任务添加标签
- name: yuchaoit.cn
  hosts: nfs
  tasks:
  - name: 01 安装nfs-utils 服务
    yum: name=nfs-utils state=installed
    tags: 01_install_nfs_service

  - name: 02 安装rpcbind 服务
    yum: name=rpcbind state=installed
    tags: 02_install_rpcbind_service

  - name: 03 创建组
    group: name=www gid=666
    tags: 03_add_group

  - name: 04 创建用户
    user: name=www uid=666 group=www create_home=no shell=/sbin/nologin
    tags: 04_add_user

  - name: 05 创建共享目录
    file: path=/data owner=www group=www state=directory
    tags: 05_create_data_dir

  - name: 06 拷贝配置文件
    copy: src=/script/exports dest=/etc/exports
    tags: 06_copy_nfs_exports

  - name: 07 创建关于rsync密码文件
    copy: content='yuchao666' dest=/etc/rsync.passwd mode=600
    tags: 07_create_rsync_passwd

  - name: 08 启动rpcbind
    service: name=rpcbind state=started enabled=yes
    tags: 08_start_rpcbind

  - name:  09 启动nfs
    systemd: name=nfs state=started enabled=yes
    tags: 09_start_nfs
列出查看当前剧本有没有标签可用

[root@master-61 ~/my_scripts]#ansible-playbook --list-tags install_nfs.yaml

playbook: install_nfs.yaml

  play #1 (nfs): yuchaoit.cn    TAGS: []
      TASK TAGS: [01_install_nfs_service, 02_install_rpcbind_service, 03_add_group, 04_add_user, 05_create_data_dir, 06_copy_nfs_exports, 07_create_rsync_passwd, 08_start_rpcbind, 09_start_nfs]
选择运行某个标签
[root@master-61 ~/my_scripts]#ansible-playbook -t 01_install_nfs_service    install_nfs.yaml

PLAY [yuchaoit.cn] ****************************************************************************************

TASK [Gathering Facts] ************************************************************************************
ok: [172.16.1.41]

TASK [01 安装nfs-utils 服务] **********************************************************************************
changed: [172.16.1.41]

PLAY RECAP ************************************************************************************************
172.16.1.41                : ok=2    changed=1    unreachable=0    failed=0    skipped=0    rescued=0    ignored=0
跳过某些个标签
跳过,5 6 7 标签指定的任务了,执行了
1 2 3 4 8 9
[root@master-61 ~/my_scripts]#ansible-playbook --skip-tags 05_create_data_dir,06_copy_nfs_exports,07_create_rsync_passwd install_nfs.yaml选择tasks执行
1.列出当前剧本有多少个任务(查看任务列表)
复制
--list-tasks          list all tasks that would be executed
查看有多少个任务需要执行,以及该任务是否有tag标签

[root@master-61 ~/my_scripts]#ansible-playbook --list-tasks  install_nfs.yaml

playbook: install_nfs.yaml

  play #1 (backup): yuchaoit.cn TAGS: []
    tasks:
      01 安装nfs-utils 服务 TAGS: [01_install_nfs_service]
      02 安装rpcbind 服务   TAGS: [02_install_rpcbind_service]
      03 创建组    TAGS: [03_add_group]
      04 创建用户   TAGS: [04_add_user]
      05 创建共享目录 TAGS: [05_create_data_dir]
      06 拷贝配置文件 TAGS: [06_copy_nfs_exports]
      07 创建关于rsync密码文件  TAGS: [07_create_rsync_passwd]
      08 启动rpcbind  TAGS: [08_start_rpcbind]
      09 启动nfs  TAGS: [09_start_nfs]
2.指定从哪个tasks开始运行
--start-at-task START_AT_TASK

ansible-playbook --start-at-task  "07 创建关于rsync密码文件"  install_nfs.yaml


 617
617

 被折叠的 条评论
为什么被折叠?
被折叠的 条评论
为什么被折叠?
 到【灌水乐园】发言


