redis学习笔记
#步骤


论坛 商城 app 小程序
mysql  关系型数据库
redis mongo es  nosql(非关系型数据库)

关系:互补关系
特点:具体看应用场景
第一天--redis介绍
单节点
1.介绍
2.安装部署
3.配置文件介绍
4.redis基础命令
5.数据持久化


结构:
1.主从复制
2.哨兵
3.集群


运维
redis常用运维工具


故障案例
常见故障案例


思考和理解


----------------------------------------------------------------
redis特点:读写非常快

应用场景:
1.键过期功能:缓存 session会话保存  优惠卷过期
2.列表:排行榜
3.天然计数器:帖子浏览数 视频播放数 评论留言数
4.集合:兴趣标签 广告投放
5.消息队列:ELK日志收集
第二天--redis安装部署
#步骤
#redis下载目录
/data/soft
#redis安装目录
/opt/redis_cluster/redis {PORT}/{conf,logs,pid}
#redis数据目录
/data/redis cluster/redis {PORT}/redis{PORT}.rdb
#redis运维脚本
1.redis多实例
#生成的文件列表
[root@centos8 ~]#ll /apps/redis/
total 0
drwxr-xr-x 2 redis redis 134 Oct 15 22:13 bin
drwxr-xr-x 2 redis redis 69 Oct 15 23:25 data
drwxr-xr-x 2 redis redis 75 Oct 15 22:42 etc
drwxr-xr-x 2 redis redis 72 Oct 15 23:25 log
drwxr-xr-x 2 redis redis 72 Oct 15 22:47 run
[root@centos8 ~]#tree /apps/redis/
/apps/redis/
├── bin
│ ├── redis-benchmark
│ ├── redis-check-aof
│ ├── redis-check-rdb
│ ├── redis-cli
│ ├── redis-sentinel -> redis-server
│ └── redis-server
├── data
│ ├── dump_6379.rdb
│ ├── dump_6380.rdb
│ └── dump_6381.rdb
├── etc
│ ├── redis_6379.conf
│ ├── redis_6380.conf
│ └── redis_6381.conf
├── log
│ ├── redis_6379.log
│ ├── redis_6380.log
│ └── redis_6381.log
└── run
├── redis_6379.pid
├── redis_6380.pid
└── redis_6381.pid
5 directories, 18 files
[root@centos8 ~]#sed 's/6379/6380/' /apps/redis/etc/redis6379.conf >
/apps/redis/etc/redis6380.conf
[root@centos8 ~]#sed 's/6379/6381/' /apps/redis/etc/redis6379.conf >
/apps/redis/etc/redis6381.conf
[root@centos8 ~]#grep '^[^#]' /apps/redis/etc/redis_6379.conf
bind 0.0.0.0
protected-mode yes
port 6379
tcp-backlog 511
timeout 0
tcp-keepalive 300
daemonize yes
supervised no
pidfile /apps/redis/run/redis_6379.pid
loglevel notice
logfile "/apps/redis/log/redis_6379.log"
databases 16
always-show-logo yes
save 900 1
save 300 10
save 60 10000
stop-writes-on-bgsave-error yes
rdbcompression yes
rdbchecksum yes
dbfilename dump_6379.rdb
dir /apps/redis/data/
replica-serve-stale-data yes
replica-read-only yes
repl-diskless-sync no
repl-diskless-sync-delay 5
repl-disable-tcp-nodelay no
replica-priority 100
lazyfree-lazy-eviction no
lazyfree-lazy-expire no
lazyfree-lazy-server-del no
replica-lazy-flush no
appendonly no
appendfilename "appendonly_6379.aof"
appendfsync everysec
no-appendfsync-on-rewrite no
auto-aof-rewrite-percentage 100
auto-aof-rewrite-min-size 64mb
aof-load-truncated yes
aof-use-rdb-preamble yes
lua-time-limit 5000
slowlog-log-slower-than 10000
slowlog-max-len 128
latency-monitor-threshold 0
notify-keyspace-events ""
hash-max-ziplist-entries 512
hash-max-ziplist-value 64
list-max-ziplist-size -2
list-compress-depth 0
set-max-intset-entries 512
zset-max-ziplist-entries 128
zset-max-ziplist-value 64
hll-sparse-max-bytes 3000
stream-node-max-bytes 4096
stream-node-max-entries 100
activerehashing yes
client-output-buffer-limit normal 0 0 0
client-output-buffer-limit replica 256mb 64mb 60
client-output-buffer-limit pubsub 32mb 8mb 60
hz 10
dynamic-hz yes
aof-rewrite-incremental-fsync yes
rdb-save-incremental-fsync yes
[root@centos8 ~]#grep 6380 /apps/redis/etc/redis_6380.conf
# Accept connections on the specified port, default is 6380 (IANA #815344).
port 6380
pidfile /apps/redis/run/redis_6380.pid
logfile "/apps/redis/log/redis_6380.log"
dbfilename dump_6380.rdb
appendfilename "appendonly_6380.aof"
# cluster-config-file nodes-6380.conf
# cluster-announce-port 6380
# cluster-announce-bus-port 6380
[root@centos7 ~]#grep 6381 /apps/redis/etc/redis_6381.conf
# Accept connections on the specified port, default is 6381 (IANA #815344).
port 6381
pidfile /apps/redis/run/redis_6381.pid
logfile "/apps/redis/log/redis_6381.log"
dbfilename dump_6381.rdb
appendfilename "appendonly_6381.aof"
# cluster-config-file nodes-6381.conf
# cluster-announce-port 6381
[root@centos8 ~]#cat /lib/systemd/system/redis6379.service
[Unit]
Description=Redis persistent key-value database
After=network.target
[Service]
ExecStart=/apps/redis/bin/redis-server /apps/redis/etc/redis_6379.conf --
supervised systemd
#ExecStop=/usr/libexec/redis-shutdown
ExecStop=/bin/kill -s QUIT $MAINPID
Type=notify
User=redis
Group=redis
RuntimeDirectory=redis
RuntimeDirectoryMode=0755
[Install]
WantedBy=multi-user.target
[root@centos8 ~]#cat /lib/systemd/system/redis6380.service
[Unit]
Description=Redis persistent key-value database
After=network.target
[Service]
ExecStart=/apps/redis/bin/redis-server /apps/redis/etc/redis_6380.conf --
supervised systemd
#ExecStop=/usr/libexec/redis-shutdown
ExecStop=/bin/kill -s QUIT $MAINPID
Type=notify
User=redis
Group=redis
RuntimeDirectory=redis
RuntimeDirectoryMode=0755
[Install]
WantedBy=multi-user.target
[root@centos8 ~]#cat /lib/systemd/system/redis6381.service
[Unit]
Description=Redis persistent key-value database
After=network.target
[Service]
ExecStart=/apps/redis/bin/redis-server /apps/redis/etc/redis_6381.conf --
supervised systemd
#ExecStop=/usr/libexec/redis-shutdown
ExecStop=/bin/kill -s QUIT $MAINPID
Type=notify
User=redis
Group=redis
RuntimeDirectory=redis
RuntimeDirectoryMode=0755
[Install]
WantedBy=multi-user.target
[root@centos8 ~]#systemctl daemon-reload
[root@centos8 ~]#systemctl enable --now redis6379 redis6380 redis6381
[root@centos8 ~]#ss -ntl
State Recv-Q Send-Q Local Address:Port Peer Address:Port
LISTEN 0 128 *:22 *:*
LISTEN 0 100 127.0.0.1:25 *:*
LISTEN 0 511 *:6379 *:*
LISTEN 0 511 *:6380 *:*
LISTEN 0 511 *:6381 *:*
LISTEN 0 128 [::]:22 [::]:*
LISTEN 0 100 [::1]:25 [::]:*
2.安装的相关程序介绍
[root@centos8 ~]#ll /apps/redis/bin/
total 32772
-rwxr-xr-x 1 root root 4366792 Feb 16 21:12 redis-benchmark #性能测试程序
-rwxr-xr-x 1 root root 8125184 Feb 16 21:12 redis-check-aof #AOF文件检查程序
-rwxr-xr-x 1 root root 8125184 Feb 16 21:12 redis-check-rdb #RDB文件检查程序
-rwxr-xr-x 1 root root 4807856 Feb 16 21:12 redis-cli #客户端程序
lrwxrwxrwx 1 root root 12 Feb 16 21:12 redis-sentinel -> redis-server #哨兵程序,软连接到服务器端主程序
-rwxr-xr-x 1 root root 8125184 Feb 16 21:12 redis-server #服务端主程序
3.客户端程序 redis-cli
[root@redis etc]# redis-cli -p 6380
127.0.0.1:6380> quit
[root@redis etc]# redis-cli -p 6381
127.0.0.1:6381> quit
[root@redis etc]# redis-cli -p 6379
127.0.0.1:6379>
#默认为本机无密码连接
redis-cli
#远程客户端连接,注意:Redis没有用户的概念
redis-cli -h <Redis服务器IP> -p <PORT> -a <PASSWORD>
4.shell脚本添加redis键值对
[root@centos8 ~]#cat redis_test.sh
#!/bin/bash
NUM=100
PASS=
for i in `seq $NUM`; do
redis-cli -h 127.0.0.1 -a "$PASS" --no-auth-warning set key${i} value${i}
echo "key${i} value${i} 写入完成"
done
echo "$NUM个key写入完成"
5.redis指令
ping
info
set name value
get name
keys *
6.config 命令用于查看当前redis配置、以及不重启redis服务实现动态更改redis配置等
注意:不是所有配置都可以动态修改,且此方式无法持久保存
CONFIG SET parameter value
时间复杂度:O(1)
CONFIG SET 命令可以动态地调整 Redis 服务器的配置(configuration)而无须重启。
可以使用它修改配置参数,或者改变 Redis 的持久化(Persistence)方式。
CONFIG SET 可以修改的配置参数可以使用命令 CONFIG GET * 来列出,所有被 CONFIG SET 修改的配
置参数都会立即生效。
CONFIG GET parameter
时间复杂度: O(N),其中 N 为命令返回的配置选项数量。
CONFIG GET 命令用于取得运行中的 Redis 服务器的配置参数(configuration parameters),在
Redis 2.4 版本中, 有部分参数没有办法用 CONFIG GET 访问,但是在最新的 Redis 2.6 版本中,所
有配置参数都已经可以用 CONFIG GET 访问了。
CONFIG GET 接受单个参数 parameter 作为搜索关键字,查找所有匹配的配置参数,其中参数和值以“键-
值对”(key-value pairs)的方式排列。
比如执行 CONFIG GET s* 命令,服务器就会返回所有以 s 开头的配置参数及参数的值:
7.设置客户端连接密码
#设置连接密码
127.0.0.1:6379> CONFIG SET requirepass 123456
OK
#查看连接密码
127.0.0.1:6379> CONFIG GET requirepass
1) "requirepass"
2) "123456"
8.获取当前配置
#奇数行为键,偶数行为值
127.0.0.1:6379> CONFIG GET *
1) "dbfilename"
2) "dump.rdb"
3) "requirepass"
4) ""
5) "masterauth"
6) ""
7) "cluster-announce-ip"
8) ""
9) "unixsocket"
10) ""
11) "logfile"
12) "/var/log/redis/redis.log"
13) "pidfile"
14) "/var/run/redis_6379.pid"
15) "slave-announce-ip"
16) ""
17) "replica-announce-ip"
18) ""
19) "maxmemory"
20) "0"
......
#查看bind
127.0.0.1:6379> CONFIG GET bind
1) "bind"
2) "0.0.0.0"
#Redis5.0有些设置无法修改,Redis6.2.6版本支持修改bind
127.0.0.1:6379> CONFIG SET bind 127.0.0.1
(error) ERR Unsupported CONFIG parameter: bind
9.设置Redis使用的最大内存量(生产环境需做优化--一般是物理内存的一半)
127.0.0.1:6379> CONFIG SET maxmemory 8589934592
OK
127.0.0.1:6379> CONFIG GET maxmemory
1) "maxmemory"
2) "8589934592"
案例:模拟生产环境设置最大内存量
[root@redis ~]# echo 995456*1024|bc
1019346944
[root@redis ~]# echo 995456*1024/2|bc
509673472
127.0.0.1:6379> CONFIG SET maxmemory 509673472
OK
127.0.0.1:6379> CONFIG GET maxmemory
1) "maxmemory"
2) "509673472"
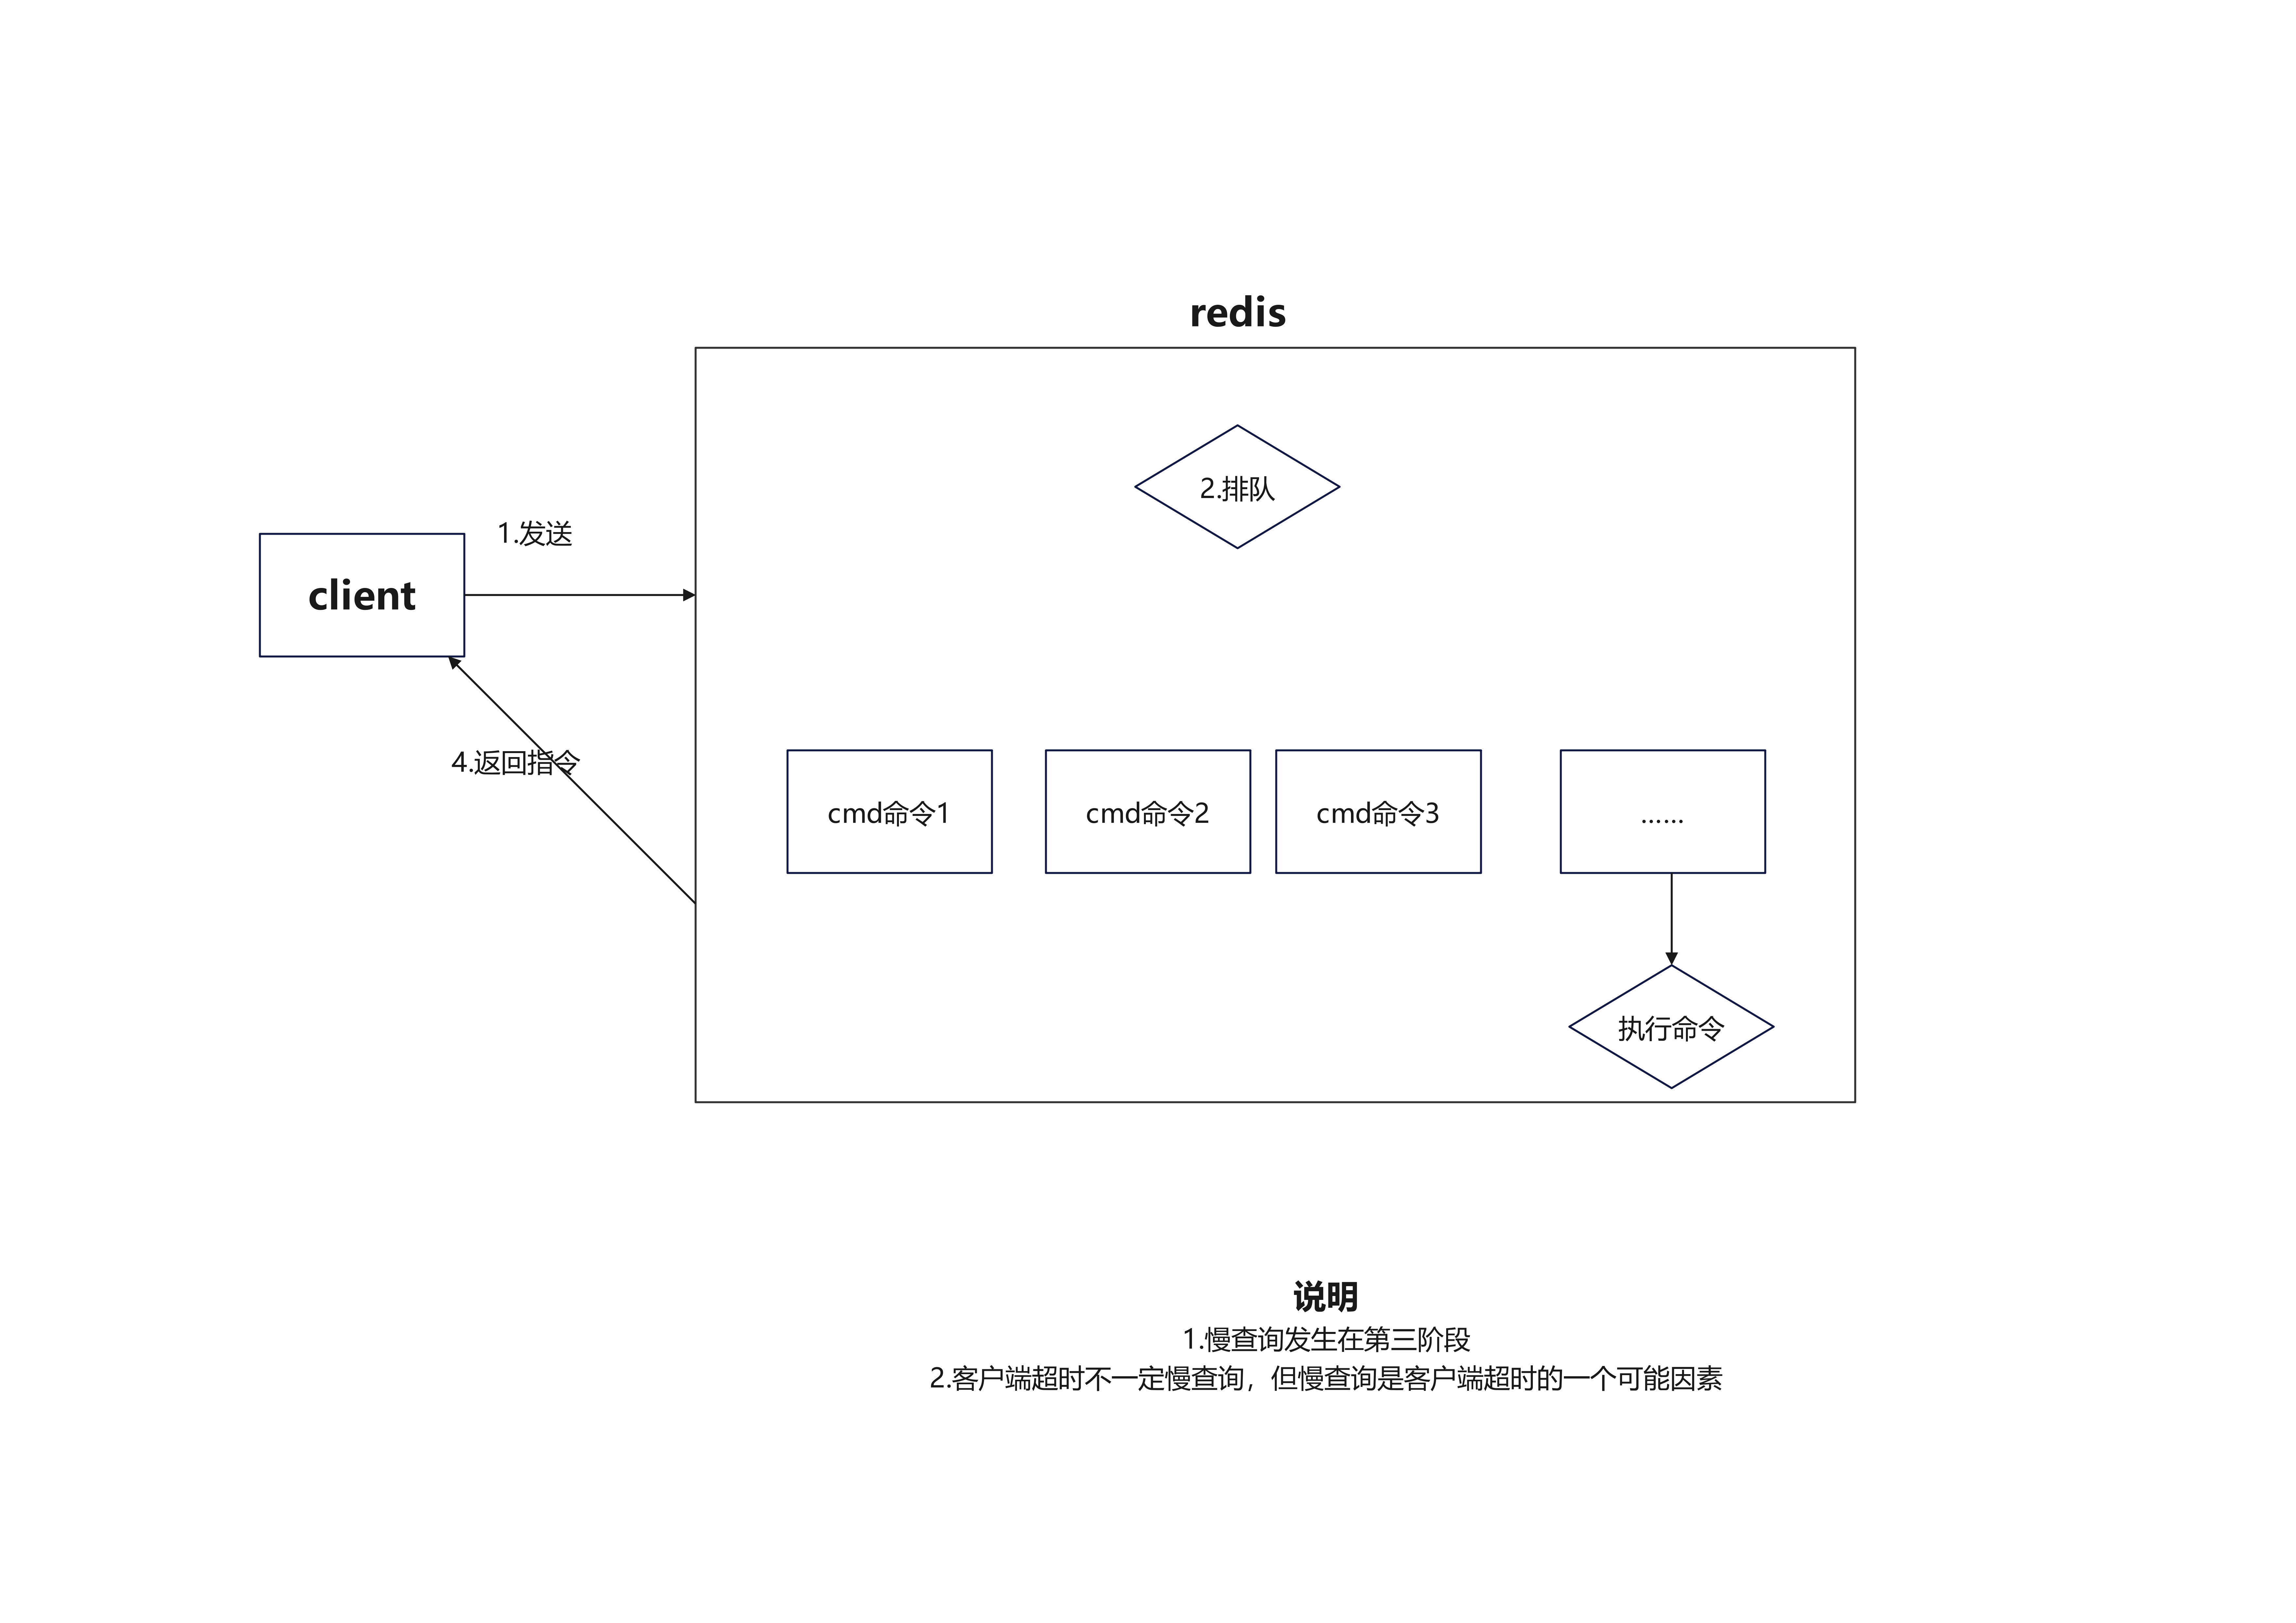
10.慢查询
1.慢查询发生在第三阶段
2.客户端超时不一定慢查询,但慢查询是客户端超时的一个可能因素
举例:SLOW LOG
[root@centos8 ~]#vim /etc/redis.conf
slowlog-log-slower-than 1 #指定超过1us即为慢的指令,默认值为10000us
slowlog-max-len 1024 #指定只保存最近的1024条慢记录,默认值为128
127.0.0.1:6379> SLOWLOG LEN #查看慢日志的记录条数
(integer) 14
127.0.0.1:6379> SLOWLOG GET [n] #查看慢日志的n条记录
1) 1) (integer) 14
2) (integer) 1544690617
3) (integer) 4 #第3)行表示每条指令的执行时长
4) 1) "slowlog"
127.0.0.1:6379> SLOWLOG GET 3
1) 1) (integer) 7
2) (integer) 1602901545
3) (integer) 26
4) 1) "SLOWLOG"
2) "get"
5) "127.0.0.1:38258"
6) ""
2) 1) (integer) 6
2) (integer) 1602901540
3) (integer) 22
4) 1) "SLOWLOG"
2) "get"
3) "2"
5) "127.0.0.1:38258"
6) ""
3) 1) (integer) 5
2) (integer) 1602901497
3) (integer) 22
4) 1) "SLOWLOG"
2) "GET"
5) "127.0.0.1:38258"
6) ""
127.0.0.1:6379> SLOWLOG RESET #清空慢日志
OK
11.redis持久化
Redis 是基于内存型的NoSQL, 和MySQL是不同的,使用内存进行数据保存
如果想实现数据的持久化,Redis也也可支持将内存数据保存到硬盘文件中
Redis支持两种数据持久化保存方法
RDB:Redis DataBase
AOF:AppendOnlyFil

由于Redis只保留最后一个版本的RDB文件,如果想实现保存多个版本的数据,需要人为实现
12.
save 执行过程会使用主进程进行快照
[root@centos7 data]#redis-cli -a 123456 save&
[1] 28684
[root@centos7 data]#pstree -p |grep redis ;ll /apps/redis/data
|-redis-server(28650)-+-{redis-server}(28651)
| |-{redis-server}(28652)
| |-{redis-server}(28653)
| `-{redis-server}(28654)
| | `-redis-cli(28684)
| `-sshd(23494)---bash(23496)---redis-cli(28601)
total 251016
-rw-r--r-- 1 redis redis 189855682 Nov 17 15:02 dump.rdb
-rw-r--r-- 1 redis redis 45674498 Nov 17 15:02 temp-28650.rdb
RDB 相关配置
#在配置文件中的 save 选项设置多个保存条件,只有任何一个条件满足,服务器都会自动执行 BGSAVE 命
令
save 900 1 #900s内修改了1个key即触发保存RDB
save 300 10 #300s内修改了10个key即触发保存RDB
save 60 10000 #60s内修改了10000个key即触发保存RDB
dbfilename dump.rdb
dir ./ #编泽编译安装时默认RDB文件存放在Redis的工作目录,此配置可指定保存的数据目
录
stop-writes-on-bgsave-error yes
rdbcompression yes
rdbchecksum yes
RDB 相关配置
[root@ubuntu2004 ~]#grep save /apps/redis/etc/redis.conf
# save <seconds> <changes>
# Redis will save the DB if both the given number of seconds and the given
# save ""
# Unless specified otherwise, by default Redis will save the DB:
# save 3600 1
# save 300 100
# save 60 10000
#以上是默认值
[root@ubuntu2004 ~]#redis-cli config get save
1) "save"
2) "3600 1 300 100 60 10000"
#禁用系统的自动快照
[root@ubuntu2004 ~]#vim /apps/redis/etc/redis.conf
save ""
# save 3600 1
# save 300 100
# save 60 10000
实现 RDB 方法
save: 同步,不推荐使用,使用主进程完成快照,因此会阻赛其它命令执行
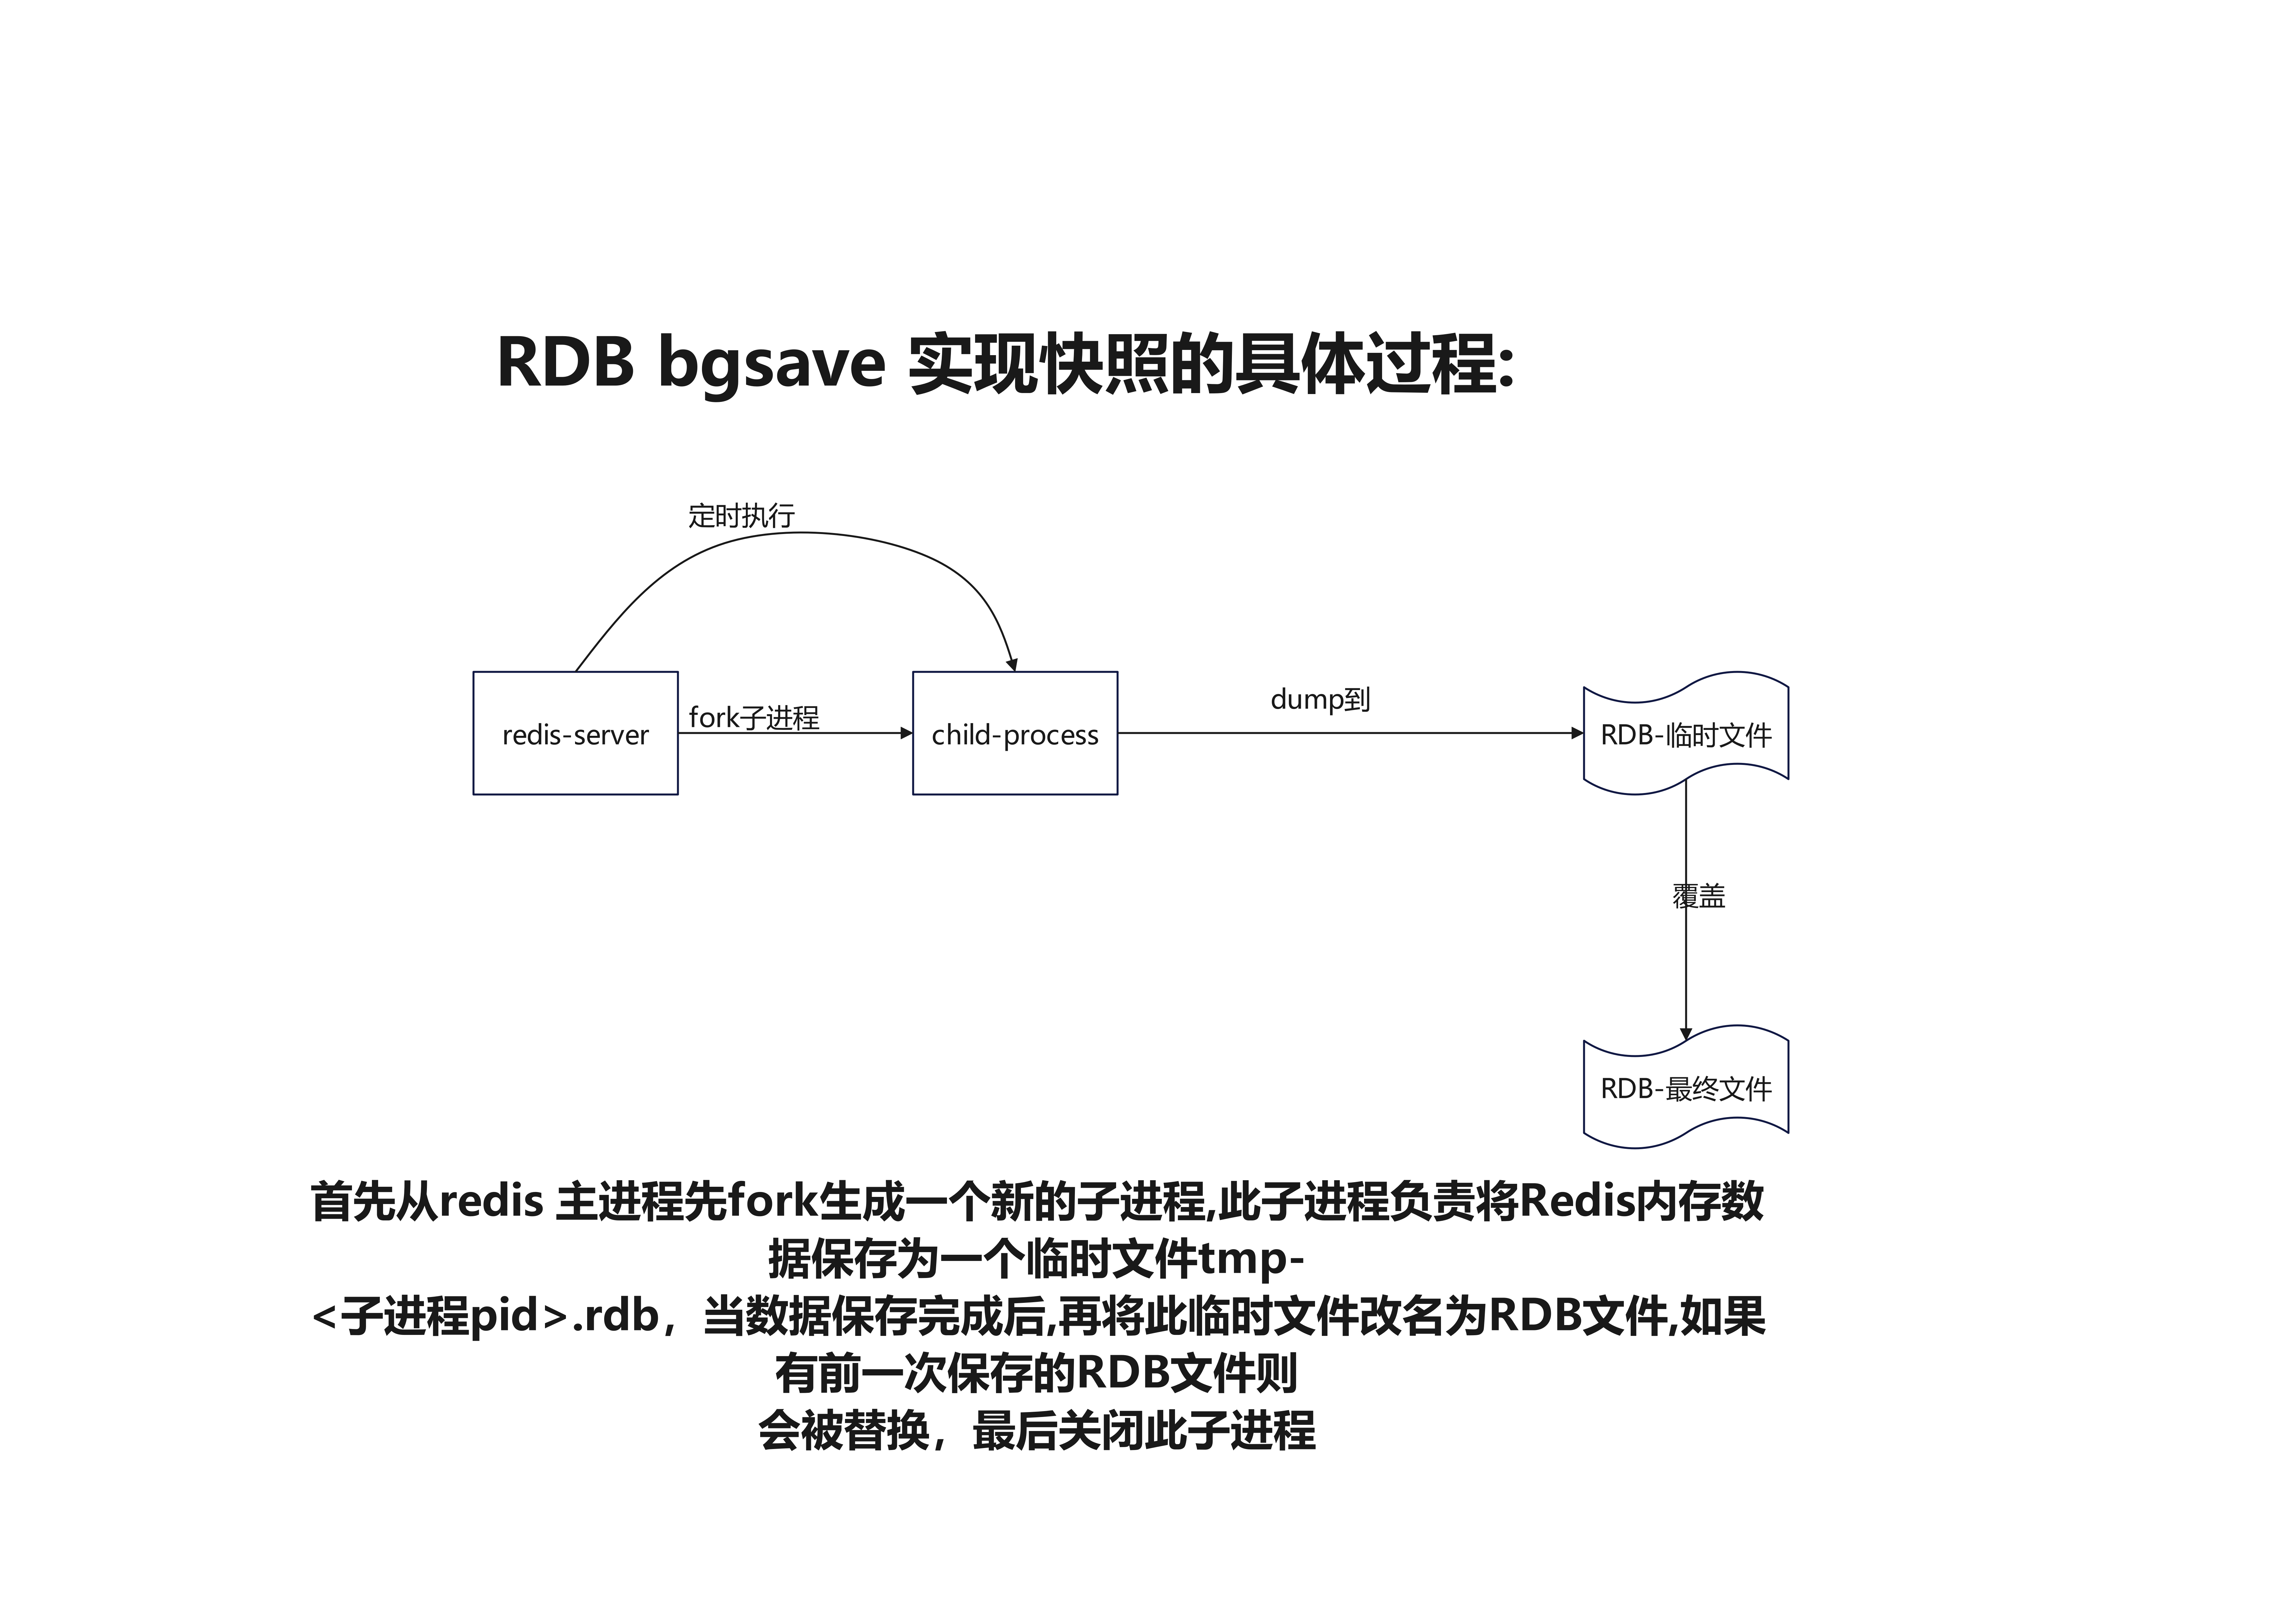
bgsave: 异步后台执行,不影响其它命令的执行,会开启独立的子进程,因此不会阻赛其它命令执行
配置文件实现自动保存: 在配置文件中制定规则,自动执行bgsave
RDB 模式的优缺点
RDB 模式优点
RDB快照只保存某个时间点的数据,恢复的时候直接加载到内存即可,不用做其他处理,这种文件
适合用于做灾备处理.可以通过自定义时间点执行redis指令bgsave或者save保存快照,实现多个版
本的备份
比如: 可以在最近的24小时内,每小时备份一次RDB文件,并且在每个月的每一天,也备份一个
RDB文件。这样的话,即使遇上问题,也可以随时将数据集还原到指定的不同的版本。
RDB在大数据集时恢复的速度比AOF方式要快
不能实时保存数据,可能会丢失自上一次执行RDB备份到当前的内存数据
如果需要尽量避免在服务器故障时丢失数据,那么RDB并不适合。虽然Redis允许设置不同的保存
点(save point)来控制保存RDB文件的频率,但是,因为RDB文件需要保存整个数据集的状态,
所以它可能并不是一个非常快速的操作。因此一般会超过5分钟以上才保存一次RDB文件。在这种
情况下,一旦发生故障停机,就可能会丢失较长时间的数据。
在数据集比较庞大时,fork()子进程可能会非常耗时,造成服务器在一定时间内停止处理客户端请
求,如果数据集非常巨大,并且CPU时间非常紧张的话,那么这种停止时间甚至可能会长达整整一秒
或更久。另外子进程完成生成RDB文件的时间也会花更长时间.
手动备份RDB文件的脚本
#配置文件
[root@centos7 ~]#vim /apps/redis/etc/redis.conf
save ""
dbfilename dump_6379.rdb
dir "/data/redis"
appendonly no
#脚本
[root@centos8 ~]#cat redis_backup_rdb.sh
#!/bin/bash
#
#
#Author: nwq
#QQ: 3078499367
#Date: 2024-10-21
#FileName: redis_rdb.sh
#URL: http://www.sansi.fun
#Description: The test script for backing up Redis RDB file
#Copyright (C): 2024 All rights reserved
#
# Define variables
BACKUP_DIR="/backup/redis-rdb"
DATA_DIR="/apps/redis/data/"
RDB_FILE="dump.rdb"
PASSWORD="123456"
# Function to display colored messages
color() {
RES_COL=60
MOVE_TO_COL="echo -en \\033[${RES_COL}G"
SETCOLOR_SUCCESS="echo -en \\033[1;32m"
SETCOLOR_FAILURE="echo -en \\033[1;31m"
SETCOLOR_WARNING="echo -en \\033[1;33m"
SETCOLOR_NORMAL="echo -en \\033[0m"
echo -n "$1" && $MOVE_TO_COL
echo -n "["
if [ "$2" = "success" ] || [ "$2" -eq 0 ]; then
${SETCOLOR_SUCCESS}
echo -n " OK "
elif [ "$2" = "failure" ] || [ "$2" -eq 1 ]; then
${SETCOLOR_FAILURE}
echo -n "FAILED"
else
${SETCOLOR_WARNING}
echo -n "WARNING"
fi
${SETCOLOR_NORMAL}
echo -n "]"
echo
}
# Trigger Redis RDB background save and wait until it's completed
redis-cli -h 127.0.0.1 -a "$PASSWORD" --no-auth-warning bgsave
while true; do
result=$(redis-cli -a "$PASSWORD" --no-auth-warning info Persistence | grep rdb_bgsave_in_progress | sed -rn 's/.*:([0-9]+).*/\1/p')
if [ "$result" -eq 0 ]; then
break
fi
sleep 1
done
# Get current date and create backup directory if it doesn't exist
DATE=$(date +%F_%H-%M-%S)
mkdir -p "$BACKUP_DIR" && chown -R redis.redis "$BACKUP_DIR"
# Copy the RDB file to the backup directory
cp "$DATA_DIR/$RDB_FILE" "$BACKUP_DIR/dump_6379-${DATE}.rdb"
# Display the result of the backup operation
color "Backup Redis RDB" "success"
#执行
[root@centos8 ~]#bash redis_backup_rdb.sh
Background saving started
Backup redis RDB [ OK ]
[root@centos8 ~]#ll /backup/redis-rdb/ -h
total 143M
-rw-r--r-- 1 redis redis 143M Oct 21 11:08 dump_6379-2020-10-21_11-08-47.rdb
观察save 和 bgsave的执行过程
#阻塞
#生成临时文件
[root@centos7 ~]#(redis-cli -a 123456 save &) ; echo save is finished; rediscli -a 123456 get class
自动保存
[root@centos7 ~]#vim /apps/redis/etc/redis.conf
save 60 3
#测试60s内修改3个key,验证是否生成RDB文件
13.AOF 工作原理
AOF 即 AppendOnlyFile,AOF 和 RDB 都采有COW机制,AOF可以指定不同的保存策略,默认为每秒钟
执行一次 fsync,按照操作的顺序地将变更命令追加至指定的AOF日志文件尾部
在第一次启用AOF功能时,会做一次完全备份,后续将执行增量性备份,相当于完全数据备份+增量变化
如果同时启用RDB和AOF,进行恢复时,默认AOF文件优先级高于RDB文件,即会使用AOF文件进行恢复
在第一次开启AOF功能时,会自动备份所有数据到AOF文件中,后续只会记录数据的更新指令
注意: AOF 模式默认是关闭的,第一次开启AOF后,并重启服务生效后,会因为AOF的优先级高于RDB,而
AOF默认没有数据文件存在,从而导致所有数据丢失
AOF 相关配置
appendonly no #是否开启AOF日志记录,默认redis使用的是rdb方式持久化,这种方式在许多应用中已经
足够用了,但是redis如果中途宕机,会导致可能有几分钟的数据丢失(取决于dump数据的间隔时间),根据
save来策略进行持久化,Append Only File是另一种持久化方式,可以提供更好的持久化特性,Redis会
把每次写入的数据在接收后都写入 appendonly.aof 文件,每次启动时Redis都会先把这个文件的数据读入
内存里,先忽略RDB文件。默认不启用此功能
appendfilename "appendonly.aof" #文本文件AOF的文件名,存放在dir指令指定的目录中
appendfsync everysec #aof持久化策略的配置
#no表示由操作系统保证数据同步到磁盘,Linux的默认fsync策略是30秒,最多会丢失30s的数据
#always表示每次写入都执行fsync,以保证数据同步到磁盘,安全性高,性能较差
#everysec表示每秒执行一次fsync,可能会导致丢失这1s数据,此为默认值,也生产建议值
dir /path
#rewrite相关
no-appendfsync-on-rewrite yes
auto-aof-rewrite-percentage 100
auto-aof-rewrite-min-size 64mb
aof-load-truncated yes
范例: 错误开启AOF功能,会导致数据丢失
[root@ubuntu1804 ~]#redis-cli
127.0.0.1:6379> dbsize
(integer) 10010011
[root@ubuntu1804 ~]#vim /apps/redis/etc/redis.conf
appendonly yes #修改此行
[root@ubuntu1804 data]#systemctl restart redis
[root@ubuntu1804 ~]#redis-cli
127.0.0.1:6379> dbsize
(integer) 0
正确启用AOF功能,访止数据丢失
[root@centos8 ~]#ll /var/lib/redis/
total 314392
-rw-r--r-- 1 redis redis 187779391 Oct 17 14:23 dump.rdb
[root@centos8 ~]#redis-cli
127.0.0.1:6379> config get appendonly
1) "appendonly"
2) "no"
127.0.0.1:6379> config set appendonly yes #自动触发AOF重写,会自动备份所有数据到AOF文
件
OK
[root@centos8 ~]#ll /var/lib/redis/
total 314392
-rw-r--r-- 1 redis redis 187779391 Oct 17 14:23 dump.rdb
-rw-r--r-- 1 redis redis 85196805 Oct 17 14:45 temp-rewriteaof-2146.aof
[root@centos8 ~]#ll /var/lib/redis/
total 366760
-rw-r--r-- 1 redis redis 187779391 Oct 17 14:45 appendonly.aof
-rw-r--r-- 1 redis redis 187779391 Oct 17 14:23 dump.rdb
[root@centos8 ~]#vim /etc/redis.conf
appendonly yes #改为yes
#config set appendonly yes 后可以同时看到下面显示
AOF rewrite 重写相关配置
#同时在执行bgrewriteaof操作和主进程写aof文件的操作,两者都会操作磁盘,而bgrewriteaof往往会涉及大量磁盘操作,这样就会造成主进程在写aof文件的时候出现阻塞的情形,以下参数实现控制
no-appendfsync-on-rewrite no #在aof rewrite期间,是否对aof新记录的append暂缓使用文件同步策略,主要考虑磁盘IO开支和请求阻塞时间。
#默认为no,表示"不暂缓",新的aof记录仍然会被立即同步到磁盘,是最安全的方式,不会丢失数据,但是要忍受阻塞的问题
#为yes,相当于将appendfsync设置为no,这说明并没有执行磁盘操作,只是写入了缓冲区,因此这样并不会造成阻塞(因为没有竞争磁盘),但是如果这个时候redis挂掉,就会丢失数据。丢失多少数据呢?Linux的默认fsync策略是30秒,最多会丢失30s的数据,但由于yes性能较好而且会避免出现阻塞因此比较推荐
#rewrite 即对aof文件进行整理,将空闲空间回收,从而可以减少恢复数据时间
auto-aof-rewrite-percentage 100 #当Aof log增长超过指定百分比例时,重写AOF文件,设置为0表示不自动重写Aof日志,重写是为了使aof体积保持最小,但是还可以确保保存最完整的数据
auto-aof-rewrite-min-size 64mb #触发aof rewrite的最小文件大小
aof-load-truncated yes #是否加载由于某些原因导致的末尾异常的AOF文件(主进程被kill/断电等),建议yes
14.Redis 常用命令
INFO 显示当前节点redis运行状态信息
SELECT 切换数据库,相当于在MySQL的 USE DBNAME 指令
KEYS 查看当前库下的所有key,此命令慎用!
BGSAVE 手动在后台执行RDB持久化操作
DBSIZE 返回当前库下的所有key 数量
FLUSHDB 强制清空当前库中的所有key,此命令慎用!
FLUSHALL 强制清空当前Redis服务器所有数据库中的所有key,即删除所有数据,此命令慎用!
SHUTDOWN
可用版本: >= 1.0.0
时间复杂度: O(N),其中 N 为关机时需要保存的数据库键数量。
SHUTDOWN 命令执行以下操作:
关闭Redis服务,停止所有客户端连接
如果有至少一个保存点在等待,执行 SAVE 命令
如果 AOF 选项被打开,更新 AOF 文件
关闭 redis 服务器(server)
如果持久化被打开的话, SHUTDOWN 命令会保证服务器正常关闭而不丢失任何数据。
另一方面,假如只是单纯地执行 SAVE 命令,然后再执行 QUIT 命令,则没有这一保证 —— 因为在执行
SAVE 之后、执行 QUIT 之前的这段时间中间,其他客户端可能正在和服务器进行通讯,这时如果执行 QUIT
就会造成数据丢失。
127.0.0.1:6379[15]> SELECT 0
OK
127.0.0.1:6379> KEYS *
1) "9527"
2) "9526"
3) "course"
4) "list1"
127.0.0.1:6379> SELECT 1
OK
127.0.0.1:6379[1]> KEYS *
(empty list or set)
127.0.0.1:6379[1]>
redis>MSET one 1 two 2 three 3 four 4 # 一次设置 4 个 key
OK
redis> KEYS *o*
1) "four"
2) "two"
3) "one"
redis> KEYS t??
1) "two"
redis> KEYS t[w]*
1) "two"
redis> KEYS * # 匹配数据库内所有 key
1) "four"
2) "three"
3) "two"
4) "one"
#交互式执行
127.0.0.1:6379[1]> BGSAVE
Background saving started
#非交互式执行
[root@centos8 ~]#ll /var/lib/redis/
total 4
-rw-r--r-- 1 redis redis 326 Feb 18 22:45 dump.rdb
[root@centos8 ~]#redis-cli -h 127.0.0.1 -a '123456' BGSAVE
Warning: Using a password with '-a' or '-u' option on the command line interface
may not be safe.
Background saving started
[root@centos8 ~]#ll /var/lib/redis/
total 4
-rw-r--r-- 1 redis redis 92 Feb 18 22:54 dump.rdb
127.0.0.1:6379> DBSIZE
(integer) 4
127.0.0.1:6379> SELECT 1
OK
127.0.0.1:6379[1]> DBSIZE
(integer) 0
127.0.0.1:6379[1]> SELECT 0
OK
127.0.0.1:6379> DBSIZE
(integer) 4
127.0.0.1:6379> FLUSHDB
OK
127.0.0.1:6379> DBSIZE
(integer) 0
127.0.0.1:6379>
127.0.0.1:6379> FLUSHALL
OK
#生产建议修改配置使用rename-command禁用此命令
vim /etc/redis.conf
rename-command FLUSHALL ""
#rename-command 可能会在后续版本淘汰
15.Redis 数据类型
string
hash
list
set
zset
none
15.1 字符串 string
set key value 设置key-value
get key 获取key-value
del key 删除key-value
setnx setxx 根据key是否存在/设置key-value
incr decr 计数
mget mset 批量操作key-value
字符串是一种最基本的Redis值类型。Redis字符串是二进制安全的,这意味着一个Redis字符串能包含任
意类型的数据,例如: 一张JPEG格式的图片或者一个序列化的Ruby对象。一个字符串类型的值最多能
存储512M字节的内容。Redis 中所有 key 都是字符串类型的。此数据类型最为常用
set 指令可以创建一个key 并赋值, 使用格式
SET key value [EX seconds] [PX milliseconds] [NX|XX]
时间复杂度: O(1)
将字符串值 value 关联到 key 。
如果 key 已经持有其他值, SET 就覆写旧值, 无视类型。
当 SET 命令对一个带有生存时间(TTL)的键进行设置之后, 该键原有的 TTL 将被清除。
从 Redis 2.6.12 版本开始, SET 命令的行为可以通过一系列参数来修改:
EX seconds : 将键的过期时间设置为 seconds 秒。 执行 SET key value EX seconds 的效果等
同于执行 SETEX key seconds value 。
PX milliseconds : 将键的过期时间设置为 milliseconds 毫秒。 执行 SET key value PX
milliseconds 的效果等同于执行 PSETEX key milliseconds value 。
NX : 只在键不存在时, 才对键进行设置操作。 执行 SET key value NX 的效果等同于执行 SETNX
key value 。
XX : 只在键已经存在时, 才对键进行设置操作。
范例
#不论key是否存在.都设置
127.0.0.1:6379> set key1 value1
OK
127.0.0.1:6379> get key1
"value1"
127.0.0.1:6379> TYPE key1 #判断类型
string
127.0.0.1:6379> SET title ceo ex 3 #设置自动过期时间3s
OK
127.0.0.1:6379> set NAME wang
OK
127.0.0.1:6379> get NAME
"wang"
#Key大小写敏感
127.0.0.1:6379> get name
(nil)
127.0.0.1:6379> set name mage
OK
127.0.0.1:6379> get name
"mage"
127.0.0.1:6379> get NAME
"wang"
#key不存在,才设置,相当于add
127.0.0.1:6379> get title
"ceo"
127.0.0.1:6379> setnx title coo #set key value nx
(integer) 0
127.0.0.1:6379> get title
"ceo"
#key存在,才设置,相当于update
127.0.0.1:6379> get title
"ceo"
127.0.0.1:6379> set title coo xx
OK
127.0.0.1:6379> get title
"coo"
127.0.0.1:6379> get age
(nil)
127.0.0.1:6379> set age 20 xx
(nil)
127.0.0.1:6379> get age
(nil)
查看一个key值
get key1
get name age
删除key
del key1
del key1 key2
批量设置多个key
mset key1 value key2 value2
批量获取多个key
mget key1 key2
keys n*
keys *
追加key的数据
append key1 " append new value"
get key1
设置新值并返回旧值
set name wang
getset name wang
get name
返回字符串key对应值的字节数
127.0.0.1:6379> SET name wang
OK
127.0.0.1:6379> STRLEN name
(integer) 4
127.0.0.1:6379> APPEND name " xiaochun"
(integer) 13
127.0.0.1:6379> GET name
"wang xiaochun"
127.0.0.1:6379> STRLEN name #返回字节数
(integer) 13
127.0.0.1:6379> set name 大马猴
OK
127.0.0.1:6379> get name
"\xe9\xa9\xac\xe5\x93\xa5\xe6\x95\x99\xe8\x82\xb2"
127.0.0.1:6379> strlen name
(integer) 12
127.0.0.1:6379>
判断key是否存在
127.0.0.1:6379> SET name wang ex 10
OK
127.0.0.1:6379> set age 20
OK
127.0.0.1:6379> EXISTS NAME #key的大小写敏感
(integer) 0
127.0.0.1:6379> EXISTS name age #返回值为1,表示存在2个key,0表示不存在
(integer) 2
127.0.0.1:6379> EXISTS name #过几秒再看
(integer) 0
获取 key 的过期时长
ttl key #查看key的剩余生存时间,如果key过期后,会自动删除
-1 #返回值表示永不过期,默认创建的key是永不过期,重新对key赋值,也会从有剩余生命周期变成永不过
期
-2 #返回值表示没有此key
num #key的剩余有效期
127.0.0.1:6379> TTL key1
(integer) -1
127.0.0.1:6379> SET name wang EX 100
OK
127.0.0.1:6379> TTL name
(integer) 96
127.0.0.1:6379> TTL name
(integer) 93
127.0.0.1:6379> SET name mage #重新设置,默认永不过期
OK
127.0.0.1:6379> TTL name
(integer) -1
127.0.0.1:6379> SET name wang EX 200
OK
127.0.0.1:6379> TTL name
(integer) 198
127.0.0.1:6379> GET name
"wang
重置key的过期时长
127.0.0.1:6379> TTL name
(integer) 148
127.0.0.1:6379> EXPIRE name 1000
(integer) 1
127.0.0.1:6379> TTL name
(integer) 999
127.0.0.1:6379>
取消key的期限
即永不过期
127.0.0.1:6379> TTL name
(integer) 999
127.0.0.1:6379> PERSIST name
(integer) 1
127.0.0.1:6379> TTL name
(integer) -1
数字递增
利用INCR命令簇(INCR, DECR, INCRBY,DECRBY)来把字符串当作原子计数器使用。
127.0.0.1:6379> set num 10 #设置初始值
OK
127.0.0.1:6379> INCR num
(integer) 11
127.0.0.1:6379> get num
"11"
数字递减
127.0.0.1:6379> set num 10
OK
127.0.0.1:6379> DECR num
(integer) 9
127.0.0.1:6379> get num
"9
数字增加
将key对应的数字加decrement(可以是负数)。如果key不存在,操作之前,key就会被置为0。如果key的
value类型错误或者是个不能表示成数字的字符串,就返回错误。这个操作最多支持64位有符号的正型
数字。
redis> SET mykey 10
OK
redis> INCRBY mykey 5
(integer) 15
127.0.0.1:6379> get mykey
"15"
127.0.0.1:6379> INCRBY mykey -10
(integer) 5
127.0.0.1:6379> get mykey
"5"
127.0.0.1:6379> INCRBY nokey 5
(integer) 5
127.0.0.1:6379> get nokey
"5"
数字减少
decrby 可以减小数值(也可以增加)
127.0.0.1:6379> SET mykey 10
OK
127.0.0.1:6379> DECRBY mykey 8
(integer) 2
127.0.0.1:6379> get mykey
"2"
127.0.0.1:6379> DECRBY mykey -20
(integer) 22
127.0.0.1:6379> get mykey
"22"
127.0.0.1:6379> DECRBY nokey 3
(integer) -3
127.0.0.1:6379> get nokey
"-3"
15.2 列表list
Redis列表就是简单的字符串数组,按照插入顺序排序. 支持双向读写,可以添加一个元素到列表的头部
(左边)或者尾部(右边),一个列表最多可以包含2^32-1=4294967295个元素,每个列表元素有下标
来标识,下标 0 表示列表的第一个元素,以 1 表示列表的第二个元素,以此类推。 也可以使用负数下
标,以 -1 表示列表的最后一个元素, -2 表示列表的倒数第二个元素,元素值可以重复,常用于存入日
志等场景,此数据类型比较常用
列表特点
有序
可重复
左右都可以操作
LPUSH和RPUSH都可以插入列表
LPUSH key value [value …]
时间复杂度: O(1)
将一个或多个值 value 插入到列表 key 的表头
如果有多个 value 值,那么各个 value 值按从左到右的顺序依次插入到表头: 比如说,对空列表
mylist 执行命令 LPUSH mylist a b c ,列表的值将是 c b a ,这等同于原子性地执行 LPUSH
mylist a 、 LPUSH mylist b 和 LPUSH mylist c 三个命令。
如果 key 不存在,一个空列表会被创建并执行 LPUSH 操作。
当 key 存在但不是列表类型时,返回一个错误。
RPUSH key value [value …]
时间复杂度: O(1)
将一个或多个值 value 插入到列表 key 的表尾(最右边)
如果有多个 value 值,那么各个 value 值按从左到右的顺序依次插入到表尾:比如对一个空列表 mylist
执行 RPUSH mylist a b c ,得出的结果列表为 a b c ,等同于执行命令 RPUSH mylist a 、
RPUSH mylist b 、 RPUSH mylist c 。
如果 key 不存在,一个空列表会被创建并执行 RPUSH 操作。
当 key 存在但不是列表类型时,返回一个错误。
范例
#从左边添加数据,已添加的需向右移
127.0.0.1:6379> LPUSH name mage wang zhang #根据顺序逐个写入name,最后的zhang会在列表
的最左侧。
(integer) 3
127.0.0.1:6379> TYPE name
list
#从右边添加数据
127.0.0.1:6379> RPUSH course linux python go
(integer) 3
127.0.0.1:6379> type course
list
列表追加新数据
127.0.0.1:6379> LPUSH list1 tom
(integer) 2
#从右边添加数据,已添加的向左移
127.0.0.1:6379> RPUSH list1 jack
(integer) 3
获取列表长度(元素个数)
127.0.0.1:6379> LLEN list1
(integer) 3
获取列表指定位置元素数据
127.0.0.1:6379> LPUSH list1 a b c d
(integer) 4
127.0.0.1:6379> LINDEX list1 0 #获取0编号的元素
"d"
127.0.0.1:6379> LINDEX list1 3 #获取3编号的元素
"a"
127.0.0.1:6379> LINDEX list1 -1 #获取最后一个的元素
"a"
#元素从0开始编号
127.0.0.1:6379> LPUSH list1 a b c d
(integer) 4
127.0.0.1:6379> LRANGE list1 1 2
1) "c"
2) "b"
127.0.0.1:6379> LRANGE list1 0 3 #所有元素
1) "d"
2) "c"
3) "b"
4) "a"
127.0.0.1:6379> LRANGE list1 0 -1 #所有元素
1) "d"
2) "c"
3) "b"
4) "a"
127.0.0.1:6379> RPUSH list2 zhang wang li zhao
(integer) 4
127.0.0.1:6379> LRANGE list2 1 2 #指定范围
1) "wang"
2) "li"
127.0.0.1:6379> LRANGE list2 2 2 #指定位置
1) "li"
127.0.0.1:6379> LRANGE list2 0 -1 #所有元素
1) "zhang"
2) "wang"
3) "li"
4) "zhao"
修改列表指定索引值
127.0.0.1:6379> RPUSH listkey a b c d e f
(integer) 6
127.0.0.1:6379> lrange listkey 0 -1
1) "a"
2) "b"
3) "c"
4) "d"
5) "e"
6) "f"
127.0.0.1:6379> lset listkey 2 java
OK
127.0.0.1:6379> lrange listkey 0 -1
1) "a"
2) "b"
3) "java"
4) "d"
5) "e"
6) "f"
127.0.0.1:6379>
删除列表数据
127.0.0.1:6379> LPUSH list1 a b c d
(integer) 4
127.0.0.1:6379> LRANGE list1 0 3
1) "d"
2) "c"
3) "b"
4) "a"
127.0.0.1:6379> LPOP list1 #弹出左边第一个元素,即删除第一个
"d"
127.0.0.1:6379> LLEN list1
(integer) 3
127.0.0.1:6379> LRANGE list1 0 2
1) "c"
2) "b"
3) "a"
127.0.0.1:6379> RPOP list1 #弹出右边第一个元素,即删除最后一个
"a"
127.0.0.1:6379> LLEN list1
(integer) 2
127.0.0.1:6379> LRANGE list1 0 1
1) "c"
2) "b"
#LTRIM 对一个列表进行修剪(trim),让列表只保留指定区间内的元素,不在指定区间之内的元素都将被删
除
127.0.0.1:6379> LLEN list1
(integer) 4
127.0.0.1:6379> LRANGE list1 0 3
1) "d"
2) "c"
3) "b"
4) "a"
127.0.0.1:6379> LTRIM list1 1 2 #只保留1,2号元素
OK
127.0.0.1:6379> LLEN list1
(integer) 2
127.0.0.1:6379> LRANGE list1 0 1
1) "c"
2) "b"
#删除list
127.0.0.1:6379> DEL list1
(integer) 1
127.0.0.1:6379> EXISTS list1
(integer) 0
15.3 集合 set
Set 是一个无序的字符串合集,同一个集合中的每个元素是唯一无重复的,支持在两个不同的集合中对
数据进行逻辑处理,常用于取交集,并集,统计等场景,例如: 实现共同的朋友
集合特点
无序
无重复
集合间操作
创建集合
sadd set1 v1
sadd set2 v2 v4
type set1
type set2
集合中追加数据
#追加时,只能追加不存在的数据,不能追加已经存在的数值
127.0.0.1:6379> SADD set1 v2 v3 v4
(integer) 3
127.0.0.1:6379> SADD set1 v2 #已存在的value,无法再次添加
(integer) 0
127.0.0.1:6379> TYPE set1
set
127.0.0.1:6379> TYPE set2
set
获取集合的所有数据
127.0.0.1:6379> SMEMBERS set1
1) "v4"
2) "v1"
3) "v3"
4) "v2"
127.0.0.1:6379> SMEMBERS set2
1) "v4"
2) "v2"
删除集合中的元素
127.0.0.1:6379> sadd goods mobile laptop car
(integer) 3
127.0.0.1:6379> srem goods car
(integer) 1
127.0.0.1:6379> SMEMBERS goods
1) "mobile"
2) "laptop"
127.0.0.1:6379>
取集合的交集
交集:同时属于集合A且属于集合B的元素
可以实现共同的朋友
127.0.0.1:6379> SINTER set1 set2
1) "v4"
2) "v2"
取集合的并集
并集:属于集合A或者属于集合B的元素
127.0.0.1:6379> SUNION set1 set2
1) "v2"
2) "v4"
3) "v1"
4) "v3"
取集合的差集
差集:属于集合A但不属于集合B的元素
可以实现我的朋友的朋友
127.0.0.1:6379> SDIFF set1 set2
1) "v1"
2) "v3"
15.4 有序集合 sorted set
Redis有序集合和Redis集合类似,是不包含相同字符串的合集。它们的差别是,每个有序集合的成员都
关联着一个双精度浮点型的评分,这个评分用于把有序集合中的成员按最低分到最高分排序。有序集合
的成员不能重复,但评分可以重复,一个有序集合中最多的成员数为 2^32 - 1=4294967295个,经常用于
排行榜的场景
有序集合特点
有序
无重复元素
每个元素是由score和value组成
score 可以重复
value 不可以重复
创建有序集合
127.0.0.1:6379> ZADD zset1 1 v1 #分数为1
(integer) 1
127.0.0.1:6379> ZADD zset1 2 v2
(integer) 1
127.0.0.1:6379> ZADD zset1 2 v3 #分数可重复,元素值不可以重复
(integer) 1
127.0.0.1:6379> ZADD zset1 3 v4
(integer) 1
127.0.0.1:6379> TYPE zset1
zset
127.0.0.1:6379> TYPE zset2
zset
#一次生成多个数据:
127.0.0.1:6379> ZADD zset2 1 v1 2 v2 3 v3 4 v4 5 v5
(integer) 5
实现排名
127.0.0.1:6379> ZADD course 90 linux 99 go 60 python 50 cloud
(integer) 4
127.0.0.1:6379> ZRANGE course 0 -1 #正序排序后显示集合内所有的key,按score从小到大显示
1) "cloud"
2) "python"
3) "linux"
4) "go"
127.0.0.1:6379> ZREVRANGE course 0 -1 #倒序排序后显示集合内所有的key,score从大到小显示
1) "go"
2) "linux"
3) "python"
4) "cloud"
127.0.0.1:6379> ZRANGE course 0 -1 WITHSCORES #正序显示指定集合内所有key和得分情况
1) "cloud"
2) "50"
3) "python"
4) "60"
5) "linux"
6) "90"
7) "go"
8) "99"
127.0.0.1:6379> ZREVRANGE course 0 -1 WITHSCORES #倒序显示指定集合内所有key和得分情况
1) "go"
2) "99"
3) "linux"
4) "90"
5) "python"
6) "60"
7) "cloud"
8) "50"
127.0.0.1:6379>
查看集合的成员个数
127.0.0.1:6379> ZCARD course
(integer) 4
127.0.0.1:6379> ZCARD zset1
(integer) 4
127.0.0.1:6379> ZCARD zset2
(integer) 4
基于索引查找数据
127.0.0.1:6379> ZRANGE course 0 2
1) "cloud"
2) "python"
3) "linux"
127.0.0.1:6379> ZRANGE course 0 10 #超出范围不报错
1) "cloud"
2) "python"
3) "linux"
4) "go"
127.0.0.1:6379> ZRANGE zset1 1 3
1) "v2"
2) "v3"
3) "v4"
127.0.0.1:6379> ZRANGE zset1 0 2
1) "v1"
2) "v2"
3) "v3"
127.0.0.1:6379> ZRANGE zset1 2 2
1) "v3"
查询指定数据的排名
127.0.0.1:6379> ZADD course 90 linux 99 go 60 python 50 cloud
(integer) 4
127.0.0.1:6379> ZRANK course go
(integer) 3 #第4个
127.0.0.1:6379> ZRANK course python
(integer) 1 #第2个
获取分数
127.0.0.1:6379> zscore course cloud
"30"
删除元素
127.0.0.1:6379> ZADD course 90 linux 199 go 60 python 30 cloud
(integer) 4
127.0.0.1:6379> ZRANGE course 0 -1
1) "cloud"
2) "python"
3) "linux"
4) "go"
127.0.0.1:6379> ZREM course python go
(integer) 2
127.0.0.1:6379> ZRANGE course 0 -1
1) "cloud"
2) "linux"
15.5 哈希hash
hash 即字典, 用于保存字符串字段field和字符串值value之间的映射,即key/value做为数据部分,hash特
别适合用于存储对象场景.
一个hash最多可以包含2^32-1 个key/value键值对
哈希特点
无序
k/v 对
适用于存放相关的数据
创建hash
HSET hash field value
时间复杂度: O(1)
将哈希表 hash 中域 field 的值设置为 value 。
如果给定的哈希表并不存在, 那么一个新的哈希表将被创建并执行 HSET 操作。
如果域 field 已经存在于哈希表中, 那么它的旧值将被新值 value 覆盖。
范例:
127.0.0.1:6379> HSET 9527 name zhouxingxing age 20
(integer) 2
127.0.0.1:6379> TYPE 9527
hash
#查看所有字段的值
127.0.0.1:6379> hgetall 9527
1) "name"
2) "zhouxingxing"
3) "age"
4) "20"
#增加字段
127.0.0.1:6379> HSET 9527 gender male
(integer) 1
127.0.0.1:6379> hgetall 9527
1) "name"
2) "zhouxingxing"
3) "age"
4) "20"
5) "gender"
6) "male"
查看hash的指定field的value
127.0.0.1:6379> HGET 9527 name
"zhouxingxing"
127.0.0.1:6379> HGET 9527 age
"20"
127.0.0.1:6379> HMGET 9527 name age #获取多个值
1) "zhouxingxing"
2) "20"
127.0.0.1:6379>
删除hash 的指定的 field/value
127.0.0.1:6379> HDEL 9527 age
(integer) 1
127.0.0.1:6379> HGET 9527 age
(nil)
127.0.0.1:6379> hgetall 9527
1) "name"
2) "zhouxingxing"
127.0.0.1:6379> HGET 9527 name
"zhouxingxing"
批量设置hash key的多个field和value
127.0.0.1:6379> HMSET 9527 name zhouxingxing age 50 city hongkong
OK
127.0.0.1:6379> HGETALL 9527
1) "name"
2) "zhouxingxing"
3) "age"
4) "50"
5) "city"
6) "hongkong"
查看hash指定field的value
127.0.0.1:6379> HMSET 9527 name zhouxingxing age 50 city hongkong
OK
127.0.0.1:6379> HMGET 9527 name age
1) "zhouxingxing"
2) "50"
127.0.0.1:6379>
查看hash的所有field
127.0.0.1:6379> HMSET 9527 name zhouxingxing age 50 city hongkong #重新设置
OK
127.0.0.1:6379> HKEYS 9527
1) "name"
2) "age"
3) "city"
查看hash 所有value
127.0.0.1:6379> HMSET 9527 name zhouxingxing age 50 city hongkong
OK
127.0.0.1:6379> HVALS 9527
1) "zhouxingxing"
2) "50"
3) "hongkong"
查看指定 hash的所有field及value
127.0.0.1:6379> HGETALL 9527
1) "name"
2) "zhouxingxing"
3) "age"
4) "50"
5) "city"
6) "hongkong"
127.0.0.1:6379>
删除 hash
127.0.0.1:6379> DEL 9527
(integer) 1
127.0.0.1:6379> HMGET 9527 name city
1) (nil)
2) (nil)
127.0.0.1:6379> EXISTS 9527
(integer) 0
16.消息队列
消息队列: 把要传输的数据放在队列中,从而实现应用之间的数据交换
常用功能: 可以实现多个应用系统之间的解耦,异步,削峰/限流等
常用的消息队列应用: Kafka,RabbitMQ,Redis
消息队列分为两种
生产者/消费者模式: Producer/Consumer
发布者/订阅者模式: Publisher/Subscriber
生产者消费者模式下,多个消费者同时监听一个频道(redis用队列实现),但是生产者产生的一个消息只
能被最先抢到消息的一个消费者消费一次,队列中的消息由可以多个生产者写入,也可以有不同的消费者
取出进行消费处理.此模式应用广泛
生产者生成消息
[root@redis ~]# redis-cli
127.0.0.1:6379> AUTH 123456
OK
127.0.0.1:6379> LPUSH channel1 message1 #从管道的左侧写入
(integer) 1
127.0.0.1:6379> LPUSH channel1 message2
(integer) 2
127.0.0.1:6379> LPUSH channel1 message3
(integer) 3
127.0.0.1:6379> LPUSH channel1 message4
(integer) 4
127.0.0.1:6379> LPUSH channel1 message5
(integer) 5
获取所有消息
127.0.0.1:6379> LRANGE channel1 0 -1
1) "message5"
2) "message4"
3) "message3"
4) "message2"
5) "message1"
消费者消费消息
127.0.0.1:6379> RPOP channel1 #基于实现消息队列的先进先出原则,从管道的右侧消费
"message1"
127.0.0.1:6379> RPOP channel1
"message2"
127.0.0.1:6379> RPOP channel1
"message3"
127.0.0.1:6379> RPOP channel1
"message4"
127.0.0.1:6379> RPOP channel1
"message5"
127.0.0.1:6379> RPOP channel1
(nil)
验证队列消息消费完成
127.0.0.1:6379> LRANGE channel1 0 -1
(empty list or set) #验证队列中的消息全部消费完成
发布者订阅模式
在发布者订阅者Publisher/Subscriber模式下,发布者Publisher将消息发布到指定的频道channel,事
先监听此channel的一个或多个订阅者Subscriber都会收到相同的消息。即一个消息可以由多个订阅者
获取到. 对于社交应用中的群聊、群发、群公告等场景适用于此模式
订阅者订阅频道
[root@redis ~]# redis-cli
127.0.0.1:6379> AUTH 123456
OK
127.0.0.1:6379> SUBSCRIBE channel01 #订阅者事先订阅指定的频道,之后发布的消
息才能收到
Reading messages... (press Ctrl-C to quit)
1) "subscribe"
2) "channel01"
3) (integer) 1
发布者发布消息
127.0.0.1:6379> PUBLISH channel01 message1 #发布者发布信息到指定频道
(integer) 2 #订阅者个数
127.0.0.1:6379> PUBLISH channel01 message2
(integer) 2
各个订阅者都能收到消息
[root@redis ~]#redis-cli
127.0.0.1:6379> AUTH 123456
OK
127.0.0.1:6379> SUBSCRIBE channel01
Reading messages... (press Ctrl-C to quit)
1) "subscribe"
2) "channel01"
3) (integer) 1
1) "message"
2) "channel01"
3) "message1"
1) "message"
2) "channel01"
3) "message2"
订阅多个频道
#订阅指定的多个频道
127.0.0.1:6379> SUBSCRIBE channel01 channel02
订阅所有频道
127.0.0.1:6379> PSUBSCRIBE * #支持通配符*
订阅匹配的频道
127.0.0.1:6379> PSUBSCRIBE chann* #匹配订阅多个频道
取消订阅频道
127.0.0.1:6379> unsubscribe channel01
1) "unsubscribe"
2) "channel01"
3) (integer) 0
第三天-redis集群和高可用
1.主从复制

注意:主从复制版本要一致

1.1启用主从复制
Redis Server 默认为 master节点,如果要配置为从节点,需要指定master服务器的IP,端口及连接密码
在从节点执行 REPLICAOF MASTER_IP PORT 指令可以启用主从同步复制功能,早期版本使用 SLAVEOF
指令


127.0.0.1:6379> REPLICAOF MASTER_IP PORT #新版推荐使用
127.0.0.1:6379> SLAVEOF MasterIP Port   #旧版使用,将被淘汰
127.0.0.1:6379> CONFIG SET masterauth <masterpass>


#在mater上设置key1
[root@centos8 ~]#redis-cli
127.0.0.1:6379> AUTH 123456
OK
127.0.0.1:6379> INFO replication
# Replication
role:master
connected_slaves:0
master_replid:a3504cab4d33e9723a7bc988ff8e022f6d9325bf
master_replid2:0000000000000000000000000000000000000000
master_repl_offset:0
second_repl_offset:-1
repl_backlog_active:0
repl_backlog_size:1048576
repl_backlog_first_byte_offset:0
repl_backlog_histlen:0
127.0.0.1:6379> SET key1 v1-master
OK
127.0.0.1:6379> KEYS *
1) "key1"
127.0.0.1:6379> GET key1
"v1-master"
127.0.0.1:6379>


#以下都在slave上执行,登录
[root@centos8 ~]#redis-cli
127.0.0.1:6379> info
NOAUTH Authentication required.
127.0.0.1:6379> AUTH 123456
OK
127.0.0.1:6379> INFO replication  #查看当前角色默认为master
# Replication
role:master
connected_slaves:0
master_replid:a3504cab4d33e9723a7bc988ff8e022f6d9325bf
master_replid2:0000000000000000000000000000000000000000
master_repl_offset:0
second_repl_offset:-1
repl_backlog_active:0
repl_backlog_size:1048576
repl_backlog_first_byte_offset:0
repl_backlog_histlen:0
127.0.0.1:6379> SET key1 v1-slave-18
OK
127.0.0.1:6379> KEYS *
1) "key1"
127.0.0.1:6379> GET key1
"v1-slave-18"
127.0.0.1:6379>
#在第二个slave,也设置相同的key1,但值不同
127.0.0.1:6379> KEYS *
1) "key1"
127.0.0.1:6379> GET key1
"v1-slave-28"
127.0.0.1:6379>
127.0.0.1:6379> INFO replication
# Replication
role:master
connected_slaves:0
master_replid:a3504cab4d33e9723a7bc988ff8e022f6d9325bf
master_replid2:0000000000000000000000000000000000000000
master_repl_offset:0
second_repl_offset:-1
repl_backlog_active:0
repl_backlog_size:1048576
repl_backlog_first_byte_offset:0
repl_backlog_histlen:0
127.0.0.1:6379>
#在slave上设置master的IP和端口,4.0版之前的指令为slaveof
127.0.0.1:6379> REPLICAOF 10.0.1.172 6379 #仍可使用SLAVEOF MasterIP Port
OK
#在slave上设置master的密码,才可以同步
127.0.0.1:6379> CONFIG SET masterauth 123456
OK
127.0.0.1:6379> INFO replication
# Replication   #角色变为slave
role:slave
master_host:10.0.1.172   #指向master
master_port:6379
master_link_status:up
master_last_io_seconds_ago:8
master_sync_in_progress:0
slave_repl_offset:42
slave_priority:100
slave_read_only:1
connected_slaves:0
master_replid:b69908f23236fb20b810d198f7f4539f795e0ee5
master_replid2:0000000000000000000000000000000000000000
master_repl_offset:42
second_repl_offset:-1
repl_backlog_active:1
repl_backlog_size:1048576
repl_backlog_first_byte_offset:1
repl_backlog_histlen:42
#查看已经同步成功
127.0.0.1:6379> GET key1
"v1-master"
#在master上可以看到所有slave信息
127.0.0.1:6379> INFO replication
# Replication
role:master
connected_slaves:2
slave0:ip=10.0.0.18,port=6379,state=online,offset=112,lag=1   #slave信息
slave1:ip=10.0.0.28,port=6379,state=online,offset=112,lag=1
master_replid:dc30f86c2d3c9029b6d07831ae3f27f8dbacac62
master_replid2:0000000000000000000000000000000000000000
master_repl_offset:112
second_repl_offset:-1
repl_backlog_active:1
repl_backlog_size:1048576
repl_backlog_first_byte_offset:1
repl_backlog_histlen:112
127.0.0.1:6379>

#如需永久保存主从复制,在从节点配置文件里添加以下
 478 replicaof 10.0.1.174 6379    (添加主节点ip和端口号)
 479 masterauth 123456             (添加主节点密码--是主节点密码,不是从节点密码)

systemctl restart redis.service


1.2 删除主从同步
在从节点执行 REPLICAOF NO ONE 指令可以取消主从复制
#取消复制,在slave上执行REPLICAOF NO ONE,会断开和master的连接不再主从复制, 但不会清除slave
上已有的数据
127.0.0.1:6379> REPLICAOF no one


1.3 验证同步
在 master 上观察日志
[root@centos8 ~]#tail /var/log/redis/redis.log
24402:M 06 Oct 2020 09:09:16.448 * Replica 10.0.0.18:6379 asks for
synchronization
24402:M 06 Oct 2020 09:09:16.448 * Full resync requested by replica
10.0.0.18:6379
24402:M 06 Oct 2020 09:09:16.448 * Starting BGSAVE for SYNC with target: disk
24402:M 06 Oct 2020 09:09:16.453 * Background saving started by pid 24507
24507:C 06 Oct 2020 09:09:16.454 * DB saved on disk
24507:C 06 Oct 2020 09:09:16.455 * RDB: 2 MB of memory used by copy-on-write
24402:M 06 Oct 2020 09:09:16.489 * Background saving terminated with success
24402:M 06 Oct 2020 09:09:16.490 * Synchronization with replica 10.0.0.18:6379
succeeded

在slave节点观察日志
[root@centos8 ~]#tail -f /var/log/redis/redis.log
24395:S 06 Oct 2020 09:09:16.411 * Connecting to MASTER 10.0.1.172:6379
24395:S 06 Oct 2020 09:09:16.412 * MASTER <-> REPLICA sync started
24395:S 06 Oct 2020 09:09:16.412 * Non blocking connect for SYNC fired the
event.
24395:S 06 Oct 2020 09:09:16.412 * Master replied to PING, replication can
continue...
24395:S 06 Oct 2020 09:09:16.414 * Partial resynchronization not possible (no
cached master)
24395:S 06 Oct 2020 09:09:16.419 * Full resync from master:
20ec2450b850782b6eeaed4a29a61a25b9a7f4da:0
24395:S 06 Oct 2020 09:09:16.456 * MASTER <-> REPLICA sync: receiving 196 bytes
from master
24395:S 06 Oct 2020 09:09:16.456 * MASTER <-> REPLICA sync: Flushing old data
24395:S 06 Oct 2020 09:09:16.456 * MASTER <-> REPLICA sync: Loading DB in memory
24395:S 06 Oct 2020 09:09:16.457 * MASTER <-> REPLICA sync: Finished with
success


1.4 修改slave节点配置文件
[root@centos8 ~]#vim /etc/redis.conf
 .......
# replicaof <masterip> <masterport>
replicaof 10.0.1.172 6379 #指定master的IP和端口号
......
# masterauth <master-password>
masterauth 123456     #如有密码需要设置
.......
[root@centos8 ~]#systemctl restart redis


1.5 master和slave查看状态
#在master上查看状态
127.0.0.1:6379> info replication
# Replication
role:master
connected_slaves:1
slave0:ip=10.0.0.18,port=6379,state=online,offset=1104403,lag=0
master_replid:b2517cd6cb3ad1508c516a38caed5b9d2d9a3e73
master_replid2:0000000000000000000000000000000000000000
master_repl_offset:1104403
second_repl_offset:-1
repl_backlog_active:1
repl_backlog_size:1048576
repl_backlog_first_byte_offset:55828
repl_backlog_histlen:1048576
127.0.0.1:6379>
#在slave上查看状态
127.0.0.1:6379> get key1   #同步成功后,slave原key信息丢失,获取master复制过来新的值
"v1-master"
127.0.0.1:6379> INFO replication
# Replication
role:slave
master_host:10.0.1.172
master_port:6379
master_link_status:up
master_last_io_seconds_ago:6
master_sync_in_progress:0
slave_repl_offset:1104431
slave_priority:100
slave_read_only:1
connected_slaves:0
master_replid:b2517cd6cb3ad1508c516a38caed5b9d2d9a3e73
master_replid2:0000000000000000000000000000000000000000
master_repl_offset:1104431
second_repl_offset:-1
repl_backlog_active:1
repl_backlog_size:1048576
repl_backlog_first_byte_offset:55856
repl_backlog_histlen:1048576
127.0.0.1:6379>
#停止master的redis服务:systemctl stop redis,在slave上可以观察到以下现象
127.0.0.1:6379> INFO replication
# Replication
role:slave
master_host:10.0.1.172
master_port:6379
master_link_status:down  #显示down,表示无法连接master
master_last_io_seconds_ago:-1
master_sync_in_progress:0
slave_repl_offset:1104529
master_link_down_since_seconds:4
slave_priority:100
slave_read_only:1
connected_slaves:0
master_replid:b2517cd6cb3ad1508c516a38caed5b9d2d9a3e73
master_replid2:0000000000000000000000000000000000000000
master_repl_offset:1104529
second_repl_offset:-1
repl_backlog_active:1
repl_backlog_size:1048576
repl_backlog_first_byte_offset:55954
repl_backlog_histlen:1048576
127.0.0.1:6379>


slave日志
[root@centos8 ~]#tail -f /var/log/redis/redis.log
24592:S 20 Feb 2020 12:03:58.792 * Connecting to MASTER 10.0.1.172:6379
24592:S 20 Feb 2020 12:03:58.792 * MASTER <-> REPLICA sync started
24592:S 20 Feb 2020 12:03:58.797 * Non blocking connect for SYNC fired the
event.
24592:S 20 Feb 2020 12:03:58.797 * Master replied to PING, replication can
continue...
24592:S 20 Feb 2020 12:03:58.798 * Partial resynchronization not possible (no
cached master)
24592:S 20 Feb 2020 12:03:58.801 * Full resync from master:
b69908f23236fb20b810d198f7f4539f795e0ee5:2440
24592:S 20 Feb 2020 12:03:58.863 * MASTER <-> REPLICA sync: receiving 213 bytes
from master
24592:S 20 Feb 2020 12:03:58.863 * MASTER <-> REPLICA sync: Flushing old data
24592:S 20 Feb 2020 12:03:58.863 * MASTER <-> REPLICA sync: Loading DB in memory
24592:S 20 Feb 2020 12:03:58.863 * MASTER <-> REPLICA sync: Finished with
success

master日志
[root@centos8 ~]#tail /var/log/redis/redis.log
11846:M 20 Feb 2020 12:11:35.171 * DB loaded from disk: 0.000 seconds
11846:M 20 Feb 2020 12:11:35.171 * Ready to accept connections
11846:M 20 Feb 2020 12:11:36.086 * Replica 10.0.0.18:6379 asks for
synchronization
11846:M 20 Feb 2020 12:11:36.086 * Partial resynchronization not accepted:
Replication ID mismatch (Replica asked for
'b69908f23236fb20b810d198f7f4539f795e0ee5', my replication IDs are
'4bff970970c073c1f3d8e8ad20b1c1f126a5f31c' and
'0000000000000000000000000000000000000000')
11846:M 20 Feb 2020 12:11:36.086 * Starting BGSAVE for SYNC with target: disk
11846:M 20 Feb 2020 12:11:36.095 * Background saving started by pid 11850
11850:C 20 Feb 2020 12:11:36.121 * DB saved on disk
11850:C 20 Feb 2020 12:11:36.121 * RDB: 4 MB of memory used by copy-on-write
11846:M 20 Feb 2020 12:11:36.180 * Background saving terminated with success
11846:M 20 Feb 2020 12:11:36.180 * Synchronization with replica 10.0.0.18:6379
succeeded


slave只读状态
验证slave节点为只读状态,不支持写入
127.0.0.1:6379> set key1 v1-slave
(error) READONLY You can't write against a read only replica.


2.主从复制故障恢复

2.1 主从复制故障恢复(过程)

 --slave 节点故障和恢复
当slave节点故障时,将redis client指向另一个slave节点即可,并及时修复故障从节点

--master 节点故障和恢复
当 master 节点故障时,需要提升slave为新的master
master故障后,只能手动提升一个slave为新master,不支持自动切换。
之后将其它的slave节点重新指定新的master为master节点
Master的切换会导致master_replid发生变化,slave之前的master_replid就和当前master不一致从而
会引发所有 slave的全量同步。


案例:主从复制故障恢复实现
假设当前主节点10.0.1.172故障,提升10.0.0.18为新的master
#查看当前10.0.0.18节点的状态为slave,master指向10.0.1.172
127.0.0.1:6379> INFO replication
# Replication
role:slave
master_host:10.0.1.172
master_port:6379
master_link_status:up
master_last_io_seconds_ago:1
master_sync_in_progress:0
slave_repl_offset:3794
slave_priority:100
slave_read_only:1
connected_slaves:0
master_replid:8e8279e461fdf0f1a3464ef768675149ad4b54a3
master_replid2:0000000000000000000000000000000000000000
master_repl_offset:3794
second_repl_offset:-1
repl_backlog_active:1
repl_backlog_size:1048576
repl_backlog_first_byte_offset:3781
repl_backlog_histlen:14
127.0.0.1:6379>

停止slave同步并提升为新的master
#将当前 slave 节点提升为 master 角色
127.0.0.1:6379> REPLICAOF NO ONE   #旧版使用SLAVEOF no one
OK
(5.04s)
127.0.0.1:6379> info replication
# Replication
role:master
connected_slaves:0
master_replid:94901d6b8ff812ec4a4b3ac6bb33faa11e55c274
master_replid2:0083e5a9c96aa4f2196934e10b910937d82b4e19
master_repl_offset:3514
second_repl_offset:3515
repl_backlog_active:1
repl_backlog_size:1048576
repl_backlog_first_byte_offset:3431
repl_backlog_histlen:84
127.0.0.1:6379>


测试能否写入数据:
127.0.0.1:6379> set keytest1 vtest1
OK

修改所有slave 指向新的master节点
#修改10.0.0.28节点指向新的master节点10.0.0.18
127.0.0.1:6379> SLAVEOF 10.0.0.18 6379
OK
127.0.0.1:6379> set key100 v100
(error) READONLY You can't write against a read only replica.
#查看日志
[root@centos8 ~]#tail -f /var/log/redis/redis.log
1762:S 20 Feb 2020 13:28:21.943 # Connection with master lost.
1762:S 20 Feb 2020 13:28:21.943 * Caching the disconnected master state.
1762:S 20 Feb 2020 13:28:21.943 * REPLICAOF 10.0.0.18:6379 enabled (user request
from 'id=5 addr=127.0.0.1:59668 fd=9 name= age=149 idle=0 flags=N db=0 sub=0
psub=0 multi=-1 qbuf=41 qbuf-free=32727 obl=0 oll=0 omem=0 events=r
cmd=slaveof')
1762:S 20 Feb 2020 13:28:21.966 * Connecting to MASTER 10.0.0.18:6379
1762:S 20 Feb 2020 13:28:21.966 * MASTER <-> REPLICA sync started
1762:S 20 Feb 2020 13:28:21.967 * Non blocking connect for SYNC fired the event.
1762:S 20 Feb 2020 13:28:21.968 * Master replied to PING, replication can
continue...
1762:S 20 Feb 2020 13:28:21.968 * Trying a partial resynchronization (request
8e8279e461fdf0f1a3464ef768675149ad4b54a3:3991).
1762:S 20 Feb 2020 13:28:21.969 * Successful partial resynchronization with
master.
1762:S 20 Feb 2020 13:28:21.969 * MASTER <-> REPLICA sync: Master accepted a
Partial Resynchronization.


在新master可看到slave
#在新master节点10.0.0.18上查看状态
127.0.0.1:6379> INFO replication
# Replication
role:master
connected_slaves:1
slave0:ip=10.0.0.28,port=6379,state=online,offset=4606,lag=0
master_replid:8e8279e461fdf0f1a3464ef768675149ad4b54a3
master_replid2:0000000000000000000000000000000000000000
master_repl_offset:4606
second_repl_offset:-1
repl_backlog_active:1
repl_backlog_size:1048576
repl_backlog_first_byte_offset:1
repl_backlog_histlen:4606
127.0.0.1:6379>


3.实现 Redis 的级联复制
即实现基于Slave节点的Slave
master和slave1节点无需修改,只需要修改slave2及slave3指向slave1做为mater即可
#在slave2和slave3上执行下面指令
127.0.0.1:6379> REPLICAOF 10.0.0.18 6379
OK
127.0.0.1:6379> CONFIG SET masterauth 123456

在 master 设置key,观察是否同步
#在master新建key
127.0.0.1:6379> set key2 v2
OK
127.0.0.1:6379> get key2
"v2"
#在slave1和slave2验证key
127.0.0.1:6379> get key2
"v2"
#在slave1和slave2都无法新建key
127.0.0.1:6379> set key3 v3
(error) READONLY You can't write against a read only replica.


在中间那个slave1查看状态
127.0.0.1:6379> INFO replication
# Replication
role:slave
master_host:10.0.1.172
master_port:6379
master_link_status:up
master_last_io_seconds_ago:8 #最近一次与master通信已经过去多少秒。
master_sync_in_progress:0  #是否正在与master通信。
slave_repl_offset:4312  #当前同步的偏移量
slave_priority:100   #slave优先级,master故障后值越小越优先同步。
slave_read_only:1
connected_slaves:1
slave0:ip=10.0.0.28,port=6379,state=online,offset=4312,lag=0 #slave的slave节点
master_replid:8e8279e461fdf0f1a3464ef768675149ad4b54a3
master_replid2:0000000000000000000000000000000000000000
master_repl_offset:4312
second_repl_offset:-1
repl_backlog_active:1
repl_backlog_size:1048576
repl_backlog_first_byte_offset:1
repl_backlog_histlen:4312


4.主从复制优化
Redis主从复制分为全量同步和增量同步
Redis 的主从同步是非阻塞的,即同步过程不会影响主服务器的正常访问.

4.1全量复制过程
主从节点建立连接,验证身份后,从节点向主节点发送PSYNC(2.8版本之前是SYNC)命令
主节点向从节点发送FULLRESYNC命令,包括runID和offset
从节点保存主节点信息
主节点执行BGSAVE保存RDB文件,同时记录新的记录到buffer中
主节点发送RDB文件给从节点
主节点将新收到buffer中的记录发送至从节点
从节点删除本机的旧数据
从节点加载RDB
从节点同步主节点的buffer信息


4.2 增量复制过程
在主从复制首次完成全量同步之后再次需要同步时,从服务器只要发送当前的offset位置(类似于MySQL的
binlog的位置)给主服务器,然后主服务器根据相应的位置将之后的数据(包括写在缓冲区的积压数据)发
送给从服务器,再次将其保存到从节点内存即可。
即首次全量复制,之后的复制基本增量复制实现


4.3 主从同步完整过程
主从同步完整过程如下:
slave发起连接master,验证通过后,发送PSYNC命令
master接收到PSYNC命令后,执行BGSAVE命令将全部数据保存至RDB文件中,并将后续发生的写
操作记录至buffer中
master向所有slave发送RDB文件
master向所有slave发送后续记录在buffer中写操作
slave收到快照文件后丢弃所有旧数据
slave加载收到的RDB到内存
slave 执行来自master接收到的buffer写操作
当slave完成全量复制后,后续master只会先发送slave_repl_offset信息
以后slave比较自身和master的差异,只会进行增量复制的数据即可


复制缓冲区(环形队列)配置参数:
#master的写入数据缓冲区,用于记录自上一次同步后到下一次同步过程中间的写入命令,计算公式:replbacklog-size = 允许从节点最大中断时长 * 主实例offset每秒写入量,比如:master每秒最大写入
64mb,最大允许60秒,那么就要设置为64mb*60秒=3840MB(3.8G),建议此值是设置的足够大
repl-backlog-size 1mb
#如果一段时间后没有slave连接到master,则backlog size的内存将会被释放。如果值为0则表示永远不
释放这部份内存。
repl-backlog-ttl   3600


4.4避免全量复制
第一次全量复制不可避免,后续的全量复制可以利用小主节点(内存小),业务低峰时进行全量
节点运行ID不匹配:主节点重启会导致RUNID变化,可能会触发全量复制,可以利用故障转移,例如哨
兵或集群,而从节点重启动,不会导致全量复制
复制积压缓冲区不足: 当主节点生成的新数据大于缓冲区大小,从节点恢复和主节点连接后,会导致全
量复制.解决方法将repl-backlog-size 调大


4.5 避免复制风暴
单主节点复制风暴
当主节点重启,多从节点复制
解决方法:更换复制拓扑

单机器多实例复制风暴
机器宕机后,大量全量复制
解决方法:主节点分散多机器


4.6 主从同步优化配置

Redis在2.8版本之前没有提供增量部分复制的功能,当网络闪断或者slave Redis重启之后会导致主从之
间的全量同步,即从2.8版本开始增加了部分复制的功能。

性能相关配置
repl-diskless-sync no # 是否使用无盘方式进行同步RDB文件,默认为no,no表示不使用无盘,需要将RDB文件保存到磁盘后再发送给slave,yes表示使用无盘,即RDB文件不需要保存至本地磁盘,而且直接通过网络发送给slave
repl-diskless-sync-delay 5 #无盘时复制的服务器等待的延迟时间
repl-ping-slave-period 10 #slave向master发送ping指令的时间间隔,默认为10s
repl-timeout 60 #指定ping连接超时时间,超过此值无法连接,master_link_status显示为down状态,并记录错误日志
repl-disable-tcp-nodelay no #是否启用TCP_NODELAY
#设置成yes,则redis会合并多个小的TCP包成一个大包再发送,此方式可以节省带宽,但会造成同步延迟时长的增加,导致master与slave数据短期内不一致
#设置成no,则master会立即同步数据
repl-backlog-size 1mb #master的写入数据缓冲区,用于记录自上一次同步后到下一次同步前期间的写入命令,计算公式:repl-backlog-size = 允许slave最大中断时长 * master节点offset每秒写入量,如:master每秒最大写入量为32MB,最长允许中断60秒,就要至少设置为32*60=1920MB,建议此值是设置的足够大,如果此值太小,会造成全量复制
repl-backlog-ttl 3600 #指定多长时间后如果没有slave连接到master,则backlog的内存数据将会过期。如果值为0表示永远不过期。
slave-priority 100 #slave参与选举新的master的优先级,此整数值越小则优先级越高。当master故障时将会按照优先级来选择slave端进行选举新的master,如果值设置为0,则表示该slave节点永远不会被选为master节点。
min-replicas-to-write 1 #指定master的可用slave不能少于个数,如果少于此值,master将无法执行写操作,默认为0,生产建议设为1,
min-slaves-max-lag 20 #指定至少有min-replicas-to-write数量的slave延迟时间都大于此秒数时,master将不能执行写操作


5.redis哨兵
高可用----redis-sentinel(v2.8)支持高可用

5.1 redis集群
主从架构和MySQL的主从复制一样,无法实现master和slave角色的自动切换,即当master出现故障时,
不能实现自动的将一个slave 节点提升为新的master节点,即主从复制无法实现自动的故障转移功能,如果
想实现转移,则需要手动修改配置,才能将 slave 服务器提升新的master节点.此外只有一个主节点支持写
操作,所以业务量很大时会导致Redis服务性能达到瓶颈
需要解决的主从复制的存在以下弊端:
master和slave角色的自动切换,且不能影响业务
提升Redis服务整体性能,支持更高并发访问


5.2 哨兵sentinel工作原理
哨兵Sentinel从Redis2.6版本开始引用,Redis 2.8版本之后稳定可用。生产环境如果要使用此功能建议
使用Redis的2.8版本以上版本

Sentinel 架构和故障转移

专门的Sentinel 服务进程是用于监控redis集群中Master工作的状态,当Master主服务器发生故障的时
候,可以实现Master和Slave的角色的自动切换,从而实现系统的高可用性
Sentinel是一个分布式系统,即需要在多个节点上各自同时运行一个sentinel进程,Sentienl 进程通过流
言协议(gossip protocols)来接收关于Master是否下线状态,并使用投票协议(Agreement Protocols)来
决定是否执行自动故障转移,并选择合适的Slave作为新的Master
每个Sentinel进程会向其它Sentinel、Master、Slave定时发送消息,来确认对方是否存活,如果发现某
个节点在指定配置时间内未得到响应,则会认为此节点已离线,即为主观宕机Subjective Down,简称
为 SDOWN
如果哨兵集群中的多数Sentinel进程认为Master存在SDOWN,共同利用 is-master-down-by-addr 命令
互相通知后,则认为客观宕机Objectively Down, 简称 ODOWN
接下来利用投票算法,从所有slave节点中,选一台合适的slave将之提升为新Master节点,然后自动修
改其它slave相关配置,指向新的master节点,最终实现故障转移failover
Redis Sentinel中的Sentinel节点个数应该为大于等于3且最好为奇数
客户端初始化时连接的是Sentinel节点集合,不再是具体的Redis节点,即 Sentinel只是配置中心不是代
理。
Redis Sentinel 节点与普通 Redis 没有区别,要实现读写分离依赖于客户端程序
Sentinel 机制类似于MySQL中的MHA功能,只解决master和slave角色的自动故障转移问题,但单个
Master 的性能瓶颈问题并没有解决
Redis 3.0 之前版本中,生产环境一般使用哨兵模式较多,Redis 3.0后推出Redis cluster功能,可以支持更大
规模的高并发环境


 Sentinel中的三个定时任务
 每10 秒每个sentinel 对master和slave执行info
发现slave节点
确认主从关系
每2秒每个sentinel通过master节点的channel交换信息(pub/sub)
通过sentinel__:hello频道交互
交互对节点的“看法”和自身信息
每1秒每个sentinel对其他sentinel和redis执行ping


5.3 实现哨兵架构


环境:虚拟机
redis-master:10.0.1.172
redis-slave1:10.0.1.173
redis-slave2:10.0.1.174


以下案例实现一主两从的基于哨兵的高可用Redis架构
sentinel master--------slave1 sentinel  slave2 sentinel
哨兵需要先实现主从复制
哨兵的前提是已经实现了Redis的主从复制

注意: master 的配置文件中masterauth 和slave 都必须相同
所有主从节点的 redis.conf 中关健配置

案例--准备主从环境配置
#在所有主从节点执行
[root@centos8 ~]#dnf -y install redis
[root@centos8 ~]#vim /etc/redis.conf
bind 0.0.0.0
masterauth "123456"
requirepass "123456"
#或者非交互执行
[root@centos8 ~]#sed -i -e 's/bind 127.0.0.1/bind 0.0.0.0/' -e 's/^# masterauth .*/masterauth 123456/' -e 's/^# requirepass .*/requirepass 123456/' /etc/redis.conf
#在所有从节点执行
[root@centos8 ~]#echo "replicaof 10.0.1.172 6379" >> /etc/redis.conf
#在所有主从节点执行
[root@centos8 ~]#systemctl enable --now redis

master 服务器状态
[root@redis-master ~]#redis-cli -a 123456
Warning: Using a password with '-a' or '-u' option on the command line interface
may not
127.0.0.1:6379> INFO replication
# Replication
role:master
connected_slaves:2
slave0:ip=10.0.0.28,port=6379,state=online,offset=112,lag=1
slave1:ip=10.0.0.18,port=6379,state=online,offset=112,lag=0
master_replid:8fdca730a2ae48fb9c8b7e739dcd2efcc76794f3
master_replid2:0000000000000000000000000000000000000000
master_repl_offset:112
second_repl_offset:-1
repl_backlog_active:1
repl_backlog_size:1048576
repl_backlog_first_byte_offset:1
repl_backlog_histlen:112
127.0.0.1:6379>


配置 slave1
[root@redis-slave1 ~]#redis-cli -a 123456
Warning: Using a password with '-a' or '-u' option on the command line interface
may not be safe.
127.0.0.1:6379> REPLICAOF 10.0.1.172 6379
OK
127.0.0.1:6379> CONFIG SET masterauth "123456"
OK
127.0.0.1:6379> INFO replication
# Replication
role:slave
master_host:10.0.1.172
master_port:6379
master_link_status:up
master_last_io_seconds_ago:4
master_sync_in_progress:0
slave_repl_offset:140
slave_priority:100
slave_read_only:1
connected_slaves:0
master_replid:8fdca730a2ae48fb9c8b7e739dcd2efcc76794f3
master_replid2:0000000000000000000000000000000000000000
master_repl_offset:140
second_repl_offset:-1
repl_backlog_active:1
repl_backlog_size:1048576
repl_backlog_first_byte_offset:99
repl_backlog_histlen:42


配置slave2
[root@redis-slave2 ~]#redis-cli -a 123456
Warning: Using a password with '-a' or '-u' option on the command line interface
may not be safe.
127.0.0.1:6379> REPLICAOF 10.0.1.172 6379
OK
127.0.0.1:6379> CONFIG SET masterauth "123456"
OK
127.0.0.1:6379> INFO replication
# Replication
role:slave
master_host:10.0.1.172
master_port:6379
master_link_status:up
master_last_io_seconds_ago:3
master_sync_in_progress:0
slave_repl_offset:182
slave_priority:100
slave_read_only:1
connected_slaves:0
master_replid:8fdca730a2ae48fb9c8b7e739dcd2efcc76794f3
master_replid2:0000000000000000000000000000000000000000
master_repl_offset:182
second_repl_offset:-1
repl_backlog_active:1
repl_backlog_size:1048576
repl_backlog_first_byte_offset:15
repl_backlog_histlen:168
127.0.0.1:6379>


5.4 编辑哨兵配置
sentinel配置
Sentinel实际上是一个特殊的redis服务器,有些redis指令支持,但很多指令并不支持.默认监听在
26379/tcp端口.
哨兵服务可以和Redis服务器分开部署在不同主机,但为了节约成本一般会部署在一起
所有redis节点使用相同的以下示例的配置文件

#如果是编译安装,在源码目录有sentinel.conf,复制到安装目录即可,
如:/apps/redis/etc/sentinel.conf
[root@centos8 ~]#cp redis-6.2.5/sentinel.conf /apps/redis/etc/sentinel.conf
[root@centos8 ~]#chown redis.redis /apps/redis/etc/sentinel.conf
[root@centos8 ~]#vim /etc/redis-sentinel.conf
bind 0.0.0.0
port 26379
daemonize yes
pidfile "redis-sentinel.pid"
logfile "sentinel_26379.log"
dir "/tmp"  #工作目录
sentinel monitor mymaster 10.0.1.172 6379 2
#mymaster是集群的名称,此行指定当前mymaster集群中master服务器的地址和端口
#2为法定人数限制(quorum),即有几个sentinel认为master down了就进行故障转移,一般此值是所有sentinel节点(一般总数是>=3的 奇数,如:3,5,7等)的一半以上的整数值,比如,总数是3,即3/2=1.5,取整为2,是master的ODOWN客观下线的依据
sentinel auth-pass mymaster 123456
#mymaster集群中master的密码,注意此行要在上面行的下面
sentinel down-after-milliseconds mymaster 30000
#判断mymaster集群中所有节点的主观下线(SDOWN)的时间,单位:毫秒,建议3000
sentinel parallel-syncs mymaster 1
#发生故障转移后,可以同时向新master同步数据的slave的数量,数字越小总同步时间越长,但可以减轻新
master的负载压力
sentinel failover-timeout mymaster 180000
#所有slaves指向新的master所需的超时时间,单位:毫秒
sentinel deny-scripts-reconfig yes #禁止修改脚本
logfile /var/log/redis/sentinel.log


三个哨兵服务器的配置都如下
[root@redis-master ~]#grep -vE "^#|^$" /etc/redis-sentinel.conf
port 26379
daemonize no
pidfile "/var/run/redis-sentinel.pid"
logfile "/var/log/redis/sentinel.log"
dir "/tmp"
sentinel monitor mymaster 10.0.1.172 6379 2        #修改此行
sentinel auth-pass mymaster 123456               #增加此行
sentinel down-after-milliseconds mymaster 3000   #修改此行
sentinel parallel-syncs mymaster 1
sentinel failover-timeout mymaster 180000
sentinel deny-scripts-reconfig yes
#注意此行自动生成必须唯一,一般不需要修改,如果相同则修改此值需重启redis和sentinel服务
sentinel myid 50547f34ed71fd48c197924969937e738a39975b
.....
# Generated by CONFIG REWRITE
protected-mode no
supervised systemd
sentinel leader-epoch mymaster 0
sentinel known-replica mymaster 10.0.0.28 6379
sentinel current-epoch 0
[root@redis-master ~]#scp /etc/redis-sentinel.conf redis-slave1:/etc/
[root@redis-master ~]#scp /etc/redis-sentinel.conf redis-slave2:/etc/

启动哨兵服务
将所有哨兵服务器都启动起来
#确保每个哨兵主机myid不同,如果相同,必须手动修改为不同的值
[root@redis-slave1 ~]#vim /etc/redis-sentinel.conf
sentinel myid 50547f34ed71fd48c197924969937e738a39975c
[root@redis-slave2 ~]#vim /etc/redis-sentinel.conf
sentinel myid 50547f34ed71fd48c197924969937e738a39975d
[root@redis-master ~]#systemctl enable --now redis-sentinel.service
[root@redis-slave1 ~]#systemctl enable --now redis-sentinel.service
[root@redis-slave2 ~]#systemctl enable --now redis-sentinel.service


如果是编译安装,在所有哨兵服务器执行下面操作启动哨兵
[root@redis-master ~]##vim /apps/redis/etc/sentinel.conf
bind 0.0.0.0
port 26379
daemonize yes
pidfile "redis-sentinel.pid"
Logfile "sentinel_26379.log"
dir "/apps/redis/data"
sentinel monitor mymaster 10.0.1.172 6379 2
sentinel auth-pass mymaster 123456
sentinel down-after-milliseconds mymaster 15000
sentinel parallel-syncs mymaster 1
sentinel failover-timeout mymaster 180000
sentinel deny-scripts-reconfig yes
[root@redis-master ~]#/apps/redis/bin/redis-sentinel /apps/redis/etc/sentinel.conf


#如果是编译安装,可以在所有节点生成新的service文件
[root@redis-master ~]#vim /lib/systemd/system/redis-sentinel.service
[Unit]
Description=Redis Sentinel
After=network.target
[Service]
ExecStart=/apps/redis/bin/redis-sentinel /apps/redis/etc/sentinel.conf --supervised systemd
ExecStop=/bin/kill -s QUIT $MAINPID
User=redis
Group=redis
RuntimeDirectory=redis
RuntimeDirectoryMode=0755
[Install]
WantedBy=multi-user.target


#拷贝哨兵启动文件到其他的机器上
[root@redis ~]# scp -r /lib/systemd/system/redis-sentinel.service root@10.0.1.173:/lib/systemd/system/redis-sentinel.service
[root@redis ~]# scp -r /lib/systemd/system/redis-sentinel.service root@10.0.1.174:/lib/systemd/system/redis-sentinel.service

#注意所有节点的目录权限,否则无法启动服务(如果失败复制过去的哨兵配置文件,权限还是root,所以要改一下所有者和所属组)
[root@redis-master ~]#chown -R redis.redis /apps/redis/

#启动所有机器哨兵服务
[root@redis ~]# systemctl start redis-sentinel


#验证哨兵服务
[root@redis-master ~]#ss -ntl
State   Recv-Q Send-Q Local Address:Port Peer Address:Port
LISTEN  0       128          0.0.0.0:22         0.0.0.0:*
LISTEN  0       128          0.0.0.0:26379      0.0.0.0:*
LISTEN  0       128          0.0.0.0:6379       0.0.0.0:*
LISTEN  0       128             [::]:22           [::]:*
LISTEN  0       128             [::]:26379         [::]:*
LISTEN  0       128             [::]:6379         [::]:*


# 查看哨兵日志
master的哨兵日志
[root@redis ~]# tail -f /apps/redis/log/sentinel.log
2470:X 19 Apr 2024 20:48:55.358 # You requested maxclients of 10000 requiring at least 10032 max file descriptors.
2470:X 19 Apr 2024 20:48:55.358 # Server can't set maximum open files to 10032 because of OS error: Operation not permitted.
2470:X 19 Apr 2024 20:48:55.358 # Current maximum open files is 4096. maxclients has been reduced to 4064 to compensate for low ulimit. If you need higher maxclients increase 'ulimit -n'.
2470:X 19 Apr 2024 20:48:55.358 * monotonic clock: POSIX clock_gettime
2470:X 19 Apr 2024 20:48:55.358 * Running mode=sentinel, port=26379.
2470:X 19 Apr 2024 20:48:55.358 # WARNING: The TCP backlog setting of 511 cannot be enforced because /proc/sys/net/core/somaxconn is set to the lower value of 128.
2470:X 19 Apr 2024 20:48:55.358 # Sentinel ID is 9de5f4c4cb3ce568b5a497e3fe71569fa8c7a363
2470:X 19 Apr 2024 20:48:55.358 # +monitor master mymaster 10.0.1.172 6379 quorum 2
2470:X 19 Apr 2024 20:48:55.358 # systemd supervision error: NOTIFY_SOCKET not found!
2470:X 19 Apr 2024 20:48:55.358 # systemd supervision error: NOTIFY_SOCKET not found!


slave1 的哨兵日志
[root@redis-slave1 ~]#tail -f /var/log/redis/sentinel.log
[root@redis etc]# tail -f /apps/redis/log/sentinel.log
13975:X 19 Apr 2024 20:47:52.998 # Server can't set maximum open files to 10032 because of OS error: Operation not permitted.
13975:X 19 Apr 2024 20:47:52.998 # Current maximum open files is 4096. maxclients has been reduced to 4064 to compensate for low ulimit. If you need higher maxclients increase 'ulimit -n'.
13975:X 19 Apr 2024 20:47:52.998 * monotonic clock: POSIX clock_gettime
13975:X 19 Apr 2024 20:47:52.998 * Running mode=sentinel, port=26379.
13975:X 19 Apr 2024 20:47:52.998 # Sentinel ID is 1835822e3453202cdcd2d18af249329d61d05144
13975:X 19 Apr 2024 20:47:52.998 # +monitor master mymaster 10.0.1.172 6379 quorum 2
13975:X 19 Apr 2024 20:47:52.998 # systemd supervision error: NOTIFY_SOCKET not found!
13975:X 19 Apr 2024 20:47:52.998 # systemd supervision error: NOTIFY_SOCKET not found!
13975:X 19 Apr 2024 20:48:20.481 # +sdown sentinel 9de5f4c4cb3ce568b5a497e3fe71569fa8c7a363 10.0.1.172 26379 @ mymaster 10.0.1.172 6379
13975:X 19 Apr 2024 20:48:55.838 # -sdown sentinel 9de5f4c4cb3ce568b5a497e3fe71569fa8c7a363 10.0.1.172 26379 @ mymaster 10.0.1.172 6379


slave2的哨兵日志
[root@redis ~]# tail -f /apps/redis/log/sentinel.log
44731:X 19 Apr 2024 20:46:57.702 * monotonic clock: POSIX clock_gettime
44731:X 19 Apr 2024 20:46:57.703 * Running mode=sentinel, port=26379.
44731:X 19 Apr 2024 20:46:57.703 # Sentinel ID is 65a4b5100456085e7730c16324e7585383e60570
44731:X 19 Apr 2024 20:46:57.703 # +monitor master mymaster 10.0.1.172 6379 quorum 2
44731:X 19 Apr 2024 20:46:57.703 # systemd supervision error: NOTIFY_SOCKET not found!
44731:X 19 Apr 2024 20:46:57.703 # systemd supervision error: NOTIFY_SOCKET not found!
44731:X 19 Apr 2024 20:47:00.720 # +sdown sentinel 1835822e3453202cdcd2d18af249329d61d05144 10.0.1.173 26379 @ mymaster 10.0.1.172 6379
44731:X 19 Apr 2024 20:47:53.997 # -sdown sentinel 1835822e3453202cdcd2d18af249329d61d05144 10.0.1.173 26379 @ mymaster 10.0.1.172 6379
44731:X 19 Apr 2024 20:48:20.565 # +sdown sentinel 9de5f4c4cb3ce568b5a497e3fe71569fa8c7a363 10.0.1.172 26379 @ mymaster 10.0.1.172 6379
44731:X 19 Apr 2024 20:48:55.969 # -sdown sentinel 9de5f4c4cb3ce568b5a497e3fe71569fa8c7a363 10.0.1.172 26379 @ mymaster 10.0.1.172 6379


#当前sentinel状态
在sentinel状态中尤其是最后一行,涉及到masterIP是多少,有几个slave,有几个sentinels,必须是符
合全部服务器数量

master的哨兵状态
[root@redis-master ~]#redis-cli -p 26379
127.0.0.1:26379> info sentinel
# Sentinel
sentinel_masters:1
sentinel_tilt:0
sentinel_running_scripts:0
sentinel_scripts_queue_length:0
sentinel_simulate_failure_flags:0
master0:name=mymaster,status=ok,address=10.0.1.172:6379,slaves=2,sentinels=3
 #两个slave,三个sentinel服务器,如果sentinels值不符合,检查myid可能冲突

[root@redis-master ~]#redis-cli -p 26379
slave1的哨兵状态
127.0.0.1:26379> INFO sentinel
# Sentinel
sentinel_masters:1
sentinel_tilt:0
sentinel_running_scripts:0
sentinel_scripts_queue_length:0
sentinel_simulate_failure_flags:0
master0:name=mymaster,status=ok,address=10.0.1.172:6379,slaves=2,sentinels=3


[root@redis-master ~]#redis-cli -p 26379
slave2的哨兵状态
127.0.0.1:26379> INFO sentinel
# Sentinel
sentinel_masters:1
sentinel_tilt:0
sentinel_running_scripts:0
sentinel_scripts_queue_length:0
sentinel_simulate_failure_flags:0
master0:name=mymaster,status=ok,address=10.0.1.172:6379,slaves=2,sentinels=3


#停止Master 实现故障转移
停止 Master 节点
[root@redis-master ~]#killall redis-server

查看各节点上哨兵信息:
[root@redis-master ~]#redis-cli -a 123456 -p 26379
Warning: Using a password with '-a' or '-u' option on the command line interface
may not be safe.
127.0.0.1:26379> info sentinel
# Sentinel
sentinel_masters:1
sentinel_tilt:0
sentinel_running_scripts:0
sentinel_scripts_queue_length:0
sentinel_simulate_failure_flags:0
master0:name=mymaster,status=ok,address=10.0.1.173:6379,slaves=2,sentinels=3


故障转移时master--sentinel的信息:
[root@redis ~]# tail -f /apps/redis/log/sentinel.log
2470:X 19 Apr 2024 20:48:55.358 # You requested maxclients of 10000 requiring at least 10032 max file descriptors.
2470:X 19 Apr 2024 20:48:55.358 # Server can't set maximum open files to 10032 because of OS error: Operation not permitted.
2470:X 19 Apr 2024 20:48:55.358 # Current maximum open files is 4096. maxclients has been reduced to 4064 to compensate for low ulimit. If you need higher maxclients increase 'ulimit -n'.
2470:X 19 Apr 2024 20:48:55.358 * monotonic clock: POSIX clock_gettime
2470:X 19 Apr 2024 20:48:55.358 * Running mode=sentinel, port=26379.
2470:X 19 Apr 2024 20:48:55.358 # WARNING: The TCP backlog setting of 511 cannot be enforced because /proc/sys/net/core/somaxconn is set to the lower value of 128.
2470:X 19 Apr 2024 20:48:55.358 # Sentinel ID is 9de5f4c4cb3ce568b5a497e3fe71569fa8c7a363
2470:X 19 Apr 2024 20:48:55.358 # +monitor master mymaster 10.0.1.172 6379 quorum 2
2470:X 19 Apr 2024 20:48:55.358 # systemd supervision error: NOTIFY_SOCKET not found!
2470:X 19 Apr 2024 20:48:55.358 # systemd supervision error: NOTIFY_SOCKET not found!
2470:X 19 Apr 2024 21:04:13.132 # +sdown master mymaster 10.0.1.172 6379
2470:X 19 Apr 2024 21:04:13.198 # +new-epoch 1
2470:X 19 Apr 2024 21:04:13.199 # +vote-for-leader 1835822e3453202cdcd2d18af249329d61d05144 1
2470:X 19 Apr 2024 21:04:14.218 # +odown master mymaster 10.0.1.172 6379 #quorum 3/2
2470:X 19 Apr 2024 21:04:14.218 # Next failover delay: I will not start a failover before Fri Apr 19 21:10:14 2024
2470:X 19 Apr 2024 21:04:14.341 # +config-update-from sentinel 1835822e3453202cdcd2d18af249329d61d05144 10.0.1.173 26379 @ mymaster 10.0.1.172 6379
2470:X 19 Apr 2024 21:04:14.341 # +switch-master mymaster 10.0.1.172 6379 10.0.1.173 6379
2470:X 19 Apr 2024 21:04:14.341 * +slave slave 10.0.1.174:6379 10.0.1.174 6379 @ mymaster 10.0.1.173 6379
2470:X 19 Apr 2024 21:04:14.341 * +slave slave 10.0.1.172:6379 10.0.1.172 6379 @ mymaster 10.0.1.173 6379
2470:X 19 Apr 2024 21:04:17.404 # +sdown slave 10.0.1.172:6379 10.0.1.172 6379 @ mymaster 10.0.1.173 6379


故障转移时slave1--sentinel信息
[root@redis etc]# tail -f /apps/redis/log/sentinel.log
13975:X 19 Apr 2024 20:47:52.998 # Server can't set maximum open files to 10032 because of OS error: Operation not permitted.
13975:X 19 Apr 2024 20:47:52.998 # Current maximum open files is 4096. maxclients has been reduced to 4064 to compensate for low ulimit. If you need higher maxclients increase 'ulimit -n'.
13975:X 19 Apr 2024 20:47:52.998 * monotonic clock: POSIX clock_gettime
13975:X 19 Apr 2024 20:47:52.998 * Running mode=sentinel, port=26379.
13975:X 19 Apr 2024 20:47:52.998 # Sentinel ID is 1835822e3453202cdcd2d18af249329d61d05144
13975:X 19 Apr 2024 20:47:52.998 # +monitor master mymaster 10.0.1.172 6379 quorum 2
13975:X 19 Apr 2024 20:47:52.998 # systemd supervision error: NOTIFY_SOCKET not found!
13975:X 19 Apr 2024 20:47:52.998 # systemd supervision error: NOTIFY_SOCKET not found!
13975:X 19 Apr 2024 20:48:20.481 # +sdown sentinel 9de5f4c4cb3ce568b5a497e3fe71569fa8c7a363 10.0.1.172 26379 @ mymaster 10.0.1.172 6379
13975:X 19 Apr 2024 20:48:55.838 # -sdown sentinel 9de5f4c4cb3ce568b5a497e3fe71569fa8c7a363 10.0.1.172 26379 @ mymaster 10.0.1.172 6379
13975:X 19 Apr 2024 21:04:13.162 # +sdown master mymaster 10.0.1.172 6379
13975:X 19 Apr 2024 21:04:13.215 # +odown master mymaster 10.0.1.172 6379 #quorum 2/2
13975:X 19 Apr 2024 21:04:13.215 # +new-epoch 1
13975:X 19 Apr 2024 21:04:13.215 # +try-failover master mymaster 10.0.1.172 6379
13975:X 19 Apr 2024 21:04:13.217 # +vote-for-leader 1835822e3453202cdcd2d18af249329d61d05144 1
13975:X 19 Apr 2024 21:04:13.220 # 9de5f4c4cb3ce568b5a497e3fe71569fa8c7a363 voted for 1835822e3453202cdcd2d18af249329d61d05144 1
13975:X 19 Apr 2024 21:04:13.222 # 65a4b5100456085e7730c16324e7585383e60570 voted for 1835822e3453202cdcd2d18af249329d61d05144 1
13975:X 19 Apr 2024 21:04:13.301 # +elected-leader master mymaster 10.0.1.172 6379
13975:X 19 Apr 2024 21:04:13.301 # +failover-state-select-slave master mymaster 10.0.1.172 6379
13975:X 19 Apr 2024 21:04:13.373 # +selected-slave slave 10.0.1.173:6379 10.0.1.173 6379 @ mymaster 10.0.1.172 6379
13975:X 19 Apr 2024 21:04:13.373 * +failover-state-send-slaveof-noone slave 10.0.1.173:6379 10.0.1.173 6379 @ mymaster 10.0.1.172 6379
13975:X 19 Apr 2024 21:04:13.435 * +failover-state-wait-promotion slave 10.0.1.173:6379 10.0.1.173 6379 @ mymaster 10.0.1.172 6379
13975:X 19 Apr 2024 21:04:14.307 # +promoted-slave slave 10.0.1.173:6379 10.0.1.173 6379 @ mymaster 10.0.1.172 6379
13975:X 19 Apr 2024 21:04:14.307 # +failover-state-reconf-slaves master mymaster 10.0.1.172 6379
13975:X 19 Apr 2024 21:04:14.361 * +slave-reconf-sent slave 10.0.1.174:6379 10.0.1.174 6379 @ mymaster 10.0.1.172 6379
13975:X 19 Apr 2024 21:04:15.329 * +slave-reconf-inprog slave 10.0.1.174:6379 10.0.1.174 6379 @ mymaster 10.0.1.172 6379
13975:X 19 Apr 2024 21:04:15.329 * +slave-reconf-done slave 10.0.1.174:6379 10.0.1.174 6379 @ mymaster 10.0.1.172 6379
13975:X 19 Apr 2024 21:04:15.396 # -odown master mymaster 10.0.1.172 6379
13975:X 19 Apr 2024 21:04:15.396 # +failover-end master mymaster 10.0.1.172 6379
13975:X 19 Apr 2024 21:04:15.396 # +switch-master mymaster 10.0.1.172 6379 10.0.1.173 6379
13975:X 19 Apr 2024 21:04:15.396 * +slave slave 10.0.1.174:6379 10.0.1.174 6379 @ mymaster 10.0.1.173 6379
13975:X 19 Apr 2024 21:04:15.397 * +slave slave 10.0.1.172:6379 10.0.1.172 6379 @ mymaster 10.0.1.173 6379
13975:X 19 Apr 2024 21:04:18.454 # +sdown slave 10.0.1.172:6379 10.0.1.172 6379 @ mymaster 10.0.1.173 6379


故障转移时slave1主从复制的信息
127.0.0.1:6379> info replication
# Replication
role:master
connected_slaves:1
slave0:ip=10.0.1.174,port=6379,state=online,offset=411182,lag=0
master_failover_state:no-failover
master_replid:0c26a7e53423197551314589988db39b5cd4df51
master_replid2:5a7545360639c3093dfa212492edd75ad51eec4c
master_repl_offset:411182
second_repl_offset:320330
repl_backlog_active:1
repl_backlog_size:1048576
repl_backlog_first_byte_offset:1
repl_backlog_histlen:411182


故障转移时slave2--sentinel的信息:
[root@redis etc]# tail -f /apps/redis/log/sentinel.log
13975:X 19 Apr 2024 20:47:52.998 # Server can't set maximum open files to 10032 because of OS error: Operation not permitted.
13975:X 19 Apr 2024 20:47:52.998 # Current maximum open files is 4096. maxclients has been reduced to 4064 to compensate for low ulimit. If you need higher maxclients increase 'ulimit -n'.
13975:X 19 Apr 2024 20:47:52.998 * monotonic clock: POSIX clock_gettime
13975:X 19 Apr 2024 20:47:52.998 * Running mode=sentinel, port=26379.
13975:X 19 Apr 2024 20:47:52.998 # Sentinel ID is 1835822e3453202cdcd2d18af249329d61d05144
13975:X 19 Apr 2024 20:47:52.998 # +monitor master mymaster 10.0.1.172 6379 quorum 2
13975:X 19 Apr 2024 20:47:52.998 # systemd supervision error: NOTIFY_SOCKET not found!
13975:X 19 Apr 2024 20:47:52.998 # systemd supervision error: NOTIFY_SOCKET not found!
13975:X 19 Apr 2024 20:48:20.481 # +sdown sentinel 9de5f4c4cb3ce568b5a497e3fe71569fa8c7a363 10.0.1.172 26379 @ mymaster 10.0.1.172 6379
13975:X 19 Apr 2024 20:48:55.838 # -sdown sentinel 9de5f4c4cb3ce568b5a497e3fe71569fa8c7a363 10.0.1.172 26379 @ mymaster 10.0.1.172 6379
13975:X 19 Apr 2024 21:04:13.162 # +sdown master mymaster 10.0.1.172 6379
13975:X 19 Apr 2024 21:04:13.215 # +odown master mymaster 10.0.1.172 6379 #quorum 2/2
13975:X 19 Apr 2024 21:04:13.215 # +new-epoch 1
13975:X 19 Apr 2024 21:04:13.215 # +try-failover master mymaster 10.0.1.172 6379
13975:X 19 Apr 2024 21:04:13.217 # +vote-for-leader 1835822e3453202cdcd2d18af249329d61d05144 1
13975:X 19 Apr 2024 21:04:13.220 # 9de5f4c4cb3ce568b5a497e3fe71569fa8c7a363 voted for 1835822e3453202cdcd2d18af249329d61d05144 1
13975:X 19 Apr 2024 21:04:13.222 # 65a4b5100456085e7730c16324e7585383e60570 voted for 1835822e3453202cdcd2d18af249329d61d05144 1
13975:X 19 Apr 2024 21:04:13.301 # +elected-leader master mymaster 10.0.1.172 6379
13975:X 19 Apr 2024 21:04:13.301 # +failover-state-select-slave master mymaster 10.0.1.172 6379
13975:X 19 Apr 2024 21:04:13.373 # +selected-slave slave 10.0.1.173:6379 10.0.1.173 6379 @ mymaster 10.0.1.172 6379
13975:X 19 Apr 2024 21:04:13.373 * +failover-state-send-slaveof-noone slave 10.0.1.173:6379 10.0.1.173 6379 @ mymaster 10.0.1.172 6379
13975:X 19 Apr 2024 21:04:13.435 * +failover-state-wait-promotion slave 10.0.1.173:6379 10.0.1.173 6379 @ mymaster 10.0.1.172 6379
13975:X 19 Apr 2024 21:04:14.307 # +promoted-slave slave 10.0.1.173:6379 10.0.1.173 6379 @ mymaster 10.0.1.172 6379
13975:X 19 Apr 2024 21:04:14.307 # +failover-state-reconf-slaves master mymaster 10.0.1.172 6379
13975:X 19 Apr 2024 21:04:14.361 * +slave-reconf-sent slave 10.0.1.174:6379 10.0.1.174 6379 @ mymaster 10.0.1.172 6379
13975:X 19 Apr 2024 21:04:15.329 * +slave-reconf-inprog slave 10.0.1.174:6379 10.0.1.174 6379 @ mymaster 10.0.1.172 6379
13975:X 19 Apr 2024 21:04:15.329 * +slave-reconf-done slave 10.0.1.174:6379 10.0.1.174 6379 @ mymaster 10.0.1.172 6379
13975:X 19 Apr 2024 21:04:15.396 # -odown master mymaster 10.0.1.172 6379
13975:X 19 Apr 2024 21:04:15.396 # +failover-end master mymaster 10.0.1.172 6379
13975:X 19 Apr 2024 21:04:15.396 # +switch-master mymaster 10.0.1.172 6379 10.0.1.173 6379
13975:X 19 Apr 2024 21:04:15.396 * +slave slave 10.0.1.174:6379 10.0.1.174 6379 @ mymaster 10.0.1.173 6379
13975:X 19 Apr 2024 21:04:15.397 * +slave slave 10.0.1.172:6379 10.0.1.172 6379 @ mymaster 10.0.1.173 6379
13975:X 19 Apr 2024 21:04:18.454 # +sdown slave 10.0.1.172:6379 10.0.1.172 6379 @ mymaster 10.0.1.173 6379

slave2主从复制状态信息
127.0.0.1:6379> info replication
# Replication
role:slave
master_host:10.0.1.173
master_port:6379
master_link_status:up
master_last_io_seconds_ago:2
master_sync_in_progress:0
slave_repl_offset:414450
slave_priority:100
slave_read_only:1
replica_announced:1
connected_slaves:1
slave0:ip=10.0.1.175,port=6379,state=online,offset=414450,lag=1
master_failover_state:no-failover
master_replid:0c26a7e53423197551314589988db39b5cd4df51
master_replid2:5a7545360639c3093dfa212492edd75ad51eec4c
master_repl_offset:414450
second_repl_offset:320330
repl_backlog_active:1
repl_backlog_size:1048576
repl_backlog_first_byte_offset:15
repl_backlog_histlen:414436


验证故障转移
故障转移后redis.conf中的replicaof行的master IP会被修改

[root@redis ~]# grep "^[a-Z]" /apps/redis/etc/redis.conf
bind 0.0.0.0 -::1
protected-mode yes
port 6379
tcp-backlog 511
timeout 0
tcp-keepalive 300
daemonize no
pidfile "/apps/redis/run/redis_6379.pid"
loglevel notice
logfile "/apps/redis/log/redis-6379.log"
databases 16
always-show-logo no
set-proc-title yes
proc-title-template "{title} {listen-addr} {server-mode}"
stop-writes-on-bgsave-error yes
rdbcompression yes
rdbchecksum yes
dbfilename "dump.rdb"
rdb-del-sync-files no
dir "/apps/redis/data"
masterauth "123456"
replica-serve-stale-data yes
replica-read-only yes
repl-diskless-sync no
repl-diskless-sync-delay 5
repl-diskless-load disabled
repl-disable-tcp-nodelay no
replica-priority 100
acllog-max-len 128
requirepass "123456"
lazyfree-lazy-eviction no
lazyfree-lazy-expire no
lazyfree-lazy-server-del no
replica-lazy-flush no
lazyfree-lazy-user-del no
lazyfree-lazy-user-flush no
oom-score-adj no
oom-score-adj-values 0 200 800
disable-thp yes
appendonly no
appendfilename "appendonly.aof"
appendfsync everysec
no-appendfsync-on-rewrite no
auto-aof-rewrite-percentage 100
auto-aof-rewrite-min-size 64mb
aof-load-truncated yes
aof-use-rdb-preamble yes
lua-time-limit 5000
slowlog-log-slower-than 10000
slowlog-max-len 128
latency-monitor-threshold 0
notify-keyspace-events ""
hash-max-ziplist-entries 512
hash-max-ziplist-value 64
list-max-ziplist-size -2
list-compress-depth 0
set-max-intset-entries 512
zset-max-ziplist-entries 128
zset-max-ziplist-value 64
hll-sparse-max-bytes 3000
stream-node-max-bytes 4kb
stream-node-max-entries 100
activerehashing yes
client-output-buffer-limit normal 0 0 0
client-output-buffer-limit replica 256mb 64mb 60
client-output-buffer-limit pubsub 32mb 8mb 60
hz 10
dynamic-hz yes
aof-rewrite-incremental-fsync yes
rdb-save-incremental-fsync yes
jemalloc-bg-thread yes
replicaof 10.0.1.173 6379
supervised systemd
save 3600 1
save 300 100
save 60 10000
user default on #8d969eef6ecad3c29a3a629280e686cf0c3f5d5a86aff3ca12020c923adc6c92 ~* &* +@all


哨兵配置文件的sentinel monitor IP 同样也会被修改
[root@redis ~]# grep "^[a-Z]" /apps/redis/etc/sentinel.conf
bind 0.0.0.0
port 26379
daemonize no
pidfile "/var/run/redis-sentinel.pid"
logfile "/apps/redis/log/sentinel.log"
dir "/tmp"
sentinel monitor mymaster 10.0.1.173 6379 2
sentinel auth-pass mymaster 123456
sentinel down-after-milliseconds mymaster 3000
acllog-max-len 128
sentinel deny-scripts-reconfig yes
sentinel resolve-hostnames no
sentinel announce-hostnames no
protected-mode no
user default on nopass sanitize-payload ~* &* +@all
sentinel myid 65a4b5100456085e7730c16324e7585383e60570
sentinel config-epoch mymaster 1
sentinel leader-epoch mymaster 1
sentinel current-epoch 1
sentinel known-replica mymaster 10.0.1.172 6379
sentinel known-replica mymaster 10.0.1.174 6379
sentinel known-sentinel mymaster 10.0.1.173 26379 1835822e3453202cdcd2d18af249329d61d05144
sentinel known-sentinel mymaster 10.0.1.172 26379 9de5f4c4cb3ce568b5a497e3fe71569fa8c7a363
supervised systemd
maxclients 4064


验证redis各节点状态
新的master状态
[root@redis-slave1 ~]#redis-cli -a 123456
Warning: Using a password with '-a' or '-u' option on the command line interface
may not be safe.
127.0.0.1:6379> info replication
# Replication
role:master
connected_slaves:1
slave0:ip=10.0.1.174,port=6379,state=online,offset=411182,lag=0
master_failover_state:no-failover
master_replid:0c26a7e53423197551314589988db39b5cd4df51
master_replid2:5a7545360639c3093dfa212492edd75ad51eec4c
master_repl_offset:411182
second_repl_offset:320330
repl_backlog_active:1
repl_backlog_size:1048576
repl_backlog_first_byte_offset:1
repl_backlog_histlen:411182


另一个slave指向新的master
[root@redis-slave2 ~]#redis-cli -a 123456
Warning: Using a password with '-a' or '-u' option on the command line interface
may not be safe.
127.0.0.1:6379> INFO replication
# Replication
role:slave
master_host:10.0.1.173
master_port:6379
master_link_status:up
master_last_io_seconds_ago:1
master_sync_in_progress:0
slave_repl_offset:502546
slave_priority:100
slave_read_only:1
replica_announced:1
connected_slaves:1
slave0:ip=10.0.1.175,port=6379,state=online,offset=502141,lag=1
master_failover_state:no-failover
master_replid:0c26a7e53423197551314589988db39b5cd4df51
master_replid2:5a7545360639c3093dfa212492edd75ad51eec4c
master_repl_offset:502546
second_repl_offset:320330
repl_backlog_active:1
repl_backlog_size:1048576
repl_backlog_first_byte_offset:15
repl_backlog_histlen:502532


原master重新加入redis集群
[root@redis-master ~]#cat /etc/redis.conf
#sentinel会自动修改下面行指向新的master
replicaof 10.0.0.18 6379

在原master上观察状态
[root@redis-master ~]#redis-cli -a 123456
Warning: Using a password with '-a' or '-u' option on the command line interface
may not be safe.
# Replication
role:slave
master_host:10.0.1.173
master_port:6379
master_link_status:up
master_last_io_seconds_ago:1
master_sync_in_progress:0
slave_repl_offset:560485
slave_priority:100
slave_read_only:1
replica_announced:1
connected_slaves:0
master_failover_state:no-failover
master_replid:0c26a7e53423197551314589988db39b5cd4df51
master_replid2:0000000000000000000000000000000000000000
master_repl_offset:560485
second_repl_offset:-1
repl_backlog_active:1
repl_backlog_size:1048576
repl_backlog_first_byte_offset:543732
repl_backlog_histlen:16754

[root@redis-master ~]#redis-cli -p 26379
127.0.0.1:26379> info sentinel
# Sentinel
sentinel_masters:1
sentinel_tilt:0
sentinel_running_scripts:0
sentinel_scripts_queue_length:0
sentinel_simulate_failure_flags:0
master0:name=mymaster,status=ok,address=10.0.1.173:6379,slaves=2,sentinels=3


观察新master上状态和日志
[root@redis-slave1 ~]#redis-cli -a 123456
Warning: Using a password with '-a' or '-u' option on the command line interface
may not be safe.
127.0.0.1:6379> info replication
# Replication
role:master
connected_slaves:2
slave0:ip=10.0.1.174,port=6379,state=online,offset=598537,lag=1
slave1:ip=10.0.1.172,port=6379,state=online,offset=598537,lag=1
master_failover_state:no-failover
master_replid:0c26a7e53423197551314589988db39b5cd4df51
master_replid2:5a7545360639c3093dfa212492edd75ad51eec4c
master_repl_offset:598821
second_repl_offset:320330
repl_backlog_active:1
repl_backlog_size:1048576
repl_backlog_first_byte_offset:1
repl_backlog_histlen:598821


[root@redis-slave1 ~]#tail -f /apps/redis/etc/sentinel.log
13975:X 19 Apr 2024 21:22:49.348 * +convert-to-slave slave 10.0.1.172:6379 10.0.1.172 6379 @ mymaster 10.0.1.173 6379


5.6 sentinel运维
手动让主节点下线
127.0.0.1:26379> sentinel failover <masterName>

案例--手动故障转移
[root@centos8 ~]#vim /etc/redis.conf
replica-priority 10 #指定优先级,值越小sentinel会优先将之选为新的master,默为值为100
[root@centos8 ~]#systemctl restart redis
#或者动态修改
[root@centos8 ~]#redis-cli -a 123456
Warning: Using a password with '-a' or '-u' option on the command line interface
may not be safe.
127.0.0.1:6379> CONFIG GET replica-priority
1) "replica-priority"
2) "100"
127.0.0.1:6379> CONFIG SET replica-priority 99
OK
127.0.0.1:6379> CONFIG GET replica-priority
1) "replica-priority"
2) "99"
[root@centos8 ~]#redis-cli   -p 26379
127.0.0.1:26379> sentinel failover mymaster
OK


5.7 应用程序连接 Sentinel
Redis 官方支持多种开发语言的客户端:https://redis.io/clients


---- 客户端连接redis工作原理
1. 客户端获取 Sentinel 节点集合,选举出一个 Sentinel
2. 由这个sentinel 通过masterName 获取master节点信息,客户端通过sentinel get-master-addr-byname master-name这个api来获取对应主节点信息

3. 客户端发送role指令确认master的信息,验证当前获取的“主节点”是真正的主节点,这样的目的是为
了防止故障转移期间主节点的变化
4. 客户端保持和Sentinel节点集合的联系,即订阅Sentinel节点相关频道,时刻获取关于主节点的相
关信息,获取新的master 信息变化,并自动连接新的master


5.8 java 连接Sentinel哨兵
java 客户端连接Redis:https://github.com/xetorthio/jedis/blob/master/pom.xml


#jedis/pom.xml 配置连接redis
<properties>
 <redishosts>localhost:6379,localhost:6380,localhost:6381,localhost:6382,localhost:6383
,localhost:6384,localhost:6385</redis-hosts>
 <sentinelhosts>localhost:26379,localhost:26380,localhost:26381</sentinel-hosts>
 <clusterhosts>localhost:7379,localhost:7380,localhost:7381,localhost:7382,localhost:7383
,localhost:7384,localhost:7385</cluster-hosts>
   <github.global.server>github</github.global.server>
 </properties>


 java客户端连接单机的redis是通过Jedis来实现的,java代码用的时候只要创建Jedis对象就可以建多个
Jedis连接池来连接redis,应用程序再直接调用连接池即可连接Redis。而Redis为了保障高可用,服务一
般都是Sentinel部署方式,当Redis服务中的主服务挂掉之后,会仲裁出另外一台Slaves服务充当
Master。这个时候,我们的应用即使使用了Jedis 连接池,如果Master服务挂了,应用将还是无法连接新的
Master服务,为了解决这个问题, Jedis也提供了相应的Sentinel实现,能够在Redis Sentinel主从切换时
候,通知应用,把应用连接到新的Master服务。
Redis Sentinel的使用也是十分简单的,只是在JedisPool中添加了Sentinel和MasterName参数,JRedis
Sentinel底层基于Redis订阅实现Redis主从服务的切换通知,当Reids发生主从切换时,Sentinel会发送
通知主动通知Jedis进行连接的切换,JedisSentinelPool在每次从连接池中获取链接对象的时候,都要对连
接对象进行检测,如果此链接和Sentinel的Master服务连接参数不一致,则会关闭此连接,重新获取新的
Jedis连接对象。


5.9 python 连接 Sentinel 哨兵


[root@centos8 ~]#yum -y install python3 python3-redis
[root@centos8 ~]#cat sentinel_test.py
#!/usr/bin/python3
import redis
from redis.sentinel import Sentinel
#连接哨兵服务器(主机名也可以用域名)
sentinel = Sentinel([('10.0.1.172', 26379),
                     ('10.0.0.18', 26379),
                     ('10.0.0.28', 26379)],
                    socket_timeout=0.5)
redis_auth_pass = '123456'
#mymaster 是配置哨兵模式的redis集群名称,此为默认值,实际名称按照个人部署案例来填写
#获取主服务器地址
master = sentinel.discover_master('mymaster')
print(master)
#获取从服务器地址
slave = sentinel.discover_slaves('mymaster')
print(slave)
#获取主服务器进行写入
master = sentinel.master_for('mymaster', socket_timeout=0.5,
password=redis_auth_pass, db=0)
w_ret = master.set('name', 'wang')
#输出:True
#获取从服务器进行读取(默认是round-roubin)
slave = sentinel.slave_for('mymaster', socket_timeout=0.5,
password=redis_auth_pass, db=0)
r_ret = slave.get('name')
print(r_ret)
#输出:wang
[root@centos8 ~]#chmod +x sentinel_test.py
[root@centos8 ~]#./sentinel_test.py
('10.0.1.172', 6379)
[('10.0.0.18', 6379), ('10.0.0.28', 6379)]
b'wang'
第四天-redis-cluster 高可用-集群
6. redis cluster
分布式----------》 redis-cluster(v3.0) 支持分布式

介绍
使用哨兵sentinel 只能解决Redis高可用问题,实现Redis的自动故障转移,但仍然无法解决Redis Master
单节点的性能瓶颈问题
为了解决单机性能的瓶颈,提高Redis 服务整体性能,可以使用分布式集群的解决方案


早期 Redis 分布式集群部署方案:
客户端分区:由客户端程序自己实现写入分配、高可用管理和故障转移等,对客户端的开发实现较为
复杂
代理服务:客户端不直接连接Redis,而先连接到代理服务,由代理服务实现相应读写分配,当前代
理服务都是第三方实现.此方案中客户端实现无需特殊开发,实现容易,但是代理服务节点仍存有单点
故障和性能瓶颈问题。比如:豌豆荚开发的 codis
Redis 3.0 版本之后推出无中心架构的 Redis Cluster ,支持多个master节点并行写入和故障的自动转移
动能.


架构:
Redis cluster 需要至少 3个master节点才能实现,slave节点数量不限,当然一般每个master都至少对应的
有一个slave节点
如果有三个主节点采用哈希槽 hash slot 的方式来分配16384个槽位 slot
此三个节点分别承担的slot 区间可以是如以下方式分配

节点M1 0-5460
节点M2 5461-10922
节点M3 10923-16383


 数据分区
如果是单机存储的话,直接将数据存放在单机redis就行了。但是如果是集群存储,就需要考虑到数据分
区了。
数据分区通常采取顺序分布和hash分布。
分布方式    顺序分布    哈希分布
数据分散度  分布倾斜    分布散列
顺序访问    支持       不支持

顺序分布保障了数据的有序性,但是离散性低,可能导致某个分区的数据热度高,其他分区数据的热度
低,分区访问不均衡。
哈希分布也分为多种分布方式,比如区域哈希分区,一致性哈希分区等。而redis cluster采用的是虚拟
槽分区的方式。


虚拟槽分区
redis cluster设置有0~16383的槽,每个槽映射一个数据子集,通过hash函数,将数据存放在不同的槽
位中,每个集群的节点保存一部分的槽。
每个key存储时,先经过哈希函数CRC16(key)得到一个整数,然后整数与16384取余,得到槽的数值,
然后找到对应的节点,将数据存放入对应的槽中。


集群通信
但是寻找槽的过程并不是一次就命中的,比如上图key将要存放在14396槽中,但是并不是一下就锁定了
node3节点,可能先去询问node1,然后才访问node3。
而集群中节点之间的通信,保证了最多两次就能命中对应槽所在的节点。因为在每个节点中,都保存了
其他节点的信息,知道哪个槽由哪个节点负责。这样即使第一次访问没有命中槽,但是会通知客户端,
该槽在哪个节点,这样访问对应节点就能精准命中。

1. 节点A对节点B发送一个meet操作,B返回后表示A和B之间能够进行沟通。
2. 节点A对节点C发送meet操作,C返回后,A和C之间也能进行沟通。
3. 然后B根据对A的了解,就能找到C,B和C之间也建立了联系。
4. 直到所有节点都能建立联系。
这样每个节点都能互相知道对方负责哪些槽。


 集群伸缩
集群并不是建立之后,节点数就固定不变的,也会有新的节点加入集群或者集群中的节点下线,这就是
集群的扩容和缩容。但是由于集群节点和槽息息相关,所以集群的伸缩也对应了槽和数据的迁移


集群扩容
当有新的节点准备好加入集群时,这个新的节点还是孤立节点,加入有两种方式。一个是通过集群节点
执行命令来和孤立节点握手,另一个则是使用脚本来添加节点。
1. cluster_node_ip:port: cluster meet ip port new_node_ip:port
2. redis-trib.rb add-node new_node_ip:port cluster_node_ip:port
通常这个新的节点有两种身份,要么作为主节点,要么作为从节点:
主节点:分摊槽和数据
从节点:作故障转移备份


下线节点的流程如下:
1. 判断该节点是否持有槽,如果未持有槽就跳转到下一步,持有槽则先迁移槽到其他节点
2. 通知其他节点(cluster forget)忘记该下线节点
3. 关闭下线节点的服务
需要注意的是如果先下线主节点,再下线从节点,会进行故障转移,所以要先下线从节点。


故障转移
除了手动下线节点外,也会面对突发故障。下面提到的主要是主节点的故障,因为从节点的故障并不影
响主节点工作,对应的主节点只会记住自己哪个从节点下线了,并将信息发送给其他节点。故障的从节
点重连后,继续官复原职,复制主节点的数据。
只有主节点才需要进行故障转移。在之前学习主从复制时,我们需要使用redis sentinel来实现故障转
移。而redis cluster则不需要redis sentinel,其自身就具备了故障转移功能。
根据前面我们了解到,节点之间是会进行通信的,节点之间通过ping/pong交互消息,所以借此就能发
现故障。集群节点发现故障同样是有主观下线和客观下线的


主观下线
对于每个节点有一个故障列表,故障列表维护了当前节点接收到的其他所有节点的信息。当半数以上的
持有槽的主节点都标记某个节点主观下线,就会尝试客观下线。

客观下线
故障转移
集群同样具备了自动转移故障的功能,和哨兵有些类似,在进行客观下线之后,就开始准备让故障节点
的从节点“上任”了。
首先是进行资格检查,只有具备资格的从节点才能参加选举:
故障节点的所有从节点检查和故障主节点之间的断线时间
超过cluster-node-timeout * cluster-slave-validati-factor(默认10)则取消选举资格
然后是准备选举顺序,不同偏移量的节点,参与选举的顺位不同。offset最大的slave节点,选举顺位最
高,最优先选举。而offset较低的slave节点,要延迟选举。
当有从节点参加选举后,主节点收到信息就开始投票。偏移量最大的节点,优先参与选举就更大可能获
得最多的票数,称为主节点。


当从节点走马上任变成主节点之后,就要开始进行替换主节点:
1. 让该slave节点执行slaveof no one变为master节点
2. 将故障节点负责的槽分配给该节点
3. 向集群中其他节点广播Pong消息,表明已完成故障转移
4. 故障节点重启后,会成为new_master的slave节点


 Redis Cluster 部署架构说明
 测试环境:3台服务器,每台服务器启动6379和6380两个redis 服务实例,适用于测试环境
 生产环境:6台服务器,分别是三组master/slave,适用于生产环境


 #集群节点
10.0.0.8
10.0.0.18
10.0.0.28
10.0.0.38
10.0.0.48
10.0.0.58
#预留服务器扩展使用
10.0.0.68
10.0.0.78


 说明:Redis 5.X 和之前版本相比有较大变化,以下分别介绍两个版本5.X和4.X的配置


部署方式介绍
redis cluster 有多种部署方法
原生命令安装
理解Redis Cluster架构
生产环境不使用
官方工具安装
高效、准确
生产环境可以使用
自主研发
可以实现可视化的自动化部署


实战案例:基于Redis 5 以上版本的 redis cluster 部署
官方文档:https://redis.io/topics/cluster-tutorial
redis cluster 相关命令
范例: 查看 --cluster 选项帮助
[root@centos8 ~]#redis-cli --cluster help
Cluster Manager Commands:
 create         host1:port1 ... hostN:portN
                 --cluster-replicas <arg>
 check         host:port
                 --cluster-search-multiple-owners
 info           host:port
 fix           host:port
                 --cluster-search-multiple-owners
 reshard       host:port
                 --cluster-from <arg>
                 --cluster-to <arg>
                 --cluster-slots <arg>
                 --cluster-yes
                 --cluster-timeout <arg>
                 --cluster-pipeline <arg>
                 --cluster-replace
 rebalance     host:port
                 --cluster-weight <node1=w1...nodeN=wN>
                 --cluster-use-empty-masters
                 --cluster-timeout <arg>
                 --cluster-simulate
                 --cluster-pipeline <arg>
                 --cluster-threshold <arg>
                 --cluster-replace
 add-node       new_host:new_port existing_host:existing_port
                 --cluster-slave
                 --cluster-master-id <arg>
 del-node       host:port node_id
 call           host:port command arg arg .. arg
 set-timeout   host:port milliseconds
 import         host:port
                 --cluster-from <arg>
                 --cluster-copy
                 --cluster-replace
 help
For check, fix, reshard, del-node, set-timeout you can specify the host and port
of any working node in the cluster.


范例: 查看CLUSTER 指令的帮助
[root@centos8 ~]#redis-cli CLUSTER HELP
1) CLUSTER <subcommand> arg arg ... arg. Subcommands are:
2) ADDSLOTS <slot> [slot ...] -- Assign slots to current node.
3) BUMPEPOCH -- Advance the cluster config epoch.
4) COUNT-failure-reports <node-id> -- Return number of failure reports for
<node-id>.
5) COUNTKEYSINSLOT <slot> - Return the number of keys in <slot>.
6) DELSLOTS <slot> [slot ...] -- Delete slots information from current node.
7) FAILOVER [force|takeover] -- Promote current replica node to being a master.
8) FORGET <node-id> -- Remove a node from the cluster.
9) GETKEYSINSLOT <slot> <count> -- Return key names stored by current node in a
slot.
10) FLUSHSLOTS -- Delete current node own slots information.
11) INFO - Return onformation about the cluster.
12) KEYSLOT <key> -- Return the hash slot for <key>.
13) MEET <ip> <port> [bus-port] -- Connect nodes into a working cluster.
14) MYID -- Return the node id.
15) NODES -- Return cluster configuration seen by node. Output format:
16)     <id> <ip:port> <flags> <master> <pings> <pongs> <epoch> <link> <slot>
... <slot>
17) REPLICATE <node-id> -- Configure current node as replica to <node-id>.
18) RESET [hard|soft] -- Reset current node (default: soft).
19) SET-config-epoch <epoch> - Set config epoch of current node.
20) SETSLOT <slot> (importing|migrating|stable|node <node-id>) -- Set slot
state.
21) REPLICAS <node-id> -- Return <node-id> replicas.
22) SLOTS -- Return information about slots range mappings. Each range is made
of:
23)     start, end, master and replicas IP addresses, ports and ids


创建 redis cluster集群的环境准备
每个Redis 节点采用相同的相同的Redis版本、相同的密码、硬件配置
所有Redis服务器必须没有任何数据
准备六台主机,地址如下:
10.0.0.8
10.0.0.18
10.0.0.28
10.0.0.38
10.0.0.48
10.0.0.58

启用 redis cluster 配置
所有6台主机都执行以下配置
[root@centos8 ~]#dnf -y install redis
每个节点修改redis配置,必须开启cluster功能的参数
#手动修改配置文件
[root@redis-node1 ~]vim /etc/redis.conf
bind 0.0.0.0
masterauth 123456   #建议配置,否则后期的master和slave主从复制无法成功,还需再配置
requirepass 123456
cluster-enabled yes #取消此行注释,必须开启集群,开启后 redis 进程会有cluster标识
cluster-config-file nodes-6379.conf #取消此行注释,此为集群状态数据文件,记录主从关系
及slot范围信息,由redis cluster 集群自动创建和维护
cluster-require-full-coverage no   #默认值为yes,设为no可以防止一个节点不可用导致整
个cluster不可用
#或者执行下面命令,批量修改
[root@redis-node1 ~]#sed -i.bak -e 's/bind 127.0.0.1/bind 0.0.0.0/' -e
'/masterauth/a masterauth 123456' -e '/# requirepass/a requirepass 123456' -
e '/# cluster-enabled yes/a cluster-enabled yes' -e '/# cluster-config-file
nodes-6379.conf/a cluster-config-file nodes-6379.conf' -e '/cluster-requirefull-coverage yes/c cluster-require-full-coverage no' /etc/redis.conf
#如果是编译安装可以执行下面操作
[root@redis-node1 ~]#sed -i.bak -e '/masterauth/a masterauth 123456' -e
'/# cluster-enabled yes/a cluster-enabled yes' -e '/# cluster-config-file
nodes-6379.conf/a cluster-config-file nodes-6379.conf' -e '/cluster-requirefull-coverage yes/c cluster-require-full-coverage no'
/apps/redis/etc/redis.conf
[root@redis-node1 ~]#systemctl enable --now redis


验证当前Redis服务状态:
#开启了16379的cluster的端口,实际的端口=redis port + 10000
[root@centos8 ~]#ss -ntl
State       Recv-Q       Send-Q Local Address:Port     Peer Address:Port

LISTEN       0             128           0.0.0.0:22            0.0.0.0:*

LISTEN       0             100         127.0.0.1:25            0.0.0.0:*

LISTEN       0             128           0.0.0.0:16379         0.0.0.0:*

LISTEN       0             128           0.0.0.0:6379          0.0.0.0:*

LISTEN       0             128             [::]:22               [::]:*

LISTEN       0             100             [::1]:25               [::]:*

#注意进程有[cluster]状态
[root@centos8 ~]#ps -ef|grep redis
redis   1939    1  0 10:54 ?    00:00:00 /usr/bin/redis-server 0.0.0.0:6379
[cluster]
root    1955   1335  0 10:57 pts/0    00:00:00 grep --color=auto redis


创建集群
#命令redis-cli的选项 --cluster-replicas 1 表示每个master对应一个slave节点
[root@redis-node1 ~]#redis-cli -a 123456 --cluster create 10.0.0.8:6379
10.0.0.18:6379   10.0.0.28:6379   10.0.0.38:6379   10.0.0.48:6379
10.0.0.58:6379 --cluster-replicas 1
Warning: Using a password with '-a' or '-u' option on the command line interface
may not be safe.
>>> Performing hash slots allocation on 6 nodes...
Master[0] -> Slots 0 - 5460
Master[1] -> Slots 5461 - 10922
Master[2] -> Slots 10923 - 16383
Adding replica 10.0.0.38:6379 to 10.0.0.8:6379
Adding replica 10.0.0.48:6379 to 10.0.0.18:6379
Adding replica 10.0.0.58:6379 to 10.0.0.28:6379
M: cb028b83f9dc463d732f6e76ca6bbcd469d948a7 10.0.0.8:6379 #带M的为master
   slots:[0-5460] (5461 slots) master #当前master的槽位起始
和结束位
M: 99720241248ff0e4c6fa65c2385e92468b3b5993 10.0.0.18:6379
   slots:[5461-10922] (5462 slots) master
M: d34da8666a6f587283a1c2fca5d13691407f9462 10.0.0.28:6379
   slots:[10923-16383] (5461 slots) master
S: f9adcfb8f5a037b257af35fa548a26ffbadc852d 10.0.0.38:6379  #带S的slave
   replicates cb028b83f9dc463d732f6e76ca6bbcd469d948a7
S: d04e524daec4d8e22bdada7f21a9487c2d3e1057 10.0.0.48:6379
   replicates 99720241248ff0e4c6fa65c2385e92468b3b5993
S: 9875b50925b4e4f29598e6072e5937f90df9fc71 10.0.0.58:6379
   replicates d34da8666a6f587283a1c2fca5d13691407f9462
Can I set the above configuration? (type 'yes' to accept): yes #输入yes自动创建集群
>>> Nodes configuration updated
>>> Assign a different config epoch to each node
>>> Sending CLUSTER MEET messages to join the cluster
Waiting for the cluster to join
....
>>> Performing Cluster Check (using node 10.0.0.8:6379)
M: cb028b83f9dc463d732f6e76ca6bbcd469d948a7 10.0.0.8:6379
   slots:[0-5460] (5461 slots) master #已经分配的槽位
   1 additional replica(s)   #分配了一个slave
S: 9875b50925b4e4f29598e6072e5937f90df9fc71 10.0.0.58:6379
   slots: (0 slots) slave   #slave没有分配槽位
   replicates d34da8666a6f587283a1c2fca5d13691407f9462  #对应的master的10.0.0.28的
ID
S: f9adcfb8f5a037b257af35fa548a26ffbadc852d 10.0.0.38:6379
   slots: (0 slots) slave
   replicates cb028b83f9dc463d732f6e76ca6bbcd469d948a7 #对应的master的10.0.0.8的ID
S: d04e524daec4d8e22bdada7f21a9487c2d3e1057 10.0.0.48:6379
   slots: (0 slots) slave
   replicates 99720241248ff0e4c6fa65c2385e92468b3b5993 #对应的master的10.0.0.18的
ID
M: 99720241248ff0e4c6fa65c2385e92468b3b5993 10.0.0.18:6379
   slots:[5461-10922] (5462 slots) master
   1 additional replica(s)
M: d34da8666a6f587283a1c2fca5d13691407f9462 10.0.0.28:6379
   slots:[10923-16383] (5461 slots) master
   1 additional replica(s)
[OK] All nodes agree about slots configuration.  #所有节点槽位分配完成
>>> Check for open slots... #检查打开的槽位
>>> Check slots coverage... #检查插槽覆盖范围
[OK] All 16384 slots covered. #所有槽位(16384个)分配完成
#观察以上结果,可以看到3组master/slave
master:10.0.0.8---slave:10.0.0.38
master:10.0.0.18---slave:10.0.0.48
master:10.0.0.28---slave:10.0.0.58
#如果节点少于3个会出下面提示错误
[root@node1 ~]#redis-cli -a 123456 --cluster create 10.0.0.8:6379
10.0.0.18:6379
Warning: Using a password with '-a' or '-u' option on the command line interface
may not be safe.
* ERROR: Invalid configuration for cluster creation.
* Redis Cluster requires at least 3 master nodes.
* This is not possible with 2 nodes and 0 replicas per node.
* At least 3 nodes are required.


验证集群
查看主从状态
[root@redis-node1 ~]#redis-cli -a 123456 -c INFO replication
Warning: Using a password with '-a' or '-u' option on the command line interface
may not be safe.
# Replication
role:master
connected_slaves:1
slave0:ip=10.0.0.38,port=6379,state=online,offset=896,lag=1
master_replid:3a388865080d779180ff240cb75766e7e57877da
master_replid2:0000000000000000000000000000000000000000
master_repl_offset:896
second_repl_offset:-1
repl_backlog_active:1
repl_backlog_size:1048576
repl_backlog_first_byte_offset:1
repl_backlog_histlen:896
[root@redis-node2 ~]#redis-cli -a 123456 INFO replication
Warning: Using a password with '-a' or '-u' option on the command line interface
may not be safe.
# Replication
role:master
connected_slaves:1
slave0:ip=10.0.0.48,port=6379,state=online,offset=980,lag=1
master_replid:b9066d3cbf0c5fecc7f4d1d5cb2433999783fa3f
master_replid2:0000000000000000000000000000000000000000
master_repl_offset:980
second_repl_offset:-1
repl_backlog_active:1
repl_backlog_size:1048576
repl_backlog_first_byte_offset:1
repl_backlog_histlen:980
[root@redis-node3 ~]#redis-cli -a 123456 INFO replication
Warning: Using a password with '-a' or '-u' option on the command line interface
may not be safe.
# Replication
role:master
connected_slaves:1
slave0:ip=10.0.0.58,port=6379,state=online,offset=980,lag=0
master_replid:53208e0ed9305d721e2fb4b3180f75c689217902
master_replid2:0000000000000000000000000000000000000000
master_repl_offset:980
second_repl_offset:-1
repl_backlog_active:1
repl_backlog_size:1048576
repl_backlog_first_byte_offset:1
repl_backlog_histlen:980
[root@redis-node4 ~]#redis-cli -a 123456 INFO replication
Warning: Using a password with '-a' or '-u' option on the command line interface
may not be safe.
# Replication
role:slave
master_host:10.0.0.8
master_port:6379
master_link_status:up
master_last_io_seconds_ago:1
master_sync_in_progress:0
slave_repl_offset:1036
slave_priority:100
slave_read_only:1
connected_slaves:0
master_replid:3a388865080d779180ff240cb75766e7e57877da
master_replid2:0000000000000000000000000000000000000000
master_repl_offset:1036
second_repl_offset:-1
repl_backlog_active:1
repl_backlog_size:1048576
repl_backlog_first_byte_offset:1
repl_backlog_histlen:1036
[root@redis-node5 ~]#redis-cli -a 123456 INFO replication
Warning: Using a password with '-a' or '-u' option on the command line interface
may not be safe.
# Replication
role:slave
master_host:10.0.0.18
master_port:6379
master_link_status:up
master_last_io_seconds_ago:2
master_sync_in_progress:0
slave_repl_offset:1064
slave_priority:100
slave_read_only:1
connected_slaves:0
master_replid:b9066d3cbf0c5fecc7f4d1d5cb2433999783fa3f
master_replid2:0000000000000000000000000000000000000000
master_repl_offset:1064
second_repl_offset:-1
repl_backlog_active:1
repl_backlog_size:1048576
repl_backlog_first_byte_offset:1
repl_backlog_histlen:1064
[root@redis-node6 ~]#redis-cli -a 123456 INFO replication
Warning: Using a password with '-a' or '-u' option on the command line interface
may not be safe.
# Replication
role:slave
master_host:10.0.0.28
master_port:6379
master_link_status:up
master_last_io_seconds_ago:7
master_sync_in_progress:0
slave_repl_offset:1078
slave_priority:100
slave_read_only:1
connected_slaves:0
master_replid:53208e0ed9305d721e2fb4b3180f75c689217902
master_replid2:0000000000000000000000000000000000000000
master_repl_offset:1078
second_repl_offset:-1
repl_backlog_active:1
repl_backlog_size:1048576
repl_backlog_first_byte_offset:1
repl_backlog_histlen:1078


范例: 查看指定master节点的slave节点信息
[root@centos8 ~]#redis-cli -a 123456 cluster nodes
4f146b1ac51549469036a272c60ea97f065ef832 10.0.0.28:6379@16379 master - 0
1602571565772 12 connected 10923-16383
779a24884dbe1ceb848a685c669ec5326e6c8944 10.0.0.48:6379@16379 slave
97c5dcc3f33c2fc75c7fdded25d05d2930a312c0 0 1602571565000 11 connected
97c5dcc3f33c2fc75c7fdded25d05d2930a312c0 10.0.0.18:6379@16379 master - 0
1602571564000 11 connected 5462-10922
07231a50043d010426c83f3b0788e6b92e62050f 10.0.0.58:6379@16379 slave
4f146b1ac51549469036a272c60ea97f065ef832 0 1602571565000 12 connected
a177c5cbc2407ebb6230ea7e2a7de914bf8c2dab 10.0.0.8:6379@16379 myself,master - 0
1602571566000 10 connected 0-5461
cb20d58870fe05de8462787cf9947239f4bc5629 10.0.0.38:6379@16379 slave
a177c5cbc2407ebb6230ea7e2a7de914bf8c2dab 0 1602571566780 10 connected
#以下命令查看指定master节点的slave节点信息,其中
#a177c5cbc2407ebb6230ea7e2a7de914bf8c2dab 为master节点的ID
[root@centos8 ~]#redis-cli -a 123456 cluster slaves
a177c5cbc2407ebb6230ea7e2a7de914bf8c2dab
1) "cb20d58870fe05de8462787cf9947239f4bc5629 10.0.0.38:6379@16379 slave
a177c5cbc2407ebb6230ea7e2a7de914bf8c2dab 0 1602571574844 10 connected"


验证集群状态
[root@redis-node1 ~]#redis-cli -a 123456 CLUSTER INFO
Warning: Using a password with '-a' or '-u' option on the command line interface
may not be safe.
cluster_state:ok
cluster_slots_assigned:16384
cluster_slots_ok:16384
cluster_slots_pfail:0
cluster_slots_fail:0
cluster_known_nodes:6  #节点数
cluster_size:3                        #三个集群
cluster_current_epoch:6
cluster_my_epoch:1
cluster_stats_messages_ping_sent:837
cluster_stats_messages_pong_sent:811
cluster_stats_messages_sent:1648
cluster_stats_messages_ping_received:806
cluster_stats_messages_pong_received:837
cluster_stats_messages_meet_received:5
cluster_stats_messages_received:1648
#查看任意节点的集群状态
[root@redis-node1 ~]#redis-cli -a 123456 --cluster info 10.0.0.38:6379
Warning: Using a password with '-a' or '-u' option on the command line interface
may not be safe.
10.0.0.18:6379 (99720241...) -> 0 keys | 5462 slots | 1 slaves.
10.0.0.28:6379 (d34da866...) -> 0 keys | 5461 slots | 1 slaves.
10.0.0.8:6379 (cb028b83...) -> 0 keys | 5461 slots | 1 slaves.
[OK] 0 keys in 3 masters.
0.00 keys per slot on average.


查看对应关系
[root@redis-node1 ~]#redis-cli -a 123456 CLUSTER NODES
Warning: Using a password with '-a' or '-u' option on the command line interface
may not be safe.
9875b50925b4e4f29598e6072e5937f90df9fc71 10.0.0.58:6379@16379 slave
d34da8666a6f587283a1c2fca5d13691407f9462 0 1582344815790 6 connected
f9adcfb8f5a037b257af35fa548a26ffbadc852d 10.0.0.38:6379@16379 slave
cb028b83f9dc463d732f6e76ca6bbcd469d948a7 0 1582344811000 4 connected
d04e524daec4d8e22bdada7f21a9487c2d3e1057 10.0.0.48:6379@16379 slave
99720241248ff0e4c6fa65c2385e92468b3b5993 0 1582344815000 5 connected
99720241248ff0e4c6fa65c2385e92468b3b5993 10.0.0.18:6379@16379 master - 0
1582344813000 2 connected 5461-10922
d34da8666a6f587283a1c2fca5d13691407f9462 10.0.0.28:6379@16379 master - 0
1582344814780 3 connected 10923-16383
cb028b83f9dc463d732f6e76ca6bbcd469d948a7 10.0.0.8:6379@16379 myself,master - 0
1582344813000 1 connected 0-5460
[root@redis-node1 ~]#redis-cli -a 123456 --cluster check 10.0.0.38:6379
Warning: Using a password with '-a' or '-u' option on the command line interface
may not be safe.
10.0.0.18:6379 (99720241...) -> 0 keys | 5462 slots | 1 slaves.
10.0.0.28:6379 (d34da866...) -> 0 keys | 5461 slots | 1 slaves.
10.0.0.8:6379 (cb028b83...) -> 0 keys | 5461 slots | 1 slaves.
[OK] 0 keys in 3 masters.
0.00 keys per slot on average.
>>> Performing Cluster Check (using node 10.0.0.38:6379)
S: f9adcfb8f5a037b257af35fa548a26ffbadc852d 10.0.0.38:6379
   slots: (0 slots) slave
   replicates cb028b83f9dc463d732f6e76ca6bbcd469d948a7
S: d04e524daec4d8e22bdada7f21a9487c2d3e1057 10.0.0.48:6379
   slots: (0 slots) slave
   replicates 99720241248ff0e4c6fa65c2385e92468b3b5993
M: 99720241248ff0e4c6fa65c2385e92468b3b5993 10.0.0.18:6379
   slots:[5461-10922] (5462 slots) master
   1 additional replica(s)
S: 9875b50925b4e4f29598e6072e5937f90df9fc71 10.0.0.58:6379
   slots: (0 slots) slave
   replicates d34da8666a6f587283a1c2fca5d13691407f9462
M: d34da8666a6f587283a1c2fca5d13691407f9462 10.0.0.28:6379
   slots:[10923-16383] (5461 slots) master
   1 additional replica(s)
M: cb028b83f9dc463d732f6e76ca6bbcd469d948a7 10.0.0.8:6379
   slots:[0-5460] (5461 slots) master
   1 additional replica(s)
   [OK] All nodes agree about slots configuration.
>>> Check for open slots...
>>> Check slots coverage...
[OK] All 16384 slots covered.


  测试集群写入数据

  redis cluster 写入key
#经过算法计算,当前key的槽位需要写入指定的node
[root@redis-node1 ~]#redis-cli -a 123456 -h 10.0.0.8 SET key1 values1
Warning: Using a password with '-a' or '-u' option on the command line interface
may not be safe.
(error) MOVED 9189 10.0.0.18:6379    #槽位不在当前node所以无法写入
#指定槽位对应node可写入
[root@redis-node1 ~]#redis-cli -a 123456 -h 10.0.0.18 SET key1 values1
Warning: Using a password with '-a' or '-u' option on the command line interface
may not be safe.
OK
[root@redis-node1 ~]#redis-cli -a 123456 -h 10.0.0.18 GET key1
Warning: Using a password with '-a' or '-u' option on the command line interface
may not be safe.
"values1"
#对应的slave节点可以KEYS *,但GET key1失败,可以到master上执行GET key1
[root@redis-node1 ~]#redis-cli -a 123456 -h 10.0.0.48 KEYS "*"
Warning: Using a password with '-a' or '-u' option on the command line interface
may not be safe.
1) "key1"
[root@redis-node1 ~]#redis-cli -a 123456 -h 10.0.0.48 GET key1
Warning: Using a password with '-a' or '-u' option on the command line interface
may not be safe.
(error) MOVED 9189 10.0.0.18:6379


 redis cluster 计算key所属的slot
 [root@centos8 ~]#redis-cli -h 10.0.0.8 -a 123456 --no-auth-warning cluster
nodes
4f146b1ac51549469036a272c60ea97f065ef832 10.0.0.28:6379@16379 master - 0
1602561649000 12 connected 10923-16383
779a24884dbe1ceb848a685c669ec5326e6c8944 10.0.0.48:6379@16379 slave
97c5dcc3f33c2fc75c7fdded25d05d2930a312c0 0 1602561648000 11 connected
97c5dcc3f33c2fc75c7fdded25d05d2930a312c0 10.0.0.18:6379@16379 master - 0
1602561650000 11 connected 5462-10922
07231a50043d010426c83f3b0788e6b92e62050f 10.0.0.58:6379@16379 slave
4f146b1ac51549469036a272c60ea97f065ef832 0 1602561650229 12 connected
a177c5cbc2407ebb6230ea7e2a7de914bf8c2dab 10.0.0.8:6379@16379 myself,master - 0
1602561650000 10 connected 0-5461
cb20d58870fe05de8462787cf9947239f4bc5629 10.0.0.38:6379@16379 slave
a177c5cbc2407ebb6230ea7e2a7de914bf8c2dab 0 1602561651238 10 connected
#计算得到hello对应的slot
[root@centos8 ~]#redis-cli -h 10.0.0.8 -a 123456 --no-auth-warning cluster
keyslot hello
(integer) 866
[root@centos8 ~]#redis-cli -h 10.0.0.8 -a 123456 --no-auth-warning set hello
magedu
OK
[root@centos8 ~]#redis-cli -h 10.0.0.8 -a 123456 --no-auth-warning cluster
keyslot name
(integer) 5798
[root@centos8 ~]#redis-cli -h 10.0.0.8 -a 123456 --no-auth-warning set name
wang
(error) MOVED 5798 10.0.0.18:6379
[root@centos8 ~]#redis-cli -h 10.0.0.18 -a 123456 --no-auth-warning set name
wang
OK
[root@centos8 ~]#redis-cli -h 10.0.0.18 -a 123456 --no-auth-warning get name
"wang"
#使用选项-c 以集群模式连接
[root@centos8 ~]#redis-cli -c -h 10.0.0.8 -a 123456 --no-auth-warning
10.0.0.8:6379> cluster keyslot linux
(integer) 12299
10.0.0.8:6379> set linux love
-> Redirected to slot [12299] located at 10.0.0.28:6379
OK
10.0.0.28:6379> get linux
"love"
10.0.0.28:6379> exit
[root@centos8 ~]#redis-cli -h 10.0.0.28 -a 123456 --no-auth-warning get linux
"love"


python 程序实现Redis Cluster 访问

官网:https://github.com/Grokzen/redis-py-cluster


范例:
[root@redis-node1 ~]#dnf -y install python3
[root@redis-node1 ~]#pip3 install redis-py-cluster
[root@redis-node1 ~]#vim redis_cluster_test.py
[root@redis-node1 ~]#cat ./redis_cluster_test.py
#!/usr/bin/env python3
from rediscluster  import RedisCluster
startup_nodes = [
   {"host":"10.0.0.8", "port":6379},
   {"host":"10.0.0.18", "port":6379},
   {"host":"10.0.0.28", "port":6379},
   {"host":"10.0.0.38", "port":6379},
   {"host":"10.0.0.48", "port":6379},
   {"host":"10.0.0.58", "port":6379}
]
redis_conn= RedisCluster(startup_nodes=startup_nodes,password='123456',
decode_responses=True)
for i in range(0, 10000):
    redis_conn.set('key'+str(i),'value'+str(i))
    print('key'+str(i)+':',redis_conn.get('key'+str(i)))
[root@redis-node1 ~]#chmod +x redis_cluster_test.py
[root@redis-node1 ~]#./redis_cluster_test.py
......
key9998: value9998
key9999: value9999
#验证数据
[root@redis-node1 ~]#redis-cli -a 123456 -h 10.0.0.8
Warning: Using a password with '-a' or '-u' option on the command line interface
may not be safe.
10.0.0.8:6379> DBSIZE
(integer) 3331
10.0.0.8:6379> GET key1
(error) MOVED 9189 10.0.0.18:6379
10.0.0.8:6379> GET key2
"value2"
10.0.0.8:6379> GET key3
"value3"
10.0.0.8:6379> KEYS *
......
3329) "key7832"
3330) "key2325"
3331) "key2880"
10.0.0.8:6379>
[root@redis-node1 ~]#redis-cli -a 123456 -h 10.0.0.18 DBSIZE
Warning: Using a password with '-a' or '-u' option on the command line interface
may not be safe.
(integer) 3340
[root@redis-node1 ~]#redis-cli -a 123456 -h 10.0.0.18 GET key1
Warning: Using a password with '-a' or '-u' option on the command line interface
may not be safe.
"value1"
[root@redis-node1 ~]#redis-cli -a 123456 -h 10.0.0.28 DBSIZE
Warning: Using a password with '-a' or '-u' option on the command line interface
may not be safe.
(integer) 3329
[root@redis-node1 ~]#redis-cli -a 123456 -h 10.0.0.18 GET key5
Warning: Using a password with '-a' or '-u' option on the command line interface
may not be safe.
"value5"
[root@redis-node1 ~]#


 模拟故障实现故障转移
 #模拟node2节点出故障,需要相应的数秒故障转移时间
[root@redis-node2 ~]#tail -f /var/log/redis/redis.log
[root@redis-node2 ~]#redis-cli -a 123456
Warning: Using a password with '-a' or '-u' option on the command line interface
may not be safe.
127.0.0.1:6379> shutdown
not connected> exit
[root@redis-node2 ~]#ss -ntl
State       Recv-Q       Send-Q Local Address:Port Peer Address:Port
LISTEN       0             128           0.0.0.0:22         0.0.0.0:*
LISTEN       0             100         127.0.0.1:25         0.0.0.0:*
LISTEN       0             128             [::]:22           [::]:*
LISTEN       0             100             [::1]:25           [::]:*
[root@redis-node2 ~]# redis-cli -a 123456 --cluster info 10.0.0.8:6379
Warning: Using a password with '-a' or '-u' option on the command line interface
may not be safe.
Could not connect to Redis at 10.0.0.18:6379: Connection refused
10.0.0.8:6379 (cb028b83...) -> 3331 keys | 5461 slots | 1 slaves.
10.0.0.48:6379 (d04e524d...) -> 3340 keys | 5462 slots | 0 slaves. #10.0.0.48为新
的master
10.0.0.28:6379 (d34da866...) -> 3329 keys | 5461 slots | 1 slaves.
[OK] 10000 keys in 3 masters.
0.61 keys per slot on average.
[root@redis-node2 ~]# redis-cli -a 123456 --cluster check 10.0.0.8:6379
Warning: Using a password with '-a' or '-u' option on the command line interface
may not be safe.
Could not connect to Redis at 10.0.0.18:6379: Connection refused
10.0.0.8:6379 (cb028b83...) -> 3331 keys | 5461 slots | 1 slaves.
10.0.0.48:6379 (d04e524d...) -> 3340 keys | 5462 slots | 0 slaves.
10.0.0.28:6379 (d34da866...) -> 3329 keys | 5461 slots | 1 slaves.
[OK] 10000 keys in 3 masters.
0.61 keys per slot on average.
>>> Performing Cluster Check (using node 10.0.0.8:6379)
M: cb028b83f9dc463d732f6e76ca6bbcd469d948a7 10.0.0.8:6379
   slots:[0-5460] (5461 slots) master
   1 additional replica(s)
S: 9875b50925b4e4f29598e6072e5937f90df9fc71 10.0.0.58:6379
   slots: (0 slots) slave
   replicates d34da8666a6f587283a1c2fca5d13691407f9462
S: f9adcfb8f5a037b257af35fa548a26ffbadc852d 10.0.0.38:6379
   slots: (0 slots) slave
   replicates cb028b83f9dc463d732f6e76ca6bbcd469d948a7
 M: d04e524daec4d8e22bdada7f21a9487c2d3e1057 10.0.0.48:6379
   slots:[5461-10922] (5462 slots) master
M: d34da8666a6f587283a1c2fca5d13691407f9462 10.0.0.28:6379
   slots:[10923-16383] (5461 slots) master
   1 additional replica(s)
[OK] All nodes agree about slots configuration.
>>> Check for open slots...
>>> Check slots coverage...
[OK] All 16384 slots covered.
[root@redis-node2 ~]#redis-cli -a 123456 -h 10.0.0.48
Warning: Using a password with '-a' or '-u' option on the command line interface
may not be safe.
10.0.0.48:6379> INFO replication
# Replication
role:master
connected_slaves:0
master_replid:0000698bc2c6452d8bfba68246350662ae41d8fd
master_replid2:b9066d3cbf0c5fecc7f4d1d5cb2433999783fa3f
master_repl_offset:2912424
second_repl_offset:2912425
repl_backlog_active:1
repl_backlog_size:1048576
repl_backlog_first_byte_offset:1863849
repl_backlog_histlen:1048576
10.0.0.48:6379>
#恢复故障节点node2自动成为slave节点
[root@redis-node2 ~]#systemctl start redis
#查看自动生成的配置文件,可以查看node2自动成为slave节点
[root@redis-node2 ~]#cat /var/lib/redis/nodes-6379.conf
99720241248ff0e4c6fa65c2385e92468b3b5993 10.0.0.18:6379@16379 myself,slave
d04e524daec4d8e22bdada7f21a9487c2d3e1057 0 1582352081847 2 connected
f9adcfb8f5a037b257af35fa548a26ffbadc852d 10.0.0.38:6379@16379 slave
cb028b83f9dc463d732f6e76ca6bbcd469d948a7 1582352081868 1582352081847 4 connected
cb028b83f9dc463d732f6e76ca6bbcd469d948a7 10.0.0.8:6379@16379 master -
1582352081868 1582352081847 1 connected 0-5460
9875b50925b4e4f29598e6072e5937f90df9fc71 10.0.0.58:6379@16379 slave
d34da8666a6f587283a1c2fca5d13691407f9462 1582352081869 1582352081847 3 connected
d04e524daec4d8e22bdada7f21a9487c2d3e1057 10.0.0.48:6379@16379 master -
1582352081869 1582352081847 7 connected 5461-10922
d34da8666a6f587283a1c2fca5d13691407f9462 10.0.0.28:6379@16379 master -
1582352081869 1582352081847 3 connected 10923-16383
vars currentEpoch 7 lastVoteEpoch 0
[root@redis-node2 ~]#redis-cli -a 123456 -h 10.0.0.48
Warning: Using a password with '-a' or '-u' option on the command line interface
may not be safe.
10.0.0.48:6379> INFO replication
# Replication
role:master
connected_slaves:1
slave0:ip=10.0.0.18,port=6379,state=online,offset=2912564,lag=1
master_replid:0000698bc2c6452d8bfba68246350662ae41d8fd
master_replid2:b9066d3cbf0c5fecc7f4d1d5cb2433999783fa3f
master_repl_offset:2912564
second_repl_offset:2912425
repl_backlog_active:1
repl_backlog_size:1048576
repl_backlog_first_byte_offset:1863989
repl_backlog_histlen:1048576
10.0.0.48:6379>


实战案例:基于 Redis 4 的 redis cluster 部署

 准备 Redis Cluster 基本环境配置
 准备三台 CentOS 7 主机,已编译安装好Redis,各启动两个Redis实例,分别使用6379和6380端口,从
而模拟实现6台Redis实例
10.0.0.7:6379|6380
10.0.0.17:6379|6380
10.0.0.27:6379|6380


准备6个实例:在三个主机上重复下面的操作
范例: 3个节点6个实例

#在三台主机上都编译安装redis
[root@redis-node1 ~]#yum -y install gcc jemalloc-devel
[root@redis-node1 ~]#cd /usr/local/src
[root@redis-node1 src]#wget http://download.redis.io/releases/redis-
4.0.14.tar.gz
[root@redis-node1 src]#tar xf redis-4.0.14.tar.gz
[root@redis-node1 src]#cd redis-4.0.14
[root@redis-node1 redis-4.0.14]#make PREFIX=/apps/redis install
#准备相关文件和目录
[root@redis-node1 redis-4.0.14]#ln -s /apps/redis/bin/redis-* /usr/bin/
[root@redis-node1 redis-4.0.14]#mkdir -p /apps/redis/{etc,log,data,run}
[root@redis-node1 redis-4.0.14]#cp redis.conf /apps/redis/etc/
#准备用户
[root@redis-node1 ~]#useradd -r -s /sbin/nologin redis
#配置权限和相关优化配置
[root@redis-node1 ~]#chown -R redis.redis /apps/redis
[root@redis-node1 ~]#cat >> /etc/sysctl.conf <<EOF
net.core.somaxconn = 1024
vm.overcommit_memory = 1
EOF
[root@redis-node1 ~]#sysctl -p
[root@redis-node1 ~]#echo 'echo never >
/sys/kernel/mm/transparent_hugepage/enabled' >> /etc/rc.d/rc.local
[root@redis-node1 ~]#chmod +x /etc/rc.d/rc.local
[root@redis-node1 ~]#/etc/rc.d/rc.local
#准备service文件
[root@redis-node1 ~]#cat > /usr/lib/systemd/system/redis.service <<EOF
[Unit]
Description=Redis persistent key-value database
After=network.target
[Service]
ExecStart=/apps/redis/bin/redis-server /apps/redis/etc/redis.conf --supervised
systemd
ExecStop=/bin/kill -s QUIT \$MAINPID
Type=notify
User=redis
Group=redis
RuntimeDirectory=redis
RuntimeDirectoryMode=0755
[Install]
WantedBy=multi-user.target
EOF
[root@redis-node1 ~]#systemctl daemon-reload
[root@redis-node1 ~]#systemctl enable --now redis
#准备6379的实例配置文件
[root@redis-node1 ~]#systemctl stop redis
[root@redis-node1 ~]#cd /apps/redis/etc/
[root@redis-node1 etc]#sed -i -e 's/bind 127.0.0.1/bind 0.0.0.0/' -e '/^#
masterauth/a masterauth 123456' -e '/# requirepass/a requirepass 123456' -e '/#
cluster-enabled yes/a cluster-enabled yes' -e '/# cluster-config-file nodes-
6379.conf/a cluster-config-file nodes-6379.conf' -e 's/^dir .*/dir
\/apps\/redis\/data/' -e '/appendonly no/c appendonly yes' -e '/logfile ""/c
logfile "/apps/redis/log/redis-6379.log"' -e '/^pidfile .*/c pidfile
/apps/redis/run/redis_6379.pid' /apps/redis/etc/redis.conf
#准备6380端口的实例的配置文件
[root@redis-node1 etc]#cp -p redis.conf redis6380.conf
[root@redis-node1 etc]#sed -i -e 's/6379/6380/' -e 's/dbfilename
dump\.rdb/dbfilename dump6380.rdb/' -e 's/appendfilename
"appendonly\.aof"/appendfilename "appendonly6380.aof"/'
/apps/redis/etc/redis6380.conf
#准备服务文件
[root@redis-node1 ~]#cp /lib/systemd/system/redis.service
/lib/systemd/system/redis6380.service
[root@redis-node1 ~]#sed -i 's/redis.conf/redis6380.conf/'
/lib/systemd/system/redis6380.service
#启动服务,查看到端口都打开
[root@redis-node1 ~]#systemctl daemon-reload
[root@redis-node1 ~]#systemctl enable --now redis redis6380
[root@redis-node1 ~]#ss -ntl
State       Recv-Q Send-Q   Local Address:Port     Peer Address:Port
LISTEN      0      100          127.0.0.1:25                 *:*

LISTEN      0      128                 *:16379               *:*

LISTEN      0      128                 *:16380               *:*

LISTEN      0      128                 *:6379               *:*

LISTEN      0      128                 *:6380               *:*

LISTEN      0      128                 *:22                 *:*

LISTEN      0      100             [::1]:25               [::]:*

LISTEN      0      128               [::]:22               [::]:*

[root@redis-node1 ~]#ps -ef|grep redis
redis 71539   1  0 22:13 ?   00:00:00 /apps/redis/bin/redis-server 0.0.0.0:6379
[cluster]
redis 71543   1  0 22:13 ?   00:00:00 /apps/redis/bin/redis-server 0.0.0.0:6380
[cluster]
root  71553  31781  0 22:15 pts/0 00:00:00 grep --color=auto redis
[root@redis-node1 ~]#tree /apps/redis/
/apps/redis
├── bin
│   ├── redis-benchmark
│   ├── redis-check-aof
│   ├── redis-check-rdb
│   ├── redis-cli
│   ├── redis-sentinel -> redis-server
│   └── redis-server
├── data
│   ├── appendonly6380.aof
│   ├── appendonly.aof
│   ├── nodes-6379.conf
│   └── nodes-6380.conf
├── etc
│   ├── redis6380.conf
│   └── redis.conf
├── log
│   ├── redis-6379.log
│   └── redis-6380.log
└── run
├── redis_6379.pid
   └── redis_6380.pid
5 directories, 16 files


准备 redis-trib.rb 工具
Redis 3和 4版本需要使用到Redis官方推出的管理redis集群的专用工具redis-trib.rb,redis-trib.rb基于
ruby开发,所以需要安装ruby的redis 环境模块,但是如果使用CentOS 7系统yum中的ruby版本太低,不
支持Redis-trib.rb工具

[root@redis-node1 ~]#find / -name redis-trib.rb
/usr/local/src/redis-4.0.14/src/redis-trib.rb
[root@redis-node1 ~]#cp /usr/local/src/redis-4.0.14/src/redis-trib.rb /usr/bin/
[root@redis-node1 ~]#redis-trib.rb #缺少ruby环境无法运行rb脚本
/usr/bin/env: ruby: No such file or directory
#CentOS 7 系统自带的ruby版本过低,无法运行上面ruby脚本,需要安装2.3以上版本,安装rubygems依赖
ruby自动安装
[root@redis-node1 ~]#yum install rubygems -y
[root@redis-node1 ~]#gem install redis #gem相当于python里pip和linux的yum
Fetching: redis-4.1.3.gem (100%)
ERROR: Error installing redis:
 redis requires Ruby version >= 2.3.0.


 解决ruby版本问题:
编译安装高版本的ruby
[root@redis-node1 ~]#yum -y install gcc openssl-devel zlib-devel
[root@redis-node1 ~]#wget https://cache.ruby-lang.org/pub/ruby/2.5/ruby-
2.5.5.tar.gz
[root@redis-node1 ~]#tar xf ruby-2.5.5.tar.gz
[root@redis-node1 ~]#cd ruby-2.5.5
[root@redis-node1 ruby-2.5.5]#./configure
[root@redis-node1 ruby-2.5.5]#make -j 2 && make install
[root@redis-node1 ruby-2.5.5]#which ruby
/usr/local/bin/ruby
[root@redis-node1 ruby-2.5.5]# ruby -v
ruby 2.5.5p157 (2019-03-15 revision 67260) [x86_64-linux]
[root@redis-node1 ruby-2.5.5]#exit   #注意需要重新登录


安装ruby中redis模块
编译安装高版本的ruby后,运行redis-trib.rb 时仍然还会出错
[root@redis-node1 ~]#redis-trib.rb
Traceback (most recent call last):
 2: from /usr/bin/redis-trib.rb:25:in `<main>'
 1: from /usr/local/lib/ruby/2.5.0/rubygems/core_ext/kernel_require.rb:59:in
`require'
/usr/local/lib/ruby/2.5.0/rubygems/core_ext/kernel_require.rb:59:in `require':
cannot load such file -- redis (LoadError)


解决上述错误:
[root@redis-node1 ~]#gem install redis -v 4.1.3 #注意需要重新登录再执行,否则无法识别到
新ruby版本
Fetching: redis-4.1.3.gem (100%)
Successfully installed redis-4.1.3
Parsing documentation for redis-4.1.3
Installing ri documentation for redis-4.1.3
Done installing documentation for redis after 1 seconds
1 gem installed
#gem uninstall redis 可以卸载已安装好redis模块

如果无法在线安装,可以下载redis模块安装包离线安装
#https://rubygems.org/gems/redis #先下载redis模块安装包
[root@redis-node1 ~]#gem install -l redis-4.1.3.gem #离线安装redis模块


redis-trib.rb 命令用法
[root@redis-node1 ~]#redis-trib.rb
Usage: redis-trib <command> <options> <arguments ...>
create host1:port1 ... hostN:portN #创建集群
 --replicas <arg> #指定每个master的副本数量,即对应slave数量,一般为1
check host:port #检查集群信息
info host:port #查看集群主机信息
fix host:port #修复集群
 --timeout <arg>
reshard host:port #在线热迁移集群指定主机的slots数据
 --from <arg>
 --to <arg>
 --slots <arg>
            --yes
 --timeout <arg>
 --pipeline <arg>
rebalance host:port #平衡集群中各主机的slot数量
 --weight <arg>
 --auto-weights
 --use-empty-masters
 --timeout <arg>
 --simulate
 --pipeline <arg>
 --threshold <arg>
add-node new_host:new_port existing_host:existing_port #添加主机到集群
 --slave
 --master-id <arg>
del-node host:port node_id #删除主机
set-timeout host:port milliseconds #设置节点的超时时间
call host:port command arg arg .. arg #在集群上的所有节点上执行命令
import host:port #导入外部redis服务器的数据到当前集群
 --from <arg>
 --copy
 --replace
help (show this help)


 修改密码 redis 登录密码
 #修改redis-trib.rb连接redis的密码
[root@redis ~]#vim /usr/local/lib/ruby/gems/2.5.0/gems/redis-
4.1.3/lib/redis/client.rb


创建 redis cluster 集群
#确保三台主机6个实例都启动状态
[root@redis-node1 ~]#systemctl is-active redis redis6380
active
active
[root@redis-node2 ~]#systemctl is-active redis redis6380
active
active
[root@redis-node3 ~]#systemctl is-active redis redis6380
active
active
#在第一个主机上执行下面操作
#--replicas 1 表示每个 master 分配一个 slave 节点,前三个节点自动划分为master,后面都为
slave节点
[root@redis-node1 ~]#redis-trib.rb create --replicas 1 10.0.0.7:6379
10.0.0.17:6379 10.0.0.27:6379 10.0.0.7:6380 10.0.0.17:6380 10.0.0.27:6380
>>> Creating cluster
>>> Performing hash slots allocation on 6 nodes...
Using 3 masters:
10.0.0.7:6379
10.0.0.17:6379
10.0.0.27:6379
Adding replica 10.0.0.17:6380 to 10.0.0.7:6379
Adding replica 10.0.0.27:6380 to 10.0.0.17:6379
Adding replica 10.0.0.7:6380 to 10.0.0.27:6379
M: 739cb4c9895592131de418b8bc65990f81b75f3a 10.0.0.7:6379
   slots:0-5460 (5461 slots) master
S: 0e0beba04cc98da02ebdb5225a11b84aa8062e10 10.0.0.7:6380
replicates a01fd3d81922d6752f7c960f1a75b6e8f28d911b
M: dddabb4e19235ec02ae96ab2ce67e295ce0274d7 10.0.0.17:6379
   slots:5461-10922 (5462 slots) master
S: 34708909088ba562decbc1525a9606e088bdddf1 10.0.0.17:6380
   replicates 739cb4c9895592131de418b8bc65990f81b75f3a
M: a01fd3d81922d6752f7c960f1a75b6e8f28d911b 10.0.0.27:6379
   slots:10923-16383 (5461 slots) master
S: aefc6203958859024b8383b2fdb87b9e09411ccd 10.0.0.27:6380
   replicates dddabb4e19235ec02ae96ab2ce67e295ce0274d7
Can I set the above configuration? (type 'yes' to accept): yes  #输入yes
>>> Nodes configuration updated
>>> Assign a different config epoch to each node
>>> Sending CLUSTER MEET messages to join the cluster
Waiting for the cluster to join....
>>> Performing Cluster Check (using node 10.0.0.7:6379)
M: 739cb4c9895592131de418b8bc65990f81b75f3a 10.0.0.7:6379
   slots:0-5460 (5461 slots) master
   1 additional replica(s)
S: 0e0beba04cc98da02ebdb5225a11b84aa8062e10 10.0.0.7:6380
   slots: (0 slots) slave
   replicates a01fd3d81922d6752f7c960f1a75b6e8f28d911b
S: 34708909088ba562decbc1525a9606e088bdddf1 10.0.0.17:6380
   slots: (0 slots) slave
   replicates 739cb4c9895592131de418b8bc65990f81b75f3a
S: aefc6203958859024b8383b2fdb87b9e09411ccd 10.0.0.27:6380
   slots: (0 slots) slave
   replicates dddabb4e19235ec02ae96ab2ce67e295ce0274d7
M: a01fd3d81922d6752f7c960f1a75b6e8f28d911b 10.0.0.27:6379
   slots:10923-16383 (5461 slots) master
   1 additional replica(s)
M: dddabb4e19235ec02ae96ab2ce67e295ce0274d7 10.0.0.17:6379
   slots:5461-10922 (5462 slots) master
   1 additional replica(s)
[OK] All nodes agree about slots configuration.
>>> Check for open slots...
>>> Check slots coverage...
[OK] All 16384 slots covered.

如果有之前的操作导致Redis集群创建报错,则执行清空数据和集群命令:
127.0.0.1:6379> FLUSHALL
OK
127.0.0.1:6379> cluster reset
OK


查看 redis cluster 集群状态
自动生成配置文件记录master/slave对应关系
[root@redis-node1 ~]#cat /apps/redis/data/nodes-6379.conf
0e0beba04cc98da02ebdb5225a11b84aa8062e10 10.0.0.7:6380@16380 slave
a01fd3d81922d6752f7c960f1a75b6e8f28d911b 0 1582383256000 5 connected
34708909088ba562decbc1525a9606e088bdddf1 10.0.0.17:6380@16380 slave
739cb4c9895592131de418b8bc65990f81b75f3a 0 1582383256216 4 connected
aefc6203958859024b8383b2fdb87b9e09411ccd 10.0.0.27:6380@16380 slave
dddabb4e19235ec02ae96ab2ce67e295ce0274d7 0 1582383257000 6 connected
739cb4c9895592131de418b8bc65990f81b75f3a 10.0.0.7:6379@16379 myself,master - 0
1582383256000 1 connected 0-5460
a01fd3d81922d6752f7c960f1a75b6e8f28d911b 10.0.0.27:6379@16379 master - 0
1582383258230 5 connected 10923-16383
dddabb4e19235ec02ae96ab2ce67e295ce0274d7 10.0.0.17:6379@16379 master - 0
1582383257223 3 connected 5461-10922
vars currentEpoch 6 lastVoteEpoch 0
[root@redis-node1 ~]#


查看状态
[root@redis-node1 ~]#redis-trib.rb info 10.0.0.7:6379
10.0.0.7:6379 (739cb4c9...) -> 0 keys | 5461 slots | 1 slaves.
10.0.0.27:6379 (a01fd3d8...) -> 0 keys | 5461 slots | 1 slaves.
10.0.0.17:6379 (dddabb4e...) -> 0 keys | 5462 slots | 1 slaves.
[OK] 0 keys in 3 masters.
0.00 keys per slot on average.
[root@redis-node1 ~]#redis-trib.rb check 10.0.0.7:6379
>>> Performing Cluster Check (using node 10.0.0.7:6379)
M: 739cb4c9895592131de418b8bc65990f81b75f3a 10.0.0.7:6379
   slots:0-5460 (5461 slots) master
   1 additional replica(s)
S: 0e0beba04cc98da02ebdb5225a11b84aa8062e10 10.0.0.7:6380
   slots: (0 slots) slave
   replicates a01fd3d81922d6752f7c960f1a75b6e8f28d911b
S: 34708909088ba562decbc1525a9606e088bdddf1 10.0.0.17:6380
   slots: (0 slots) slave
   replicates 739cb4c9895592131de418b8bc65990f81b75f3a
S: aefc6203958859024b8383b2fdb87b9e09411ccd 10.0.0.27:6380
   slots: (0 slots) slave
   replicates dddabb4e19235ec02ae96ab2ce67e295ce0274d7
M: a01fd3d81922d6752f7c960f1a75b6e8f28d911b 10.0.0.27:6379
   slots:10923-16383 (5461 slots) master
   1 additional replica(s)
M: dddabb4e19235ec02ae96ab2ce67e295ce0274d7 10.0.0.17:6379
   slots:5461-10922 (5462 slots) master
   1 additional replica(s)
[OK] All nodes agree about slots configuration.
>>> Check for open slots...
>>> Check slots coverage...
[OK] All 16384 slots covered.
[root@redis-node1 ~]#redis-cli -a 123456
Warning: Using a password with '-a' option on the command line interface may not
be safe.
127.0.0.1:6379> CLUSTER INFO
cluster_state:ok
cluster_slots_assigned:16384
cluster_slots_ok:16384
cluster_slots_pfail:0
cluster_slots_fail:0
cluster_known_nodes:6
cluster_size:3
cluster_current_epoch:6
cluster_my_epoch:1
cluster_stats_messages_ping_sent:252
cluster_stats_messages_pong_sent:277
cluster_stats_messages_sent:529
cluster_stats_messages_ping_received:272
cluster_stats_messages_pong_received:252
cluster_stats_messages_meet_received:5
cluster_stats_messages_received:529
127.0.0.1:6379>
[root@redis-node1 ~]#redis-cli -a 123456 -p 6379 CLUSTER NODES
Warning: Using a password with '-a' option on the command line interface may not
be safe.
29a83275db60f1c8f9f6d39b66cbc6c3d5cf20f1 10.0.0.7:6379@16379 myself,master - 0
1601985995000 1 connected 0-5460
3e607de412a8a240e8214c2d7a663cf1523412eb 10.0.0.17:6380@16380 slave
29a83275db60f1c8f9f6d39b66cbc6c3d5cf20f1 0 1601985997092 4 connected
17d0b29d2f50ea9c89d4e6e0cf3ee3ee4f7c4179 10.0.0.7:6380@16380 slave
90b206131d89b0812c626677343df9a11ff1d211 0 1601985995075 5 connected
90b206131d89b0812c626677343df9a11ff1d211 10.0.0.27:6379@16379 master - 0
1601985996084 5 connected 10923-16383
fb34c3a704aefb1e1ef2317b20598d6e1e51c010 10.0.0.17:6379@16379 master - 0
1601985995000 3 connected 5461-10922
c9ea6113a1992695fb86f5368fe6320349b0f8a6 10.0.0.27:6380@16380 slave
fb34c3a704aefb1e1ef2317b20598d6e1e51c010 0 1601985996000 6 connected
[root@redis-node1 ~]#redis-cli -a 123456 -p 6379 INFO replication
Warning: Using a password with '-a' option on the command line interface may not
be safe.
# Replication
role:master
connected_slaves:1
slave0:ip=10.0.0.17,port=6380,state=online,offset=196,lag=0
master_replid:4ee36f9374c796ca4c65a0f0cb2c39304bb2e9c9
master_replid2:0000000000000000000000000000000000000000
master_repl_offset:196
second_repl_offset:-1
repl_backlog_active:1
repl_backlog_size:1048576
repl_backlog_first_byte_offset:1
repl_backlog_histlen:196
[root@redis-node1 ~]#redis-cli -a 123456 -p 6380 INFO replication
Warning: Using a password with '-a' option on the command line interface may not
be safe.
# Replication
role:slave
master_host:10.0.0.27
master_port:6379
master_link_status:up
master_last_io_seconds_ago:2
master_sync_in_progress:0
slave_repl_offset:224
slave_priority:100
slave_read_only:1
connected_slaves:0
master_replid:dba41cb31c14de7569e597a3d8debc1f0f114c1e
master_replid2:0000000000000000000000000000000000000000
master_repl_offset:224
second_repl_offset:-1
repl_backlog_active:1
repl_backlog_size:1048576
repl_backlog_first_byte_offset:1
repl_backlog_histlen:224


 python脚本实现RedisCluster集群写入
 [root@redis-node1 ~]#yum -y install python3
[root@redis-node1 ~]#pip3 install redis-py-cluster
[root@redis-node1 ~]#vim redis_cluster_test.py
[root@redis-node1 ~]#cat ./redis_cluster_test.py
#!/usr/bin/env python3
from rediscluster import RedisCluster
startup_nodes = [
   {"host":"10.0.0.7", "port":6379},
   {"host":"10.0.0.7", "port":6380},
   {"host":"10.0.0.17", "port":6379},
   {"host":"10.0.0.17", "port":6380},
   {"host":"10.0.0.27", "port":6379},
   {"host":"10.0.0.27", "port":6380}
]
redis_conn= RedisCluster(startup_nodes=startup_nodes,password='123456',
decode_responses=True)
for i in range(0, 10000):
   redis_conn.set('key'+str(i),'value'+str(i))
   print('key'+str(i)+':',redis_conn.get('key'+str(i)))
[root@redis-node1 ~]#chmod +x redis_cluster_test.py
[root@redis-node1 ~]#./redis_cluster_test.py
......
key9998: value9998
key9999: value9999


验证脚本写入的状态
[root@redis-node1 ~]#redis-cli -a 123456 -h 10.0.0.7 DBSIZE
Warning: Using a password with '-a' option on the command line interface may not
be safe.
(integer) 3331
[root@redis-node1 ~]#redis-cli -a 123456 -h 10.0.0.17 DBSIZE
Warning: Using a password with '-a' option on the command line interface may not
be safe.
(integer) 3340
[root@redis-node1 ~]#redis-cli -a 123456 -h 10.0.0.27 DBSIZE
Warning: Using a password with '-a' option on the command line interface may not
be safe.
(integer) 3329
[root@redis-node1 ~]#redis-cli -a 123456 GET key1
Warning: Using a password with '-a' option on the command line interface may not
be safe.
(error) MOVED 9189 10.0.0.17:6379
[root@redis-node1 ~]#redis-cli -a 123456 GET key2
Warning: Using a password with '-a' option on the command line interface may not
be safe.
"value2"
[root@redis-node1 ~]#redis-cli -a 123456 -h 10.0.0.17 GET key1
Warning: Using a password with '-a' option on the command line interface may not
be safe.
"value1"
[root@redis-node1 ~]#redis-trib.rb info 10.0.0.7:6379
10.0.0.7:6379 (739cb4c9...) -> 3331 keys | 5461 slots | 1 slaves.
10.0.0.27:6379 (a01fd3d8...) -> 3329 keys | 5461 slots | 1 slaves.
10.0.0.17:6379 (dddabb4e...) -> 3340 keys | 5462 slots | 1 slaves.
[OK] 10000 keys in 3 masters.
0.61 keys per slot on average.
[root@redis-node1 ~]#


模拟故障实现自动的故障转移
[root@redis-node1 ~]#systemctl stop redis
#不会立即提升,需要稍等一会儿再观察下面结果
[root@redis-node1 ~]#redis-trib.rb check 10.0.0.27:6379
>>> Performing Cluster Check (using node 10.0.0.27:6379)
M: a01fd3d81922d6752f7c960f1a75b6e8f28d911b 10.0.0.27:6379
   slots:10923-16383 (5461 slots) master
   1 additional replica(s)
S: aefc6203958859024b8383b2fdb87b9e09411ccd 10.0.0.27:6380
   slots: (0 slots) slave
   replicates dddabb4e19235ec02ae96ab2ce67e295ce0274d7
S: 0e0beba04cc98da02ebdb5225a11b84aa8062e10 10.0.0.7:6380
   slots: (0 slots) slave
   replicates a01fd3d81922d6752f7c960f1a75b6e8f28d911b
M: 34708909088ba562decbc1525a9606e088bdddf1 10.0.0.17:6380
   slots:0-5460 (5461 slots) master
   0 additional replica(s)
M: dddabb4e19235ec02ae96ab2ce67e295ce0274d7 10.0.0.17:6379
   slots:5461-10922 (5462 slots) master
   1 additional replica(s)
[OK] All nodes agree about slots configuration.
>>> Check for open slots...
>>> Check slots coverage...
[OK] All 16384 slots covered.
[root@redis-node1 ~]#tail /var/log/messages
Feb 22 23:23:13 centos7 redis-server: 71887:M 22 Feb 23:23:13.656 * Saving the
final RDB snapshot before exiting.
Feb 22 23:23:13 centos7 systemd: Stopped Redis persistent key-value database.
Feb 22 23:23:13 centos7 redis-server: 71887:M 22 Feb 23:23:13.660 * DB saved on
disk
Feb 22 23:23:13 centos7 redis-server: 71887:M 22 Feb 23:23:13.660 * Removing the
pid file.
Feb 22 23:23:13 centos7 redis-server: 71887:M 22 Feb 23:23:13.660 # Redis is now
ready to exit, bye bye...
Feb 22 23:23:13 centos7 systemd: Unit redis.service entered failed state.
Feb 22 23:23:13 centos7 systemd: redis.service failed.
Feb 22 23:23:30 centos7 redis-server: 72046:S 22 Feb 23:23:30.077 * FAIL message
received from dddabb4e19235ec02ae96ab2ce67e295ce0274d7 about
739cb4c9895592131de418b8bc65990f81b75f3a
Feb 22 23:23:30 centos7 redis-server: 72046:S 22 Feb 23:23:30.077 # Cluster
state changed: fail
Feb 22 23:23:30 centos7 redis-server: 72046:S 22 Feb 23:23:30.701 # Cluster
state changed: ok
[root@redis-node1 ~]#redis-trib.rb info 10.0.0.27:6379
10.0.0.27:6379 (a01fd3d8...) -> 3329 keys | 5461 slots | 1 slaves.
10.0.0.17:6380 (34708909...) -> 3331 keys | 5461 slots | 0 slaves.
10.0.0.17:6379 (dddabb4e...) -> 3340 keys | 5462 slots | 1 slaves.
[OK] 10000 keys in 3 masters.
0.61 keys per slot on average.


将故障的master恢复后,该节点自动加入集群成为新的slave
[root@redis-node1 ~]#systemctl start redis
[root@redis-node1 ~]#redis-trib.rb check 10.0.0.27:6379
>>> Performing Cluster Check (using node 10.0.0.27:6379)
M: a01fd3d81922d6752f7c960f1a75b6e8f28d911b 10.0.0.27:6379
   slots:10923-16383 (5461 slots) master
   1 additional replica(s)
S: aefc6203958859024b8383b2fdb87b9e09411ccd 10.0.0.27:6380
   slots: (0 slots) slave
   replicates dddabb4e19235ec02ae96ab2ce67e295ce0274d7
S: 739cb4c9895592131de418b8bc65990f81b75f3a 10.0.0.7:6379
   slots: (0 slots) slave
   replicates 34708909088ba562decbc1525a9606e088bdddf1
S: 0e0beba04cc98da02ebdb5225a11b84aa8062e10 10.0.0.7:6380
   slots: (0 slots) slave
   replicates a01fd3d81922d6752f7c960f1a75b6e8f28d911b
M: 34708909088ba562decbc1525a9606e088bdddf1 10.0.0.17:6380
   slots:0-5460 (5461 slots) master
   1 additional replica(s)
M: dddabb4e19235ec02ae96ab2ce67e295ce0274d7 10.0.0.17:6379
   slots:5461-10922 (5462 slots) master
   1 additional replica(s)
[OK] All nodes agree about slots configuration.
>>> Check for open slots...
>>> Check slots coverage...
[OK] All 16384 slots covered.


Redis cluster 管理

集群扩容
扩容适用场景:
当前客户量激增,现有的Redis cluster架构已经无法满足越来越高的并发访问请求,为解决此问题,新购
置两台服务器,要求将其动态添加到现有集群,但不能影响业务的正常访问。
注意: 生产环境一般建议master节点为奇数个,比如:3,5,7,以防止脑裂现象


添加节点准备
增加Redis 新节点,需要与之前的Redis node版本和配置一致,然后分别再启动两台Redis node,应为
一主一从。


#配置node7节点
[root@redis-node7 ~]#dnf -y install redis
[root@redis-node7 ~]#sed -i.bak -e 's/bind 127.0.0.1/bind 0.0.0.0/' -e
'/masterauth/a masterauth 123456' -e '/# requirepass/a requirepass 123456' -e '/#
cluster-enabled yes/a cluster-enabled yes' -e '/# cluster-config-file nodes-
6379.conf/a cluster-config-file nodes-6379.conf' -e '/cluster-require-fullcoverage yes/c cluster-require-full-coverage no' /etc/redis.conf
#编译安装执行下面操作
[root@redis-node7 ~]#sed -i.bak -e '/masterauth/a masterauth 123456' -e '/#
cluster-enabled yes/a cluster-enabled yes' -e '/# cluster-config-file nodes-
6379.conf/a cluster-config-file nodes-6379.conf' -e '/cluster-require-fullcoverage yes/c cluster-require-full-coverage no'
/apps/redis/etc/redis.conf;systemctl restart redis
[root@redis-node7 ~]#systemctl enable --now redis
#配置node8节点
[root@redis-node8 ~]#dnf -y install redis
[root@redis-node8 ~]#sed -i.bak -e 's/bind 127.0.0.1/bind 0.0.0.0/' -e
'/masterauth/a masterauth 123456' -e '/# requirepass/a requirepass 123456' -e '/#
cluster-enabled yes/a cluster-enabled yes' -e '/# cluster-config-file nodes-
6379.conf/a cluster-config-file nodes-6379.conf' -e '/cluster-require-fullcoverage yes/c cluster-require-full-coverage no' /etc/redis.conf
#编译安装执行下面操作
[root@redis-node8 ~]#sed -i.bak -e '/masterauth/a masterauth 123456' -e '/#
cluster-enabled yes/a cluster-enabled yes' -e '/# cluster-config-file nodes-
6379.conf/a cluster-config-file nodes-6379.conf' -e '/cluster-require-fullcoverage yes/c cluster-require-full-coverage no'
/apps/redis/etc/redis.conf;systemctl restart redis
[root@redis-node8 ~]#systemctl enable --now redis


添加新的master节点到集群
使用以下命令添加新节点,要添加的新redis节点IP和端口添加到的已有的集群中任意节点的IP:端口
add-node new_host:new_port existing_host:existing_port [--slave --master-id
<arg>]
#说明:
new_host:new_port #指定新添加的主机的IP和端口
existing_host:existing_port #指定已有的集群中任意节点的IP和端口


Redis 3/4 版本的添加命令:
#把新的Redis 节点10.0.0.37添加到当前Redis集群当中。
[root@redis-node1 ~]#redis-trib.rb add-node 10.0.0.37:6379 10.0.0.7:6379
[root@redis-node1 ~]#redis-trib.rb info 10.0.0.7:6379
10.0.0.7:6379 (29a83275...) -> 3331 keys | 5461 slots | 1 slaves.
10.0.0.37:6379 (12ca273a...) -> 0 keys | 0 slots | 0 slaves.
10.0.0.27:6379 (90b20613...) -> 3329 keys | 5461 slots | 1 slaves.
10.0.0.17:6379 (fb34c3a7...) -> 3340 keys | 5462 slots | 1 slaves.
[OK] 10000 keys in 4 masters.
0.61 keys per slot on average.


Redis 5 以上版本的添加命令:
#将一台新的主机10.0.0.68加入集群,以下示例中10.0.0.58可以是任意存在的集群节点
[root@redis-node1 ~]#redis-cli -a 123456 --cluster add-node 10.0.0.68:6379 <当前
任意集群节点>:6379
Warning: Using a password with '-a' or '-u' option on the command line interface
may not be safe.
>>> Adding node 10.0.0.68:6379 to cluster 10.0.0.58:6379
>>> Performing Cluster Check (using node 10.0.0.58:6379)
S: 9875b50925b4e4f29598e6072e5937f90df9fc71 10.0.0.58:6379
   slots: (0 slots) slave
   replicates d34da8666a6f587283a1c2fca5d13691407f9462
M: d04e524daec4d8e22bdada7f21a9487c2d3e1057 10.0.0.48:6379
   slots:[5461-10922] (5462 slots) master
   1 additional replica(s)
M: d34da8666a6f587283a1c2fca5d13691407f9462 10.0.0.28:6379
   slots:[10923-16383] (5461 slots) master
   1 additional replica(s)
S: 99720241248ff0e4c6fa65c2385e92468b3b5993 10.0.0.18:6379
   slots: (0 slots) slave
   replicates d04e524daec4d8e22bdada7f21a9487c2d3e1057
S: f9adcfb8f5a037b257af35fa548a26ffbadc852d 10.0.0.38:6379
   slots: (0 slots) slave
   replicates cb028b83f9dc463d732f6e76ca6bbcd469d948a7
M: cb028b83f9dc463d732f6e76ca6bbcd469d948a7 10.0.0.8:6379
 slots:[0-5460] (5461 slots) master
   1 additional replica(s)
[OK] All nodes agree about slots configuration.
>>> Check for open slots...
>>> Check slots coverage...
[OK] All 16384 slots covered.
>>> Send CLUSTER MEET to node 10.0.0.68:6379 to make it join the cluster.
[OK] New node added correctly.
#观察到该节点已经加入成功,但此节点上没有slot位,也无从节点,而且新的节点是master
[root@redis-node1 ~]#redis-cli -a 123456 --cluster info 10.0.0.8:6379
Warning: Using a password with '-a' or '-u' option on the command line interface
may not be safe.
10.0.0.8:6379 (cb028b83...) -> 6672 keys | 5461 slots | 1 slaves.
10.0.0.68:6379 (d6e2eca6...) -> 0 keys | 0 slots | 0 slaves.
10.0.0.48:6379 (d04e524d...) -> 6679 keys | 5462 slots | 1 slaves.
10.0.0.28:6379 (d34da866...) -> 6649 keys | 5461 slots | 1 slaves.
[OK] 20000 keys in 5 masters.
1.22 keys per slot on average.
[root@redis-node1 ~]#redis-cli -a 123456 --cluster check 10.0.0.8:6379
Warning: Using a password with '-a' or '-u' option on the command line interface
may not be safe.
10.0.0.8:6379 (cb028b83...) -> 6672 keys | 5461 slots | 1 slaves.
10.0.0.68:6379 (d6e2eca6...) -> 0 keys | 0 slots | 0 slaves.
10.0.0.48:6379 (d04e524d...) -> 6679 keys | 5462 slots | 1 slaves.
10.0.0.28:6379 (d34da866...) -> 6649 keys | 5461 slots | 1 slaves.
[OK] 20000 keys in 5 masters.
1.22 keys per slot on average.
>>> Performing Cluster Check (using node 10.0.0.8:6379)
M: cb028b83f9dc463d732f6e76ca6bbcd469d948a7 10.0.0.8:6379
   slots:[0-5460] (5461 slots) master
   1 additional replica(s)
M: d6e2eca6b338b717923f64866bd31d42e52edc98 10.0.0.68:6379
   slots: (0 slots) master
S: 9875b50925b4e4f29598e6072e5937f90df9fc71 10.0.0.58:6379
   slots: (0 slots) slave
   replicates d34da8666a6f587283a1c2fca5d13691407f9462
S: f9adcfb8f5a037b257af35fa548a26ffbadc852d 10.0.0.38:6379
   slots: (0 slots) slave
   replicates cb028b83f9dc463d732f6e76ca6bbcd469d948a7
M: d04e524daec4d8e22bdada7f21a9487c2d3e1057 10.0.0.48:6379
   slots:[5461-10922] (5462 slots) master
   1 additional replica(s)
S: 99720241248ff0e4c6fa65c2385e92468b3b5993 10.0.0.18:6379
   slots: (0 slots) slave
   replicates d04e524daec4d8e22bdada7f21a9487c2d3e1057
M: d34da8666a6f587283a1c2fca5d13691407f9462 10.0.0.28:6379
   slots:[10923-16383] (5461 slots) master
   1 additional replica(s)
[OK] All nodes agree about slots configuration.
>>> Check for open slots...
>>> Check slots coverage...
[OK] All 16384 slots covered.
[root@redis-node1 ~]#cat /var/lib/redis/nodes-6379.conf
d6e2eca6b338b717923f64866bd31d42e52edc98 10.0.0.68:6379@16379 master - 0
1582356107260 8 connected
9875b50925b4e4f29598e6072e5937f90df9fc71 10.0.0.58:6379@16379 slave
d34da8666a6f587283a1c2fca5d13691407f9462 0 1582356110286 6 connected
f9adcfb8f5a037b257af35fa548a26ffbadc852d 10.0.0.38:6379@16379 slave
cb028b83f9dc463d732f6e76ca6bbcd469d948a7 0 1582356108268 4 connected
d04e524daec4d8e22bdada7f21a9487c2d3e1057 10.0.0.48:6379@16379 master - 0
1582356105000 7 connected 5461-10922
99720241248ff0e4c6fa65c2385e92468b3b5993 10.0.0.18:6379@16379 slave
d04e524daec4d8e22bdada7f21a9487c2d3e1057 0 1582356108000 7 connected
d34da8666a6f587283a1c2fca5d13691407f9462 10.0.0.28:6379@16379 master - 0
1582356107000 3 connected 10923-16383
cb028b83f9dc463d732f6e76ca6bbcd469d948a7 10.0.0.8:6379@16379 myself,master - 0
1582356106000 1 connected 0-5460
vars currentEpoch 8 lastVoteEpoch 7
#和上面显示结果一样
[root@redis-node1 ~]#redis-cli -a 123456 CLUSTER NODES
Warning: Using a password with '-a' or '-u' option on the command line interface
may not be safe.
d6e2eca6b338b717923f64866bd31d42e52edc98 10.0.0.68:6379@16379 master - 0
1582356313200 8 connected
9875b50925b4e4f29598e6072e5937f90df9fc71 10.0.0.58:6379@16379 slave
d34da8666a6f587283a1c2fca5d13691407f9462 0 1582356311000 6 connected
f9adcfb8f5a037b257af35fa548a26ffbadc852d 10.0.0.38:6379@16379 slave
cb028b83f9dc463d732f6e76ca6bbcd469d948a7 0 1582356314208 4 connected
d04e524daec4d8e22bdada7f21a9487c2d3e1057 10.0.0.48:6379@16379 master - 0
1582356311182 7 connected 5461-10922
99720241248ff0e4c6fa65c2385e92468b3b5993 10.0.0.18:6379@16379 slave
d04e524daec4d8e22bdada7f21a9487c2d3e1057 0 1582356312000 7 connected
d34da8666a6f587283a1c2fca5d13691407f9462 10.0.0.28:6379@16379 master - 0
1582356312190 3 connected 10923-16383
cb028b83f9dc463d732f6e76ca6bbcd469d948a7 10.0.0.8:6379@16379 myself,master - 0
1582356310000 1 connected 0-5460
#查看集群状态
[root@redis-node1 ~]#redis-cli -a 123456 CLUSTER INFO
Warning: Using a password with '-a' or '-u' option on the command line interface
may not be safe.
cluster_state:ok
cluster_slots_assigned:16384
cluster_slots_ok:16384
cluster_slots_pfail:0
cluster_slots_fail:0
cluster_known_nodes:7
cluster_size:3
cluster_current_epoch:8
cluster_my_epoch:1
cluster_stats_messages_ping_sent:17442
cluster_stats_messages_pong_sent:13318
cluster_stats_messages_fail_sent:4
cluster_stats_messages_auth-ack_sent:1
cluster_stats_messages_sent:30765
cluster_stats_messages_ping_received:13311
cluster_stats_messages_pong_received:13367
cluster_stats_messages_meet_received:7
cluster_stats_messages_fail_received:1
cluster_stats_messages_auth-req_received:1
cluster_stats_messages_received:26687
[root@redis-node1 ~]#


在新的master上重新分配槽位
新的node节点加到集群之后,默认是master节点,但是没有slots,需要重新分配,否则没有槽位将无法访
问
注意: 重新分配槽位需要清空数据,所以需要先备份数据,扩展后再恢复数据


Redis 3/4 版本命令:
[root@redis-node1 ~]# redis-trib.rb check 10.0.0.67:6379 #当前状态
[root@redis-node1 ~]# redis-trib.rb reshard <任意节点>:6379 #重新分片
[root@redis-node1 ~]# redis-trib.rb fix 10.0.0.67:6379 #如果迁移失败使用此命令修复集群


Redis 5以上版本命令:
[root@redis-node1 ~]#redis-cli -a 123456 --cluster reshard <当前任意集群节点>:6379
Warning: Using a password with '-a' or '-u' option on the command line interface
may not be safe.
>>> Performing Cluster Check (using node 10.0.0.68:6379)
M: d6e2eca6b338b717923f64866bd31d42e52edc98 10.0.0.68:6379
   slots: (0 slots) master
M: d34da8666a6f587283a1c2fca5d13691407f9462 10.0.0.28:6379
   slots:[10923-16383] (5461 slots) master
   1 additional replica(s)
M: d04e524daec4d8e22bdada7f21a9487c2d3e1057 10.0.0.48:6379
   slots:[5461-10922] (5462 slots) master
   1 additional replica(s)
M: cb028b83f9dc463d732f6e76ca6bbcd469d948a7 10.0.0.8:6379
   slots:[0-5460] (5461 slots) master
   1 additional replica(s)
S: 99720241248ff0e4c6fa65c2385e92468b3b5993 10.0.0.18:6379
   slots: (0 slots) slave
   replicates d04e524daec4d8e22bdada7f21a9487c2d3e1057
M: f67f1c02c742cd48d3f48d8c362f9f1b9aa31549 10.0.0.78:6379
   slots: (0 slots) master
S: f9adcfb8f5a037b257af35fa548a26ffbadc852d 10.0.0.38:6379
   slots: (0 slots) slave
   replicates cb028b83f9dc463d732f6e76ca6bbcd469d948a7
S: 9875b50925b4e4f29598e6072e5937f90df9fc71 10.0.0.58:6379
   slots: (0 slots) slave
   replicates d34da8666a6f587283a1c2fca5d13691407f9462
[OK] All nodes agree about slots configuration.
>>> Check for open slots...
>>> Check slots coverage...
[OK] All 16384 slots covered.
How many slots do you want to move (from 1 to 16384)?4096 #新分配多少个槽位
=16384/master个数
What is the receiving node ID? d6e2eca6b338b717923f64866bd31d42e52edc98 #新的
master的ID
Please enter all the source node IDs.
 Type 'all' to use all the nodes as source nodes for the hash slots.
 Type 'done' once you entered all the source nodes IDs.
 Source node #1: all #输入all,将哪些源主机的槽位分配给新的节点,all是自动在所有的redis
node选择划分,如果是从redis cluster删除某个主机可以使用此方式将指定主机上的槽位全部移动到别的
redis主机
......
Do you want to proceed with the proposed reshard plan (yes/no)?  yes #确认分配
......
Moving slot 12280 from 10.0.0.28:6379 to 10.0.0.68:6379: .
Moving slot 12281 from 10.0.0.28:6379 to 10.0.0.68:6379: .
Moving slot 12282 from 10.0.0.28:6379 to 10.0.0.68:6379:
Moving slot 12283 from 10.0.0.28:6379 to 10.0.0.68:6379: ..
Moving slot 12284 from 10.0.0.28:6379 to 10.0.0.68:6379:
Moving slot 12285 from 10.0.0.28:6379 to 10.0.0.68:6379: .
Moving slot 12286 from 10.0.0.28:6379 to 10.0.0.68:6379:
Moving slot 12287 from 10.0.0.28:6379 to 10.0.0.68:6379: ..
[root@redis-node1 ~]#
#确定slot分配成功
[root@redis-node1 ~]#redis-cli -a 123456 --cluster check 10.0.0.8:6379
Warning: Using a password with '-a' or '-u' option on the command line interface
may not be safe.
10.0.0.8:6379 (cb028b83...) -> 5019 keys | 4096 slots | 1 slaves.
10.0.0.68:6379 (d6e2eca6...) -> 4948 keys | 4096 slots | 0 slaves.
10.0.0.48:6379 (d04e524d...) -> 5033 keys | 4096 slots | 1 slaves.
10.0.0.28:6379 (d34da866...) -> 5000 keys | 4096 slots | 1 slaves.
[OK] 20000 keys in 5 masters.
1.22 keys per slot on average.
>>> Performing Cluster Check (using node 10.0.0.8:6379)
M: cb028b83f9dc463d732f6e76ca6bbcd469d948a7 10.0.0.8:6379
   slots:[1365-5460] (4096 slots) master
   1 additional replica(s)
M: d6e2eca6b338b717923f64866bd31d42e52edc98 10.0.0.68:6379
   slots:[0-1364],[5461-6826],[10923-12287] (4096 slots) master #可看到4096个slots
S: 9875b50925b4e4f29598e6072e5937f90df9fc71 10.0.0.58:6379
   slots: (0 slots) slave
   replicates d34da8666a6f587283a1c2fca5d13691407f9462
S: f9adcfb8f5a037b257af35fa548a26ffbadc852d 10.0.0.38:6379
   slots: (0 slots) slave
   replicates cb028b83f9dc463d732f6e76ca6bbcd469d948a7
M: d04e524daec4d8e22bdada7f21a9487c2d3e1057 10.0.0.48:6379
   slots:[6827-10922] (4096 slots) master
   1 additional replica(s)
S: 99720241248ff0e4c6fa65c2385e92468b3b5993 10.0.0.18:6379
   slots: (0 slots) slave
   replicates d04e524daec4d8e22bdada7f21a9487c2d3e1057
M: d34da8666a6f587283a1c2fca5d13691407f9462 10.0.0.28:6379
   slots:[12288-16383] (4096 slots) master
   1 additional replica(s)
[OK] All nodes agree about slots configuration.
>>> Check for open slots...
>>> Check slots coverage...
[OK] All 16384 slots covered.


为新的master指定新的slave节点
当前Redis集群中新的master节点存单点问题,还需要给其添加一个对应slave节点,实现高可用功能
有两种方式:
方法1:在新加节点到集群时,直接将之设置为slave
Redis 3/4 添加命令:
redis-trib.rb   add-node --slave --master-id
750cab050bc81f2655ed53900fd43d2e64423333 10.0.0.77:6379 <任意集群节点>:6379

Redis 5 以上版本添加命令:
redis-cli -a 123456 --cluster add-node 10.0.0.78:6379 <任意集群节点>:6379 --
cluster-slave --cluster-master-id d6e2eca6b338b717923f64866bd31d42e52edc98


范例:
#查看当前状态
[root@redis-node1 ~]#redis-cli -a 123456 --cluster check 10.0.0.8:6379
Warning: Using a password with '-a' or '-u' option on the command line interface
may not be safe.
10.0.0.8:6379 (cb028b83...) -> 5019 keys | 4096 slots | 1 slaves.
10.0.0.68:6379 (d6e2eca6...) -> 4948 keys | 4096 slots | 0 slaves.
10.0.0.48:6379 (d04e524d...) -> 5033 keys | 4096 slots | 1 slaves.
10.0.0.28:6379 (d34da866...) -> 5000 keys | 4096 slots | 1 slaves.
[OK] 20000 keys in 4 masters.
1.22 keys per slot on average.
>>> Performing Cluster Check (using node 10.0.0.8:6379)
M: cb028b83f9dc463d732f6e76ca6bbcd469d948a7 10.0.0.8:6379
   slots:[1365-5460] (4096 slots) master
   1 additional replica(s)
M: d6e2eca6b338b717923f64866bd31d42e52edc98 10.0.0.68:6379
   slots:[0-1364],[5461-6826],[10923-12287] (4096 slots) master
S: 9875b50925b4e4f29598e6072e5937f90df9fc71 10.0.0.58:6379
   slots: (0 slots) slave
   replicates d34da8666a6f587283a1c2fca5d13691407f9462
S: f9adcfb8f5a037b257af35fa548a26ffbadc852d 10.0.0.38:6379
   slots: (0 slots) slave
   replicates cb028b83f9dc463d732f6e76ca6bbcd469d948a7
M: d04e524daec4d8e22bdada7f21a9487c2d3e1057 10.0.0.48:6379
   slots:[6827-10922] (4096 slots) master
   1 additional replica(s)
S: 99720241248ff0e4c6fa65c2385e92468b3b5993 10.0.0.18:6379
   slots: (0 slots) slave
   replicates d04e524daec4d8e22bdada7f21a9487c2d3e1057
M: d34da8666a6f587283a1c2fca5d13691407f9462 10.0.0.28:6379
   slots:[12288-16383] (4096 slots) master
   1 additional replica(s)
[OK] All nodes agree about slots configuration.
>>> Check for open slots...
>>> Check slots coverage...
[OK] All 16384 slots covered.
#直接加为slave节点
[root@redis-node1 ~]#redis-cli -a 123456 --cluster add-node 10.0.0.78:6379
10.0.0.8:6379 --cluster-slave --cluster-master-id
d6e2eca6b338b717923f64866bd31d42e52edc98
#验证是否成功
[root@redis-node1 ~]#redis-cli -a 123456 --cluster check 10.0.0.8:6379
Warning: Using a password with '-a' or '-u' option on the command line interface
may not be safe.
10.0.0.8:6379 (cb028b83...) -> 5019 keys | 4096 slots | 1 slaves.
10.0.0.68:6379 (d6e2eca6...) -> 4948 keys | 4096 slots | 1 slaves.
10.0.0.48:6379 (d04e524d...) -> 5033 keys | 4096 slots | 1 slaves.
10.0.0.28:6379 (d34da866...) -> 5000 keys | 4096 slots | 1 slaves.
[OK] 20000 keys in 4 masters.
1.22 keys per slot on average.
>>> Performing Cluster Check (using node 10.0.0.8:6379)
M: cb028b83f9dc463d732f6e76ca6bbcd469d948a7 10.0.0.8:6379
   slots:[1365-5460] (4096 slots) master
   1 additional replica(s)
M: d6e2eca6b338b717923f64866bd31d42e52edc98 10.0.0.68:6379
   slots:[0-1364],[5461-6826],[10923-12287] (4096 slots) master
   1 additional replica(s)
S: 36840d7eea5835ba540d9b64ec018aa3f8de6747 10.0.0.78:6379
   slots: (0 slots) slave
   replicates d6e2eca6b338b717923f64866bd31d42e52edc98
S: 9875b50925b4e4f29598e6072e5937f90df9fc71 10.0.0.58:6379
   slots: (0 slots) slave
   replicates d34da8666a6f587283a1c2fca5d13691407f9462
S: f9adcfb8f5a037b257af35fa548a26ffbadc852d 10.0.0.38:6379
   slots: (0 slots) slave
   replicates cb028b83f9dc463d732f6e76ca6bbcd469d948a7
M: d04e524daec4d8e22bdada7f21a9487c2d3e1057 10.0.0.48:6379
   slots:[6827-10922] (4096 slots) master
   1 additional replica(s)
S: 99720241248ff0e4c6fa65c2385e92468b3b5993 10.0.0.18:6379
   slots: (0 slots) slave
   replicates d04e524daec4d8e22bdada7f21a9487c2d3e1057
M: d34da8666a6f587283a1c2fca5d13691407f9462 10.0.0.28:6379
   slots:[12288-16383] (4096 slots) master
   1 additional replica(s)
[OK] All nodes agree about slots configuration.
>>> Check for open slots...
>>> Check slots coverage...
[OK] All 16384 slots covered.
[root@centos8 ~]#redis-cli -a 123456 -h 10.0.0.8 --no-auth-warning cluster info
cluster_state:ok
cluster_slots_assigned:16384
cluster_slots_ok:16384
cluster_slots_pfail:0
cluster_slots_fail:0
cluster_known_nodes:8   #8个节点
cluster_size:4          #4组主从
cluster_current_epoch:11
cluster_my_epoch:10
cluster_stats_messages_ping_sent:1810
cluster_stats_messages_pong_sent:1423
cluster_stats_messages_auth-req_sent:5
cluster_stats_messages_update_sent:14
cluster_stats_messages_sent:3252
cluster_stats_messages_ping_received:1417
cluster_stats_messages_pong_received:1368
cluster_stats_messages_meet_received:2
cluster_stats_messages_fail_received:2
cluster_stats_messages_auth-ack_received:2
cluster_stats_messages_update_received:4
cluster_stats_messages_received:2795


方法2:先将新节点加入集群,再修改为slave
为新的master添加slave节点
Redis 3/4 版本命令:
[root@redis-node1 ~]#redis-trib.rb add-node 10.0.0.78:6379 10.0.0.8:6379


Redis 5 以上版本命令:
#把10.0.0.78:6379添加到集群中:
[root@redis-node1 ~]#redis-cli -a 123456 --cluster add-node 10.0.0.78:6379
10.0.0.8:6379


更改新节点更改状态为slave:
需要手动将其指定为某个master的slave,否则其默认角色为master。
[root@redis-node1 ~]#redis-cli -h 10.0.0.78 -p 6379 -a 123456 #登录到新添加节点
10.0.0.78:6380> CLUSTER NODES #查看当前集群节点,找到目标master 的ID
10.0.0.78:6380> CLUSTER REPLICATE 886338acd50c3015be68a760502b239f4509881c #将其设
置slave,命令格式为cluster replicate MASTERID
10.0.0.78:6380> CLUSTER NODES #再次查看集群节点状态,验证节点是否已经更改为指定master 的
slave


集群缩容
缩容适用场景:
随着业务萎缩用户量下降明显,和领导商量决定将现有Redis集群的8台主机中下线两台主机挪做它用,缩容
后性能仍能满足当前业务需求
删除节点过程:
扩容时是先添加node到集群,然后再分配槽位,而缩容时的操作相反,是先将被要删除的node上的槽
位迁移到集群中的其他node上,然后 才能再将其从集群中删除,如果一个node上的槽位没有被完全迁
移空,删除该node时也会提示有数据出错导致无法删除。


 迁移要删除的master节点上面的槽位到其它master
注意: 被迁移Redis master源服务器必须保证没有数据,否则迁移报错并会被强制中断。
Redis 3/4 版本命令
[root@redis-node1 ~]# redis-trib.rb reshard 10.0.0.8:6379
[root@redis-node1 ~]# redis-trib.rb fix 10.0.0.8:6379 #如果迁移失败使用此命令修复集群


Redis 5版本以上命令
#查看当前状态
[root@redis-node1 ~]#redis-cli -a 123456 --cluster check 10.0.0.8:6379
Warning: Using a password with '-a' or '-u' option on the command line interface
may not be safe.
10.0.0.8:6379 (cb028b83...) -> 5019 keys | 4096 slots | 1 slaves.
10.0.0.68:6379 (d6e2eca6...) -> 4948 keys | 4096 slots | 1 slaves.
10.0.0.48:6379 (d04e524d...) -> 5033 keys | 4096 slots | 1 slaves.
10.0.0.28:6379 (d34da866...) -> 5000 keys | 4096 slots | 1 slaves.
[OK] 20000 keys in 4 masters.
1.22 keys per slot on average.
>>> Performing Cluster Check (using node 10.0.0.8:6379)
M: cb028b83f9dc463d732f6e76ca6bbcd469d948a7 10.0.0.8:6379
   slots:[1365-5460] (4096 slots) master
   1 additional replica(s)
M: d6e2eca6b338b717923f64866bd31d42e52edc98 10.0.0.68:6379
   slots:[0-1364],[5461-6826],[10923-12287] (4096 slots) master
   1 additional replica(s)
   S: 36840d7eea5835ba540d9b64ec018aa3f8de6747 10.0.0.78:6379
   slots: (0 slots) slave
   replicates d6e2eca6b338b717923f64866bd31d42e52edc98
S: 9875b50925b4e4f29598e6072e5937f90df9fc71 10.0.0.58:6379
   slots: (0 slots) slave
   replicates d34da8666a6f587283a1c2fca5d13691407f9462
S: f9adcfb8f5a037b257af35fa548a26ffbadc852d 10.0.0.38:6379
   slots: (0 slots) slave
   replicates cb028b83f9dc463d732f6e76ca6bbcd469d948a7
M: d04e524daec4d8e22bdada7f21a9487c2d3e1057 10.0.0.48:6379
   slots:[6827-10922] (4096 slots) master
   1 additional replica(s)
S: 99720241248ff0e4c6fa65c2385e92468b3b5993 10.0.0.18:6379
   slots: (0 slots) slave
   replicates d04e524daec4d8e22bdada7f21a9487c2d3e1057
M: d34da8666a6f587283a1c2fca5d13691407f9462 10.0.0.28:6379
   slots:[12288-16383] (4096 slots) master
   1 additional replica(s)
[OK] All nodes agree about slots configuration.
>>> Check for open slots...
>>> Check slots coverage...
[OK] All 16384 slots covered.
#连接到任意集群节点,#最后1365个slot从10.0.0.8移动到第一个master节点10.0.0.28上
[root@redis-node1 ~]#redis-cli -a 123456 --cluster reshard 10.0.0.18:6379
Warning: Using a password with '-a' or '-u' option on the command line interface
may not be safe.
>>> Performing Cluster Check (using node 10.0.0.18:6379)
S: 99720241248ff0e4c6fa65c2385e92468b3b5993 10.0.0.18:6379
   slots: (0 slots) slave
   replicates d04e524daec4d8e22bdada7f21a9487c2d3e1057
S: f9adcfb8f5a037b257af35fa548a26ffbadc852d 10.0.0.38:6379
   slots: (0 slots) slave
   replicates cb028b83f9dc463d732f6e76ca6bbcd469d948a7
S: 36840d7eea5835ba540d9b64ec018aa3f8de6747 10.0.0.78:6379
   slots: (0 slots) slave
   replicates d6e2eca6b338b717923f64866bd31d42e52edc98
M: cb028b83f9dc463d732f6e76ca6bbcd469d948a7 10.0.0.8:6379
   slots:[1365-5460] (4096 slots) master
   1 additional replica(s)
M: d6e2eca6b338b717923f64866bd31d42e52edc98 10.0.0.68:6379
   slots:[0-1364],[5461-6826],[10923-12287] (4096 slots) master
   1 additional replica(s)
S: 9875b50925b4e4f29598e6072e5937f90df9fc71 10.0.0.58:6379
   slots: (0 slots) slave
   replicates d34da8666a6f587283a1c2fca5d13691407f9462
M: d04e524daec4d8e22bdada7f21a9487c2d3e1057 10.0.0.48:6379
   slots:[6827-10922] (4096 slots) master
   1 additional replica(s)
M: d34da8666a6f587283a1c2fca5d13691407f9462 10.0.0.28:6379
   slots:[12288-16383] (4096 slots) master
   1 additional replica(s)
[OK] All nodes agree about slots configuration.
>>> Check for open slots...
>>> Check slots coverage...
[OK] All 16384 slots covered.
How many slots do you want to move (from 1 to 16384)? 1356 #共4096/3分别给其它三个
master节点
What is the receiving node ID? d34da8666a6f587283a1c2fca5d13691407f9462 #master
10.0.0.28
Please enter all the source node IDs.
 Type 'all' to use all the nodes as source nodes for the hash slots.
 Type 'done' once you entered all the source nodes IDs.
Source node #1: cb028b83f9dc463d732f6e76ca6bbcd469d948a7 #输入要删除节点10.0.0.8的
ID
Source node #2: done
Ready to move 1356 slots.
 Source nodes:
   M: cb028b83f9dc463d732f6e76ca6bbcd469d948a7 10.0.0.8:6379
       slots:[1365-5460] (4096 slots) master
       1 additional replica(s)
 Destination node:
   M: d34da8666a6f587283a1c2fca5d13691407f9462 10.0.0.28:6379
       slots:[12288-16383] (4096 slots) master
       1 additional replica(s)
 Resharding plan:
   Moving slot 1365 from cb028b83f9dc463d732f6e76ca6bbcd469d948a7
......
 Moving slot 2719 from cb028b83f9dc463d732f6e76ca6bbcd469d948a7
   Moving slot 2720 from cb028b83f9dc463d732f6e76ca6bbcd469d948a7
Do you want to proceed with the proposed reshard plan (yes/no)? yes #确定
......
Moving slot 2718 from 10.0.0.8:6379 to 10.0.0.28:6379: ..
Moving slot 2719 from 10.0.0.8:6379 to 10.0.0.28:6379: .
Moving slot 2720 from 10.0.0.8:6379 to 10.0.0.28:6379: ..
#非交互式方式
#再将1365个slot从10.0.0.8移动到第二个master节点10.0.0.48上
[root@redis-node1 ~]#redis-cli -a 123456 --cluster reshard 10.0.0.18:6379 --
cluster-slots 1365 --cluster-from cb028b83f9dc463d732f6e76ca6bbcd469d948a7 --
cluster-to d04e524daec4d8e22bdada7f21a9487c2d3e1057 --cluster-yes
#最后的slot从10.0.0.8移动到第三个master节点10.0.0.68上
[root@redis-node1 ~]#redis-cli -a 123456 --cluster reshard 10.0.0.18:6379 --
cluster-slots 1375 --cluster-from cb028b83f9dc463d732f6e76ca6bbcd469d948a7 --
cluster-to d6e2eca6b338b717923f64866bd31d42e52edc98 --cluster-yes
#确认10.0.0.8的所有slot都移走了,上面的slave也自动删除,成为其它master的slave
[root@redis-node1 ~]#redis-cli -a 123456 --cluster check 10.0.0.8:6379
Warning: Using a password with '-a' or '-u' option on the command line interface
may not be safe.
10.0.0.8:6379 (cb028b83...) -> 0 keys | 0 slots | 0 slaves.
10.0.0.68:6379 (d6e2eca6...) -> 6631 keys | 5471 slots | 2 slaves.
10.0.0.48:6379 (d04e524d...) -> 6694 keys | 5461 slots | 1 slaves.
10.0.0.28:6379 (d34da866...) -> 6675 keys | 5452 slots | 1 slaves.
[OK] 20000 keys in 4 masters.
1.22 keys per slot on average.
>>> Performing Cluster Check (using node 10.0.0.8:6379)
M: cb028b83f9dc463d732f6e76ca6bbcd469d948a7 10.0.0.8:6379
   slots: (0 slots) master
M: d6e2eca6b338b717923f64866bd31d42e52edc98 10.0.0.68:6379
   slots:[0-1364],[4086-6826],[10923-12287] (5471 slots) master
   2 additional replica(s)
S: 36840d7eea5835ba540d9b64ec018aa3f8de6747 10.0.0.78:6379
   slots: (0 slots) slave
   replicates d6e2eca6b338b717923f64866bd31d42e52edc98
S: 9875b50925b4e4f29598e6072e5937f90df9fc71 10.0.0.58:6379
   slots: (0 slots) slave
   replicates d34da8666a6f587283a1c2fca5d13691407f9462
S: f9adcfb8f5a037b257af35fa548a26ffbadc852d 10.0.0.38:6379
   slots: (0 slots) slave
   replicates d6e2eca6b338b717923f64866bd31d42e52edc98
M: d04e524daec4d8e22bdada7f21a9487c2d3e1057 10.0.0.48:6379
   slots:[2721-4085],[6827-10922] (5461 slots) master
   1 additional replica(s)
S: 99720241248ff0e4c6fa65c2385e92468b3b5993 10.0.0.18:6379
   slots: (0 slots) slave
   replicates d04e524daec4d8e22bdada7f21a9487c2d3e1057
M: d34da8666a6f587283a1c2fca5d13691407f9462 10.0.0.28:6379
   slots:[1365-2720],[12288-16383] (5452 slots) master
   1 additional replica(s)
[OK] All nodes agree about slots configuration.
>>> Check for open slots...
>>> Check slots coverage...
[OK] All 16384 slots covered.
#原有的10.0.0.38自动成为10.0.0.68的slave
[root@redis-node1 ~]#redis-cli -a 123456 -h 10.0.0.68 INFO replication
Warning: Using a password with '-a' or '-u' option on the command line interface
may not be safe.
# Replication
role:master
connected_slaves:2
slave0:ip=10.0.0.78,port=6379,state=online,offset=129390,lag=0
slave1:ip=10.0.0.38,port=6379,state=online,offset=129390,lag=0
master_replid:43e3e107a0acb1fd5a97240fc4b2bd8fc85b113f
master_replid2:0000000000000000000000000000000000000000
master_repl_offset:129404
second_repl_offset:-1
repl_backlog_active:1
repl_backlog_size:1048576
repl_backlog_first_byte_offset:1
repl_backlog_histlen:129404
[root@centos8 ~]#redis-cli -a 123456 -h 10.0.0.8 --no-auth-warning cluster info
cluster_state:ok
cluster_slots_assigned:16384
cluster_slots_ok:16384
cluster_slots_pfail:0
cluster_slots_fail:0
cluster_known_nodes:8  #集群中8个节点
cluster_size:3         #少了一个主从的slot
cluster_current_epoch:16
cluster_my_epoch:13
cluster_stats_messages_ping_sent:3165
cluster_stats_messages_pong_sent:2489
cluster_stats_messages_fail_sent:6
cluster_stats_messages_auth-req_sent:5
cluster_stats_messages_auth-ack_sent:1
cluster_stats_messages_update_sent:27
cluster_stats_messages_sent:5693
cluster_stats_messages_ping_received:2483
cluster_stats_messages_pong_received:2400
cluster_stats_messages_meet_received:2
cluster_stats_messages_fail_received:2
cluster_stats_messages_auth-req_received:1
cluster_stats_messages_auth-ack_received:2
cluster_stats_messages_update_received:4
cluster_stats_messages_received:4894

 从集群中删除服务器

上面步骤完成后,槽位已经迁移走,但是节点仍然还属于集群成员,因此还需从集群删除该节点
注意: 删除服务器前,必须清除主机上面的槽位,否则会删除主机失败
Redis 3/4命令
[root@s~]#redis-trib.rb del-node <任意集群节点的IP>:6379
dfffc371085859f2858730e1f350e9167e287073
#dfffc371085859f2858730e1f350e9167e287073 是删除节点的ID
>>> Removing node dfffc371085859f2858730e1f350e9167e287073 from cluster
192.168.7.102:6379
>>> Sending CLUSTER FORGET messages to the cluster...
>>> SHUTDOWN the node


Redis 5以上版本命令:
[root@redis-node1 ~]#redis-cli -a 123456 --cluster del-node <任意集群节点的IP>:6379
cb028b83f9dc463d732f6e76ca6bbcd469d948a7
#cb028b83f9dc463d732f6e76ca6bbcd469d948a7是删除节点的ID
Warning: Using a password with '-a' or '-u' option on the command line interface
may not be safe.
>>> Removing node cb028b83f9dc463d732f6e76ca6bbcd469d948a7 from cluster
10.0.0.8:6379
>>> Sending CLUSTER FORGET messages to the cluster...
>>> SHUTDOWN the node.
#删除节点后,redis进程自动关闭
#删除节点信息
[root@redis-node1 ~]#rm -f /var/lib/redis/nodes-6379.conf


删除多余的slave节点验证结果
#验证删除成功
[root@redis-node1 ~]#ss -ntl
State       Recv-Q       Send-Q   Local Address:Port     Peer Address:Port

LISTEN       0             128            0.0.0.0:22             0.0.0.0:*

LISTEN       0             128               [::]:22               [::]:*
[root@redis-node1 ~]#redis-cli -a 123456 --cluster check 10.0.0.18:6379
Warning: Using a password with '-a' or '-u' option on the command line interface
may not be safe.
10.0.0.68:6379 (d6e2eca6...) -> 6631 keys | 5471 slots | 2 slaves.
10.0.0.48:6379 (d04e524d...) -> 6694 keys | 5461 slots | 1 slaves.
10.0.0.28:6379 (d34da866...) -> 6675 keys | 5452 slots | 1 slaves.
[OK] 20000 keys in 3 masters.
1.22 keys per slot on average.
>>> Performing Cluster Check (using node 10.0.0.18:6379)
S: 99720241248ff0e4c6fa65c2385e92468b3b5993 10.0.0.18:6379
   slots: (0 slots) slave
   replicates d04e524daec4d8e22bdada7f21a9487c2d3e1057
S: f9adcfb8f5a037b257af35fa548a26ffbadc852d 10.0.0.38:6379
   slots: (0 slots) slave
   replicates d6e2eca6b338b717923f64866bd31d42e52edc98
S: 36840d7eea5835ba540d9b64ec018aa3f8de6747 10.0.0.78:6379
   slots: (0 slots) slave
   replicates d6e2eca6b338b717923f64866bd31d42e52edc98
M: d6e2eca6b338b717923f64866bd31d42e52edc98 10.0.0.68:6379
   slots:[0-1364],[4086-6826],[10923-12287] (5471 slots) master
   2 additional replica(s)
S: 9875b50925b4e4f29598e6072e5937f90df9fc71 10.0.0.58:6379
   slots: (0 slots) slave
   replicates d34da8666a6f587283a1c2fca5d13691407f9462
M: d04e524daec4d8e22bdada7f21a9487c2d3e1057 10.0.0.48:6379
   slots:[2721-4085],[6827-10922] (5461 slots) master
   1 additional replica(s)
M: d34da8666a6f587283a1c2fca5d13691407f9462 10.0.0.28:6379
   slots:[1365-2720],[12288-16383] (5452 slots) master
   1 additional replica(s)
[OK] All nodes agree about slots configuration.
>>> Check for open slots...
>>> Check slots coverage...
[OK] All 16384 slots covered.
#删除多余的slave从节点
[root@redis-node1 ~]#redis-cli -a 123456 --cluster del-node 10.0.0.18:6379
f9adcfb8f5a037b257af35fa548a26ffbadc852d
Warning: Using a password with '-a' or '-u' option on the command line interface
may not be safe.
>>> Removing node f9adcfb8f5a037b257af35fa548a26ffbadc852d from cluster
10.0.0.18:6379
>>> Sending CLUSTER FORGET messages to the cluster...
>>> SHUTDOWN the node.
#删除集群文件
[root@redis-node4 ~]#rm -f /var/lib/redis/nodes-6379.conf
[root@redis-node1 ~]#redis-cli -a 123456 --cluster check 10.0.0.18:6379
Warning: Using a password with '-a' or '-u' option on the command line interface
may not be safe.
10.0.0.68:6379 (d6e2eca6...) -> 6631 keys | 5471 slots | 1 slaves.
10.0.0.48:6379 (d04e524d...) -> 6694 keys | 5461 slots | 1 slaves.
10.0.0.28:6379 (d34da866...) -> 6675 keys | 5452 slots | 1 slaves.
[OK] 20000 keys in 3 masters.
1.22 keys per slot on average.
>>> Performing Cluster Check (using node 10.0.0.18:6379)
S: 99720241248ff0e4c6fa65c2385e92468b3b5993 10.0.0.18:6379
   slots: (0 slots) slave
   replicates d04e524daec4d8e22bdada7f21a9487c2d3e1057
S: 36840d7eea5835ba540d9b64ec018aa3f8de6747 10.0.0.78:6379
   slots: (0 slots) slave
   replicates d6e2eca6b338b717923f64866bd31d42e52edc98
M: d6e2eca6b338b717923f64866bd31d42e52edc98 10.0.0.68:6379
 slots:[0-1364],[4086-6826],[10923-12287] (5471 slots) master
   1 additional replica(s)
S: 9875b50925b4e4f29598e6072e5937f90df9fc71 10.0.0.58:6379
   slots: (0 slots) slave
   replicates d34da8666a6f587283a1c2fca5d13691407f9462
M: d04e524daec4d8e22bdada7f21a9487c2d3e1057 10.0.0.48:6379
   slots:[2721-4085],[6827-10922] (5461 slots) master
   1 additional replica(s)
M: d34da8666a6f587283a1c2fca5d13691407f9462 10.0.0.28:6379
   slots:[1365-2720],[12288-16383] (5452 slots) master
   1 additional replica(s)
[OK] All nodes agree about slots configuration.
>>> Check for open slots...
>>> Check slots coverage...
[OK] All 16384 slots covered.
[root@redis-node1 ~]#redis-cli -a 123456 --cluster info 10.0.0.18:6379
Warning: Using a password with '-a' or '-u' option on the command line interface
may not be safe.
10.0.0.68:6379 (d6e2eca6...) -> 6631 keys | 5471 slots | 1 slaves.
10.0.0.48:6379 (d04e524d...) -> 6694 keys | 5461 slots | 1 slaves.
10.0.0.28:6379 (d34da866...) -> 6675 keys | 5452 slots | 1 slaves.
[OK] 20000 keys in 3 masters.
1.22 keys per slot on average.
#查看集群信息
[root@redis-node1 ~]#redis-cli -a 123456 -h 10.0.0.18 CLUSTER INFO
Warning: Using a password with '-a' or '-u' option on the command line interface
may not be safe.
cluster_state:ok
cluster_slots_assigned:16384
cluster_slots_ok:16384
cluster_slots_pfail:0
cluster_slots_fail:0
cluster_known_nodes:6  #只有6个节点
cluster_size:3
cluster_current_epoch:11
cluster_my_epoch:10
cluster_stats_messages_ping_sent:12147
cluster_stats_messages_pong_sent:12274
cluster_stats_messages_update_sent:14
cluster_stats_messages_sent:24435
cluster_stats_messages_ping_received:12271
cluster_stats_messages_pong_received:12147
cluster_stats_messages_meet_received:3
cluster_stats_messages_update_received:28
cluster_stats_messages_received:24449


导入现有Redis数据至集群
官方提供了迁移单个Redis节点数据到集群的工具,有些公司开发了离线迁移工具
官方工具: redis-cli --cluster import
第三方在线迁移工具: 模拟slave 节点实现, 比如: 唯品会 redis-migrate-tool , 豌豆荚 redis-port
导入适用场景:业务数据初始是放在单一节点的主机上,随着业务量上升,建立了redis 集群,需要将之前旧数据导入到新建的Redis cluster中.
注意: 导入数据需要redis cluster不能与被导入的数据有重复的key名称,否则导入不成功或中断。


基础环境准备
因为导入时不能指定验证密码,所以导入数据之前需要关闭所有Redis 节点的密码。
#在所有节点包括master和slave节点上关闭各Redis密码认证
[root@redis ~]# redis-cli -h 10.0.0.18 -p 6379 -a 123456 --no-auth-warning
CONFIG SET requirepass ""
OK


执行数据导入
将源Redis 节点的数据直接导入之 Redis cluster,此方式慎用!
Redis 3/4命令:
[root@redis ~]# redis-trib.rb import --from <外部Redis node-IP:PORT> --replace <集群服务器IP:PORT>

Redis 5以上版本命令:
[root@redis ~]#redis-cli --cluster import <集群服务器IP:PORT> --cluster-from <外部
Redis node-IP:PORT> --cluster-copy --cluster-replace
#只使用cluster-copy,则要导入集群中的key不能存在
#如果集群中已有同样的key,如果需要替换,可以cluster-copy和cluster-replace联用,这样集群中的key就会被替换为外部数据


范例:将非集群节点的数据导入redis cluster

#在非集群节点10.0.0.78生成数据
[root@centos8 ~]#hostname -I
10.0.0.78
[root@centos8 ~]#cat redis_test.sh
#!/bin/bash
#
#
#Author:   wangxiaochun
#QQ:   29308620
#Date:   2020-02-03
#FileName:   redis.sh
#URL:   http://www.wangxiaochun.com
#Description: The test script
#Copyright (C):     2020 All rights reserved
#
NUM=10
PASS=123456
for i in `seq $NUM`;do
   redis-cli -h 127.0.0.1 -a "$PASS"  --no-auth-warning  set testkey${i}
testvalue${i}
    echo "testkey${i} testvalue${i} 写入完成"
done
echo "$NUM个key写入到Redis完成"
[root@centos8 ~]#bash redis_test.sh
OK
testkey1 testvalue1 写入完成
OK
testkey2 testvalue2 写入完成
OK
testkey3 testvalue3 写入完成
OK
testkey4 testvalue4 写入完成
OK
testkey5 testvalue5 写入完成
OK
testkey6 testvalue6 写入完成
OK
testkey7 testvalue7 写入完成
OK
testkey8 testvalue8 写入完成
OK
testkey9 testvalue9 写入完成
OK
testkey10 testvalue10 写入完成
10个key写入到Redis完成
#取消需要导入的主机的密码
[root@centos8 ~]#redis-cli -h 10.0.0.78 -p 6379 -a 123456 --no-auth-warning
CONFIG SET requirepass ""
#取消所有集群服务器的密码
[root@centos8 ~]#redis-cli -h 10.0.0.8 -p 6379 -a 123456 --no-auth-warning
CONFIG SET requirepass ""
[root@centos8 ~]#redis-cli -h 10.0.0.18 -p 6379 -a 123456 --no-auth-warning
CONFIG SET requirepass ""
[root@centos8 ~]#redis-cli -h 10.0.0.28 -p 6379 -a 123456 --no-auth-warning
CONFIG SET requirepass ""
[root@centos8 ~]#redis-cli -h 10.0.0.38 -p 6379 -a 123456 --no-auth-warning
CONFIG SET requirepass ""
[root@centos8 ~]#redis-cli -h 10.0.0.48 -p 6379 -a 123456 --no-auth-warning
CONFIG SET requirepass ""
[root@centos8 ~]#redis-cli -h 10.0.0.58 -p 6379 -a 123456 --no-auth-warning
CONFIG SET requirepass ""
#导入数据至集群
#注意: Redis6.2.4版本在cluster集群的任意节点或非集群节点执行下面操作导入大量数据时都会出
现"Segmentation fault"的错误
#Redis6.2.4版本的集群导入大量数据时,如果是在非集群的外部节点Redis5执行下面操作却可以成功
#在CentOS8上的Redis5版本集群则没有此问题
[root@centos8 ~]#redis-cli --cluster import 10.0.0.8:6379 --cluster-from
10.0.0.78:6379 --cluster-copy --cluster-replace
>>> Importing data from 10.0.0.78:6379 to cluster 10.0.0.8:6379
>>> Performing Cluster Check (using node 10.0.0.8:6379)
M: a177c5cbc2407ebb6230ea7e2a7de914bf8c2dab 10.0.0.8:6379
   slots:[0-5461] (5462 slots) master
   1 additional replica(s)
M: 4f146b1ac51549469036a272c60ea97f065ef832 10.0.0.28:6379
 slots:[10923-16383] (5461 slots) master
   1 additional replica(s)
S: 779a24884dbe1ceb848a685c669ec5326e6c8944 10.0.0.48:6379
   slots: (0 slots) slave
   replicates 97c5dcc3f33c2fc75c7fdded25d05d2930a312c0
M: 97c5dcc3f33c2fc75c7fdded25d05d2930a312c0 10.0.0.18:6379
   slots:[5462-10922] (5461 slots) master
   1 additional replica(s)
S: 07231a50043d010426c83f3b0788e6b92e62050f 10.0.0.58:6379
   slots: (0 slots) slave
   replicates 4f146b1ac51549469036a272c60ea97f065ef832
S: cb20d58870fe05de8462787cf9947239f4bc5629 10.0.0.38:6379
   slots: (0 slots) slave
   replicates a177c5cbc2407ebb6230ea7e2a7de914bf8c2dab
[OK] All nodes agree about slots configuration.
>>> Check for open slots...
>>> Check slots coverage...
[OK] All 16384 slots covered.
* Importing 10 keys from DB 0
Migrating testkey4 to 10.0.0.18:6379: OK
Migrating testkey8 to 10.0.0.18:6379: OK
Migrating testkey6 to 10.0.0.28:6379: OK
Migrating testkey1 to 10.0.0.8:6379: OK
Migrating testkey5 to 10.0.0.8:6379: OK
Migrating testkey10 to 10.0.0.28:6379: OK
Migrating testkey7 to 10.0.0.18:6379: OK
Migrating testkey9 to 10.0.0.8:6379: OK
Migrating testkey2 to 10.0.0.28:6379: OK
Migrating testkey3 to 10.0.0.18:6379: OK
#验证数据
[root@centos8 ~]#redis-cli -h 10.0.0.8 keys '*'
1) "testkey5"
2) "testkey1"
3) "testkey9"
[root@centos8 ~]#redis-cli -h 10.0.0.18 keys '*'
1) "testkey8"
2) "testkey4"
3) "testkey3"
4) "testkey7"
[root@centos8 ~]#redis-cli -h 10.0.0.28 keys '*'
1) "testkey6"
2) "testkey10"
3) "testkey2"


集群偏斜
redis cluster 多个节点运行一段时间后,可能会出现倾斜现象,某个节点数据偏多,内存消耗更大,或者接受
用户请求访问更多
发生倾斜的原因可能如下:
节点和槽分配不均
不同槽对应键值数量差异较大
包含bigkey,建议少用
内存相关配置不一致
热点数据不均衡 : 一致性不高时,可以使用本缓存和MQ

获取指定槽位中对应键key值的个数
#redis-cli cluster countkeysinslot {slot的值}


范例: 获取指定slot对应的key个数
[root@centos8 ~]#redis-cli -a 123456 cluster countkeysinslot 1
(integer) 0
[root@centos8 ~]#redis-cli -a 123456 cluster countkeysinslot 2
(integer) 0
[root@centos8 ~]#redis-cli -a 123456 cluster countkeysinslot 3
(integer) 1


执行自动的槽位重新平衡分布,但会影响客户端的访问,此方法慎用
#redis-cli --cluster rebalance <集群节点IP:PORT>


范例: 执行自动的槽位重新平衡分布

[root@centos8 ~]#redis-cli -a 123456 --cluster rebalance 10.0.0.8:6379
>>> Performing Cluster Check (using node 10.0.0.8:6379)
[OK] All nodes agree about slots configuration.
>>> Check for open slots...
>>> Check slots coverage...
[OK] All 16384 slots covered.
* No rebalancing needed! All nodes are within the 2.00% threshold.


获取bigkey ,建议在slave节点执行
#redis-cli --bigkeys


范例: 查找 bigkey
[root@centos8 ~]#redis-cli -a 123456 --bigkeys
# Scanning the entire keyspace to find biggest keys as well as
# average sizes per key type. You can use -i 0.1 to sleep 0.1 sec
# per 100 SCAN commands (not usually needed).
[00.00%] Biggest string found so far 'key8811' with 9 bytes
[26.42%] Biggest string found so far 'testkey1' with 10 bytes
-------- summary -------
Sampled 3335 keys in the keyspace!
Total key length in bytes is 22979 (avg len 6.89)
Biggest string found 'testkey1' has 10 bytes
3335 strings with 29649 bytes (100.00% of keys, avg size 8.89)
0 lists with 0 items (00.00% of keys, avg size 0.00)
0 sets with 0 members (00.00% of keys, avg size 0.00)
0 hashs with 0 fields (00.00% of keys, avg size 0.00)
0 zsets with 0 members (00.00% of keys, avg size 0.00)
0 streams with 0 entries (00.00% of keys, avg size 0.00)


 Redis cluster 的局限性
3.3.6.1 集群的读写分离
在集群模式下的从节点是只读连接的,也就是说集群模式中的从节点是拒绝任何读写请求的。当有命令
尝试从slave节点获取数据时,slave节点会重定向命令到负责该数据所在槽的节点。
为什么说是只读连接呢?因为slave可以执行命令:readonly,这样从节点就能读取请求,但是这只是在
这次连接中生效。也就是说,当客户端断开连接重启后,再次请求又变成重定向了。
集群模式下的读写分离更加复杂,需要维护不同主节点的从节点和对于槽的关系。
通常是不建议在集群模式下构建读写分离,而是添加节点来解决需求。不过考虑到节点之间信息交流带
来的带宽问题,官方建议节点数不超过1000个。


单机,哨兵和集群的选择
大多数时客户端性能会”降低”
命令无法跨节点使用:mget、keys、scan、flush、sinter等
客户端维护更复杂:SDK和应用本身消耗(例如更多的连接池)
不支持多个数据库︰集群模式下只有一个db 0
复制只支持一层∶不支持树形复制结构,不支持级联复制
Key事务和Lua支持有限∶操作的key必须在一个节点,Lua和事务无法跨节点使用
所以集群搭建还要考虑单机redis是否已经不能满足业务的并发量,在redis sentinel同样能够满足高可
用,且并发并未饱和的前提下,搭建集群反而是画蛇添足了。


范例: 跨slot的局限性
[root@centos8 ~]#redis-cli -a 123456 mget key1 key2 key3
Warning: Using a password with '-a' or '-u' option on the command line interface
may not be safe.
(error) CROSSSLOT Keys in request don't hash to the same slot
第五天-常见面试题
常见面试题
Redis 做什么的,即在哪些场景下使用
如果监控 Redis 是否出现故障
Redis客户端timeout报错突然增加,排查思路是怎样的?
请简单描述pipeline功能,为什么pipeline功能会提升redis性能?
本地redis-client访问远程Redis服务出错,说出几种常见的错误?
key-value的大小超大或单key的qps超高,会对Redis本身造成什么样的影响、会对访问Redis的其
他客户端造成什么样的影响?
Zabbix 监控 Redis 哪些监控项
RDB和AOF持久化区别
docker拉取一个Redis如何实现数据持久化保存
Redis 支持哪些数据类型
Redis 如何实现消息队列
描述下常见的redis集群架构有哪些,他们之间的优缺点对比
主从复制工作原理
Redis 如何实现高可用
哨兵工作原理
Redis 集群的工作原理
Redis 集群如果避免脑裂
Redis 集群最少几个节点为什么?
Redis的集群槽位多少个
Redis集群中某个节点缺少一个槽位是否能使用
Redis数据写入的时候是怎么在各个节点槽位分配数据的
Redis的数据存储是以什么样的方式存储
Redis集群的各槽位和总槽位之间什么关系


Redis是什么,应用场景:
Redis是一种开源、内存中的数据存储系统,也被称为数据结构服务器。它支持多种数据结构(如字符串、哈希、列表、集合、有序集合、Bitmaps、HyperLogLogs等),并提供持久化、复制、事务、Lua脚本等功能。Redis常用于缓存、实时排行榜、计数器、消息队列、社交网络Feed流、Session共享、Geo地理位置索引等多种场景。

监控Redis是否出现故障:
可以通过监控Redis的响应时间、内存使用情况、CPU负载、磁盘IO、连接数、主从复制延迟等关键指标来判断Redis是否出现故障。此外,Sentinel(哨兵)也能监控Redis节点状态,并在主节点故障时自动完成故障转移。

Redis客户端timeout报错排查思路:
1. 检查网络连接是否正常,如防火墙、路由、DNS等问题。
2. 检查Redis服务器资源是否耗尽,如内存满载、CPU过高等导致无法及时响应请求。
3. 查看Redis服务器的慢查询日志,分析是否有耗时较长的操作。
4. 确认Redis客户端配置的超时时间和服务器响应时间是否匹配,适当调整客户端超时时间。
5. 检查Redis服务器是否出现阻塞,如AOF fsync阻塞、大量客户端连接排队等待等。

Pipeline功能及提升性能原因:
Pipeline功能允许客户端一次性发送多个命令并在服务器端依次执行,而无需等待每个命令的回复,最后一次性返回所有命令的执行结果。这样减少了网络往返次数,显著提高了Redis操作的吞吐量和效率。

本地Redis-client访问远程Redis服务出错的常见错误:
1. 网络问题,如主机名解析失败、网络不通等。
2. 认证失败,如密码错误或无权限访问。
3. 端口错误,Redis服务未在预期端口监听。
4. Redis服务器挂掉或未启动。

key-value大小超大或单key qps超高带来的影响:
1. 对Redis自身的影响:可能导致内存占用过大,影响Redis性能;单key的高qps可能引发热点问题,加大CPU压力,甚至影响其他key的读写速度。
2. 对其他客户端的影响:大量内存消耗可能导致Redis响应变慢,进而影响其他客户端的请求响应时间;高qps操作可能挤占带宽资源,影响其他客户端的通信质量。

Zabbix监控Redis的监控项:
1. 连接数(Connections)
2. 内存使用情况(Memory usage)
3. 主从复制延迟(Replication lag)
4. CPU使用率(CPU usage)
5. 响应时间(Response time)
6. 慢查询(Slow log)
7. 错误日志监控(Error logs)

RDB和AOF持久化区别:
1. RDB(Redis Database)持久化是周期性地将内存中的数据生成快照(snapshot)保存到磁盘,优点是恢复速度快,占用空间相对较小,缺点是在两次持久化间隔期间可能出现数据丢失。
2. AOF(Append Only File)持久化则是把每次写操作以命令形式追加到文件中,优点是数据完整性好,几乎不会丢失数据,缺点是文件大小增长较快,恢复速度相对较慢。

Docker拉取Redis实现数据持久化保存:
在Docker中,可以通过挂载宿主机目录至容器内部的Redis数据目录来实现持久化,例如在运行容器时加上 `-v /host/path:/data` 参数,其中 `/host/path` 是宿主机目录,`/data` 是Redis容器内数据存储目录。

Redis支持的数据类型:
String、List、Set、Sorted Set、Hash、Bitmaps、HyperLogLogs、Geospatial、Stream等。

Redis实现消息队列:
利用List数据结构,生产者使用LPUSH或RPUSH将消息放入队列,消费者使用BRPOP或BLPOP从队列中取出并消费消息。

常见的Redis集群架构及其优缺点对比:
1. 主从复制架构:一个主节点,多个从节点,主节点负责写入,从节点负责读取。优点是可以提高读性能和数据冗余备份,缺点是只有一个写入口,写性能受限且主节点故障恢复复杂。
2. Redis Sentinel(哨兵):通过哨兵监控主从集群,实现自动故障转移。优点是高可用性强,能够自动切换主节点,缺点是增加了系统的复杂度。
3. Redis Cluster:采用分布式架构,数据分片存储在多个节点上。优点是扩展性强,可水平扩展,缺点是需要处理数据分区的问题,客户端需兼容集群特性。

主从复制工作原理:
主节点将数据同步给从节点,从节点不断向主节点发送命令,请求最新的数据。当主节点执行写命令时,会将命令传播给从节点,从而保证主从数据一致性。

Redis如何实现高可用:
通过主从复制配合Sentinel(哨兵)机制,或者使用Redis Cluster自带的自动故障转移功能,都能实现在主节点故障时自动切换到从节点继续提供服务。

哨兵工作原理:
哨兵是一组运行在单独的Redis实例上的进程,它们持续监控主从集群的状态,当主节点发生故障时,哨兵之间通过投票选择新的主节点,并将这一变化通知给其他的从节点和客户端。

Redis集群的工作原理:
Redis集群采用数据分片(sharding)技术,将数据分散存储在多个节点上,每个节点只负责一定范围的槽(slot)。客户端在写入或读取数据时,会根据Key计算出槽位置,然后定位到对应的节点进行操作。

Redis集群如何避免脑裂:
Redis Cluster通过Quorum机制和Node majority投票策略来避免脑裂(split-brain)问题,只有获得大多数节点认可的主节点才能有效进行写操作,以此防止在网络分区情况下产生两个主节点的情况。

Redis集群最少几个节点:
Redis Cluster至少需要3个主节点,因为每个主节点至少需要一个从节点来达到多数派投票要求,所以至少需要6个节点(3主3从)。

Redis集群槽位数量:
Redis Cluster默认将键空间分为16384个槽位。

Redis集群中某个节点缺少一个槽位是否能使用:
不能完全使用,因为这意味着某些Key可能无法定位到正确的节点上进行操作。要确保所有槽位都有节点负责,集群才能正常工作。

Redis数据写入时的槽位分配:
客户端根据Key计算CRC16散列值,然后模以16384,得到的余数就是该Key所属的槽位编号,根据槽位编号确定数据写入哪个节点。

Redis数据存储方式:
Redis将数据存储在内存中,并可以根据配置选择不同的持久化方式(RDB或AOF)将内存中的数据定期或实时写入磁盘。

Redis集群的各槽位和总槽位之间的关系:
Redis集群将所有可能的Key映射到0至16383共16384个槽位上,每个槽位都可以被集群中的任何一个节点“拥有”。客户端根据Key计算出槽位号后,会找到拥有该槽位的节点进行数据操作。这种设计使得Redis集群能够将数据均匀地分布在多个节点上,实现水平扩展。
redis学习故障案例
故障1:
(integer) 11840 10.0.1.172:6379> set name wang (error) MISCONF Redis is configured to save RDB snapshots, but it is currently not able to persist on disk. Commands that may modify the data set are disabled, because this instance is configured to report errors during writes if RDB snapshotting fails (stop-writes-on-bgsave-error option). Please check the Redis logs for details about the RDB error.


解决:
由于服务器配置为在RDB快照保存失败时报告错误(stop-writes-on-bgsave-error选项启用),所以命令执行失败。在redis配置文件中改为no,问题解决


故障2:redis配置主从复制不成功


解决:版本不一致,redis配置主从复制版本须一致,才可以,否则很容易出现问题


故障3:redis主从复制配置后,用keys * 查询不到任何数据?


解决:在slave上设置master的密码,才可以同步


故障4:[root@redis ~]# ll /apps/redis/etc/redis.conf -rw-r--r-- 1 redis redis 93787 Apr 19 00:15 /apps/redis/etc/redis.conf [root@redis ~]# systemctl restart redis.service Job for redis.service failed because the control process exited with error code. See "systemctl status redis.service" and "journalctl -xe" for details. [root@redis ~]# journalctl -xe Apr 19 10:19:33 redis systemd[1]: Failed to start Redis persistent key-value database. Apr 19 10:19:33 redis systemd[1]: Unit redis.service entered failed state. Apr 19 10:19:33 redis systemd[1]: redis.service failed. Apr 19 10:19:33 redis polkitd[517]: Unregistered Authentication Agent for unix-process:11 Apr 19 10:20:01 redis systemd[1]: Created slice User Slice of root. Apr 19 10:20:01 redis systemd[1]: Started Session 8 of user root. Apr 19 10:20:01 redis CROND[11356]: (root) CMD (/usr/sbin/ntpdate ntp1.aliyun.com >/dev/n Apr 19 10:20:02 redis polkitd[517]: Registered Authentication Agent for unix-process:1135 Apr 19 10:20:02 redis systemd[1]: Starting Redis persistent key-value database... Apr 19 10:20:02 redis systemd[1]: redis.service: main process exited, code=exited, status Apr 19 10:20:02 redis systemd[1]: Failed to start Redis persistent key-value database. Apr 19 10:20:02 redis systemd[1]: Unit redis.service entered failed state. Apr 19 10:20:02 redis systemd[1]: redis.service failed. Apr 19 10:20:02 redis polkitd[517]: Unregistered Authentication Agent for unix-process:11 Apr 19 10:20:09 redis systemd[1]: Removed slice User Slice of root.


redis日志信息
11365:C 19 Apr 2024 10:20:02.807 * Supervised by systemd. Please make sure you set appropriate values for TimeoutStartSec and TimeoutStopSec in your service unit. 11365:C 19 Apr 2024 10:20:02.807 # oO0OoO0OoO0Oo Redis is starting oO0OoO0OoO0Oo 11365:C 19 Apr 2024 10:20:02.807 # Redis version=6.2.5, bits=64, commit=00000000, modified=0, pid=11365, just started 11365:C 19 Apr 2024 10:20:02.807 # Configuration loaded 11365:M 19 Apr 2024 10:20:02.807 * monotonic clock: POSIX clock_gettime 11365:M 19 Apr 2024 10:20:02.808 # Warning: Could not create server TCP listening socket 10.0.1.174:6379: bind: Cannot assign requested address 11365:M 19 Apr 2024 10:20:02.808 # Failed listening on port 6379 (TCP), aborting.


解决:redis配置文件里绑定的bind地址不是本机的ip地址,所以无法重新启动,修改为本机的ip地址即可


故障5:主从硬件和软件配置不一致

主从节点的maxmemory不一致,主节点内存大于从节点内存,主从复制可能丢失数据
rename-command 命令不一致,如在主节点启用flushdb,从节点禁用此命令,结果在master节点执行
flushdb后,导致slave节点不同步

解决:#在从节点定义rename-command flushall "",但是在主节点没有此配置,则当在主节点执行flushall
时,会在从节点提示下面同步错误
10822:S 16 Oct 2020 20:03:45.291 # == CRITICAL == This replica is sending an
error to its master: 'unknown command `flushall`, with args beginning with: '
after processing the command '<unknown>'
#master有一个rename-command flushdb "magedu",而slave没有这个配置,则同步时从节点可以看到
以下同步错误
3181:S 21 Oct 2020 17:34:50.581 # == CRITICAL == This replica is sending an
error to its master: 'unknown command `magedu`, with args beginning with: ' after
processing the command '<unknown>'


故障6:master密码错误

解决:
如果slave节点配置的master密码错误,导致验证不通过,自然将无法建立主从同步关系。

[root@centos8 ~]#tail -f /var/log/redis/redis.log
24930:S 20 Feb 2020 13:53:57.029 * Connecting to MASTER 10.0.1.172:6379
24930:S 20 Feb 2020 13:53:57.030 * MASTER <-> REPLICA sync started
24930:S 20 Feb 2020 13:53:57.030 * Non blocking connect for SYNC fired the
event.
24930:S 20 Feb 2020 13:53:57.030 * Master replied to PING, replication can
continue...
24930:S 20 Feb 2020 13:53:57.031 # Unable to AUTH to MASTER: -ERR invalid
password


故障7:Redis版本不一致


解决:
不同的redis 版本之间尤其是大版本间可能会存在兼容性问题,如:Redis 3,4,5,6之间
因此主从复制的所有节点应该使用相同的版本


故障8:安全模式下无法远程连接


解决:
如果开启了安全模式,并没有设置bind地址和密码,会导致无法远程连接
[root@centos8 ~]#vim /etc/redis.conf
#bind 127.0.0.1   #将此行注释
[root@centos8 ~]#systemctl restart redis
[root@centos8 ~]#ss -ntl
State       Recv-Q       Send-Q       Local Address:Port         Peer
Address:Port
LISTEN       0             128                 0.0.0.0:22
0.0.0.0:*
LISTEN       0             100               127.0.0.1:25
0.0.0.0:*
LISTEN       0             128                 0.0.0.0:6379
0.0.0.0:*
LISTEN       0             128                   [::]:22
[::]:*
LISTEN       0             100                   [::1]:25
[::]:*
LISTEN       0             128                   [::]:6379
[::]:*
[root@centos8 ~]#redis-cli -h 10.0.1.172
10.0.1.172:6379> KEYS *
(error) DENIED Redis is running in protected mode because protected mode is
enabled, no bind address was specified, no authentication password is requested
to clients. In this mode connections are only accepted from the loopback
interface. If you want to connect from external computers to Redis you may adopt
one of the following solutions: 1) Just disable protected mode sending the
command 'CONFIG SET protected-mode no' from the loopback interface by connecting
to Redis from the same host the server is running, however MAKE SURE Redis is not
publicly accessible from internet if you do so. Use CONFIG REWRITE to make this
change permanent. 2) Alternatively you can just disable the protected mode by
editing the Redis configuration file, and setting the protected mode option to
'no', and then restarting the server. 3) If you started the server manually just
for testing, restart it with the '--protected-mode no' option. 4) Setup a bind
address or an authentication password. NOTE: You only need to do one of the
above things in order for the server to start accepting connections from the
outside.
10.0.0.38:6379> exit
#可以本机登录
[root@centos8 ~]#redis-cli
127.0.0.1:6379> KEYS *
(empty list or set)


故障9:


解决:


 1740
1740

 被折叠的 条评论
为什么被折叠?
被折叠的 条评论
为什么被折叠?
 到【灌水乐园】发言


