


系统的安装
参考质料:http://spotpear.cn/public/index/study/detail/id/781.html
rockpi设备树的配置
这个可以控制rockpi的针脚使用哪种输入输出方式
目前使用了i2c和uart两种模式
具体参考:https://wiki.radxa.com/Rock3/dev/libmraa
overlays=rk3568-uart7 rk3568-i2c3-m0
root@rock3a:~# cat /boot/uEnv.txt
verbosity=7
overlay_prefix=rockchip
rootfstype=ext4
fdtfile=rockchip/rk3568-rock-3-a.dtb
overlays=rk3568-uart7rk3568-i2c3-m0
rootuuid=ee2ce23a-e0b1-4625-a54b-6ce12c167e97
initrdsize=0x81bfa9
kernelversion=4.19.193-16-rockchip-g0cca7bdf9cdb
initrdimg=initrd.img-4.19.193-16-rockchip-g0cca7bdf9cdb
kernelimg=vmlinuz-4.19.193-16-rockchip-g0cca7bdf9cdb
远程连接
准备工作
将一根网线一端连接ROCK 3A,另一端连接路由器的LAN端口
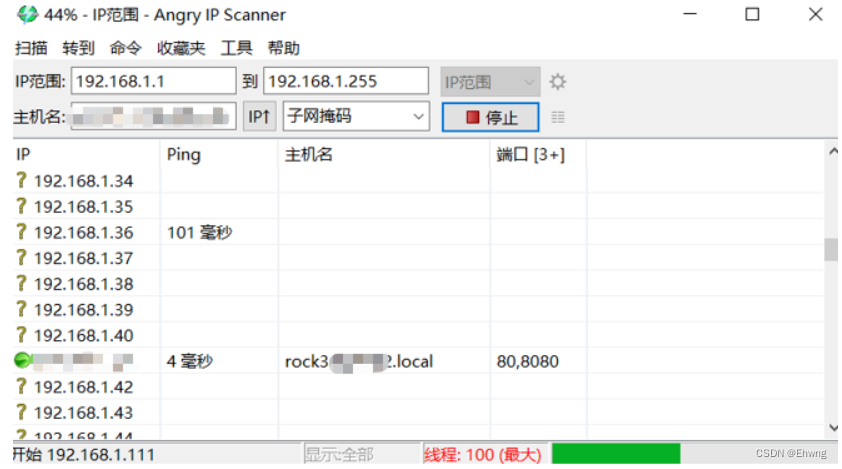
获取ROCK3 Model A的IP地址
-
登录路由器查找ROCK3 Model A的IP地址。
-
在电脑cmd终端使用ping命令查找,打开cmd终端输入:
ping -4 rock-3a.local -
使用官方工具搜索,下载连接:
https://github.com/angryip/ipscan/releases/download/3.8.2/ipscan-3.8.2-setup.exe
找到rock3a.loacl的ip
4.使用自己的远程连接工具连接(没有的话,使用参考资料内的工具即可)
使用更新apt-get
这个是使用国区镜像更新包(不使用可能安装包和更新很慢,和更新失败)
sudo vim /etc/apt/sources.list.d/apt-radxa-com.list
将文件内容改为
#deb http://apt.radxa.com/buster-stable/ buster main
#deb http://apt.radxa.com/buster-testing/ buster main
deb https://radxa-apt.aghost.cn/buster-stable/ buster main
deb https://radxa-apt.aghost.cn/buster-testing/ buster main
(不使用中国镜像也需要改为)
deb http://apt.radxa.com/buster-stable/ buster main
deb http://apt.radxa.com/buster-testing/ buster main
然后更新apt
sudo apt-get update
允许root登录
修改配置文件(当有时候找不到命令的时候都可以使用whereis 命令 查找命令是否安装和安装的位置,然后参考:https://blog.csdn.net/weixin_42189798/article/details/119902242)
vim /etc/ssh/sshd_config
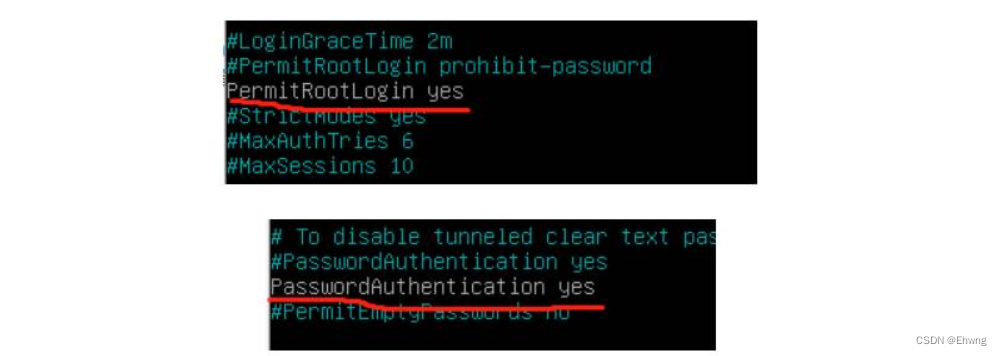
PermitRootLogin yes
上面这一句后面改为yes,表示允许root用户登录
PasswordAuthentication yes
这一句表示,允许用密码登录
然后重启ssh服务
service sshd restart
登录绕过登录界面直接进入系统
1.进入文件夹
cd /etc/lightdm/
2.找ightdm.conf文件(应该有,没有就创建一个)
在文件中添加以下内容
[Seat:*]
autologin-guest=false
autologin-user=用户名(以自己的)
autologin-user-timeout=0
这里有个非常细节的问题,用户名中有大写字母的也应该写成小写,要不然系统没法识别。
然后,在命令行输入
sudo groupadd -r autologin
sudo gpasswd -a 用户名(用自己的) autologin
中文字符的安装
安装中文支持
第一步,先进行相关更新:
sudo apt-get update
第二步:为debian系统安装中文字库:
sudo apt-get install ttf-wqy-microhei
第三步:我们可以更改系统中文显示指令是: (locales需要另外安装)
sudo apt-get install locales
sudo dpkg-reconfigure locales
空格键勾选 “zhCN” 的选项,保证 “zhCN.UTF-8” 被选中,同使在local字库选择“zh_CN.UTF-8”
vnc远程登录
参考:https://wiki.radxa.com/Rock/vnc
需要自己下载vncviewer
sudo apt-get install tightvncserver
- 第一次运行设置密码: vncserver
You will require a password to access your desktops.

Password:                                        #(输入远程连接密码)
Warning: password truncated to the length of 8.
Verify:                                           #(确认密码)
Would you like to enter a view-only password (y/n)? n       #(这里输入n)
xauth:  file /root/.Xauthority does not exist

New 'X' desktop is radxa:1

Creating default startup script /root/.vnc/xstartup
Starting applications specified in /root/.vnc/xstartup
Log file is /root/.vnc/radxa:1.log
2.编辑 ~/.vnc/xstartup 文件,添加两行
#startlubuntu &
lxsession -e LXDE -s Lubuntu &
#!/bin/sh
xrdb $HOME/.Xresources
xsetroot -solid grey
#x-terminal-emulator -geometry 80x24+10+10 -ls -title "$VNCDESKTOP Desktop" &
#x-window-manager &
#startlubuntu &
lxsession -e LXDE -s Lubuntu &
# Fix to make GNOME work
export XKL_XMODMAP_DISABLE=1
/etc/X11/Xsession
vncserver -kill :1   //删除桌面1
vncserver           //开启桌面连接
3.使用vncviewer远程连接
开机自启vnc(开机自动启动目前未使用,因为开启后远程连接能登录,但是在rockpi上连接屏幕登录不了)
自带的开机启动没有成功!,反而会报没有权限错误
使用update-rc.d的方式开机启动脚本
sudo vim /etc/init.d/tightvncserver
#!/bin/sh
export USER='rock'
eval cd ~$USER
case "$1" in
  start)
    # 启动命令行。此处自定义分辨率、控制台号码或其它参数。
    su $USER -c '/usr/bin/vncserver -depth 24 -geometry 1024x768 :1'
    echo "Starting VNCServer for $USER "
    ;;
  stop)
    # 终止命令行。此处控制台号码与启动一致。
    su $USER -c '/usr/bin/vncserver -kill :1'
    echo "VNCServer stopped"
    ;;
  *)
    echo "Usage: /etc/init.d/vncserver {start|stop}"
    exit 1
    ;;
esac
exit 0
sudo chmod 755 /etc/init.d/tightvncserver
sudo update-rc.d tightvncserver  start 99 5
sudo update-rc.d tightvncserver  defaults 99   //开机自启
sudo update-rc.d tightvncserver remove    //移除自启
环境安装
DotNet安装
- 进入/tmp临时目录
cd /tmp
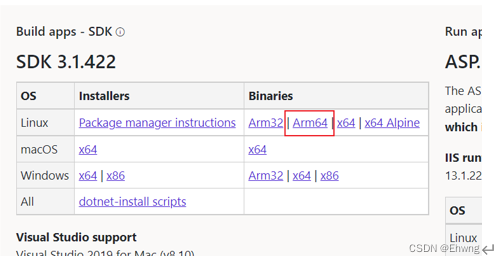
- 下载时可以选择 .NET runtime,或 ASP.NET Core Runtime。后者包含运行Web应用的库。使用 wget 下载压缩包
第一种方法:
wget https://download.visualstudio.microsoft.com/download/pr/fdf76122-e9d5-4f66-b96f-4dd0c64e5bea/d756ca70357442de960db145f9b4234d/dotnet-sdk-3.1.422-linux-arm64.tar.gz
第二种直接先在计算机下载好包,然后使用sftp上传
https://dotnet.microsoft.com/en-us/download/dotnet/3.1
选择arm64版本下载
3. 在 /usr/local 目录下创建一个目录,叫 dotnet。
sudo mkdir /usr/local/dotnet
- 解压刚刚下载的压缩包,放到 /usr/local/dotnet 目录下面。
sudo tar -zxf dotnet-sdk-3.1.422-linux-arm64.tar.gz -C /usr/local/dotnet
-z 参数表示使用 gz 算法,-x 表示解压,-f 表示要解压的文件,三个参数合起来就是 -zxf。注意 -C 参数是大写的,表示工作目录,也就是你要解压到哪个目录,此处解压到 /usr/local/dotnet 目录下。
5. 在 /etc/profile 文件中加入以下内容。
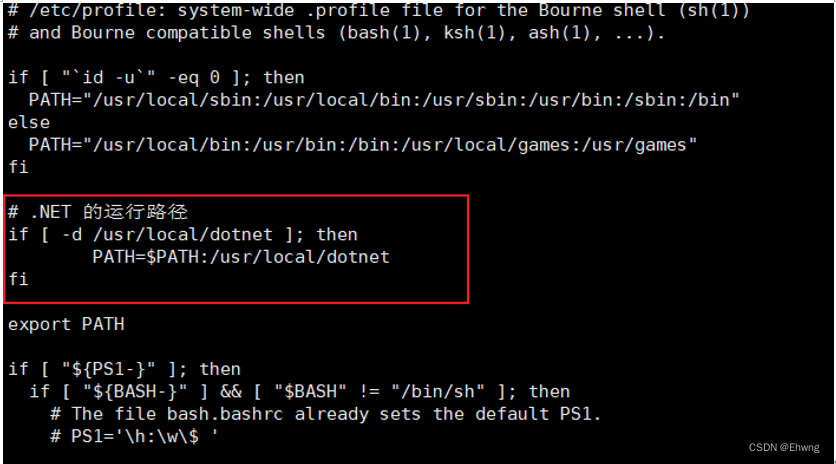
# .NET
if [ -d /usr/local/dotnet ]; then
 PATH=$PATH:/usr/local/dotnet
fi
位置是在 PATH 环境变量导出之前,将 dotnet 运行时的路径追加上去。即在 export 命令之前。保存并退出就OK了。
设置 PATH 变量放在 /etc/profile 中比放在 bash 的资源文件中好一些。放在bash资源中需要你登录终端时才执行,而且只在当前会话期间可用。放在 /etc/profile 中就成了“全局”了,只要顺利登入系统都有效。
在任意路径下执行 dotnet --info,如果有以下输出,那就成功了。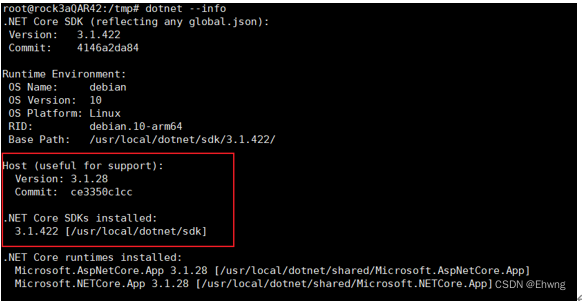
使用命令dotnot 打包后的dll文件
dotnet testA.dll
Nginx安装
1.apt-get install nginx(使用国区镜像应该可以安装成功不成功,可以多尝试apt-get update之后在使用安装命令多安装几次。还是不行可以尝试一下这个文章:https://www.php.cn/nginx/488924.html)
2.查看是否安装成功
nginx -v //出现版本号即完成安装
3.启动
server nginx restart
4.打开浏览器输入ip,成功看到欢迎页
Vue项目部署到Nginx
- 前端打包dist
- 上传到服务器上
- 找到nginx.conf文件 (可以使用whereis nginx查找),目前是在/etc/nginx下面
- 修改配置文件,在http内加入server配置
server {
        listen 8080;     //端口
        server_name localhost;
        root /usr/HISTRON.QAR/WEB;  //上传到的路径
        index index.html;
        location / {
        #需要指向下面的@router否则会出现vue的路由在nginx中刷新出现404
        try_files $uri $uri/ @router;
        index  index.html index.htm;
        }
        location /prod-api/{
        proxy_set_header Host $http_host;
        proxy_set_header X-Real-IP $remote_addr;
        proxy_set_header REMOTE-HOST $remote_addr;
        proxy_set_header X-Forwarded-For $proxy_add_x_forwarded_for;
        proxy_pass http://localhost:8080/;  # 后端接口
        }
        #对应上面的@router,主要原因是路由的路径资源并不是一个真实的路径,所以无法找到具体的文件
        #因此需要rewrite到index.html中,然后交给路由在处理请求资源
        location @router {
        rewrite ^.*$ /index.html last;
        }
}
开机自动开启网页全屏
vim /etc/init.d/webapp
/usr/bin/chromium/chromium浏览器位置
#/bin/sh
/usr/bin/chromium/chromium "127.0.0.1:8080" -kiosk
sudo chmod 755 /etc/init.d/webapp
系统设置开机选项中添加当前脚本

在添加哪里找到编写的脚本进行添加,重启就完成了


 438
438

 被折叠的 条评论
为什么被折叠?
被折叠的 条评论
为什么被折叠?
 到【灌水乐园】发言


