


一.:准备(1~9)
1:虚拟机安装 & 配置:
1)配置虚拟机上网:
2)配置静态 IP 地址:
-:https://blog.csdn.net/qq_43056248/article/details/123930880
2:Nginx 介绍:
1)版本介绍:

2)安装:
-1:环境:
-- 安装 c语言 编译器
yum install -y gcc

-- 安装 perl 库
yum install -y pcre-devel

-- 安装 zlib库
yum install -y zlib zlib-devel
-2:下载:http://nginx.org/en/download.html
-3:安装:
-- 解压
tar -zxvf nginx-1.21.0.tar.gz

-- 编译 & 安装
./configure --prefix=/usr/local/bin/nginx/
make
make install

-- 启动
cd /usr/local/bin/nginx/sbin/
./nginx
-4:关闭防火墙后,访问:(127.0.0.1:80)
3)命令:
./nginx 		// 启动
./nginx -s stop		// 快速停止
./nginx -s quit		// 优雅的关闭,(退出前完成已接收的连接请求)
./nginx -s reload	// 重新加载配置,(优雅关闭并重启)
4)用脚本访问,Nginx 变成系统服务:
-1:设置脚本:
-2:重新加载系统服务:(systemctl daemon-reload)
-3:启动:(systemctl start nginx)
5)目录结构:
-1:
-2:
-3:
-4:
-5:
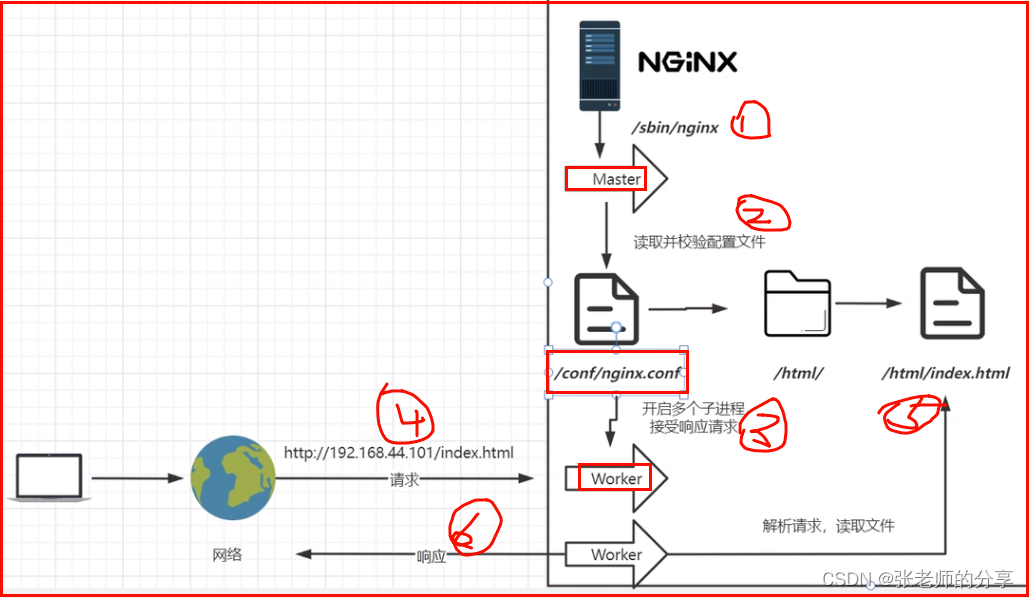
6)基本运行原理:
-1:开启主进程,读取配置文件并校验。并负责协调多个子进程。
-2:主进程,开启多个子进程,接受响应。
二.:Nginx 基础配置(10~18)
1:最小配置文件:(简单解读)
# 工作的进程个数(启动 nginx时,启动多少个工作线程)
#(数量最好:对应服务器核心数)
worker_processes  1;

# 事件驱动模块
events {

	# 每个 工作进程,可以创建 1024 个连接
    worker_connections  1024;
}

# http 模块
http {

	# 引入外部配置文件(返回请求时,增加的请求头,告诉浏览器此文件的类型)
    include       mime.types;
    # 如果上面文件不能解析类型,返回浏览器的,默认类型
    default_type  application/octet-stream;

	# 数据零拷贝(免除了一次中间拷贝环节)
    sendfile        on;
    # 连接超时时间
    keepalive_timeout  65;

	# server (虚拟主机)模块,配置监听请求,可通过端口号区分。
    server {

    	# 监听 端口号
        listen       80;
        # 可配置:(域名 / 主机名)
        server_name  localhost;

		# 路径(uri)
        location / {

            root   html;	# 相对路径
            index  index.html index.htm;	# 默认页
        }

		# 发生服务器端错误返回
        error_page   500 502 503 504  /50x.html;
        location = /50x.html {

            root   html;
        }
    }
}
2):
-1:
-2:
-3:
-4:
-5:
3):
-1:
-2:
-3:
-4:
-5:
4):
-1:
-2:
-3:
-4:
-5:
5):
-1:
-2:
-3:
-4:
-5:
2:核心配置:
1):
-1:
-2:
-3:
-4:
-5:
2):
-1:
-2:
-3:
-4:
-5:
3):
-1:
-2:
-3:
-4:
-5:
4):
-1:
-2:
-3:
-4:
-5:
5):
-1:
-2:
-3:
-4:
-5:
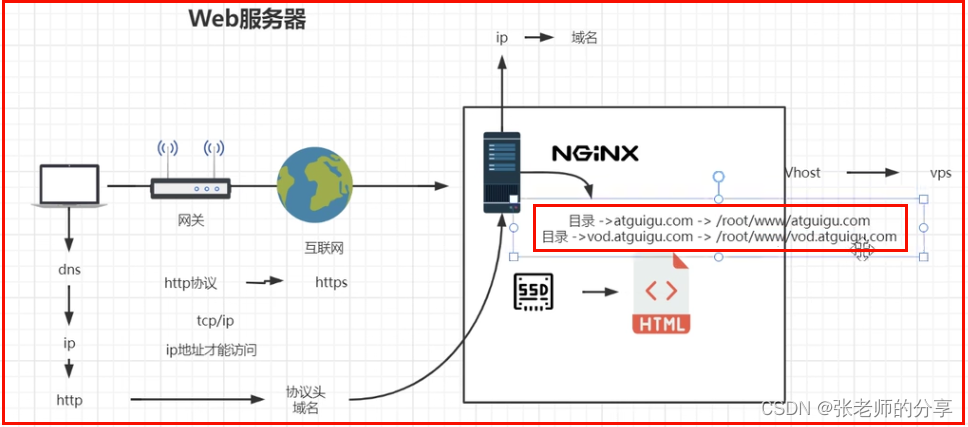
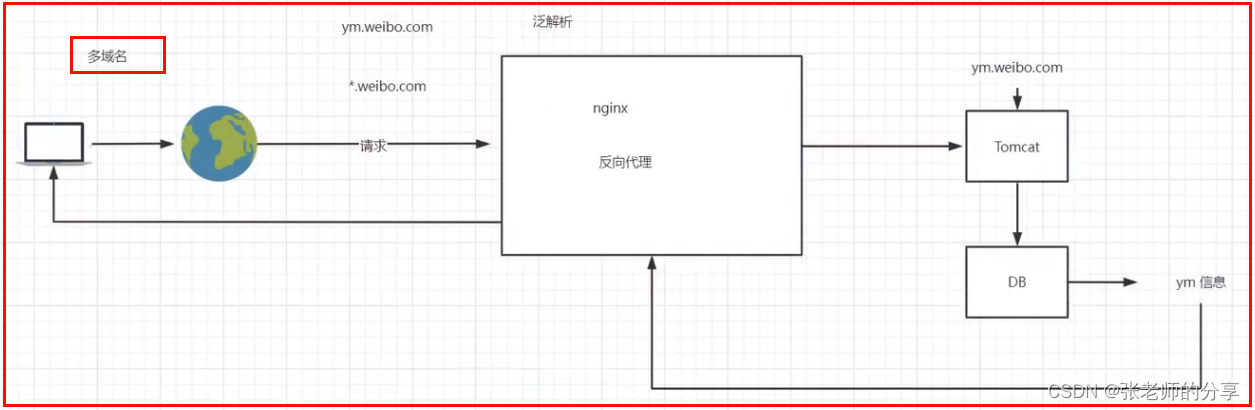
3:虚拟主机 & 域名解析:
1)(域名、dns、ip)地址关系:
2)(浏览器、Nginx、Http协议):
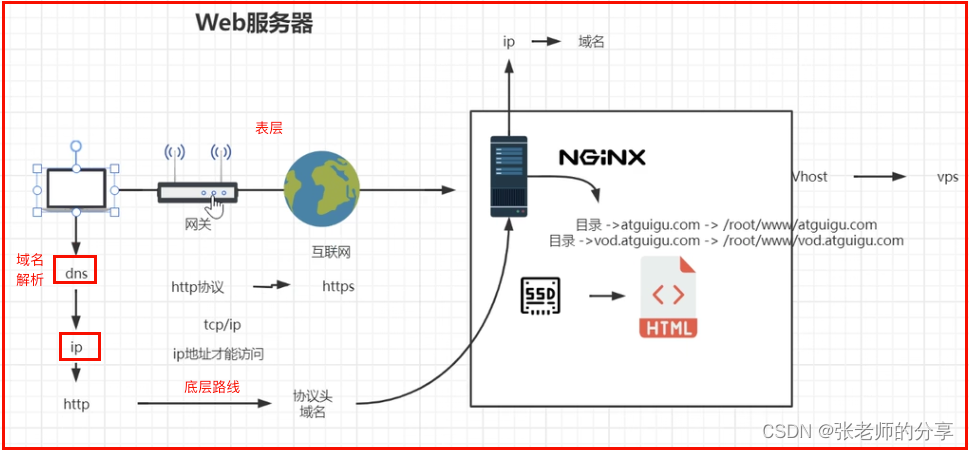
3)虚拟主机原理:
4)【域名解析 & 泛域名解析(*.xx.com) 】实战:
-1:hosts 配置:
# ngnix
192.168.124.38 www.s.com
192.168.124.38 www.a.s.com
-2:配置外网域名:(需购买并配置)

5)域名解析相关,企业项实战技术架构:
-1:servername 配置规则:

-2:配置实例:
    server {

        listen       80;
        server_name  www.s.com;
        location / {

            root   /wod;
            index  index.html index.htm;
        }
    }

    server {

        listen       80;
        server_name  *.a.s.com;
        location / {

            root   /www;
            index  index.html index.htm;
        }
    }
-3:多域名配置:
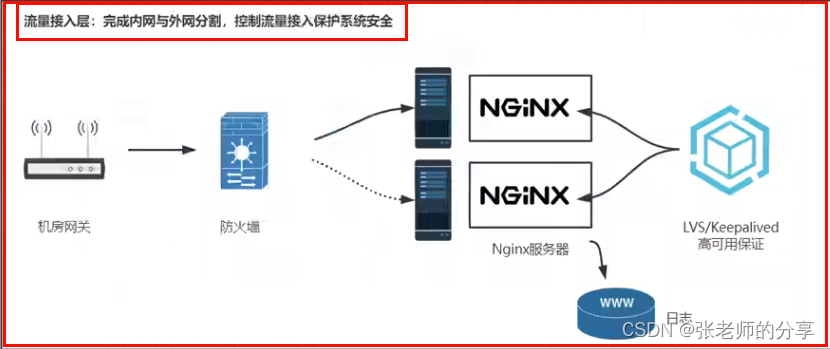
三.:反向代理 & 负载均衡 & 动静分离(19~31)
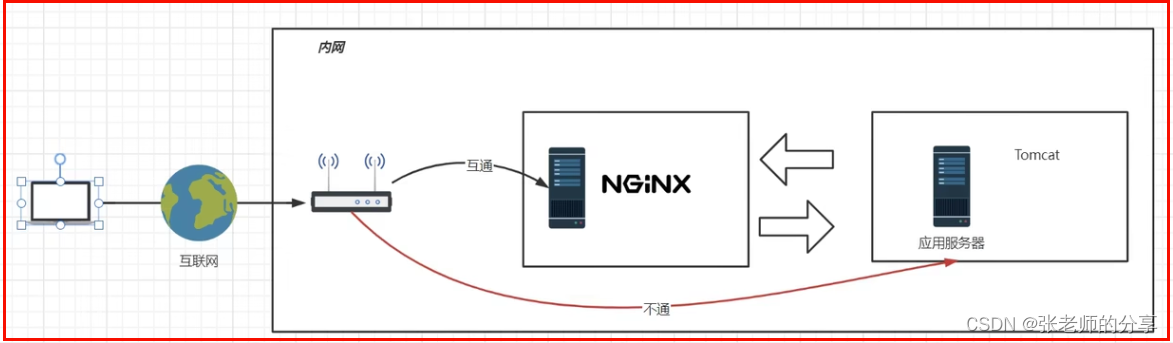
1:反向代理:
1)网关、代理、反向代理:
-1:反向代理流程图:(隧道时模型)
-2:还有一个软件:lvs
2)反向代理,在系统架构中的应用场景:
3)Nginx 的反向代理配置:
  2 worker_processes  1;
  3 events {

  4     worker_connections  1024;
  5 }
  6
  7 http {

  8     include       mime.types;
  9     default_type  application/octet-stream;
 10     sendfile        on;
 11     keepalive_timeout  65;
 12
 13     server {

 14         listen       80;
 15         server_name  localhost;
 16
 17         location / {

 				# 配置转发路径
 18             proxy_pass http://www.baidu.com;
 19         }
 20     }
 21 }
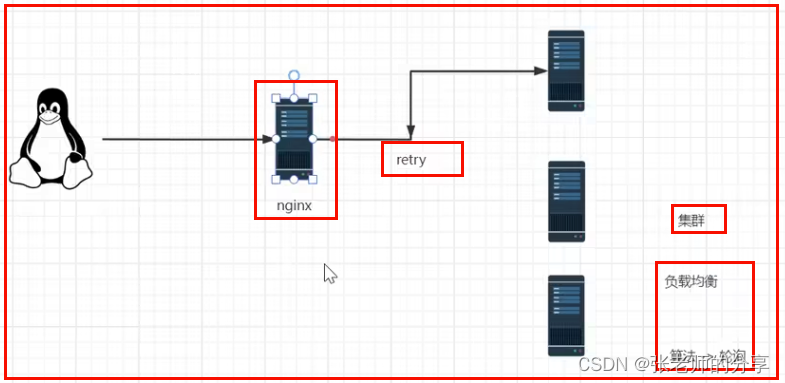
2:负载均衡:
1)基于反向代理的,负载均衡器:
-1:retry 重试机制:(访问此服务器失败,去访问下一个服务器)
-2:图示:
2)负载均衡策略:(都不常用)
down:某些机器不参与负载均衡。
backup:没有机器可用时,才会使用。
-1:轮询:默认
-2:权重:
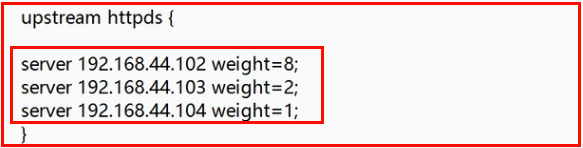
-3:ip_hash:根据客户端ip地址,转发到访问过的服务器。
-4:fair:第三方,根据服务端响应时间,自动配置权重。(有流量倾斜风险 )
-5:使用 lurl 脚本方式:在 Nginx 里编程,动态管理列表。
3):
4)代码实现:
  2 worker_processes  1;
  3 events {

  4     worker_connections  1024;
  5 }
  6
  7 http {

  8     include       mime.types;
  9     default_type  application/octet-stream;
 10     sendfile        on;
 11     keepalive_timeout  65;
 12
 13    upstream loadbalance {

 14         server 114.215.173.88:80;
 15         server 114.215.173.88:81;
 16     }
 17
 18     server {

 19         listen       80;
 20         server_name  localhost;
 21
 22         location / {

 23             proxy_pass http://loadbalance;
 24         }
 25     }
 26 }
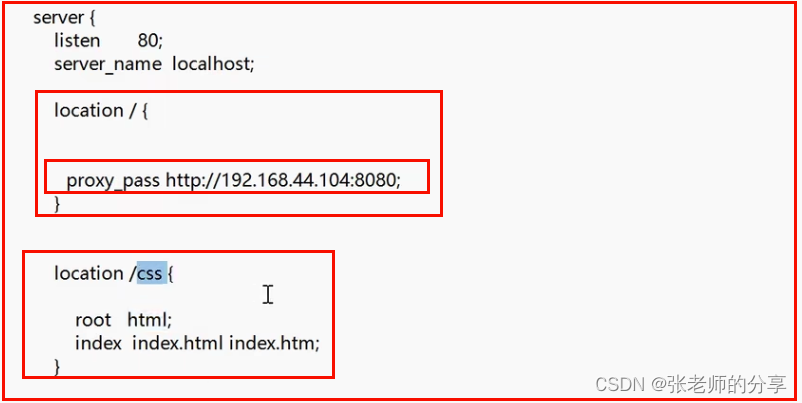
3:动静分离:
1)使用场景:
-1:只适合中小型网站使用,(并发量低,静态资源少)的情况。
2)动静分离原理:

3)代码实现:
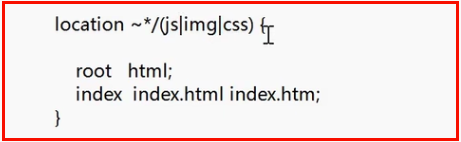
4)使用正则配置动静分离:
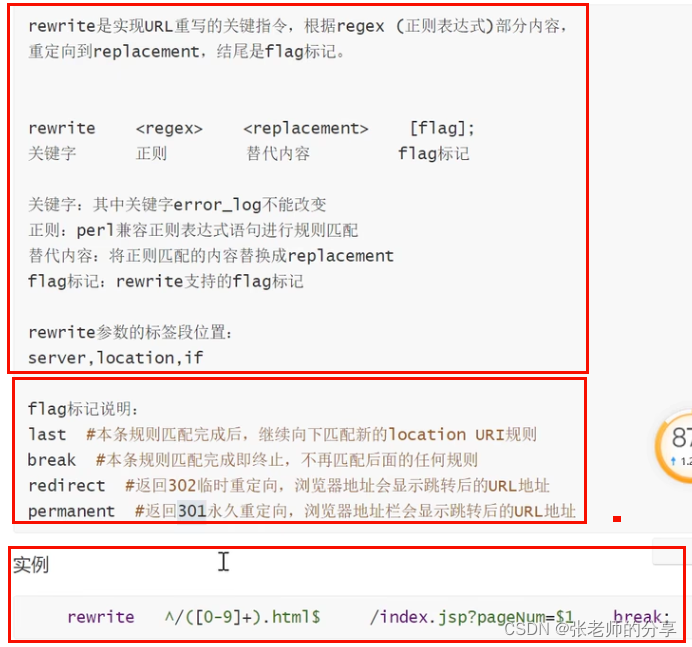
4:URL Rewrite:
1)使用场景:
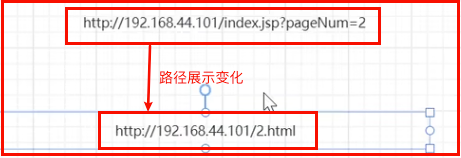
2)配置方式:

3)负载均衡 + URLRewrite:
-1:网关:
a:应用服务器开启防火墙。
b:配置指定端口 和 IP访问。
-2:在网关上配置 URLRewirite:
 最低0.47元/天 解锁文章


 被折叠的 条评论
为什么被折叠?
被折叠的 条评论
为什么被折叠?
 到【灌水乐园】发言


