


一.:简介(1~6)
1:课程介绍:
1)基本概念:
-1:什么是 Sharding Sphere?
1)官网:https://shardingsphere.apache.org/index_zh.html
2)是什么:
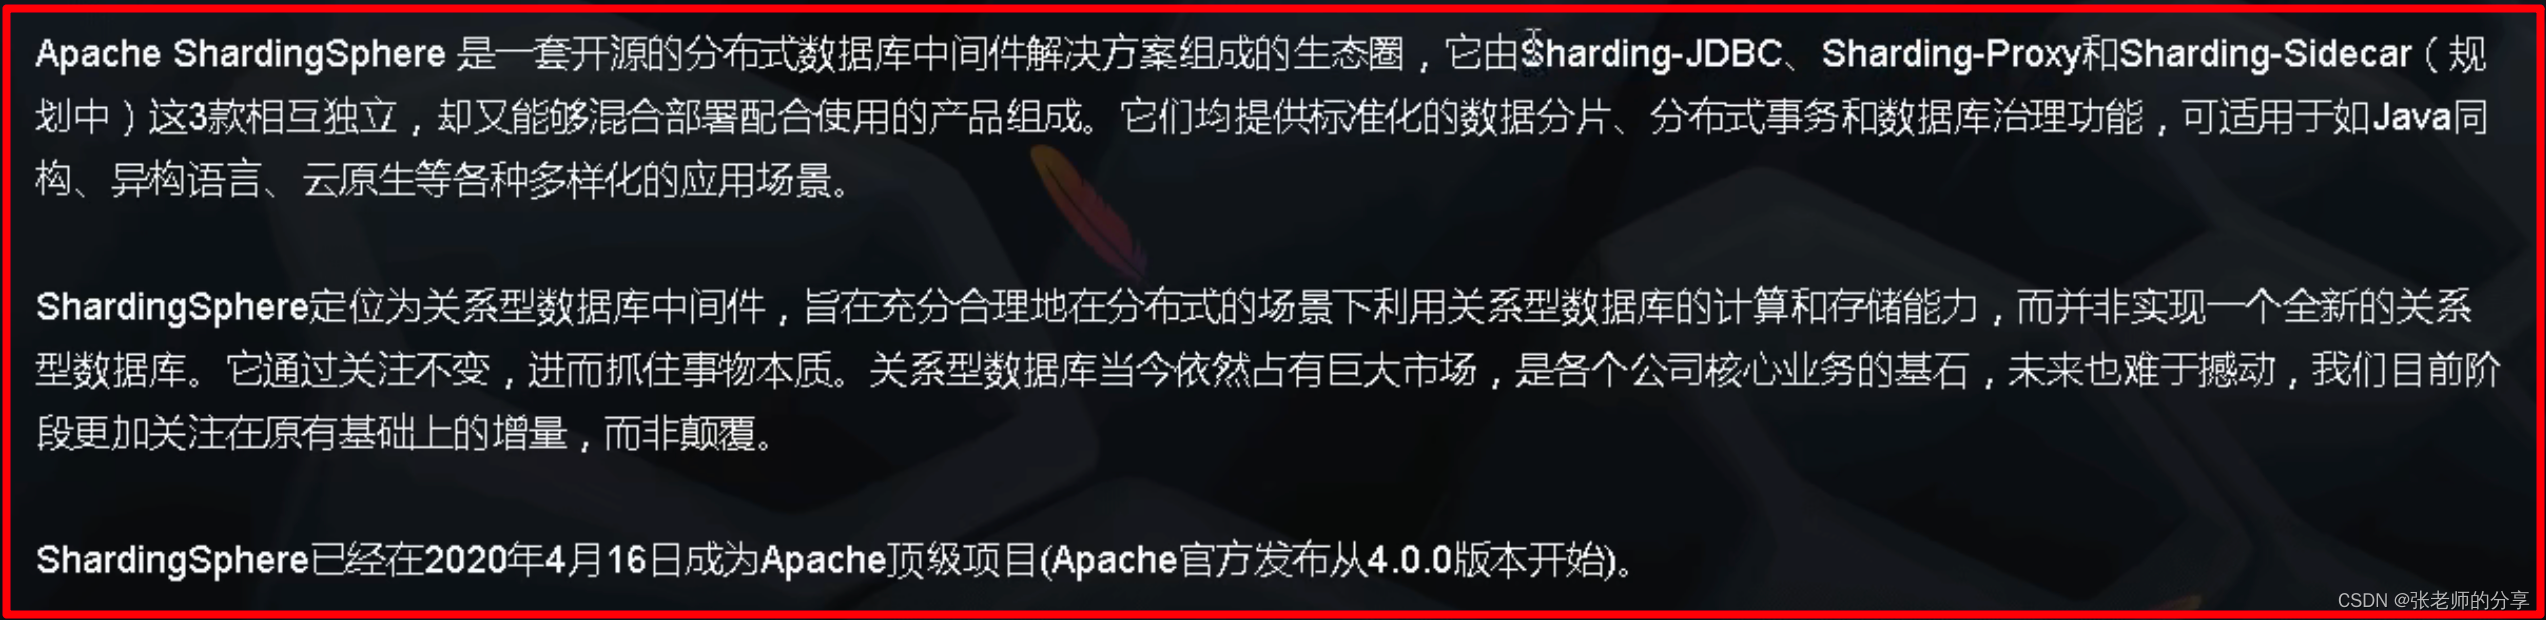
1、一套开源的,分布式数据库,中间件解决方案。
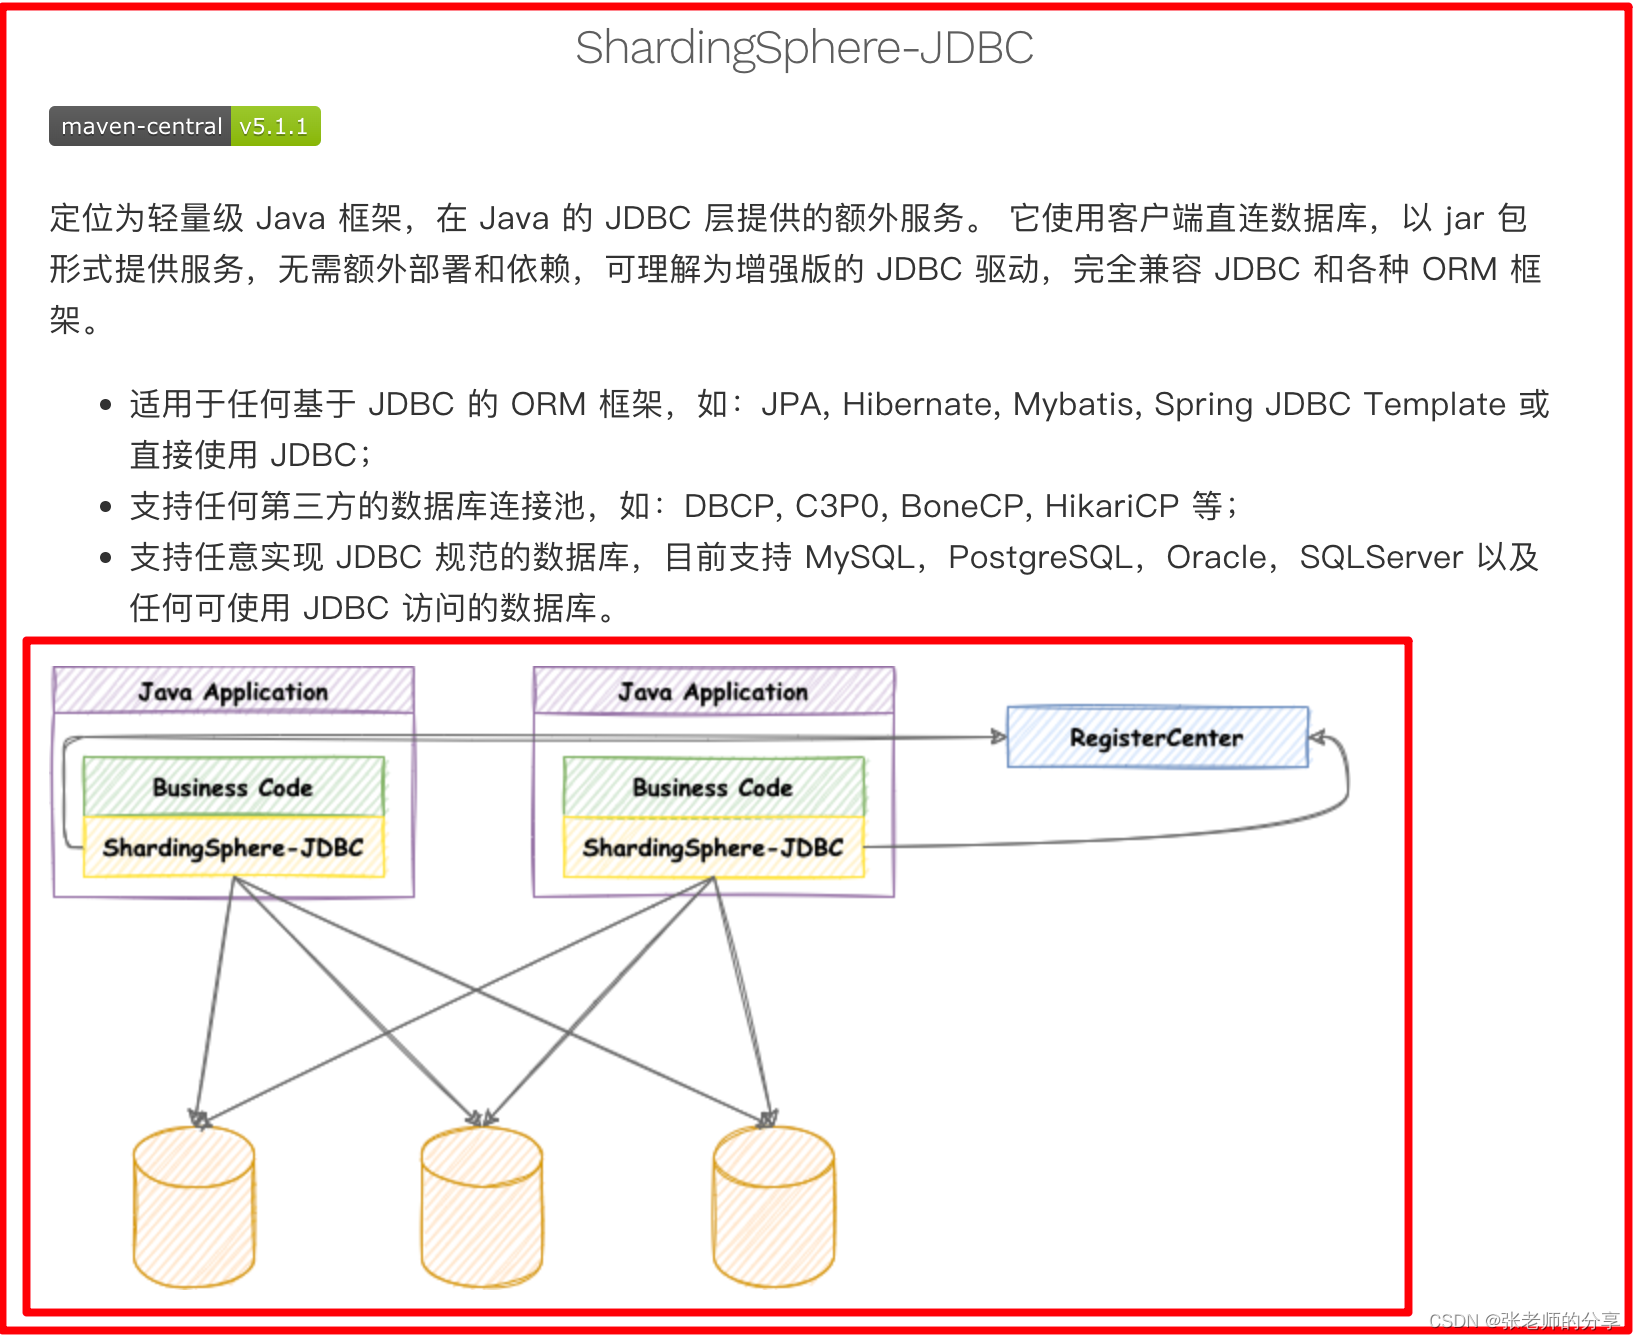
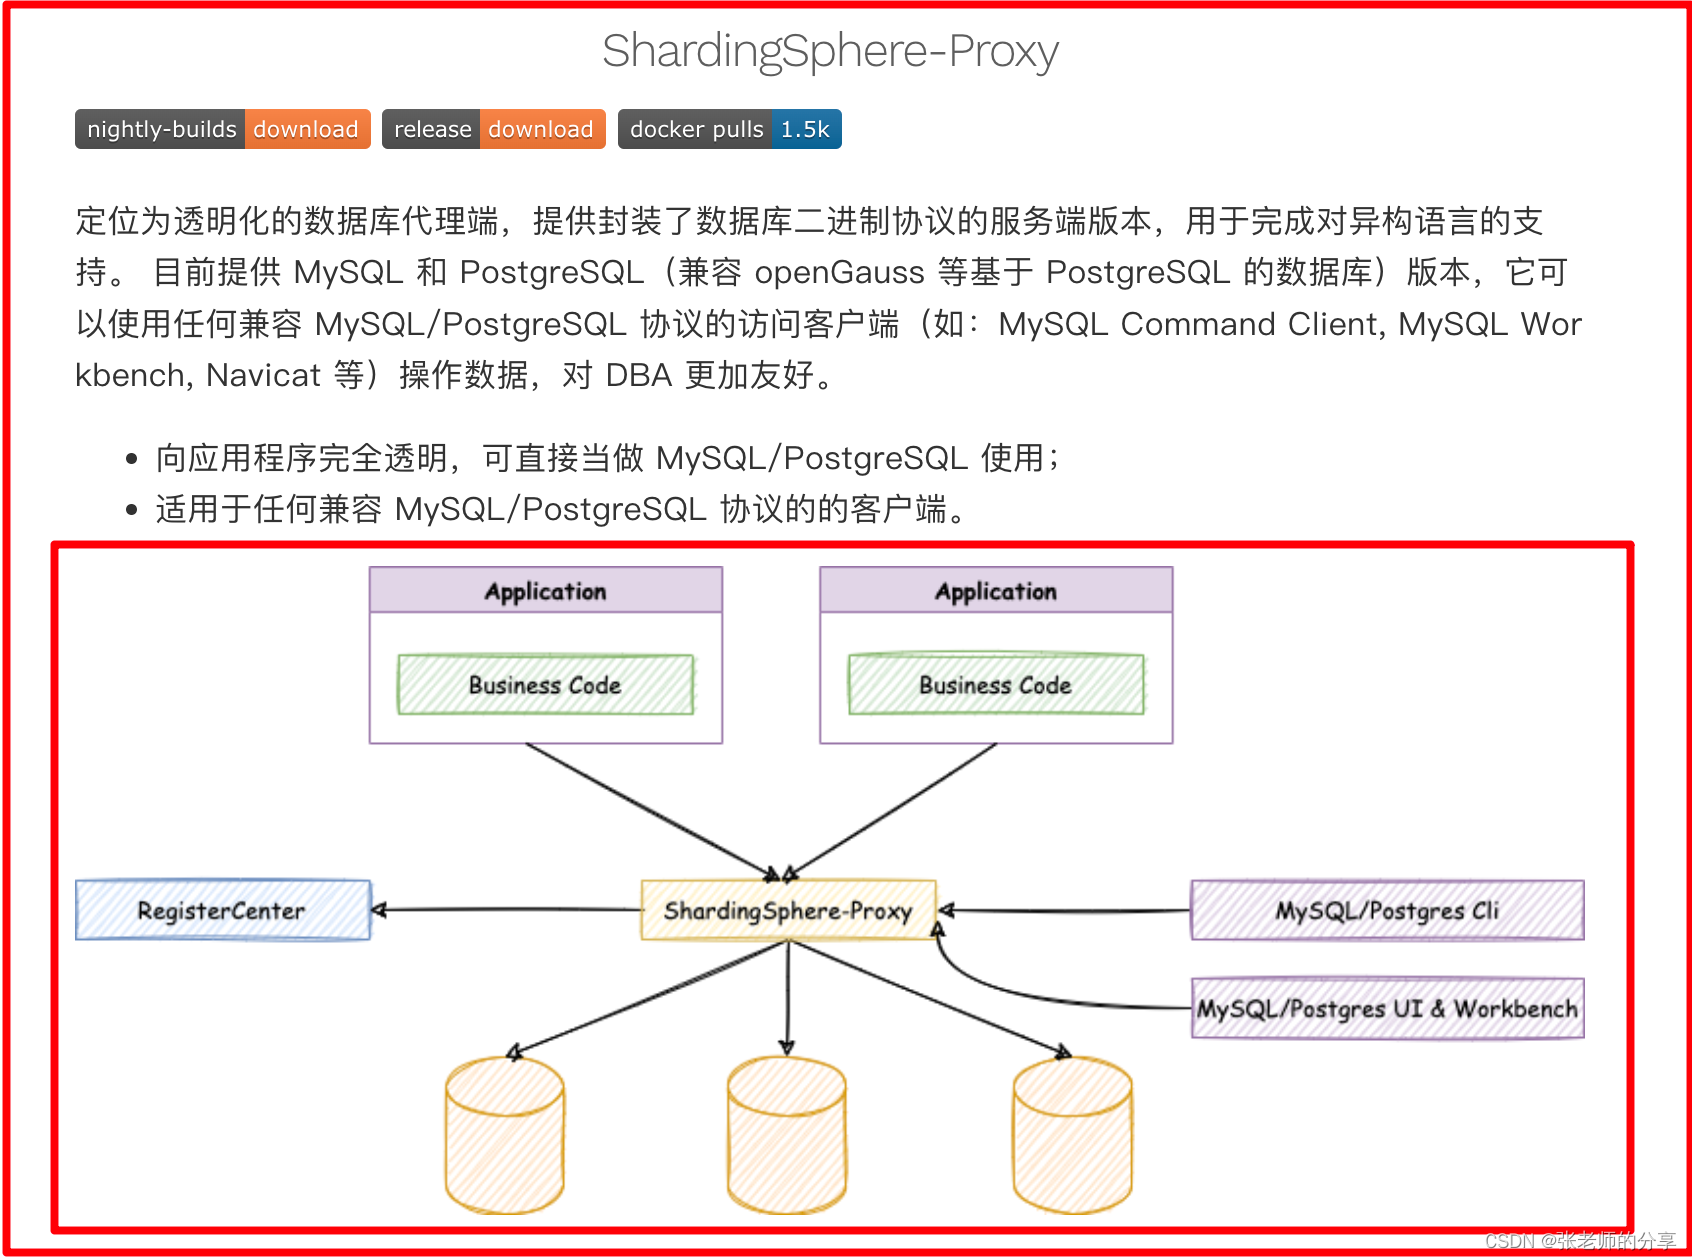
2、有三个产品:(Sharding-JDBC)(Sharding-Proxy)(Sharding-Sidecar)
2、定位为关系型数据库的一个中间件。合理在分布式环境下,使用关系型数据库操作。
3)主要学:(Sharding-JDBC)(Sharding-Proxy)
-2:分库分表:
2)Sharding-JDBC 分库分表操作:
3)Sharding-Proxy 分库分表操作:
4)Sharding-Sidecar 分库分表操作:
2:分库分表介绍:
1)什么是分库分表?
2)分库分表两种方式:
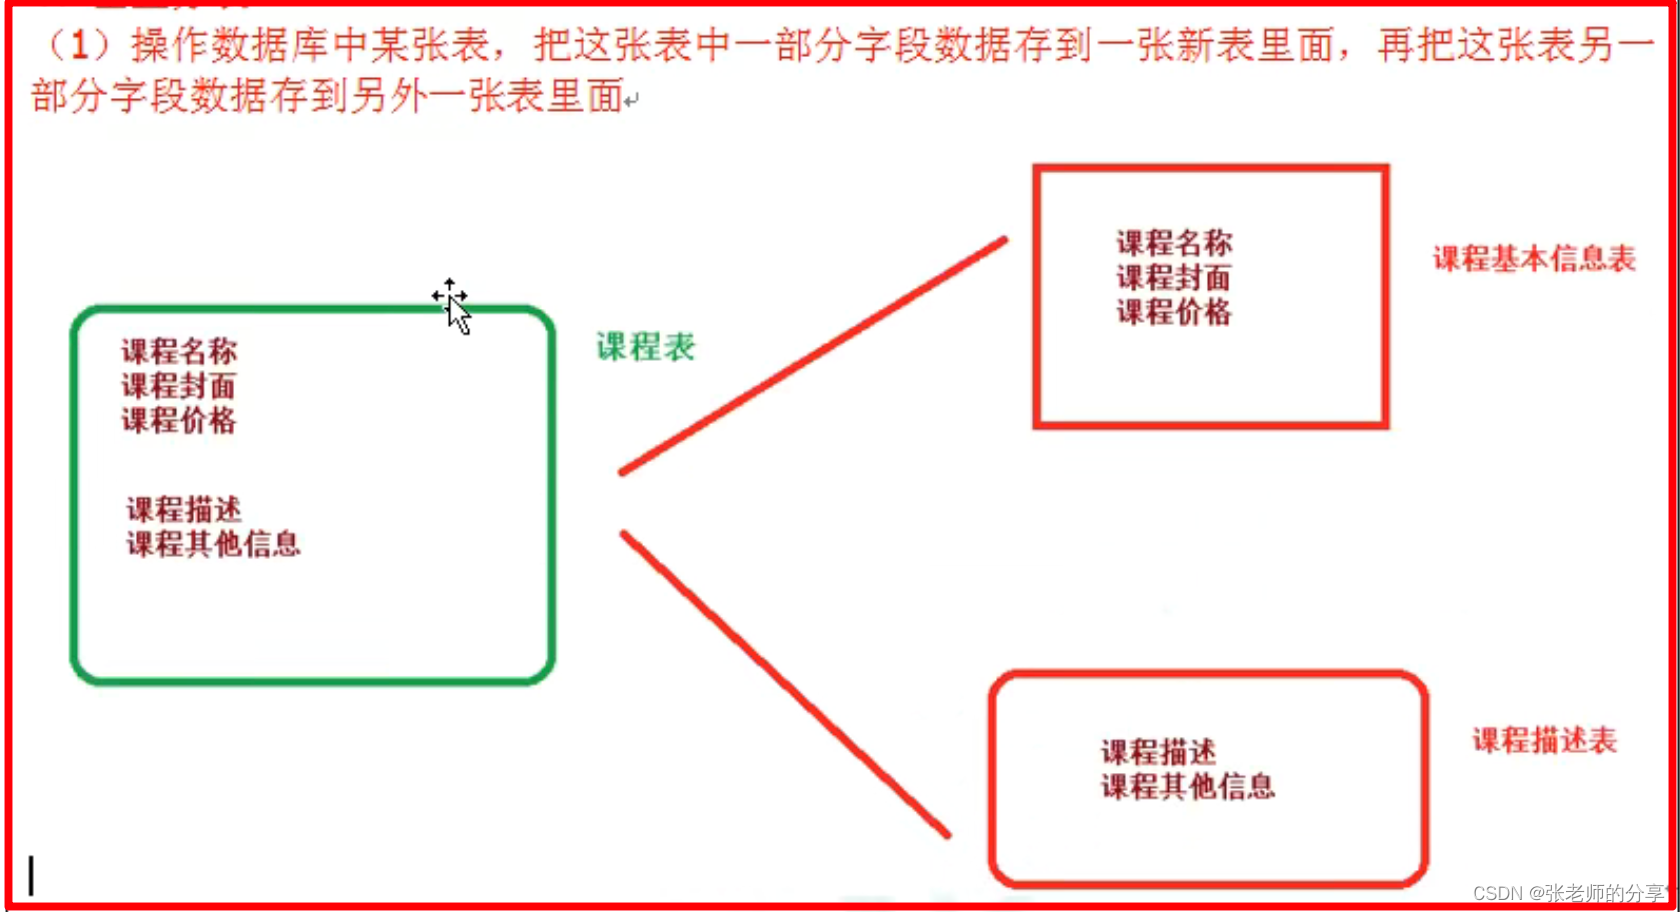
-1:垂直拆分:
1:垂直分表:
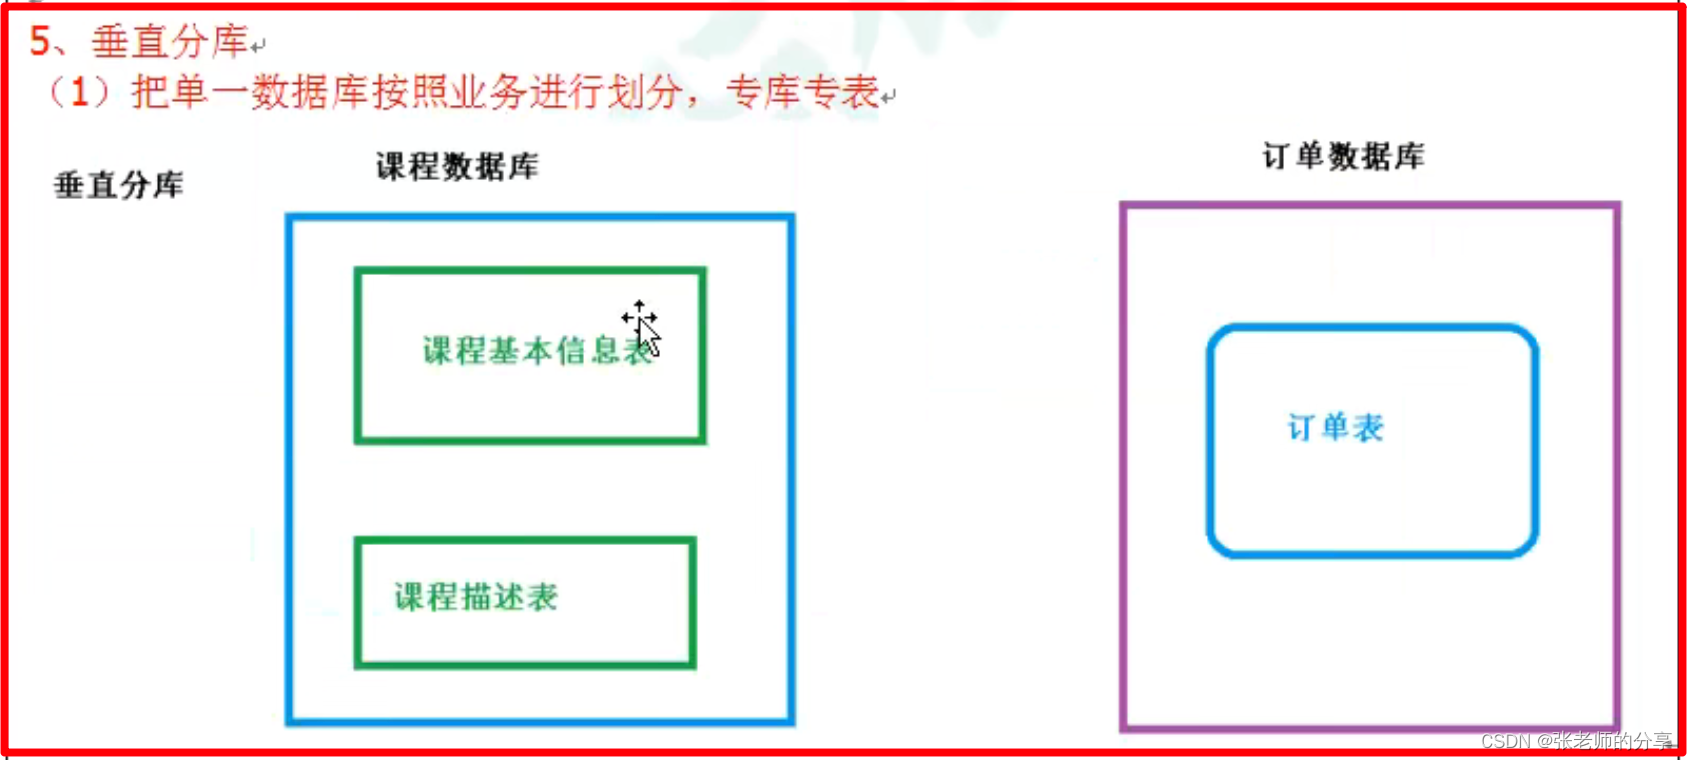
2:垂直分库:
-2:水平拆分:
1:水平分表:
3:水平分库:
3:分库分表—垂直拆分:
1)垂直分表:
2)垂直分库:
4:分库分表—水平拆分:
1)水平分表:
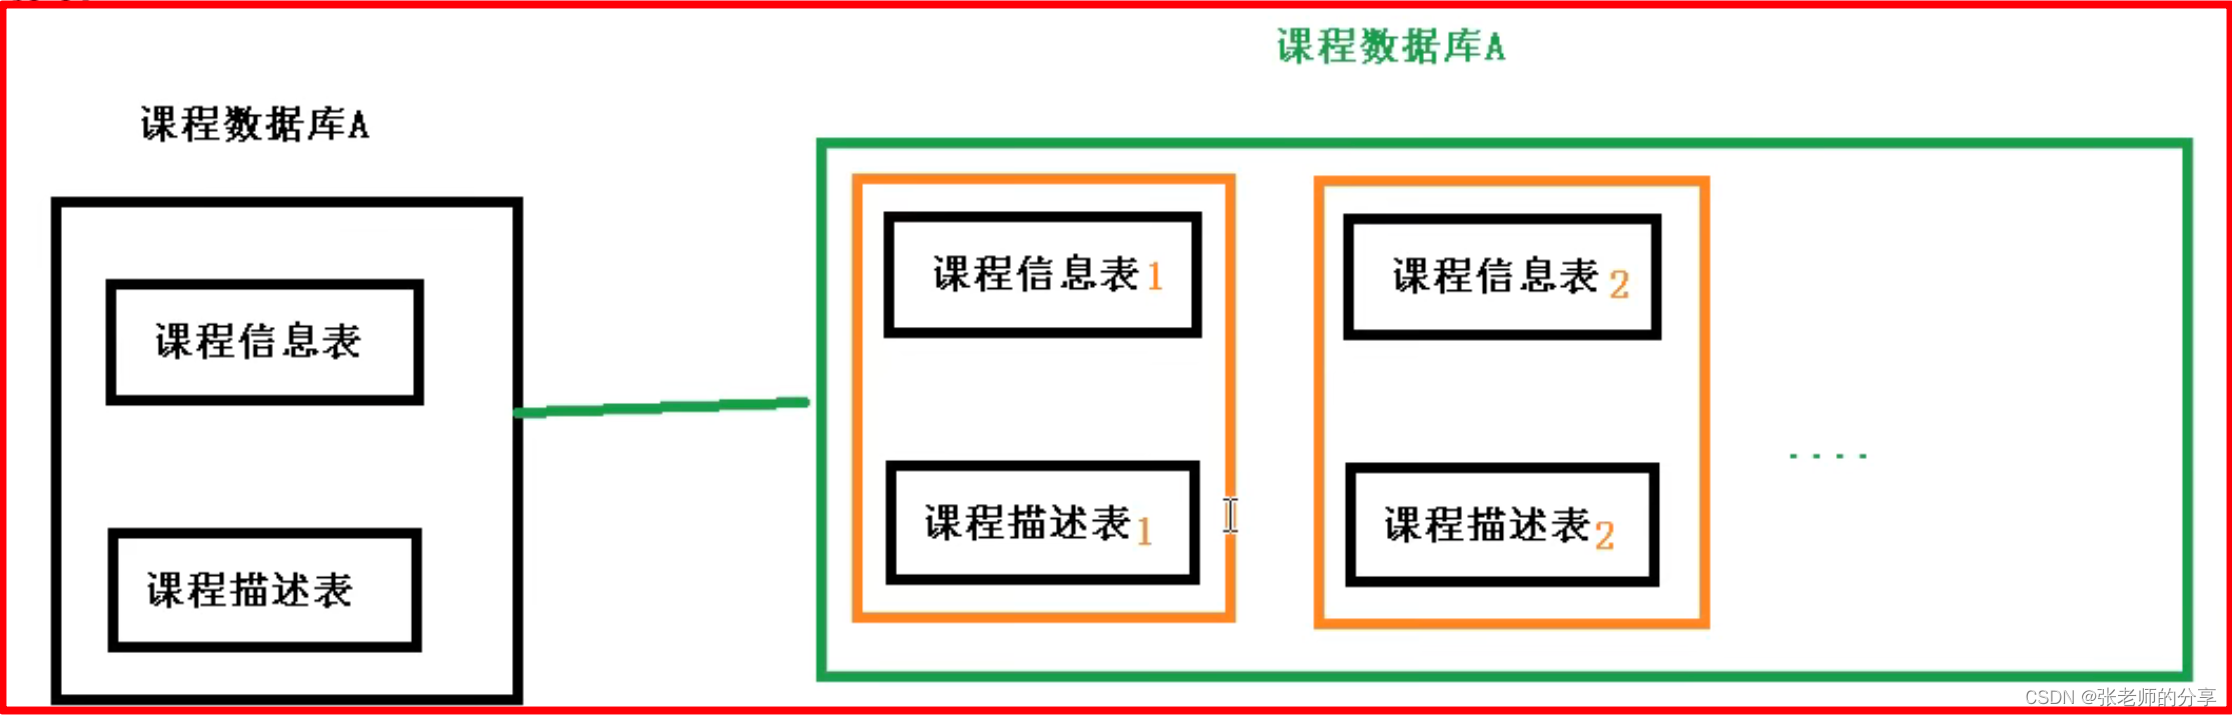
2)水平分库:
5:分库分表—小总结&问题:
1)应用时应考虑:
-1:在数据库设计时候,考虑垂直分库和垂直分表。
-2:随着数据库访问量增加,不要马上考虑做水平切分。首先要考虑缓存处理,读写分离,使用索引等等方式。
-3:如果这些方式不能根本解决问题了,再考虑做水平分库和水平分表。
2)分库分表,所带来的问题:
-1:跨界点链接查询问题。(分页,排序)
-2:多数据源管理问题。
二.:Sharding-JDBC—分库分表(7~14)
1:Sharding-JDBC 简介:
1):
-1:
-2:
-3:
-4:
-5:
2):
-1:
-2:
-3:
-4:
-5:
2:环境搭建:
1)环境搭建:SpringBoot + MyBatisPlus + Sharding-JDBC + Druid 连接池。
2)按照水平分表的方式,创建数据库 & 数据表
-1:创建课程数据库:course_db
-2:在数据库创建两张表:course_1,course_2
CREATE database course_db;

CREATE TABLE course_1 (
    id    BIGINT(20) primary key,
    name  varchar(100) not null,
    userId bigint(20)   not null,
    status  int          not null
);
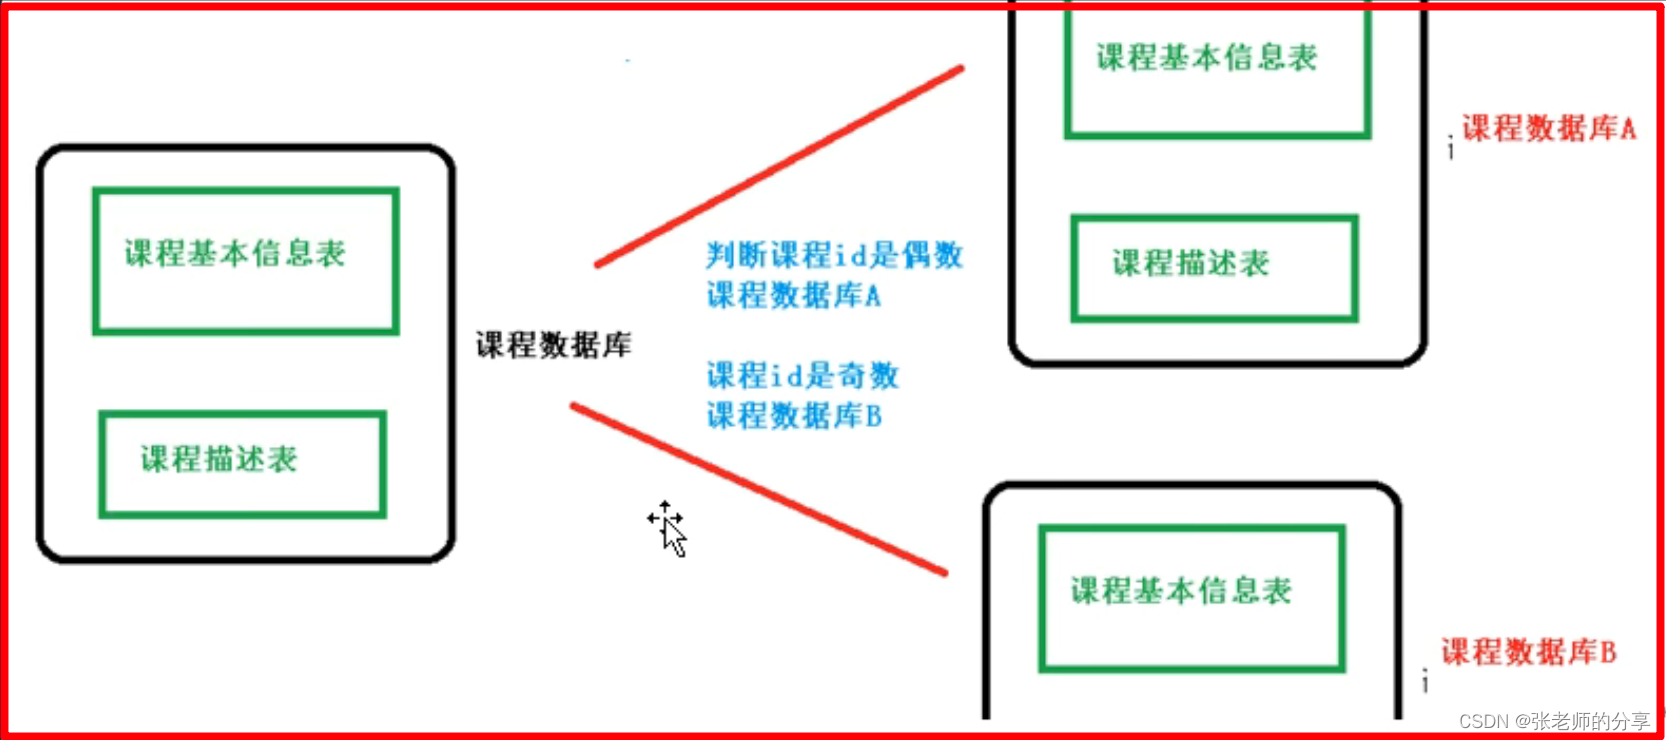
-3:约定一种规则:如果添加课程ID 是偶数,数据添加到 course_1;如果添加课程ID 是奇数,数据添加到 course_2。
3)新建 boot 项目:
-1:添加依赖:
<dependency>
    <groupId>org.springframework.boot</groupId>
    <artifactId>spring-boot-starter-web</artifactId>
</dependency>

<dependency>
    <groupId>org.projectlombok</groupId>
    <artifactId>lombok</artifactId>
    <optional>true</optional>
</dependency>

<dependency>
    <groupId>org.springframework.boot</groupId>
    <artifactId>spring-boot-starter-test</artifactId>
    <scope>test</scope>
</dependency>

<dependency>
    <groupId>com.alibaba</groupId>
    <artifactId>druid-spring-boot-starter</artifactId>
    <version>1.1.22</version>
</dependency>

<dependency>
    <groupId>mysql</groupId>
    <artifactId>mysql-connector-java</artifactId>
</dependency>

<dependency>
    <groupId>org.apache.shardingsphere</groupId>
    <artifactId>sharding-jdbc-spring-boot-starter</artifactId>
    <version>4.0.0-RC1</version>
</dependency>

<!--  mybatis-plus  -->
<dependency>
    <groupId>com.baomidou</groupId>
    <artifactId>mybatis-plus-boot-starter</artifactId>
    <version>3.3.1</version>
</dependency>
<!-- 引入 mybatis 使用  -->
<!--        <dependency>-->
<!--            <groupId>org.mybatis.spring.boot</groupId>-->
<!--            <artifactId>mybatis-spring-boot-starter</artifactId>-->
<!--            <version>2.0.0</version>-->
<!--        </dependency>-->
-2:dao 层:
@Mapper
public interface CourseMapper extends BaseMapper<CourseEntity> {

}
2:Sharding-JDBC 水平分表:
1)官网:
2)配置文件:
################ 配置 sharding-JDBC 分片策略 ###############
# 配置数据源,给数据源起名称
spring.shardingsphere.datasource.names=db1

# 配置第 1 个数据源,包含连接池,驱动,地址,用户名和密码
spring.shardingsphere.datasource.db1.type=com.alibaba.druid.pool.DruidDataSource
spring.shardingsphere.datasource.db1.driver-class-name=com.mysql.cj.jdbc.Driver
spring.shardingsphere.datasource.db1.url=jdbc:mysql://114.215.173.88:3306/course_db?serverTimezone=GMT%2B8
spring.shardingsphere.datasource.db1.username=root
spring.shardingsphere.datasource.db1.password=ROOT.root.123

# 标准分片表配置
# 指定 course 表分布情况,配置表在哪个数据库里面,表名称都是什么 ( db1.course_1 ,db1.course_2 )
spring.shardingsphere.sharding.tables.course.actual-data-nodes=db1.course_$->{1..2}

# 用于多分片键的复合分片场景,
# 指定 course 表里面,主键 id 生成策略 SNOWFLAKE 雪花算法
spring.shardingsphere.sharding.tables.course.key-generator.column=id
spring.shardingsphere.sharding.tables.course.key-generator.type=SNOWFLAKE

# 指定 分表策略,同分库策略
#( 约定 id 值偶数添加到 course_1 表,如果 id 是奇数添加到 course_2表 )
spring.shardingsphere.sharding.tables.course.table-strategy.inline.sharding-column=id
spring.shardingsphere.sharding.tables.course.table-strategy.inline.algorithm-expression=course_$->{id % 2 + 1}

# 打开 sql 输出日志
spring.shardingsphere.props.sql.show=true

# 让一个实体类,可以对应两张表,覆盖
spring.main.allow-bean-definition-overriding=true

logging.level.com.example=debug
3)启动报错:
-1:错误展示:
***************************
APPLICATION FAILED TO START
***************************

Description:

The bean 'dataSource', defined in class path resource [org/apache/shardingsphere/shardingjdbc/spring/boot/SpringBootConfiguration.class], could not be registered. A bean with that name has already been defined in class path resource [com/alibaba/druid/spring/boot/autoconfigure/DruidDataSourceAutoConfigure.class] and overriding is disabled.

Action:

Consider renaming one of the beans or enabling overriding by setting spring.main.allow-bean-definition-overriding=true
-2:问题说明:一个 course 实体类,无法对应两张表,覆盖
-3:解决方案:添加提示中的:
# 让一个实体类,可以对应两张表,覆盖
spring.main.allow-bean-definition-overriding=true
4)测试:
@SpringBootTest
class Springboot01Tests {

    @Autowired
    private CourseService courseService;

    @Test
    void get() {
        Course course = courseService.getCourse(1530403056737423362L);
        System.out.println(course);
    }

    @Test
    void add() {
        for (int i = 0; i < 20; i++) {
            Course course = new Course();
            course.setName("aa" + i);
            course.setUserid(Long.valueOf(i));
            course.setStatus(i);
            courseService.addCourse(course);
        }
    }
}
5)查询的 打印 sql:
main] c.e.s.mapper.CourseMapper.selectById     : ==>  Preparing: SELECT id,name,userid,status FROM course WHERE id=?
main] c.e.s.mapper.CourseMapper.selectById     : ==> Parameters: 1530412407518720002(Long)
main] ShardingSphere-SQL                       : Rule Type: sharding
main] ShardingSphere-SQL                       : Logic SQL: SELECT id,name,userid,status FROM course WHERE id=?
main] ShardingSphere-SQL                       : SQLStatement:。。。。
main] ShardingSphere-SQL                       : Actual SQL: db1 ::: SELECT id,name,userid,status FROM course_1 WHERE id=?  ::: [1530412407518720002]
main] c.e.s.mapper.CourseMapper.selectById     : <==      Total: 1
3:Sharding-JDBC 水平分库:
1)创建 2个数据库 & 4张表:
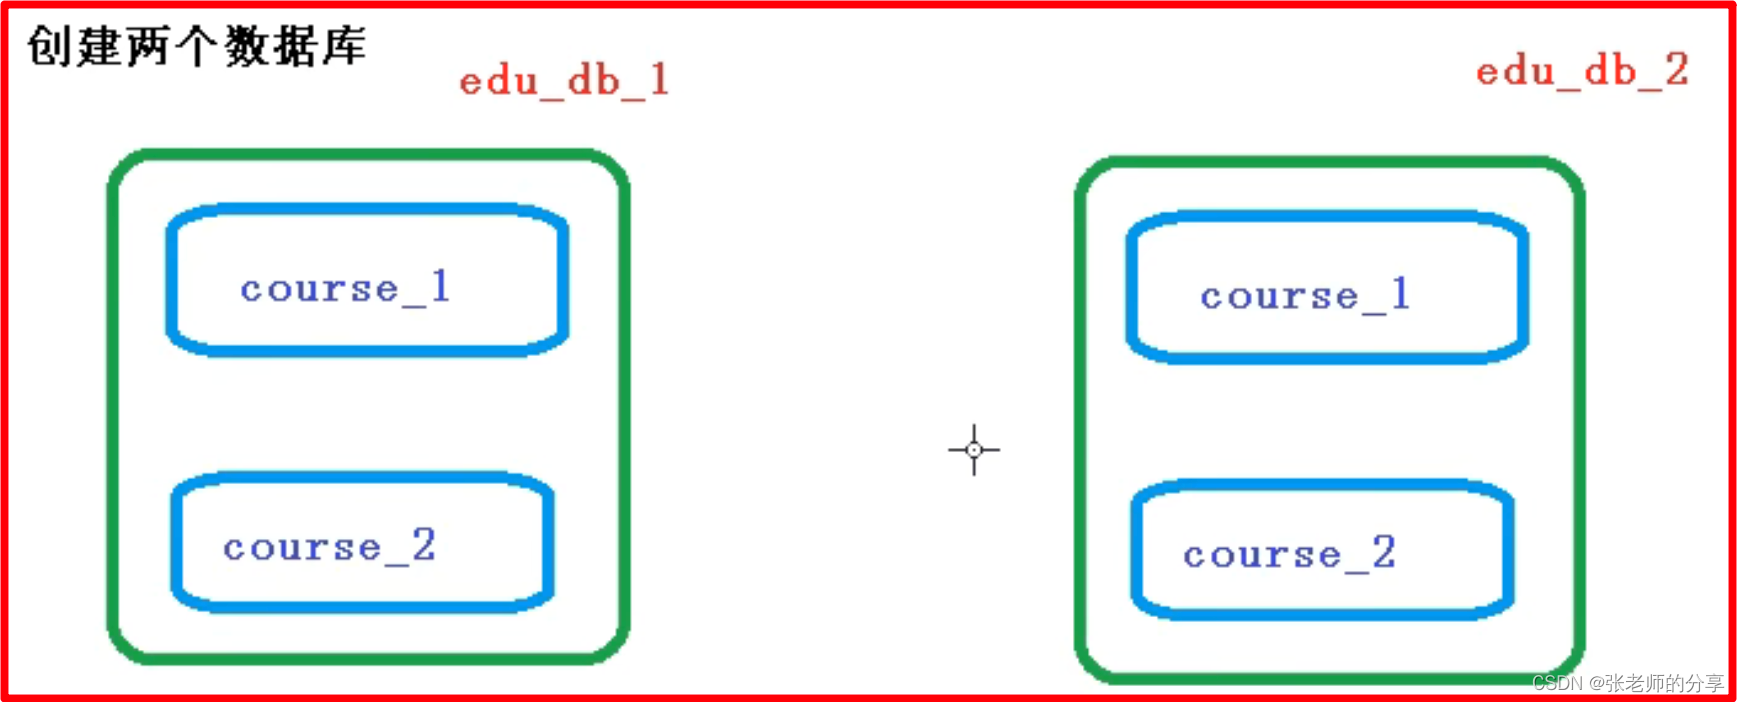
create database edu_db_1;
create database edu_db_2;

CREATE TABLE course_1 ( # 2
    id    BIGINT(20) primary key,
    name  varchar(100) not null,
    userId bigint(20)   not null,
    status  int          not null
);
2)约定 数据库分片规则:
-1:userId 为偶数:数据添加 edu_db_1 数据库。
-2:userId 为奇数:数据添加 edu_db_2 数据库。
3)约定 表 分片规则:
-1:id 为偶数:数据添加 course_1 表中。
-2:id 为奇数:数据添加 course_2 表中。
4)修改配置文件,配置:数据库分片配置规则:
################ 配置 sharding-JDBC 分片策略 ###############
# 配置数据源,给数据源起名称
spring.shardingsphere.datasource.names=db1,db2

# 配置第 1 个数据源(包含连接池,驱动,地址,用户名和密码)
spring.shardingsphere.datasource.db1.type=com.alibaba.druid.pool.DruidDataSource
spring.shardingsphere.datasource.db1.driver-class-name=com.mysql.cj.jdbc.Driver
spring.shardingsphere.datasource.db1.url=jdbc:mysql://114.215.173.88:3306/edu_db_1?serverTimezone=GMT%2B8
spring.shardingsphere.datasource.db1.username=root
spring.shardingsphere.datasource.db1.password=ROOT.root.123
# 配置第 1 个数据源(包含连接池,驱动,地址,用户名和密码)
spring.shardingsphere.datasource.db2.type=com.alibaba.druid.pool.DruidDataSource
spring.shardingsphere.datasource.db2.driver-class-name=com.mysql.cj.jdbc.Driver
spring.shardingsphere.datasource.db2.url=jdbc:mysql://114.215.173.88:3306/edu_db_2?serverTimezone=GMT%2B8
spring.shardingsphere.datasource.db2.username=root
spring.shardingsphere.datasource.db2.password=ROOT.root.123

# 指定:数据库分布的情况,指定:数据库里表的分布情况
# ( db1.course_1 )( db1.course_2 )( db2.course_1 )( db2.course_2 )
spring.shardingsphere.sharding.tables.course.actual-data-nodes=db$->{1..2}.course_$->{1..2}

# 用于多分片键的复合分片场景,
# 指定 course 表里面,主键 id 生成策略 SNOWFLAKE 雪花算法
spring.shardingsphere.sharding.tables.course.key-generator.column=id
spring.shardingsphere.sharding.tables.course.key-generator.type=SNOWFLAKE

# 指定 数据库的分片策略。(写法 1)
#spring.shardingsphere.sharding.default-database-strategy.inline.sharding-column=userid
#spring.shardingsphere.sharding.default-database-strategy.inline.algorithm-expression=db$->{userid % 2 + 1}
# (写法 2),执行数据库中特定的表,指定特定规则
spring.shardingsphere.sharding.tables.course.database-strategy.inline.sharding-column=userid
spring.shardingsphere.sharding.tables.course.database-strategy.inline.algorithm-expression=db$->{userid % 2 + 1}

# 指定 分表策略,同分库策略
#( 约定 id 值偶数添加到 course_1 表,如果 id 是奇数添加到 course_2表 )
spring.shardingsphere.sharding.tables.course.table-strategy.inline.sharding-column=id
spring.shardingsphere.sharding.tables.course.table-strategy.inline.algorithm-expression=course_$->{id % 2 + 1}

# 打开 sql 输出日志
spring.shardingsphere.props.sql.show=true

# 让一个实体类,可以对应两张表,覆盖
spring.main.allow-bean-definition-overriding=true

logging.level.com.example=debug
5)测试:
@SpringBootTest
class Springboot01Tests {

    @Autowired
    private CourseService courseService;

    @Test
    void get() {
        Course course = courseService.getCourse(1531112342652223490L);
        System.out.println(course);
    }

    @Test
    void add() {
        for (int i = 0; i < 20; i++) {
            Course course = new Course();
            course.setName("aa" + i);
            course.setUserid(Long.valueOf(i));
            course.setStatus(i);
            courseService.addCourse(course);
        }
    }
}
4:Sharding-JDBC 垂直分库:
1)垂直分库说明:

2)数据库实际拆分:
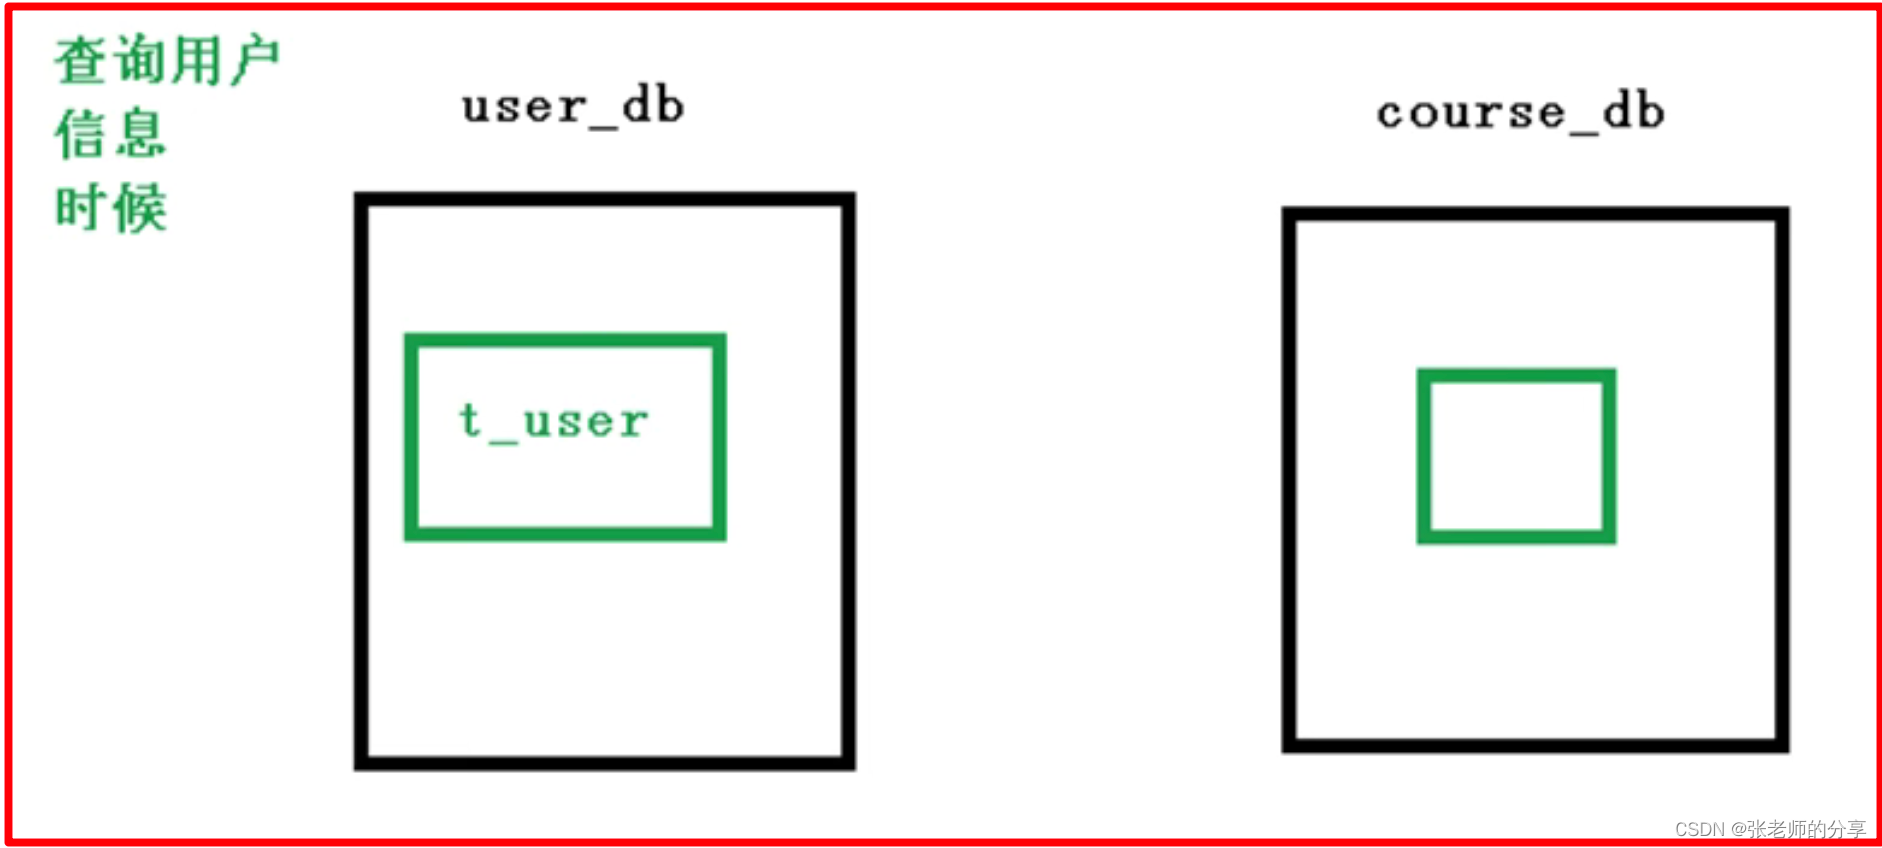
create database user_db;

CREATE TABLE t_user (
    user_id    BIGINT(20) primary key,
    user_name  varchar(100) not null,
    user_status    int(10)   not null
);
-------------------------------
@Data
@TableName("t_user")
public class TUser {

    private Long userId;
    private String userName;
    private Integer userStatus;
}
-------------------------------
@Mapper
public interface TUserMapper extends BaseMapper<TUser> {

}
3)配置 垂直分库 策略:
# 配置第 1 个数据源(包含连接池,驱动,地址,用户名和密码)
spring.shardingsphere.datasource.db2.type=com.alibaba.druid.pool.DruidDataSource
spring.shardingsphere.datasource.db2.driver-class-name=com.mysql.cj.jdbc.Driver
spring.shardingsphere.datasource.db2.url=jdbc:mysql://114.215.173.88:3306/user_db?serverTimezone=GMT%2B8
spring.shardingsphere.datasource.db2.username=root
spring.shardingsphere.datasource.db2.password=ROOT.root.123

# 配置 user_db 数据库里面,t_user 专库专表
spring.shardingsphere.sharding.tables.t_user.actual-data-nodes=db$->{2}.t_user
spring.shardingsphere.sharding.tables.t_user.key-generator.column=id
spring.shardingsphere.sharding.tables.t_user.key-generator.type=SNOWFLAKE
spring.shardingsphere.sharding.tables.t_user.database-strategy.inline.sharding-column=user_id
spring.shardingsphere.sharding.tables.t_user.database-strategy.inline.algorithm-expression=t_user
4)测试:
5:Sharding-JDBC 垂直分表:
6:Sharding-JDBC 公共表:
三.:Sharding-JDBC—读写分离(15~18)
1:主从复制说明:
1)主从复制概念:(双机热备)(一主多从)
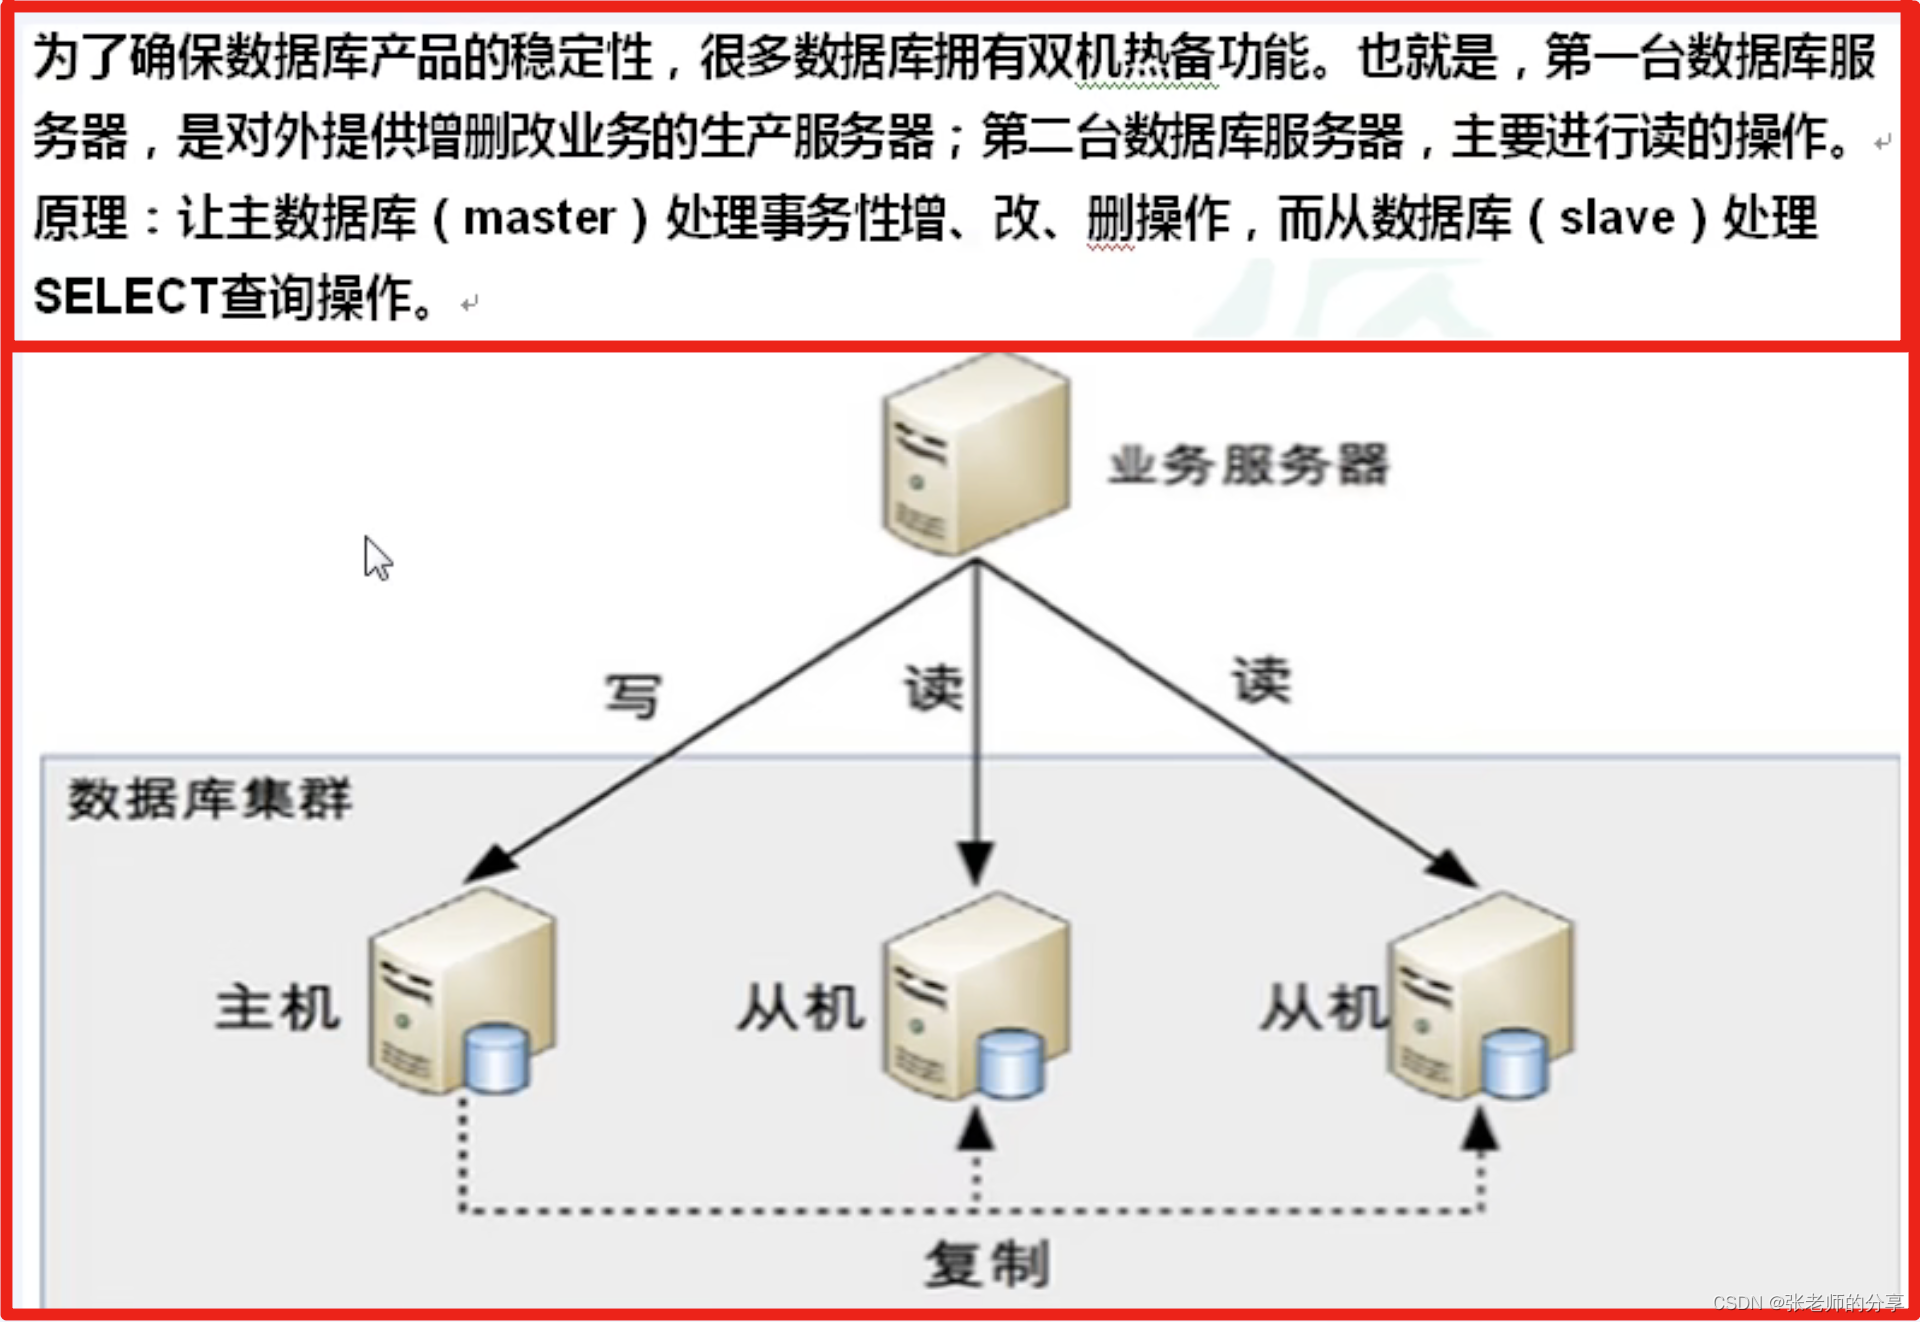
2)主从复制的原理:

3)mysql 主从配置:
-1:文档:https://www.yuque.com/aiyou-ywqry/wkt1mi/rzhzen
2:Sharding-JDBC 读写分离:
1)配置文件:
# 读写分离的操作
# 配置数据源,给数据源起名称
spring.shardingsphere.datasource.names=db1,db2

# 配置 主数据源,包含连接池,驱动,地址,用户名和密码
spring.shardingsphere.datasource.db1.type=com.alibaba.druid.pool.DruidDataSource
spring.shardingsphere.datasource.db1.driver-class-name=com.mysql.cj.jdbc.Driver
spring.shardingsphere.datasource.db1.url=jdbc:mysql://114.215.173.88:3306/user_db2?serverTimezone=GMT%2B8
spring.shardingsphere.datasource.db1.username=root
spring.shardingsphere.datasource.db1.password=ROOT.root.123

# 配置 从数据源,包含连接池,驱动,地址,用户名和密码
spring.shardingsphere.datasource.db2.type=com.alibaba.druid.pool.DruidDataSource
spring.shardingsphere.datasource.db2.driver-class-name=com.mysql.cj.jdbc.Driver
spring.shardingsphere.datasource.db2.url=jdbc:mysql://120.48.42.110:3306/user_db2?serverTimezone=GMT%2B8
spring.shardingsphere.datasource.db2.username=root
spring.shardingsphere.datasource.db2.password=ROOT.root.123

# 主服务器
spring.shardingsphere.sharding.master-slave-rules.mydb.master-data-source-name=db1
# 从服务器
spring.shardingsphere.sharding.master-slave-rules.mydb.slave-data-source-names=db2
# 主从规则
spring.shardingsphere.sharding.master-slave-rules.mydb.load-balance-algorithm-type=ROUND_ROBIN
# name??
spring.shardingsphere.sharding.master-slave-rules.mydb.name=mydb

spring.shardingspere.props.sql.show=true
spring.main.allow-bean-definition-overriding=true
2)测试:
四.:Sharding-Proxy(19~22)
1:Sharding-Proxy 简介:
1):
-1:
-2:
-3:
-4:
-5:
2):
-1:
-2:
-3:
-4:
-5:
3):
-1:
-2:
-3:
-4:
-5:
4):
-1:
-2:
-3:
-4:
-5:
5):
-1:
-2:
-3:
-4:
-5:
2:安装:
1):
-1:
-2:
-3:
-4:
-5:
2):
-1:
-2:
-3:
-4:
-5:
3):
-1:
-2:
-3:
-4:
-5:
4):
-1:
-2:
-3:
-4:
-5:
5):
-1:
-2:
-3:
-4:
-5:
3:分表:
1):
-1:
-2:
-3:
-4:
-5:
2):
-1:
-2:
-3:
-4:
-5:
3):
-1:
-2:
-3:
-4:
-5:
4):
-1:
-2:
-3:
-4:
-5:
5):
-1:
-2:
-3:
-4:
-5:
4:分库:
1):
-1:
-2:
-3:
-4:
-5:
2):
-1:
-2:
-3:
-4:
-5:
3):
-1:
-2:
-3:
-4:
-5:
4):
-1:
-2:
-3:
-4:
-5:
5):
-1:
-2:
-3:
-4:
-5:
5:读写分离:
1):
-1:
-2:
-3:
-4:
-5:
2):
-1:
-2:
-3:
-4:
-5:
3):
-1:
-2:
-3:
-4:
-5:
4):
-1:
-2:
-3:
-4:
-5:
5):
-1:
-2:
-3:
-4:
-5:


 957
957


 被折叠的 条评论
为什么被折叠?
被折叠的 条评论
为什么被折叠?
 到【灌水乐园】发言


