


1. 磁盘扩大
VMware 管理平台VSphere Client登陆,将需要扩容的虚拟机进行关机操作,然后编辑设置,将磁盘大小进行调整(需要删除所有快照)

2. 扩分区
2.1 查看当前分区信息
在进行扩展之前,要查看/etc/fstab记录下原本的文件系统
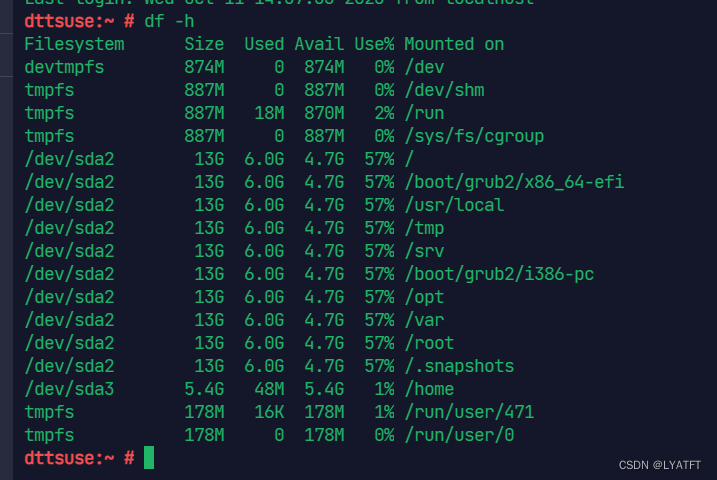
以下指令可以查看到根分区是sda2,只有13G大小
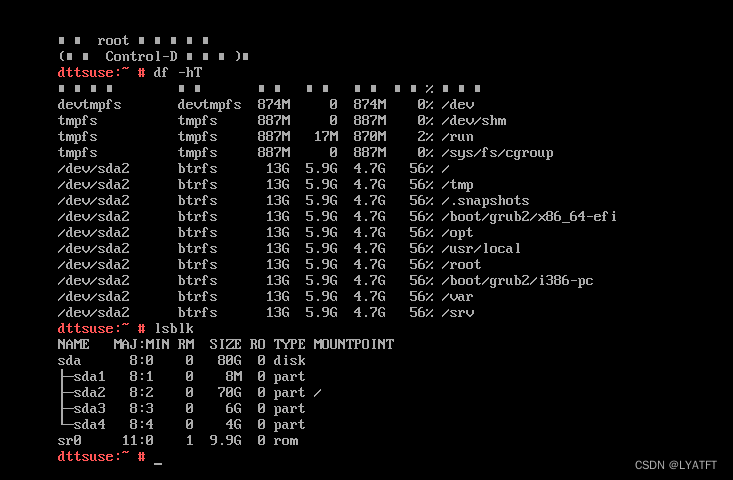
可以看到当前磁盘容量已经增加到80Gb了,但是分区仍是之前的大小,所以接下来我们需要按照步骤,将分区大小进行调整

2.2 增加根分区大小
💡注意:标准分区的扩容方式其实是将原有分区删除掉,然后再重建时增加容量,但是千万要记住以下步骤,通过fdisk操作时,不要将根分区删除后就执行w保存,这样会导致所有数据写盘丢失
dttsuse:~ # fdisk /dev/sda

Welcome to fdisk (util-linux 2.33.1).
Changes will remain in memory only, until you decide to write them.
Be careful before using the write command.

GPT PMBR size mismatch (41943039 != 167772159) will be corrected by write.
The backup GPT table is not on the end of the device. This problem will be corrected by write.

Command (m for help): p //这里输入p,列出分区列表,记住下面的所有的分区

Disk /dev/sda: 80 GiB, 85899345920 bytes, 167772160 sectors
Disk model: Virtual disk
Units: sectors of 1 * 512 = 512 bytes
Sector size (logical/physical): 512 bytes / 512 bytes
I/O size (minimum/optimal): 512 bytes / 512 bytes
Disklabel type: gpt
Disk identifier: 33193FED-8BA0-4AEA-9479-31FCC6DE4E45

Device        Start      End  Sectors  Size Type
/dev/sda1      2048    18431    16384    8M BIOS boot
/dev/sda2     18432 26433535 26415104 12.6G Linux filesystem
/dev/sda3  26433536 37748735 11315200  5.4G Linux filesystem
/dev/sda4  37748736 41943006  4194271    2G Linux swap

Command (m for help): d //这里输入d,删除一个分区,因为之前的分区是/dev/sda2,所以它之后的分区都要重建
Partition number (1-4, default 4): 4

Partition 4 has been deleted.

Command (m for help): d
Partition number (1-3, default 3): 3

Partition 3 has been deleted.

Command (m for help): d
Partition number (1,2, default 2): 2

Partition 2 has been deleted.

Command (m for help): n //删除完,输入n新建一个分区
Partition number (2-128, default 2):
First sector (18432-167772126, default 18432):
Last sector, +/-sectors or +/-size{K,M,G,T,P} (18432-167772126, default 167772126): +70G //扩展分区

Created a new partition 2 of type 'Linux filesystem' and of size 70 GiB.
Partition #2 contains a btrfs signature.

Do you want to remove the signature? [Y]es/[N]o: n

Command (m for help): n
Partition number (3-128, default 3): 3
First sector (146819072-167772126, default 146819072):
Last sector, +/-sectors or +/-size{K,M,G,T,P} (146819072-167772126, default 167772126): +6G

Created a new partition 3 of type 'Linux filesystem' and of size 6 GiB.

Command (m for help): n
Partition number (4-128, default 4): 4
First sector (159401984-167772126, default 159401984):
Last sector, +/-sectors or +/-size{K,M,G,T,P} (159401984-167772126, default 167772126):

Created a new partition 4 of type 'Linux filesystem' and of size 4 GiB.

Command (m for help): p
Disk /dev/sda: 80 GiB, 85899345920 bytes, 167772160 sectors
Disk model: Virtual disk
Units: sectors of 1 * 512 = 512 bytes
Sector size (logical/physical): 512 bytes / 512 bytes
I/O size (minimum/optimal): 512 bytes / 512 bytes
Disklabel type: gpt
Disk identifier: 33193FED-8BA0-4AEA-9479-31FCC6DE4E45

Device         Start       End   Sectors Size Type
/dev/sda1       2048     18431     16384   8M BIOS boot
/dev/sda2      18432 146819071 146800640  70G Linux filesystem
/dev/sda3  146819072 159401983  12582912   6G Linux filesystem
/dev/sda4  159401984 167772126   8370143   4G Linux filesystem

Command (m for help): w //最后写入保存
The partition table has been altered.
Failed to remove partition 3 from system: Device or resource busy
Failed to remove partition 4 from system: Device or resource busy
Failed to update system information about partition 2: Device or resource busy
Failed to add partition 3 to system: Device or resource busy
Failed to add partition 4 to system: Device or resource busy

The kernel still uses the old partitions. The new table will be used at the next reboot.
Syncing disks.

dttsuse:~ # reboot
2.3 修改/etc/fstab
分区重建后,重启机器由于无法找到原来的磁盘文件,无法正常启动。需要进入紧急救援模式,修改/etc/fstab文件

可以看到挂载目录的空间没有扩大,但对应的分区空间已成功扩大
2.3.1 恢复/dev/sda3 分区
重新格式化/dev/sda3 分区(在进行扩展之前,查看/etc/fstab时记录下的文件系统)

2.3.2 恢复/dev/sda4分区
重建分区之前,发现/dev/sda4分区是swap分区,所以要恢复成swap分区

执行以下命令,将新建的分区创建为swap。
# mkswap /dev/sda4

执行以下命令,激活swap分区。
# swapon /dev/sda4

执行以下命令,查询已启动的swap。
# swapon -s
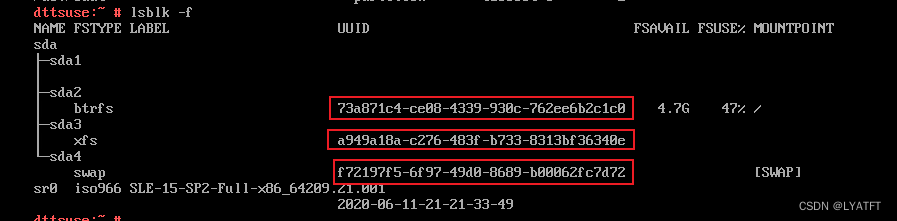
2.3.3 查看分区的uuid,修改/etc/fstab文件
记录分区重建后的uuid
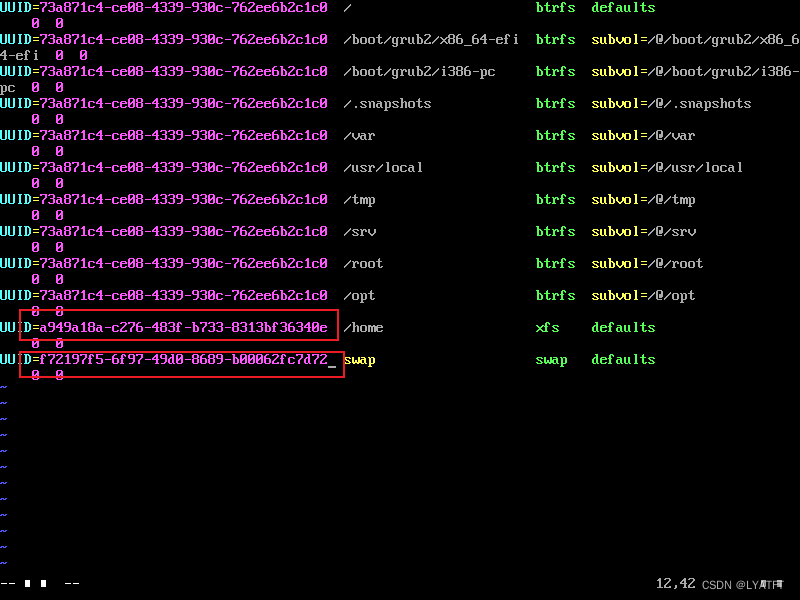
修改/etc/fstab文件

保存之后重启操作系统
2.4 刷新文件系统
重启系统后,要刷新文件系统,不然扩展不会生效
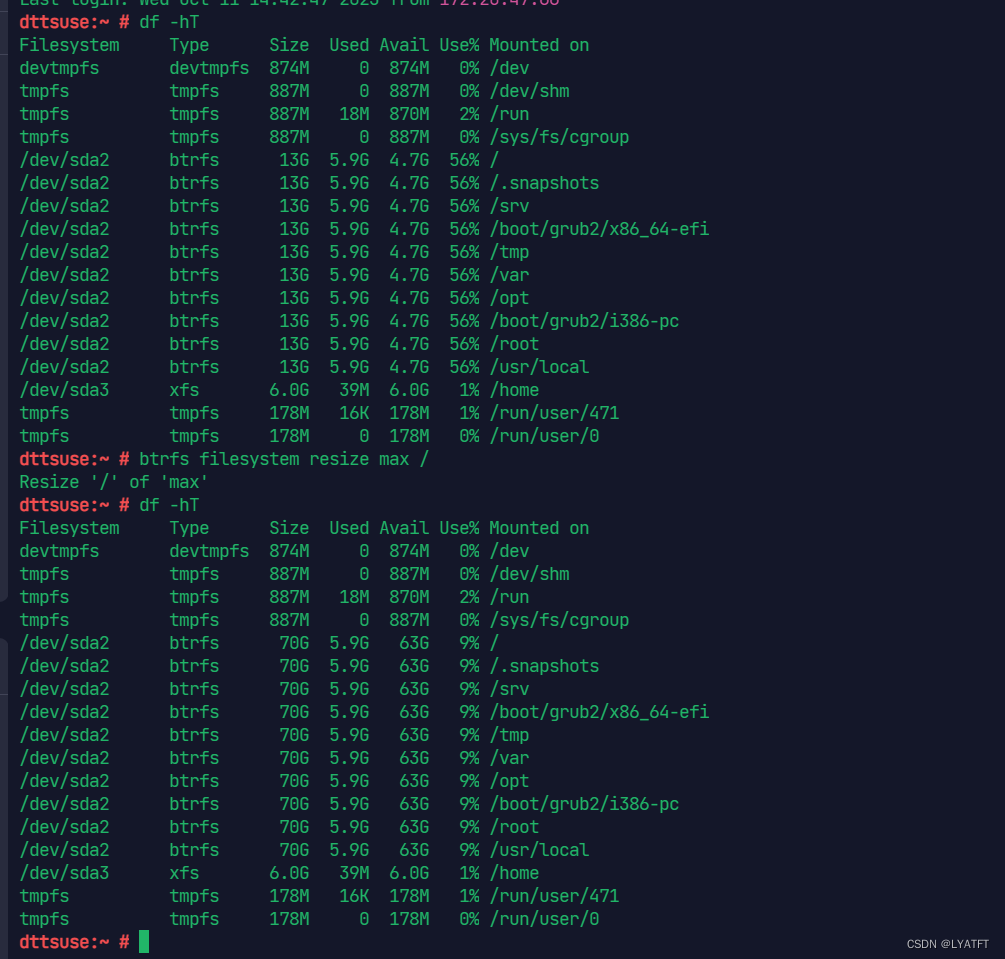
这里需要根据不同的文件系统类型来执行不同的刷新指令,查看sda2的文件系统是btrfs,所以这里我们使用btrfs filesystem resize max /来刷新
resize2fs命令          针对的是ext2、ext3、ext4文件系统
xfs_growfs命令         针对的是xfs文件系统
在扩展存储池后,建议运行btrfs balance start -d -m /来重新平衡数据和元数据,以确保它们分布均匀在新磁盘上。

至此,已经将根分区扩容成功,后续就可以正常使用了
个人原创,禁止转载!如有侵权,联系必删
717707754@qq.com


 976
976


 被折叠的 条评论
为什么被折叠?
被折叠的 条评论
为什么被折叠?
 到【灌水乐园】发言


