


 这篇文章展示了如何使用VantUI库来定制单选radio和复选框checkbox的样式,包括文字、布局和选中状态的颜色。代码示例涵盖了van-radio-group和van-checkbox-group的使用,并提供了相应的CSS样式以改变默认外观。此外,还提及了JavaScript部分,用于处理答题后的答案显示,根据用户选择和正确答案添加不同颜色的类名。
自定义vant 单选 radio和复选框 checkbox 样式
话不多数,直接上代码
1、这里是单选 radio 哦
<van-radio-group
    v-if="cur_question.questionType === 1 || cur_question.questionType === 3"
      v-model="a_list[cur_index]"
     >
       <van-radio
          v-for="(item, index) in cur_question.questionOptions"
           :key="index"
           :name="item.questionOption"
           @click="
             clickQuestionHandle(
               a_list[cur_index],
               cur_index,
               cur_question.questionBankId,
               index,
             )"
          >
         <span class="select">{{ item.questionOption }}</span>
         <p class="text">{{ item.optionContent }}</p>
     </van-radio>
  </van-radio-group>
2、这里是复选框 checkbox 的哦
  <van-checkbox-group
     v-if="cur_question.questionType === 2"
     v-model="a_list[cur_index]"
     >
       <van-checkbox
          v-for="(item, index) in cur_question.questionOptions"
          :key="index"
          :name="item.questionOption"
          @click="
            changeQuestionCheckboxHandle(
             a_list[cur_index],
             cur_index,
             cur_question.questionBankId,
             item,
           )"
          >
          <span class="select">{{ item.questionOption }}</span>
          <p class="text">{{ item.optionContent }}</p>
       </van-checkbox>
  </van-checkbox-group>
其中,数据是自己的,不做过多解释,更换成自己的数据即可
3、这里是重点哦( CSS啦 )
 /deep/ .custom-radio-group,
      .custom-checkbox-group {
        width: 100%;
      }

      /*单选框,复选框文字样式*/
      /deep/ .van-radio__label,
      /deep/ .van-checkbox__label {
        display: flex;
        min-height: 60px;
        align-items: center;
        justify-content: space-around;
        font-size: 16px;
        font-family: PingFangSC-Regular, PingFang SC;
        font-weight: 400;
        line-height: 22px;
        /*padding-top: 8px;*/
        /*padding-bottom: 8px;*/
      }

      /deep/ .van-radio,
      /deep/ .van-checkbox {
        position: relative;
        overflow: hidden;
        width: 327px;
        margin-top: 12px;
        border-radius: 8px;
        background: #f6f6f6;
        color: #333333;
      }

      /*去掉原本的勾选样式*/
      /deep/ .van-radio__icon .van-icon,
      /deep/ .van-checkbox__icon .van-icon {
        border: 0;
        display: none;
        width: 0;
      }

      /deep/ .van-radio__label,
      /deep/ .van-checkbox__label {
        margin: 0;
      }

      /*  选中之后的文字颜色和背景色设置*/
      /deep/ .van-radio__icon--checked + .van-radio__label,
      /deep/ .van-checkbox__icon--checked + .van-checkbox__label {
        background: rgba(228, 248, 245, 0.8);

        span {
          color: #00bc90;

          &::before {
            border-right-color: #00a178;
          }
        }

        p {
          color: #00bc90;
        }
      }

      .select {
        position: relative;
        display: block;
        font-size: 16px;
        font-family: PingFangSC-Regular, PingFang SC;
        font-weight: 400;
        color: #333333;
        line-height: 22px;
        width: 50px;
        text-align: center;

        &::before {
          content: '';
          position: absolute;
          right: 0;
          top: 50%;
          margin-top: -5px;
          height: 10px;
          border-right: 1px solid #333333;
        }
      }

      .text {
        width: 327px;
        font-size: 16px;
        font-family: PingFangSC-Regular, PingFang SC;
        font-weight: 400;
        color: #333333;
        line-height: 22px;
        margin-left: 8px;
        word-wrap: break-word;
      }
    }
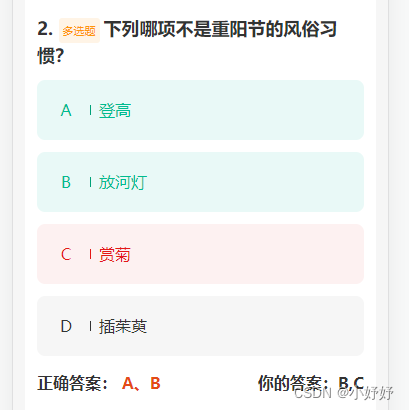
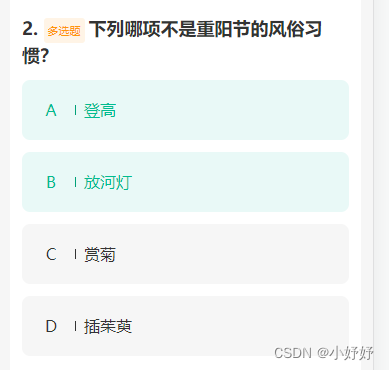
4、看看js吧,答题过后还要查看答案的呢,先看图吧
 // 多选添加多个分类
 // this.cur_question.userSelectList 用户选择的答案列表
 //  item 循环的当前答案
 //  把用户选的答案和循环的答案相对比后添加对应的类名,就得到不通的颜色了
 //  filter 遍历数组
      classList(item, index) {
        let class_list = ['answer-item'];
        if (item.correct === 1) {
          if (this.cur_question.userSelectList.length > 0){
            this.cur_question.userSelectList.filter(n => {
              if (n != item.questionOption) {
                class_list.push('green');
              }
              if (n == item.questionOption) {
                class_list.push('green');
              }
            });
          }else{
            class_list.push('green');
          }

        } else {
          this.cur_question.userSelectList.filter(n => {
            if (n == item.questionOption) {
              class_list.push('red');
            }
          });
        }
        return class_list;
      },
接网友留言,补充一下class_list 的用法 (具体的样式根据自己需要做调整哈,这里做一下参考~~~)
  .answer {
        &-item {
          width: 327px;
          min-height: 60px;
          border-radius: 8px;
          display: flex;
          align-items: center;
          justify-content: space-around;
          background: #f6f6f6;
          margin-top: 12px;

          span {
            position: relative;
            display: block;
            width: 25px;
            font-size: 16px;
            font-family: PingFangSC-Regular, PingFang SC;
            font-weight: 400;
            color: #333333;
            line-height: 22px;
            width: 50px;
            text-align: center;

            &::before {
              content: '';
              position: absolute;
              right: 0;
              top: 50%;
              margin-top: -5px;
              height: 10px;
              border-right: 1px solid #333333;
            }
          }

          p {
            width: 261px;
            font-size: 16px;
            font-family: PingFangSC-Regular, PingFang SC;
            font-weight: 400;
            color: #333333;
            line-height: 22px;
          }

          &.green {
            background: rgba(228, 248, 245, 0.8);

            span {
              color: #00bc90;

              &::before {
                border-right-color: #00a178;
              }
            }

            p {
              color: #00bc90;
            }
          }

          &.red {
            background: rgba(253, 237, 237, 0.8);

            span {
              color: #e41717;

              &::before {
                border-right-color: #e41717;
              }
            }

            p {
              color: #e41717;
            }
          }
        }
      }
好了,最后看下界面吧,我这里做的是答题选中的效果在这里插入图片描述


 7391
7391

 被折叠的 条评论
为什么被折叠?
被折叠的 条评论
为什么被折叠?
 到【灌水乐园】发言


