


1、websocket和自定义ThreadPoolTaskExecutor实现代码
参考链接:
https://i4k.xyz/article/axiang_/113586870
https://blog.csdn.net/axiang_/article/details/113586870
2、一开始遇到了整合WebSocket组件(@ServerEndPoint)无法@Autowired自动注入的问题:
原因:spring管理的都是单例(singleton),和 websocket (多对象)相冲突
解决方法:要注入的对象,申明为static
private static MyThreadPoolTaskExecutor taskExecutor;
@Autowired
public void setBean(MyThreadPoolTaskExecutor taskExecutor){
    WebSocketService.taskExecutor = taskExecutor;
}
参考链接:
https://chenweisheng.blog.csdn.net/article/details/102780642?spm=1001.2101.3001.6650.1&utm_medium=distribute.pc_relevant.none-task-blog-2%7Edefault%7ECTRLIST%7Edefault-1-102780642-blog-88538993.pc_relevant_default&depth_1-utm_source=distribute.pc_relevant.none-task-blog-2%7Edefault%7ECTRLIST%7Edefault-1-102780642-blog-88538993.pc_relevant_default&utm_relevant_index=2
代码结构:
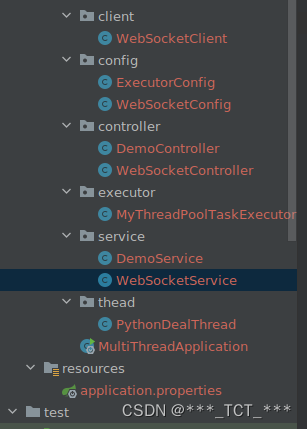
后端:
package com.scut.demo.multithread.client;


import javax.websocket.Session;

public class WebSocketClient {
    // 与某个客户端的连接会话,需要通过它来给客户端发送数据
    private Session session;

    //连接的uri
    private String uri;

    public Session getSession() {
        return session;
    }

    public void setSession(Session session) {
        this.session = session;
    }

    public String getUri() {
        return uri;
    }

    public void setUri(String uri) {
        this.uri = uri;
    }
}
package com.scut.demo.multithread.config;


import org.springframework.context.annotation.Bean;
import org.springframework.context.annotation.Configuration;
import org.springframework.web.socket.server.standard.ServerEndpointExporter;

@Configuration
public class WebSocketConfig {

    @Bean
    public ServerEndpointExporter serverEndpointExporter(){
        return  new ServerEndpointExporter();
    }
}
package com.scut.demo.multithread.config;


import com.scut.demo.multithread.executor.MyThreadPoolTaskExecutor;
import org.slf4j.Logger;
import org.slf4j.LoggerFactory;
import org.springframework.beans.factory.annotation.Value;
import org.springframework.context.annotation.Bean;
import org.springframework.context.annotation.Configuration;
import org.springframework.scheduling.annotation.EnableAsync;

import java.util.concurrent.ThreadPoolExecutor;


@Configuration
@EnableAsync
public class ExecutorConfig {
    private static final Logger logger = LoggerFactory.getLogger(ExecutorConfig.class);

    @Value("${async.executor.thread.core_pool_size}")
    private int corePoolSize;

    @Value("${async.executor.thread.max_pool_size}")
    private int maxPoolSize;

    @Value("${async.executor.thread.queue_capacity}")
    private int queueCapacity;

    @Value("${async.executor.thread.keep_alive_seconds}")
    private int keepAliveSSeconds;
    @Value("${async.executor.thread.name.prefix}")
    private String namePrefix;

    //别忘了给方法加上 @Bean 注解,否则 SpringBoot 不会加载
    @Bean(name = "asyncServiceExecutor")
    public MyThreadPoolTaskExecutor asyncServiceExecutor(){
        logger.info("开启SpringBoot的线程池");

        MyThreadPoolTaskExecutor executor = new MyThreadPoolTaskExecutor();
        // 设置核心线程数
        executor.setCorePoolSize(corePoolSize);
        // 设置最大线程数
        executor.setMaxPoolSize(maxPoolSize);
        // 设置缓冲队列大小
        executor.setQueueCapacity(queueCapacity);
        // 设置线程的最大空闲时间
        executor.setKeepAliveSeconds(keepAliveSSeconds);
        // 设置线程名字的前缀
        executor.setThreadNamePrefix(namePrefix);

        // 设置拒绝策略:当线程池达到最大线程数时,如何处理新任务
        // CALLER_RUNS:在添加到线程池失败时会由主线程自己来执行这个任务
        executor.setRejectedExecutionHandler(new ThreadPoolExecutor.CallerRunsPolicy());

        // 线程池初始化
//        executor.initialize();
        return executor;

    }


}
package com.scut.demo.multithread.controller;


import com.scut.demo.multithread.service.DemoService;
import io.swagger.annotations.Api;
import io.swagger.annotations.ApiOperation;
import org.springframework.beans.factory.annotation.Autowired;
import org.springframework.web.bind.annotation.GetMapping;
import org.springframework.web.bind.annotation.RequestMapping;
import org.springframework.web.bind.annotation.RestController;

@Api(tags = "WebSocketTest")
@RestController
@RequestMapping("/admin/websocket")
public class DemoController {

    @Autowired
    private DemoService demoService;

    @ApiOperation(value = "async")
    @GetMapping("/async")
    public void async() {
        demoService.asyncTest();
    }

    @ApiOperation(value = "info")
    @GetMapping("/info")
    public String info() {
        return demoService.getExecutorInfo();
    }
}
package com.scut.demo.multithread.controller;


import com.scut.demo.multithread.service.WebSocketService;
import org.springframework.web.bind.annotation.GetMapping;
import org.springframework.web.bind.annotation.RequestMapping;
import org.springframework.web.bind.annotation.RestController;


@RestController
@RequestMapping("/websocket")
public class WebSocketController {


    @GetMapping("/pushone")
    public void pushone()
    {
        WebSocketService.sendMessage("user","发送数据");
    }
}
package com.scut.demo.multithread.executor;


import org.slf4j.Logger;
import org.slf4j.LoggerFactory;
import org.springframework.core.task.AsyncTaskExecutor;
import org.springframework.scheduling.concurrent.ThreadPoolTaskExecutor;
import org.springframework.util.concurrent.ListenableFuture;

import java.util.concurrent.Callable;
import java.util.concurrent.Future;
import java.util.concurrent.ThreadPoolExecutor;


public class MyThreadPoolTaskExecutor extends ThreadPoolTaskExecutor implements AsyncTaskExecutor {
    private static final Logger logger = LoggerFactory.getLogger(MyThreadPoolTaskExecutor.class);

    public String info() {
        ThreadPoolExecutor executor = this.getThreadPoolExecutor();

        if (executor == null) return "线程池不存在";

        String info = "线程池" + this.getThreadNamePrefix() +
                "中,总任务数为 " + executor.getTaskCount() +
                " ,已处理完的任务数为 " + executor.getCompletedTaskCount() +
                " ,目前正在处理的任务数为 " + executor.getActiveCount() +
                " ,缓冲队列中任务数为 " + executor.getQueue().size();

        logger.info(info);
        return info;
    }


    @Override
    public void execute(Runnable task, long startTimeout) {
        info();
        super.execute(task, startTimeout);
    }

    @Override
    public Future<?> submit(Runnable task) {
        info();
        return super.submit(task);
    }

    @Override
    public <T> Future<T> submit(Callable<T> task) {
        info();
        return super.submit(task);
    }

    @Override
    public void execute(Runnable task) {
        info();
        super.execute(task);
    }


    @Override
    public ListenableFuture<?> submitListenable(Runnable task) {
        info();
        return super.submitListenable(task);
    }

    @Override
    public <T> ListenableFuture<T> submitListenable(Callable<T> task) {
        info();
        return super.submitListenable(task);
    }
}
package com.scut.demo.multithread.service;


import com.scut.demo.multithread.executor.MyThreadPoolTaskExecutor;
import lombok.SneakyThrows;
import org.slf4j.Logger;
import org.slf4j.LoggerFactory;
import org.springframework.beans.factory.annotation.Autowired;
import org.springframework.scheduling.annotation.Async;
import org.springframework.stereotype.Service;

import javax.websocket.OnMessage;

@Service
public class DemoService {

    private static final Logger logger = LoggerFactory.getLogger(DemoService.class);

    // 别忘了这里要用 SpringBoot 的自动注入
    @Autowired
    private MyThreadPoolTaskExecutor executor;

    // @SneakyThrows 这个注解是Lombok带的,我为了代码简洁使用的。你也可以使用 try catch 的方法。
    @SneakyThrows
    @Async("asyncServiceExecutor")
    public void asyncTest() {
        logger.info("任务开始!");

        System.out.println("异步执行某耗时的事...");
        System.out.println("如休眠5秒");
        Thread.sleep(5000);

        logger.info("任务结束!");

        // 你甚至可以在任务结束时再打印一下线程池信息
        executor.info();
    }

    public String getExecutorInfo() {
        return executor.info();
    }
}
package com.scut.demo.multithread.service;

import com.scut.demo.multithread.client.WebSocketClient;
import com.scut.demo.multithread.executor.MyThreadPoolTaskExecutor;
import com.scut.demo.multithread.thead.PythonDealThread;
import lombok.SneakyThrows;
import org.apache.commons.lang.StringUtils;
import org.slf4j.Logger;
import org.slf4j.LoggerFactory;
import org.springframework.beans.factory.annotation.Autowired;
import org.springframework.scheduling.annotation.Async;
import org.springframework.stereotype.Service;

import javax.annotation.Resource;
import javax.websocket.*;
import javax.websocket.server.PathParam;
import javax.websocket.server.ServerEndpoint;
import java.io.IOException;
import java.util.concurrent.ConcurrentHashMap;
import java.util.concurrent.CopyOnWriteArraySet;

@ServerEndpoint(value = "/websocket/{userName}")
@Service
public class WebSocketService {

//    @Resource(name = "asyncServiceExecutor")
    private static MyThreadPoolTaskExecutor taskExecutor;

    @Autowired
    public void setBean(MyThreadPoolTaskExecutor taskExecutor){
        WebSocketService.taskExecutor = taskExecutor;
    }
    private static final Logger log = LoggerFactory.getLogger(WebSocketService.class);

    //静态变量,用来记录当前在线连接数。应该把它设计成线程安全的。
    private static int onlineCount = 0;
    //concurrent包的线程安全Set,用来存放每个客户端对应的WebSocketServer对象。
    private static ConcurrentHashMap<String, WebSocketClient> webSocketMap = new ConcurrentHashMap<>();
    private static CopyOnWriteArraySet<Session> SessionSet = new CopyOnWriteArraySet<>();

    /**
     * 与某个客户端的连接会话,需要通过它来给客户端发送数据
     */
    private Session session;
    /**
     * 接收userName
     */
    private String userName = "";

    /**
     * 连接建立成功调用的方法
     */
    @OnOpen
    public void onOpen(Session session, @PathParam("userName") String userName) {
        SessionSet.add(session);
        log.info("【WebSocket】建立WebSocket连接,【连接id】=" + session.getId());

        if (!webSocketMap.containsKey(userName)) {
            addOnlineCount(); // 在线数 +1
        }
        this.session = session;
        this.userName = userName;
        WebSocketClient client = new WebSocketClient();
        client.setSession(session);
        client.setUri(session.getRequestURI().toString());
        webSocketMap.put(userName, client);

        log.info("----------------------------------------------------------------------------");
        log.info("用户连接:" + userName + ",当前在线人数为:" + getOnlineCount());
        try {
            sendMessage("来自后台的反馈:连接成功");
        } catch (IOException e) {
            log.error("用户:" + userName + ",网络异常!!!!!!");
        }
    }

    /**
     * 连接关闭调用的方法
     */
    @OnClose
    public void onClose() {
        if (webSocketMap.containsKey(userName)) {
            webSocketMap.remove(userName);
            if (webSocketMap.size() > 0) {
                //从set中删除
                subOnlineCount();
            }
        }
        SessionSet.remove(session);
        log.info("【WebSocket】移除WebSocket连接,【连接id】=" + session.getId());
        log.info("----------------------------------------------------------------------------");
        log.info(userName + "用户退出,当前在线人数为:" + getOnlineCount());
    }

    /**
     * 收到客户端消息后调用的方法
     *
     * @param message 客户端发送过来的消息
     */


    @OnMessage
    public void onMessage(String message, Session session) {
        log.info("收到用户消息:" + userName + ",报文:" + message);
        //可以群发消息
        //消息保存到数据库、redis
        if (StringUtils.isNotBlank(message)) {

        }
        try{
            taskExecutor.execute(new PythonDealThread(message, session));
            taskExecutor.info();
        }catch (Exception e){
            e.printStackTrace();
        }
    }

    /**
     * @param session
     * @param error
     */
    @OnError
    public void onError(Session session, Throwable error) {
        log.error("用户错误:" + this.userName + ",原因:" + error.getMessage());
        error.printStackTrace();
    }

    /**
     * 连接服务器成功后主动推送
     */
    public void sendMessage(String message) throws IOException {
        synchronized (session) {
            this.session.getBasicRemote().sendText(message);
        }
    }

    /**
     * 向指定客户端发送消息
     *
     * @param userName
     * @param message
     */
    public static void sendMessage(String userName, String message) {
        try {
            WebSocketClient webSocketClient = webSocketMap.get(userName);
            if (webSocketClient != null) {
                webSocketClient.getSession().getBasicRemote().sendText(message);
            }
        } catch (IOException e) {
            e.printStackTrace();
            throw new RuntimeException(e.getMessage());
        }
    }


    public static void sendMessage(Session session, String message) {
        try {
            session.getBasicRemote().sendText(message);
        } catch (IOException e) {
            log.error("发送消息出错:{}", e.getMessage());
            e.printStackTrace();
        }
    }

    public static synchronized int getOnlineCount() {
        return onlineCount;
    }

    public static synchronized void addOnlineCount() {
        WebSocketService.onlineCount++;
    }

    public static synchronized void subOnlineCount() {
        WebSocketService.onlineCount--;
    }

    public static void setOnlineCount(int onlineCount) {
        WebSocketService.onlineCount = onlineCount;
    }


    public static ConcurrentHashMap<String, WebSocketClient> getWebSocketMap() {
        return webSocketMap;
    }

    public static void setWebSocketMap(ConcurrentHashMap<String, WebSocketClient> webSocketMap) {
        WebSocketService.webSocketMap = webSocketMap;
    }

    public Session getSession() {
        return session;
    }

    public void setSession(Session session) {
        this.session = session;
    }

    public String getUserName() {
        return userName;
    }

    public void setUserName(String userName) {
        this.userName = userName;
    }

}
package com.scut.demo.multithread.thead;


import com.scut.demo.multithread.service.WebSocketService;
import lombok.extern.slf4j.Slf4j;
import net.sf.json.JSONObject;

import javax.websocket.Session;
import java.io.BufferedReader;
import java.io.IOException;
import java.io.InputStreamReader;


@Slf4j
public class PythonDealThread extends Thread {

    private final Session session;

    /**
     * 请求参数
     */
    private final String message;

    public PythonDealThread(String message, Session session) {
        this.session = session;
        this.message = message;
    }

    @Override
    public void run() {

        System.out.println("python参数:" + message);
        //releaseId=?&releaseName="xx"
        JSONObject jsonObject = (JSONObject) JSONObject.fromObject(message);


        Process pr = null;
        try {

            System.out.println(jsonObject.getString("releaseId"));
            String cmd = buildPubArray(jsonObject.getString("releaseId"),
                    jsonObject.getString("releaseName"));
            pr = Runtime.getRuntime().exec(cmd);


        } catch (IOException e) {
            log.info("执行python合包脚本异常");
        }

        if (pr != null) {
            BufferedReader in = null;
            String line;
            try {
                log.info("python脚本开始调用");
                in = new BufferedReader(new InputStreamReader(pr.getInputStream()));

                while ((line = in.readLine()) != null) {
                    // 将实时日志通过WebSocket发送给客户端
                    WebSocketService.sendMessage(session, line);
                }
                log.info("python脚本结束调用");
            } catch (Exception e) {
                log.error(e.getMessage());
            } finally {
                try {
                    if (in != null) {
                        in.close();
                    }

                    if (session != null) {
                        session.close();
                    }
                } catch (IOException e) {
                    e.printStackTrace();
                }
            }
        }

    }


    /**
     * 参数
     */
    private static String buildPubArray(String releaseId, String releaseName) {
        String commandArr = "python -u /home/chut/pythontest/testPython.py";


        return commandArr;
    }

}
@SpringBootApplication(exclude = DataSourceAutoConfiguration.class)
@EnableSwagger2
@ComponentScan(basePackages = {"com.scut"})
@EnableDiscoveryClient
@EnableFeignClients(basePackages = "com.scut")
public class MultiThreadApplication {

    public static void main(String[] args) {
        SpringApplication.run(MultiThreadApplication.class, args);
    }
}
<?xml version="1.0" encoding="UTF-8"?>
<project xmlns="http://maven.apache.org/POM/4.0.0"
         xmlns:xsi="http://www.w3.org/2001/XMLSchema-instance"
         xsi:schemaLocation="http://maven.apache.org/POM/4.0.0 http://maven.apache.org/xsd/maven-4.0.0.xsd">
    <parent>
        <artifactId>service</artifactId>
        <groupId>com.scut</groupId>
        <version>1.0</version>
    </parent>
    <modelVersion>4.0.0</modelVersion>

    <artifactId>service_multithread</artifactId>
    <dependencies>
        <dependency>
            <groupId>org.springframework</groupId>
            <artifactId>spring-websocket</artifactId>
        </dependency>
        <!-- JSONObject对象依赖的jar包 -->
        <dependency>
            <groupId>commons-beanutils</groupId>
            <artifactId>commons-beanutils</artifactId>
            <version>1.9.3</version>
        </dependency>
        <dependency>
            <groupId>commons-collections</groupId>
            <artifactId>commons-collections</artifactId>
            <version>3.2.1</version>
        </dependency>
        <dependency>
            <groupId>commons-lang</groupId>
            <artifactId>commons-lang</artifactId>
            <version>2.6</version>
        </dependency>
        <dependency>
            <groupId>commons-logging</groupId>
            <artifactId>commons-logging</artifactId>
            <version>1.1.1</version>
        </dependency>
        <dependency>
            <groupId>net.sf.ezmorph</groupId>
            <artifactId>ezmorph</artifactId>
            <version>1.0.6</version>
        </dependency>
        <dependency>
            <groupId>net.sf.json-lib</groupId>
            <artifactId>json-lib</artifactId>
            <version>2.2.3</version>
            <classifier>jdk15</classifier><!-- 指定jdk版本 -->
        </dependency>
        <dependency>
            <groupId>net.minidev</groupId>
            <artifactId>json-smart</artifactId>
            <version>2.3</version>
            <scope>compile</scope>
        </dependency>
        <!-- Json依赖架包下载 -->

    </dependencies>

    <properties>
        <maven.compiler.source>8</maven.compiler.source>
        <maven.compiler.target>8</maven.compiler.target>
    </properties>

</project>
没有引入swagger的,建议引入一下依赖,方便测试
前端:
<template>

  <div>
      <el-button @click="sendDataToServer" >给后台发送消息</el-button>
      <el-button @click="wsMessageHanler" ></el-button>
     <div v-text="data"></div>

  </div>
</template>

<script>
    export default {
        name: "WebSocket",
        data() {
            return {
                // ws是否启动
                wsIsRun: false,
                // 定义ws对象
                webSocket: null,
                // ws请求链接(类似于ws后台地址)
                ws: '',
                // ws定时器
                wsTimer: null,
                data:'',
            }
        },
        async mounted() {
            this.wsIsRun = true
            this.wsInit()
        },
        methods: {
            sendDataToServer() {
                if (this.webSocket.readyState === 1) {
                    var json = '{"releaseId" : 0, "releaseName": "uft-dbtest001"}';
                    // this.webSocket.send('来自前端的数据' + '来自前端的数据')
                    this.webSocket.send(json)
                } else {
                    throw Error('服务未连接')
                }
            },
            /**
             * 初始化ws
             */
            wsInit() {
                const wsuri = 'ws://172.30.xxx.xxx:7778/websocket/user'
//此处的172.30.xxx.xxx为你的ip地址
                this.ws = wsuri
                if (!this.wsIsRun) return
                // 销毁ws
                this.wsDestroy()
                // 初始化ws
                this.webSocket = new WebSocket(this.ws)
                // ws连接建立时触发
                this.webSocket.addEventListener('open', this.wsOpenHanler)
                // ws服务端给客户端推送消息
                this.webSocket.addEventListener('message', this.wsMessageHanler)
                // ws通信发生错误时触发
                this.webSocket.addEventListener('error', this.wsErrorHanler)
                // ws关闭时触发
                this.webSocket.addEventListener('close', this.wsCloseHanler)

                // 检查ws连接状态,readyState值为0表示尚未连接,1表示建立连接,2正在关闭连接,3已经关闭或无法打开
                clearInterval(this.wsTimer)
                this.wsTimer = setInterval(() => {
                    if (this.webSocket.readyState === 1) {
                        clearInterval(this.wsTimer)
                    } else {
                        console.log('ws建立连接失败')
                        this.wsInit()
                    }
                }, 3000)
            },
            wsOpenHanler(event) {
                console.log('ws建立连接成功')
            },
            wsMessageHanler(e) {
                console.log('wsMessageHanler')
                this.data = e.data
                console.log(e)
                console.log(this.data)
                //const redata = JSON.parse(e.data)
                //console.log(redata)
            },
            /**
             * ws通信发生错误
             */
            wsErrorHanler(event) {
                console.log(event, '通信发生错误')
                this.wsInit()
            },
            /**
             * ws关闭
             */
            wsCloseHanler(event) {
                console.log(event, 'ws关闭')
                this.wsInit()
            },
            /**
             * 销毁ws
             */
            wsDestroy() {
                if (this.webSocket !== null) {
                    this.webSocket.removeEventListener('open', this.wsOpenHanler)
                    this.webSocket.removeEventListener('message', this.wsMessageHanler)
                    this.webSocket.removeEventListener('error', this.wsErrorHanler)
                    this.webSocket.removeEventListener('close', this.wsCloseHanler)
                    this.webSocket.close()
                    this.webSocket = null
                    clearInterval(this.wsTimer)
                }
            },
        }
    }
</script>

<style scoped>

</style>
python:简单的测试数据
import os
import time
total_time = 0.0
for i in range(60):

    start_time = time.time()
    # print(i)
    time.sleep(0.5)
    end_time = time.time()
    sigle_time = end_time - start_time
    total_time += sigle_time
    print(total_time)
    if i == 10:
        print("end")
测试成功:
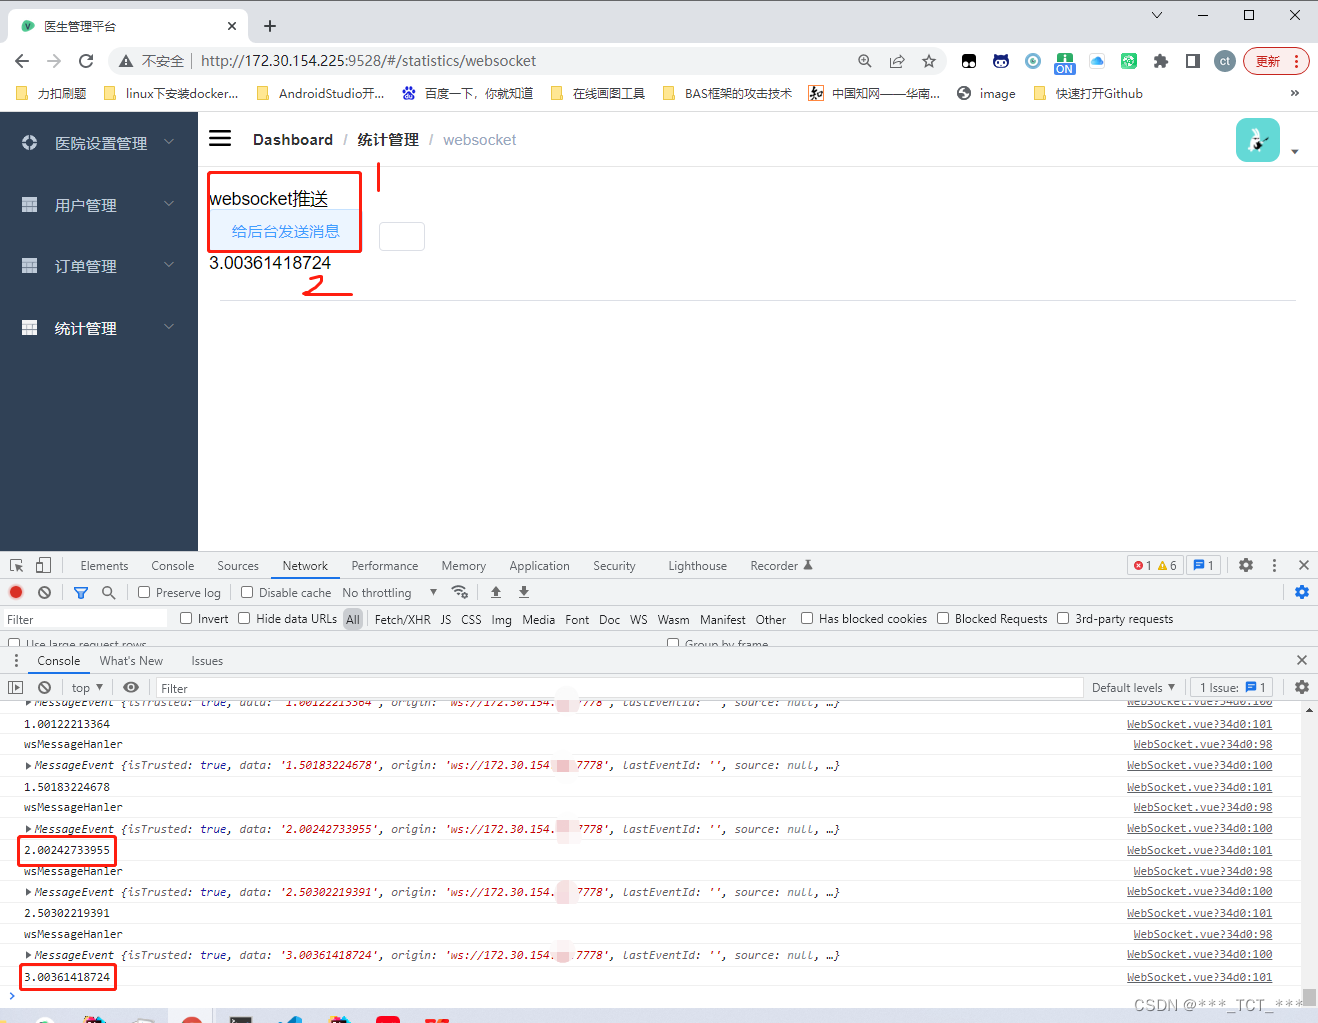


 1274
1274


 被折叠的 条评论
为什么被折叠?
被折叠的 条评论
为什么被折叠?
 到【灌水乐园】发言


