


Material Design上的新控件:NestedScrollView
NestedScrollView是嵌套滑动控件,用于解决ScrollView与其它具有滑动特性的控件嵌套造成的滑动冲突
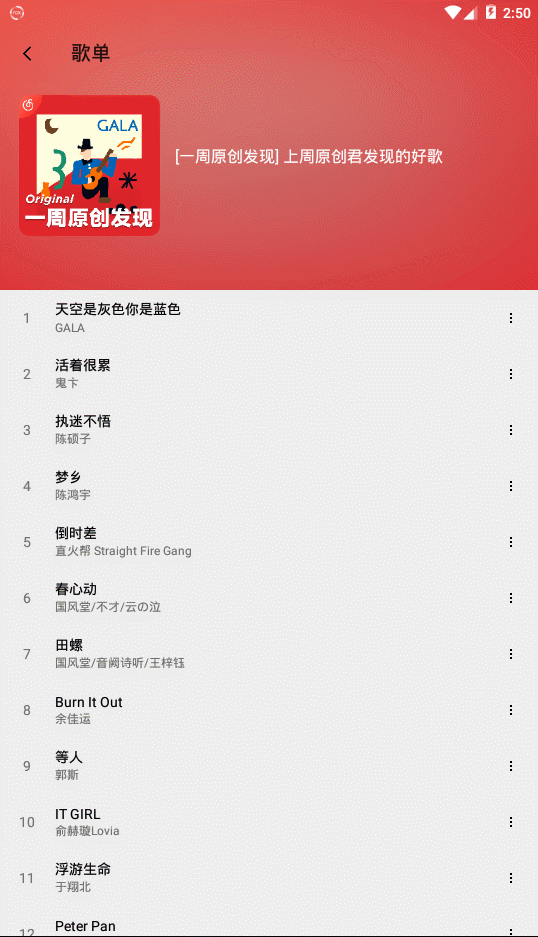
上效果图:
1、布局中定义个NestedScrollView控件(NestedScrollView中只允许存在一个子控件)
2、LinearLayout包裹头部图片和Recyclerview存放在NestedScrollView中
3、在NestedScrollView控件后放置ToolBar
代码区:======================================
<FrameLayout xmlns:android="http://schemas.android.com/apk/res/android"
    android:layout_width="match_parent"
    android:layout_height="match_parent"
    xmlns:app="http://schemas.android.com/apk/res-auto">

    <!--NestedScrollView中只允许存在一个子控件-->
    <android.support.v4.widget.NestedScrollView
        android:layout_width="match_parent"
        android:layout_height="match_parent"
        android:scrollbarSize="4dp"
        android:scrollbars="vertical">

        <!--包含头部背景和Recyclerview-->
        <LinearLayout
            android:layout_width="match_parent"
            android:layout_height="wrap_content"
            android:orientation="vertical"
            android:descendantFocusability="blocksDescendants">

            <!--<include-->
            <!--layout="@layout/top"/>-->
            <TextView
                android:layout_width="match_parent"
                android:layout_height="300dp"
                android:background="#00BFFF"/>

            <android.support.v7.widget.RecyclerView
                android:id="@+id/recyclerview"
                android:layout_width="match_parent"
                android:layout_height="wrap_content" />
        </LinearLayout>

    </android.support.v4.widget.NestedScrollView>

    <RelativeLayout
        android:id="@+id/rl_title_head"
        android:layout_width="match_parent"
        android:layout_height="wrap_content">

        <ImageView
            android:id="@+id/iv_title_head_bg"
            android:layout_width="match_parent"
            android:layout_height="310dp"
            android:scaleType="fitXY" />

        <android.support.v7.widget.Toolbar
            android:id="@+id/title_tool_bar"
            android:layout_width="match_parent"
            android:layout_height="?attr/actionBarSize"
            android:background="#87CEFA"
            app:title="歌单"/>
    </RelativeLayout>

</FrameLayout>
看下效果:
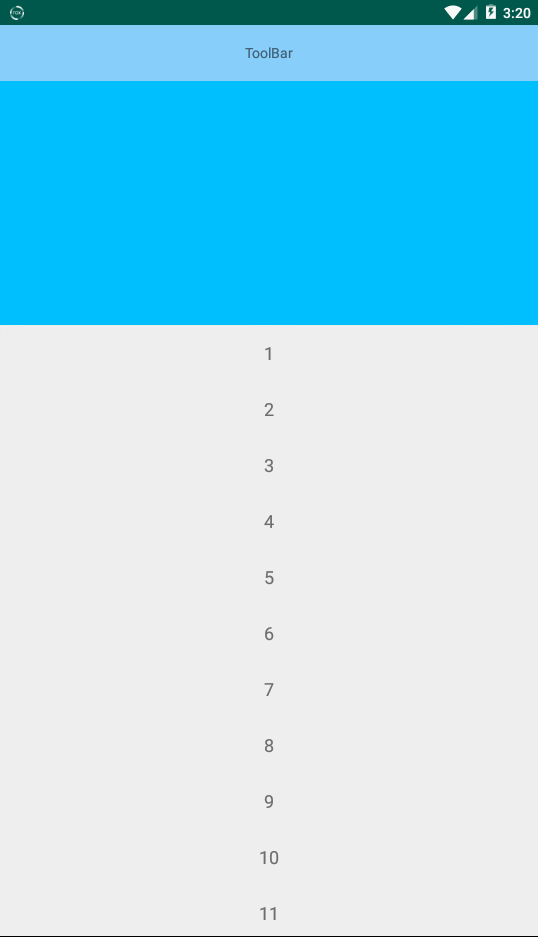
还行,修改一下,再加点小细节。
系统的滚动监听只能api23以上用,为了兼容需要重写NestedScrollView控件,定义滑动接口和监听事件
public class MyNestedScrollView extends NestedScrollView {

    private ScrollInterface scrollInterface;

    // 定义滑动接口
    public interface ScrollInterface {
        void onScrollChange(int scrollX, int scrollY, int oldScrollX, int oldScrollY);
    }

    public MyNestedScrollView(Context context) {
        super(context);
    }

    public MyNestedScrollView(Context context, AttributeSet attrs) {
        super(context, attrs);
    }

    public MyNestedScrollView(Context context, AttributeSet attrs, int defStyleAttr) {
        super(context, attrs, defStyleAttr);
    }

    @Override
    protected void onScrollChanged(int l, int t, int oldl, int oldt) {
        if (scrollInterface != null) {
            scrollInterface.onScrollChange(l, t, oldl, oldt);
        }
        super.onScrollChanged(l, t, oldl, oldt);
    }

   //滑动监听
    public void setOnMyScrollChangeListener(ScrollInterface t) {
        this.scrollInterface = t;
    }
}
加载titlebar背景,加载后将背景设为透明
//加载titlebar背景,加载后将背景设为透明
    private void setImgHeaderBg() {
        Glide.with(this)
                .load(ImgUrl)
                .bitmapTransform(new BlurTransformation(this, 200, 3))// 设置高斯模糊
                .listener(new RequestListener<String, GlideDrawable>() {//监听加载状态
                    @Override//图片加载异常回调
                    public boolean onException(Exception e, String model, Target<GlideDrawable> target, boolean isFirstResource) {
                        return false;
                    }

                    @Override//加载成功的回调
                    public boolean onResourceReady(GlideDrawable resource, String model, Target<GlideDrawable> target, boolean isFromMemoryCache, boolean isFirstResource) {
                        // Toolbar背景设为透明
                        toolbar.setBackgroundColor(Color.TRANSPARENT);
                        // 背景图初始化为全透明,该方法只对前景有效
                        headImgBg.setImageAlpha(0);
                        headImgBg.setVisibility(View.VISIBLE);
                        return false;
                    }
                }).into(headImgBg);
    }
进行滑动渐变初始化
获取标题栏加状态栏的高度和,使背景图向上移动到图片的最底端,保留toolbar+状态栏的高度
 //初始化滑动渐变
    private void initSlideShapeTheme() {

        setImgHeaderBg();

        // toolbar的高度56
        int toolbarHeight = toolbar.getLayoutParams().height;
        // toolbar+状态栏的高度81
        final int headerBgHeight = toolbarHeight + StatusBarUtil.getStatusBarHeight(this);
        // 使背景图向上移动到图片的最底端,保留toolbar+状态栏的高度
        ViewGroup.LayoutParams params = headImgBg.getLayoutParams();

        ViewGroup.MarginLayoutParams ivTitleHeadBgParams = (ViewGroup.MarginLayoutParams) headImgBg.getLayoutParams();

        int marginTop = params.height - headerBgHeight;//310-81=229

        ivTitleHeadBgParams.setMargins(0, -marginTop, 0, 0);
        headImgBg.setImageAlpha(0);

        // 为头部是View的界面设置状态栏透明
        StatusBarUtil.setTranslucentImageHeader(this, 0, toolbar);

        ViewGroup.LayoutParams imgItemBgparams = img_item_bg.getLayoutParams();
        // 获得高斯图背景的高度
        imageBgHeight = imgItemBgparams.height;//290

        // 监听改变透明度
        initScrollViewListener();

    }
实现滑动改变透明度
用页面滑动距离除以图片背景减去标题栏和状态栏的和
如果Y轴小于slidingDistance,那么title部分的背景透明度开始发生渐变
 //根据页面滑动距离改变Header透明度方法
    private void scrollChangeHeader(int scrolledY) {

        if (scrolledY < 0) {
            scrolledY = 0;
        }
        float alpha = Math.abs(scrolledY) * 1.0f / (slidingDistance);
        Drawable drawable = headImgBg.getDrawable();


        if (drawable != null) {
            if (scrolledY <= slidingDistance) {
                // title部分的渐变
                drawable.mutate().setAlpha((int) (alpha * 255));
                headImgBg.setImageDrawable(drawable);
            } else {
                drawable.mutate().setAlpha(255);
                headImgBg.setImageDrawable(drawable);
            }
        }
    }
关键类的完整源代码如下:
public class MainActivity extends AppCompatActivity {

    private List<String> mDatas;
    private RecyclerView recyclerView;
    private ImageView headImgBg,img_item_bg;
    private  Toolbar toolbar;
    private int imageBgHeight;// 这个是高斯图背景的高度
    private int slidingDistance; // 在多大范围内变色
    private MyNestedScrollView nsv_scrollview;
    private ImageView iv_one_photo;
    private String ImgUrl="http://pic46.nipic.com/20140815/2531170_172548240000_2.jpg";
    @Override
    protected void onCreate(Bundle savedInstanceState) {
        super.onCreate(savedInstanceState);
        setContentView(R.layout.activity_main);
        initData();
        initView();
        setPicture();
        initSlideShapeTheme();
    }

    public void initView(){
        recyclerView=findViewById(R.id.xrv_list);
        recyclerView.setLayoutManager(new LinearLayoutManager(this));
        recyclerView.setAdapter(new Adapter(this,mDatas));

        headImgBg=findViewById(R.id.iv_title_head_bg);//标题栏背景

        toolbar=findViewById(R.id.title_tool_bar);//标题栏

        img_item_bg=findViewById(R.id.img_item_bg);//头部背景图

        nsv_scrollview=findViewById(R.id.nsv_scrollview);//嵌套滑动控件

        iv_one_photo=findViewById(R.id.iv_one_photo);
    }
    public void initData(){
        mDatas=new ArrayList<>();
        for (int i=1;i<100;i++){
            mDatas.add(""+i);
        }
    }


    //初始化滑动渐变
    private void initSlideShapeTheme() {

        setImgHeaderBg();

        // toolbar的高度56
        int toolbarHeight = toolbar.getLayoutParams().height;
        // toolbar+状态栏的高度81
        final int headerBgHeight = toolbarHeight + StatusBarUtil.getStatusBarHeight(this);
        // 使背景图向上移动到图片的最底端,保留toolbar+状态栏的高度
        ViewGroup.LayoutParams params = headImgBg.getLayoutParams();

        ViewGroup.MarginLayoutParams ivTitleHeadBgParams = (ViewGroup.MarginLayoutParams) headImgBg.getLayoutParams();

        int marginTop = params.height - headerBgHeight;//310-81=229

        ivTitleHeadBgParams.setMargins(0, -marginTop, 0, 0);
        headImgBg.setImageAlpha(0);

        // 为头部是View的界面设置状态栏透明
        StatusBarUtil.setTranslucentImageHeader(this, 0, toolbar);

        ViewGroup.LayoutParams imgItemBgparams = img_item_bg.getLayoutParams();
        // 获得高斯图背景的高度
        imageBgHeight = imgItemBgparams.height;//290

        // 监听改变透明度
        initScrollViewListener();

    }

    //加载titlebar背景,加载后将背景设为透明
    private void setImgHeaderBg() {
        Glide.with(this)
                .load(ImgUrl)
                .bitmapTransform(new BlurTransformation(this, 200, 3))// 设置高斯模糊
                .listener(new RequestListener<String, GlideDrawable>() {//监听加载状态
                    @Override//图片加载异常回调
                    public boolean onException(Exception e, String model, Target<GlideDrawable> target, boolean isFirstResource) {
                        return false;
                    }

                    @Override//加载成功的回调
                    public boolean onResourceReady(GlideDrawable resource, String model, Target<GlideDrawable> target, boolean isFromMemoryCache, boolean isFirstResource) {
                        // Toolbar背景设为透明
                        toolbar.setBackgroundColor(Color.TRANSPARENT);
                        // 背景图初始化为全透明,该方法只对前景有效
                        headImgBg.setImageAlpha(0);
                        headImgBg.setVisibility(View.VISIBLE);
                        return false;
                    }
                }).into(headImgBg);
    }

    private void initScrollViewListener() {
        // 为了兼容api23以下
        nsv_scrollview.setOnMyScrollChangeListener(new MyNestedScrollView.ScrollInterface() {

            public void onScrollChange(int scrollX, int scrollY, int oldScrollX, int oldScrollY) {
                scrollChangeHeader(scrollY);
            }
        });
        //api23+
        int titleBarAndStatusHeight =56+StatusBarUtil.getStatusBarHeight(this);
        slidingDistance = imageBgHeight - titleBarAndStatusHeight;//图片高度-状态栏+标题栏的和

    }

    //根据页面滑动距离改变Header透明度方法
    private void scrollChangeHeader(int scrolledY) {

        if (scrolledY < 0) {
            scrolledY = 0;
        }
        float alpha = Math.abs(scrolledY) * 1.0f / (slidingDistance);
        Drawable drawable = headImgBg.getDrawable();


        if (drawable != null) {
            if (scrolledY <= slidingDistance) {
                // title部分的渐变
                drawable.mutate().setAlpha((int) (alpha * 255));
                headImgBg.setImageDrawable(drawable);
            } else {
                drawable.mutate().setAlpha(255);
                headImgBg.setImageDrawable(drawable);
            }
        }
    }

    //主图图片和高斯背景图
    private void setPicture() {
        Glide.with(this)
                .load(ImgUrl)
                .override(R.dimen.dp_140, R.dimen.dp_140)
                .into(iv_one_photo);

        // "14":模糊度;"3":图片缩放3倍后再进行模糊
        Glide.with(this)
                .load(ImgUrl)
                .error(R.mipmap.img)
                .placeholder(R.mipmap.img)
//                .crossFade(3000)//动画效果时长
                .dontAnimate()//取消动画效果
                .bitmapTransform(new BlurTransformation(this, 200, 3))// 设置高斯模糊
//                .bitmapTransform(new BlurTransformation(getActivity(), 14, 3))
                .into(img_item_bg);
    }
}
最后Demo效果

Demo地址:https://github.com/hsxiaodev/SlideDemo
学习资料:
https://cloud.tencent.com/developer/article/1335103
https://www.jianshu.com/p/1995b7135073


 2万+
2万+


 被折叠的 条评论
为什么被折叠?
被折叠的 条评论
为什么被折叠?
 到【灌水乐园】发言


