


vue基础
一、vue事件
1、事件入门
语法:使用v-on指令注册事件
<标签 v-on:事件句柄=“表达式或者事件处理函数”></标签>
简写方式
<标签 @事件句柄=“表达式或者事件处理函数”></标签>
注意事项:
事件处理函数作为事件句柄的值不需要调用
<!DOCTYPE html>
<html lang="en" xmlns:v-on="http://www.w3.org/1999/xhtml">
<head>
    <meta charset="UTF-8">
    <title>vue事件命令</title>
    <script type="text/javascript" src="node_modules/vue/dist/vue.js"></script>
</head>
<body>
    <div id="app">
        <hr>
        <span>vue点击事件</span><br/>
        <button v-on:click="num++">点击一</button>
        <button @click="num++">点击二</button>
        <button @click="countSum">点击三</button>
        <button @click="countSum()">点击四</button>
        <button @click="say('hello word!')">点击五</button><br/>
        {{num}}
    </div>
    <script>
        new Vue({
            el: "#app",
            data: {
                num: 0
            },
            methods: {
                countSum() {
                    this.num++;
                },
                say(msg){
                    alert(msg);
                }
            }
        });
    </script>
</body>
</html>
2、 内联事件处理函数
语法:
使用v-on指令注册事件
<标签 v-on:事件句柄=“内联函数(实际参数)”></标签>
简写方式
<标签 @事件句柄=“内联函数(实际参数)”></标签>
注意事项:
内联事件处理函数需要调用才能够执行并且可以传入实际参数给函数
<div id="app">
 <button v-on:click="say('hello')">hello</button><br/>
 <button @click="say('hi')">hi</button><br/>
</div>

var app = new Vue({
	el: "#app",
	data: {
	},
	methods:{
		say:function(message){
			//this指向当前vue对象:app
			console.log(this);
		}
	}
});
二、计算属性和watch
1、计算属性
在插值表达式中使用js表达式是非常方便的,而且也经常被用到。
但是如果表达式的内容很长,就会显得不够优雅,而且后期维护起来也不方便,例如下面的场景,我们有一个日期的数据,但是是毫秒值:
data: {
  	 birthday:4529032123321
      }
方案1:我们在页面渲染,希望得到yyyy-MM-dd的样式:
<h1>您的生日是:{{
      new Date(birthday).getFullYear() + '-'+ new Date(birthday).getMonth()+ '-' + new Date(birthday).getDay()
      }}
  </h1>
虽然得到了结果,但是非常的麻烦
方案2:
vue中提供了计算属性,来替代复杂的表达式:
js部分
<script>
        new Vue({
            el: "#app",
            data: {
               birthday:4529032123321
            },
            methods:{
                //方案一
                getBrith1(){
                    return new Date(this.birthday).getFullYear() + "年"
                            + new Date(this.birthday).getMonth() + "月"
                            + new Date(this.birthday).getDate() + "日";
                }
            },
            computed:{
                //方案二
                getBrith1(){
                    return new Date(this.birthday).getFullYear() + "年"
                            + new Date(this.birthday).getMonth() + "月"
                            + new Date(this.birthday).getDate() + "日";
                }
            }
        });
    </script>
html部分:
<div id="app">
        <hr>
        <span>vue计算属性</span><br/>
        {{getBrith1()}}<br/>
        {{getBrith1()}}
    </div>
总的来说,想要实现同样的功能,一共有2种方法,计算属性本质就是方法,但是一定要返回数据。然后页面渲染时,可以把这个方法当成一个变量来使用。
效果:

2、watch
watch可以让我们监控一个值的变化。从而做出相应的反应。
实例:
<body>
    <div id="app">
        <hr>
        <span>vue_wath属性</span><br/>
        <input type="text" v-model="msg"/>
    </div>
    <script>
        new Vue({
            el: "#app",
            data: {
               msg:''
            },
            methods:{

            },
            watch:{
                msg(newVal,oldVal){
                    console.debug(newVal, oldVal);
                }
            }
        });
    </script>
</body>
运行结果:

三、组件
1、什么是主键
组件 (Component) 是 Vue.js 最强大的功能之一。组件可以扩展 HTML 元素,封装可重用的代码。在较高层面上,组件是自定义元素标签,Vue.js 的编译器为它添加特殊功能。在有些情况下,组件也可以表现为用 js特性进行了扩展的原生 HTML 元素。
总结:
组件是用来完成特定功能的一个自定义的HTML标签
实例:
<div>
	<mycomponent1></mycomponent1>
</div>
注: mycomponent1就是一个组件, 该组件必须通过Vue为mycomponent1赋予一定的功能。
2、组件的作用
组件是对特定功能代码(html,css,js)的封装, 通过组件的名字可以重复利用该组件中的代码。
3、组件的分类
组件分为全局组件和局部组件
全局组件:在所有vue实例中(.在它所挂载元素下面有效)有效
局部组件:在自己vue实例中(.在它所挂载元素下面有效)有效
3.1、全局组件
语法:
Vue.component(“自定义标签的名字”,{配置对象})
特点:
全局组件可以在任何被挂着的标签中使用。
全局组件的配置对象中必须包含template属性。
注意事项:
template中的html必须在一个标签中. 仅且只能有一个根节点
应用场景:
如果该组件的特定功能需要在任何被挂着的标签中使用.。推荐使用全局组件
<div id="app">
    <mycomponent1></mycomponent1>
    <mycomponent2></mycomponent2>
</div>

<div id="app1">
    <mycomponent1></mycomponent1>
    <mycomponent2></mycomponent2>
</div>
-------------------------------------------------------------------------------
//定义第一个全局组件
Vue.component("mycomponent1",{
	template : "<h1>这是第一个全局组件</h1>"
})

//定义第二个全局组件
var component2Config = {
	template : "<h1>这是第二个全局组件</h1>"
};
Vue.component("mycomponent2",component2Config);

var app = new Vue({
	el: "#app",
	data: {
	}
});

var app1 = new Vue({
	el: "#app1",
	data: {
	}
});
3.2、局部组件
语法:
var app = new Vue({
el: “#app”,
data: {},
components : {
“局部组件的名字1” : {组件的配置对象}
“局部组件的名字2” : {组件的配置对象}
}
});
特点:
局部组件只能够在所挂载的标签中使用
<div id="app1">
    <mycomponent></mycomponent>
</div>
<div id="app2">
    <mycomponent></mycomponent>
</div>


//>>1. 在id=app1挂载的实例的components中定义局部组件
var app1 = new Vue({
	el: "#app1",
	data: {},
	components : {
		"mycomponent" : {
			template : "<h1>这是一个局部组件</h1>"
		}
	}
});

//>>2. 在id=app2的标签中是不能够使用上面app2对象的局部组件.
var app2 = new Vue({
	el: "#app2",
	data: {}
});
4、 组件使用两种HTML模板
组织两种方式
1 直接在template属性写上html代码字符串或者变量指定
template: “html代码的字符串”
2 将当前网页中的html标签作为模板代码 (大量的HTML不用拼装HTML字符串)
a. 在网页中定义template标签或者script标签包含模板中需要的html模板代码
<!--
       <template id="mytemplate">
            <h1>template标签中的html</h1>
        </template>

       <script type="text/template" id="mytemplate">
            <h1>template标签中的html</h1>
        </script>

        -->
b. template属性上使用上门的html模板代码。
<!--
        "mycomponent2":{
              template: "#mytemplate" ,  #代表找到对应的html代码作为当前组件的模板代码
        }-->
代码:
<div id="app4">
    <mycomponent4></mycomponent4>
</div>

<!--   <template id="mytemplate">
       <h1>template标签中的html</h1>
   </template-->>
<script type="text/template" id="mytemplate">
    <h1>template标签中的htmlssssssssssssssss</h1>
</script>
<script type="text/javascript">
    var app4 =  new Vue({
        el:"#app4",
        components:{
            "mycomponent4":{
                template:"#mytemplate"
            }
        }
    });
</script>
5、组件的数据必须是函数
组件中数据的定义
语法:
“组件的名字”:{
template: “”,
data : function(){
return {
键1:值1,
键2:值2
}
}
}
注意事项:
1) data数据只能够以函数的形式返回,因为函数中可以写其他的业务代码
2)只能够在各自的组件模板中使用各自的组件中的data数据
3)Vue对象中的数据不能够在组件中使用. 组件的数据也不能够在挂载的html标签上使用.
components:{
“mycomponent1”:{
// “template”:"#templateStr1"
“template”:"#templateStr2",
//模板是定义数据以下是可行的
//1 必须是函数
//2 通过return返回数据对象
//3 如果有多个数据就是对象对象多个属性及值
data(){
return {
messaage:“jjjj”,
yhptest:“xxxxxxxxxxxxxx”
}
}
测试代码:
<!DOCTYPE html>
<html lang="en" xmlns:v-on="http://www.w3.org/1999/xhtml">
<head>
    <meta charset="UTF-8">
    <title>vue组件template的数据必须是函数</title>
    <script type="text/javascript" src="node_modules/vue/dist/vue.js"></script>
</head>
<body>
    <div id="app1">
        <hr>
        <span>vue组件template的数据必须是函数</span><br/>
        <mycomponent1></mycomponent1><br/>
        {{name}}
    </div>
    <template id="mytemplate">
        <form>
            {{name}}:<input type="text" />
        </form>
    </template>

    <script>
      new Vue({
            el: "#app1",
            data:{
                "name": "张三"
            },
            components: {
                "mycomponent1": {
                    template: "#mytemplate",
                    data:function () {
                        return{"name": "用户名"}
                    }
                }
            }
        });
    </script>
</body>
</html>
测试结果:

四、路由
1、什么是路由
路由是负责将进入的浏览器请求映射到特定的组件代码中。即决定了由谁(组件)去响应客户端请求。简单说路由就是url地址和对应的资源的映射,通过一个路径的url地址,可以唯一找到一个资源。路由不包含子啊vue中,是一个插件,需要单独下载。
官方地址:https://router.vuejs.org/zh/
地址:https://unpkg.com/vue-router@3.0.1/dist/vue-router.js
2、路由入门
在js中定义路由;
<script src="node_modules/vue-router/dist/vue-router.js"></script>
挂载到一个dom元素上;
使用路由;
定义路由出口
<!DOCTYPE html>
<html lang="en" xmlns:v-on="http://www.w3.org/1999/xhtml">
<head>
    <meta charset="UTF-8">
    <title>vue路由</title>
    <script type="text/javascript" src="node_modules/vue/dist/vue.js"></script>
    <script type="text/javascript" src="node_modules/vue-router/dist/vue-router.js"></script>
</head>
<body>
    <div id="app1">
        <hr>
        <span>vue路由</span><br/>
        <router-link to="/">首页</router-link>
        <router-link to="/employee">员工管理</router-link>
        <router-link to="/permis">权限管理</router-link>
        <router-link to="/mune">菜单管理</router-link><br/>
        <!-- 路由出口-->
        <router-view></router-view>
    </div>
    <script>
        var index = Vue.component("index",{
            template:"<h1>首页</h1>"
        });
        var employeeCp = Vue.component("employee",{
            template:"<h1>员工管理</h1>"
        });
        var permisCp = Vue.component("permis",{
            template:"<h1>权限管理</h1>"
        });
        var muneCp = Vue.component("mune",{
            template:"<h1>菜单管理</h1>"
        });

        var routes1 = new VueRouter({
            routes:[{
                path:"/",
                component:index
            },{
                path:"/employee",
                component:employeeCp
            },{
                path:"/permis",
                component:permisCp
            },{
                path:"/mune",
                component:muneCp
            }]
        });
        //把路由挂载到vue对象上面
        new Vue({
            el:"#app1",
            router:routes1
        });
    </script>
</body>
</html>
五、webpack打包
1、为什么需要打包
- 将许多碎小文件打包成一个整体,减少单页面内的衍生请求次数,提高网站效率。
- 将ES6的高级语法进行转换编译,以兼容老版本的浏览器。
- 将代码打包的同时进行混淆,提高代码的安全性。
2、是什么
Webpack 是一个前端资源加载/打包工具。它将根据模块的依赖关系进行静态分析,然后将这些模块按照指定的规则生成对应的静态资源。

从图中我们可以看出,Webpack 可以将多种静态资源 js、css、less (扩展css样式)转换成一个静态文件,减少了页面的请求。 接下来我们简单为大家介绍 Webpack 的安装与使用。
3、使用
3.1、安装
本地安装:
npm install webpack --save-dev
npm install webpack-cli --save-dev
全局安装:–推荐使用 后面要用
npm install -g webpack
npm install -g webpack-cli
3.2、简单使用
3.2.1、Js打包-入门
创建前端项目
npm init -y

a.js
var a = “a模块”;
var b = require(’./b.js’);
console.log(b);
b.js
define(function () {
var b = “b模块”;
return b;
});
—amd模式可以但是commonjs必须在nodejs环境,浏览器环境不ok
打包:webpack src/a.js -o dist/bundle.js
Index.html
3.2.2、Js打包-配置文件
上面我们每次在打包的时候,都要输入 webpack src/a.js -o dist/bundle.js 这个命令,比较麻烦,所以我们可以按照下面的方式,新建一个js文件,到时候打包的时候,只需要运行webpack 命令就可以进行打包。
webpack.config.js ,该文件与项目根处于同级目录
var path = require("path");
module.exports = {
		entry: './src/main.js',
		output: {
		path: path.resolve(__dirname, './dist'),
		filename: 'bundle.js'
	}
}
3.3、css加载
3.3.1、加载器
- webpack 可以使用 loader 来预处理文件。这允许你打包除JavaScript 之外的任何静态资源。你可以使用 Node.js 来很简单地编写自己的 loader。
- loader 通过在 require() 语句中使用 loadername! 前缀来激活,或者通过 webpack 配置中的正则表达式来自动应用 -
vue-loader 转换vue组件 *.vue
css-loader 加载css文件
babel-loader 加载 ES2015+ 代码,然后使用 Babel 转译为 ES5
3.3.2、实现

步骤一:
npm install style-loader --save-dev
npm install css-loader --save-dev
步骤二:
a. js引入:
var a = "a模块";
var b = require('./b.js');
console.log(b);
require('../css/index.css')
步骤三:在webpack.config.js文件引入下面代码
var path = require("path");
module.exports = {
    entry: './web/js/a.js',
    output: {
        path: path.resolve(__dirname, './dist'),
        filename: 'bundle.js'
    },
    module: {
        rules: [
            {
                test: /\.css$/,     //匹配文件规则
                use: ['style-loader', 'css-loader']    //匹配后使用什么加载器进行模块加载
                // webpack use的配置,是从右到左进行加载的
            },
        ]
    }
}
步骤四:打包:webpack
3.4、热更新web服务器
刚才的案例中,我们都是本地运行。webpack给我们提供了一个插件,可以帮我们运行一个web服务;
1)安装插件:npm install webpack-dev-server --save-dev
2)添加启动脚本
在package.json中配置script
  "scripts": {
    "dev": "webpack-dev-server --inline  --progress --config ./webpack.conf.js",      },
–inline:自动刷新
–hot:热加载
–port:指定端口
–open:自动在默认浏览器打开
–host:可以指定服务器的 ip,不指定则为127.0.0.1
npm run dev/test
出现错误之后
https://www.cnblogs.com/gqx-html/p/10756388.html
https://www.cnblogs.com/laraLee/p/9174383.html
"devDependencies": {
  "css-loader": "^3.1.0",
  "style-loader": "^0.23.1",
  "webpack": "^3.10.0",
  "webpack-dev-server": "^2.9.7"
},
在执行 npm install
六、 Vue-cli
1、简介
在开发中,需要打包的东西不止是js、css、html。还有更多的东西要处理,这些插件和加载器如果我们一一去添加就会比较麻烦。
幸好,vue官方提供了一个快速搭建vue项目的脚手架:vue-cli
使用它能快速的构建一个web工程模板。
官网:https://github.com/vuejs/vue-cli
安装命令:npm install -g vue-cli
2、快速上手
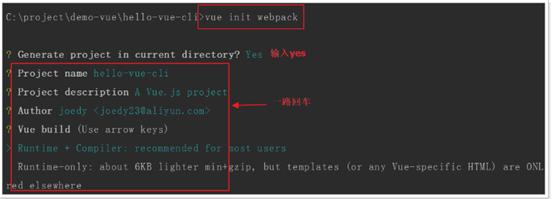
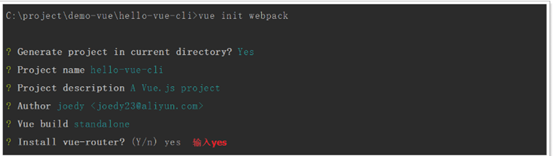
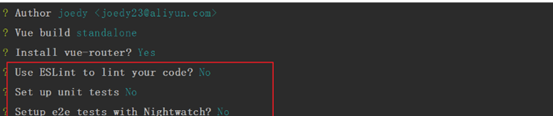
2.1、 新建模块
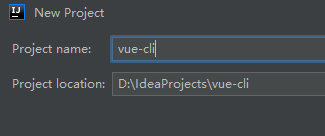
2.2、 进入目录

2.3、 vue-cli快速创建webpack项目
vue init webpack


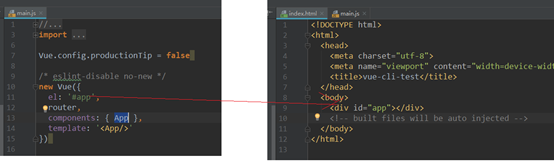
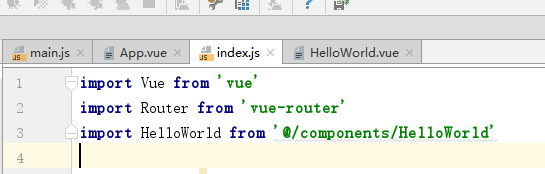
3、项目结构
入口

4、单文件组件

而单文件组件中包含三部分内容:
- template:模板,支持html语法高亮和提示
- script:js脚本,这里编写的就是vue的组件对象,还可以有data(){}等
- style:样式,支持CSS语法高亮和提示
每个组件都有自己独立的html、JS、CSS,互不干扰,真正做到可独立复用。
运行


 221
221


 被折叠的 条评论
为什么被折叠?
被折叠的 条评论
为什么被折叠?
 到【灌水乐园】发言


