


官网:https://uniapp.dcloud.net.cn/collocation/package.html#%E7%94%A8%E6%B3%95
小程序开发完成之后需要一套代码多个小程序使用,每次都需要在manifest.json文件中手动修改,大大增加了开发的复杂度。
官网:https://uniapp.dcloud.net.cn/collocation/package.html#%E7%94%A8%E6%B3%95
小程序开发完成之后需要一套代码多个小程序使用,每次都需要在manifest.json文件中手动修改,大大增加了开发的复杂度,动态获取appid,便于维护小程序数据。
一、修改 package.json 扩展配置
 "uni-app": {
    "scripts": {
      "fbl": {
        "title": "翻倍了",
        "env": {
          "UNI_PLATFORM": "mp-weixin",
          "ENV_TYPE": "fbl"
        },
        "define": {
          "MP-WEIXIN": true
        }
      },
      "wlsc": {
        "title": "为了生存",
        "env": {
          "UNI_PLATFORM": "mp-weixin",
          "ENV_TYPE": "wlsc"
        },
        "define": {
          "MP-WEIXIN": true
        }
      }
    }
  },
补充:
{
    /**
     * package.json其它原有配置
     * 拷贝代码后请去掉注释!
     */
    "uni-app": {// 扩展配置
        "scripts": {
            "custom-platform": { //自定义编译平台配置,可通过cli方式调用
                "title":"自定义扩展名称", // 在HBuilderX中会显示在 运行/发行 菜单中
                "browser":"",  //运行到的目标浏览器,仅当UNI_PLATFORM为h5时有效
                "env": {//环境变量
                    "UNI_PLATFORM": "",  //基准平台
                    "MY_TEST": "", // ... 其他自定义环境变量
                 },
                "define": { //自定义条件编译
                    "CUSTOM-CONST": true //自定义条件编译常量,建议为大写
                }
            }
        }
    }
}
Tips: ●
UNI_PLATFORM仅支持填写uni-app默认支持的基准平台,目前仅限如下枚举值:h5、mp-weixin、mp-alipay、mp-baidu、mp-toutiao、mp-qq
● browser
仅在UNI_PLATFORM为h5时有效,目前仅限如下枚举值:chrome、firefox、ie、edge、safari、hbuilderx
● package.json文件中不允许出现注释,否则扩展配置无效 ● vue-cli 需更新到最新版,HBuilderX需升级到
2.1.6+ 版本
二、根目录创建config/env.ts 文件
type EnvConfigType = {
  appid: string
  appName: string
  appLogoUrl: string
}
// 翻倍了
const fbl: EnvConfigType = {
  appid: 'wx123cbb5e',
  appName: '翻倍了',
}

// 为了生存
const wlsc: EnvConfigType = {
  appid: 'wxd4573',
  appName: '为了生存',
}

// 注意:这里的属性名要和上面package.json中定义的扩展节点编译名称相同
const ENV_CONFIG = {
  fbl,
  wlsc,
}

module.exports = ENV_CONFIG
三、 vite.config.ts 配置文件,修改appid
import { defineConfig } from 'vite'
import VueTypeImports from 'vite-plugin-vue-type-imports'
import uni from '@dcloudio/vite-plugin-uni'

// 导入fs模块
const fs = require('fs')
// 导入环境变量配置文件
const ENV_CONFIG = require('./config/env.ts')
const manifestPath = `${__dirname}/src/manifest.json` // 注意一下自己配置的 manifestPath 是否正确
let Manifest = fs.readFileSync(manifestPath, {
  encoding: 'utf-8',
})
function replaceManifest(path: string, value: string) {
  const arr = path.split('.')
  const len = arr.length
  const lastItem = arr[len - 1]

  let i = 0
  const ManifestArr = Manifest.split(/\n/)

  for (let index = 0; index < ManifestArr.length; index++) {
    const item = ManifestArr[index]
    if (new RegExp(`"${arr[i]}"`).test(item)) ++i
    if (i === len) {
      const hasComma = /,/.test(item)
      ManifestArr[index] = item.replace(
        new RegExp(`"${lastItem}"[\\s\\S]*:[\\s\\S]*`),
        `"${lastItem}": ${value}${hasComma ? ',' : ''}`,
      )
      break
    }
  }
  Manifest = ManifestArr.join('\n')
}
// 获取执行命令
const ENV_TYPE = JSON.parse(process.env.UNI_CUSTOM_DEFINE)['ENV_TYPE'] // 打印出来是否正确
// 读取环境变量内容
const appid = ENV_CONFIG[ENV_TYPE].appid
if (appid) {
  replaceManifest('mp-weixin.appid', `"${appid}"`)
}
fs.writeFileSync(manifestPath, Manifest, { flag: 'w' })

// https://vitejs.dev/config/
export default defineConfig({
  build: {
    // 开发阶段启用源码映射:https://uniapp.dcloud.net.cn/tutorial/migration-to-vue3.html#需主动开启-sourcemap
    sourcemap: process.env.NODE_ENV === 'development',
  },
  plugins: [uni(), VueTypeImports()],
})
四、运行及发布项目
1、启动命令
vue-cli开发者可通过如下命令,启动钉钉小程序平台的编译
运行项目
npm run dev:custom fbl
npm run dev:custom wlsc
发布项目
npm run build:custom fbl
npm run build:custom wlsc
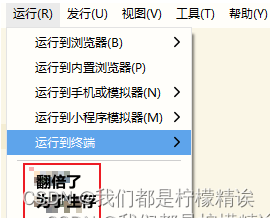
HBuilderX会根据package.json的扩展配置,在运行、发行菜单下,生成自定义菜单(钉钉小程序),开发者点击对应菜单编译运行即可,如下图:

2、修改启动命令
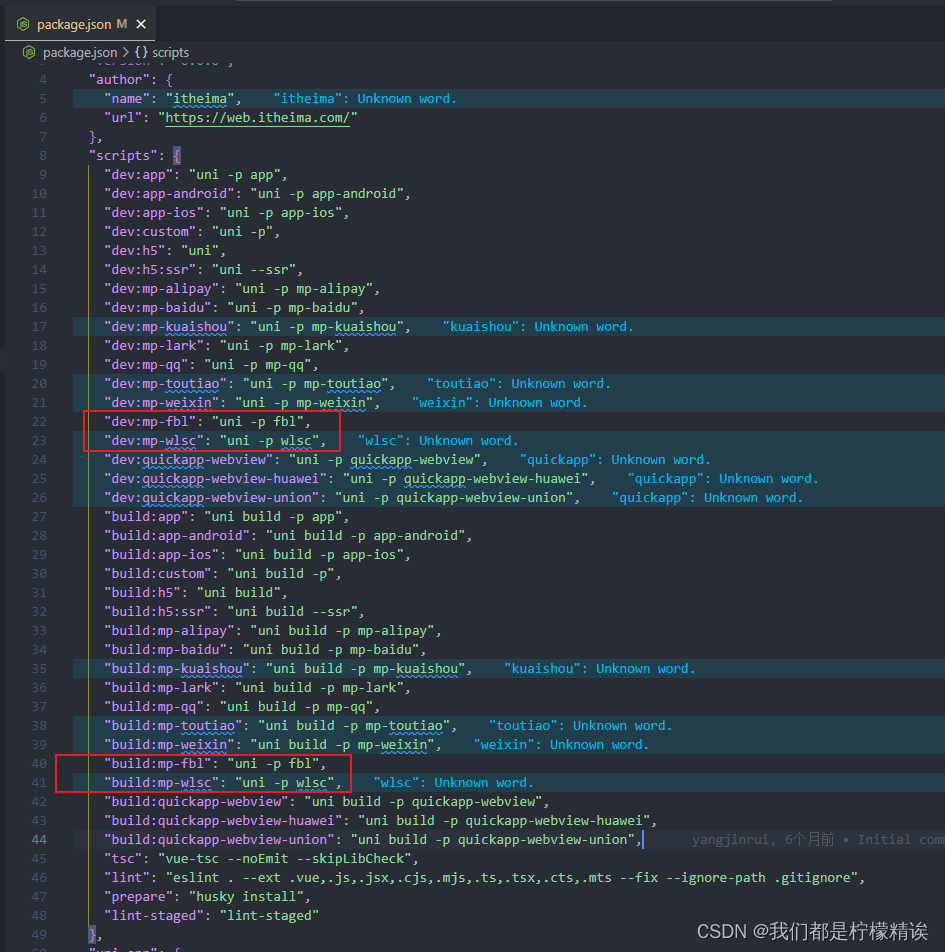
添加指令
    "dev:mp-fbl": "uni -p fbl",
    "dev:mp-wlsc": "uni -p wlsc",

    "build:mp-fbl": "uni -p fbl",
    "build:mp-wlsc": "uni -p wlsc",
启动打包命令:
# 启动
npm run dev:mp-fbl
npm run dev:mp-wlsc
# 打包
npm run build:mp-fbl
npm run build:mp-wlsc
五、获取自定义环境配置的信息
可以在 vite.config.ts 文件中,添加 define 共享选项 。
1、vite 的 define 共享选项

2、配置共享选项
我们可以将处理好的当前微信小程序环境配置信息,放到共享选项中的常量中,修改vite.config.ts文件。
import { defineConfig } from 'vite'
import VueTypeImports from 'vite-plugin-vue-type-imports'
import uni from '@dcloudio/vite-plugin-uni'

// 导入fs模块
const fs = require('fs')
// 导入环境变量配置文件
const ENV_CONFIG = require('./config/env.ts')
const manifestPath = `${__dirname}/src/manifest.json`
let Manifest = fs.readFileSync(manifestPath, {
  encoding: 'utf-8',
})
function replaceManifest(path: string, value: string) {
  const arr = path.split('.')
  const len = arr.length
  const lastItem = arr[len - 1]

  let i = 0
  const ManifestArr = Manifest.split(/\n/)

  for (let index = 0; index < ManifestArr.length; index++) {
    const item = ManifestArr[index]
    if (new RegExp(`"${arr[i]}"`).test(item)) ++i
    if (i === len) {
      const hasComma = /,/.test(item)
      ManifestArr[index] = item.replace(
        new RegExp(`"${lastItem}"[\\s\\S]*:[\\s\\S]*`),
        `"${lastItem}": ${value}${hasComma ? ',' : ''}`,
      )
      break
    }
  }
  Manifest = ManifestArr.join('\n')
}
// 获取执行命令
const ENV_TYPE = JSON.parse(process.env.UNI_CUSTOM_DEFINE)['ENV_TYPE']
// 读取环境变量内容
const appid = ENV_CONFIG[ENV_TYPE].appid
if (appid) {
  replaceManifest('mp-weixin.appid', `"${appid}"`)
}
fs.writeFileSync(manifestPath, Manifest, { flag: 'w' })
console.log(ENV_CONFIG[ENV_TYPE])
// https://vitejs.dev/config/
export default defineConfig({
  build: {
    // 开发阶段启用源码映射:https://uniapp.dcloud.net.cn/tutorial/migration-to-vue3.html#需主动开启-sourcemap
    sourcemap: process.env.NODE_ENV === 'development',
  },
  plugins: [uni(), VueTypeImports()],
  // 定义全局常量替换方式。其中每项在开发环境下会被定义在全局,而在构建时被静态替换。
  define: {
    _PROCESS_ENV_APP_INFO: ENV_CONFIG[ENV_TYPE],
  },
})
3、页面获取自定义环境配置信息
打开App.vue文件,在 onShow 里面去执行仓储的赋值。
1)仓储创建
import { defineStore } from 'pinia'

export const useAppInfoStore = defineStore('appInfo', () => {
  const appInfo = ref<{ appid: string, appName: string, appLogoUrl: string }>(uni.getStorageSync('_appInfo'))
  // 获取缓存小程序自定义环境配置信息
  const setAppInfo = (appData: { appid: string; appName: string; appLogoUrl: string }) => {
    appInfo.value = appData
    uni.setStorage({
      key: '_appInfo',
      data: appData,
    })
  }
  return { setAppInfo, appInfo }
})
2)在App.vue文件中执行赋值操作
<script setup lang="ts">
  import { onLaunch, onShow, onHide } from '@dcloudio/uni-app'
  import { useThemesStore, useAppInfoStore } from '@/stores'

  const themesStore = useThemesStore()
  const appInfoStore = useAppInfoStore()

  onLaunch(() => {
    console.log('App Launch')
  })
  onShow(() => {
    console.log('App Show', getCurrentPages())
    themesStore.actionThemeCfg() // 执行仓储赋值
    appInfoStore.setAppInfo(_PROCESS_ENV_APP_INFO) // 设置app信息
  })

  onHide(() => {
    console.log('App Hide')
  })

  // #ifndef MP-WEIXIN
  // 隐藏原生的底部tabbar
  uni.hideTabBar()
  // #endif
</script>

<style lang="scss">
</style>
取值:
import { useAppInfoStore } from '@/stores'
const { appInfo } = useAppInfoStore()

 <image
   v-if="appInfo.appLogoUrl"
    class="app-logo"
    mode="heightFix"
    :src="appInfo.appLogoUrl"
  />
  <text v-else>{{ appInfo.appName }}</text>


 3356
3356

 被折叠的 条评论
为什么被折叠?
被折叠的 条评论
为什么被折叠?
 到【灌水乐园】发言


