


一,ReentrantReadWriteLock原理
读写锁用的是同一个 Sycn 同步器,因此等待队列、state 等也是同一个,写锁状态占了 state 的低 16 位,而读锁使用的是 state 的高 16 位;(state是int类型,占4个字节,4*8 = 32位)。
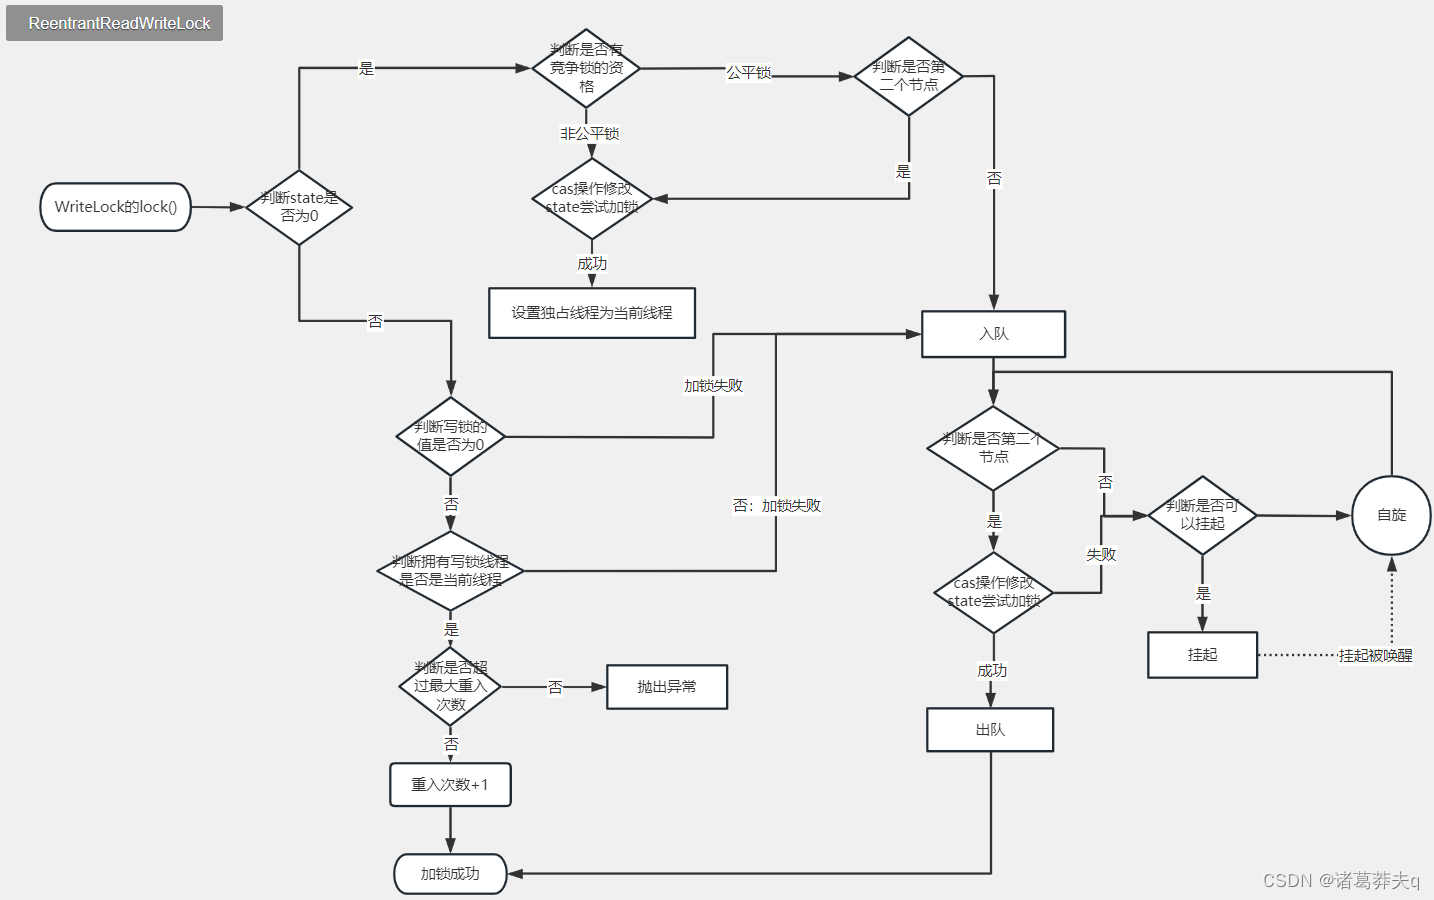
1.1 WriteLock的lock()
WriteLock的lock()方法:
public void lock() {
    sync.acquire(1);
}
跟进 sync.acquire(1);方法:
public final void acquire(int arg) {
    // 标记1.1.A:tryAcquire(arg)方法,后面解析
    // 标记1.1.B:addWaiter(Node.EXCLUSIVE),后面解析
    // 标记1.1.C: acquireQueued(addWaiter(Node.EXCLUSIVE), arg),后面解析
    if (!tryAcquire(arg) &&
        acquireQueued(addWaiter(Node.EXCLUSIVE), arg))
        selfInterrupt();
}
解析标记1.1.A,跟进tryAcquire(arg)方法:
protected final boolean tryAcquire(int acquires) {
   // 获得当前线程
    Thread current = Thread.currentThread();
    // 获得 Sycn的state的值
    int c = getState();
    // 获取 state低16位的值 即写锁的值
    int w = exclusiveCount(c);
    // c != 0表示已经加锁了,但不知道添加的读锁还是写锁,是别人添加还是自己添加的
    if (c != 0) {
        // 情况一:w == 0 返回false加锁失败
        // 失败原因:w == 0表示没加写锁,而c != 0,那一定是读锁
        // 读锁和我们当前想要进行的加写锁的操作,属于重入升级锁是不支持的

        // 情况二:w != 0 并且 current != getExclusiveOwnerThread()返回false加锁失败
        // 失败原因:w != 0 表示加了写锁,current != getExclusiveOwnerThread()表示不是当前线程
        // 别人加了写锁,写写互斥,返回false
       if (w == 0 || current != getExclusiveOwnerThread())
            return false;

       // 走到这一步说明当达了情况三 ,w != 0 并且 current == getExclusiveOwnerThread()
       // 情况三 :w != 0 表示一定加了写锁  current == getExclusiveOwnerThread()表示当前线程
       // 情况三是当前线程加了写锁,可以进行锁重入的操作
        if (w + exclusiveCount(acquires) > MAX_COUNT)
            throw new Error("Maximum lock count exceeded");
       // 锁重入次数加一
        setState(c + acquires);
        return true;
    }
    // c == 0 才执行如下代码,c == 0 表示还未加锁

    // 注意:writerShouldBlock返回false才是执行compareAndSetState(c, c + acquires)方法
    if (writerShouldBlock() ||
        !compareAndSetState(c, c + acquires))
        return false;

   // setExclusiveOwnerThread设置当前线程是锁的拥有者
    setExclusiveOwnerThread(current);
    return true;

}
writerShouldBlock() 解析:writerShouldBlock()方法有公平和非公平的两种实现 
非公平的:
final boolean writerShouldBlock() {
    return false; // 方法返回false表示可以尝试获取锁
}
公平的:
final boolean writerShouldBlock() {
    return hasQueuedPredecessors(); // 方法返回false表示可以尝试获取锁
}
继续跟进hasQueuedPredecessors()方法:
public final boolean hasQueuedPredecessors() {
    Node t = tail;
    Node h = head;
    Node s;
    return h != t &&
        ((s = h.next) == null || s.thread != Thread.currentThread());
}
- 情况1: h == t 表示等待队列中没有阻塞的线程,此时返回false;
- 情况2: h != t 并且 (s = h.next) == null 表示等待队列中初始化未完成,此时不确定是否有线程正在入队初始化,所以返回true;
- 情况3: h != t 并且 (s = h.next) != null 并且 s.thread != Thread.currentThread() 表示当前线程不是等待队列第二个节点,此时返回true;
- 情况4: h != t 并且 (s = h.next) != null 并且 s.thread == Thread.currentThread() 表示当前线程是等待队列第二个节点,此时返回false;
解析标记1.1.B的addWaiter(Node.EXCLUSIVE)方法和标记1.1.C的acquireQueued(addWaiter(Node.EXCLUSIVE), arg),在获取锁失败的时候会通过addWaiter(Node.EXCLUSIVE)方法进入阻塞队列,通过acquireQueued(addWaiter(Node.EXCLUSIVE), arg)方法尝试挂起,这里就不详说了,可以看ReentrantLock原理文章中有详细介绍。
下图链接地址:
1.2 ReadLock的lock()
ReadLock的lock()方法:
 public void lock() {
    sync.acquireShared(1);
}
继续跟进sync.acquireShared(1);方法:
public final void acquireShared(int arg) {
    // tryAcquireShared尝试获取锁,包含锁重入.标记1.2.A:tryAcquireShared方法,后面解析
    if (tryAcquireShared(arg) < 0)。
        // doAcquireShared 入队,挂起。标记1.2.B:doAcquireShared方法,后面解析
        doAcquireShared(arg);
}
tryAcquireShared 返回值:
- -1 表示失败
- 0 表示成功,但后继节点不会继续唤醒
- 正数表示成功,而且数值是还有几个后继节点需要唤醒,读写锁返回 1
在解析tryAcquireShared(arg)方法,之前介绍两个类HoldCounter类和ThreadLocalHoldCounter类
HoldCounter类:用来记录读锁加锁次数
static final class HoldCounter {
    int count = 0; // 记录读锁加锁次数
    final long tid = getThreadId(Thread.currentThread()); // 获取加锁次数对应线程的tid
}
ThreadLocalHoldCounter类:用来存放不是第一个获取读锁的线程的其他线程的读锁重入数对象,继承ThreadLocal
static final class ThreadLocalHoldCounter
	extends ThreadLocal<HoldCounter> {
	public HoldCounter initialValue() {
		return new HoldCounter();
	}
}
解析标记1.2.A,跟进tryAcquireShared(arg)方法:
protected final int tryAcquireShared(int unused) {
    // 获取当前线程
    Thread current = Thread.currentThread();
    // 获得Sycn的state的值
    int c = getState();

    // exclusiveCount(c) != 0,低16位不为0,一定加了写锁
    // getExclusiveOwnerThread() != curren,不是当前线程加的
    if (exclusiveCount(c) != 0 &&
        getExclusiveOwnerThread() != current)
        return -1; // 不是自己添加的写锁返回false
    // 能走到下面的断要么是读锁,要么是无锁
    int r = sharedCount(c); // sharedCount(c),高16位
    // readerShouldBlock方法返回值是false有资格竞争锁,标记①,后面解析
    // compareAndSetState方法是 读锁加一
    if (!readerShouldBlock() &&
        r < MAX_COUNT &&
        compareAndSetState(c, c + SHARED_UNIT)) {
        if (r == 0) { // 无锁
            firstReader = current; // 设置当前线程是第一个读线程,firstReader记录的是首个获得读锁的线程;
            firstReaderHoldCount = 1; // 资源占用1,firstReaderHoldCount记录其持有的读锁数
        } else if (firstReader == current) { // r != 0 已经加了读锁
            firstReaderHoldCount++ ; // 锁重入
        } else { // r != 0 已经加了读锁且不是当前线程
            HoldCounter rh = cachedHoldCounter; // 获取计数器
            if (rh == null || rh.tid != getThreadId(current)) //计数器为空或者计数器的tid不为当前正在运行的线程的tid
                cachedHoldCounter = rh = readHolds.get(); // readHolds是ThreadLocalHoldCounter用来存放不是第一个获取读锁的线程的其他线程的读锁重入数对象
            else if (rh.count == 0) // 计数为0
                readHolds.set(rh); // 加入到readHolds中
            rh.count++;// 计数+1
        }
        return 1;
    }
    // 没有资格竞争锁或者竞争锁失败才会进入fullTryAcquireShared方法,标记②,后面解析
    return fullTryAcquireShared(current);
}
解析标记①,跟进readerShouldBlock()方法判断是否有资格获取锁:

同样的readerShouldBlock()方法,也有公平和非公平两种实现。
非公平锁:
final boolean readerShouldBlock() {
    return apparentlyFirstQueuedIsExclusive();
}
继续跟进apparentlyFirstQueuedIsExclusive()方法:
final boolean apparentlyFirstQueuedIsExclusive() { // 返回false是有资格获取
    Node h, s;
    return (h = head) != null &&
        (s = h.next)  != null &&
        !s.isShared()         &&
        s.thread != null;
}
- 情况1:(h = head) == null 表示等待队列未初始化,返回false
- 情况2:(h = head) != null 且 (s = h.next) == null 表示等待队列没有阻塞的线程,返回false
- 情况3:(h = head) != null 且 (s = h.next) != null 且s.isShared() == ture 表示等待队列第二个节点是共享节点,返回false(共享节点是非公平的)
- 情况4:(h = head) != null 且 (s = h.next) != null 且s.isShared() == false 且 s.thread == null;表示等待队列第二个节点不是共享节点,但是对应的线程是null,返回false
- 情况4:(h = head) != null 且 (s = h.next) != null 且s.isShared() == false 且 s.thread != null;表示等待队列第二个节点不是共享节点,对应的线程也不是null,返回ture
公平锁:和WriteLock的lock()方法中判断是否有资格是调用同样的方法:
final boolean readerShouldBlock() {
    return hasQueuedPredecessors(); // 返回false是有资格获取
}
继续跟进hasQueuedPredecessors();方法:
public final boolean hasQueuedPredecessors() {
    Node t = tail;
    Node h = head;
    Node s;
    return h != t &&
        ((s = h.next) == null || s.thread != Thread.currentThread());
}
- 情况1: h == t 表示等待队列中没有阻塞的线程,此时返回false;
- 情况2: h != t 并且 (s = h.next) == null 表示等待队列中初始化未完成,此时不确定是否有线程正在入队初始化,所以返回true;
- 情况3: h != t 并且 (s = h.next) != null 并且 s.thread != Thread.currentThread() 表示当前线程不是等待队列第二个节点,此时返回true;
- 情况4: h != t 并且 (s = h.next) != null 并且 s.thread == Thread.currentThread() 表示当前线程是等待队列第二个节点,此时返回false;
解析标记②,跟进fullTryAcquireShared(current)方法:没有资格竞争锁或者竞争锁失败才会进入fullTryAcquireShared方法:
final int fullTryAcquireShared(Thread current) {
    HoldCounter rh = null;
    // 死循环
    for (;;) {
        int c = getState();
        if (exclusiveCount(c) != 0) { // 如果存在写锁
            // 不是当前线程,获取锁失败,
            // 如果持有写锁的是当前线程,那么就会进入下面的逻辑,下面的逻辑是读锁,这里体现了锁升级。
            if (getExclusiveOwnerThread() != current)
                return -1;
        } else if (readerShouldBlock()) {// 如果写锁空闲,且可以获取读锁。
            if (firstReader == current) {// 第一个读线程是当前线程
            } else {// 如果不是当前线程
                if (rh == null) {
                    rh = cachedHoldCounter;
                    if (rh == null || rh.tid != getThreadId(current)) {
                        // 从 ThreadLocal 中取出计数器
                        rh = readHolds.get();
                        if (rh.count == 0)
                            readHolds.remove();
                    }
                }
                if (rh.count == 0)
                    return -1;
            }
        }
        // 下面的逻辑是获取读锁
        // 如果读锁次数达到 65535 ,抛出异常
        if (sharedCount(c) == MAX_COUNT)
            throw new Error("Maximum lock count exceeded");
        // 尝试对 state 加 65536, 也就是设置读锁,实际就是对高16位加一。
        if (compareAndSetState(c, c + SHARED_UNIT)) {
            if (sharedCount(c) == 0) {// 如果读锁是空闲的
                firstReader = current;// 设置第一个读锁
                firstReaderHoldCount = 1; // 计数器为 1
            } else if (firstReader == current) { // 如果不是空闲的,查看第一个线程是否是当前线程。
                firstReaderHoldCount++;// 更新计数器
            } else {// 如果不是当前线程
                if (rh == null)
                    rh = cachedHoldCounter;
                if (rh == null || rh.tid != getThreadId(current))// 如果最后一个读计数器所属线程不是当前线程。
                    rh = readHolds.get();// 自己创建一个。
                else if (rh.count == 0)
                    readHolds.set(rh);
                rh.count++;// 对计数器 ++
                cachedHoldCounter = rh;// 更新缓存计数器。
            }
            return 1;
        }
    }
}
fullTryAcquireShared(current)方法中,判断如果存在写锁不是当前线程,获取锁失败;如果存在写锁是当前线程,那么就会尝试获取读锁,这里体现了锁重入时锁升级。
解析标记1.2.B,跟进doAcquireShared(arg);方法:加读锁失败才会进入该方法
private void doAcquireShared(int arg) {
    final Node node = addWaiter(Node.SHARED);// 添加Node.SHARED类型的节点,重点
    boolean failed = true;
    try {
        boolean interrupted = false;
        for (;;) {
            final Node p = node.predecessor();
            if (p == head) { // 判断前驱节点是否是头节点
                // 前驱节点是头节点尝试获取锁
                int r = tryAcquireShared(arg);
                if (r >= 0) {
                    setHeadAndPropagate(node, r);// 标记setHeadAndPropagate下面有解释
                    p.next = null; // 出队
                    if (interrupted) // 打断
                        selfInterrupt();
                    failed = false;
                    return;
                }
            }
            // shouldParkAfterFailedAcquir方法如果没有成功,在 for (;;) 循环一次,把前驱节点的 waitStatus 改为 -1,
            // 再for (;;)循环一 次尝试 如果还不成功,那么在 parkAndCheckInterrupt()挂起,
            // 可以看ReentrantLock原理文章中有这两个函数的详细介绍
            if (shouldParkAfterFailedAcquire(p, node) &&
                parkAndCheckInterrupt())
                interrupted = true;
        }
    } finally {
        if (failed)
            cancelAcquire(node);
    }
}
setHeadAndPropagate(node, r);方法除了将自身节点变成头节点,还可以唤醒身后的共享节点,这也是共享锁的关键所在:
private void setHeadAndPropagate(Node node, int propagate) { // node前驱节点是头节点
    Node h = head;
    setHead(node);  // 自己变成前驱节点
    if (propagate > 0 || h == null || h.waitStatus < 0 ||
        (h = head) == null || h.waitStatus < 0) {
        Node s = node.next; // 自己的下一个节点是否共享类型节点
        if (s == null || s.isShared()) // 判断自己的下一个节点是否共享类型节点
            doReleaseShared(); // 是共享类型节点接着唤醒共享类型节点
    }
}
跟进doReleaseShared();方法
private void doReleaseShared() {
    for (;;) {
        Node h = head;
        if (h != null && h != tail) {
            int ws = h.waitStatus;
            if (ws == Node.SIGNAL) {
                if (!compareAndSetWaitStatus(h, Node.SIGNAL, 0))
                    continue;
                unparkSuccessor(h);// 接着唤醒下一个节点
            }
            else if (ws == 0 &&
                     !compareAndSetWaitStatus(h, 0, Node.PROPAGATE))
                continue;
        }
        if (h == head)
            break;
    }
}
下图链接地址: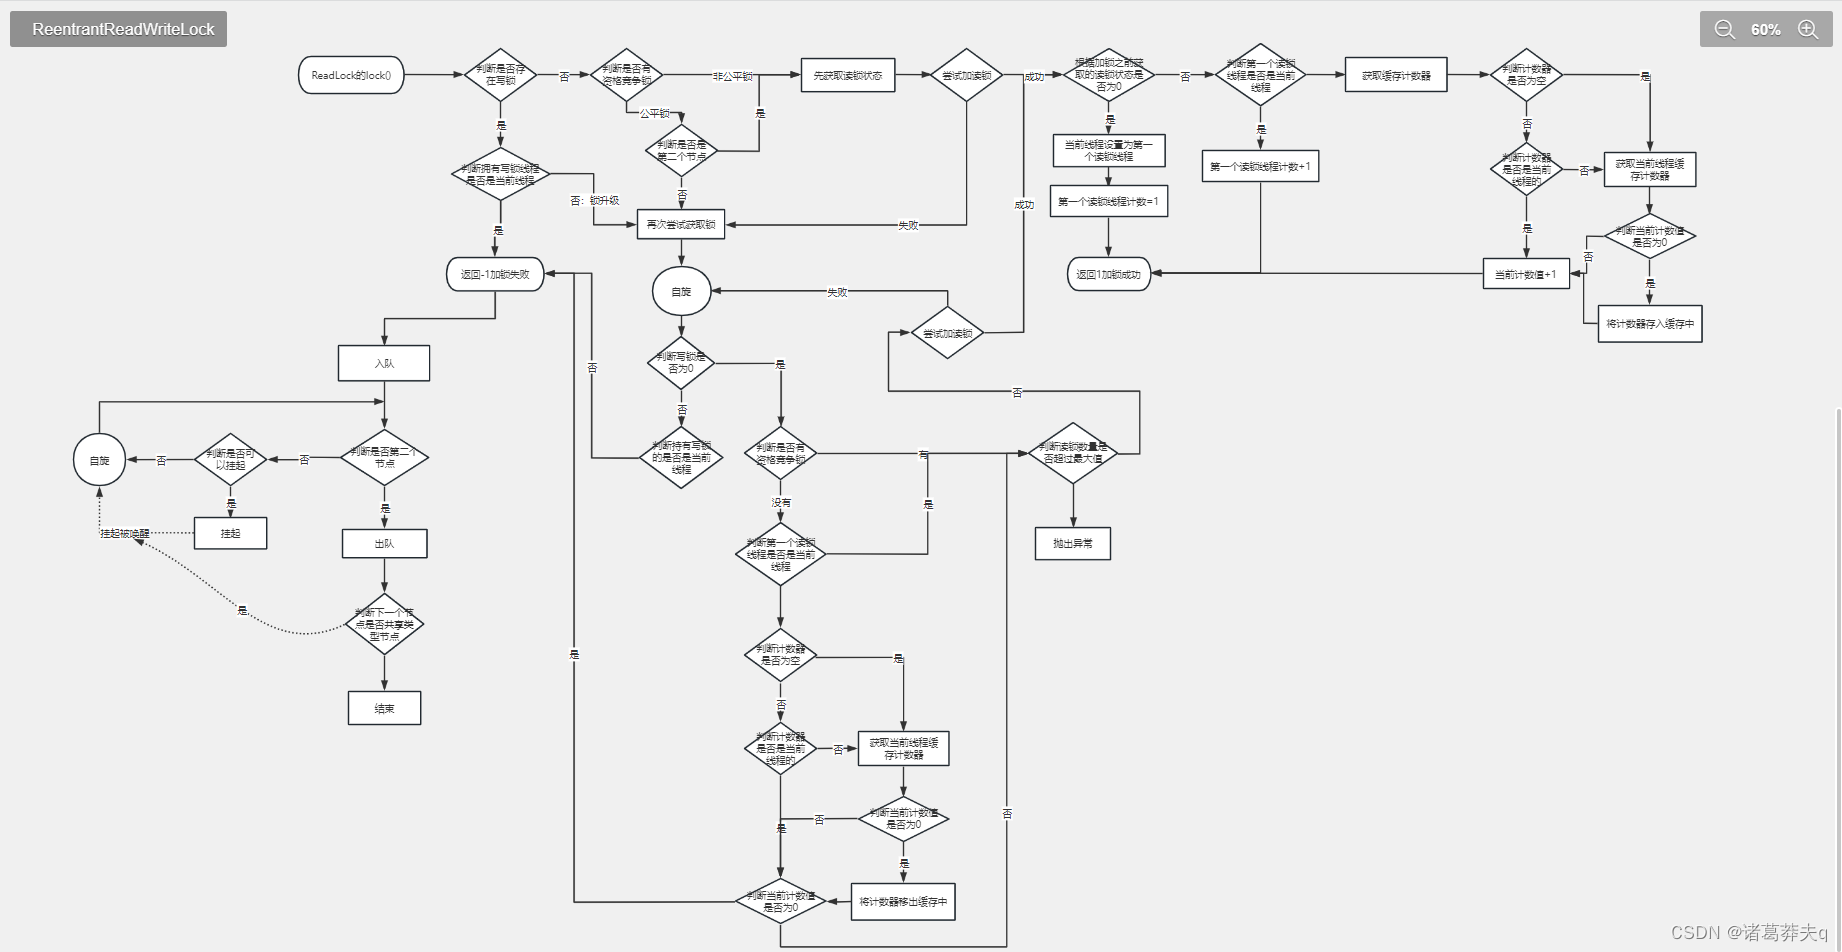
1.3 WriteLock的unlock()
public void unlock() {
	sync.release(1);
}
跟进sync.release(1);方法:
 public final boolean release(int arg) {
     // ①,tryRelease方法尝试获取锁
     if (tryRelease(arg)) {
         Node h = head; // 如果释放锁成功,会继续判断新的第二节点可不可以唤醒
         if (h != null && h.waitStatus != 0)
         	unparkSuccessor(h);  //②,唤醒第二个节点
         return true;
     }
     return false;
 }
①,跟进tryRelease(arg)方法尝试释放锁:
protected final boolean tryRelease(int releases) {
    if (!isHeldExclusively())// isHeldExclusively判断是否是当前线程拥有锁
        throw new IllegalMonitorStateException();
    int nextc = getState() - releases;// 加锁的次数减一
    boolean free = exclusiveCount(nextc) == 0;
    if (free) // 锁的次数 == 0
        setExclusiveOwnerThread(null);
    setState(nextc);
    return free;
}
②,跟进unparkSuccessor(h)方法,唤醒第二个节点:
private void unparkSuccessor(Node node) {
    int ws = node.waitStatus;  // 获取头节点的状态
    if (ws < 0)
        compareAndSetWaitStatus(node, ws, 0);// 将头节点改为0
    Node s = node.next; // 获取头节点的下一个节点
    if (s == null || s.waitStatus > 0) {
        s = null;
        for (Node t = tail; t != null && t != node; t = t.prev) // 从后向前找前驱节点waitStatus<= 0的节点
            if (t.waitStatus <= 0)
                s = t;
    }
    if (s != null)
        LockSupport.unpark(s.thread); // 唤醒线程
}
被唤醒的线程会回到,WriteLock的lock()方法中,被挂起的地方接着尝试获取锁。
下图链接地址:

1.4 ReadLock的unlock()
public void unlock() {
	sync.releaseShared(1);
}
跟进sync.releaseShared(1);方法:
public final boolean releaseShared(int arg) {
    // tryReleaseShared(arg)方法尝试解锁
    if (tryReleaseShared(arg)) {
        doReleaseShared(); // 唤醒后续节点
        return true;
    }
    return false;
}
tryReleaseShared(arg)方法尝试解锁:
protected final boolean tryReleaseShared(int unused) {
    Thread current = Thread.currentThread();
    if (firstReader == current) { // 当前线程是第一个加读锁的线程
        if (firstReaderHoldCount == 1)
            firstReader = null; // 第一个firstReader置空
        else
            firstReaderHoldCount--; // 锁数量减一
    } else {
        HoldCounter rh = cachedHoldCounter; // 获取读锁计数器
        if (rh == null || rh.tid != getThreadId(current))
            rh = readHolds.get();
        int count = rh.count; // 获取次数
        if (count <= 1) {
            readHolds.remove(); // 删除读锁计数器
            if (count <= 0) // 解锁次数超过加锁次数
                throw unmatchedUnlockException();
        }
        --rh.count; // 计数-1
    }
    for (;;) {
        int c = getState();
        int nextc = c - SHARED_UNIT;
        if (compareAndSetState(c, nextc))
            return nextc == 0; // 返回解锁情况
    }
}
跟进doReleaseShared();方法唤醒下一个节点
private void doReleaseShared() {
    for (;;) {
        Node h = head;
        if (h != null && h != tail) {
            int ws = h.waitStatus;
            if (ws == Node.SIGNAL) {
                if (!compareAndSetWaitStatus(h, Node.SIGNAL, 0))
                    continue;
                unparkSuccessor(h);// 接着唤醒下一个节点
            }
            else if (ws == 0 &&
                     !compareAndSetWaitStatus(h, 0, Node.PROPAGATE))
                continue;
        }
        if (h == head)
            break;
    }
}
跟进unparkSuccessor(h);方法:
private void unparkSuccessor(Node node) {
    int ws = node.waitStatus;  // 获取头节点的状态
    if (ws < 0)
        compareAndSetWaitStatus(node, ws, 0);// 将头节点改为0
    Node s = node.next; // 获取头节点的下一个节点
    if (s == null || s.waitStatus > 0) {
        s = null;
        for (Node t = tail; t != null && t != node; t = t.prev) // 从后向前找前驱节点waitStatus<= 0的节点
            if (t.waitStatus <= 0)
                s = t;
    }
    if (s != null)
        LockSupport.unpark(s.thread); // 唤醒线程
}
唤醒的读锁线程,会回到doAcquireShared(arg);方法中继续执行,doAcquireShared(arg);方法中配合setHeadAndPropagate(node, r);方法,实现唤醒多个共享节点。
下图链接地址:https://www.processon.com/embed/63f6cca0075f2179bc9854ac

1.5 补充
-
读读可以共享的,读写和写写都是互斥的
-
读锁不支持条件变量,写锁支持
-
不支持重入时升级,即持有读锁的情况下去获取写锁,会导致获取写锁永久等待,在上面加WriteLock的lock()中有介绍
-
支持重入时降级,线程先获取到写锁,然后再获取读锁,再把写锁释放,最后释放读锁,这里解释一下为啥先释放写锁后,再释放读锁?其实先释放读锁后,再释放写锁,也是可以的,只是这样坐加读锁就没有意义了,反而会浪费资源,因为最后释放写锁其它线程还是不能获取到读锁;先释放写锁后,再释放读锁,其它线程可以再写锁释放后获取读锁的,这缩小写锁的时间,提高读写并发效率。在上面加ReadLock的lock()中有介绍。
-
饥饿问题:在读操作比较多的时候,想要获取写锁就变得比较困难了,因为有可能会一直存在读锁,从而无法获得写锁,这个问题在jdk1.8的时候引入了一个新的锁StampedLock。
二,StampedLock
2.1 为什么会需要StampedLock
任何一个新引入的知识都是为了解决以往系统中出现的问题,否则新引入的将变得毫无价值。我曾经写过一些关于ReentrantReadWriteLock, ReentrantLock 和synchronized锁的文章。如果你之前了解过这些锁或者在工作中使用过,你会发现他们都有各种各样的缺点。比如synchronized不可中断等,ReentrantLock未能读写分离实现,虽然ReentrantReadWriteLock能够读写分离了,但是对于其写锁想要获取的话,就必须没有任何其他读写锁存在才可以,这实现了悲观读取,而且如果读操作很多,写很少的情况下,线程有可能遭遇饥饿问题。
饥饿问题:ReentrantReadWriteLock实现了读写分离,想要获取读锁就必须确保当前没有其他任何读写锁了,但是一旦读操作比较多的时候,想要获取写锁就变得比较困难了,因为当前有可能会一直存在读锁。而无法获得写锁。这时候怎么办呢?于是在jdk1.8的时候引入了一个新的锁StampedLock。该类自 JDK 8 加入,是为了进一步优化读性能,它的特点是在使用读锁、写锁时都必须配合【戳】使用
2.2 介绍
读锁:
long stamp = lock.readLock(); // 加锁
lock.unlockRead(stamp);  // 解锁
写锁:
 long stamp = lock.writeLock();  // 加锁
 lock.unlockWrite(stamp); // 解锁
乐观读:StampedLock 支持tryOptimisticRead()方法(乐观读),读取完毕后需要做一次戳校验 如果校验通过,表示这期间确实没有写操作,数据可以安全使用,如果校验没通过,需要重新获取读锁,保证数据安全。
long stamp = lock.tryOptimisticRead();
if(!lock.validate(stamp)){ // 验戳
     stamp = lock.readLock(); // 锁升级
     // 逻辑
     lock.unlockRead(stamp)
}
案例:
class DataContainerStamped {
    private int data;
    private final StampedLock lock = new StampedLock();

    public DataContainerStamped(int data) {
        this.data = data;
    }

    public int read(int readTime) {
        long stamp = lock.tryOptimisticRead();
        log.debug("optimistic read locking...{}", stamp);
        sleep(readTime);
        if (lock.validate(stamp)) {
            log.debug("read finish...{}, data:{}", stamp, data);
            return data;
        }
        log.debug("updating to read lock... {}", stamp);
        try {
            stamp = lock.readLock();  // 锁升级 - 读锁
            log.debug("read lock {}", stamp);
            sleep(readTime);
            log.debug("read finish...{}, data:{}", stamp, data);
            return data;
        } finally {
            log.debug("read unlock {}", stamp);
            lock.unlockRead(stamp);
        }
    }

    public void write(int newData) {
        long stamp = lock.writeLock();
        log.debug("write lock {}", stamp);
        try {
                sleep(2);
                 this.data = newData;
            } finally {
                 log.debug("write unlock {}", stamp);
                 lock.unlockWrite(stamp);
             }
     }
}
测试一: 读-读 可以优化
public static void main(String[] args) {
    DataContainerStamped dataContainer = new DataContainerStamped(1);
    new Thread(() -> {
        dataContainer.read(1);
        }, "t1").start();
    sleep(0.5);
    new Thread(() -> {
        dataContainer.read(0);
    }, "t2").start();
}
结果:可以看到实际没有加读锁
15:58:50.217 c.DataContainerStamped [t1] - optimistic read locking...256
15:58:50.717 c.DataContainerStamped [t2] - optimistic read locking...256
15:58:50.717 c.DataContainerStamped [t2] - read finish...256, data:1
15:58:51.220 c.DataContainerStamped [t1] - read finish...256, data:1
测试二: 读-写 时优化读补加读锁
public static void main(String[] args) {
     DataContainerStamped dataContainer = new DataContainerStamped(1);
     new Thread(() -> {
         dataContainer.read(1);
     }, "t1").start();
     sleep(0.5);
     new Thread(() -> {
         dataContainer.write(100);
     }, "t2").start();
}
输出结果:
15:57:00.219 c.DataContainerStamped [t1] - optimistic read locking...256
15:57:00.717 c.DataContainerStamped [t2] - write lock 384
15:57:01.225 c.DataContainerStamped [t1] - updating to read lock... 256
15:57:02.719 c.DataContainerStamped [t2] - write unlock 384
15:57:02.719 c.DataContainerStamped [t1] - read lock 513
15:57:03.719 c.DataContainerStamped [t1] - read finish...513, data:1000
15:57:03.719 c.DataContainerStamped [t1] - read unlock 513
上面的StampedLock 读写还是互斥的,得到读锁就不能进行写操作,为什么会解决饥饿问题?
当只有读操作时,使用tryOptimisticRead()方法尝试获取锁的,获取锁成功是没有加上读锁的,那么写锁获取就不会因为读操作特别多,写操作一直获取不到锁的现象了。
StampedLock 是不支持条件变量 ,不支持可重入所以,StampedLock 是并不能替代ReentrantReadWriteLock。


 535
535


 被折叠的 条评论
为什么被折叠?
被折叠的 条评论
为什么被折叠?
 到【灌水乐园】发言


