


SpringBoot-config
1、yaml的写法
# k=v    属性后面一定要跟空格(对空格的要求高)
# 普通的key=value
name: xd

#对象
student:
	name: xd
	age: 18

#行内写法
student: { name: xd,age: 18 }

#数组
pets:
	- cat
	- dog
	- pig

pets: [cat,dog,pig]
2、通过yaml给实体类注入值
实体类
@Component
@ConfigurationProperties(prefix = "user1")
public class User {
    private String name;
    private Integer age;
    private Boolean happy;
    private Date birth;
    private Map<String,Object> map;
    private List<Object> lists;
    private Dog dog;
yaml
user1:
  name: xiaodi
  age: 12
  happy: true
  birth: 2019/11/02
  map: {k1: v1,k2: v2}
  lists:
    - code
    - music
    - girl
  dog:
    name: 旺财
    age: 3
总结:
- ConfigurationProperties:加上该注解会爆红,需要导入一个依赖,然后重启idea。
- prefix:选择你注入的对象
问题:user的时候,name= Administrator,但user1时name=xiaodi?
拓展:试想Mybatis的配置能否用这种方式注入? 可以。
properties文件编码改为UTF-8:setting——>Editor——>File Encoding
name=xiaodi
总结:
所以:麻烦,低级。知道就行了。
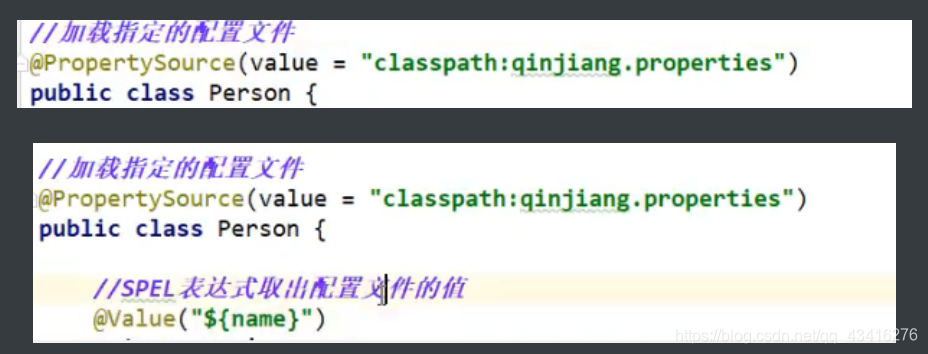
3、SPEL
user1:
  name: xiaodi${random.uuid}    # 使用uuid
  age: ${random.int}		#使用随机int值
  happy: true
  birth: 2019/11/02
  map: {k1: v1,k2: v2}
  lists:
    - code
    - music
    - girl
  dog:
    name: ${user.hello:hello}_旺财  # 如果user.hello存在值,则赋其值+'_旺财'。不存在就为hello+'_旺财'
    age: 3
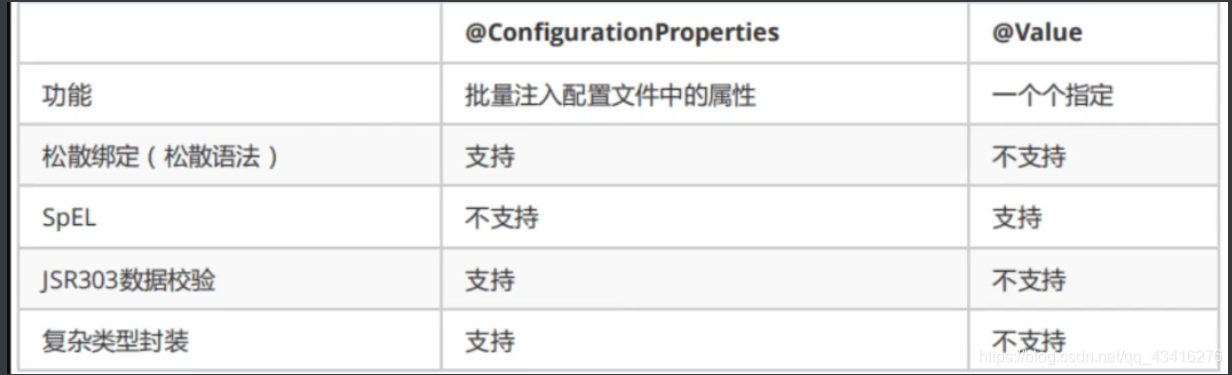
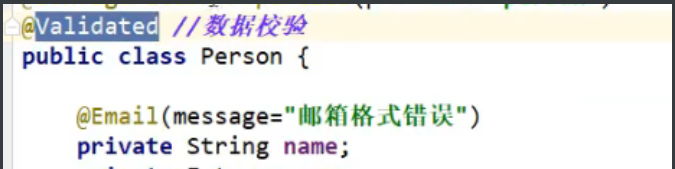
4、JSR303数据校验

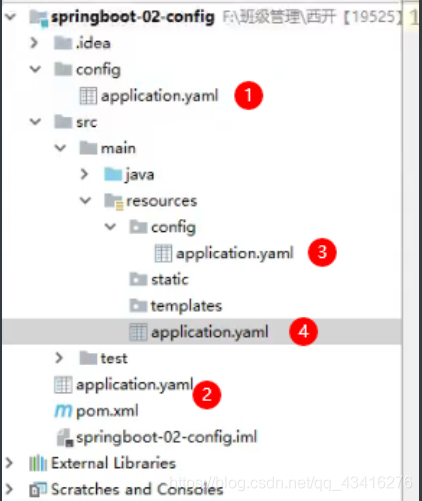
5、config文件可配路径:
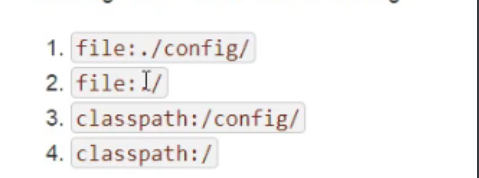
测试:优先级:1234
server:
	prot: 8082
6、Spring多环境配置
properties版
目录:
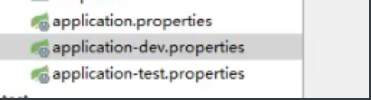
application.properties:
spring.profile.active=dev # 激活dev环境
yaml版
application.yaml
server:    # 默认环境
	port: 8081
spring:
	profiles:
		active:dev		# 环境选择
---				# 分隔符 dev环境
server:
	port: 8082
spring:
	profiles: dev
---
server:			#分隔符 test环境
	port: 8083
spring:
	profiles: test


 1万+
1万+


 被折叠的 条评论
为什么被折叠?
被折叠的 条评论
为什么被折叠?
 到【灌水乐园】发言


