


1.安装ElasticaSearch
安装配置:
1、新版本要求至少jdk1.8以上。
2、支持tar、zip、rpm等多种安装方式。
在windows下开发建议使用ZIP安装方式。
3、支持docker方式安装
详细参见:https://www.elastic.co/guide/en/elasticsearch/reference/current/install-elasticsearch.html
下载ES: Elasticsearch 6.2.1
https://www.elastic.co/downloads/past-releases
1.1.解压 elasticsearch-6.2.1.zip
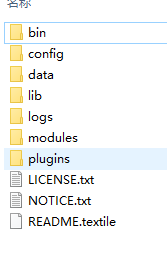
bin:脚本目录,包括:启动、停止等可执行脚本
config:配置文件目录
data:索引目录,存放索引文件的地方
logs:日志目录
modules:模块目录,包括了es的功能模块
plugins :插件目录,es支持插件机制
1.2 配置ElasticaSearch.yml
cluster.name: xuecheng
node.name: es_node_1
network.host: 0.0.0.0
http.port: 9200
transport.tcp.port: 9300
node.master: true
node.data: true
discovery.zen.ping.unicast.hosts: ["0.0.0.0:9300", "0.0.0.0:9301"]
discovery.zen.minimum_master_nodes: 1
node.ingest: true
bootstrap.memory_lock: false
node.max_local_storage_nodes: 2

path.data: E:\ElasticaSearch\elasticsearch-1\data
path.logs: E:\ElasticaSearch\elasticsearch-1\logs

http.cors.enabled: true
http.cors.allow-origin: /.*/
1.3 启动ElasticaSearch
进入bin目录,在cmd下运行:elasticsearch.bat

如果显示如下,则说明ElasticaSearch安装成功

1.4 安装head插件
head插件是ES的一个可视化管理插件,用来监视ES的状态,并通过head客户端和ES服务进行交互,比如创建映 射、创建索引等,head的项目地址在https://github.com/mobz/elasticsearch-head 。
从ES6.0开始,head插件支持使得node.js运行。
1、安装node.js
2、下载head并运行 git clone git://github.com/mobz/elasticsearch-head.git cd elasticsearch-head npm install npm run start open
HTTP://本地主机:9100 /
3.运行结果如下:

1.5 安装logstash
下载Logstash6.2.1版本,和本项目使用的Elasticsearch6.2.1版本一致。
解压logstash
1.6 安装logstash-input-jdbc
logstash-input-jdbc 是ruby开发的,先下载ruby并安装
下载地址: https://rubyinstaller.org/downloads/
下载2.5版本即可。
安装完成记得查看是否安装成功:在cmd输入指令 ruby -v
logstash目录下进入config配置mysql.conf文件供logstash使用,logstash会根据mysql.conf文件的配置的地址从MySql中读取数据向ES中写入索引。
参考https://www.elastic.co/guide/en/logstash/current/plugins-inputs-jdbc.html
1.7 配置mysql.conf
在logstash/config文件夹打开mysql.conf
input {

  stdin {

  }
  jdbc {

  jdbc_connection_string => "jdbc:mysql://localhost:3306/elasticsearch?useUnicode=true&characterEncoding=utf-8&useSSL=true&serverTimezone=UTC"
  # the user we wish to excute our statement as
  jdbc_user => "root"
  jdbc_password => 'root'
  # the path to our downloaded jdbc driver
  jdbc_driver_library => "F:/mysql-connector-java-8.0.15.jar"
  # the name of the driver class for mysql
  jdbc_driver_class => "com.mysql.jdbc.Driver"
  jdbc_paging_enabled => "true"
  jdbc_page_size => "50000"
  #要执行的sql文件
  #statement_filepath => "/conf/course.sql"
  statement => "select * from wp_ex_source_goods_tb_cat_copy where time_stemp > date_add(:sql_last_value,INTERVAL 8 HOUR)"
  #定时配置
  schedule => "* * * * *"
  record_last_run => true
  last_run_metadata_path => "D:/Elasticearch01/logstash-6.2.1/config/logstash_metadata"
  }
}


output {

  elasticsearch {

  #ES的ip地址和端口
  hosts => "localhost:9200"
  #hosts => ["localhost:9200","localhost:9202","localhost:9203"]
  #ES索引库名称
  index => ""es_cat""
  document_id => "%{cid}"
  document_type => "doc"
  template =>"D:/Elasticearch01/logstash-6.2.1/config/goods_template.json"
  template_name =>"goods"
  template_overwrite =>"true"
  }
  stdout {

 #日志输出
  codec => json_lines
  }
}
1.8 测试
启动logstash.bat:
.\logstash.bat ‐f ..\config\mysql.conf
出现如下,则说明向数据库索引数据成功了


2.编写后端代码
项目结构如下:

config文件夹下放的是封装的返回类型、请求对象及一些配置文件
application.yml
server:
  port: 8080
spring:
  application:
    name: sbes
cat:
  elasticsearch:
    hostlist: ${
   eshostlist:127.0.0.1:9200} #\u591A\u4E2A\u7ED3\u70B9\u4E2D\u95F4\u7528\u9017\u53F7\u5206\u9694
    es:
      index: es_cat
      type: doc
      source_field: cid,name,is_parent,parent_id,level,pathid,path,timestamp
实体层
package com.dy.sbes.pojo;

import lombok.Data;

import java
最低0.47元/天 解锁文章


 2170
2170


 被折叠的 条评论
为什么被折叠?
被折叠的 条评论
为什么被折叠?
 到【灌水乐园】发言


